How to Split a Cell in Excel (Step by Step)
By Dr. Zubair Khalid, DVM, MS, PhD ·
To split a cell in Excel, you separate the contents of one cell into two or more cells. Excel has no single "split" button, so you use Text to Columns for a one-time split or the TEXTBEFORE and TEXTAFTER functions for a split that updates when the source changes. This guide covers both, plus what to do when the split goes wrong.
Quick Answer
- Text to Columns splits one column into several in place. Select the column, go to Data > Text to Columns, choose Delimited, pick your delimiter, and set the destination.
- TEXTBEFORE and TEXTAFTER split with formulas.
=TEXTBEFORE(A2," ")returns everything before the first space, and=TEXTAFTER(A2," ")returns everything after it. - Formulas are the better choice when the source data may change, because the split updates automatically.
- Text to Columns is faster for a one-time cleanup of a static list.
- Both methods work on text. Neither can split a single cell into two cells side by side without pushing other content aside.
Before You Start
Splitting works on the contents of a cell, not the cell itself. Excel cells sit on a fixed grid, so you cannot cut one cell in half and keep both halves in the same column. What you actually do is take the text in one cell and distribute it across several cells, usually in the columns to the right.
Decide which method you need before you touch the data.
| Situation | Best method |
|---|---|
| One-time cleanup of a pasted list | Text to Columns |
| Source data changes and you want the split to refresh | TEXTBEFORE and TEXTAFTER |
| Splitting on a comma, tab, or other character | Either method |
| Splitting on a space in a full name | Either method |
Two practical checks first. Make sure the columns to the right of your data are empty, because Text to Columns overwrites whatever is there. And confirm your delimiter is consistent. If some rows use a space and others use a comma, neither method will split them cleanly until you standardize the text.
If your goal is specifically names, the first and last name split guide walks through the same logic with more name-specific cases.
Step by Step
Method 1: Text to Columns
- Select the column that holds the text you want to split. Click the column letter so the whole column is selected.
- Go to Data > Text to Columns.
- Choose Delimited and click Next. Delimited means the parts are separated by a character you choose.
- Check the delimiter box that matches your data, such as Space or Comma, then click Next.
- Set the Destination to the first cell where the split output should start, then click Finish.
The original column is replaced by the split values unless you point the destination somewhere else. If you set the destination to a cell in another column, the original text stays where it was.
Method 2: TEXTBEFORE and TEXTAFTER
These are newer functions, so they are available in current Microsoft 365 builds of Excel. If your version does not recognize them, use Text to Columns or the older LEFT, RIGHT, and FIND combination.
- Click the first empty cell to the right of your source data.
- Type
=TEXTBEFORE(A2," ")to pull the text before the first space. - In the next column, type
=TEXTAFTER(A2," ")to pull the text after the first space. - Press Enter and check the result against the source cell.
- Drag the fill handle down to apply both formulas to the rest of the column.
The second argument is the delimiter. Change " " to "," for comma-separated text, or to "-" for hyphenated codes. Parentheses and argument order matter here, and a misplaced bracket is one of the most common formula errors, so it pays to read the formula carefully before filling it down [1].
Worked Example
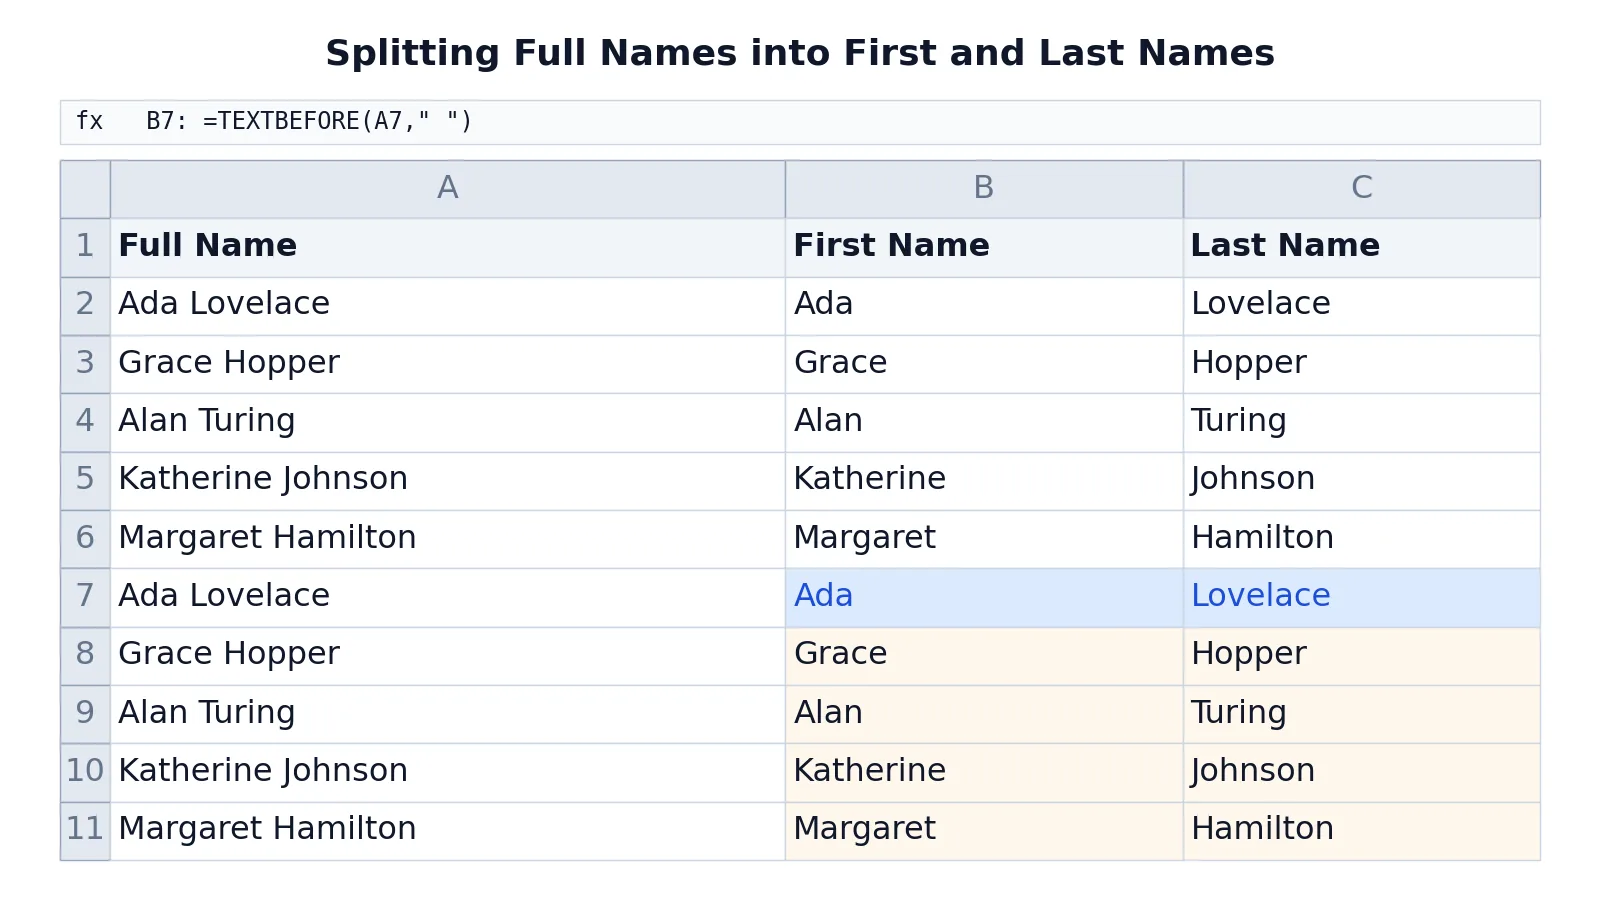
The table below holds a short list of full names in column A. Columns B and C show the split first and last names. Rows 2 through 6 contain the results as plain values, and rows 7 through 11 show the formulas that produce the same results.
| Row | A (Full Name) | B (First Name) | C (Last Name) |
|---|---|---|---|
| 1 | Full Name | First Name | Last Name |
| 2 | Ada Lovelace | Ada | Lovelace |
| 3 | Grace Hopper | Grace | Hopper |
| 4 | Alan Turing | Alan | Turing |
| 5 | Katherine Johnson | Katherine | Johnson |
| 6 | Margaret Hamilton | Margaret | Hamilton |
| 7 | Ada Lovelace | =TEXTBEFORE(A7," ") -> displays Ada | =TEXTAFTER(A7," ") -> displays Lovelace |
| 8 | Grace Hopper | =TEXTBEFORE(A8," ") -> displays Grace | =TEXTAFTER(A8," ") -> displays Hopper |
| 9 | Alan Turing | =TEXTBEFORE(A9," ") -> displays Alan | =TEXTAFTER(A9," ") -> displays Turing |
| 10 | Katherine Johnson | =TEXTBEFORE(A10," ") -> displays Katherine | =TEXTAFTER(A10," ") -> displays Johnson |
| 11 | Margaret Hamilton | =TEXTBEFORE(A11," ") -> displays Margaret | =TEXTAFTER(A11," ") -> displays Hamilton |
The two formulas do the work in a single step each. In cell B7, =TEXTBEFORE(A7," ") reads the text in A7 and returns everything up to the first space, which is Ada. In cell C7, =TEXTAFTER(A7," ") returns everything after that first space, which is Lovelace.
The same pattern holds down the column. =TEXTBEFORE(A10," ") returns Katherine and =TEXTAFTER(A10," ") returns Johnson. Because these are formulas, editing a name in column A updates both output columns immediately.
If you prefer the interface route, the same result comes from selecting column A, going to Data > Text to Columns, choosing Delimited, checking Space as the delimiter, and setting the destination to $B$2.
Other Ways to Do It
Flash Fill. Type the first name you want in the column next to your data, then start typing the second one. Excel often detects the pattern and offers to fill the rest. Press Enter to accept. Flash Fill is fast but it is a one-time fill, not a live formula, so it does not update when the source changes.
LEFT, RIGHT, and FIND. These older functions work in every version of Excel. To get the text before a space, you combine LEFT with FIND to locate the space position. To get the text after it, you combine RIGHT with LEN and FIND. The formulas are longer and harder to read, which is why TEXTBEFORE and TEXTAFTER exist.
Power Query. For repeated imports, Power Query can split a column by delimiter as part of a refreshable query. This suits anyone rebuilding the same report each week from a fresh export.
Once your columns are split, you may want to sort the result or filter it to check the output. If the split creates repeated rows, removing duplicates cleans them up.
Troubleshooting
The formula returns #NAME? Your Excel version does not recognize TEXTBEFORE or TEXTAFTER. Switch to Text to Columns or build the split with LEFT, RIGHT, and FIND.
The split lands in the wrong place. With Text to Columns, the destination cell controls where output starts. Reset it and run the wizard again.
Only part of the text splits. Your delimiter is inconsistent. Some rows may use a space and others a comma. Standardize the source text first.
Extra spaces appear in the results. Trailing or leading spaces in the source carry through. Wrap the formula in TRIM to strip them.
The split overwrote neighboring data. Text to Columns writes over whatever sits in the destination columns. Undo with Ctrl+Z and move the data first.
Common Mistakes
- Splitting without checking the columns to the right. Text to Columns overwrites them silently. Fix: insert blank columns before you start, or set the destination to an empty area.
- Using a formula when the data is static. A formula adds overhead you do not need for a one-time list. Fix: use Text to Columns for static data and formulas for data that changes.
- Forgetting that TEXTBEFORE and TEXTAFTER are version-dependent. Older Excel builds return an error. Fix: test one formula before filling it down the whole column.
- Assuming every row has the same number of parts. A middle name or a suffix breaks a two-part split. Fix: inspect a sample of rows before choosing your delimiter.
- Leaving the delimiter as a space when the data uses commas. The formula returns #N/A because the delimiter is not found. Fix: match the delimiter to the actual character in the data.
- Deleting the source column after splitting. The formulas in the output columns then return errors. Fix: paste the results as values before removing the source.
Limitations
Splitting only redistributes text. It cannot turn one physical cell into two cells within the same column, and it cannot merge cells back together. If your data has an inconsistent number of parts, such as names with middle initials, a simple two-way split will drop or misplace the extra piece. You need a rule for those rows before you split.
Text to Columns is destructive by default. It replaces the original column, so the source text is gone unless you set a different destination or keep a backup copy. Formula-based splits avoid that problem but depend on your Excel version supporting the functions. Neither approach validates the output, so a split that runs without errors can still produce wrong results if the delimiter appears inside a value.
Frequently Asked Questions
Can I split a cell into two rows instead of two columns?
Not directly. Splitting distributes text across columns. To turn one row into two, you would split into columns first, then rearrange the data with copy, paste, and delete, or reshape it in Power Query.
Why does TEXTBEFORE return #NAME? in my workbook?
That error means Excel does not recognize the function name. TEXTBEFORE and TEXTAFTER are available in current Microsoft 365 builds. On older versions, use Text to Columns or combine LEFT, RIGHT, and FIND instead.
How do I split a cell by a comma instead of a space?
Change the delimiter argument. Use =TEXTBEFORE(A2,",") and =TEXTAFTER(A2,","). In Text to Columns, check Comma instead of Space in the delimiter step.
Does splitting a cell delete the original text?
With Text to Columns, yes, unless you set the destination to a different location. With formulas, no. The source cell stays intact and the formulas read from it.
Can I split a cell that contains a number and text together?
Yes, if a consistent delimiter separates them. For example, =TEXTBEFORE(A2,"-") on the text INV-1042 returns INV and =TEXTAFTER(A2,"-") returns 1042. The number comes back as text, so convert it if you need to do math on it. For arithmetic on split values, see the division formula guide and the formula basics guide.
References
Further Reading
- Broman KW, Woo KH (2018). Data Organization in Spreadsheets. The American Statistician
- Ziemann M, Eren Y, El-Osta A (2016). Gene name errors are widespread in the scientific literature. Genome Biology
- Microsoft Support: Excel help and learning
- McCullough B, Heiser DA (2008). On the accuracy of statistical procedures in Microsoft Excel 2007. Computational Statistics & Data Analysis
- Abeysooriya M, Soria M, Kasu MS et al. (2021). Gene name errors: Lessons not learned. PLOS Computational Biology