Excel Fill Handle: How to Autofill and Copy Data
By Dr. Zubair Khalid, DVM, MS, PhD ·
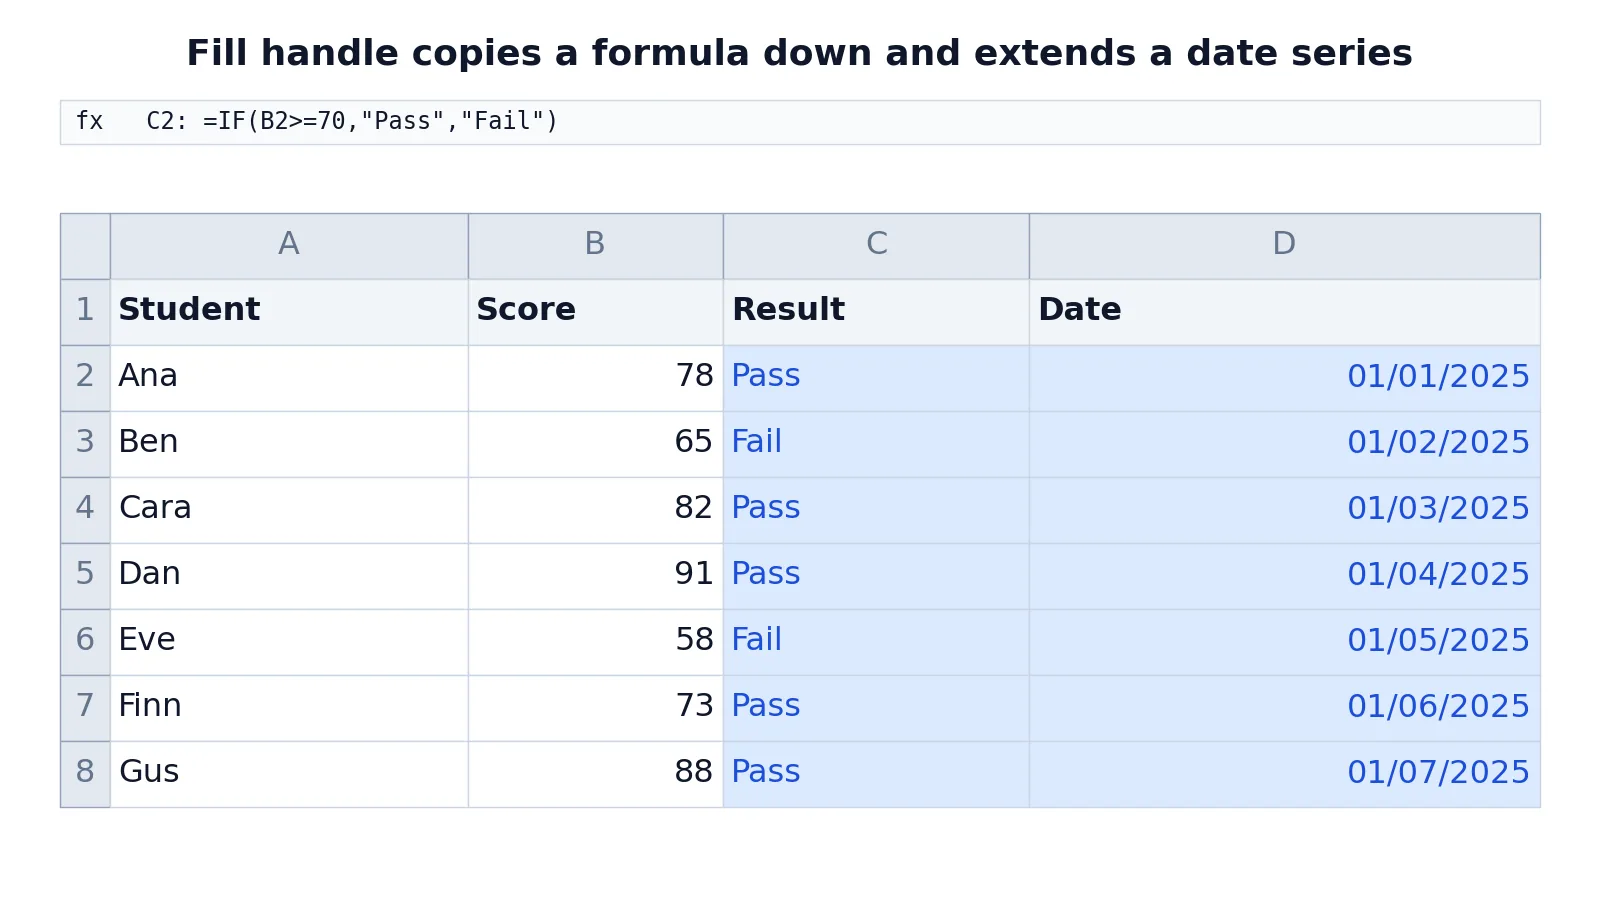
The Excel fill handle is the small square at the bottom-right corner of the selected cell or range. Drag it to copy a formula into adjacent cells or to continue a series such as numbers, dates or months. Excel decides what to do based on what is already in the cells you selected.
Quick Answer
- The fill handle appears when you select a cell or range. Rest the pointer on the bottom-right corner until it turns into a plus sign, then drag [1].
- To continue a series, type the first two values, select both, and drag. For 1, 2, 3, 4, 5, type 1 and 2 first. For 2, 4, 6, 8, type 2 and 4 [2].
- To repeat a single value, type it in one cell and drag. Excel copies the same value into every cell you fill [2].
- To copy a formula, select the cell holding it and drag. Relative references adjust for each row unless you use absolute references with dollar signs [3][1].
- To build a date series, select the first date and drag. Excel increments the dates as you go [4].
Before You Start
The fill handle is turned on by default in Excel. If you cannot see the small square when you select a cell, it has been hidden. Go to File > Options > Advanced, and under Editing options select the Enable fill handle and cell drag-and-drop check box [5]. On Excel for Mac, the same option sits under Edit Options and is called Allow fill handle and cell dragging and dropping [1].
Two other settings matter. If formulas do not recalculate after you fill them, check that workbook calculation is set to Automatic under Calculation options [3]. If you want Excel to warn you before a drag overwrites existing data, keep the Alert before overwriting cells check box selected [5].
Plan the starting cells before you drag. Excel reads the pattern from what you selected, so one cell, two cells and a full range each produce a different result.
Step by Step
- Select the cell or cells that hold the starting values. For a series, select at least the first two values so Excel can detect the step [2].
- Move the pointer to the bottom-right corner of the selection. It changes to a plus sign [1].
- Drag the handle down, up, or across the cells you want to fill. Excel shows a preview of each value as you drag [6].
- Release the mouse button. Excel fills the cells.
- Click the Auto Fill Options icon that appears after the drag if you want a different result, such as Fill Formatting Only or Fill Without Formatting [3].
For formulas, the same drag copies the formula and adjusts relative references row by row [3]. If you need a reference to stay fixed, type a dollar sign before the column and row, as in =SUM($A$1,B1) [1].
Worked Example
This sheet tracks seven students, their scores, a pass or fail result, and a date for each record.
| A | B | C | D | |
|---|---|---|---|---|
| 1 | Student | Score | Result | Date |
| 2 | Ana | 78 | =IF(B2>=70,"Pass","Fail") -> displays Pass | =DATE(2025,1,1) -> displays 01/01/2025 |
| 3 | Ben | 65 | =IF(B3>=70,"Pass","Fail") -> displays Fail | =DATE(2025,1,2) -> displays 01/02/2025 |
| 4 | Cara | 82 | =IF(B4>=70,"Pass","Fail") -> displays Pass | =DATE(2025,1,3) -> displays 01/03/2025 |
| 5 | Dan | 91 | =IF(B5>=70,"Pass","Fail") -> displays Pass | =DATE(2025,1,4) -> displays 01/04/2025 |
| 6 | Eve | 58 | =IF(B6>=70,"Pass","Fail") -> displays Fail | =DATE(2025,1,5) -> displays 01/05/2025 |
| 7 | Finn | 73 | =IF(B7>=70,"Pass","Fail") -> displays Pass | =DATE(2025,1,6) -> displays 01/06/2025 |
| 8 | Gus | 88 | =IF(B8>=70,"Pass","Fail") -> displays Pass | =DATE(2025,1,7) -> displays 01/07/2025 |
Two drags build this sheet.
Select C2, then drag the fill handle down to C8. The formula in C2 is:
$$=IF(B2>=70,"Pass","Fail")$$
It checks whether the score in B2 is at least 70 and returns Pass or Fail. When you fill it down, the relative reference B2 becomes B3, then B4, and so on through B8. Each row is tested against its own score, so C3 returns Fail for Ben's 65 and C8 returns Pass for Gus's 88 [3][1].
Type the date 1/1/2025 into D2 as a plain value, then drag the fill handle down to D8. Excel recognizes the date and increments it by one day for each cell you fill, ending at 01/07/2025 in D8 [4]. If D2 held the formula =DATE(2025,1,1) instead, dragging would copy that formula unchanged and every cell would show 01/01/2025, because the formula has no cell references to adjust.
Other Ways to Do It
Dragging is not the only option. Select the cell with the formula plus the adjacent cells you want to fill, then go to Home > Fill and choose Down, Right, Up, or Left [3]. The keyboard shortcuts Ctrl+D fill down and Ctrl+R fill to the right [3].
For dates, you can select the first date and the range to fill, then use Fill > Series > Date unit to choose the unit you want, such as day, weekday, month, or year [4]. This is useful when you need weekdays only or month-end dates.
On Excel for iPad, iPhone, Android tablets and Android phones, tap the cell, tap it again to open the Edit menu, tap Fill, then drag the green fill arrows down or to the right [7].
Troubleshooting
If the handle will not appear, the setting is off. Turn on Enable fill handle and cell drag-and-drop under File > Options > Advanced [5].
If every filled cell shows the same number instead of a series, Excel did not detect a pattern. Type the first two values, select both, and drag again [2].
If a formula returns the wrong result after filling, check your references. Relative references change as you fill, and absolute references with dollar signs do not [1]. A reference that should have stayed fixed but was written as relative is the usual cause.
If formulas do not update at all, workbook calculation may be set to Manual. Set it to Automatic under Calculation options [3].
If a drag overwrites data you wanted to keep, undo it and turn the Alert before overwriting cells check box back on [5].
Common Mistakes
- Dragging from a single cell when you need a series. Excel repeats the value instead of counting up. Fix it by typing the first two values and selecting both before you drag [2].
- Forgetting absolute references. If a formula points at a fixed cell such as a tax rate, write it as
$A$1so it does not shift as you fill down [1]. - Assuming filled row numbers stay correct. Sequential numbers created by dragging are static values. If you add or remove rows, select two numbers in the right sequence and drag again to renumber [6].
- Using the ROW function without checking the result.
=ROW(A1)returns 1, and the numbers update when you sort, but the sequence can break if you add, move, or delete rows [6]. - Filling over blank cells that hold formatting you want to keep. Use the Auto Fill Options icon after the drag to choose Fill Without Formatting [3].
- Dragging in the wrong direction. Drag down or right to increase, and up or left to decrease [6].
Limitations
The fill handle copies and extends patterns, but it does not create them from nothing. Excel needs at least one value, and usually two, to detect a step. Custom lists such as your own department names will not autofill unless they have been added to Excel's custom lists.
Filled values are ordinary cell contents, not live links. If the source cell changes later, the filled cells do not update on their own. The same applies to dragged row numbers, which stay put when rows are inserted or deleted [6]. For numbering that survives edits, use a formula such as =ROW(A1) and refill when the structure changes [6].
Frequently Asked Questions
Where is the fill handle in Excel?
It is the small square at the bottom-right corner of the selected cell or range. When you rest the pointer over it, the pointer changes to a plus sign, and you can drag to fill adjacent cells [1]. It is enabled by default and can be turned off under Editing options [5].
How do I autofill numbers in Excel?
Type the first two numbers of the series in adjacent cells, select both, then drag the fill handle. For 1, 2, 3, 4, 5, type 1 and 2. For 2, 4, 6, 8, type 2 and 4 [2][6]. To repeat the same number in every cell, type it once and drag from that single cell [2].
Does the fill handle copy formulas correctly?
Yes, when your references are set up the way you want. Relative references adjust for each row as you fill, and absolute references with dollar signs stay fixed [3][1]. If a result looks wrong, the reference type is the first thing to check.
How do I fill a series of dates?
Select the cell with the first date and drag the fill handle across the cells you want to fill. Excel increments the dates as it goes [4]. For control over the step, use Fill > Series > Date unit and pick day, weekday, month, or year [4].
Why is my fill handle not showing?
The option has been turned off. Go to File > Options > Advanced, and under Editing options select Enable fill handle and cell drag-and-drop [5]. On Excel for Mac, look under Edit Options for Allow fill handle and cell dragging and dropping [1].
References
- Copy a formula by dragging the fill handle in Excel for Mac | Microsoft Support
- Fill data automatically in worksheet cells | Microsoft Support
- Fill a formula down into adjacent cells | Microsoft Support
- Create a list of sequential dates | Microsoft Support
- Display or hide the fill handle | Microsoft Support
- Automatically number rows in Excel | Microsoft Support
- Fill data in a column or row | Microsoft Support
Further Reading
- Broman KW, Woo KH (2018). Data Organization in Spreadsheets. The American Statistician
- Ziemann M, Eren Y, El-Osta A (2016). Gene name errors are widespread in the scientific literature. Genome Biology