How to Avoid Pipette Tip Contamination
By Dr. Zubair Khalid, DVM, MS, PhD ·

Pipette tip contamination is one of the most common causes of false-positive PCR results, failed RNA preparations, and unexplained assay variability. When a tip touches the wrong surface, or when an aerosol carries template DNA from a finished reaction into a fresh one, the contamination travels silently through every downstream tube. A clean-tip workflow prevents carryover between samples, protects low-copy targets, and keeps control reactions negative.
This article explains how to avoid pipette tip contamination step by step, from bench setup through tip ejection, decontamination of pipettes, and verification with controls. The core habit takes about 10 to 15 minutes to establish at the start of a session and adds seconds per transfer. Once it becomes routine, it protects every assay you run, from plasmid minipreps to diagnostic qPCR.
The Principle: How Tips Become Contaminated
A pipette tip becomes contaminated in one of four ways.
Contact transfer. The wetted or dry tip touches a nonsterile surface, a bottle neck, a tube rim, or the outside of a sample tube. Contact transfer also works in reverse. A clean tip touching the inside of a reagent bottle seeds that bottle with foreign DNA, cells, or nucleases, and the bottle contaminates every sample that follows.
Aerosol and droplet transfer. Pressing a plunger too fast, blowing out the last drop, or pipetting near the liquid surface creates aerosols. Work simulating manual cell-product processing showed that droplets falling from a height of 30 cm scatter visible contamination, and that bubbles bursting at a pipette tip distribute traces up to 50 cm from the point of rupture [1]. Aerosols are invisible, so the operator rarely knows an event occurred.
Carryover from previous work. Amplicons from finished PCR reactions, plasmid miniprep DNA, or RNA from a previous session can persist on bench surfaces, inside pipette shafts, and on rack surfaces. These nucleic acids resist casual wiping and can be re-amplified in later reactions.
Reagent-borne contamination. Contamination can arrive inside commercial reagents. A diagnostic laboratory traced sporadic false-positive hepatitis A virus PCR results to HAV RNA present in the reagents of a commercial anti-HAV immunoassay that shared a preprocessing step with molecular testing. The laboratory passed every external quality assessment and every surface contamination check, yet the false positives were reproducible across several RNA assays until investigators connected them to the preceding analyzer run [2]. The lesson is direct. A contaminated reagent defeats even perfect tip technique, and routine quality checks can miss it.
Because contamination hides in liquids, surfaces, and air currents, a prevention strategy must address all three routes at once.
Materials and Reagents
| Item | Working concentration or specification | Purpose |
|---|---|---|
| Sterile filtered (aerosol-resistant) tips | Certified DNase-free, RNase-free, pyrogen-free where relevant | Barrier tip filters block aerosols from entering the pipette shaft |
| Sterile unfiltered tips | Autoclaved, nuclease-free for routine transfers | General liquid handling where the shaft is protected |
| Fresh sodium hypochlorite (bleach) solution | Dilute a 10.8% commercial stock 1:5 to yield 2% sodium hypochlorite for instrument tip washes [3] | Destroys nucleic acids and vegetative microbes on fixed tips and surfaces |
| Laboratory detergent | 2.5% Alconox solution for tip washing before steam decontamination [4] | Removes genetic material from reusable tips |
| Ethanol, 70% (v/v) in water | Standard laboratory grade | Rapid disinfection of bench surfaces, racks, and pipette exteriors |
| Nuclease-free water | Molecular biology grade | Rinsing and dilution in nuclease-sensitive work |
| UV source | Dose validated for the cabinet, effective at 50 mJ/cm² against common contaminants [1] | Decontamination of biosafety cabinet surfaces between sessions |
| Autoclave | Standard gravity or vacuum cycle for liquids-free goods | Sterilizing tip boxes and reusable glassware |
| No-template controls and extraction blanks | Prepared fresh each run | Detecting contamination when it occurs |
Safety note. Dilute bleach corrodes metal over time and releases chlorine fumes. Prepare it fresh, wear eye protection and gloves, rinse metal surfaces with water after contact, and never mix bleach with acids or ammonia-containing cleaners. UV lamps damage skin and corneas, so shield the cabinet and never work under an active lamp.
Prevent Pipette Tip Contamination Step by Step
Follow this sequence at the start of every session. Each step states the reason behind it.
- Plan the workflow direction before you open anything. Move from clean to dirty: reagent preparation first, sample addition second, amplification product handling last and in a separate area. Reason. Contamination flows with your hands. A fixed, unidirectional workflow means you never carry a used tip or an opened reagent backward into a clean zone.
- Clear the bench and decontaminate the work surface. Remove unnecessary items, wipe the surface and pipette racks with 70% ethanol or a fresh disinfectant, and run the biosafety cabinet UV cycle where available. A validated UV dose of 50 mJ/cm² eliminated Bacillus subtilis vegetative cells and Aspergillus brasiliensis spores in controlled testing [1]. Reason. Visible clutter traps droplets and shelters spores that wiping misses.
- Gather only the tips you need and keep boxes closed. Open a tip box, remove one rack or refill, and close the lid. Never leave an open box on the bench while you work elsewhere. Reason. An open box is an environmental collector for aerosols and dust for as long as it sits uncovered.
- Load the tip firmly. Press the pipette shaft into the tip with a slight twist until you feel a seal. Reason. A loosely seated tip leaks, drips, can fall into samples, and permits liquid to wick into the shaft, which then becomes a contamination reservoir for every subsequent tip.
- Never touch the tip, the shaft, or the inside of a tube rim. Treat the tip as sterile only until it touches something that is not. If a tip contacts a glove, the bench, or the outside of any tube, discard it immediately and take a new one. Reason. Contact transfer happens in a fraction of a second, and reusing a touched tip is the single most frequent self-inflicted contamination route in teaching laboratories.
- Hold the pipette vertical whenever a tip is loaded. Keep the loaded tip upright between aspiration and ejection. Reason. A tipped or horizontal shaft lets liquid run into the cone, contaminates the pipette itself, and turns the instrument into a contamination vector that survives tip changes.
- Immerse the tip only 2 to 3 mm below the liquid surface during aspiration. Aspirate slowly and steadily. Reason. Shallow immersion with slow aspiration minimizes the liquid film that clings to the outside of the tip. A deeply submerged or quickly filled tip carries surface liquid into the destination tube, and that carryover is enough to contaminate sensitive reactions.
- Pre-wet the tip for viscous or volatile liquids. Aspirate and dispense the target volume once or twice before the measured draw. Reason. Equilibrated humidity inside the tip prevents volume drift and reduces the aerosol-gathering bubble behavior that dry tips exhibit with foamy samples.
- Release the plunger slowly, especially on the dispense stroke. Stop at the first stop, pause, then depress to the second stop only when full expulsion is required, and never blow out into a clean tube. Reason. Rapid plunger release aerosolizes the liquid. Aerosols dispersed from a rupturing bubble at the tip spread contamination up to 50 cm across a work surface [1], which is why adjacent sample rows become contaminated together.
- Keep all liquid transfers at low height. Aspirate from and dispense into containers held close to the tip, never decant or pour from a height above 30 cm above an open surface. Droplets falling from 30 cm scatter contamination across the surrounding area in documented simulations [1]. Reason. Height converts small spills into wide-spread sprays.
- Use one tip per liquid. A tip that has entered a stock solution never returns to a fresh stock and never enters a different sample. If you must mix multiple components, add reagents to each tube in sequence, renewing the tip whenever you dip back into a shared stock. Reason. Sequencing with a single tip turns a shared reagent into a contamination bridge between every sample on the rack.
- Use filtered, aerosol-resistant tips for nucleic acid work. Reserve filtered tips for PCR setup, RNA handling, next-generation sequencing libraries, and any low-copy target. Reason. The hydrophobic filter inside the tip blocks aerosols generated during aspiration from reaching the shaft, breaking the carryover chain that plain tips permit.
- Assign pipettes to zones. Dedicate one pipette set to pre-PCR reagent setup and a separate set to post-PCR product analysis. Never carry either set across the boundary. Reason. Post-PCR tubes contain massive amounts of amplifiable product, and a single contaminated shaft can seed weeks of false positives.
- Eject tips directly into a sharps or biohazard container placed inside the work zone. Press the ejector with the tip pointing into the container, away from open tubes. Reason. Ejecting across the bench flicks droplets onto surfaces within the 50 cm contamination radius documented for tip-adjacent scatter [1].
- Decontaminate the pipette exterior and shaft between sample groups. Wipe the shaft and ejector with 70% ethanol, or remove the shaft per the manufacturer instructions for deeper cleaning, whenever you switch between sample sets or reagent lots. Reason. The shaft touches every tip cone and accumulates aerosol deposits that individual tip filters cannot fully prevent if liquid ever wicks past.
- Change gloves on any suspect contact. New gloves when you touch your face, a door handle, a phone, or a nonsterile surface, and between clean and dirty zones. Reason. Gloves are the outermost surface of the workflow and the easiest to renew.
- Aliquot shared reagents into single-use or few-use volumes. Dispense master mixes, nuclease-free water, and buffers into small tubes on arrival, and label the aliquots. Reason. Each entry into a stock is a contamination opportunity. Ten small aliquots with ten fresh tips create ten chances to catch contamination early, while one large stock creates one route to lose everything.
- Include negative controls in every run. Set up a no-template control in the reagent preparation area before any samples are opened, and an extraction blank that goes through the full procedure with water in place of sample. Reason. Controls are your only real-time detector. Contamination that reaches them tells you the problem exists before it reaches your data.
Pipetting Technique That Reduces Contamination
Beyond the sequence above, the mechanical details of your pipetting technique determine how much material a tip sheds into the environment.
Speed control. Aspirate and dispense at moderate, consistent speeds. Fast strokes generate bubbles, and bubbles bursting at the tip are a documented mechanism for spreading contamination across a wide radius [1]. Slow strokes also improve accuracy because they reduce the turbulent film left inside the cone.
Angle. Keep the pipette within about 10 to 20 degrees of vertical during aspiration and while holding liquid. A slanted shaft runs liquid toward the ejector seal and into the pipette body.
Tip immersion depth. Shallow immersion keeps the outer surface clean. Deep immersion is justified only when the liquid volume demands it, such as with large-volume serological transfers, and those cases call for wide-bore or serological pipettes rather than forcing a micropipette deep into the vessel.
Bubble discipline. If you aspirate a bubble, do not dispense it into your sample. Expel it back into the source vessel or discard the draw entirely and refit the tip. A bubble that bursts in the destination tube sprays fine droplets onto the rim and cap area.
Ejection mechanics. Depress the plunger past the second stop before or as you press the ejector, so the tip is empty when it releases. An ejected tip with residual liquid leaves that liquid wherever it lands.
Pipette Calibration and Why It Belongs in the Conversation
Pipette calibration does not prevent contamination, but it protects the other half of data integrity. A pipette that delivers an inaccurate volume compromises quantification, dilution schemes, and reaction stoichiometry, and the resulting variation is often misread as intermittent contamination. Calibrate pipettes on the schedule your institution or manufacturer specifies, and perform quick gravimetric or colorimetric checks in house whenever a result looks systematically off. A leaking or worn seal can also draw liquid into the shaft, which then sits as a contamination reservoir inside the instrument. Any pipette that has aspirated corrosive, radioactive, or biologically hazardous material should be fully disassembled and decontaminated before it reenters general service.
Controls, Expected Results, and How to Read Them
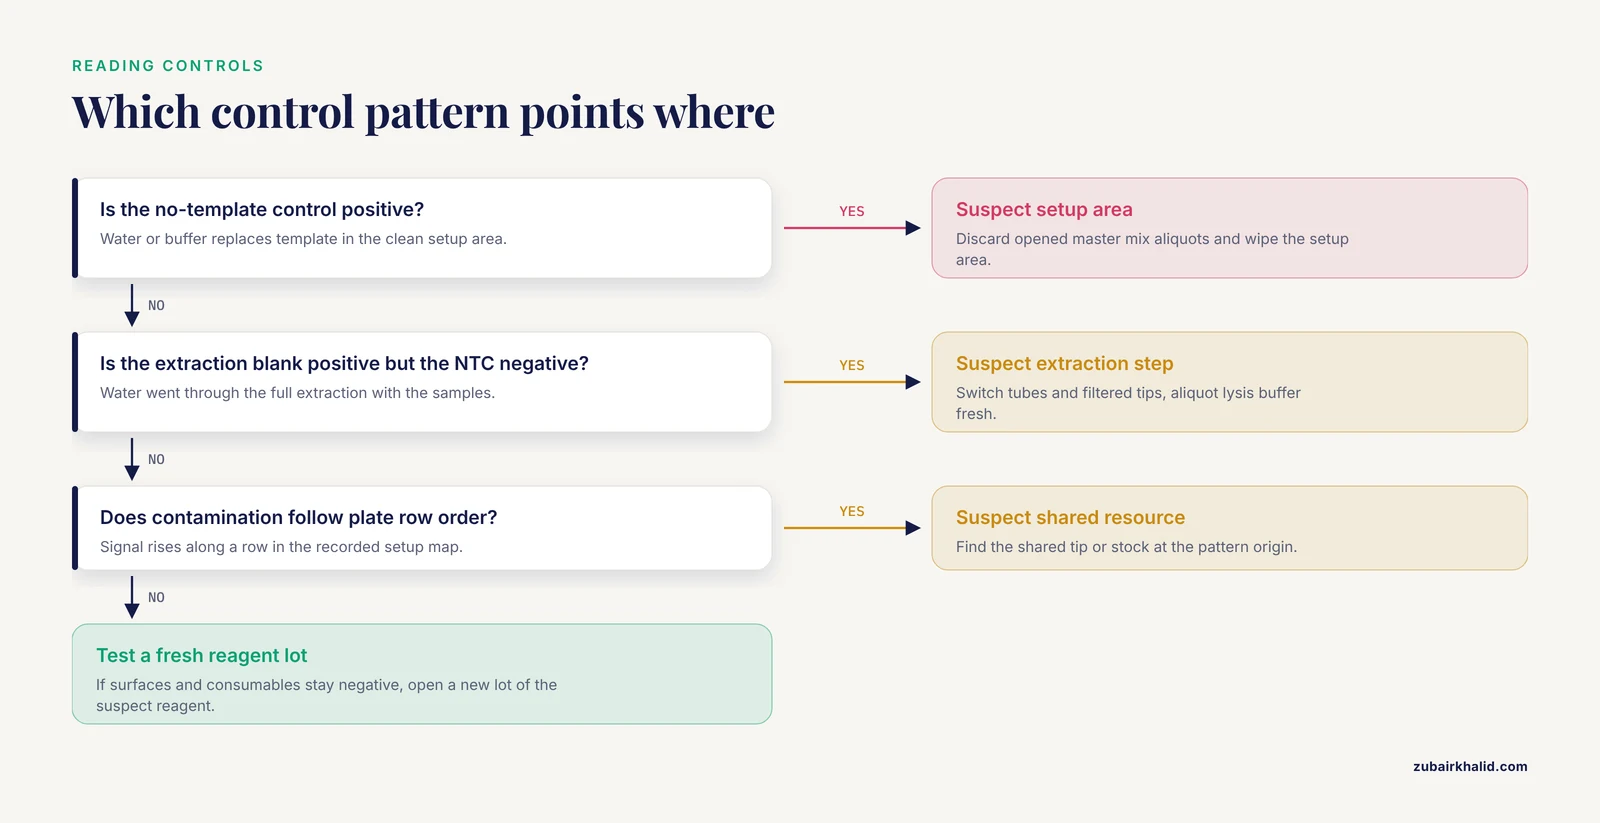
A clean-tip workflow is verified by what your controls do.
No-template control (NTC). Water or buffer replaces template in a PCR set up entirely in the clean area. Expected result, no amplification. Any signal in the NTC means contamination entered during setup, and the cycle threshold (Ct) value tells you roughly how much contaminant is present. A late Ct near the assay limit suggests a trace environmental or aerosol event. An early Ct suggests a contaminated reagent stock, which must be discarded along with any opened aliquots from the same session.
Extraction blank. Nuclease-free water processed through extraction with your samples. Expected result, negative. A positive extraction blank with a negative NTC localizes the problem to the extraction step, the tubes, or the tips used during extraction rather than the PCR master mix.
Surface swabs. Moisten a sterile swab with nuclease-free water, wipe a defined bench area, rack, or pipette shaft, and test the eluate by qPCR. This is the same logic used in a published decontamination evaluation, where tips exposed to Aeromonas hydrophila DNA were assessed after cleaning by the log reduction in detectable genomic material using real-time quantitative PCR [4]. A surface swab that turns positive after wiping tells you the wiping agent or technique failed on that material.
Reading the pattern. Contamination confined to the NTC implicates master mix or setup-area surfaces. Contamination in the extraction blank but not the NTC implicates extraction reagents or handling. Contamination that increases across a sample row in plate order implicates a shared tip, a shared stock, or an aerosol event at the position where the pattern begins. Plate-order patterns are diagnostic gold, so record sample placement before you troubleshoot.
Troubleshooting
| Symptom | Likely cause | Fix |
|---|---|---|
| Positive signal in the no-template control | Contaminated master mix component, or amplicon carryover in the setup area | Discard all opened reagent aliquots, wipe the setup area with fresh disinfectant, and repeat with newly made mix in a different location |
| Extraction blank positive, NTC negative | Contaminated extraction consumables, tips, or lysis buffer | Switch to a fresh lot of tubes and filtered tips, aliquot lysis buffer fresh, and swab-test the shaker or heat block surface |
| Contamination follows plate row order | One shared tip or one shared stock used across the row | Review the setup map, identify the shared resource at the pattern origin, and re-run with fresh aliquots |
| Contamination appears only after a specific operator works up | Pipetting technique generating aerosols, or tips touched during loading | Observe a session, review plunger speed and tip handling, and retrain on the step-by-step sequence above |
| Intermittent positive signals weeks apart | Contamination persisting on a pipette shaft, inside a centrifuge rotor, or on a rack | Deep-clean and disassemble pipettes, swab-test rotors and racks, and reestablish zone discipline |
| RNA degraded in every preparation despite clean technique | Environmental RNase on gloves, bench, or an unfiltered tip entering an open tube | Wipe with RNase-deactivating agent, switch to certified RNase-free filtered tips, and keep tubes closed except during active transfer |
| Repeated positives despite negative surface swabs | Reagent-borne contamination arriving with a commercial reagent, as documented in a hepatitis A false-positive investigation [2] | Test a freshly opened lot of the suspect reagent, run the assay from an unopened kit, and segregate the implicated lot |
Variations and Special Situations
Automated Liquid Handlers With Fixed Tips
Robotic workstations can use nondisposable tips safely if the washing routine is validated. In forensic DNA casework, TECAN Genesis and Freedom EVO workstations running exclusively on fixed tips incorporated wash steps into the extraction process and at the end of each session. A 2% sodium hypochlorite wash, prepared as a 1:5 dilution of a 10.8% commercial bleach stock, proved to be the best overall approach for preventing cross-contamination, and the wash steps did not harm the short tandem repeat profiles generated from extracted DNA [3]. The general principle carries over to manual work. Bleach-based decontamination of the fluid path between samples is compatible with downstream STR and similar genotyping assays when validated.
Safety note. Hypochlorite is corrosive to stainless steel and incompatible with many assay chemistries as residue. Follow bleach washes with thorough neutralization or water rinses as specified by the instrument manufacturer, and ventilate the area.
Reusing and Washing Tips
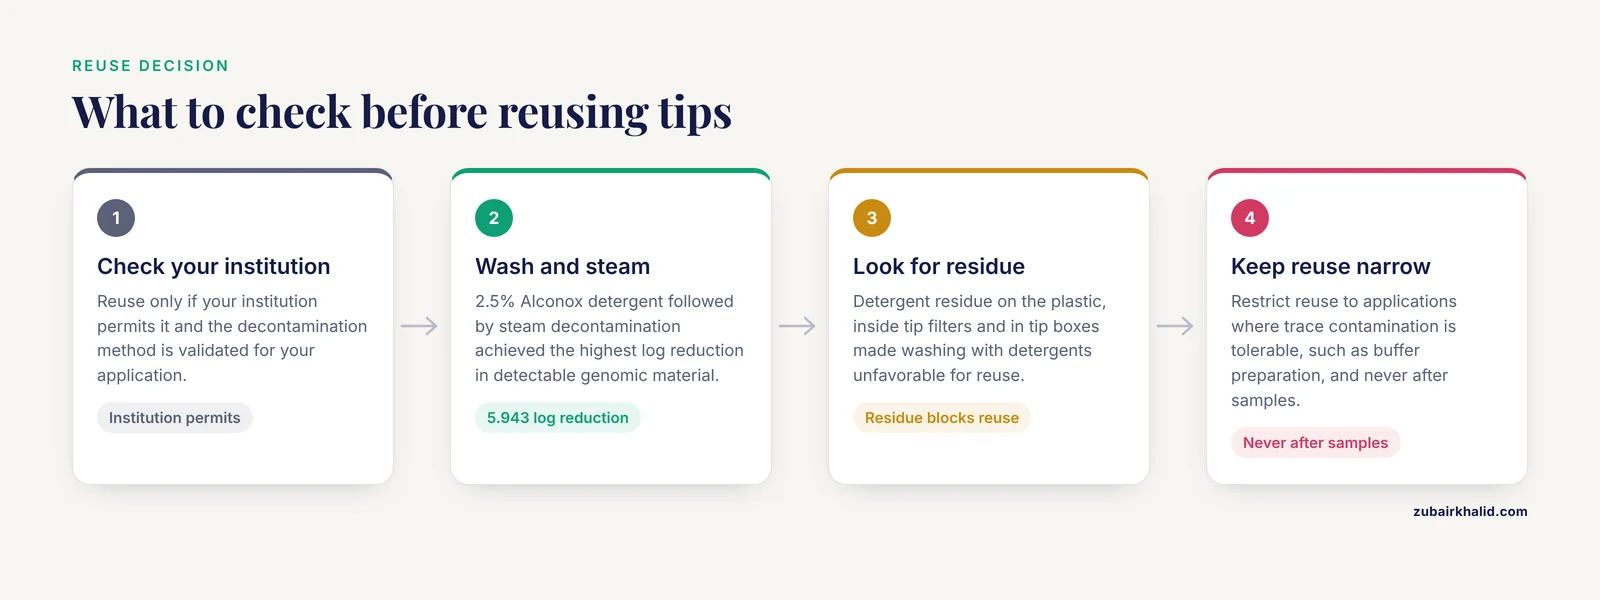
Single-use tips dominate molecular work, but reuse programs exist and are studied seriously. One evaluation compared decontamination methods for laboratory-grade plastic tips contaminated with Aeromonas hydrophila DNA. Cleaning with 2.5% Alconox detergent followed by steam decontamination achieved the highest log reduction in detectable genomic material, and detergent washing reached a 95.9% turnover ratio with a 5.943 log reduction. However, detergent residue persisting on the plastic, inside tip filters, and in tip boxes made washing with detergents unfavorable for reuse. Ozone vapor at 250 and 14,400 PPM·min and cold atmospheric plasma were also tested, with lower performance than the detergent and steam combination [4].
An independent cost-benefit analysis of a university-wide tip washing station estimated that a single reuse of tips could return 100% of the equipment investment, and pilot experiments replicating commercial UV-based decontamination found washing to be 100% efficient at sterilizing tips contaminated with bacteriophage, DNA, and RNA, with decontaminated tips then used successfully for phage quantification [5].
The practical takeaway for a standard research laboratory is careful and narrow. If your program permits tip reuse, validate the process on your own assay with qPCR-based swab or turnover testing as described in the literature, verify that no detergent or oxidizing residue reaches your reactions, and restrict reuse to applications where trace contamination is tolerable, such as buffer preparation. Never reuse tips that touched samples, PCR products, RNA, or primary cultures.
Specialized Tips as Analytical Devices
Tips are not only consumables. Pipette tip solid-phase extraction (PT-SPE) packs an adsorbent into a tip so the pipette itself performs sample cleanup. One design packed 5.0 mg of a molecularly imprinted resin into tips to extract organochlorine pesticides from spinach extracts, using 0.7 mL of methanol-water (1:1, v/v) as washing solvent and 0.6 mL of cyclohexane-ethyl acetate (9:1, v/v) for elution, with recoveries of 89.1% to 101.9% and relative standard deviations no greater than 7.1% [6]. Devices like these depend on an intact, clean tip cone, so a cracked or contaminated tip compromises the packed bed and the result at the same time.
Pipettes have also been adapted as full analytical instruments. A portable Salmonella biosensor used a modified pipette to perform mixing by pipette-blowing, magnetic separation through a specialized tip, catalytic signal generation, and pressure-based readout, detecting Salmonella typhimurium at 180 CFU/mL within 90 minutes [7]. In such systems, the tip is a reaction chamber, and the same contamination rules apply with even higher stakes because the tip carries reagents that generate the signal.
Changeover Between Samples or Products
When moving from one sample, cell line, or patient product to the next, treat changeover as a formal step rather than a pause. Decontaminate the biosafety cabinet work surface between products, discard all open reagents from the previous batch, and allow the validated UV cycle or a fresh disinfectant contact time before introducing new material [1]. Human error during manual processing is the dominant cross-contamination risk in biosafety cabinets, so a written changeover checklist reduces the dependence on memory.
Storage and Stability Notes
- Store unopened tip boxes sealed in their original packaging, away from UV sources, ozone generators, and disinfectant vapors, which embrittle polypropylene over time.
- Autoclaved tip refills should be dried fully before sealing. Trapped condensation supports microbial growth once boxes cool.
- Once opened, reseal tip boxes immediately after each rack is emptied, and label the opening date. Discard refills that have been open in a laboratory for an extended period if they will be used for nuclease-sensitive work.
- Filter tips do not have an indefinite life once wetted or autoclaved repeatedly. Retire any tip with a discolored, wetted, or damaged filter.
- Dilute bleach degrades within hours to days at room temperature and light exposure. Prepare working dilutions fresh on the day of use.
- Pipettes themselves store clean, dry, and with the plunger released to full extension, which relieves spring tension and protects the seal that keeps liquid out of the shaft.
Common Mistakes and Limitations
Reusing a tip that touched a nonsterile surface. Researchers frequently touch a loaded tip to a tube rim, notice, and continue anyway. The rim of an opened reagent tube is a contact point for everything that entered it. Replace the tip.
Blowing out into sample tubes. The second stop exists for complete delivery, but using it inside a clean tube sprays the last film of liquid, which carries the highest contamination load of any part of the draw. Dispense to the first stop for routine transfers and reserve full blowout for viscous liquids into waste or into tubes already committed to the same sample.
One tip across a serial dilution or master mix. Dip once, use everywhere is the fastest way to spread a single contaminant across an entire experiment. Renew the tip at every entry into a stock.
Open tip boxes and open stocks sitting on the bench. Both collect aerosols continuously. This habit also allows a reagent stock to become the hidden reservoir, the same failure mode that produced persistent false positives in a diagnostic laboratory whose routine quality checks all passed [2].
Cleaning without verification. Wiping a surface or washing a rack without a swab or control check tells you nothing about whether the decontamination worked. Published tip-decontamination work relies on qPCR-based measurement of residual genomic material for exactly this reason [4].
Ignoring the pipette body. Tips shield the shaft only partially, and liquid that wicks past the filter or past an unfiltered cone contaminates the instrument itself. If a pipette ever aspirated a biologically active or chemically aggressive liquid, it needs full decontamination before returning to service.
Overinterpreting calibration as a contamination fix. Pipette calibration corrects volume accuracy. It does not sterilize anything. Keep the two programs separate and both on schedule.
A final limitation. The steps here reflect general laboratory best practice and peer-reviewed evidence for specific decontamination methods. Individual applications, especially clinical, diagnostic, or cell-product work, are governed by your institution's standard operating procedures, validation records, and biosafety approvals, which take precedence over any general protocol.
Frequently Asked Questions
Do I need filtered tips for every experiment?
No. Filtered tips are essential for PCR setup, RNA work, and any low-copy or highly sensitive target. For routine buffer exchanges, plate media changes, and noncritical transfers, plain sterile tips are adequate as long as your pipetting technique avoids aerosols and your shafts stay clean.
Can I reuse disposable pipette tips?
Only if your institution permits it and the decontamination method is validated for your application. Published work shows detergent washing with steam decontamination removes nucleic acid efficiently but leaves residue problematic for reuse, while validated UV-based washing stations have sterilized tips contaminated with bacteriophage, DNA, and RNA successfully. Restrict reuse to low-stakes applications and never reuse tips that touched samples or amplicons.
How do aerosols actually contaminate my samples?
Rapid plunger release and liquid impaction create droplets and bubbles that burst at the tip. Simulated processing work showed droplets falling from 30 cm scatter visible contamination and traces spread up to 50 cm from where a bubble ruptures. Slow plunger strokes, shallow immersion, and low transfer heights minimize the droplets that create this spread.
How often should a pipette be calibrated?
Follow the calibration interval specified by your institution or the pipette manufacturer, and add in-house gravimetric checks whenever results look systematically biased. Calibration protects accuracy and volume reproducibility. It does not substitute for decontamination, and a worn seal can also allow liquid into the shaft, so maintenance and cleanliness are linked.
Is UV irradiation by itself enough to decontaminate a workspace?
UV helps but is not universal. In controlled testing, a dose of 50 mJ/cm² eliminated Bacillus subtilis vegetative cells and Aspergillus brasiliensis, two difficult contaminants, but UV only reaches surfaces in its direct line of sight and loses effectiveness against shadowed areas and heavy organic soiling. Combine UV with surface disinfectants rather than relying on either alone.
Will bleach damage my pipette?
Bleach corrodes metal components with prolonged contact. Wipe the exterior briefly, rinse or follow with 70% ethanol and water as your standard operating procedure requires, and never soak a pipette in hypochlorite. For automated systems, validated bleach wash routines followed by appropriate rinses have been shown compatible with downstream forensic DNA profiling.
What is the difference between carryover and cross-contamination?
Carryover means a substance from one reaction, usually PCR amplicons or template DNA, reenters a fresh reaction through tips, aerosols, or surfaces. Cross-contamination is the broader event of material passing between two samples or products in either direction. Carryover is one common mechanism of cross-contamination, and clean-tip technique with dedicated zones addresses both.
How can I tell whether my reagents or my tips are the contamination source?
Use the pattern of your controls. A positive no-template control points to master mix or the setup area, a positive extraction blank points to extraction consumables or handling, and contamination following plate order points to a shared tip or stock. If surfaces and consumables test negative repeatedly, test a freshly opened lot of the suspect reagent, since contamination can arrive inside commercial products and evade routine quality checks.
Sources
- Cross-contamination risk and decontamination during changeover after cell-product processing.
- Sporadic Hepatitis A Virus PCR False-Positive Results Observed during Reflex Testing of Serum Samples Previously Tested for Anti-HAV Antibodies and Caused by Contamination with HAV RNA Present in the Reagents of the Commercial Anti-HAV Immunoassay.
- Automated processing of forensic casework samples using robotic workstations equipped with nondisposable tips: contamination prevention.
- Development and application of decontamination methods for the re-use of laboratory grade plastic pipette tips.
- Bio-contaminated plastic micropipette tip sterilization stations: Environmentally, economically, and energetically viable solution.
- Glyoxal-Urea-Formaldehyde Molecularly Imprinted Resin as Pipette Tip Solid-Phase Extraction Adsorbent for Selective Screening of Organochlorine Pesticides in Spinach.
- A pipette-adapted biosensor for Salmonella detection.