Pipetting Training for New Lab Hires: A 30-Day Onboarding Plan
By Dr. Zubair Khalid, DVM, MS, PhD ·

This plan takes a new lab hire from first contact with an air displacement pipette to documented, gravimetrically verified liquid handling competence in 30 calendar days. It covers core pipetting technique, reverse pipetting, gravimetric accuracy checks, pipette calibration concepts, application-specific variations, and a formal competency sign-off. The goal is simple. A hire who finishes this program sets a target volume, picks the right pipette and tip, delivers that volume reproducibly, recognizes when the pipette rather than the technique is the problem, and knows when to escalate to the equipment manager.
Use this plan during the first month of onboarding for any wet-lab role, including research, clinical, quality control, and academic teaching labs. It assumes the hire has completed general lab safety orientation and has access to a supervisor or designated trainer for at least 30 minutes per day during weeks 1 and 2.
Time commitment. The plan spans 30 calendar days. Hands-on bench time totals roughly 18 to 22 hours, front-loaded into weeks 1 and 2 (about 60 to 90 minutes per day) and tapering to short daily practice blocks plus one assessment session in weeks 3 and 4. Trainee practice time can run alongside other onboarding activities once week 2 is complete.
Every stage produces a written record in the trainee's training log. Those records matter. When an auditor, a reviewer, or a principal investigator asks how the lab assures data quality, a signed pipetting competency file is one of the cheapest and strongest pieces of evidence a lab can produce.
The Principle: Why Pipetting Technique Deserves a Month
Most molecular biology reactions are defined by ratios. A qPCR mix, a restriction digest, or a ligation only works when its components sit within a narrow concentration window. The pipette is the instrument that enforces those ratios, and small errors compound. A 5 percent underestimate of a master mix component, repeated across a plate, can shift every data point in an experiment.
An air displacement pipette works by a piston sealed against a column of air. When the plunger moves, the piston compresses or expands that air cushion, and the change in air volume is translated into liquid drawn into or pushed out of a disposable plastic tip. The liquid never touches the piston. This design is fast and cheap, but it carries a built-in weakness. The air cushion is compressible and its behavior depends on temperature, vapor pressure, and liquid density, so the delivered volume depends partly on physics outside the instrument. That is why technique, environment, and pipette calibration are inseparable topics in this plan.
Two definitions organize everything that follows:
- Accuracy (also called inaccuracy or systematic error) is how close the mean delivered volume is to the set volume.
- Precision (expressed as the coefficient of variation, or CV, the standard deviation divided by the mean, reported as a percent) is how repeatable the deliveries are.
A pipette can be precise but wrong on average (a calibration problem), accurate on average but scattered (a technique problem), or both. The training plan deliberately separates these two failure modes so the trainee learns to diagnose them independently. The international standard governing piston-operated volumetric instruments, ISO 8655, defines accuracy and precision in exactly this way and provides the framework manufacturers use for their published specifications. Manufacturer manuals list the accuracy and precision limits for each model and volume setting, and those limits are the reference points used throughout this plan.
Materials and Setup
Gather everything below before Day 1. The trainer should confirm the pipettes themselves are within their calibration interval, because training on an uncalibrated instrument teaches the wrong baseline.
| Item | Specification or working concentration | Purpose |
|---|---|---|
| Air displacement pipette set | 2, 20, 200, and 1000 µL single-channel models (or equivalent), within calibration interval | Core training instruments |
| Pipette tips | Racked, Sterile where needed, correct brand or verified fit for each pipette | Liquid transfer, seating practice |
| Low-retention tips | Optional, matched to pipette shafts | Variation exercise with viscous or sticky liquids |
| Filter (aerosol-barrier) tips | Matched to pipette shafts | Aseptic and aerosol-sensitive work |
| Analytical balance | Readable to 0.1 mg for volumes of 10 µL and above, 0.01 mg or better for smaller volumes | Gravimetric accuracy and precision checks |
| Distilled or deionized water | Held at room temperature (roughly 20 to 25 °C) for at least 30 minutes before testing | Test liquid for gravimetric checks |
| Weighing vessels | Small glass beakers or weighing boats, 5 to 20 mL capacity | Receives dispensed water on the balance |
| Forceps | Clean, dedicated to tip handling where aseptic practice is taught | Tip manipulation without contamination |
| 70 percent ethanol (v/v in water) | In a spray bottle | Surface disinfection, cleaning pipette exterior |
| Blue food dye or Coomassie dye solution | Roughly 0.1 percent (w/v) in water, any visible dilution | Makes small droplets visible during technique drills |
| Glycerol | 100 percent (neat) | Viscous liquid exercise, reverse pipetting practice |
| Tween 20 solution | 0.05 percent (v/v) in water | Foaming-liquid exercise |
| Pipette stands | One per pipette | Correct vertical storage |
| Training log | Bound notebook or electronic form | Records daily exercises, masses, CVs, and sign-offs |
| Timer or stopwatch | Any lab timer | Consistent aspiration and dispense pacing drills |
| Nitrile gloves, lab coat, safety glasses | Standard PPE | Personal protection |
Safety note. 70 percent ethanol is flammable. Keep it away from open flames and Bunsen burners, and do not spray it near operating electrical equipment. Dispose of dye and detergent waste in accordance with the lab's chemical waste procedure. Glycerol spills are slippery. Wipe them immediately.
The 30-Day Plan at a Glance
| Week | Focus | Deliverable in training log |
|---|---|---|
| 1 (Days 1 to 7) | Anatomy, forward and reverse pipetting technique, first gravimetric checks | Daily practice records, first gravimetric dataset |
| 2 (Days 8 to 14) | Accuracy, precision, calibration concepts, formal gravimetric verification | Gravimetric verification sheet with CV and inaccuracy per pipette |
| 3 (Days 15 to 21) | Application variations: viscous, foaming, volatile, cold, and small-volume liquids, multichannel work | Completed variation exercises with notes |
| 4 (Days 22 to 30) | Workflow integration, aseptic technique, documentation, competency assessment | Signed competency record |
Week 1 (Days 1 to 7): Building Correct Pipetting Technique
Week 1 builds motor patterns. Errors learned here persist for years, so the trainer watches every set early in the week and fades supervision as the technique stabilizes.
Day 1: Anatomy, Range Selection, and Tip Seating
Step 1. Identify each pipette's nominal range and verify the display. Each model has a useable range printed on the handle, for example 100 to 1000 µL on a P1000. Trainees read the digital display aloud and convert the digits to the volume, because misreading a decimal place is one of the most frequent new-hire errors. Why: Operating a pipette outside its stated range degrades both accuracy and the instrument. Manufacturers specify performance only within the stated range, and the middle of the range generally gives the best relative performance.
Step 2. Set a target volume correctly. Turn the volume adjustment slowly toward the target, approaching from a lower value rather than winding down from above where the model's design calls for it. Follow the manufacturer's manual here, because geared mechanisms differ between brands. Why: Overshooting and winding back can introduce mechanical backlash on some models. Approaching the target from below, where the manual recommends it, gives the most reproducible setting.
Step 3. Seat a tip using a slight twist. Press the pipette shaft firmly into the tip in the rack with a quarter-turn twist. Do not hammer the pipette down repeatedly. Why: An unsealed tip lets air escape past the cone during aspiration, silently delivering less liquid than displayed. A firm twist creates the airtight seal the air displacement mechanism depends on. Excessive hammering wears the tip cone seal over time.
Step 4. Pick up and hold the pipette correctly. Grip the handle so the plunger thumb rests comfortably, wrist straight, elbow relaxed and close to the body. Why: Pipetting is a high-repetition task, and a neutral wrist position reduces cumulative strain. Trainees who hook the pipette with a flexed wrist for thousands of strokes a day are the ones who develop overuse complaints later.
Practice block (about 20 minutes): Set and read five random volumes on each pipette, seat and eject ten tips on each, and have the trainer confirm each step.
Day 2: The First Stop, the Second Stop, and Forward Pipetting
Trainees must understand the two detents before touching liquid.
- The first stop is the soft resistance met when pressing the plunger slowly. This stroke displaces exactly the set volume of air.
- The second stop is the firm stop beyond the first. This stroke adds extra displacement used to blow out residual liquid from the tip.
Step 1. Press to the first stop only. Hold the pipette vertically, in air, and press slowly to the first stop. Hold it there. Why: Pressing past the first stop before aspiration adds an extra volume of compressed air that will be released into the liquid, over-delivering on the aspiration stroke and confusing the cycle.
Step 2. Immerse the tip and release the plunger smoothly. Immerse the tip a few millimeters into the liquid, no deeper than about 2 to 3 mm for small volumes and up to roughly 6 mm for a P1000. Release the plunger in one slow, controlled motion. Why: Immersion depth controls two errors. Too shallow, and the tip can suck air at the surface. Too deep, and liquid clinging to the outside of the tip is carried over, and hydrostatic pressure pushes extra liquid in. A slow release keeps the inflow velocity low enough that the liquid column follows the piston cleanly instead of splashing and forming bubbles.
Step 3. Dispense against the wall at an angle. Touch the tip to the inside wall of the receiving vessel at a shallow angle, press smoothly to the first stop, pause about one second, then press to the second stop to blow out the residual film, and only then withdraw the tip while still holding the second stop. Why: The wall contact lets surface tension pull the liquid off the tip completely. The pause matters because the liquid film drains down the tip wall over about a second. Releasing the plunger before withdrawing lets a residual droplet wick back into the tip, which is the classic cause of dispensing less than the set volume.
Step 4. Release the plunger only after the tip is out of the liquid. Why: Releasing above the receiving liquid can draw the dispelled liquid or aerosols back into the tip.
Practice block: Fifty forward pipetting strokes of water between two beakers using the P200 at 100 µL, with the trainer watching for vertical aspiration, slow release, wall contact, and the pause.
Day 3: Pre-Wetting and the Reverse Pipetting Technique
Pre-wetting means aspirating and dispensing the working liquid into the same vessel two or three times before the first measured delivery.
Step 1. Pre-wet the tip two to three times before measured deliveries. Why: The inside of a dry plastic tip and the residual liquid film that coats it after the first stroke both affect volume. The first delivery from a dry tip is typically low. Pre-wetting equilibrates the film and the humidity inside the tip so every subsequent delivery is consistent. This is the single highest-yield habit in pipetting technique.
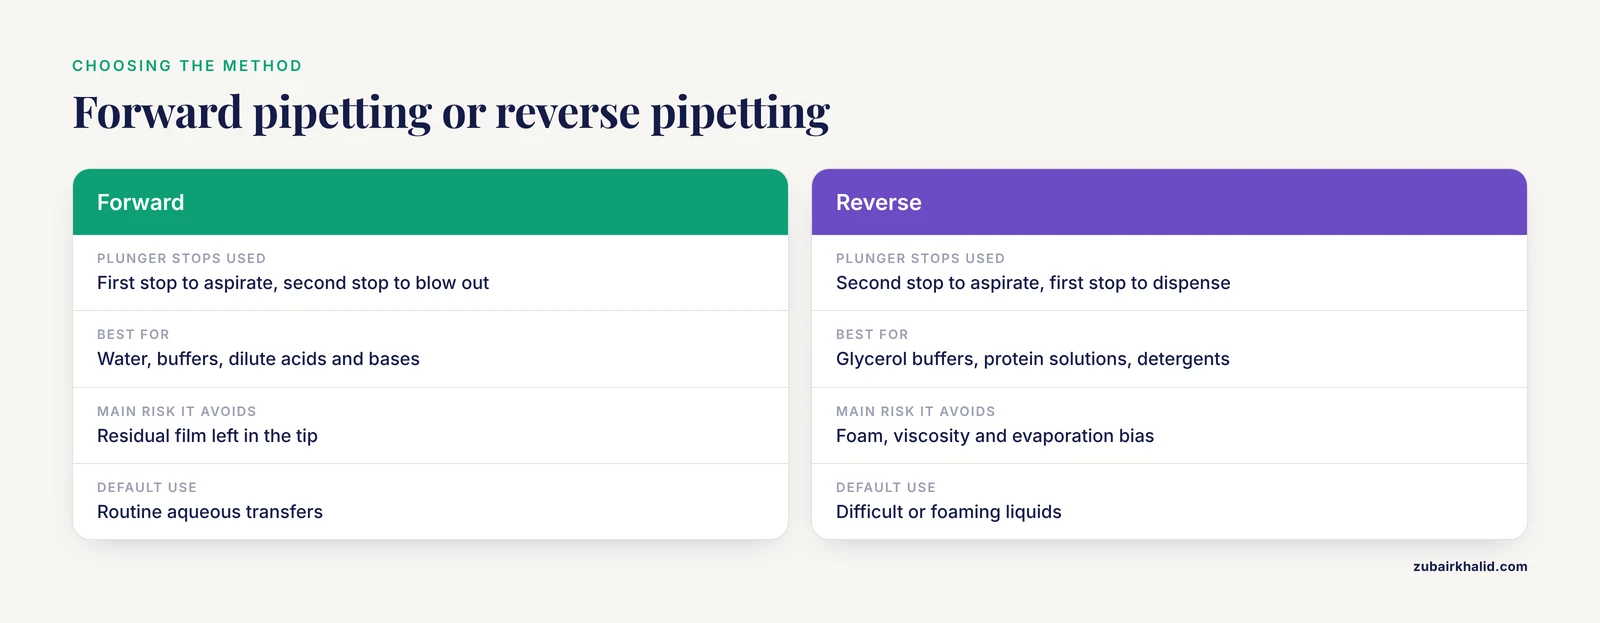
Step 2. Learn reverse pipetting for difficult liquids. Press the plunger to the second stop first, aspirate the liquid, dispense only to the first stop, and discard the remaining excess into waste. Why: Reverse pipetting over-aspirates and then delivers a defined fraction, so foam, viscosity, and evaporation losses stop biasing the delivered volume. It is the correct default for glycerol-containing buffers, protein solutions, detergents, and anything that foams. For routine aqueous solutions such as water, buffers, and dilute acids and bases, forward pipetting remains the correct default.
Practice block: Compare the two techniques directly. Pipette 100 µL of the blue dye solution forward ten times into one beaker and reverse ten times into another, then repeat with 100 µL of glycerol. Watch the glycerol deliveries with forward pipetting. The trainee will usually see the trailing droplet and inconsistent deliveries that justify reverse pipetting for viscous liquids.
Days 4 and 5: Speed Control, Verticality, and Common Failure Drills
Step 1. Run pacing drills. Aspirate over a two-second count and dispense over a two-second count, every stroke, for a full rack of tips. Why: Consistent plunger speed is what precision is made of. Fast aspiration pulls bubbles and aerosols, and inconsistent speed shows up directly as a wide CV on the gravimetric check in week 2.
Step 2. Drill the vertical rule. Aspirate with the pipette vertical. Dispensing at an angle against a wall is fine. Aspiration should be upright within about 20 degrees of vertical. Why: The volume of air displaced by the piston is fixed, but the hydrostatic head on the tip changes with angle, tilting the delivered volume. An angled aspiration consistently over-fills the tip.
Step 3. Run deliberate failure drills. Under trainer direction, perform one cycle each with an unseated tip, a fast plunger release, aspiration at 45 degrees, and no pre-wet. Record what each failure does to the visible droplet. Why: A trainee who has seen the failure once recognizes it instantly on a real experiment. This is a controlled way to build diagnostic instincts without contaminating real samples.
Days 6 and 7: First Gravimetric Checks
Introduce the balance on Day 6. The gravimetric method is the same principle used in formal pipette calibration, scaled to a training context.
Step 1. Prepare the balance and test liquid. Tare a weighing vessel on the balance. Use distilled water that has sat at room temperature long enough to match the room, since cold or warm water introduces density error. Why: The gravimetric method converts mass to volume using the density of water. At ordinary room temperature, 1 µL of water weighs approximately 1 mg, so 100 µL of delivered water should read about 100 mg. Density correction factors refine this, and manufacturer documentation and ISO 8655 describe the correction procedure used in formal verification.
Step 2. Perform ten replicate deliveries at the nominal volume. Using the P200 at 100 µL with correct technique, dispense ten times into the vessel, recording the balance reading after each dispense. Compute the difference between successive readings to get each individual delivery mass. Why: Ten replicates give a workable dataset for a mean, a standard deviation, and a CV, and the increment method (reading differences between successive weighings) cancels out slow evaporation drift.
Step 3. Calculate inaccuracy and CV. Worked example. Suppose ten deliveries of a 100 µL setting give a mean mass of 99.4 mg. Converting at approximately 1 mg per µL, the mean delivered volume is 99.4 µL, so the inaccuracy is (99.4 minus 100) divided by 100, or minus 0.6 percent. Suppose the standard deviation of the ten deliveries is 1.2 µL. The CV is 1.2 divided by 99.4, or about 1.2 percent. Why: These two numbers separate the two failure modes. A shifted mean with a small CV points at calibration or a systematic technique fault such as chronic angled aspiration. A large CV with a mean near target points at inconsistent plunger speed, unsteady immersion depth, or tip seating variation.
Step 4. Log the numbers and repeat on Day 7. Why: Comparing Day 6 to Day 7 shows the trainee their own learning curve and gives the trainer an early signal of persistent faults.
Week 2 (Days 8 to 14): Accuracy, Pipette Calibration, and Verification
Week 2 formalizes what Day 6 and 7 introduced. The trainee learns the difference between a daily check, a verification, and a full calibration, and performs a documented gravimetric verification on every pipette in their starter set.
The Three Levels of Pipette Quality Assurance
- Daily user check. A quick gravimetric spot check at one volume, usually mid-range, before critical work. Takes about ten minutes with ten replicates.
- Periodic verification. A fuller gravimetric test at multiple points across the range, for example 10, 50, and 100 percent of nominal, with ten replicates each, performed on a schedule. Most labs verify pipettes on a 3 to 6 month interval, and always after a drop, a suspected liquid ingestion into the shaft, or any event that could shift the mechanism. The interval is a lab policy decision guided by manufacturer recommendations and the criticality of the work.
- Full calibration and adjustment. Performed by a trained technician or an external calibration service, this includes disassembly-level inspection, seal and piston checks, adjustment of the mechanism to bring performance back within the manufacturer's specification, and a certificate traceable to a reference standard.
Step 1. Verify each pipette gravimetrically at three volume points. For each pipette, run ten replicates at roughly the lowest quarter, the middle, and near the top of the stated range. Record every mass. Why: Performance is not uniform across the range. A pipette that passes at 500 µL can drift badly at 50 µL. Testing three points maps the whole range and matches how calibration services report results.
Step 2. Compute inaccuracy and CV at each point. Use the same arithmetic from week 1, applying the water density correction if the lab's procedure calls for it. For training purposes at room temperature, the 1 mg per µL approximation is adequate when the trainer states it openly. Why: The deliverable is a table the trainee can read. A pipette with a large systematic offset at every point needs calibration. A pipette with a fine mean but a large CV at low volumes usually indicates the operator, not the instrument, especially at the bottom of the range where absolute errors shrink but relative errors grow.
Step 3. Compare against the manufacturer's specification. Pull the specification from the pipette manual or the manufacturer's website for the exact model and volumes tested. Why: Manufacturer specifications define the acceptance limits for that instrument. A pipette inside specification passes. A pipette outside specification is tagged, taken out of service, and sent for calibration. Trainees must learn that a personal daily check does not replace the calibration program. It screens for drift between services.
Step 4. Document everything. File the verification sheet with the pipette ID, serial number, balance ID, date, trainee name, temperatures, and results. Why: Traceable records are what turn a bench habit into a quality system.
Safety note. Analytical balances are sensitive to drafts and vibration. Do not lean on the balance table, and close the draft shield doors before reading. Handle glass weighing vessels with care at the edges.
Week 3 (Days 15 to 21): Application Variations
Week 3 moves from pure technique to the situations that break standard technique. Each day pairs a short explanation with hands-on exercises.
Day 15: Viscous Liquids
Use neat glycerol. Standard forward pipetting under-delivers because viscous liquid drains slowly and clings to the tip. Practice reverse pipetting here, aspirate slowly, dispense slowly against the wall, and never snap the plunger. Record the difference between forward and reverse deliveries gravimetrically so the trainee sees the bias as a number.
Day 16: Foaming and Volatile Liquids
Use the 0.05 percent Tween 20 solution for foaming. Aspirate slowly, pre-wet generously, and use reverse pipetting. For volatile solvents, discuss the physics: evaporation into the air cushion during aspiration increases the vapor volume and causes over-delivery or drips. Positive displacement pipettes (see Variations) are the correct tool for highly volatile or dense liquids, and filter tips protect the pipette from solvent and aerosol ingress.
Safety note. Volatile organic solvents are handled only in a chemical fume hood or biosafety cabinet as the lab's chemical hygiene plan directs, never on an open bench. Filter tips do not make solvent inhalation safe.
Day 17: Small Volumes and the Limits of Air Displacement
Practice at 2 µL and 5 µL on the P2 or P20. At these volumes, tip wetting, ambient humidity, and operator consistency dominate. Run twenty replicates gravimetrically on the fine balance and discuss why CVs widen at low volumes even with perfect technique. This exercise teaches the most important judgment call in the lab: when a volume is small enough that the technique or the instrument class must change.
Day 18: Multichannel Pipettes and Plates
If the lab uses 8- or 12-channel pipettes, train alignment. Lower the tips into a 96-well plate squarely, watching for equal tip angles, and confirm uniform pickup using the dye solution. A misaligned channel pipettes a different volume across the row, which quietly ruins plate-based assays.
Day 19: Cold and Warm Samples
Discuss why air displacement pipettes and temperature mismatches interact. Liquid colder than the room gains density and tends to over-delivery bias as it warms inside the tip, and warm liquid under-delivers as it cools. The practical rules are to equilibrate liquids to room temperature where the protocol allows, pre-wet thoroughly, and never pre-wet a tip with liquid that will sit in it long enough to change temperature.
Day 20: Aseptic Pipetting
In a biosafety cabinet with trainer supervision, practice sterile technique: hands and sleeves positioned correctly, tips deep in the cabinet's working flow, no reaching over open vessels, filter tips where the protocol requires them, and single-use tips with no double dipping. Why: Contamination from a pipette barrel or an aerosol event is one of the most common causes of failed cultures and ruined PCRs. Filter (aerosol-barrier) tips contain a hydrophobic membrane that stops liquid and aerosols from reaching the shaft.
Safety note. Trainees must complete the lab's biosafety orientation before handling any biological material, and this session assumes biosafety cabinet use under existing institutional procedures.
Day 21: Ergonomics Review
Review grip, wrist position, workstation layout, and volume-setting posture. Pipetting is a repetitive motion task, and labs that let new hires develop a bent-wrist, elbow-out style pay for it in lost workdays. Light-touch pipettes, rotating tasks, and micro-breaks are the standard countermeasures.
Week 4 (Days 22 to 30): Workflow Integration and Competency Sign-Off
Days 22 to 25, integration. The trainee performs real, low-stakes lab tasks under observation, for example preparing buffer dilution series, aliquoting reagents, or loading a practice gel. The trainer checks for transfer of technique into real workflows, where time pressure and interruptions erode form.
Days 26 to 27, documentation habits. The trainee practices recording what they actually did, including lot numbers of tips, pipette IDs used, and any deviations. Good pipetting records carry the same weight as gel images in troubleshooting later.
Days 28 to 29, blind assessment. The trainer assigns a blind gravimetric test: unknown target volumes across the set, ten replicates each, scored for inaccuracy and CV against the lab's pre-defined pass thresholds. The lab should write these thresholds into its training policy in advance. An example internal target is a CV at or below 2 percent with inaccuracy within 2 percent of nominal at mid-range volumes, tightened as volumes decrease, but the specific numbers are a lab policy choice matched to the work the hire will perform and the manufacturer's stated specifications.
Day 30, sign-off. The supervisor reviews the training log, the verification sheets, and the blind assessment, then signs the competency record. The record states which pipette types and tasks the hire is approved to perform independently. Any weakness is documented with a remediation plan rather than a vague pass.
How to Read Results: Expected Outcomes and Diagnoses
The gravimetric dataset is the assessment's control and readout system, and it deserves a clear interpretation scheme.
Expected results for a trained operator on an in-specification pipette:
- Mean delivered volume close to the set volume at all three test points, within the manufacturer's stated accuracy specification.
- CV small at mid-range volumes, widening modestly at the bottom of the range.
- Replicate masses scattered randomly around the mean, with no drift within the run.
Pattern recognition:
- Tight cluster, shifted mean. Precision is good, accuracy is poor. Suspect calibration drift, an incorrect volume setting, or a systematic habit such as consistent angled aspiration or chronic failure to blow out.
- Correct mean, wide scatter. Accuracy is fine, precision is poor. Suspect inconsistent plunger speed, variable immersion depth, unstable hand position, or inconsistent pause times at the first stop.
- Drift within a run, readings falling over time. Evaporation from the weighing vessel or a warming test liquid. Redo using the increment method or shorten the run.
- First delivery low, subsequent deliveries consistent. Missing pre-wet. This is the classic signature and the reason pre-wetting is drilled on Day 3.
- Bubbles visible in the tip. Aspiration too fast or the tip broke the liquid surface. Reject the delivery, expel, pre-wet, and repeat. Never flick or shake a loaded tip to remove bubbles during a measured delivery.
Troubleshooting
| Symptom | Likely cause | Fix |
|---|---|---|
| Delivered volume consistently low | Unsealed or wrong-fit tip, missing blow-out, no pre-wet, angled aspiration | Reseat the tip with a twist, finish each dispense at the second stop, pre-wet two to three times, aspirate vertically |
| Delivered volume consistently high | Aspirating past the first stop before immersion, over-deep immersion, dispensing with the second stop on every routine transfer | Aspirate to the first stop only, control immersion depth to 2 to 3 mm for small volumes, reserve the second stop for blow-out and reverse pipetting |
| High CV with a correct mean | Inconsistent plunger speed, unsteady immersion depth, hand tremor from a tense grip | Slow down to a two-second aspiration and dispense, rest the forearm on the bench, relax the grip |
| Bubbles form in the tip | Aspiration too fast, tip drawn out of the liquid mid-stroke | Release the plunger slowly, keep the tip immersed, expel and re-aspirate |
| Drips or a hanging droplet after dispense | Static charge on dry plastic, insufficient wall contact, tip incompatibility | Touch off on the vessel wall, humidify the workspace for small volumes, verify tip fit for the pipette model |
| Liquid found inside the shaft | Aspirated liquid entered the barrel, usually from over-immersion, a contaminated tip, or lay-back of the plunger during aspiration | Stop using the pipette, decontaminate per the manual, inspect the piston and seal, recalibrate before returning it to service |
| Plunger feels stiff or gritty | Corrosion or residue on the piston and seal from vapor or liquid ingress | Send for service. Do not force the plunger |
| Results drift between checks | Pipette out of calibration interval, seal wear, environmental change in the room | Shorten the verification interval, schedule calibration, note room temperature in the log |
Variations on the Core Method
Positive displacement pipettes. These use a piston that sits directly against the liquid inside a capillary tip, eliminating the compressible air cushion. They are the correct choice for viscous, volatile, or high-density liquids where air displacement physics misbehaves. The piston is a consumable and each stroke uses a fresh capillary or piston.
Serological pipettes with electronic pipettors. For milliliter-scale transfers, an electronic pipettor with graduated serological pipettes is standard. Train reading the meniscus at eye level and setting the pipettor's speed appropriately for the liquid.
Repeat pipettors and dispensers. For aliquoting one stock solution into many vessels, a repeat mode on electronic pipettors or a dedicated dispenser improves both speed and between-aliquot consistency.
Low-retention tips. These have a smoother, more hydrophobic surface that reduces liquid film retention. They matter most at small volumes and with viscous or proteinaceous liquids, and they cost more, so they are used where the gain justifies it.
Filter tips. Standard for PCR setup, RNA work, and any aerosol-sensitive or sample-precious application. They protect both the sample and the pipette.
Air displacement pipettes remain the default for the overwhelming majority of aqueous molecular biology work. The training goal is knowing when the default fails and what to reach for instead.
Storage and Maintenance
- Store pipettes vertically on a stand or hanger, never flat on the bench where liquid can run into the shaft.
- Set the display per the manufacturer's guidance for storage. Many manuals recommend a specific storage volume to rest the spring, so check the manual for the models in your lab.
- Wipe the exterior daily or after any spill with 70 percent ethanol or the disinfectant the lab specifies. Never immerse a pipette or hold it under a running tap.
- Follow the manufacturer manual for decontamination and autoclaving. Many modern models have autoclavable shafts and tip ejectors while the handle requires a lower-temperature decontamination cycle, and assuming the whole instrument is autoclavable is a common and expensive error.
- Inspect nose cones and seals weekly for cracks or residue. Damaged seals are the leading mechanical cause of silent accuracy loss.
- Log every drop, every decontamination, and every verification. A pipette's calibration status is only as trustworthy as its paper trail.
Common Mistakes and Limitations
These are the specific, recurring errors seen in pipetting training for new lab hires, in rough order of frequency.
- Skipping the pre-wet. The first delivery from a dry tip is systematically low. In a dilution series, this quietly biases the first step of every series.
- Ignoring tip fit. Tips that are almost-but-not-quite right for a shaft seat loosely and leak air. Trainees should verify tip compatibility per model, not assume universality.
- Fast plunger release. It causes bubbles, aerosols, splashing onto the shaft, and volume error in one motion.
- Aspiration at an angle. Over-fills the tip consistently, so it hides inside a tight CV while biasing the mean.
- Wrong pipette for the volume. Dispensing 15 µL on a P1000 delivers a large relative error. Match the volume to the pipette whose mid-range it falls in.
- Operating at the extremes of the range. Manufacturers specify performance across the stated range, but relative error is always worst near the bottom. Choose the next pipette down when a volume sits below about 20 percent of the range.
- Confusing a daily check with calibration. A gravimetric spot check screens for drift. It does not adjust the instrument or replace a traceable calibration service.
- Treating technique as finished after training. Precision regresses under time pressure, new pipette models, and new tip lots. Short periodic re-checks keep the skill current.
- Pipetting at the wrong pace with viscous liquids. Viscous liquids need slow strokes and reverse pipetting, not more force.
Limitations. This plan covers aqueous liquid handling with air displacement instruments and the standard variations. It does not substitute for the lab's biosafety orientation, chemical hygiene training, radiation safety, or instrument-specific training for equipment such as thermal cyclers and centrifuges. It also does not replace a formal calibration program with traceable certificates. Individual competency decisions rest with the supervising scientist, who knows the specific assay tolerances the hire will work under, and pass thresholds should be set by each lab to match its own analytical needs.
Frequently Asked Questions
How long should pipetting training for new lab hires take before they work independently?
Most new hires reach independent routine liquid handling within the 30 days of this plan, with formal sign-off on Day 30. Complex applications such as low-volume qPCR setup or multichannel plate work may need additional supervised time beyond the first month.
What is the difference between accuracy and precision in pipetting?
Accuracy is how close the average delivered volume is to the set volume. Precision is how tightly the deliveries cluster, expressed as a coefficient of variation. A pipette can be precise but inaccurate, accurate on average but scattered, or both.
How often should pipettes be calibrated?
Most labs verify pipettes gravimetrically every 3 to 6 months and send them to a calibration service on an annual or semiannual schedule, depending on manufacturer recommendations and how critical the work is. Always verify after a drop or suspected liquid ingestion.
When should I use reverse pipetting?
Use reverse pipetting for viscous, foaming, or high-vapor-pressure liquids such as glycerol-containing buffers, protein solutions, and detergent-containing mixes. Use standard forward pipetting for routine aqueous solutions like water and simple buffers.
Why do my volumes come out low even though the pipette passed calibration?
The most common causes are a missing pre-wet, an unseated tip, dispensing without the pause and blow-out at the second stop, or aspirating at an angle. Technique faults, not instrument faults, explain most low deliveries on a calibrated pipette.
Can I autoclave my pipette?
Only the components the manufacturer designates as autoclavable, which for many modern models includes the shaft and tip ejector but not the complete handle. Check the manual for your specific model before autoclaving anything, and recalibrate or verify after any autoclave cycle.
Do expensive pipette tips matter?
Tip fit and consistency matter more than price. A tip that seats correctly and releases liquid cleanly is what counts, and switching tip brands without checking fit is a real source of error. Low-retention and filter tips earn their cost in specific applications rather than universally.
How can I quickly check a pipette without a full calibration?
Run a ten-replicate gravimetric spot check at mid-range volume on an analytical balance, converting mass to volume at roughly 1 mg per µL for room-temperature water. Compare the mean and CV to the manufacturer's stated specification for that setting.