Reverse Pipetting Technique: Step-by-Step Guide
By Dr. Zubair Khalid, DVM, MS, PhD ·

Reverse pipetting is a manual liquid-handling method in which you deliberately aspirate more liquid than you need, dispense only the volume you set, and leave the excess in the tip. The method exists because standard forward pipetting, which works beautifully for water and dilute buffers, becomes unreliable with viscous, foaming, or volatile liquids. In forward mode, a film of glycerol clings to the inside of the tip, a film of 10 percent Tween-20 foams and drips, and a volatile solvent evaporates into the expanding air pocket inside the pipette shaft. Each failure mode steals volume from your intended dispense. Reverse pipetting compensates by preloading that lost volume as an overage, so the delivered volume matches the dial setting even when the liquid fights back.
Learning the reverse pipetting technique takes about 15 to 20 minutes of hands-on practice with a water-filled tray and an analytical balance. Once learned, it adds roughly one second per dispense compared with forward pipetting, because the only change is where you press the plunger and where you stop. A full gravimetric verification of your technique with a balance takes another 20 to 30 minutes.
Use reverse pipetting when you dispense viscous solutions such as glycerol-containing stocks and protein concentrates, foaming solutions such as detergent-containing buffers, volatile liquids such as some organic solvents, and small volumes where liquid retention in the tip would otherwise cause systematic under-delivery. Stick with forward pipetting for ordinary aqueous buffers, where reverse mode only wastes reagent and adds steps.
The Principle: How Reverse Pipetting Differs from Forward Pipetting
An air-displacement pipette works by moving a captive column of air. When you press the plunger, a piston pushes air out of the shaft, and releasing the piston creates negative pressure that draws liquid into the tip. The volume of liquid aspirated depends on the piston travel and on the physical behavior of that air cushion. Temperature, barometric pressure, vapor pressure of the liquid, and the viscosity and surface tension of the liquid all distort the relationship between piston travel and delivered volume. This is the root cause of most pipetting technique problems with difficult liquids, and it is why pipette manufacturers distinguish between air-displacement and positive-displacement instruments.
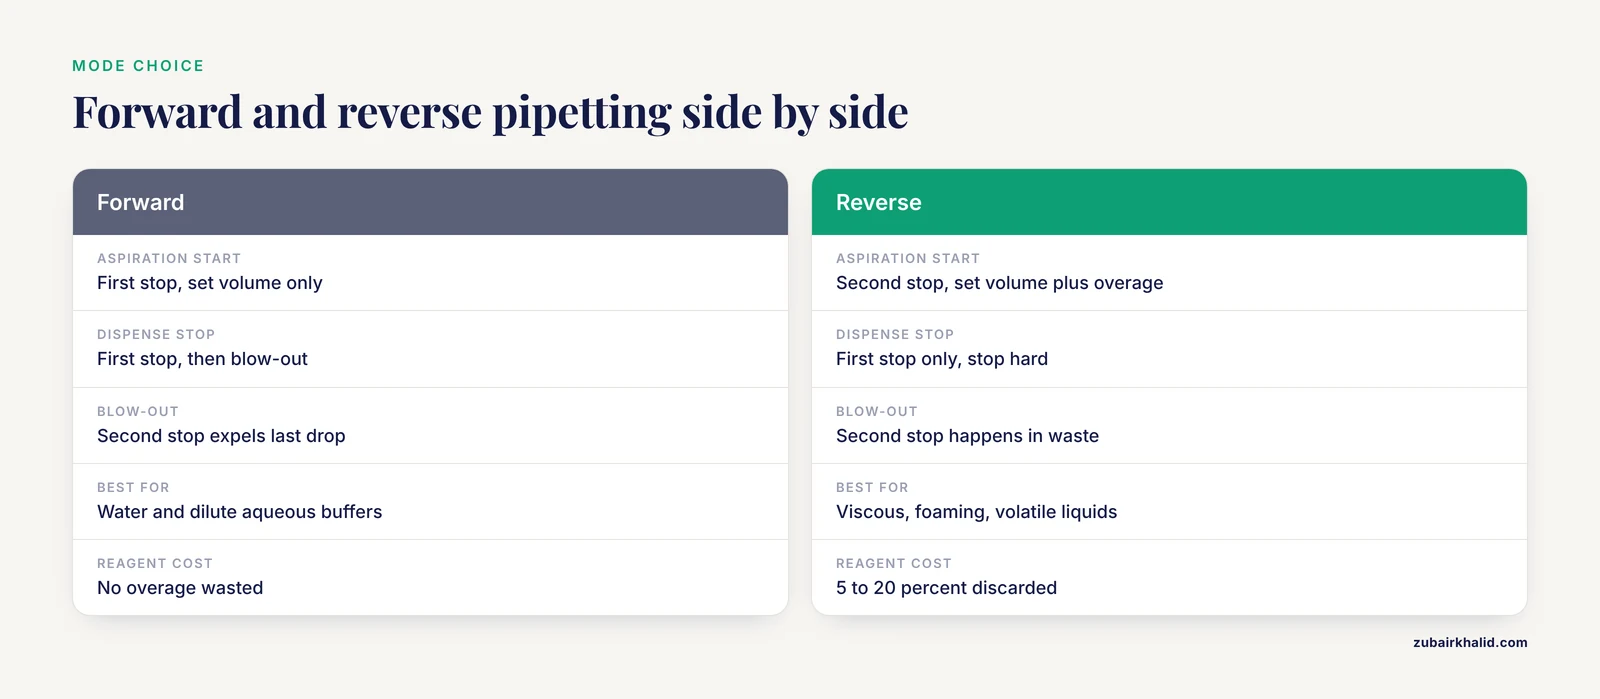
In forward pipetting, the standard method, you press the plunger to the first stop, aspirate the set volume, dispense by pressing to the first stop again, and finish with a blow-out stroke to the second stop to expel the last drop. Every microliter you aspirated is supposed to leave the tip. With water this works well. With viscous liquid, some of the liquid stays behind as a film on the tip wall, so the blow-out recovers less than expected and the dispensed volume falls short.
In reverse pipetting, you start the aspiration from the second stop rather than the first. This draws in the set volume plus an overage, typically in the range of 5 to 20 percent extra depending on the liquid. You then dispense by pressing the plunger only to the first stop, which delivers a volume very close to the dial setting, and you discard the residual liquid and the small air gap left in the tip. The excess acts as a buffer that absorbs the volume lost to tip retention, foaming, and vapor expansion. The delivered volume tracks the setting because the extra liquid, not the dispensed volume, absorbs the error.
The distinction between forward and reverse flow directions is well recognized outside manual pipetting too. In an automated hydrodynamically mediated technique for preparing calibration solutions, investigators tested forward and reverse modes of hydrodynamic delivery and found that both produced calibration curves consistent with standard manual pipetting, while the automated approach significantly reduced the volume of solution consumed and the risk of random errors [1]. The same directional logic that governs automated liquid delivery applies at the bench: the direction and sequence of liquid movement determine how much of what you intended actually lands in the receiving tube.
When to Use Reverse Pipetting
Choose reverse pipetting when the liquid you are dispensing has at least one of these properties.
Viscous liquids. Glycerol stocks, 50 percent glycerol working solutions, concentrated protein solutions such as 10 to 20 mg/mL bovine serum albumin, dense polymer solutions, and undiluted serum all drain slowly and coat the tip. Forward pipetting under-delivers these liquids consistently, and the shortfall grows as viscosity rises.
Foaming liquids. Solutions containing detergents, such as buffers with 0.05 to 1 percent Tween-20, Triton X-100, or SDS, foam when agitated. In forward mode, the blow-out stroke agitates the residual liquid and fills the tip with foam, so the blow-out expels foam and air instead of liquid. Reverse pipetting avoids the aggressive blow-out against the target vessel, which reduces foaming in the receiving tube.
Volatile liquids. Organic solvents and other liquids with high vapor pressure evaporate into the air cushion inside an air-displacement pipette. The expanding vapor pushes liquid out of the tip before you dispense, causing drips and over-delivery. Reverse pipetting reduces drip losses because a plug of liquid remains seated in the tip during the dispense stroke. For truly volatile solvents, a positive-displacement pipette remains the better instrument, as described in the variations section.
Small volumes with retention problems. At volumes near the bottom of a pipette's range, the ratio of tip wall surface area to liquid volume is high, and retention losses become a larger fraction of the dispense. Reverse pipetting compensates for that retention.
Do not use reverse pipetting for routine transfer of aqueous buffers, for reagent additions where the extra drawn volume would contaminate a shared stock with the receiving tube's contents in the tip, or when reagent economy matters more than delivery accuracy, because the method consumes extra liquid on every dispense.
Materials and Equipment
| Item | Specification | Working concentration or use | Notes |
|---|---|---|---|
| Air-displacement pipette, adjustable | 2-20 µL, 20-200 µL, or 100-1000 µL as appropriate | Set to the intended dispense volume | Calibrated within the last 6 to 12 months |
| Pipette tips | Manufacturer-recommended, low-retention for viscous work | One tip per reagent | Low-retention tips reduce wall film in difficult liquids |
| Analytical balance | Readability 0.1 mg for volumes of 100 µL and below | Gravimetric verification of technique | Calibrated, level, draft-shielded |
| Distilled or nuclease-free water | Ambient temperature | Technique practice and gravimetric checks | Must be equilibrated to room temperature |
| Glycerol, molecular biology grade | Undiluted | Viscous-liquid practice, 1.26 g/mL at room temperature | Prepare a 50 percent v/v glycerol-water working solution for gentler practice |
| Tween-20 | 10 percent v/v stock in water | Foaming-liquid practice | A 0.1 percent v/v working solution mimics wash buffer conditions |
| Protein stock, optional | Bovine serum albumin | 10 mg/mL in water or buffer | Example of a viscous biological stock |
| Waste container | Small beaker or tip box with liquid waste | Disposal of excess volume from each dispense | Keep it beside the receiving tubes, not between them |
| Receiving tubes or plate | 1.5 mL tubes or microplate | Target vessels | Pre-label before starting |
| Pipette calibration log or software record | Laboratory quality system | Tracking calibration dates | Required by most institutional quality programs |
The Reverse Pipetting Technique Step by Step
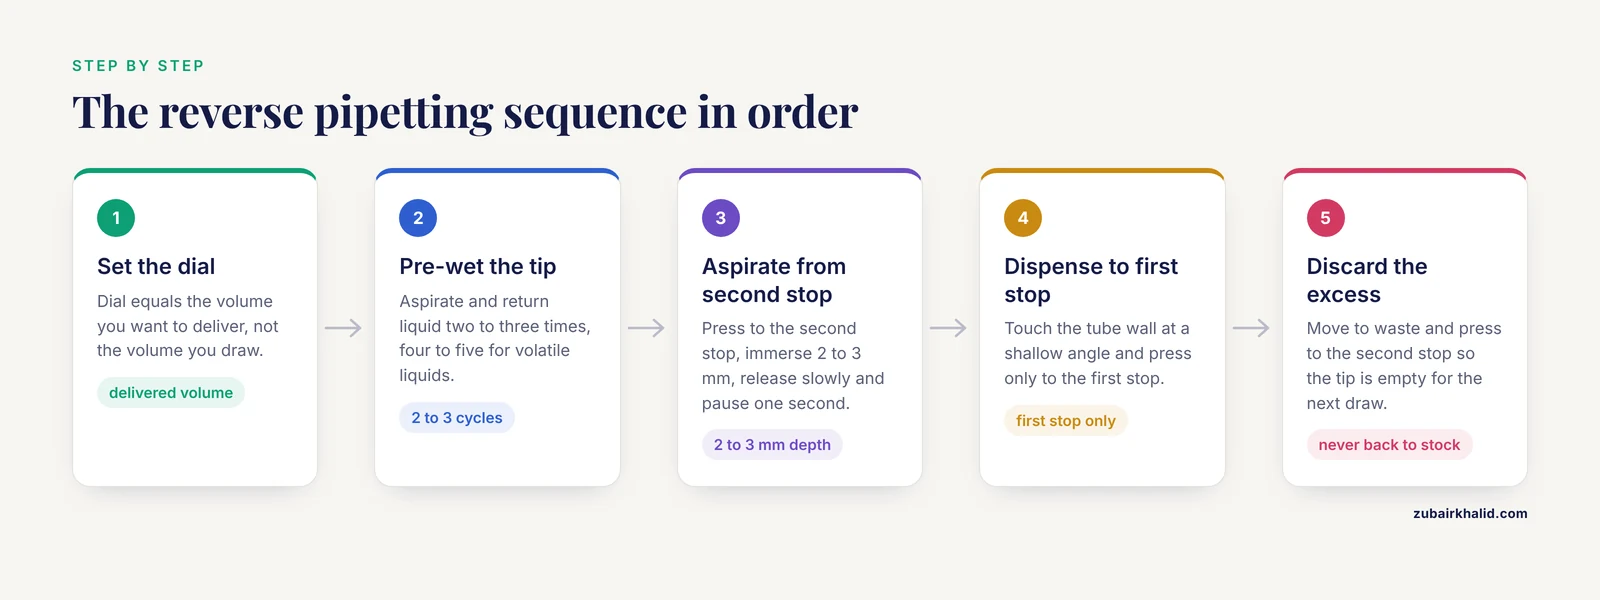
The sequence below assumes an adjustable air-displacement pipette and a single dispense. Practice with water first, then repeat the sequence with a 50 percent glycerol solution to feel the difference in plunger resistance and dispense behavior.
Step 1. Set the pipette to the volume you want to deliver. Reason: the dial always refers to the delivered volume in reverse mode. Some experienced users instead set the pipette higher to control the size of the overage, but for learning and for most applications, set the true target volume and let the second-stop aspiration provide the excess.
Step 2. Fit a fresh tip and pre-wet it. Press the plunger to the first stop, aspirate the liquid, dispense it back into the source, and repeat two to three times. Reason: pre-wetting equilibrates the air cushion inside the tip with vapor from the liquid and coats the tip wall with a thin film. For volatile and viscous liquids this step is not optional. A dry tip loses vapor into unsaturated air and retains liquid on dry plastic, and both effects shift the delivered volume. A pipette that has just dispensed pre-wetted liquid is already conditioned for the next aspirate, which is one reason consistent technique improves reproducibility in quantitative assays. A qPCR study of citrus pathogen detection that tested several workflow levers found that improved pipetting consistency reduced operator-dependent variability in Ct values [2].
Step 3. Press the plunger smoothly to the second stop and hold it there. Reason: pressing to the second stop before aspiration expels a volume larger than the set volume, which is what creates the excess. When you release the plunger, the piston travels back past the first-stop position and draws in the set volume plus the overage. Keep the motion smooth. A jerky release draws bubbles in viscous liquids.
Step 4. Immerse the tip 2 to 3 mm below the liquid surface and aspirate slowly. Release the plunger at an even, moderate speed and wait about one second with the tip still immersed. Reason: shallow immersion prevents the tip from pushing liquid onto the outside of the tip, which would add uncontrolled volume. Slow aspiration prevents bubbles in viscous liquids and prevents splash-back in foamy ones. The one-second pause lets the liquid column stop moving before you lift out, which matters most with dense liquids that keep flowing into the tip after the plunger stops.
Step 5. Withdraw the tip from the liquid, touching it against the vessel wall at a shallow angle if permitted by sterility requirements. Reason: wall contact removes the external droplet that would otherwise travel with the tip and add an uncontrolled volume to your dispense.
Step 6. Place the tip against the wall of the receiving tube at a shallow angle, just above the liquid surface if the tube already contains liquid, or against the bottom wall for a dry tube. Reason: wall dispensing lets the liquid run down the tube rather than splash, and it gives the dispensed plug a defined destination. This step, and the general handling of the dispense, is where small differences in operator habit show up. A published protocol for live-cell immunocytochemistry in isolated neurons explicitly lists specific pipetting techniques among the factors that determine whether the experiment succeeds, because gentle, consistent dispensing protects fragile cellular structures [3].
Step 7. Press the plunger to the first stop, slowly and steadily, and stop there. Reason: this is the defining step of the reverse pipetting technique. Pressing to the first stop delivers a volume equal to the dial setting. The overage and the small air gap remain in the tip. If you press to the second stop here, you dispense the excess too, and the entire point of the method is lost.
Step 8. Without lifting the tip away, wait a moment for the liquid to drain down the tube wall. Reason: viscous liquids lag behind the plunger. Dispensing and immediately pulling the tip away leaves part of the intended volume clinging to the outside of the tip or still descending the tube wall.
Step 9. Move the tip to your waste container and press the plunger to the second stop to discard the excess. Reason: the residual liquid in the tip is now contaminated with whatever was in the receiving tube or has been exposed to air. It cannot go back into the stock. Discard it completely so the tip is empty before the next aspirate, because a partially filled tip changes the volume of the next draw.
Step 10. Eject the tip into a sharps or tip waste container when the series is done. For a series of dispenses from the same stock with the same pipette, keep the same tip and repeat steps 3 through 9 for each aliquot, re-wetting is no longer needed after the first dispense because the tip stays conditioned. Reason: consistent tip conditioning across a series reduces drift in the delivered volumes.
Step 11. Confirm your technique gravimetrically when learning or when troubleshooting. Pipette 100 µL of water onto a tared weigh boat on an analytical balance ten times. Record each mass in milligrams. At room temperature, 100 µL of water has a mass of approximately 99.8 mg, so masses should cluster near that value. Calculate the mean and the coefficient of variation, which is the standard deviation divided by the mean times 100. Repeat with your problem liquid at the same setting. Reason: water checks the instrument and your neutral technique, while the problem liquid checks whether the reverse method is actually compensating for that liquid's behavior. A study of a multichannel pipettor in a kinase assay applied exactly this kind of systematic optimization to maximize precision and accuracy so that inhibition data would be reliable [4].
Verifying Accuracy: Controls, Calibration, and Expected Results
Controls
Use three controls when validating your reverse pipetting technique.
- Water forward-pipetting control. This establishes your baseline performance with the easiest possible liquid. If your forward water dispenses are poor, the problem is your general pipetting technique or the instrument, not the liquid.
- Problem-liquid forward-pipetting control. Dispense your viscous, foaming, or volatile liquid in forward mode and measure it gravimetrically. This documents the error you are trying to correct and gives you a before value for comparison.
- Problem-liquid reverse-pipetting result. The after value. The improvement between control 2 and control 3 is the evidence that your reverse technique works for that specific liquid.
How to read the results
For each condition, dispense at least ten aliquots, weigh each one, and calculate the mean mass, the systematic error, which is the percent difference between the mean and the target, and the random error, which is the coefficient of variation. Systematic error tells you whether your volumes land too high or too low on average. Random error tells you how tight the spread is.
A successful switch to reverse pipetting should show two patterns. First, the systematic error for the difficult liquid moves close to zero and toward the error you see with water. Second, the random error shrinks because blow-out variability and film retention no longer differ from aliquot to aliquot.
Published comparisons support the value of controlling liquid-handling precision in quantitative work. In a validated automated pipetting system for cell culture and toxicology assays, technical imprecision reached 2 percent for a cell survival assay and 4.5 to 6 percent for bioluminescent and ELISA-based assays, while intraday biological variation between wells in the same experimental group was larger than the technical variation [5]. The lesson for manual pipetting is direct: your technique should contribute variability well below the biological variability of the experiment, and refining liquid handling is one of the cheapest ways to get there. The same principle appears in qPCR assay development, where improving pipetting consistency was reported to reduce operator-dependent variability and tighten replicate Ct values [2].
Pipette calibration
Technique cannot rescue an out-of-calibration instrument. Pipette calibration verifies that the piston travel corresponds to the dial setting, and it is performed gravimetrically by repeatedly dispensing a set volume of water and weighing it, with corrections for water density at the measured temperature. Most institutional quality programs and manufacturer documentation recommend calibration at fixed intervals, commonly every 6 to 12 months, plus calibration after any drop, any suspected overload, or any repair. Between calibration events, a quick gravimetric spot check with water, as described in step 11, catches drifting instruments early.
Two details matter for calibration in the context of reverse pipetting. First, calibration is performed in forward mode, because that is the manufacturer's reference method, so a pipette can pass calibration and still under-deliver glycerol in forward mode. This is expected and is exactly why reverse pipetting exists. Second, if you routinely use reverse mode, your pipette sees a wider range of plunger travel, from full second-stop aspiration, so keeping the instrument well calibrated across its range matters even more.
Reverse Pipetting Technique Tips
- Keep the aspiration speed constant within a series. The overage you draw in depends partly on how fast you release the plunger, so varying the speed varies the excess and can shift delivered volumes.
- Discard the excess every single time. A tip that still holds excess liquid from the previous aliquot will deliver an uncontrolled extra volume on the next aspirate.
- Use the same angle against the tube wall every time. Consistent wall angle makes the drain behavior reproducible.
- Match tip immersion depth to the dispense. Two to three millimeters for aspiration, and shallow wall contact for dispensing, keeps the external droplet contribution small.
- Pre-wet more aggressively for volatile liquids. Four to five pre-wet cycles saturate the air cushion with vapor and stop the drift that occurs over the first several dispenses with a dry tip.
- Practice the two-stop rhythm until it is automatic. The most common failure is muscle memory from forward pipetting, where the thumb presses to the second stop during dispensing. Train the opposite pattern deliberately: second stop to pick up, first stop to put down.
- Use low-retention tips for viscous liquids. They reduce the wall film and lower the amount of overage you need.
- Check volumes more often when dispensing small volumes. At 10 µL and below, a one-microliter retention error is 10 percent of the dispense. The value of tight liquid handling at small scales is visible in automated systems too, where a hydrodynamically mediated calibration-solution method enhanced its effectiveness further by shrinking the working volume down to 10 µL in specialized vials [1].
- Warm or cool your liquid to room temperature when the protocol allows. Thermal mismatch between the liquid, the tip, and the pipette shaft changes the air cushion behavior and can exceed the correction that reverse pipetting provides.
Troubleshooting
| Symptom | Likely cause | Fix |
|---|---|---|
| Delivered volume is consistently low even in reverse mode | Overage is too small for this liquid, or the plunger is not reaching the second stop before aspiration | Increase aspiration resistance to full second stop, confirm you feel the second detent, or set the dial slightly above the target volume and recalculate |
| Delivered volume is consistently high | Pressing past the first stop during dispensing, or excess liquid on the outside of the tip | Slow the dispense and stop hard at the first stop, touch the tip to the vessel wall after aspiration to remove the external droplet |
| Delivered volumes drift upward over a series | Vapor buildup in a dry tip with a volatile liquid, or warming of the pipette from hand heat | Pre-wet the tip 4 to 5 times, use consistent rhythm, and minimize the time the pipette sits in a warm hand |
| Bubbles appear in the tip during aspiration | Aspiration too fast for a viscous liquid, or the tip is immersed too deep and vortexing the liquid | Aspirate more slowly, keep immersion at 2 to 3 mm, and let viscous liquids settle before aspirating |
| Foam forms in the receiving tube | Dispensing too fast or blowing out against the liquid | Dispense to the first stop only, against the tube wall above the liquid surface, and confirm the blow-out happens in waste |
| The residual volume in the tip varies wildly between aliquots | Inconsistent aspiration speed or inconsistent plunger release | Use a metronome-like rhythm, full second stop, smooth release, one-second pause |
| Water spot checks pass but the difficult liquid still under-delivers | Liquid-specific retention exceeds the standard overage, or the liquid is so viscous that reverse mode alone is insufficient | Increase pre-wetting, use low-retention tips, warm the liquid, or switch to a positive-displacement pipette |
| Volumes differ between channels on a multichannel pipette | Uneven tip seating or a channel-specific calibration error | Seat each tip firmly and uniformly, verify each channel gravimetrically, and recalibrate or service the instrument |
| The first dispense of a series is off and the rest are fine | Tip was not pre-wetted | Always pre-wet, especially with viscous and volatile liquids |
Variations
Setting a higher volume instead of using the second stop
An alternative formulation of the reverse pipetting technique keeps the aspiration at the first stop but dials the pipette to a higher setting, for example 120 µL to deliver 100 µL. You aspirate 120 µL, dispense to the first stop, and judge by feel and by the visible residual how much excess remained. This variant gives direct control of the overage but requires you to determine the correct overage empirically for each liquid. The second-stop method is more reproducible for most users because the overage is set mechanically by the instrument.
Positive-displacement pipettes
A positive-displacement pipette eliminates the air cushion entirely, using a piston that sits directly against the liquid inside a disposable capillary piston tip. For volatile solvents and very viscous liquids, positive displacement outperforms any air-displacement method, including reverse mode. Reverse pipetting is the manual compensation available when only an air-displacement instrument is on hand.
Multichannel reverse pipetting
The technique applies to multichannel pipettes, with attention to uniform tip seating and per-channel verification. Multichannel precision is worth the effort in plate-based work. Published workflow optimization for a multichannel pipettor in kinase inhibition assays focused specifically on maximizing precision and accuracy of liquid delivery to improve the data [4], and large-scale expression profiling on 384-well plates depends on consistent small-volume dispensing across hundreds of wells at once [6]. Verify each channel separately during calibration and gravimetric spot checks.
Automation and robots
When dispense consistency becomes the limiting factor in high-throughput work, laboratories move liquid handling to automated systems. Open-source liquid-handling robots running a multiplex RT-qPCR saliva diagnostic workflow achieved average turnaround under 9 hours for 95 percent of samples at a low per-test cost [7], and a validated automated pipetting platform for cell culture seeding, noxious agent exposure, and bio-analytical assays demonstrated excellent technical precision with 2 percent imprecision in a cell survival assay while confirming that intraday biological variability exceeded technical variability [5]. Automation also formalizes the forward-versus-reverse choice, as shown in the hydrodynamically mediated calibration-solution method that tested both modes and found consistent results with reduced random errors compared with manual pipetting [1]. Reverse pipetting at the bench remains the manual counterpart of this principle: when the liquid is difficult, control where the excess goes.
Template transfer tools and low-skill formats
When many untrained operators must add samples to reactions, calibrated tools that do not require classical pipetting skill can replace manual technique. A point-of-care RT-LAMP workflow for SARS-CoV-2 calibrated a template transfer tool specifically to simplify sample addition into reactions where pipetting skills would otherwise be needed, and validated the resulting assay with 99.30 percent diagnostic accuracy against reference RT-PCR [8]. This is the same logic that motivates reverse pipetting, reducing the dependence of the delivered volume on operator mechanics, applied at the workflow level.
Storage and Stability Notes
Reverse pipetting itself involves no storage, but the liquids it is used for usually do, and storage conditions interact directly with pipetting behavior.
- Glycerol-containing stocks are typically stored at room temperature or 4 °C and remain stable for months. Cold glycerol is dramatically more viscous, so let refrigerated stocks reach room temperature before reverse pipetting, or accept that your overage must grow.
- Protein stocks such as 10 mg/mL bovine serum albumin are commonly aliquoted at the working concentration and stored at 4 °C for days to weeks or frozen at minus 20 °C in single-use aliquots. Avoid repeated freeze-thaw cycles, and thaw frozen aliquots completely and mix gently before pipetting, because concentration gradients in a partially thawed tube make every aliquot different.
- Detergent-containing buffers such as 0.1 percent Tween-20 solutions are stored at room temperature and can support microbial growth over weeks, so prepare fresh or filter-sterilize as appropriate for your application.
- Pre-wetted tips are used immediately and never stored, since the conditioned film evaporates or picks up contamination within minutes.
- Aliquots prepared by reverse pipetting should be labeled with the actual dispense date and handled per your protocol's stability guidance. If your verification gravimetry shows that delivered volumes are within your assay's tolerance, the aliquots are as fit for storage as those prepared by any other manual method.
Common Mistakes and Limitations
These are the reverse pipetting technique common mistakes seen most often in training, followed by the honest limits of the method.
- Blowing out during the dispense. The single most common error is pressing to the second stop in the receiving tube out of forward-pipetting habit. This dispenses the overage and defeats the method entirely. Retrain the rhythm deliberately, pick up on the second stop, put down on the first.
- Skipping pre-wetting. Reverse pipetting without pre-wetting gives the worst of both modes, an uncontrolled overage in a dry tip and uncontrolled retention in the dispense. Pre-wet two to three times for aqueous and viscous liquids, four to five times for volatile ones.
- Keeping the excess in the tip for the next aliquot. The residual is contaminated or vapor-loaded. Discard it in waste every time.
- Using reverse mode for everything. For water and simple aqueous buffers, forward pipetting is at least as accurate, cheaper in reagent, and faster. Reserve reverse mode for the liquids that need it.
- Assuming the overage is universal. The 5 to 20 percent excess that works for a dilute buffer will not cover the retention of undiluted glycerol. Verify gravimetrically with your actual liquid, not with water alone.
- Aspiring jerkily and releasing fast. Fast release bubbles viscous liquids and splashes foamy ones, and inconsistent release changes the overage. Slow, smooth, identical motion on every aliquot.
- Ignoring temperature. A cold stock dispensed with a room-temperature pipette shifts the air cushion behavior beyond what reverse compensation handles. Equilibrate liquids when the protocol permits.
- Treating reverse mode as a substitute for calibration. A pipette that fails gravimetric calibration fails in both modes. Technique sits on top of a calibrated instrument, never instead of one. Most quality programs schedule pipette calibration every 6 to 12 months, and any drop or overload event triggers an immediate check.
- Expecting reverse pipetting to fix small-volume precision limits. Near the bottom of a pipette's range, the instrument's own uncertainty grows as a fraction of the volume. Reverse mode compensates for retention, not for instrumental limits. If you need accurate 1 µL dispenses, use a pipette whose range includes 1 µL near its middle, or a positive-displacement instrument.
- Comparing reverse-pipetted and forward-pipetted aliquots without verification. If a protocol specifies one mode, follow it, because the delivered volumes differ. When you change modes, document the change and verify volumes gravimetrically.
The broader limitation is that reverse pipetting compensates rather than corrects. It manages the symptoms of difficult liquid behavior but does not eliminate the physics of the air cushion. For the most demanding dispenses, positive displacement or automation remains the stronger tool, and the literature on validated automated systems shows what mature precision looks like, including the finding that biological variation between wells typically exceeds even modest technical imprecision [5].
Safety Notes
- Glycerol and detergent solutions are low-hazard but can cause eye irritation. Wear safety glasses and gloves per your institution's chemical hygiene plan.
- Volatile organic solvents may be flammable and inhalation hazards. Dispense them in a fume hood, keep them away from ignition sources, and prefer positive-displacement pipettes with compatible plastic-capillary tips rather than drawing solvents into a standard air-displacement shaft.
- Biological stocks such as serum and protein preparations should be handled with the personal protective equipment and containment level your biosafety assessment requires, and discarded residuals go into the appropriate liquid waste stream, never back into the source tube.
- Sharps discipline. Eject tips into designated tip waste, never by hand, and never recap or remove a contaminated tip with your fingers.
Frequently Asked Questions
What is the difference between forward and reverse pipetting?
Forward pipetting aspirates the set volume from the first stop and dispenses it completely with a blow-out to the second stop. Reverse pipetting aspirates from the second stop, drawing extra volume, then dispenses only to the first stop and discards the excess. Forward mode suits water and dilute buffers, reverse mode suits viscous, foaming, and volatile liquids.
When should I use the reverse pipetting technique?
Use it for liquids that under-deliver in forward mode, including glycerol-containing stocks, protein concentrates, detergent-containing foaming buffers, volatile solvents, and small volumes where tip retention is a large fraction of the dispense. Do not use it for ordinary aqueous buffers, where it only wastes reagent.
How much extra volume does reverse pipetting draw?
Aspirating from the second stop draws roughly 5 to 20 percent more than the set volume, with the exact overage determined by the pipette model and the liquid's properties. Verify the actual overage gravimetrically for your specific liquid rather than assuming a universal value.
Does reverse pipetting work with positive displacement pipettes?
Reverse pipetting is a compensation method designed for air-displacement pipettes, where the air cushion causes the errors. Positive-displacement pipettes have no air cushion, so they do not need reverse mode, and for volatile or very viscous liquids a positive-displacement instrument is the better choice.
Why does my volume come out short when I reverse pipette?
Short volumes in reverse mode usually mean the plunger never reached the true second stop before aspiration, the tip was not pre-wetted, or the liquid's retention exceeds the standard overage. Confirm the second detent click, pre-wet properly, and if the shortfall persists, increase pre-wetting, switch to low-retention tips, or move to positive displacement.
Can I use reverse pipetting with a multichannel pipette?
Yes, the same pick-up on the second stop and dispense to the first stop sequence applies. Verify each channel gravimetrically during calibration, because multichannel instruments can have channel-to-channel differences that reverse mode will not correct.
How often should pipette calibration be done?
Most institutional quality programs and manufacturer guidance call for calibration every 6 to 12 months, plus an immediate check after any drop, overload, or repair. Between calibration events, a quick gravimetric spot check with water on an analytical balance catches a drifting instrument early.
Does reverse pipetting waste reagent?
Yes, every dispense carries an overage that is discarded, typically 5 to 20 percent plus a small residual. That waste is the price of accuracy with difficult liquids, which is why reverse mode should be reserved for the reagents and volumes where forward pipetting actually fails.
Sources
- An Automated Hydrodynamically Mediated Technique for Preparation of Calibration Solutions via Capillary Electrophoresis System as a Promising Alternative to Manual Pipetting.
- A qPCR method for detection of 'Candidatus Liberibacter asiaticus': Optimization of selected assay parameters.
- Protocol to visualize ion channel trafficking in acutely isolated rodent neurons using live-cell immunocytochemistry.
- Maximizing the Precision and Accuracy of a Multi-Channel Pipettor to Optimize Inhibition Data from a Kinase Assay
- Validation of automated pipetting systems for cell culture seeding, exposure and bio-analytical assays in sulfur mustard toxicology.
- Automated 384-well SYBR Green Expression Array for Optimization of Human Induced Pluripotent Stem Cell Differentiation.
- Efficient SARS-CoV-2 Quantitative Reverse Transcriptase PCR Saliva Diagnostic Strategy utilizing Open-Source Pipetting Robots.
- A point-of-care SARS-CoV-2 test based on reverse transcription loop-mediated isothermal amplification without RNA extraction with diagnostic performance same as RT-PCR.