Pipetting Technique Checklist: Template and Examples
By Dr. Zubair Khalid, DVM, MS, PhD ·

By the end of this article you will be able to run a complete pipetting technique checklist on a manual air displacement pipette, record the results in a reusable template, calculate accuracy and precision from gravimetric data with a short script, and decide whether a pipette needs recalibration or replacement. You will also know how viscous samples, dial misreading, and operator-to-operator variation distort volumes, and what to do about each one.
To work through the example you need the following on your bench:
- One manual air displacement pipette (the worked example uses a P100, a pipette that spans roughly 10 to 100 microliters, but any single channel pipette works)
- Compatible tips from a single manufacturer lot
- An analytical balance readable to at least 0.1 mg (four decimal places in grams)
- Deionized or distilled water equilibrated to room temperature, roughly 20 to 25 degrees Celsius
- A small evaporation trap or weigh boat for the balance
- A log sheet or spreadsheet for the pipetting technique checklist template shown below
- Optional, a spectrophotometer if you prefer the photometric verification route described later
Why a Checklist Matters More Than Most Scientists Assume
Pipettes are to a molecular biology laboratory what workstations are to a computer science department. Nearly every result that leaves the lab passes through one. A 2023 mini-review in the Journal of Mass Spectrometry and Advances in Clinical Laboratory Medicine made a point that stings: variation in manual pipetting is a known unknown. Most labs accept that variation exists, yet very few have ever measured how large it is in their own hands, and unaddressed variation compounds across a dilution series or a plate map until data quality suffers [1].
The consequences are not abstract. Nearly every liquid-based assay reports a result as a concentration, which means the final number depends directly on the volumes transferred along the way [2]. If the first dilution of a tenfold series is off by 5 percent, that 5 percent propagates into every downstream tube, standard curve, and reported concentration. A checklist does not make the error disappear. It makes the error visible, repeatable to test, and correctable before it reaches your data.
Two facts motivate the specific structure of the checklist that follows. First, the accuracy (systematic error, how close the delivered volume is to the set volume) and precision (random error, how repeatable repeated deliveries are, usually reported as the coefficient of variation, CV) of manual pipetting can be measured with straightforward gravimetric or spectrophotometric protocols that any lab can run for training and periodic checks [1]. Second, a surprising share of pipetting failures is cognitive rather than mechanical. An educational study published in Biochemistry and Molecular Biology Education showed that many students cannot correctly read and convert the volume dial of a micropipette even before they touch one, and that targeted practice on dial reading alone significantly improved both accuracy and self-rated confidence [3]. A good checklist therefore covers the hands, the head, and the instrument.
The Pipetting Technique Checklist Template
The checklist below is a template you can copy into a spreadsheet or print. It has two parts. Part A is the behavioral checklist you run every time you pipette. Part B is the periodic performance check you run on a schedule, and it produces the numbers that go into your calibration log.
Part A. Daily technique checklist (run mentally on every use)
| # | Step | What to do | Pass criterion |
|---|---|---|---|
| 1 | Select the pipette | Choose a pipette whose range covers the target volume. Aim for the upper half of the range. | Target volume is between about 20 and 100 percent of the pipette maximum |
| 2 | Set the volume | Dial down to the target volume from above, never by winding up past the volume and back down repeatedly | Dial reading matches the intended volume exactly |
| 3 | Verify the dial reading | Read the digits aloud or have a colleague cross-check when training | Every digit, including the last, is read in the correct position |
| 4 | Attach the tip | Press the pipette into the tip with a slight twist. Do not hammer it on | No visible gap, no wobbling, no air path at the seal |
| 5 | Pre-rinse the tip | Aspirate and dispense the working liquid two to three times before the first measured delivery | Tip interior is conditioned, especially for viscous or volatile liquids |
| 6 | Aspirate correctly | Hold the pipette vertical. Immerse the tip 2 to 3 mm below the liquid surface. Release the plunger smoothly to the rest position | No bubbles in the tip, no liquid on the outside of the tip |
| 7 | Dispense correctly | Touch the tip to the side wall of the receiving vessel at a consistent angle. Press to the first stop, then blow out to the second stop for air displacement delivery | No residual liquid clinging to the tip |
| 8 | Handle between steps | Do not lay a loaded pipette on the bench. Return it upright to a rack | No liquid runs back into the shaft |
| 9 | Release the tip | Eject into a sharps or tip waste container using the ejector | No hand contact with the used tip |
| 10 | Log exceptions | Note any event that could affect volume: bubbles, a dropped tip, a splash, an unusual viscosity | Log entry exists if anything unusual occurred |
Steps 2 and 3 deserve emphasis because of the cognitive gap identified in the training literature. Correctly setting and reading a manual air displacement micropipette is an essential but genuinely difficult skill, and errors in reading the dial scale produce incorrect delivered volumes that corrupt both the experiment and the interpretation of the data [3]. If you train new students, have them read a set dial and state the volume in microliters before you let them near a plate.
Part B. Periodic performance check (the checklist format for your log)
Run this check at the schedule your institution or the pipette manufacturer specifies, and additionally after any drop, any suspected misuse, and before critical experiments. Record the following fields. This is the pipetting technique checklist template in its recording format:
PIPETTE PERFORMANCE CHECK LOG
---------------------------------------------
Date               : ____ / ____ / ________
Operator           : ______________________
Pipette ID         : ______________________
Nominal volume     : ________ uL
Tip lot/brand      : ______________________
Room temperature   : ________ C
Balance ID         : ______________________
Balance last verif.: ____ / ____ / ________

Replicate masses (mg or g):
1) ______  2) ______  3) ______  4) ______  5) ______
6) ______  7) ______  8) ______  9) ______ 10) ______

Mean mass      : ________ mg
Mean volume    : ________ uL
Inaccuracy (%) : ________ %
SD             : ________ mg
CV (%)         : ________ %

Manufacturer tolerance met?  [ ] Yes  [ ] No
Action taken: __________________________________
Sign-off: ______________________________________
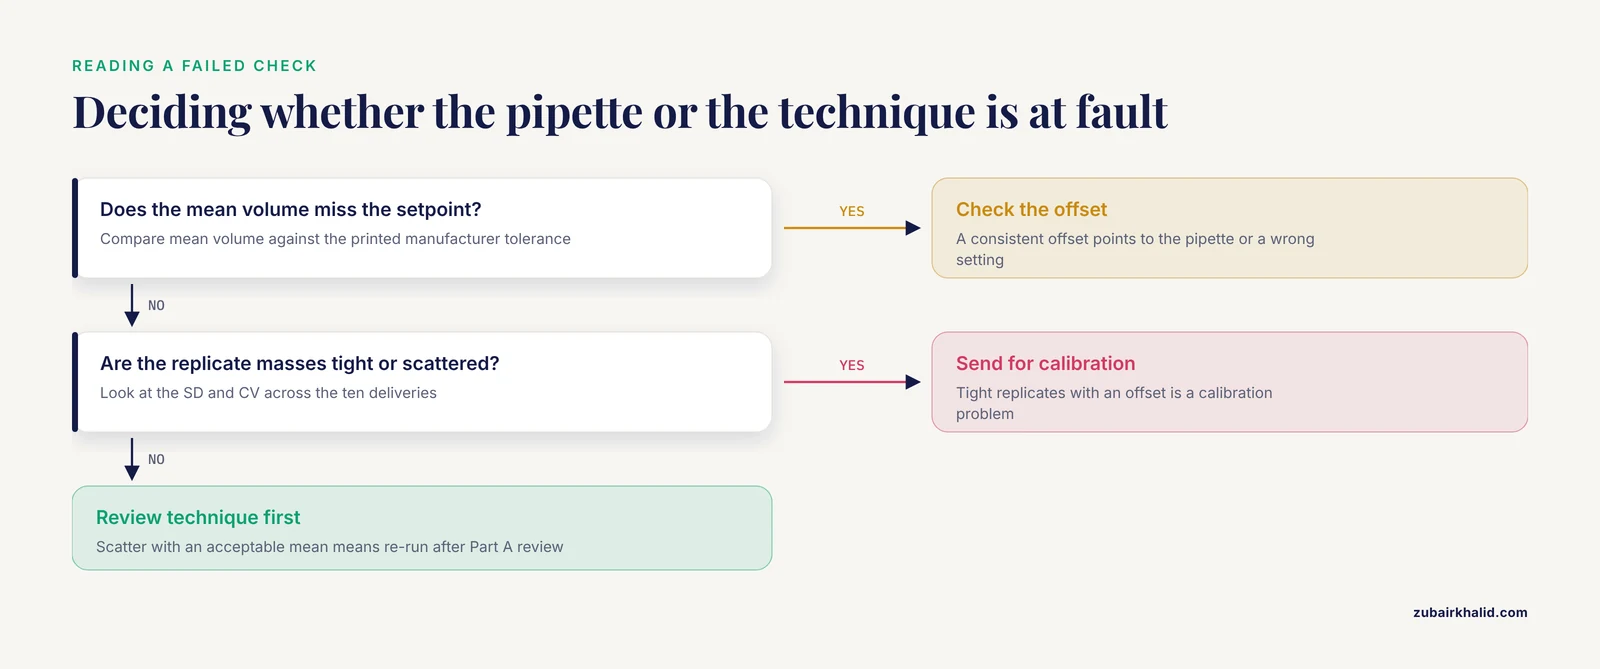
The two numbers that matter are inaccuracy, which reflects systematic error, and CV, which reflects random error. They diagnose different problems. A large inaccuracy with a small CV points to the pipette itself, a wrong setting, or a wrong technique component such as an immersion depth issue. A large CV with acceptable mean volume points to inconsistent operator technique, tip fit problems, or an unstable sample.
Worked Example: Gravimetric Accuracy and Precision Check
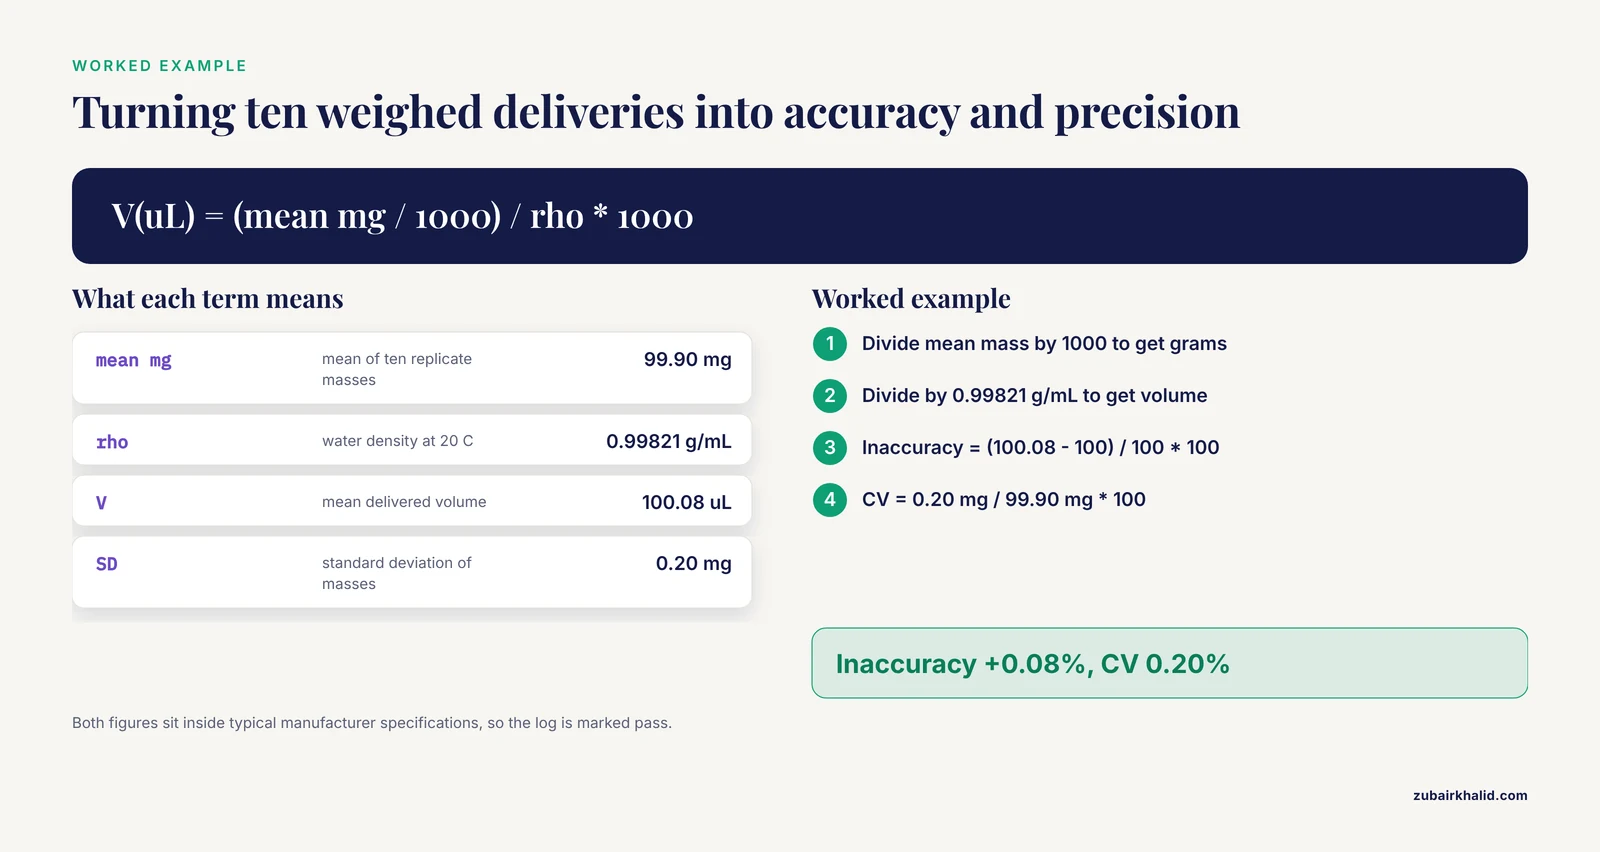
Gravimetry and spectrophotometry are the two common approaches for determining pipetting accuracy and precision, and gravimetry, weighing the delivered volume, is the one most labs can run immediately with an analytical balance [1]. The physics is simple. Water has a known density at a given temperature. If you weigh the water a pipette delivers, you can convert mass to volume exactly.
A useful reference density is 0.99821 g/mL for water at 20 degrees Celsius. Between 20 and 25 degrees Celsius the density stays near 0.997 to 0.998 g/mL, so for routine in-lab checks the correction is small. Use the exact density for your recorded temperature when the check is part of a formal calibration.
Follow this sequence:
- Equilibrate the water, the tips, and the pipette on the bench at room temperature for at least 30 minutes. Cold water will aspirate warmer and change density between the tip and the balance.
- Set the pipette to its nominal maximum. For this example, set the P100 to 100 microliters.
- Pre-rinse the tip three times with the test water.
- Tare the balance with your weigh boat or evaporation trap reading zero.
- Dispense one delivery into the boat and record the mass. For small volumes, dispense into existing liquid or work quickly, because evaporation during the reading is the main artifact at 10 microliters and below.
- Repeat for 10 deliveries, taring or recording cumulative mass after each. Ten replicates give a defensible standard deviation without turning the check into an afternoon.
- Convert the mean mass to volume and compute the statistics.
Here is a complete script for step 7. You can paste it into any Python environment.
import statistics

# Masses of dispensed water in milligrams, 10 replicate deliveries
# of a P100 set to 100 microliters
masses_mg = [99.7, 99.9, 100.1, 99.8, 100.0,
             99.6, 100.2, 99.9, 100.1, 99.7]

rho = 0.99821   # density of water in g/mL at 20 C

mean_mg = statistics.mean(masses_mg)
sd_mg   = statistics.stdev(masses_mg)
mean_uL = (mean_mg / 1000) / rho * 1000
cv_pct  = sd_mg / mean_mg * 100
inacc   = (mean_uL - 100) / 100 * 100

print(f"Mean mass      : {mean_mg:.2f} mg")
print(f"Mean volume    : {mean_uL:.2f} uL")
print(f"Inaccuracy     : {inacc:+.2f}%")
print(f"SD             : {sd_mg:.2f} mg")
print(f"CV (precision) : {cv_pct:.2f}%")
Running the script produces this output:
Mean mass      : 99.90 mg
Mean volume    : 100.08 uL
Inaccuracy     : +0.08%
SD             : 0.20 mg
CV (precision) : 0.20%
Interpret the output against the manufacturer tolerance. The nominal tolerance for your specific pipette model at your specific test volume is printed on the instrument or listed on its calibration certificate, and that printed tolerance is the pass criterion you enter in the log. In this worked example the pipette delivers a mean of 100.08 microliters against a 100 microliter setpoint, an inaccuracy of plus 0.08 percent, with a CV of 0.20 percent. Both figures sit comfortably inside typical manufacturer specifications for this class of pipette, so the log entry would be marked pass with no action taken.
If your check fails, the pattern tells you where to look. A consistent offset with tight replicate masses is a calibration problem, and the pipette goes to recalibration. Scatter among replicates with an acceptable mean is a technique problem, so re-run the check after reviewing Part A of the checklist, particularly tip attachment and plunger release speed.
The Spectrophotometric Alternative
Some laboratories prefer a photometric check, and the same 2023 mini-review that codified the gravimetric protocol also provides detailed protocols for accuracy and precision determination using spectrophotometry as the readout, for both single channel and multichannel pipettes [1]. In a photometric check you pipette a dilute dye solution of known absorbance properties into a defined volume in a cuvette or microplate well, measure absorbance, and convert the absorbance back to volume using a prepared standard curve. The approach is attractive when a balance is unavailable, when you need to check every position of a multichannel pipette against a plate, or when you want an in-workflow check rather than a bench-side check. The tradeoff is that photometric results inherit any uncertainty in the dye concentration and in the reader itself, so gravimetry remains the reference method for formal pipette calibration.
Whichever readout you choose, the review's larger point stands. Having a common protocol for evaluating pipetting variation lets laboratories compare results across sites and could eventually support a reference range for acceptable operator error under good laboratory practice [1]. If your lab adopts the checklist above, you are not just protecting your own data. You are generating comparable records.
Key Methods and Formulas at a Glance
| Method | What it measures | Typical use | Notes |
|---|---|---|---|
| Gravimetry | Mass of dispensed water, converted to volume | Formal pipette calibration, periodic checks, training | Reference method. Requires a 0.1 mg balance. Evaporation matters at low volumes [1] |
| Spectrophotometry | Absorbance of a dye delivery, converted to volume | Multichannel checks, in-workflow verification | Faster on plates. Inherits dye and reader uncertainty [1] |
| Weight-corrected pipetting | Gravimetric correction applied per delivery | High-viscosity samples where volumetric delivery is compromised | Practical fix when viscosity breaks volumetric transfer [4] |
| Motorized pipetting | Machine-driven aspiration and dispensing | Viscous or high-throughput transfers needing repeatability | Validated for high-viscosity liquid handling in protein formulations [4] |
| Routine assay monitoring | Bead counts or equivalent internal controls | Detecting pipetting error in ongoing services | Can flag random pipetting error before it reaches reports [5] |
Viscous Samples Break Normal Rules
Everything above assumes water-like behavior. High-concentration protein formulations, glycerol-containing buffers, and concentrated polymer solutions do not behave like water, and standard forward pipetting of these liquids produces volume errors that are large enough to corrupt quantification. A study in AAPS PharmSciTech examined exactly this bottleneck using two high-concentration monoclonal antibody formulations with distinct viscosities. Direct measurement with three mainstream commercial protein analyzers showed formulation-dependent deviations, and both of the authors' optimized workflows, one based on a motorized continuous pipette for direct measurement and one based on weight correction, improved pipetting precision and gave concentration estimates with better repeatability than traditional manual pipetting [4].
The practical translation for your checklist is this. When a liquid is visibly viscous, slow the aspiration stroke deliberately, pre-rinse the tip more thoroughly, and consider reverse pipetting, in which you aspirate an extra volume and dispense only the set volume, so the residual film in the tip works in your favor rather than against you. For quantitative work with high-viscosity samples, a weight-corrected approach, weighing each delivery instead of trusting the dial, is a validated practical option [4]. Note that reverse pipetting is standard practice for viscous and foaming liquids, but it is not appropriate for air displacement pipetting of aqueous samples in normal use, so treat it as a mode you switch into deliberately, not a default.
Training the Cognitive Half of Pipetting
A recurring finding in laboratory education is that technique training concentrates on the physical action while the cognitive task of reading the volume dial is left to absorb by osmosis. The interactive prelaboratory simulation study addressed this directly by isolating dial reading from physical handling. Students at two independent universities showed significant improvements in self-rated confidence and in micropipette scale reading accuracy after using the simulation, with highly positive feedback on how it built self-efficacy before lab sessions [3].
For a lab manager, the actionable version of this finding is simple. Before a new student's first plate, give them a set of dial positions to read and state back in microliters, including the tricky third digit that represents tenths of a microliter on a P200. A student who reads a P200 dial showing 1-5-0 as 150 microliters when the instrument is displaying 15.0 microliters will fail a dilution series quietly, and no amount of good plunger technique will save the data. Five minutes of dial-reading drills is the highest-yield training intervention the current literature supports.
Common Mistakes and Limitations
These are the errors seen most often when labs audit their own pipetting, along with the specific fix for each.
- Dial misreading. Reading the last digit in the wrong decimal position produces a tenfold volume error, the single most damaging failure mode for a dilution series. Fix it with read-back drills and by having a second person verify settings for critical dilutions [3].
- Operating below 20 percent of the pipette range. Using a P1000 for 50 microliters or a P20 for 2 microliters inflates relative error because systematic error grows proportionally at the bottom of the range. Fix it by switching to a smaller pipette whose maximum is close to your target.
- Releasing the plunger too fast. Snapping the plunger back pulls liquid in as an aerosol, leaves droplets on the tip wall, and generates bubbles. Fix it by releasing the thumb smoothly and consistently, always at the same speed.
- Wrong immersion depth and angle. Too deep and liquid coats the outside of the tip, too shallow and you aspirate air. Holding the pipette at an angle during aspiration changes the hydrostatic head. Fix it with vertical aspiration at 2 to 3 mm immersion, consistently.
- Skipping the pre-rinse. The first delivery from a dry tip is systematically low because liquid films the plastic. Fix it by pre-rinsing two to three times, and by pre-rinsing more thoroughly with viscous liquids.
- Ignoring viscosity. Treating a concentrated protein solution like water silently breaks volumetric transfer. Fix it with slower strokes, reverse pipetting, or a weight-corrected or motorized workflow [4].
- No performance verification schedule. A pipette that was never checked is a pipette you cannot defend. The gravimetric protocol above is deliberately simple enough for any lab to run for competency training and regular checks [1]. Also verify the balance itself, because an uncalibrated balance makes every gravimetric check meaningless.
- Trusting a single good check forever. Pipette calibration is not a one-time event. Volume measurement methods exist specifically to calibrate, routinely verify performance of, and optimize liquid handling devices, and the verification needs to recur on a schedule [2].
A final limitation belongs in your thinking rather than on the checklist. Even a perfect checklist controls the pipette and the operator, not the experiment. Sample properties, environmental conditions, and instrument state all interact, so a passing gravimetric check with water does not guarantee accuracy for every liquid you transfer. Individual samples and individual cases need judgment on the bench, and the checklist is a floor for competence, not a ceiling for rigor.
When Manual Technique Meets Its Limit: Automation
There is a point where checklist discipline stops scaling. Multichannel work across a full plate, cell-based workflows with many standardized transfers, and clinical sample preparation all magnify operator-to-operator variation, and the automation literature quantifies what standardization buys you.
In 3D cell culture, manual protocols are difficult to standardize and produce variable spheroid morphology that impairs assay robustness and cross-study comparability. A modular benchtop automation platform for liver spheroid generation and drug-response testing reduced hands-on time, minimized well-to-well variability in spheroid size, and improved overall spheroid viability compared with the manual workflow, with the authors concluding that standardized, well-tuned pipetting routines drive the improvement [6]. The lesson for a manual-pipetting lab is not necessarily to buy a robot. It is that the benefit came from standardization of the pipetting routine itself, which is exactly what your checklist enforces by hand.
Flow cytometry sample preparation shows the same pattern in a clinical setting. Automated sample preparation systems now perform many of the manual steps, including pipetting, staining, lysing, washing, and fixing, with the potential to become mainstay items in busy clinical flow cytometry laboratories while saving significant hands-on time for staff [7]. If your lab processes clinical specimens, the manual checklist is your interim control, and automation is the recognized path when volume and consistency demands outgrow human repeatability.
Pipette Calibration: What It Is and Who Does It
The word calibration gets used loosely, so pin it down. Pipette calibration is the process of comparing the volume a pipette actually delivers against its set volume, usually gravimetrically, and adjusting or documenting the instrument so it meets the manufacturer's stated tolerance. Volume measurement methods and technologies, spanning picoliters to a few milliliters, are reviewed specifically for this purpose in life science laboratories, including their addressable volume range, attainable precision and accuracy, suitability for measuring actual samples, and regulatory compliance considerations [2].
In practice, calibration splits into two tiers. The first tier is the in-lab check described in the worked example, which any trained operator can run in under an hour with a balance and a spreadsheet. The second tier is formal service calibration, performed with calibrated equipment and documented certificates on the schedule your institution's quality system requires. The in-lab check does not replace service calibration. It catches drift between services, validates pipettes after a suspected misuse, and provides the objective record for operator competency training [1]. Keep both in the log, keyed by pipette ID, so any pipette's history is reconstructable.
Checking Pipetting Error Hidden in Routine Data
There is a third way to detect pipetting problems that most labs never exploit, and it comes from external quality assessment practice. In a CD4 counting proficiency program, archived external quality assessment scheme panels were used to establish reporting equivalency across laboratories, and bead-count-rate data were used to detect pipetting error. Random pipetting error showed up as aberrant bead count rates, and one laboratory showed systematic under-reading with excellent precision, meaning the beads were counted consistently but the pipetted bead population was wrong from the start [5].
The generalizable point is that assays containing internal controls or counting beads carry a free pipetting audit inside every run. If your assay includes any component whose expected value is known, a persistent shift across runs with tight replicate scatter is the signature of a systematic pipetting problem, exactly the pattern seen in that proficiency study [5]. Build a review step into your checklist that looks at control values for pipetting signatures, not just for pass or fail.
Frequently Asked Questions
How often should I check my pipette calibration?
Run an in-lab gravimetric or spectrophotometric check on the schedule your institution requires, plus after any drop, any suspected misuse, and before critical experiments. Formal service calibration follows your quality system's interval, and the in-lab check catches drift between services.
What is the difference between accuracy and precision in pipetting?
Accuracy is systematic error, how close the mean delivered volume is to the set volume. Precision is random error, how repeatable repeated deliveries are, reported as the coefficient of variation. A pipette can be precise but inaccurate, which is why the log records both [1].
Should I pre-rinse the pipette tip before aspirating?
Yes. Pre-rinse by aspirating and dispensing the working liquid two to three times before the first measured delivery, because the first delivery from a dry tip runs systematically low. Pre-rinse even more thoroughly with viscous liquids.
Why does my pipette deliver wrong volumes with viscous liquids?
Viscous liquids do not flow into and out of the tip the way water does, so volumetric transfer is compromised and concentration measurements pick up the error. Motorized continuous pipetting and weight-corrected delivery are validated practical options that improved precision for high-viscosity monoclonal antibody formulations compared with manual pipetting [4].
How do I read a micropipette dial correctly?
Read each digit in its printed decimal position, including the last digit that represents a fraction of a microliter, and state the full volume back in microliters before pipetting. Misreading the dial position is a documented cause of incorrect delivered volumes, and targeted dial-reading practice measurably improves accuracy and confidence [3].
What is reverse pipetting and when should I use it?
Reverse pipetting means aspirating an extra volume and dispensing only the set volume, leaving residual liquid in the tip. Use it for viscous or foaming liquids where the residual film otherwise causes under-delivery. Do not use it for routine aqueous transfers with an air displacement pipette.
How many replicate deliveries do I need for a pipette check?
Ten replicates at one test volume give a defensible mean and standard deviation for routine checks, and the same gravimetric protocol structure supports both single channel and multichannel pipettes for training and regular verification [1].
When should a lab move from manual pipetting to automation?
Move when volume, plate-scale work, or the need for standardized complex workflows outgrows human repeatability. Automated pipetting routines reduced hands-on time and well-to-well variability in 3D liver spheroid workflows [6], and automated sample preparation systems now handle pipetting through fixing in clinical flow cytometry laboratories [7].
Sources
- Assessing variations in manual pipetting: An under-investigated requirement of good laboratory practice.
- Guide to liquid volume measurements: A review of methods and technologies.
- Click Before You Pipette: Building Foundational Pipetting Skills and Confidence With an Interactive Prelaboratory Simulation.
- Practical Pipetting Optimization Strategies for Accurate Concentration Measurement of High-Concentration Protein Formulations.
- Categorizing and Establishing CD4 Service Equivalency: Testing of Residual, Archived External Quality Assessment Scheme Sample Panels Enables Accelerated Virtual Peer Laboratory Review.
- Automation of 3D liver spheroid generation and acetaminophen dose-response on the MO:BOT enhances assay robustness and precision.
- Automation in flow cytometry: Guidelines and review of systems.