Pipetting Angle and Immersion Depth
By Dr. Zubair Khalid, DVM, MS, PhD ·

What This Method Achieves and When to Use It
Pipetting angle and immersion depth are the two geometric variables that most strongly influence the accuracy of an air-displacement pipette. The method described here covers how to hold the pipette, how deep to insert the tip, and how to dispense, so that every volume you transfer matches the volume you dialed in. Applied correctly, a calibrated pipette held vertically and inserted to the recommended depth delivers volumes within the manufacturer's accuracy specification, typically within one percent or better for a properly maintained instrument.
You use this technique every time you aspirate or dispense with an air-displacement pipette, which is the standard piston pipette found in molecular biology and biochemistry laboratories. The geometry rules apply to simple buffer transfers, PCR master mix assembly, serial dilutions, protein assays, and any workflow where small volume errors compound across a plate or a dilution series. The same rules extend to serological pipettes in a pipette controller, although the tolerances are wider there.
The hands-on time to learn the technique and verify your form with a gravimetric check is about 45 to 60 minutes. Once learned, correct angle and depth cost you nothing in time. They are simply the default position of your hand and arm on every aspiration. The elapsed time for a full accuracy verification with a balance, from equilibrating water to recording the final weighing, runs about 30 minutes per pipette.
The Principle Behind Angle and Immersion Depth
Air-displacement pipettes work by a piston pushing a column of air. The piston moves a fixed distance, displaces a volume of air, and that displaced air is replaced by liquid drawn into the tip. Anything that changes the pressure, temperature, or vapor content of that air column changes the delivered volume. Angle and immersion depth act on the system in three ways.
First, immersion depth sets hydrostatic pressure. When you push a tip into liquid, the liquid exerts pressure on the air inside the tip proportional to the depth of insertion. Insert too deep and this hydrostatic pressure pushes liquid into the tip before you aspirate, so you deliver too much. Insert too shallow and the tip can break contact with the liquid during aspiration, pulling air into the tip, so you deliver too little. Pipette manufacturers and standard laboratory skills textbooks converge on a consistent set of recommendations that scale with tip orifice size and volume.
Second, angle changes the effective hydrostatic head and the wetting behavior of the tip. A tip held perfectly vertical presents the same pressure at the orifice throughout the aspiration. Tilt the pipette and the orifice depth changes relative to the liquid surface while the piston moves, the liquid can run along the tilted tip wall, and surface tension effects at the orifice shift. Most manufacturers specify accuracy only for vertical aspiration. Holding the pipette vertical during aspiration and tilting only during dispensing is therefore not a stylistic preference, it is the condition under which the printed accuracy specification is valid.
Third, both variables control residual film formation. Liquid wets the inside wall of the tip and leaves a thin film after dispensing. Deeper immersion and longer contact times deposit more film. A film that stays behind in the tip is volume you dialed but never delivered. This is why immersion depth recommendations favor the shallow insertion that still guarantees contact, rather than deep insertion as a safety margin.
These effects are small individually, often fractions of a percent for moderate depth errors on a 1000 microliter pipette. They grow in importance as volume shrinks. A one percent error on a 1000 microliter transfer is 10 microliters. A one percent error on a 2 microliter transfer is 0.02 microliters, which is the difference between a working enzyme reaction and a failed one when you are pipetting concentrated stock solutions into small reaction volumes.
Typical Immersion Depth Recommendations
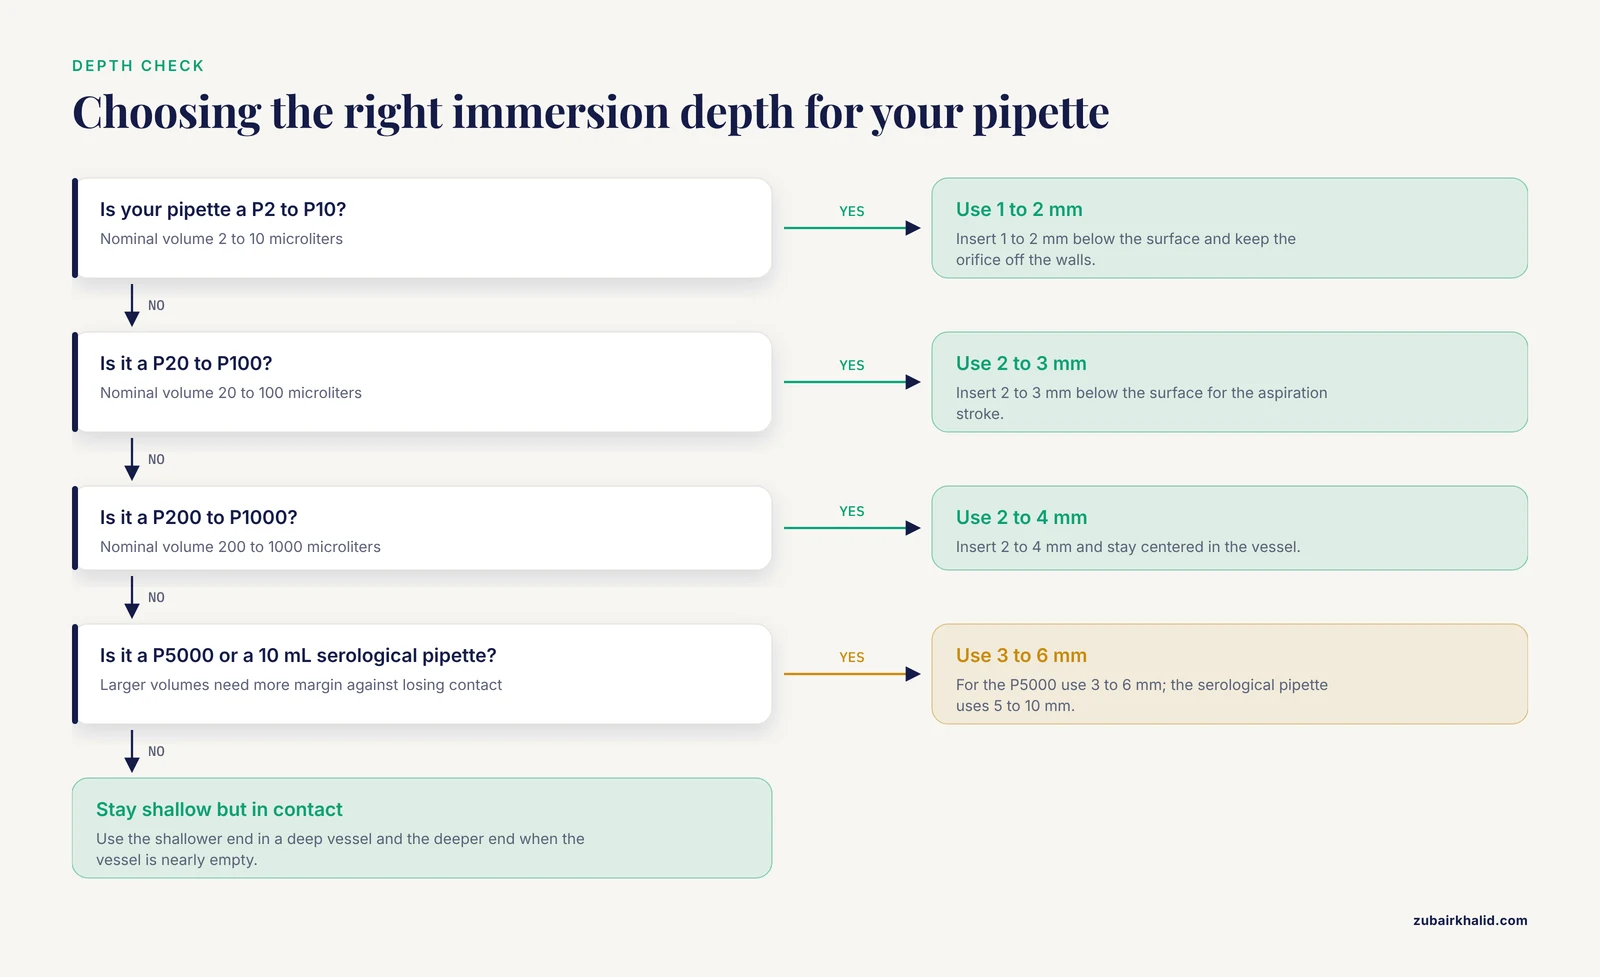
Manufacturer guidance for air-displacement pipettes follows a consistent pattern. The values below reflect the ranges published in pipette manufacturer technical documentation and standard laboratory technique references, expressed as insertion depth below the liquid surface at the moment of aspiration.
| Pipette size (nominal volume) | Typical aspiration volume range | Recommended immersion depth |
|---|---|---|
| P2 to P10 (2 to 10 microliters) | 0.1 to 10 microliters | 1 to 2 mm |
| P20 to P100 | 2 to 100 microliters | 2 to 3 mm |
| P200 to P1000 | 20 to 1000 microliters | 2 to 4 mm |
| P5000 (5 mL) | 500 to 5000 microliters | 3 to 6 mm |
| P10 mL serological pipette | 1 to 10 mL | 5 to 10 mm |
Two rules govern every row of that table. The tip must be inserted far enough that it cannot leave the liquid during the aspiration stroke, including the slight meniscus drop that occurs as liquid enters. The tip must not touch the bottom or walls of the vessel, because contact drags liquid, scratches the orifice, and can force liquid into the tip opening by capillary action. When a recommendation gives a range, use the shallower end for a full-volume aspiration in a deep vessel and the deeper end when the vessel is nearly empty and you need margin against losing contact.
Materials and Equipment
| Item | Specification | Notes |
|---|---|---|
| Air-displacement pipettes | P10, P200, P1000 (single channel) | Within current calibration, verified against manufacturer accuracy specification |
| Pipette tips | Manufacturer-matched, sterile, low-retention optional | Match tip to pipette brand or confirmed compatible brand, mismatched tips alter seal and orifice geometry |
| Distilled or deionized water | Type II or better, equilibrated to room temperature, 20 to 25 degrees Celsius | Test liquid for gravimetric verification and practice |
| Analytical balance | Readability 0.1 mg for volumes at or above 100 microliters, 0.01 mg for smaller volumes | Inside draft shield, level, calibrated with internal weights |
| Weighing vessels | Small glass or polypropylene boats or 1.5 mL tubes | Mass must remain within balance range when filled |
| Waste beaker | 250 mL or larger | For aspirated test liquid and tip ejects |
| 70 percent ethanol (v/v in water) | 70 mL ethanol to 30 mL water | Work surface disinfection, flammable, keep away from flame |
| Absorbent bench pad | Single-use lint-free | Protects work surface from spills |
| Laboratory notebook or recording template | Any | Record ten replicate readings per test point |
No hazardous reagents appear in the verification procedure itself. When you apply the technique to real samples, treat every liquid according to its own hazard classification. Common molecular biology reagents carry specific risks. Phenol-chloroform mixtures are corrosive and toxic. Ethidium bromide and many nucleic acid stains are mutagens. Load tips for these liquids with the same geometry described here while working inside a certified chemical hood or biosafety cabinet, wearing appropriate gloves, and eject tips directly into a labeled hazardous waste container.
Step-by-Step Procedure: Pipetting Angle and Immersion Depth
This procedure covers forward pipetting of an aqueous liquid with an air-displacement pipette, from the first approach to the vessel through tip ejection. Each step includes the reason it matters. Perform the sequence slowly at first. Muscle memory forms within a few practice sessions.
- Set the volume within the pipette's range. Dial the target volume, staying between about 20 and 100 percent of nominal volume. Below roughly 20 percent of nominal, the piston travel is short, the dead volume of the tip dominates, and relative error rises sharply. Never force the dial past the upper or lower stop, because this misaligns the mechanism and destroys calibration.
- Attach a fresh tip and seat it firmly. Press the pipette shaft into the tip with a slight twist until you feel a seal. A loose tip leaks air and produces both aspiration error and dripping. A tip that is not matched to the shaft geometry can change the orifice diameter, which changes aspiration behavior enough to matter at small volumes.
- Pre-rinse the tip when accuracy matters. Aspirate and dispense the working liquid two to three times into the same vessel or a waste tube before the analytical transfer. Pre-rinsing equilibrates the air inside the tip with the vapor of the liquid and leaves a conditioning film on the tip wall, which reduces the volume lost to the residual film on the first delivery. This step matters most for volatile solvents, cold liquids, and small volumes.
- Bring the pipette to the vertical position. Hold the pipette perpendicular to the liquid surface, within a few degrees of true vertical. Look at the shaft, not the thumb button, when checking. Manufacturers define accuracy in the vertical orientation, and every degree of tilt introduces a small but systematic error through the mechanisms described in the principle section.
- Immerse the tip to the recommended depth. Using the table above, lower the tip into the liquid so the orifice sits 1 to 2 mm below the surface for a P10, 2 to 3 mm for a P20 to P100, 2 to 4 mm for a P200 to P1000, and 3 to 6 mm for a 5 mL instrument. Watch the meniscus climb and stop lowering at once. Keep the tip centered in the vessel and away from the walls.
- Pause briefly, then aspirate smoothly. Let the tip sit in the liquid for one to two seconds before you begin, so any pressure disturbance from insertion settles. Press the plunger to the first stop before the tip is in the liquid (this is standard, see step 7), release the plunger in one slow, controlled motion, and hold it at the full aspiration position for one to two seconds while the liquid rises. A slow release lets the air column inside the pipette equilibrate. A fast release pulls a partial vacuum that entrains bubbles and delivers a low volume.
- Confirm the correct plunger sequence. The full cycle for forward pipetting runs as follows. Press to the first stop in air. Immerse the tip to depth while holding the first stop. Release slowly to aspirate. Pause. Withdraw the tip from the liquid by pulling straight up, touching the orifice briefly against the inner wall above the meniscus if the vessel wall is wetted. Dispense by pressing to the first stop, then to the second stop (blow-out) to expel the residual film. Only then release the plunger back. Pressing to the first stop after immersion rather than before is the most common sequence error among beginners and reliably produces a low delivery, because the spring must first travel back through the pre-blowout displacement.
- Withdraw at a consistent angle and speed. Pull the tip straight up out of the liquid without changing the vertical orientation. For small volumes in narrow tubes, draw the orifice along the inside wall as you exit to shed adherent droplets back into the vessel. Do not tap the tip against the tube, since tapping sprays droplets onto the wall above the meniscus and jolts liquid inside the tip.
- Dispense at an angle against the wall. Touch the tip orifice to the angled inner wall of the receiving vessel, at roughly 20 to 45 degrees from vertical for the vessel, with the pipette shaft near vertical or slightly tilted. Dispense to the first stop, pause one to two seconds, then press to the second stop to blow out the residual film. Dispensing against a wall exploits surface tension to pull every last droplet out of the orifice and prevents droplets from clinging to the tip and being carried away.
- Keep the plunger pressed until the tip is clear of liquid. While blowing out into a vessel that still contains liquid, hold the second stop and lift the tip out of contact with the receiving liquid before you release. Releasing while the orifice is still in or touching the liquid sucks a slug of the receiving liquid back into the tip, which contaminates the pipette and corrupts the next transfer.
- Eject the tip into a proper waste container. Press the ejector button with the tip directed into a sharps-safe or liquid waste receptacle. Ejecting by hand pulls aerosols and film across your glove and the shaft. For hazardous liquids, ejection into a sealed container inside the hood is the final containment step.
- Return the plunger to rest and store the pipette correctly. After the last transfer of a session, dial the volume back down to its minimum or to the value recommended by the manufacturer for storage (often the maximum volume on some models, check your manual), and hang the pipette upright on a rack or store it vertically. Storing a pipette horizontally with liquid in the shaft lets liquid wick into the piston assembly and corrode or contaminate it.
Performing a Gravimetric Accuracy Check (Pipette Calibration Verification)
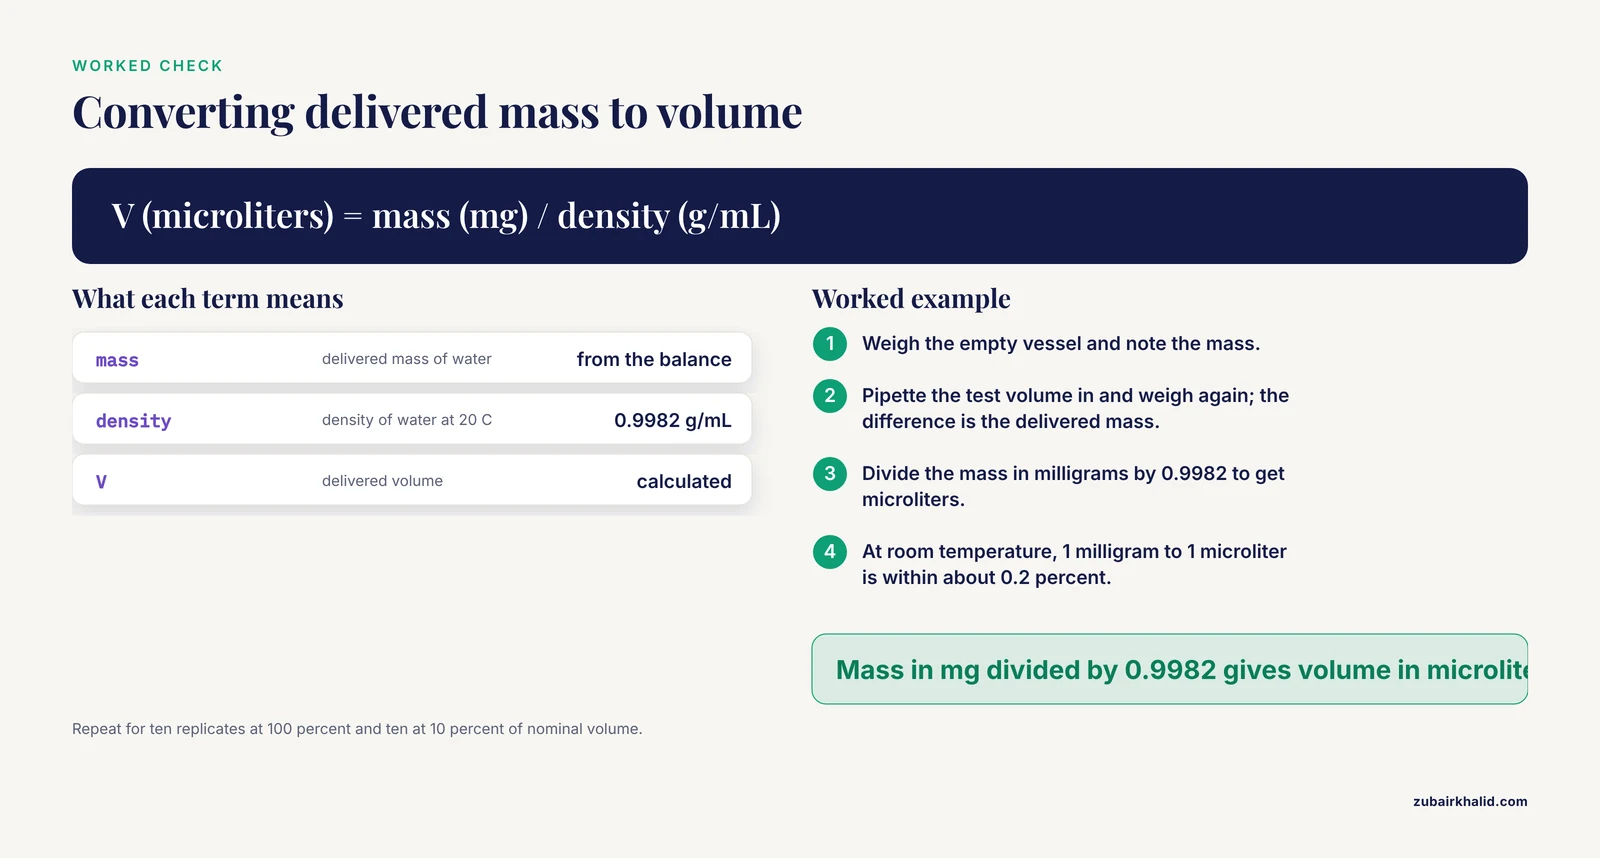
Calibration verification tells you whether your technique and your instrument jointly deliver the dialed volume. The accepted method is gravimetric, meaning you pipette water and weigh it, following the general approach of the ISO 8655 standard for piston-operated volumetric apparatus.
- Let a container of distilled water sit on the bench beside the balance for at least 30 minutes so the water, the pipette, the tips, and the air all reach the same temperature. Temperature mismatch is the largest single source of error in a home verification.
- Record the balance ambient conditions if your balance displays them, at minimum a stable room temperature near 20 degrees Celsius.
- Weigh an empty vessel, note the mass, then pipette the chosen test volume into the vessel and record the new mass. The difference is the delivered mass.
- Repeat for ten replicates at 100 percent of nominal volume and ten replicates at 10 percent of nominal volume, changing tips periodically or as they show retention.
- Convert each mass to volume using the density of water at the measured temperature, approximately 0.9982 grams per milliliter at 20 degrees Celsius, adjusted further for air buoyancy if you need traceable results. At room temperature the simple conversion of 1 milligram to 1 microliter is within about 0.2 percent, which is adequate for a bench check.
- Calculate the mean delivered volume, the systematic error (mean minus nominal), and the coefficient of variation (standard deviation divided by mean, times 100).
Compare your results against the manufacturer specification printed on the pipette or in its manual. A P1000, for example, typically specifies accuracy near one percent or better at nominal volume and precision below a few tenths of a percent as a coefficient of variation. The key interpretation point is separating technique error from instrument error. If your precision (scatter) is poor, your technique is inconsistent. Angle drift, variable immersion depth, uneven plunger speed, and waiting time changes all show up as scatter. If your precision is tight but your mean sits off target, the instrument is out of adjustment, the tip does not fit, or the liquid conditions differ from the calibration conditions. Tight but wrong data is the signature that calls for a professional pipette calibration service.
Choosing Angle and Depth in Real Situations
The step-by-step rules assume an aqueous liquid in a vessel deep enough to allow proper immersion. Real benches rarely stay that tidy. The following adjustments keep the geometry correct under common conditions.
Narrow tubes and small vessels. In a 0.5 mL tube with only 50 microliters of liquid, a P200 orifice cannot reach 2 mm of depth without touching the bottom. Switch to a P10 or P20 with a narrow tip, or tilt the tube slightly (about 45 degrees) while keeping the pipette vertical, which increases liquid depth along the wall and lets the orifice enter vertically without wall contact.
Low-volume work at the bottom of a plate well. The same tilt-the-vessel-not-the-pipette rule applies. Some multiwell plate work benefits from reverse pipetting, described under variations, because it avoids the partial aspiration problems at the very end of a stock.
Foaming or viscous liquids. Foaming liquids (detergent solutions, protein extracts) and viscous liquids (glycerol-containing enzyme stocks, serum) both behave poorly with standard forward pipetting. Slow the plunger release further, immerse slightly deeper within the allowed range so the orifice stays submerged while the viscous slug flows in slowly, and dispense against the wall with an extended pause before blow-out. If accuracy still suffers, switch to reverse pipetting or to a positive-displacement instrument.
Volatile or cold liquids. Cold liquids aspirated warm expand inside the pipette after uptake and deliver high. Volatile liquids evaporate into the air column and deliver low. Both problems shrink when you pre-rinse the tip several times so the trapped air saturates with vapor. Keep pre-rinse immersion depth identical to the analytical aspiration depth.
Consistency across a series. For a dilution series, set one immersion depth and one plunger rhythm and hold them across every transfer. Variable depth across a series converts into a systematic gradient in your data that looks like reagent degradation or instrument drift.
Controls and How to Read Expected Results
Three controls make the geometry rules verifiable on your own bench.
Gravimetric check, described above. Expected result at 100 percent of nominal volume is a mean within the manufacturer accuracy specification and a coefficient of variation below the printed precision value. For a healthy P1000 with good technique, ten replicate transfers of 1000 microliters typically land within a fraction of a percent of each other.
Dye spot test for gross error. Pipette a fixed volume of a colored dye solution (for example a dilute solution of Coomassie or food coloring) onto a hydrophobic surface or into wells of known area, and compare spot size across replicates. This is not a measurement method, it is a fast screen. Uniform spot sizes mean consistent technique. A single outlier pinpoints a transfer to review.
Serial dilution linearity check. Prepare a twofold serial dilution across eight tubes, add a constant amount of a dye to each tube, and read absorbance at the dye's peak wavelength (for example around 595 nm for Coomassie-based protein assays, following the dye manufacturer's instructions). On semi-log paper or after log transformation, a correct series falls on a straight line. A systematic bend, where early points sit high and later points sit low or vice versa, is the classic signature of a consistent geometry error, most often a drifting immersion depth as vessel liquid volume changes.
Reading your gravimetric data correctly requires distinguishing systematic error from random error. Systematic error (bias) moves every transfer in the same direction. It comes from calibration drift, a damaged tip cone, or a consistent angle habit such as always pipetting at 45 degrees. Random error (scatter) moves individual transfers unpredictably. It comes from inconsistent depth, variable plunger speed, and unstable hands. The fix differs. Bias calls for calibration service. Scatter calls for practice and attention to rhythm.
Troubleshooting
| Symptom | Likely cause | Fix |
|---|---|---|
| Delivered volume consistently high | Tip inserted too deep, hydrostatic pressure fills tip before aspiration | Reduce immersion depth to the recommended range, verify vertical hold |
| Delivered volume consistently low | Tip breaks contact during aspiration, or tip inserted too deep and residual film grows | Check depth against the table, slow the plunger release, pre-rinse |
| Bubbles visible in the tip after aspiration | Plunger released too fast, or tip orifice partially blocked or cracked | Release slowly, discard tip, inspect tip box for damaged tips, keep the tip centered away from walls |
| Volume varies widely between replicates | Inconsistent immersion depth or angle, variable plunger rhythm | Set a fixed depth habit, hold vertically, count a one-second pause on every cycle |
| Droplet clings to tip after dispensing | No wall contact, no blow-out, or wettable tip surface | Touch orifice to vessel wall, press to second stop, extend the pause, consider low-retention tips |
| First transfer of a session is off, later ones are fine | Dry tip and unsaturated air column on first draw | Pre-rinse two to three times before the first analytical transfer |
| Liquid creeps up outside the tip | Orifice wetted externally by contact with vessel wall or immersion too deep | Keep tip centered, reduce depth, wipe the outside of the tip only before aspiration |
| Pipette delivers correctly at high volume, poorly at low volume | Working below 20 percent of nominal volume | Move to a smaller pipette sized for the volume |
| Drips from tip during pre-aspiration hold | Loose tip seal, incompatible tip, or leaking seals in the pipette | Re-seat or change the tip, if dripping persists in air have the pipette serviced |
| Gradual drift toward low delivery over months | Seal and O-ring wear, spring fatigue | Schedule pipette calibration and seal replacement |
Variations
Reverse pipetting. Press the plunger to the second stop in air, immerse to the standard depth, aspirate to the rest position, dispense only to the first stop, and discard the residual volume. The excess in the tip compensates for film retention. Use this mode for viscous liquids, foaming liquids, and any liquid where the last microliter matters more than the air-equilibration benefits of forward pipetting.
Positive-displacement pipetting. A positive-displacement pipette carries a piston inside the tip itself, so the liquid never contacts an air column. Immersion depth still matters for splash and film, but hydrostatic pressure no longer biases the volume. These instruments are the correct choice for high-viscosity, volatile, or cold liquids that defeat air displacement.
Serological pipettes. In a pipette controller, immerse the pipette tip a few millimeters below the surface, keep the pipette near vertical, and let liquid flow by gravity or suction control. Withdraw along the wall as the meniscus falls so the orifice never breaks contact before delivery is complete. Dispense against the receiving wall with the controller in blow-out mode.
Multichannel pipettes. Geometry rules are identical, with one addition. Verify that all tips reach the liquid at the same depth. Uneven tip seating on the manifold or a warped plate sitting on a bench produces one row where some tips aspirate from air and others from depth. Check tip seating by pressing each channel against a flat surface before loading.
Filter tips and low-retention tips. Filter tips add a hydrophobic barrier that stops aerosols from entering the shaft. They do not change the geometry rules. Low-retention tips reduce the residual film and are worth the premium when transferring small volumes of protein solutions or viscous buffers.
Storage, Maintenance, and Stability of Performance
Pipettes hold their calibration only under maintenance. Follow these practices to keep the accuracy you verified.
- Store pipettes vertically on a rack, never flat on the bench where liquid can enter the shaft and where the pipette can be knocked against hard surfaces.
- Set the volume dial to its minimum or the manufacturer-recommended storage position before putting the pipette away for the day. Relaxed springs last longer.
- Clean the outside of the shaft and cone with 70 percent ethanol after spills, and follow the manufacturer disassembly instructions for internal cleaning when the liquid was hazardous.
- Replace seals and O-rings on the interval your manufacturer recommends, commonly annually or when the gravimetric check shows rising scatter.
- Schedule professional pipette calibration at a fixed interval, commonly every 6 to 12 months depending on use intensity and your laboratory's quality system, or immediately after a drop, a jam, or any suspected malfunction. Many laboratories performing regulated work operate under formal quality systems that dictate the interval, and the general expectation in clinical and research quality programs aligns with annual verification at minimum.
- Keep a calibration log with the date, operator, test volumes, measured means, and the calibration service certificate number if applicable.
The stability language matters because technique and instrument drift in opposite directions. Technique scatter improves with practice and stays improved. Instrument bias creeps slowly and silently as seals age. The only defense against silent bias is scheduled verification against a balance.
Common Mistakes and Limitations
These are the errors seen most often in teaching laboratories and in audits of working research benches, phrased so you can check your own habits against them.
- Aspirating at an angle because it is comfortable. A consistent 30-degree tilt feels fine and produces a consistent small bias. Consistency is not accuracy. Hold vertical during aspiration.
- Dunking the tip to be safe. Deep immersion feels protective but biases the volume high, increases external wetting, and leaves more film. Depth is specified, not guessed.
- Skipping the pre-rinse. The first draw into a dry tip behaves differently from every later draw. If the first transfer in a series is always slightly off, this is why.
- Pressing to the first stop after immersion. This sequence error quietly subtracts volume from every transfer. Build the correct sequence into muscle memory once and it never returns.
- Releasing the plunger too fast. Fast release entrains bubbles and under-delivers. Slow, steady release on every stroke.
- Blowing out while the orifice still touches the receiving liquid. Liquid splashes back into the tip, contaminating the shaft and corrupting the next transfer.
- Tapping the tip against the tube wall to shed droplets. Tapping sprays sample onto surfaces and jostles the liquid column. Draw along the wall instead.
- Using the wrong pipette for the volume. A P1000 set to 100 microliters is working at 10 percent of nominal, where relative error balloons. Match pipette size to volume.
- Testing accuracy with tips that differ from working tips. Verification with brand A tips proves nothing about brand B tips if B is what you use at the bench. Verify with your working tip.
- Assuming calibration lasts forever. Seals wear, springs relax, and a dropped pipette can lose adjustment invisibly. Scheduled pipette calibration is the only check against silent drift.
The main limitation of the technique itself is that it optimizes geometry only. Angle and depth control the geometric sources of error, not thermal expansion, not evaporation, not viscosity-driven flow errors, and not operator-to-operator differences in plunger rhythm. Those require the variations described above, appropriate instrument selection, and periodic gravimetric verification. Individual cases where pipetting outcomes affect patient samples, clinical reporting, or animal diagnosis require review by a qualified laboratory professional or veterinarian responsible for the results.
Frequently Asked Questions
What angle should I hold a pipette when aspirating?
Hold the pipette as close to vertical as possible, within a few degrees of perpendicular to the liquid surface, because manufacturer accuracy specifications assume vertical aspiration and tilt introduces systematic error.
How deep should the pipette tip go into the liquid?
Insert the tip 1 to 2 mm below the surface for a 2 to 10 microliter pipette, 2 to 3 mm for a P20 to P100, 2 to 4 mm for a P200 to P1000, and 3 to 6 mm for a 5 mL pipette, keeping the orifice off the vessel bottom and walls.
What happens if the tip is inserted too deep?
Hydrostatic pressure pushes liquid into the tip before aspiration, so you deliver too much volume, external wetting increases, and more residual film stays behind after dispensing.
What happens if the tip is too shallow?
The tip can lose contact with the liquid during the aspiration stroke, pulling air into the tip, so you deliver too little volume and often see bubbles.
Does angle matter when dispensing as well as aspirating?
Yes, but differently. Dispense with the tip orifice touching the angled inner wall of the receiving vessel, which uses surface tension to pull the liquid out completely, while keeping aspiration vertical.
How often should a pipette be calibrated?
Most laboratories schedule professional pipette calibration every 6 to 12 months depending on use and their quality system, with immediate recalibration after a drop, jam, or failed gravimetric check.
When should I use reverse pipetting?
Use reverse pipetting for viscous, foaming, or high-retention liquids, pressing to the second stop to aspirate and dispensing only to the first stop so the excess compensates for film left in the tip.
Why do I get bubbles in my pipette tip?
Bubbles usually come from releasing the plunger too fast, a damaged or poorly seated tip, or the orifice being too close to the vessel wall or surface during aspiration, and the fix is a slow plunger release with a fresh, centered tip at the correct depth.