Weekly Biosafety Maintenance: A Checklist
By Dr. Zubair Khalid, DVM, MS, PhD ·
A weekly biosafety checklist is a scheduled, documented sweep of the equipment, consumables, records, and practices that keep a microbiology laboratory contained. Run it every operating week, on the same day, and it catches the slow failures that daily work hides: a biosafety cabinet drifting toward its airflow limit, an incubator water pan turning cloudy with mold, a bleach working solution that lost its strength weeks ago, a training record that lapsed quietly in spring. The payoff is prevented exposure. Modeling of high-containment facilities shows that routine weekly screening for lab-acquired infections lowers the probability that a single unnoticed infection grows into a large outbreak, and that the benefit grows as the cadence tightens [1]. A year-long occupational hygiene program at a recombinant protein production plant made weekly monitoring the backbone of its biosafety verification and could demonstrate, with data, that containment held [2].
This article provides a weekly biosafety checklist laboratory teams can complete in under two hours, with the reason behind every task, the working concentrations of the disinfectants involved, the controls that prove a check actually worked, and fixes for the failures you will meet at the bench.
Time budget. Hands-on time is 60 to 90 minutes for a BSL-2 (biosafety level 2, the standard containment level for human clinical material and moderate-risk agents) microbiology suite of three to six rooms with one or two biosafety cabinets. Elapsed time runs about half a day, because the autoclave biological indicator incubates overnight before the week's record can close.
Why Weekly Biosafety Maintenance Matters
Containment rests on layers: elimination and substitution of hazards, engineering controls such as biosafety cabinets and autoclaves, administrative controls such as training and written procedures, and personal protective equipment (PPE). Each layer degrades silently. High-efficiency particulate air (HEPA) filters load with particles and change the pressure needed to move air through the cabinet. Door gaskets stiffen and crack. Disinfectant working dilutions lose strength in the bottle. Competency fades without use. None of these failures announces itself during normal work, which is why a scheduled verification pass exists.
Weekly biosafety maintenance is that verification pass. It sits between the daily habits (surface disinfection at the start and end of each session, point-of-use sharps disposal) and the annual deep verification (cabinet certification, autoclave calibration). One week is long enough for drift and expiry to become detectable and short enough that a detected failure rarely becomes an exposure.
The checklist also creates a record. A signed weekly log with actual gauge readings and test results is the document that shows a laboratory exercised due diligence, and it is the first thing an incident review will request. The interferon plant study cited above built exactly this kind of record, sampling weekly for a full year so that any later question about containment had a documented answer [2].
What Gets Checked Daily, Weekly, and Annually
Weekly maintenance works only when it is slotted into a sensible schedule. The table below reflects common practice in clinical and research microbiology laboratories. Your institutional biosafety manual and the manufacturer documentation for each instrument set the binding intervals for your facility.
| Interval | Typical tasks |
|---|---|
| , - | , - |
| Daily | Disinfect the biosafety cabinet work surface before and after use, verify the airflow indicator before work, dispose of sharps at the point of use, wipe benches after each session |
| Weekly | The full checklist in this article |
| Monthly | Fire extinguisher visual check, freezer inventory reconciliation, deep clean of any water bath not covered weekly |
| Quarterly | Rotate deep cleaning of hard-to-reach areas, review open corrective actions from prior weeks |
| Annually | Biosafety cabinet certification, autoclave calibration and safety inspection, reference thermometer recertification, full biosafety risk assessment review |
Materials and Reagents
| Item | Working concentration or specification | Purpose | Handling notes |
|---|---|---|---|
| , - | , - | , - | , - |
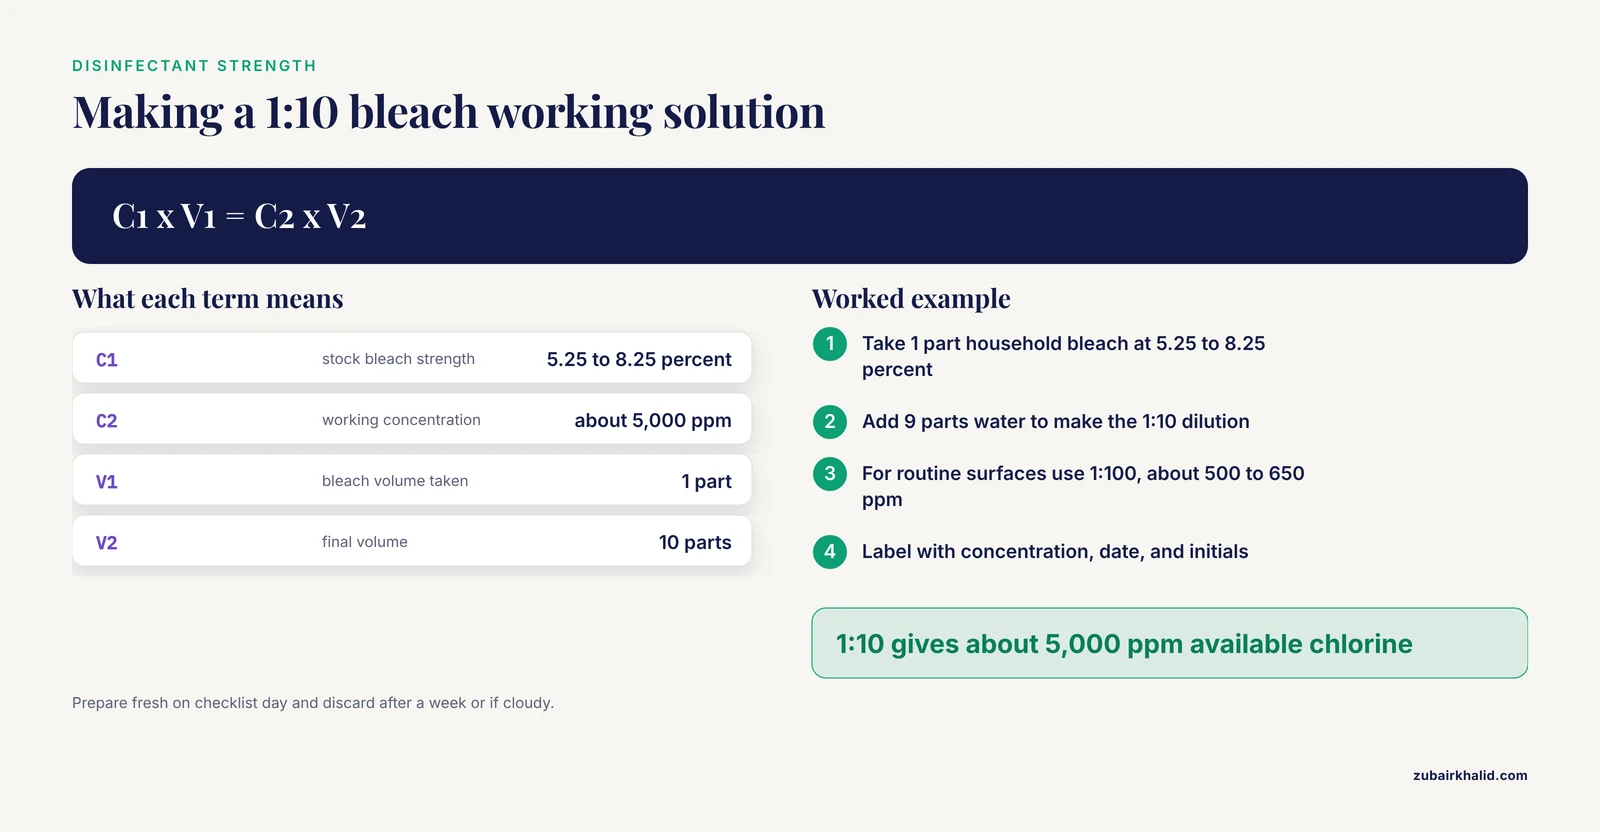
| Sodium hypochlorite (household bleach, US-typical 5.25 to 8.25 percent) | 1:10 dilution (about 5,000 ppm available chlorine) for high-risk areas, 1:100 dilution (about 500 to 650 ppm) for routine weekly surfaces, prepared fresh | General surface and equipment disinfection | Corrosive to stainless steel with prolonged contact. Rinse or wipe with 70 percent alcohol after the contact time. Never mix with acids or ammonia. |
| Ethanol or isopropanol, 70 percent (v/v, volume per volume) | 70 percent in water | Wipe-downs, small items, bleach residue removal | Flammable. Store in a flammable cabinet. Poor activity against spores. |
| Quaternary ammonium disinfectant (quat, a cationic surface disinfectant) | Per the label dilution | Routine surfaces where bleach corrosion is a concern | Weakened by organic load and hard water. Verify strength with quat test strips if available. |
| pH-neutral detergent | Per the label | Pre-cleaning before disinfection | Removes the organic film that otherwise neutralizes disinfectants. |
| Biological indicator (BI) | Geobacillus stearothermophilus, 10^6 spores per strip or self-contained ampoule | Weekly autoclave sterility check | Check the expiry date. Incubate with a positive control. |
| Chemical indicators | Type matched to the cycle | Each-load verification that cycle conditions were reached | Supplements, never replaces, the BI. |
| Certified reference thermometer | Calibrated within the past year | Incubator and refrigerator temperature verification | Ice-point check weekly. |
| Chlorine test strips | Range matched to your dilution | Verifying bleach working solution strength | Keep dry, check expiry. |
| PPE | Fluid-resistant lab coat, nitrile gloves, safety glasses | Protection during cleaning | Change gloves between contaminated zones. |
| Spill kit | Absorbent material, fresh disinfectant, forceps, dustpan, biohazard bags, spare PPE | Immediate spill response | Verify contents and disinfectant date weekly. |
| Log binder or digital checklist | Timestamped fields with initials | Documentation | Retain per institutional policy. |
Safety note. Hypochlorite releases chlorine gas on contact with acids and chloramine gas on contact with ammonia or amines. Ventilate while mixing and never combine disinfectants in one container. 70 percent alcohol is flammable, so keep it away from open flames and Bunsen burners, and store stock in a flammable cabinet.
Weekly Biosafety Checklist Laboratory Walk-Through, Step by Step
The procedure below is organized by zone. Complete the zones in any order, but finish with the paperwork zone so that findings from the walk-through are captured in the record. Each step states the reason, because a checklist without reasons gets performed on autopilot.
Zone 0: Prepare (5 minutes)
- Pull last week's completed checklist and the incident log. Read any spills, exposures, malfunctions, or complaints recorded during the week. Reason: this week's failures tell you where to look harder today.
- Put on PPE. Fluid-resistant lab coat, nitrile gloves, safety glasses. Reason: you will handle disinfectants and surfaces that may carry contamination.
- Confirm your working disinfectants are fresh and labeled. Bleach diluted today or within the week, labeled with concentration, date, and initials. Reason: hypochlorite loses activity in storage, and an unlabeled bottle is a guess you cannot defend.
Zone 1: Biosafety Cabinets (15 minutes per cabinet)
- Read the differential pressure gauge (commonly called a magnehelic gauge) with the cabinet running. Compare the reading to the range written on the certification sticker and log the number. Reason: the gauge is your only weekly window into the HEPA filter and blower. A reading drifting toward the edge of the range predicts filter loading before it becomes a containment failure.
- Check the certification sticker date. If the cabinet passed certification more than 11 months ago, schedule recertification now. Reason: annual certification is the standard, and certifier lead times run weeks.
- Empty the cabinet completely. Nothing is stored inside, including pipette cans and reagent boxes. Reason: stored items disrupt the laminar airflow and shadow surfaces from disinfection.
- Run the blower 5 minutes, then decontaminate. Wipe the ceiling, sidewalls, work surface, and interior glass with detergent, then apply disinfectant for its labeled contact time (about 10 minutes for hypochlorite), then wipe with water or 70 percent alcohol to remove chlorine residue. Where the manual allows, lift the work surface and clean the drain pan beneath. Reason: detergent removes the organic film that would neutralize the disinfectant, and rinsing prevents pitting corrosion of stainless steel.
- Check the drain pan and drain valve. Verify the pan is dry and close the valve. Reason: standing fluid breeds contamination and can aerosolize during work.
- If a UV lamp is fitted, record the hours, wipe the lamp sleeve with alcohol, and test the interlock. Reason: UV output falls with lamp age and with film on the sleeve, and UV disinfects only line-of-sight surfaces. It supplements chemical disinfection and never replaces it.
Safety note. Never operate a UV lamp while anyone is in the room, and never look directly at an operating lamp. UV damages skin and eyes.
Zone 2: Incubators, Refrigerators, and Freezers (15 minutes)
- Verify each incubator display against the certified reference thermometer. Place the reference on a middle shelf for at least 15 minutes, then log both readings. Bacteriology incubators are typically held at 35 C or 37 C within about 1 C. Reason: displays drift, and media performance depends on true temperature, not the number on the panel.
- Check the humidity water pan in CO2 incubators. Top up with distilled water only, and look for film, cloudiness, or fungal spots. Clean and refill if fouled. Reason: warm stagnant water is a reservoir for fungi and opportunistic bacteria that then contaminate cultures.
- Check CO2 cylinder pressure and log it. Reason: a near-empty cylinder discovered mid-culture is a failed experiment, and low CO2 silently shifts medium pH.
- Review refrigerator and freezer temperature logs for the week and investigate any excursion. Discard unlabeled material per policy. Reason: unlabelled material is a disposal hazard and an inventory risk, and an unexplained excursion can invalidate a week of work.
Zone 3: Autoclave and Sterilization (20 minutes)
- With the chamber cool and at zero pressure, remove and clean the drain strainer. Inspect the door gasket for cracks or debris. Reason: a clogged strainer causes wet loads and poor steam contact, and a leaking gasket prevents the cycle from reaching pressure.
- Wipe the chamber interior, shelves, and door face. Reason: residue and spilled media insulate organisms from steam.
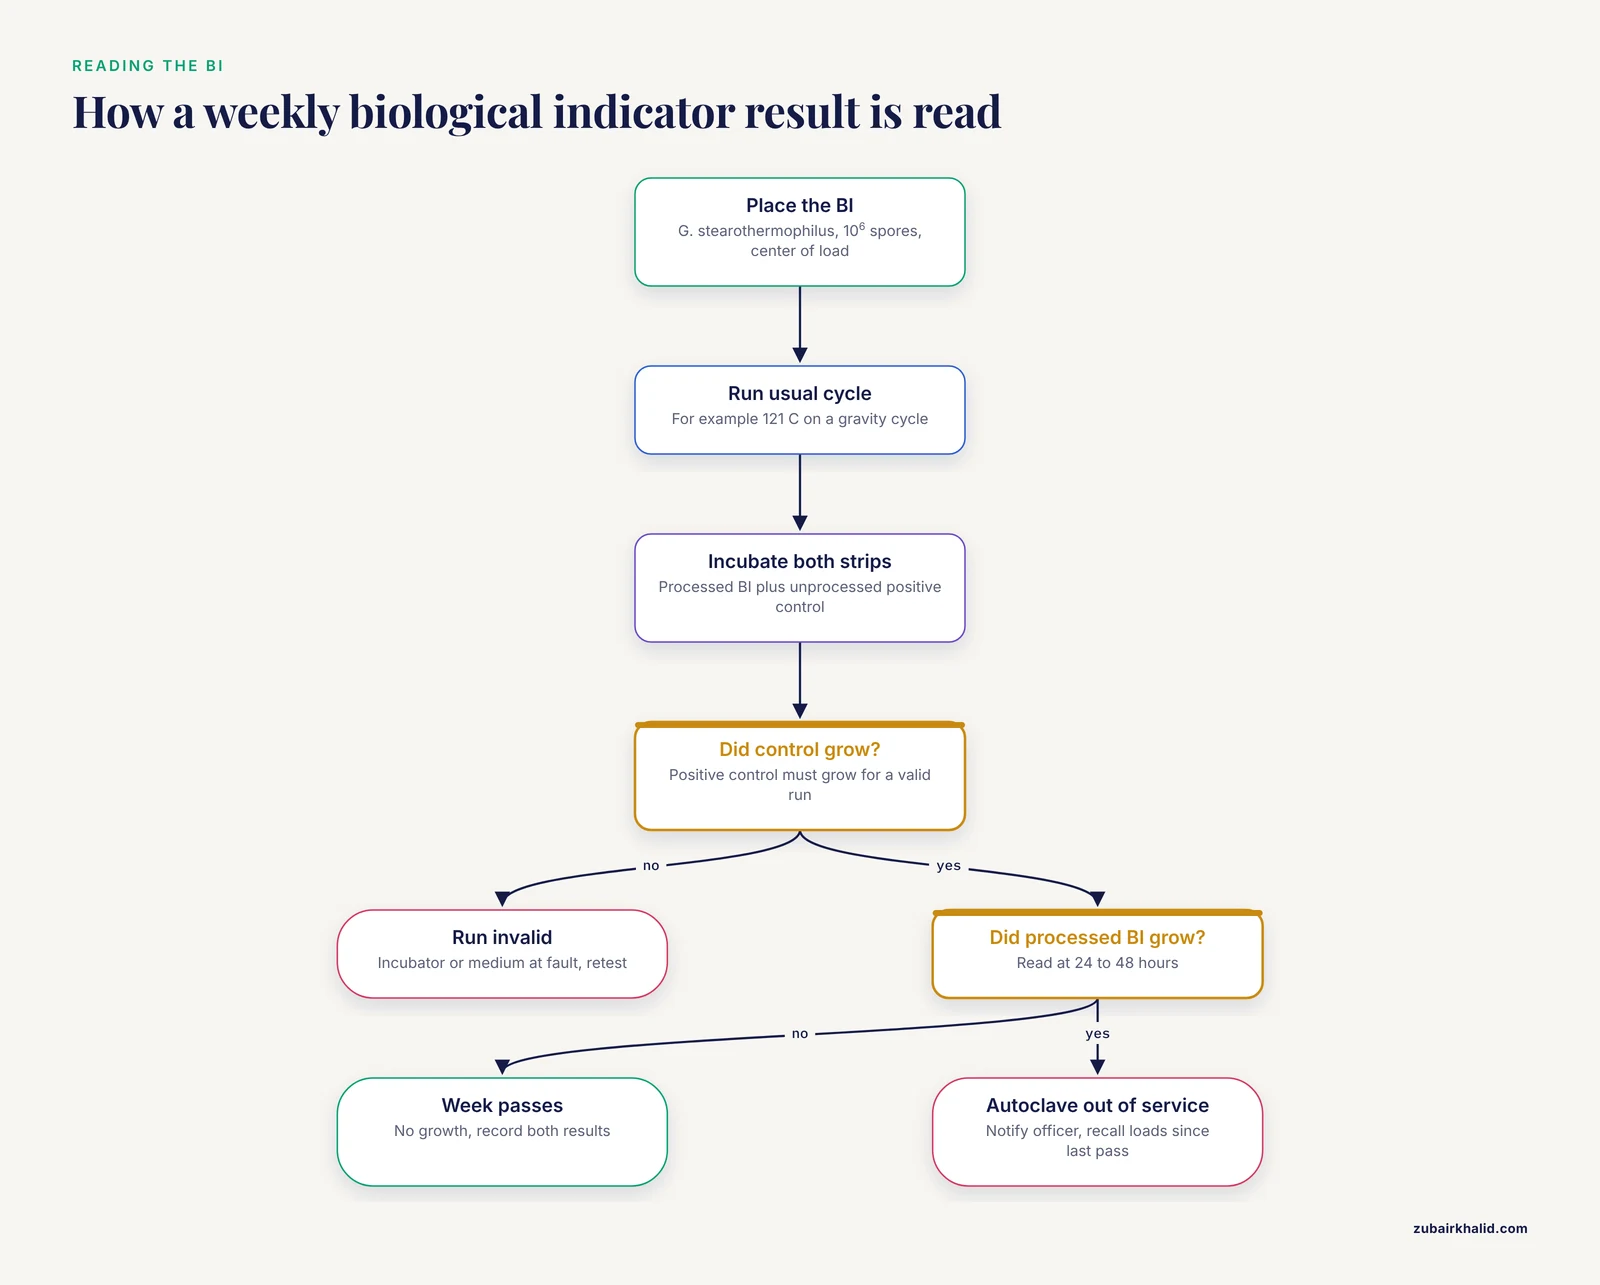
- Run a biological indicator with a representative load. Place a G. stearothermophilus BI (10^6 spores) in the center of a normal load and run the usual cycle, for example 121 C on a gravity cycle. Place chemical indicators in the load as well. For vacuum-assisted cycles, run an air-removal (Bowie-Dick type) test per your schedule. Reason: chemical indicators show that conditions were reached, and the BI proves those conditions killed bacterial spores, which is the practical definition of sterility assurance.
- Incubate the processed BI and an unprocessed positive-control strip per the manufacturer's instructions, commonly 55 to 60 C with results read at 24 to 48 hours for rapid systems. Record both results. Reason: the positive control proves the incubator and medium work. A BI without a positive control is uninterpretable.
Safety note. Confirm the chamber pressure reads zero before opening, wear heat-resistant gloves, and stand behind the door as you crack it open to avoid scalding steam.
Zone 4: Centrifuges, Water Baths, and Bench Equipment (10 minutes)
- Open each centrifuge and inspect the rotor, buckets, and lids for cracks, pitting, or corrosion. Check the O-rings on aerosol-tight (sealed) buckets and lids, and re-grease per the manual. Wipe the chamber with disinfectant, then rinse and dry. Reason: damaged rotors fail catastrophically, and degraded O-rings turn a spill into an aerosol.
- Check water baths for level, cleanliness, and biocide. Reason: warm water supports bacterial and fungal growth that contaminates anything dipped into it.
- Wipe down microscope stages, staining racks, and bench edges. Reason: the weekly deep clean catches the drips that daily wipe-downs miss.
Zone 5: Waste, Sharps, and Spill Readiness (10 minutes)
- Replace any sharps container past three-quarters full. Reason: overfilled containers are the classic setup for needlestick injuries during disposal.
- Verify the week's waste treatment logs are complete and signed. Confirm biohazard bags are closed, not overfilled, and sitting in rigid secondary containment. Reason: the log is the record that waste left your laboratory decontaminated.
- Inventory the spill kit. Absorbent material present, disinfectant fresh and dated, forceps and dustpan present, biohazard bags and spare PPE stocked. Reason: a spill kit with expired disinfectant is decoration.
- Flush each eyewash station until the water runs clear and both streams are even, typically a minute or two. Wipe the nozzles, replace the dust covers, and log the flush. Reason: weekly activation clears rust, sediment, and microbial slime from the lines, and confirms the device works before you need it.
Zone 6: People, Records, and Risk Assessment (10 minutes)
- Verify that every person who worked in the suite this week holds current microbiology biosafety training. Reason: training lapses stay invisible until an incident review finds them.
- Confirm occupational health screening is current for the suite's workers, per institutional policy. Reason: regular screening for lab-acquired infections is the personnel-side mirror of equipment verification, and the evidence for a weekly cadence is covered in the section below.
- Check that any new agent, protocol, or instrument introduced this week has a documented biosafety risk assessment, and flag changes to the biosafety officer. Confirm that biohazard signage and the emergency contact sheet are posted and current. Reason: new work under an old checklist is how gaps appear.
- Sign and date the checklist, and escalate every failed item the same day. Reason: an unsigned checklist is a gap in the record, and a failed item that waits for Monday is a week of exposure risk.
Controls, Expected Results, and How to Read Them
A weekly check only counts if it can fail. These controls make the checklist self-verifying.
Biological indicator controls. Incubate an unprocessed strip or ampoule from the same lot alongside the processed one. The unprocessed positive control must grow, and the processed BI must not. In many self-contained systems, no growth leaves the medium purple and clear, while growth turns it yellow and turbid. Read your product insert, because color schemes vary. If the positive control fails to grow, the run is invalid regardless of the processed result, and the incubator or medium is at fault.
Reference thermometer control. Perform an ice-point check weekly by placing the reference thermometer in a slurry of crushed ice and distilled water. It should read 0 C within its stated tolerance. A reference that fails the ice point invalidates every temperature reading taken with it that week.
Gauge control. The certification sticker is the control value for the cabinet airflow gauge. The weekly reading means nothing until you compare it to that range.
Load controls. Chemical indicators in every autoclave load confirm that temperature and steam conditions were reached. They respond faster than a BI but do not prove spore kill.
Expected results for a passing week. All gauge readings inside the sticker range, all incubators and refrigerators at setpoint with no unexplained excursions, processed BI showing no growth with a growing positive control, chemical indicators showing a pass, eyewash flowing clear, spill kit complete, sharps containers below three-quarters, waste logs signed, training records current, and the form signed and dated.
How to read a failure. A growing processed BI means the autoclave goes out of service immediately. Notify the biosafety officer, retest, and recall or re-sterilize everything processed since the last passing result. A gauge reading outside the sticker range means the cabinet comes off open-bench infectious work until it is certified. A temperature excursion means the affected cultures are quarantined until someone judges whether they were compromised. Failures are findings, not embarrassments. The checklist exists to find them on your schedule rather than during an incident.
Troubleshooting Weekly Biosafety Failures
| Symptom | Likely cause | Fix |
|---|---|---|
| , - | , - | , - |
| Airflow gauge reading below the sticker range | HEPA filter loading or blower wear | Stop open-infectious work in the cabinet, schedule certification or service |
| Airflow gauge reading above the range | Stuck gauge or a recent filter change | Verify with an airflow measurement at the next certification, replace the gauge if it is stuck |
| Processed biological indicator grows | Cycle did not reach parameters, load packed too dense, chamber scale, expired indicator | Pull the autoclave from service, retest with a reduced load, service the unit, recall loads since the last pass |
| Incubator reads 1 to 2 C above setpoint | Door seal leak, overloaded shelves, thermostat drift | Check the gasket, reduce load density, recalibrate against the reference thermometer |
| Repeated fungal growth in the CO2 water pan | Stagnant water or a contaminated top-up bottle | Use distilled water only, add the recommended treatment, shorten the cleaning interval |
| Stainless steel pitting under the disinfectant | Bleach left on too long, or residues mixing | Keep contact time at the label interval, rinse with water or 70 percent alcohol after contact |
| Wet loads from the autoclave | Clogged drain strainer, tight packing, cold start | Clean the strainer weekly, space the load, allow full preheat |
| Weak or sputtering eyewash flow | Sediment or scaling in the line | Flush longer each week, schedule plumbing service if it persists |
| Working disinfectant strength unknown | Unlabeled or expired bottle | Discard, prepare fresh, label with concentration, date, and initials |
| Checklist items skipped week after week | No named owner, no calendar anchor | Assign a named owner each week, anchor the task to the same weekday, audit signatures monthly |
Variations by Laboratory Type
BSL-3 and containment suites. Add verification of directional airflow and pressure differential readings against the facility manual, alarm function tests, and the facility's own decontamination schedule for the room itself. Documentation expectations rise with the containment level, and the weekly form usually becomes a daily form for pressure readings. Fumigation-level decontamination of a cabinet or room is a trained-personnel task and never a routine weekly item.
Teaching laboratories. Schedule the deep clean at the end of the week, after the last student session, so the suite sits clean over the weekend. Verify student and teaching-assistant training records weekly during teaching terms, because turnover is constant.
Shared core facilities. Put a named weekly owner on a posted rotation, keep the logbook at the entrance, and have the facility manager countersign. Shared spaces fail when everyone assumes someone else checked.
Small laboratories. A condensed 30-minute version covers the five non-negotiables: cabinet gauge and interior, incubator temperature and water pan, sharps and waste, spill kit, and eyewash. Expand back to the full checklist whenever the lab introduces a new agent or protocol.
Labs working with spore-formers or mycobacteria. Weight the disinfectant choices toward hypochlorite with verified contact times, because alcohol does not kill spores and its activity against mycobacteria is slower than against vegetative bacteria. The weekly checklist should verify that the right agent, not just any agent, is stocked at the bench.
Product and device testing laboratories. Some labs carry their own weekly sampling obligations from study protocols, such as scheduled specimen collection for stability or leak testing. Fold those sampling dates into the same weekly form so that a missed study sample surfaces as a failed checklist line rather than a surprise at analysis time.
Storage and Stability Notes
Bleach working solution. Prepare fresh on checklist day at the latest. Store in an opaque, labeled bottle, cool and away from sunlight, and discard after a week or immediately if the solution turns cloudy. Date stock bottles when opened, because stock hypochlorite also degrades, faster in heat.
70 percent alcohol. Store stock in a flammable cabinet with containers tightly closed. Check the level weekly, because an evaporating stock drifts away from 70 percent and its label.
Quat working solutions. Label each bottle with the dilution and preparation date, and follow the label's efficacy window. Some quat dilutions lose activity within days.
Biological indicators. Store per the label, usually at room temperature away from heat and moisture. Check expiry dates during the weekly restock, and never use an ampoule with discolored medium.
Test strips. Keep chlorine and quat strips sealed and dry, and check expiry. A strip in a damp drawer reads whatever the dampness tells it.
Reference thermometer. Store it in its protective case, separate from bench work, and send it for recertification on the annual schedule.
Records. Retain completed checklists per your institution's record retention policy, filed where a reviewer or inspector can retrieve them without archaeology.
Weekly Biosafety Checklist Tips from the Bench
- Anchor the checklist to the same weekday and time. Wednesday morning works well in most labs, after the busy Monday-Tuesday push and before the week closes.
- Walk the suite with a second person. Two sets of eyes catch more, and the discussion between you is where "we should also check" ideas surface.
- Photograph the gauges. A phone photo of the airflow gauge and incubator displays, attached to the digital log, settles any later dispute about what the reading was.
- Keep a fix-it column. Small defects (a stiff hinge, a faded label) go on the list with an owner and a date, so they get fixed before they become failures.
- Do the ice-point check first. If your reference thermometer is wrong, every temperature you record after it is wrong too.
- Pair the checklist with restocking. Check spore strips, disinfectant stock, gloves, and biohazard bags while you walk, so consumables never run out mid-week.
- Never sign in advance. A pre-signed form is worse than no form, because it converts a safety record into a fiction.
- Keep the form where the work happens. A checklist in an office drawer gets skipped. A clipboard or tablet at the suite entrance gets used.
Personnel Screening and Microbiology Biosafety Training
The weekly checklist verifies people as well as equipment, through two line items: training currency and occupational health screening.
The screening evidence is worth understanding. A 2026 modeling study simulated high-biosafety research facilities in which an initial lab-acquired infection (LAI, an infection acquired through laboratory work) had occurred, and asked how routine staff screening changes the probability of a large outbreak, defined as 50 or more infections, over a 100-day horizon. The model ran 1,000 simulations for each of 192 combinations of test frequency (0 to 7 tests per week), peak test sensitivity (50 to 100 percent), and isolation delay (0 to 3 days). Once-weekly testing cut the modeled outbreak risk by 52 percent under optimistic assumptions (80 percent sensitivity, 1-day isolation delay) and by 29 percent under pessimistic assumptions (50 percent sensitivity, 2-day delay). Screening two and five times per week raised those reductions to 62 and 71 percent under optimistic assumptions and 43 and 55 percent under pessimistic assumptions, and logistic regression showed that each additional weekly test further lowered risk [1].
The practical precedent is older. A one-year occupational hygiene study at a plant producing recombinant interferon alpha-2a collected weekly stool samples from employees and tested them for tetracycline-resistant coliforms (a marker of resistance transfer into gut bacteria), the production organism, and the recombinant DNA (rDNA), using polymerase chain reaction (PCR) among other methods. Neither the rDNA nor the production organism appeared in any sample, gut flora showed no shift toward tetracycline resistance, blood tests found no antibodies against the product, and the production process itself inactivated both the resistance gene and the rDNA [2].
Most BSL-2 laboratories will not sample stool weekly, and the checklist does not ask them to. The line item is narrower: verify that whatever screening and occupational health actions your own biosafety risk assessment requires are current for every person who worked in the suite this week. The deeper point from both studies stands. A weekly cadence of verification, applied consistently and documented, changes outcomes, and it produces the record that proves it.
Biosafety Risk Assessment and the Weekly Checklist
The biosafety risk assessment is the document that decides what your checklist must cover. It identifies the agents you work with, the procedures that could release them, the volumes and concentrations involved, the routes of exposure, and the competencies required. Every line on the weekly form should trace back to a control named in that assessment: the cabinet airflow line traces to the engineering controls, the training line traces to the administrative controls, the spill kit line traces to the response plan.
The interferon plant study shows the translation from assessment to schedule. Its risk assessment identified the release pathways that mattered, shedding of the production organism and transfer of resistance markers, and converted them into defined weekly monitoring with defined endpoints and defined pass criteria, weekly stool testing by PCR with no detectable organism or rDNA and no trend in resistance [2]. Your checklist should trace to your assessment the same way, with a named test, a named frequency, and a named pass criterion for each risk.
Treat the weekly form as a trigger for reassessment as well as a verification. Any new agent, new protocol, new instrument, incident, or near miss during the week means the assessment gets updated before the next checklist runs. Findings from the checklist feed the annual assessment review, closing the loop.
Common Mistakes and Limitations
Common mistakes.
- Signing without walking. A form completed from memory is a guess with a signature. The two-person walk-through and photo logs exist to prevent this.
- Skipping the detergent pre-clean. Disinfectants are neutralized by organic load. Wiping a dirty surface with bleach disinfects the dirt, not the surface.
- Leaving bleach on stainless steel. Hypochlorite pits stainless steel with prolonged contact. Respect the contact time, then rinse or wipe with alcohol.
- Using alcohol for everything. 70 percent alcohol is a fine wipe-down agent and a poor choice against spores. Match the agent to the agent, so to speak.
- Storing clutter inside the biosafety cabinet. Boxes and pipette cans wreck the airflow pattern and shadow surfaces from disinfection.
- Ignoring a drifting gauge. A reading still inside the range but trending toward the edge is a warning. Schedule certification rather than waiting for the line to be crossed.
- Overfilled sharps containers. The three-quarter rule exists because disposal injuries happen at the rim.
- Packing autoclave loads tight. Steam cannot penetrate a dense mass, and the chemical indicator on the outside of the pack will not tell you.
- Forgetting the BI incubator. A positive control that fails to grow invalidates the run. Check the incubator temperature as part of the weekly form.
- Treating UV as disinfection. UV misses shadowed surfaces and loses output with age. Chemical disinfection does the work.
Limitations. A weekly checklist is a snapshot, not a guarantee. It samples one moment in the week, it does not replace daily work practices, and it does not replace annual certification or the risk assessment itself. A passing biological indicator reflects the tested load, not every item processed since the last test. Screening and maintenance reduce risk, they do not erase it, and even favorable modeling assumptions leave residual risk on the table [1]. And an actual exposure or suspected exposure is an individual medical event that needs occupational health evaluation the same day, not a checklist entry.
Frequently Asked Questions
What should a weekly biosafety checklist in a laboratory include?
A complete weekly checklist covers biosafety cabinets, incubators, refrigerators and freezers, the autoclave with a biological indicator, centrifuges and water baths, sharps and biohazard waste, the spill kit, eyewash stations, training records, and any new protocols that need a risk assessment. Each item gets a reading or a yes-or-no result, a date, and initials.
How long does weekly biosafety maintenance take?
Plan 60 to 90 minutes of hands-on time for a three to six room BSL-2 suite, plus passive time while the biological indicator incubates overnight. Small laboratories can run a condensed 30-minute version covering the five non-negotiables: cabinet, incubator, sharps and waste, spill kit, and eyewash.
Which disinfectant should I use for weekly laboratory biosafety cleaning?
Use a detergent first, then a disinfectant matched to your agents. A fresh 1:10 dilution of household bleach (about 5,000 ppm available chlorine) suits high-risk areas, a 1:100 dilution (about 500 to 650 ppm) suits routine surfaces, and 70 percent alcohol works for wipe-downs but not spores. Rinse bleach off stainless steel to prevent corrosion.
What do I check weekly on a biosafety cabinet between certifications?
Check the airflow gauge against the range on the certification sticker, confirm the sticker date, empty the cabinet of stored items, and clean the interior including the drain pan. Certification itself remains an annual task.
What should I do if the weekly autoclave biological indicator grows?
Take the autoclave out of service immediately, notify the biosafety officer, and retest. Recall or re-sterilize everything processed since the last passing result, and have the unit serviced before it returns to use.
Is weekly biosafety maintenance required in a BSL-2 laboratory?
Weekly maintenance is standard practice in BSL-2 microbiology laboratories even where binding rules only mandate annual certification, because filters, gaskets, disinfectants, and training all drift within a single year. Your institutional biosafety manual sets the requirements for your facility.
How does the weekly checklist connect to biosafety risk assessment and training?
The risk assessment decides what your checklist must cover, and the checklist verifies that those controls still work. The weekly training check confirms everyone working in the suite holds current microbiology biosafety training, and any new agent or protocol triggers a fresh risk assessment before the checklist can cover it.
Who should complete and sign the weekly biosafety checklist?
A named, trained member of the laboratory completes it, and the supervisor or biosafety officer countersigns and reviews any failures. Rotating the task through the staff builds skills, but every signer must have been trained on the checklist itself.