How Often to Clean a Rat Habitat: Cleaning Schedule
By Dr. Zubair Khalid, DVM, MS, PhD ·

Clean a rat habitat on three overlapping schedules. Remove droppings and wet spots every day, replace bedding and wash surfaces at least once a week, and perform a full deep clean of the entire enclosure, accessories, and cage furniture every three to four weeks. Adjust that baseline upward if you keep a large group of rats, if your enclosure is small, or if any rat is sick, elderly, or recovering from surgery.
Pet rats are clean animals that groom themselves carefully, but the habitat they live in accumulates urine, feces, food debris, and ammonia from soiled bedding faster than most owners expect. Poor rat habitat hygiene is one of the most preventable contributors to respiratory irritation and skin problems in this species. A predictable rat cage cleaning schedule protects your rats and makes the work easier for you, because small frequent tasks are simpler than one exhausting overhaul every two months.
This article walks through what to do each day, each week, and each month, which cleaning products are safe around pet rats, how to deep clean a rat enclosure without erasing the familiar scent profile your rats rely on, and the warning signs that mean it is time to call your veterinarian.
Rat Habitat Cleaning at a Glance
Use this checklist as your working schedule. Rats are social animals that do best in groups, so assume the habitat holds more than one rat and scale your effort accordingly.
| Frequency | Task | Time needed |
|---|---|---|
| Daily | Remove droppings, uneaten fresh food, and visibly wet bedding | 5 minutes |
| Daily | Refresh water and wipe the bottle spout | 2 minutes |
| Daily | Quick visual health check of each rat | 2 minutes |
| Every 2 to 3 days | Stir or top up bedding in high-traffic corners, swap soiled hammocks | 10 minutes |
| Weekly | Remove all bedding, wash the cage base and solid surfaces, replace substrate | 30 to 45 minutes |
| Weekly | Wash fabric items, tunnels, and heavily used accessories | 15 minutes |
| Every 3 to 4 weeks | Full deep clean of the enclosure, all accessories, and cage structure | 1 to 2 hours |
| Monthly | Inspect the cage for damage, worn plastic, sharp edges, and loose parts | 10 minutes |
Why Rat Habitat Hygiene Matters
Rats spend their lives in close contact with their bedding. They dig in it, burrow through it, sleep in it, and eat in the same space. When bedding saturates with urine, urea breaks down into ammonia, which accumulates in the warm, still air of an enclosed cage. Ammonia irritates the respiratory tract, and rats are already prone to respiratory disease, so a dirty cage works directly against their most vulnerable body system.
A long-term study of health monitoring in a rodent facility describes how subclinical infections can remain unnoticed while influencing animal physiology and colony management, and how husbandry and hygiene practices form part of the framework that keeps animals healthy [1]. The same principle applies in the home. A rat can carry low-grade respiratory or skin pathogens without obvious signs, and a habitat that stays damp and soiled gives those organisms the conditions they need to multiply. Hygiene is not cosmetic. It is preventive medicine you perform with a scoop and a spray bottle.
Welfare research on pet rats also shows why cleaning discipline matters at home. A survey of 677 UK pet rat owners documented a generally high prevalence of disease in the pet rat population and identified husbandry gaps, including uncertainty about whether rats had adequate nesting substrate [2]. Clean, appropriate bedding is part of the answer to both problems, because substrate quality depends on how often it is refreshed.
Finally, routine handling during cleaning gives you structured contact with every rat. Husbandry guidance for rodent care emphasizes clean water, hygiene, enrichment, and monitoring of health indicators such as weight, coat condition, hydration, and activity [3]. Your daily scoop-and-check routine is the single best early-warning system for illness in a species that hides disease well.
Your Daily Rat Cage Cleaning Routine
Daily cleaning takes less than ten minutes and does most of the heavy lifting for odor control and respiratory health.
- Scoop soiled spots. Rats usually urinate and defecate in one or two preferred corners. Lift out that bedding with a small scoop or an old spoon, plus any visibly wet or clumped material elsewhere in the cage.
- Remove fresh food remnants. Spoiling vegetables, fruit, and cooked foods grow bacteria within hours and attract flies. Take leftovers out within a few hours of feeding.
- Refresh water. Empty and refill the bottle or bowl. Check the spout on water bottles, because biofilm builds there quickly and can clog the valve. A bottle brush dedicated to this job helps.
- Wipe feeding areas. A quick wipe of the food dish area with plain warm water keeps dried food and grease from accumulating.
- Do a visual check. While the rats investigate the scoop, look at each one. Watch breathing effort, note any porphyrin staining around the eyes or nose, check that each rat moves normally, and confirm everyone comes for food. Rats that sit fluffed in a corner during your routine need closer examination.
Daily cleaning should be non-disruptive. Leave familiar scent markers in place, keep the routine at the same time of day, and let the rats climb on your hands and the scoop. Many rats treat cleaning time as playtime with their owner.
The Weekly Rat Cage Cleaning Schedule
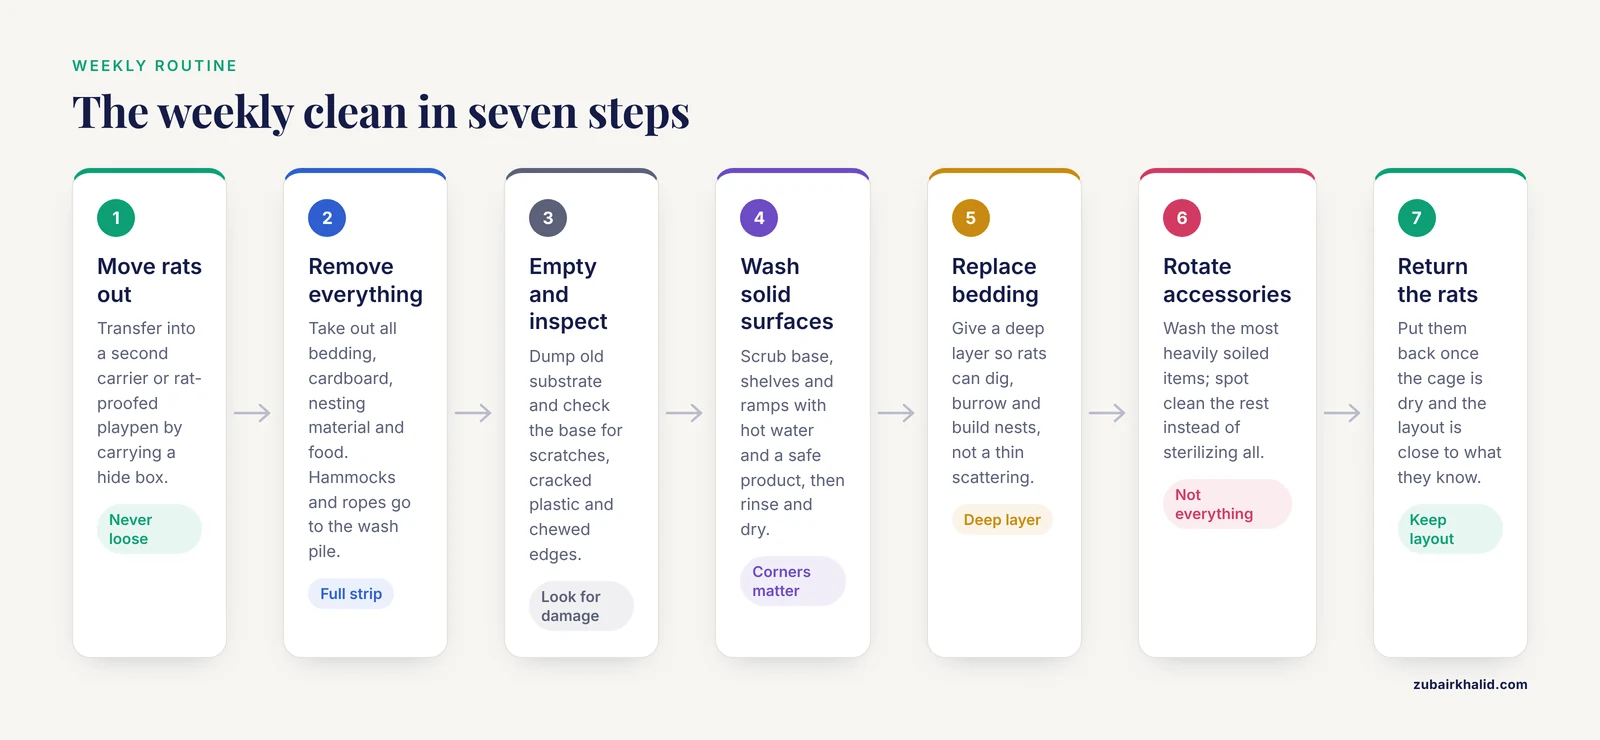
The weekly clean is the core of rat habitat hygiene. Once a week, replace the bedding in the whole enclosure and wash the hard surfaces.
Step 1. Move the rats to a safe temporary space. Use a second carrier or a rat-proofed playpen. Never clean around loose rats in an open room, because a startled rat can bolt, fall, or escape. Transfer them by encouraging them into a hide box or tunnel and carrying the box itself, which is less stressful than grabbing.
Step 2. Remove everything. Take out all bedding, cardboard, nesting material, and food. Fabric hammocks and ropes go into the wash pile.
Step 3. Empty and inspect. Dump the old substrate completely. Look at the cage base for scratches, cracked plastic, and chewed edges. Smooth or replace damaged surfaces, because rough plastic traps urine and bacteria and can injure feet.
Step 4. Wash solid surfaces. Scrub the cage base, shelves, and ramps with hot water and a safe cleaning product, then rinse thoroughly and dry. Pay attention to corners where urine crystals form.
Step 5. Replace bedding generously. Pet rat housing guidelines developed through expert consultation emphasize that suitable substrate and refuges are core features of good pet rat housing [4]. Provide enough bedding for the rats to dig, burrow, and build nests, which is a natural behavior, not a luxury. A thin scattering of shavings over the floor does not meet that need. Aim for a deep layer across at least part of the enclosure.
Step 6. Rotate rather than sterilize everything. Wash the most heavily soiled accessories each week. Heavily scented or minimally soiled items can simply be spot cleaned. Full sterilization of every object every week is unnecessary and, as discussed below, may add stress.
Step 7. Return the rats. Put the rats back once the cage is dry and the furniture is arranged. Keeping the general layout consistent, with small changes rather than total rearrangement, helps rats settle quickly.
Working around litter habits
Many rats can be trained to use a litter pan in one corner, which concentrates waste and stretches the interval between full bedding changes. Place the pan where the rats have already chosen to go, add a small amount of used bedding to seed it with their scent, and reward use with a food treat. With a successful litter pan, some owners can go ten days between full changes, though the pan itself needs emptying every day or two.
Deep Cleaning a Rat Enclosure
Every three to four weeks, go beyond the weekly routine with a full deep clean. Deep cleaning a rat enclosure means every component comes out, every surface is washed, and the structure itself is disinfected and dried.
What deep cleaning includes:
- Full disassembly of shelves, ramps, ladders, and hammock attachments so you can reach hidden corners
- Scrubbing of all plastic, metal, and ceramic accessories with hot water and detergent, followed by thorough rinsing
- Washing of all fabric items, including hammocks, sputnik liners, fleece blankets, and fabric hide tubes, and complete drying before reuse to prevent damp-related skin problems
- Cleaning of the exterior of the cage, the stand, and the surrounding floor, where dropped food and bedding accumulate
- Checking bottle nozzles, latches, and doors for wear
A note on disinfecting. After washing with detergent, you can disinfect hard, nonporous surfaces with a diluted, unscented household bleach solution or a small-animal-safe disinfectant from a pet supplier. If you use bleach, the sequence matters: clean first, apply disinfectant, allow adequate contact time, then rinse with clean water multiple times and let the surface air dry completely. Any chemical residue left on a surface a rat walks on, chews, or sleeps against can harm them. When in doubt, an extra rinse costs nothing.
What deep cleaning should not include. Do not strip the habitat so thoroughly that it loses every familiar cue. Rats navigate partly by scent, and research on rodent husbandry shows that animal-origin scents carry information that affects rodent behavior and physiology, which is why laboratory facilities manage scent transfer during routine care [5]. Practical translation for pet owners: keep one or two unwashed items in the habitat through a deep clean, or return a small pinch of the previous clean bedding, so the rats recognize their home. This is the single most common reason owners report post-cleaning tension, squabbling, or hiding in a freshly scrubbed cage.
Safe Cleaning Products for Pet Rats
Rats have sensitive respiratory tracts and they explore the world with their mouths and noses, so product selection is a genuine safety decision, not a preference.
Reasonably safe choices:
- Diluted unscented dish soap or castile soap for routine washing of hard surfaces, followed by thorough rinsing
- White vinegar diluted with water for dissolving urine scale and mineral deposits on cage bases and bottles, followed by rinsing
- Unscented, pet-label cleaning sprays formulated for small animal cages, used according to label directions
- Diluted unscented bleach for disinfection only, with full rinsing and complete drying before the rats return
- Plain hot water and elbow grease for most weekly work, which is safer than any chemical
Products to avoid:
- Scented cleaners, heavily perfumed soaps, and essential oil products. Strong fragrances linger on surfaces and in the air, and the olfactory sensitivity of rodents means these residues are far more intrusive to a rat than to a human [5].
- Ammonia-based cleaners. Ammonia is already the irritant you are cleaning to remove, and adding more to an enclosed space works against the goal.
- Oven cleaners, drain products, and abrasive chemical powders in an animal enclosure.
- Disinfectant wipes and sprays left on surfaces without rinsing. Quaternary ammonium products and similar disinfectants require contact time and thorough rinsing, and residue on chewable surfaces is a hazard.
Whatever you use, the safe pattern is the same. Clean away organic debris with detergent, rinse, disinfect only where needed, rinse again, and dry. Wash hands before and after handling your rats and their equipment, and keep any cleaning bucket, sponge, and brush dedicated to the rat cage alone so household chemicals never cross over.
If you are unsure whether a specific product is safe for your setup, bring the label to an exotic animal veterinarian and ask before using it in or near the habitat.
Setting Up the Habitat to Make Cleaning Easier
The right housing choices reduce cleaning workload and improve hygiene at the same time.
Housing guidelines for pet rats, developed through consultation with veterinarians, veterinary nurses, animal welfare scientists, and experienced owners, cover cage sizing, refuges, substrates, and injury prevention as core elements of good housing [4]. Those principles translate directly to cleaning.
- Choose solid-bottom housing with bedding. Both the National Research Council and the Association for Assessment and Accreditation of Laboratory Animal Care recommend housing rats in solid-bottom cages with bedding rather than wire-bottom floors, and research comparing the two found that solid-bottom housing with bedding supports rats appropriately [6]. Solid floors hold substrate, are easier to clean, and protect feet from injury and from accumulating droppings.
- Use deep, absorbent bedding. Paper-based or kiln-dried wood bedding absorbs urine and controls ammonia better than thin layers. Deeper substrate in a digging area absorbs waste from activity zones and supports natural burrowing.
- Concentrate mess. Food dishes, water, and the litter pan belong near each other in one zone. Rats toilet in predictable places once established, and you can design the layout to work with that habit.
- Minimize porous and fabric surfaces in wet zones. Keep fabric hammocks and cardboard houses away from the litter corner and the bottle drip line, or you will wash them constantly.
- Size the cage generously. Overcrowding is the fastest route to a cage that smells within a day of cleaning. Adequate space for the number of rats you keep is the most cost-effective hygiene tool you own.
Common Cleaning Mistakes and How to Fix Them
Cleaning too infrequently. Waiting until the cage smells means ammonia has been irritating your rats' airways for days before you noticed, because a rat's ammonia tolerance is far lower than yours. Rats often make a cage smell less than an owner expects, so odor is a lagging indicator, not a target. Follow the schedule rather than your nose.
Cleaning too aggressively. Stripping every scent, rearranging all furniture, and disinfecting every object on a rigid weekly cycle can stress rats and, in groups, trigger renewed territorial squabbling. Keep the full sterilization for the monthly deep clean, and preserve familiar cues during weekly work.
Using strongly scented products. Lavender, citrus, and pine-scented cleaners may smell clean to you and noxious to a rat. Unscented products plus good rinsing solve the same problem without the chemical load.
Leaving damp bedding or damp fabric in place. Wet patches left in a corner after a partial clean harbor bacteria and mold. If you cannot fully dry a fabric item before returning it, leave it out and replace it with a dry one.
Changing the entire bedding type at once. If you switch substrates, mix the new bedding with the old over several changes. Abrupt changes remove familiar scent and texture cues and can cause temporary stress-related behaviors.
Ignoring accessories. The cage floor gets cleaned while the chewed wooden hideout, the ceramic bowl, and the bottle spout quietly accumulate biofilm and old food. Add every item in the cage to your weekly or monthly list so nothing is permanent furniture for bacteria.
Skipping the health check. Cleaning is your scheduled opportunity to observe each rat up close. Owners who clean on autopilot often miss the first signs of illness, such as reduced grooming, a dull coat, or labored breathing.
Welfare and Safety During Cleaning
Cleaning should be a low-stress part of your rats' routine, and how you do it matters as much as how often.
- Keep the rats physically safe. Never clean with rats loose in the room or on your shoulders during scrubbing. Falls and escapes most often happen during disrupted routines.
- Preserve scent continuity. As covered above, keep familiar-smelling items or bedding in the habitat through each clean. Continuous home-cage monitoring research shows that behavior measured in the home cage is a sensitive, non-invasive indicator of welfare state in rats [7], which means a sudden post-cleaning change in activity or hiding behavior is meaningful data, not a mood. If your rats routinely show freezing, excessive hiding, or aggression after cleaning, soften your approach rather than assuming they will adjust.
- Keep the temperature and airflow reasonable. Clean in a warm room, dry the cage before returning the rats, and never leave a damp habitat in a draft.
- Watch the group dynamic. Cleaning sometimes resets scent-based social structure. If squabbling begins after deep cleans, preserve more scent cues and introduce any layout changes gradually.
- Monitor the indicators that matter. Weight, coat condition, hydration, and activity are the core health indicators used in professional rodent care [3]. A scale near the cleaning station and a quick handling check during the weekly clean let you catch gradual changes early.
Limitations and When to Contact a Veterinarian
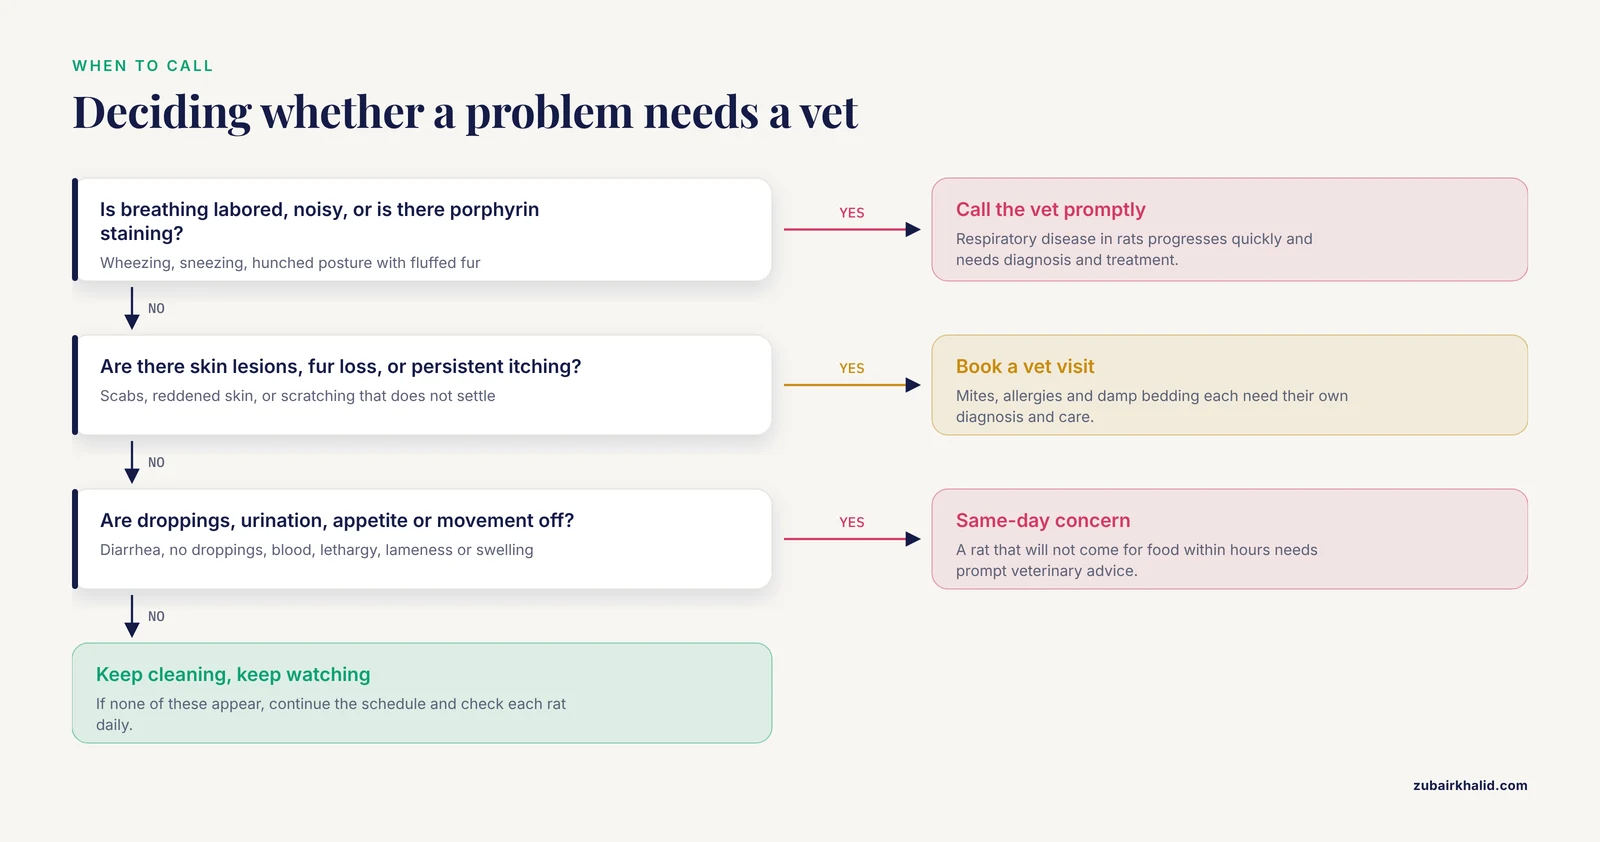
The schedules in this article are practical starting points for a healthy adult group in an adequately sized enclosure. Individual situations need adjustment, and only your veterinarian, ideally one experienced with exotic companion mammals, can tailor advice to your specific rats, their health status, and your housing.
Contact your veterinarian promptly if you notice any of the following:
- Respiratory signs. Labored or noisy breathing, wheezing, sneezing, porphyrin staining around the eyes or nose, or hunched posture with fluffed fur. Respiratory disease in rats progresses quickly and needs diagnosis and treatment, not just better cleaning.
- Skin lesions or persistent itching. Fur loss, scabs, or reddened skin can reflect mites, allergies, or damp bedding, and treatment differs for each cause.
- A sudden change in droppings or urination. Diarrhea, absent droppings, blood in the cage, or unusually wet bedding warrants a call.
- One rat being bullied after a clean. Recurring post-cleaning aggression that leads to wounds needs behavioral assessment, and may indicate the group structure is fragile.
- Lethargy or loss of appetite. A rat that does not come for food during your routine for more than a few hours is a same-day concern, not a watch-and-wait situation.
- Wounds, swelling, or lameness. Check any injury found during handling before assuming it is minor.
This article is educational and is not a substitute for veterinary diagnosis or treatment.
Frequently Asked Questions
How often should I fully clean a rat cage?
Do a full bedding change and surface wash at least once a week, and a complete deep clean of the enclosure and all accessories every three to four weeks. Increase the frequency if you keep a large group, notice odor between cleans, or one of your rats is ill.
Can cleaning the cage too often harm my rats?
Yes, excessive cleaning can stress rats by stripping the familiar scent cues they use to feel secure, and it may trigger territorial tension in groups. Balance is the goal. Keep daily spot cleaning, keep the weekly bedding change, and preserve some familiar-smelling items through each deep clean.
Is white vinegar safe for cleaning a rat cage?
Yes, diluted white vinegar is a practical choice for dissolving urine scale on cage bases and bottles. Rinse surfaces with clean water afterward and let them dry before the rats return.
Is bleach safe to use around pet rats?
Diluted unscented bleach can be used to disinfect hard, nonporous cage surfaces, but only when the rats are out of the enclosure. Clean first, allow contact time, rinse thoroughly several times, and let everything air dry completely before the rats go back.
How do I clean the cage without stressing my rats?
Move the rats to a familiar carrier or playpen rather than grabbing them, keep your routine consistent, keep the cage layout recognizable, and leave one or two scent-soaked items in place during a deep clean. Handle the rats calmly during and after the clean so the experience stays positive.
How often should I change rat bedding?
Change the bedding fully once a week in a typical multi-rat enclosure, and scoop soiled corners daily. If the bedding stays dry and the group is small, some owners extend to every ten days, but daily scooping remains essential either way.
Should I remove my rats while I clean?
Yes, always. Move them to a secure carrier or enclosed playpen with water and a hide. Cleaning around free rats risks escapes, falls, and injuries from equipment, and it prevents you from working efficiently.
Why does my rat cage smell even after cleaning?
Persistent odor usually means ammonia is building below the surface, from saturated bedding that needs deeper substrate or more frequent changes, a missed urination spot under furniture, a dirty bottle spout, or an enclosure that is too small for the number of rats. Review the weekly routine, add substrate depth, and confirm the cage size suits your group.
Sources
- Twenty years of health monitoring in a conventional neuroscience animal facility: challenges, strategies, and 3Rs-oriented approaches to animal welfare, personnel health, and research integrity.
- Pet rat welfare in the United Kingdom: The good, the bad and the ugly.
- Building a humane scientific future: Second Asia Laboratory Animal Day.
- Developing guidelines for pet rat housing through expert consultation.
- Olfaction variation in mouse husbandry and its implications for refinement and standardization: UK survey of animal scents.
- Clinical pathology laboratory values of rats housed in wire-bottom cages compared with those of rats housed in solid-bottom cages.
- Hesperidin from Citrus reticulata peel improves welfare in PTU-induced hypothyroid rats through home-cage behavior, endocrine, neurobehavioral, and anti-inflammatory mechanisms.