Reptile Enclosure Setup: Step-by-Step Guide
By Dr. Zubair Khalid, DVM, MS, PhD ·
A correct reptile enclosure setup does four things at once. It provides a temperature gradient your reptile can move through, the right humidity range for the species, full-spectrum lighting where the species needs it, and secure places to hide and rest. Get these four elements right before the animal ever enters the cage, and you prevent the majority of health problems seen in pet reptiles, including metabolic bone disease, respiratory infections, and poor shedding. Reptile medicine organizations consistently identify improper husbandry as the leading cause of illness in captive reptiles, which makes the enclosure itself your single most powerful health tool.
This guide walks you through reptile enclosure setup step by step, from choosing the tank to verifying temperatures before introduction, then covers a maintenance checklist, the most common setup mistakes, and the point at which you should involve a reptile veterinarian.
Reptile Enclosure Setup at a Glance
Use this sequence as your working plan. Each step is explained in detail below.
| Step | Task | Key detail |
|---|---|---|
| 1 | Research the species | Adult size, temperature range, humidity, arboreal or terrestrial habits |
| 2 | Choose the enclosure | Sized for the adult animal, secure lid, appropriate ventilation |
| 3 | Install heating on a thermostat | Gradient from a warm basking zone to a cooler zone |
| 4 | Install lighting | Species-appropriate UVB and a consistent day-night cycle |
| 5 | Manage humidity | Hygrometer, species-appropriate moisture, ventilation balance |
| 6 | Add substrate | Safe, species-appropriate bedding, no unsafe loose particles for risk species |
| 7 | Add hides and furnishings | At least one hide on each end of the gradient, climbing structure if arboreal |
| 8 | Provide water | Clean water dish, soaked and refreshed regularly |
| 9 | Stabilize and verify | Run the empty enclosure for several days and confirm readings |
| 10 | Introduce and monitor | Weigh and observe the animal, schedule a wellness exam |
Why Enclosure Setup Comes Before Everything Else
Reptiles are ectotherms. They do not generate their own body heat the way mammals do, so they depend entirely on their environment to regulate body temperature, digest food, and fight infection. The Merck Veterinary Manual notes that a large share of disease presentations in captive reptiles trace back to husbandry deficiencies such as incorrect temperature, inadequate lighting, poor humidity, and unsanitary conditions. When a reptile is kept too cold, digestion slows and the immune system weakens. When humidity is wrong, shedding problems and skin and respiratory infections follow. When UVB lighting is absent in species that require it, calcium metabolism fails and bones deform.
This is why experienced herpetological veterinarians, including members of the Association of Reptilian and Amphibian Veterinarians, treat the enclosure review as part of nearly every patient visit. Fixing the setup often resolves problems that medication alone cannot.
Step 1: Research Your Specific Species First
Every decision in a reptile enclosure setup flows from the species you keep. A ball python, a bearded dragon, a crested gecko, and a Russian tortoise need fundamentally different environments. Before you buy anything, write down answers to these questions for your species:
- Adult size. A juvenile animal in a small tank is temporary. Plan for the adult enclosure now, or plan the upgrade timeline explicitly.
- Temperature gradient. What is the appropriate basking temperature, warm-side temperature, and nighttime temperature for the species?
- Humidity range. Desert species need dry air with a humid hide, while tropical species need consistently elevated humidity.
- Lifestyle. Terrestrial species need floor space, arboreal species need vertical height and climbing branches, and fossorial species need depth for burrowing.
- Lighting. Is the species diurnal or nocturnal, and does it require UVB exposure?
Authoritative sources for this data include the Merck Veterinary Manual's exotic animal sections, VCA Animal Hospitals' species care guides, and the evidence-based species guides published by ReptiFiles. Write the target ranges down and keep them next to the enclosure. You will use them to calibrate every piece of equipment in the following steps.
One caution applies to any source. Individual animals, local room conditions, and cage materials all shift readings, so treat published ranges as starting points and confirm with your own thermometers and hygrometers inside the actual enclosure.
Step 2: Choose the Right Enclosure
The enclosure is the foundation of the entire build. Choose it with these criteria in mind.
Size. Bigger is almost always better, as long as you can maintain the temperature and humidity gradient throughout. An undersized enclosure cannot provide a meaningful thermal gradient, which forces the animal to choose between proper body temperature and proper hydration. The widely used minimum standard in evidence-based husbandry guides is an enclosure at least as long as the animal itself, with many keepers and ReptiFiles' species guides recommending considerably more floor space than traditional minimums, especially for active species. Confirm the specific recommendation for your species before purchasing.
Material. Glass aquariums and terrariums, PVC and HDPE enclosures, and commercially made reptile cages all work when they hold heat and humidity appropriately for your species. Glass loses heat faster and needs more attention to insulation. PVC holds heat and humidity well and is popular for tropical species. Wooden vivaria work for some setups but can be difficult to disinfect and warp with moisture.
Ventilation. Ventilation must match the species. A screen top drains heat and humidity quickly, which suits desert species but sabotages tropical setups. Side or rear vents give you airflow with better humidity retention. Poor ventilation combined with high moisture encourages bacterial and fungal growth, while excessive ventilation dries out the cage. The goal is fresh air exchange without moisture stagnation.
Security. Reptiles are escape artists. Every enclosure needs a secure, locking or clips-on lid or doors, especially for snakes and climbing geckos. Confirm that the lid supports the weight of your lighting fixtures.
Access. Front-opening doors reduce stress because you approach from the side rather than from above, where a bird-shaped shadow triggers predator responses. Front access also makes daily maintenance easier, which means maintenance actually gets done.
Step 3: Build the Thermal Gradient with a Thermostat
Heating is where most beginners make their first serious mistake. A reptile does not need one uniform temperature. It needs a gradient, a warm end for basking and digestion and a cooler end for cooling down, so the animal can thermoregulate by moving.
Equipment selection:
- Primary heat source. Overhead heating generally produces the most natural basking behavior. Halogen or incandescent basking bulbs, ceramic heat emitters for nighttime heat without light, and radiant heat panels for larger enclosures are the main options. Under-tank heaters (heat mats) are appropriate for some terrestrial species that absorb heat through their belly, but they are not a complete heating solution for species that bask.
- Thermostat, non-negotiable. Every heat source must be plugged into a proportional or dimming thermostat with the probe positioned where the animal actually rests. Unregulated heat equipment can overheat and cause severe burns. ReptiFiles and reptile veterinarians consistently list a thermostat as required safety equipment, not an optional upgrade.
- Thermometers, plural. One digital thermometer with a probe at the basking spot and one at the cool end lets you verify the gradient. Stick-on dial thermometers are inaccurate and measure the glass rather than the air. Infrared temperature guns let you measure surface temperatures, which matter more than air temperature for basking reptiles.
Placement. Place the heat source over one end of the enclosure, never the center, so a cool zone always remains. Position basking surfaces at the correct distance from the bulb so the animal cannot burn itself, and shield or cage any bulb the animal can touch. Never use adhesive heat rocks or any heater the animal can curl directly around, because contact burns are a well-documented injury pattern in pet reptiles.
Verify readings with your probes for several days and adjust the thermostat until the measured temperatures match the published range for your species.
Step 4: Install UVB and Visible Lighting
Lighting serves two functions. It sets a day-night rhythm that governs activity, appetite, and breeding behavior, and for many species it supplies ultraviolet B radiation that enables vitamin D3 synthesis in the skin, which drives calcium absorption.
The Merck Veterinary Manual identifies inadequate UVB exposure as a primary contributor to nutritional secondary hyperparathyroidism, commonly called metabolic bone disease, one of the most frequent and preventable diseases of captive reptiles. Diurnal, day-active species such as bearded dragons, many iguanas, and most tortoises generally need strong UVB from dedicated fluorescent or mercury vapor bulbs. Many nocturnal geckos and snakes can obtain adequate vitamin D3 from diet, and their UVB requirements are lower or optional, though low-level UVB is increasingly offered to a wider range of species on veterinary advice.
Practical lighting rules that hold across setups:
- Use a dedicated UVB bulb from a reputable manufacturer and replace it on the manufacturer's schedule, because UVB output declines long before the bulb stops producing visible light.
- Position the UVB source so the animal can bask within the effective range published for that bulb, and provide shaded areas so the animal can escape exposure entirely.
- Do not rely on light passing through glass or plastic, because these materials filter out UVB.
- Provide a consistent photoperiod, typically a day cycle that matches the natural season of the species, on a timer so it never drifts.
- Turn all lights off at night. Colored nighttime bulbs are unnecessary in most homes. If nighttime heat is needed, a ceramic heat emitter produces warmth without visible light.
Step 5: Control Humidity and Air Quality
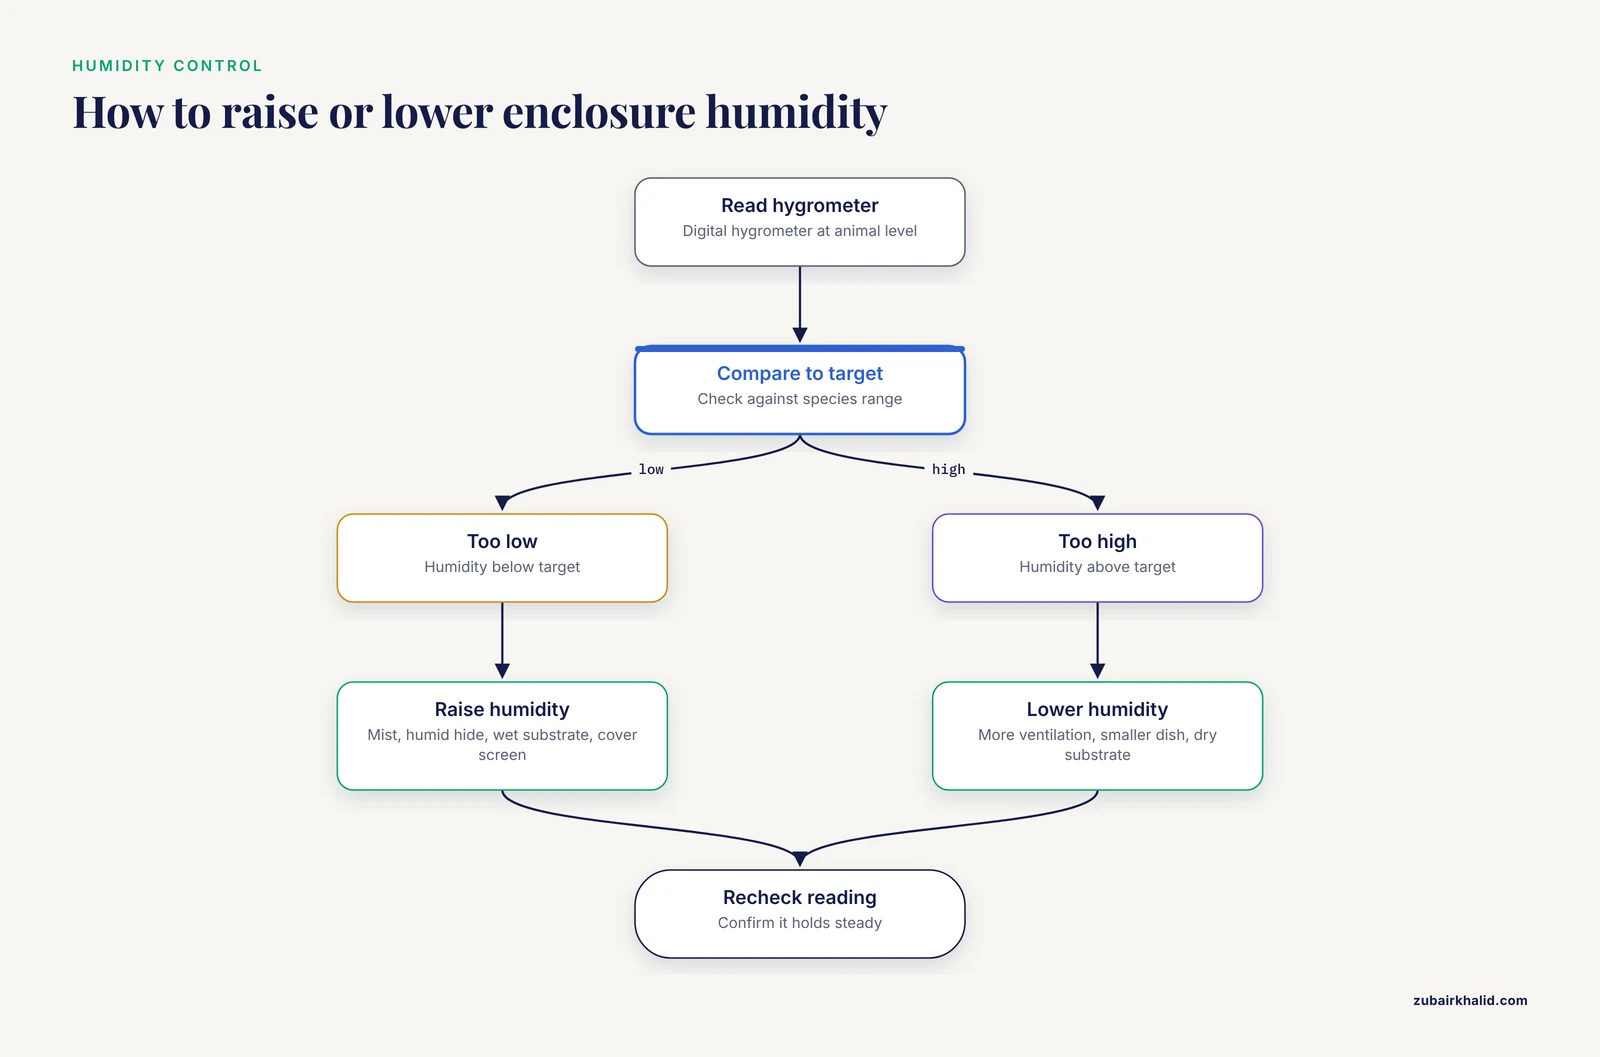
Humidity errors cause shedding problems, dehydration, and respiratory disease. Control it with measurement first.
- Hygrometer. Use a digital hygrometer placed at animal level. Cheap dial hygrometers drift badly.
- Methods to raise humidity. Regular misting, a large shallow water bowl, moisture-retentive substrate, partial screen coverage, and reptile-safe humidifiers all raise humidity. For species needing a humid microclimate, such as many tropical geckos and ball pythons during shed, a humid hide filled with damp sphagnum moss gives the animal a choice.
- Methods to lower humidity. Increase ventilation, reduce water surface area, and use a drier substrate.
- The danger of constant wetness. Soggy substrate grows bacteria and mold. High humidity should come from humid air and moist hides, not from a permanently waterlogged floor.
A helpful principle from modern husbandry guides is gradient-based humidity, mirroring the thermal gradient. Offer a humid zone and a drier zone in the same enclosure and let the animal select what it needs.
Step 6: Choose and Install Substrate
Substrate affects hygiene, humidity, enrichment, and safety. Select it by species and by risk.
Safe, versatile options. Paper-based bedding, newspaper, and reptile carpet are easy to clean and eliminate impaction risk, which makes them standard choices for quarantine enclosures and for animals recovering from illness. Cypress mulch, coconut fiber, and similar naturalistic substrates hold humidity well for tropical species, while aspen shavings and dry bioactive soils suit arid species. Bioactive planted setups with a cleanup crew of invertebrates are an advanced but rewarding option supported by detailed guides such as ReptiFiles.
Risk considerations. Loose particulate substrates carry a small risk of accidental ingestion, particularly in animals that are already ill, dehydrated, or kept at improper temperatures. Sand mixed with soil is appropriate for some desert species but is repeatedly blamed for impaction when used for species it does not suit. Veterinarians commonly recommend simpler substrates for young animals, for new acquisitions still in quarantine, and for any patient with a health problem. Cypress mulch and cedar products differ sharply in safety, and cedar in particular should never be used because its aromatic oils are harmful to reptiles.
Match substrate depth to the species. Burrowers need several inches or more to dig, while surface dwellers need only enough to cover the floor and spot-clean easily.
Step 7: Add Hides, Climbing Structure, and Enrichment
Furnishings are not decoration. They are behavioral medicine.
- Two hides minimum. Place one hide on the warm end and one on the cool end so the animal never has to choose between feeling secure and thermoregulating. A single hide in a warm cage forces cold, stressed animals to sit exposed.
- Cover and sightlines. Cork bark, branches, and plants, live or artificial, break up the open space and lower chronic stress, especially in shy species.
- Climbing structure for arboreal species. Sturdy branches positioned at safe distances from heat and UVB sources, plus vertical wall surfaces for geckos.
- Rough surfaces for shedding. Rocks and textured branches help reptiles rub off old skin during ecdysis.
- Water and soaking space. Aquatic and semi-aquatic species need enough clean, dechlorinated, temperature-appropriate water to submerge and swim. Many terrestrial species benefit from a water dish large enough to soak in, and some species, such as many turtles and water dragons, soak or defecate in water, which means more frequent cleaning.
Secure everything heavy. Reptiles dig, climb, and push, and an unstable rock stack can crush an animal.
Step 8: Quarantine, Hygiene, and Salmonella Awareness
Plan hygiene into the setup from day one, because sanitation protects both your reptile and your household.
Quarantine. Any newly acquired reptile should be housed separately from existing reptiles for a quarantine period determined with your reptile veterinarian, commonly on the order of several weeks to a few months, in a simple, easy-to-disinfect enclosure with paper substrate and dedicated equipment. The Merck Veterinary Manual and the Association of Reptilian and Amphibian Veterinarians both emphasize quarantine as a core biosecurity practice that prevents the spread of parasites and infectious disease into an established collection.
Cleaning routine. Spot-clean feces and urates daily, replace substrate on a schedule appropriate to the setup, and disinfect surfaces with a reptile-safe disinfectant or a diluted bleach solution followed by thorough rinsing and complete drying before the animal returns. Keep a dedicated set of sponges, buckets, and tools for reptile cleaning, and never use them in the kitchen.
Salmonella. Reptiles can carry Salmonella bacteria without showing any signs of illness. The AVMA advises that everyone wash their hands with soap and water after handling reptiles or anything in their enclosure, and that reptiles not be kept in homes with young children, older adults, or immunocompromised people without careful discussion of the risk. Supervise any interaction between reptiles and small children, and never clean reptile equipment in sinks used for food preparation.
Step 9: Run the Empty Enclosure Before Introducing Your Reptile
Assemble everything, then wait. Run the heating, lighting, and humidity systems for at least several days with no animal inside and confirm the following:
- Thermometer probes read within your species' target range at the basking site, warm end, and cool end, including overnight.
- The thermostat holds temperature steadily rather than cycling wildly.
- The hygrometer reads within the target humidity range and holds steady after misting.
- UVB output and distances are verified.
- No equipment fails, overheats, or leaks.
This stabilization period is the single highest-value reptile enclosure setup tip for beginners, because it catches equipment problems before they harm an animal. It also lets humidity and temperature settle into realistic values instead of the optimistic values you imagine when the cage is empty.
Reptile Care Checklist After Setup
Once your reptile is home, routine maintenance keeps the environment you built healthy. Print this and post it on the enclosure.
Daily
- Check thermometer and hygrometer readings against target ranges
- Spot-clean feces and shed skin
- Refresh water
- Confirm lighting timers worked
- Observe appetite, posture, breathing, and activity
Weekly
- Wipe surfaces, clean the water dish thoroughly, and mist or adjust humidity as needed
- Test thermostat probe accuracy against a second thermometer
- Check hides, branches, and fixtures for stability and wear
Monthly
- Inspect and clean UVB and heat equipment, and track bulb replacement dates
- Deep-clean decor
- Weigh the animal and record the weight
- Assess substrate condition and replace as scheduled
Periodically
- Wellness examination with a reptile veterinarian, including a fecal parasite screening, which the Companion Animal Parasite Council recommends for reptiles as part of routine care
- Upgrade the enclosure as a juvenile grows toward adult size
Common Reptile Enclosure Setup Mistakes
These are the errors veterinarians and experienced keepers encounter most often, and every one of them is avoidable during setup.
- Buying for the baby instead of the adult. Many popular species grow far larger than the tanks sold with them. Plan the adult enclosure from the start.
- No thermostat on any heat source. Unregulated heat mats and bulbs burn animals and start fires.
- One uniform temperature instead of a gradient. A cage that is warm everywhere removes the animal's ability to thermoregulate.
- Trusting stick-on dials. Inaccurate thermometers produce confident owners with wrong temperatures. Use digital probes and an infrared gun.
- Skipping UVB for species that need it, or never replacing UVB bulbs. Output fades invisibly, so old bulbs look fine while causing deficiency.
- No thermostat on the heat mat under glass. Heat mats on thin substrate over glass can reach burn temperatures.
- Substrate chosen for looks instead of safety. Cedar and pine products, and inappropriate sandy mixes, cause respiratory irritation and impaction.
- Water dish too small, too shallow, or never refreshed. Dehydration and dirty water drive skin and kidney problems.
- One hide, or hides only on the warm side. Security is part of the gradient.
- No quarantine. New animals go straight into a collection, spreading parasites and infections.
- Feeding in place of fixing the environment. Poor appetite is usually an enclosure problem. Adding food does not fix a cage that is too cold.
- Co-housing incompatible animals. Different species, and even two of the same species, often need different conditions and stress or injure each other.
Troubleshooting a Setup That Is Not Holding Its Values
Temperature will not rise. Check that the enclosure is not in a cold room or against an exterior wall, that the bulb wattage matches the enclosure size, and that screen tops are not draining heat. Insulating panels on three glass sides help. Never compensate by removing the thermostat.
Temperature will not drop. Reduce wattage, raise the fixture height, or add a second thermostat-controlled source for nighttime only. Ambient room heat matters more than owners expect.
Humidity will not rise. Add a humid hide, cover part of the screen top, switch to a moisture-retentive substrate, and mist on a schedule. Confirm ventilation is not excessive.
Humidity will not drop. Increase ventilation, shrink the water dish, and dry the substrate surface.
Reptile hides constantly, will not eat, or rubs its nose on the glass. These are stress signals with enclosure causes far more often than illness causes. Recheck temperatures, hides, and traffic around the cage first, then consult a reptile veterinarian if the behavior persists.
Bad shed. Check humidity and the presence of a humid hide, and confirm rough shedding surfaces. Stuck shed around the toes, tail tip, or eye caps needs attention because retained bands can constrict tissue.
Welfare and Safety Points
- Keep the enclosure out of direct sunlight, which can overheat it rapidly through glass, and away from drafts, loud vibration, and constant household commotion.
- Never house animals of different species together.
- Handle with restraint in both frequency and duration, and support the animal's body fully.
- Wash your hands before and after every contact with the animal or its enclosure.
- Secure electrical cords so animals cannot chew them and fixtures cannot fall.
- Plan for power outages, because reptiles tolerate temperature failure poorly. Know in advance how you will provide backup heat.
Limitations and When to Contact a Veterinarian
Every setup in this guide is a framework. The exact temperatures, humidity ranges, bulb distances, and enclosure dimensions for your animal must come from species-specific references and from a reptile veterinarian who has examined your individual pet, because individual animals, local conditions, and health status change what is appropriate.
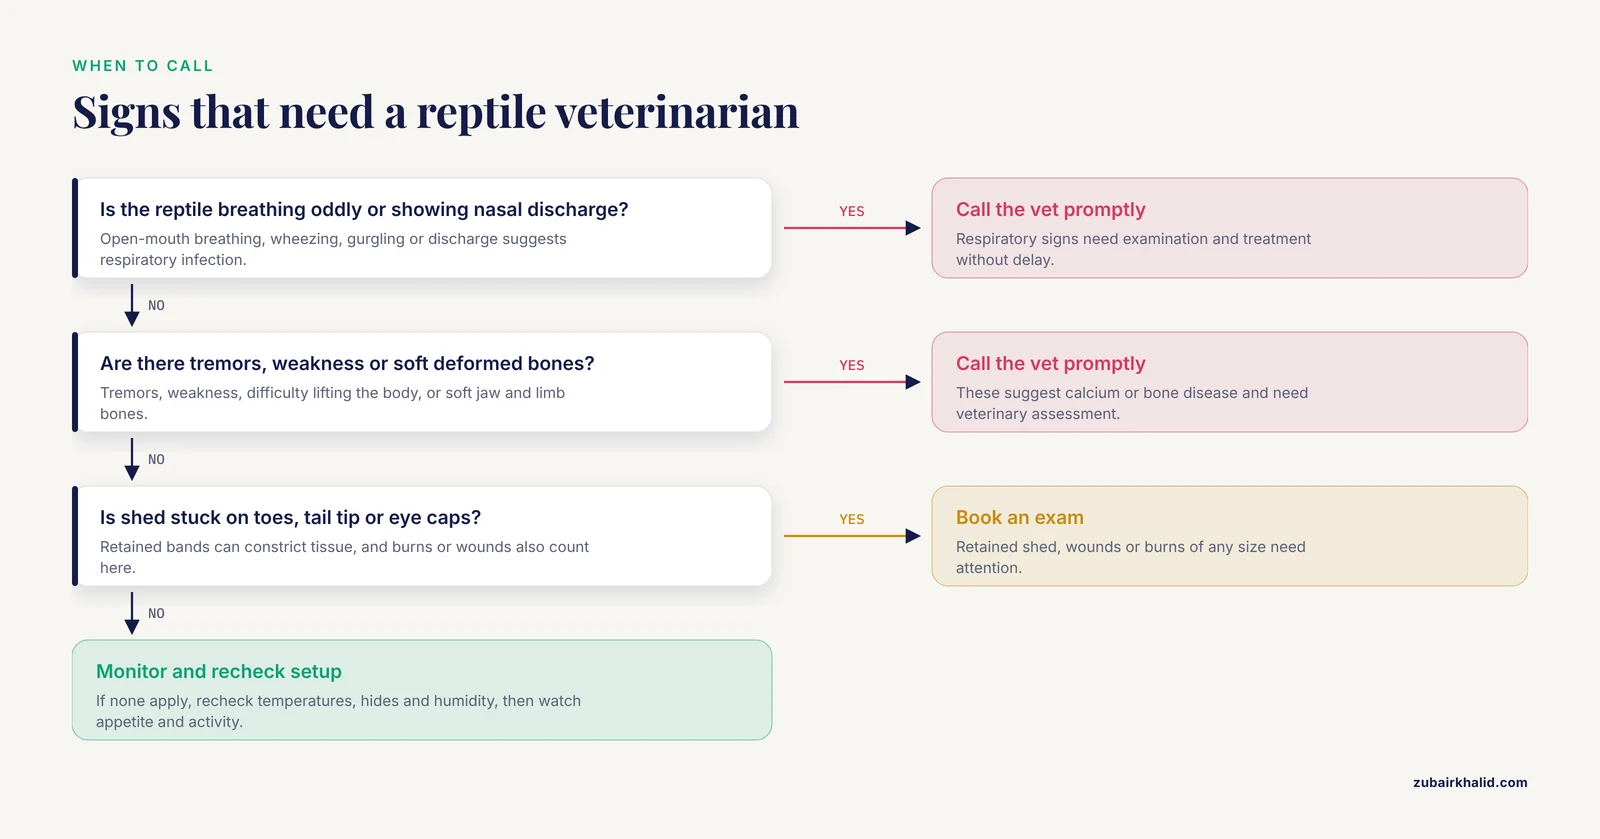
Contact a reptile veterinarian promptly if you see any of the following:
- Open-mouth breathing, wheezing, nasal discharge, or a gurgling sound, which suggests respiratory infection
- Lethargy, staying hidden for days, or refusing food beyond the species' normal fasting pattern
- Swelling, lumps, or soft or deformed jaw or limb bones
- Tremors, weakness, or difficulty lifting the body
- Diarrhea, unusually smelly or discolored urates, or visible worms in feces
- Retained shed constricting toes, tail, or eyes, or wounds and burns of any size
- Prolonged basking posture, gaping, or attempts to escape an overheated cage
- Regurgitation or sudden weight loss
A fecal examination and a wellness exam shortly after acquisition is a sound baseline for any new reptile, even one that appears healthy.
Frequently Asked Questions
How big should my reptile's enclosure be?
Size the enclosure for the adult animal, not the juvenile you are buying, and follow the specific minimum dimensions published for your species by evidence-based guides such as ReptiFiles or your veterinarian. A practical floor rule is an enclosure at least as long as the animal, with larger enclosures preferred because they allow a usable thermal gradient.
Do all reptiles need UVB lighting?
No, but many do. Diurnal basking species such as bearded dragons and most tortoises require UVB to synthesize vitamin D3 and metabolize calcium, and deficiency leads to metabolic bone disease. Nocturnal and many carnivorous species can often meet their needs through diet, which is a decision to confirm for your specific species with a veterinarian or species guide.
What temperature should a reptile enclosure be?
There is no single correct temperature. Each species needs a gradient with a basking zone at its documented upper range and a cooler zone several degrees lower, plus an appropriate nighttime temperature. Use published species ranges as your targets, measure with digital probes at animal level, and control all heat sources with a thermostat.
How do I keep humidity at the right level?
Measure with a digital hygrometer at animal level, then adjust using misting, a water bowl, moisture-retentive substrate, a humid hide, or ventilation changes depending on whether you need to raise or lower the reading. Offer a humidity gradient so the animal can choose.
What substrate is safest?
Paper-based products, newspaper, and reptile carpet are the safest options and are standard for quarantine and sick animals. For long-term naturalistic setups, cypress mulch, coconut fiber, aspen, or bioactive soil can be appropriate depending on species, but cedar and pine must never be used and loose sand is unsuitable for many species.
Are heat rocks safe to use?
No. Heat rocks develop hot spots and can cause serious contact burns, and veterinary sources consistently advise against them. Provide heat from a thermostat-controlled overhead source or a properly regulated under-tank heater instead.
How long should I set up the enclosure before adding my reptile?
Run the empty enclosure with all equipment for at least several days to confirm temperatures, humidity, and lighting hold steady and that nothing malfunctions. This stabilization window catches problems while they are still cheap and safe to fix.
How often should I clean the enclosure?
Spot-clean waste daily, refresh water daily or as needed, clean dishes and surfaces weekly, and replace or deep-clean substrate on a schedule that depends on the substrate type and the size of the animal. Disinfect with reptile-safe products or diluted bleach followed by complete rinsing and drying, always with dedicated cleaning tools.
This article is educational and is not a substitute for veterinary diagnosis or treatment.