How to Trim Your Bird's Nails at Home: A Step-by-Step Guide
By Dr. Zubair Khalid, DVM, MS, PhD ·

You can trim your bird's nails at home by wrapping the bird gently in a towel, holding one foot at a time, and clipping only the sharp tip of each nail with a small animal or human nail clipper. Cut a tiny sliver at a time and stop as soon as the hook shape is gone, because cutting too far will hit the blood vessel inside the nail and cause bleeding.
Nail trims are one of the routine grooming tasks that pet birds need throughout their lives. Overgrown nails interfere with perching, scratch the skin of the bird's own legs, catch on cage wire and fabric, and can even lead to foot injuries. Most healthy, cooperative pet birds can have their nails maintained at home once an avian veterinarian or veterinary technician has shown you the technique on your specific bird. This guide walks you through the full process, the supplies you need, the mistakes to avoid, and the situations where a home trim is the wrong choice.
This article is educational and is not a substitute for veterinary diagnosis or treatment.
At a Glance: Bird Nail Trim Checklist
Use this checklist as your quick reference. Each step is explained in detail in the sections that follow.
| Step | What You Do | Key Point |
|---|---|---|
| 1 | Confirm your bird is a good candidate for a home trim | Skip the home trim if the nails are dark, extremely long, broken, or if your bird panics during restraint |
| 2 | Gather supplies | Nail clippers, a towel, styptic powder or cornstarch, good lighting, treats |
| 3 | Set up a calm, closed room | No ceiling fans, no open windows, no other pets in the room |
| 4 | Wrap the bird in a towel | Support the body, keep the head out, hold securely but without pressure on the chest |
| 5 | Examine each nail in good light | Identify where the sharp curved tip starts and where the blood vessel (quick) likely sits |
| 6 | Clip a tiny sliver from the tip | One small cut at a time, nail by nail |
| 7 | Stop as soon as the hook is gone | The nail should rest flat on your finger without scratching |
| 8 | Release, reward, and monitor | Watch each foot briefly afterward for any signs of bleeding |
| 9 | Schedule the next check | Most birds need periodic checks rather than a fixed calendar date, so inspect the nails regularly |
Why Bird Nails Need Attention in the First Place
A wild bird wears its nails down through constant contact with rough bark, rock, and varied perching surfaces. A pet bird spends most of its life on smooth wooden dowels, plastic platforms, and flat cage floors, so the nails grow longer and sharper than nature intended. The Association of Avian Veterinarians identifies grooming, including nail care, as a standard component of preventive avian health care, and it recommends that owners learn routine husbandry tasks alongside an avian veterinary team before attempting them solo.
Overgrown nails cause several problems:
- The bird's grip changes, which puts abnormal pressure on the toe joints and the bottom of the foot.
- Long nails can curl under and press into the toe pads, creating sores.
- Nails snag on cage bars, toys, frayed rope perches, and loose fabric threads, and a struggling bird can injure a toe or rip a nail off.
- Owners get scratched more often, which makes handling stressful for everyone.
Some birds also wear their nails unevenly because of foot problems, abnormal perching, or underlying disease. If one side of the feet is noticeably worse than the other, that asymmetry is a reason to have a veterinarian examine the bird rather than simply trimming more aggressively.
Understanding Bird Nail Anatomy Before You Cut
Bird nails differ from dog and cat nails in one critical way. Instead of sitting fully inside the nail, the blood supply and nerve (the quick) may extend a variable distance into the nail, and in many birds, especially those with dark or pigmented nails, you cannot see it through the nail wall.
In birds with light colored or clear nails, you can often see a faint line where the pink or darker vascular tissue ends and the clear dead tip begins. The safe cutting zone is only the clear, curved hook beyond that line. In birds with dark nails, there is no visible dividing line, so you trim conservatively and take off the smallest amount that removes the sharp point.
The Merck Veterinary Manual notes that clipping a bird's nails too short is one of the most common causes of bleeding during home grooming, and that the resulting blood loss, while often small in a large parrot, can be significant in a small finch, canary, or budgerigar. A small bird has a small total blood volume, so even a modest nail bleed deserves respect.
Two practical consequences follow from this anatomy:
- Your first trims should be shorter in ambition than you expect. Take the sharp tip off and leave the rest for the next session.
- Have a bleeding control product ready and within arm's reach before the first cut, not after.
Supplies You Need Before You Start
You do not need much equipment, but everything should be laid out and open before you catch the bird. Chasing a bird around the room to find a missing item turns a calm trim into a frightening event.
Nail clippers. Small bird and small animal nail clippers, or a standard human nail clipper for small species, work well. Scissor style clippers with a short cutting edge give you better control on a tiny nail than large guillotine style dog clippers. For a macaw or large cockatoo, many owners use human toenail clippers or heavy duty small animal clippers. Ask your avian veterinarian which tool matches your bird's nail size, because an oversized clipper crushes a small nail and an undersized one fights a large nail.
A towel. A clean, plain towel without loose threads is the standard restraint tool for pet birds. VCA Animal Hospitals' avian care guides describe towel restraint as the routine method for safely holding a bird for brief procedures such as nail trims, and they emphasize supporting the bird's body rather than squeezing the chest.
Styptic powder or cornstarch. Styptic powder stops bleeding from a nail cut too short. Plain cornstarch or flour pressed firmly into the nail tip is a commonly recommended household alternative discussed in avian first aid guidance from Merck Veterinary Manual and VCA Animal Hospitals. Keep it open on the table. Note that styptic products made for other purposes, such as some human shaving products, are not the same, so use a product sold for animal nail bleeding or plain cornstarch.
Good lighting. A bright lamp or a headlamp lets you see the nail tip clearly. Dim lighting is how owners end up cutting into the quick.
Treats. A favorite food reward after the trim helps end the session on a positive note. Lafeber Company's avian behavior resources describe food rewards as a primary reinforcement tool for building cooperative behavior in pet parrots, and a calm end to a grooming session makes the next session easier.
A helper. For most birds, a second person holds the wrapped bird while you trim. A single experienced handler can do the whole job with a small, calm bird, but two people is the safer setup for a parrot with a strong beak.
How to Trim Bird Nails at Home Step by Step
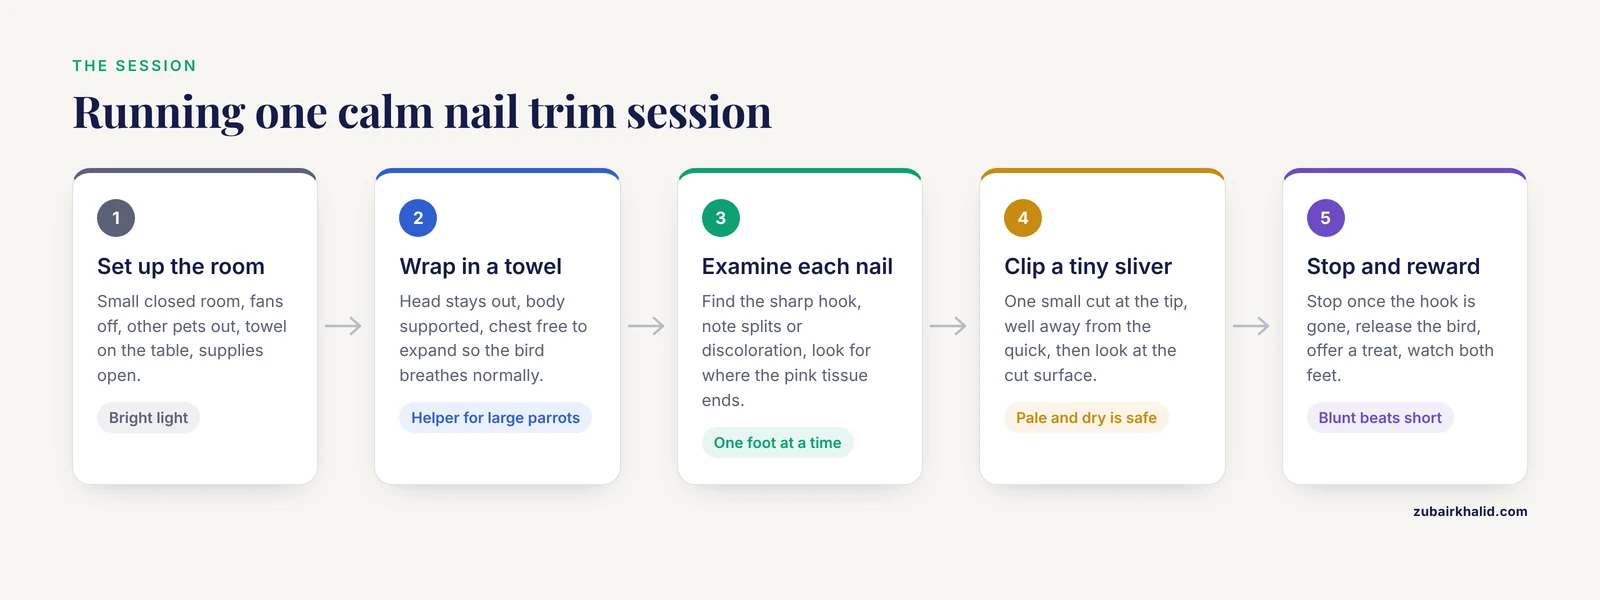
This is the full procedure for how to trim your bird's nails at home, from preparation through cleanup. Read all of it once before you touch the clippers.
Step 1: Confirm the Trim Is Appropriate
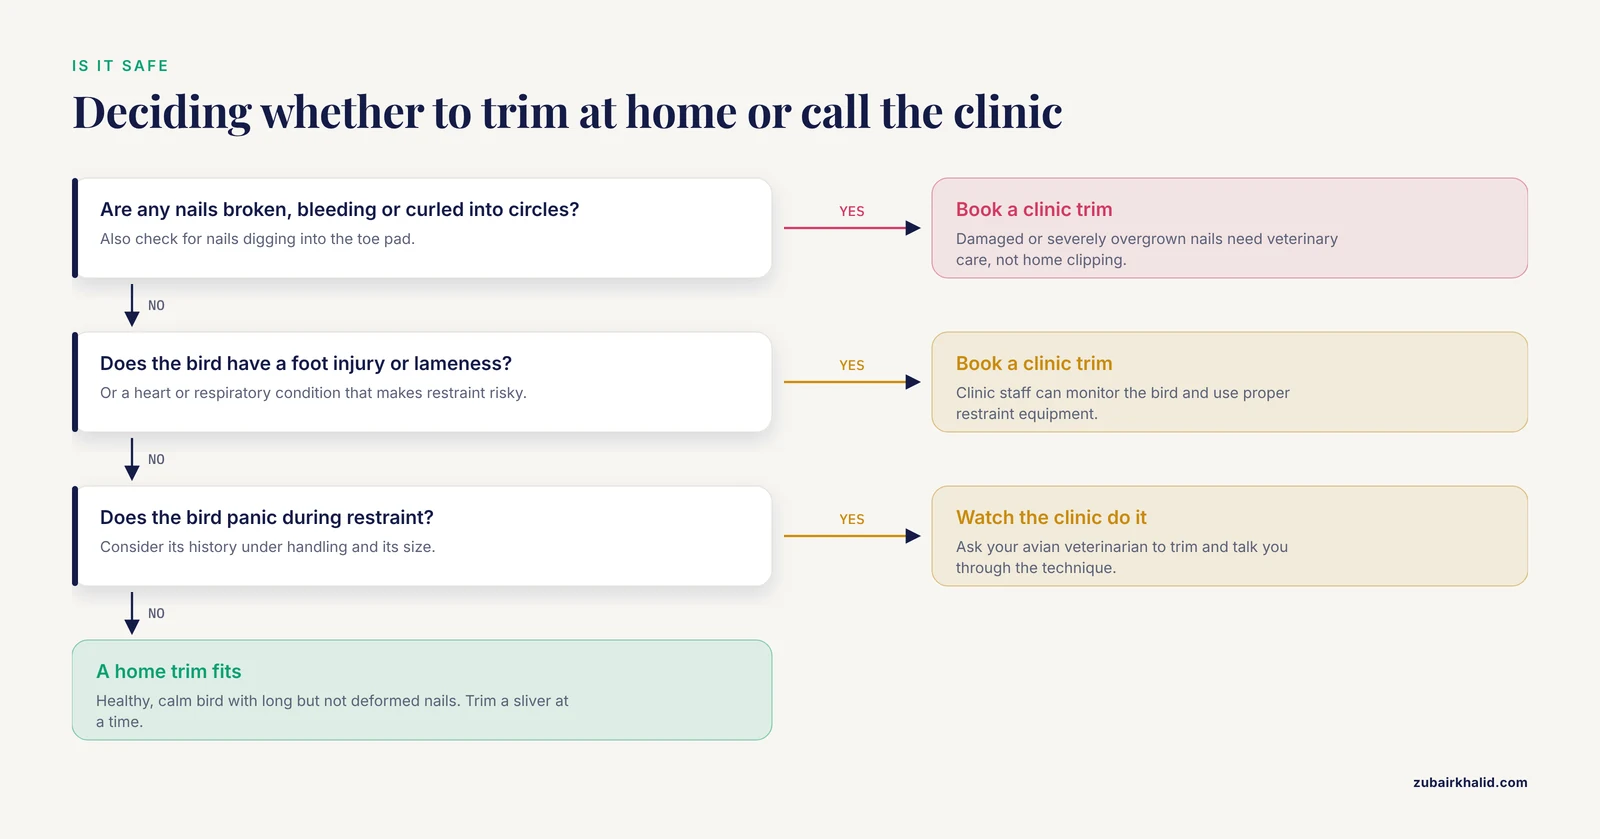
Home trims suit birds that are healthy, reasonably calm during handling, and have nails that are long but not severely deformed. A home trim is not appropriate when the nails are so long that they have curled into circles, when any nail is broken or bleeding already, when the bird has a foot injury or lameness, or when the bird has a heart or respiratory condition that makes restraint risky. Birds like these need a veterinary clinic trim, where staff can monitor the bird and use proper restraint equipment.
If you have never seen a nail trim done, the best first step is to ask your avian veterinarian to do the trim in front of you and talk you through it. Many clinics will do this, and the Association of Avian Veterinarians encourages owners to build these handling skills with professional guidance.
Step 2: Prepare the Room
Pick a small, closed room. Close the windows, turn off ceiling fans, move other pets out, and cover large mirrors or windows if your bird might fly into them if it escapes. Put a towel on the table where you will work. Have the clippers, styptic powder, and a bright light open and within reach. Do the trim during a time of day when your bird is normally calm, not right after a noisy household event.
Step 3: Wrap the Bird in the Towel
Place the towel over the bird from behind or above, depending on how the bird sits on your hand, so the head stays out and the body is contained. The bird's back should rest against your palm or the helper's palm, with the feet accessible. VCA Animal Hospitals' restraint guidance for pet birds describes the correct hold as one that controls the head gently, supports the body fully, and allows the bird to breathe normally. A bird should never be wrapped so tightly that its chest cannot expand.
For small birds such as budgerigars, cockatiels, and lovebirds, one handler can often wrap and trim alone. For conures, African greys, Amazons, macaws, and cockatoos, use a helper, and treat every large parrot with respect for its beak. A large parrot can bite hard enough to cause serious injury even during a routine nail trim.
Step 4: Examine Each Foot and Nail
Bring one foot into the light and look at each nail. Notice three things:
- Which nails curve into a sharp hook and which are already blunt.
- Whether any nail is split, broken, discolored, or bleeding.
- In light nails, where the pink or dark vascular tissue ends.
If a nail looks diseased rather than merely long, for example thickened, crumbly, discolored, or painful to touch, stop and consult your veterinarian. Nail changes can reflect nutritional problems, infection, or other systemic disease in birds, and the Merck Veterinary Manual notes that abnormalities of the beak and nails in birds frequently have underlying medical causes that trimming alone will not fix.
Step 5: Clip a Tiny Sliver From the Tip
Hold the foot steady between your thumb and forefinger with the nail exposed. Position the clipper so you take off only the fine, sharp tip of the hook, well away from the blood vessel. Make one small cut. Look at the cut surface. If it is pale, dry, and clearly dead nail, you can take one more tiny sliver. If you see any pink tint in a light nail, or the bird flinches sharply, stop on that nail.
Repeat for each nail on the foot, then move to the other foot. Most birds have four toes per foot, arranged either in the typical parrot pattern or, in some species, in other configurations, so take a moment to identify each nail rather than trimming by feel.
Step 6: Know When to Stop
The goal is a nail that no longer hooks sharply and does not scratch your skin when you draw the tip across your finger. The nail does not need to be short. A slightly long but blunt nail is far safer than a short nail with a cut quick. If you are unsure after a couple of small cuts, stop. You can trim again in a week or two.
Step 7: Manage Bleeding Immediately if It Happens
If a nail starts to bleed, stay calm and act promptly. Press the nail tip firmly into styptic powder or cornstarch and hold steady pressure for a moment until the bleeding stops. Keep the bird wrapped and quiet while you do this. Once the bleeding has stopped, keep the bird calm and perched on a soft towel surface, and check the nail again over the next several minutes. The Merck Veterinary Manual's guidance on avian grooming emergencies emphasizes prompt pressure and a clotting agent for nail bleeds, and warns that repeated heavy bleeding in a small bird warrants veterinary attention.
Do not apply water, and do not let the bird groom the treated nail while the powder is fresh.
Step 8: Release, Reward, and Monitor
Unwrap the bird, return it to its cage or perch, and offer a treat. Spend a minute watching the bird step normally and grip a perch with both feet. If it holds one foot up persistently, favors a leg, or seems painful, contact your veterinarian.
Step 9: Plan the Next Check
Rather than a fixed schedule, inspect your bird's nails during regular handling, for example when you weigh the bird or change the cage papers. The right interval varies with the species, the perch surfaces in the cage, the bird's activity level, and its age. A young active conure on rough natural branches may need trims far less often than an older, less active canary on smooth plastic perches.
How to Trim Bird Nails at Home: Tips From Avian Practice
These practical tips address the questions owners most often ask once they understand the basic technique.
Trim after a bath or a misting session. Some birds are slightly calmer after bathing, and damp nails are easier to see. Keep the room warm so the wet bird does not chill.
Work in short sessions. If your bird tolerates only a couple of nails before becoming frantic, stop there. Two calm trims a week apart build tolerance better than one traumatic full trim. This is standard advice in avian behavior resources from Lafeber Company and the Association of Avian Veterinarians, both of which stress cooperative care and low stress handling for pet parrots.
Let the bird grip the towel with its feet. A bird that can hold something with its feet often struggles less. Position the towel so the non working foot has something to grasp.
Keep sessions away from feeding time for large parrots only if your veterinarian advises it. For most pet birds, food is not withheld for a nail trim, and a slightly hungry, food motivated bird can be easier to reward afterward. Ask your avian veterinarian whether any fasting applies to your species, because small birds should never be fasted due to their high metabolic rate.
Use a rough perch to slow nail growth between trims. This is discussed in detail in the cage setup section below.
Handle the feet during ordinary cuddle time. Birds that are used to having their toes touched briefly accept nail trims with far less panic. Pair gentle foot touches with a treat over several weeks before you ever bring clippers near.
Watch your own confidence level. Birds read handler tension. If you are frightened, the bird will be frightened, and a frightened bird plus a sharp tool is a bad combination. If you cannot stay calm, book the trim at the clinic.
Common Mistakes When Trimming Bird Nails at Home
These are the errors avian veterinarians see most often in birds that arrive after a home grooming attempt went wrong.
Cutting too much at once. The single most common mistake. Owners try to bring the nail back to a normal length in one cut, cut into the quick, and cause a bleed that frightens both bird and owner. Trim in slivers.
Guessing on dark nails. Pigmented nails hide the quick entirely. Owners of African greys, Amazons, and other dark nailed parrots should trim only the extreme tip or, better, learn the trim technique with veterinary guidance first.
Using the wrong tool. Household scissors crush and split nails. Large dog clippers give no fine control on a budgie's nail. Paper cutters of any kind have no place near a bird.
Restraint that restricts breathing. A towel wrapped too snugly around the chest can suffocate a bird. Birds do not have a diaphragm in the mammalian sense and rely on chest expansion for ventilation, so any hold that compresses the ribcage is dangerous. VCA Animal Hospitals' restraint guidance stresses that a properly held bird has its chest free to move.
Trimming a stressed or overheated bird. Birds that have been chasing around the room, or that have been restrained too long, can overheat and become distressed. Signs include open mouth breathing, holding the wings away from the body, and loss of coordination. If you see these signs, release the bird immediately and stop the session.
Ignoring a broken or bleeding nail. A nail that was already split, torn, or bleeding before the trim is a veterinary problem, not a grooming problem. Damaged nails can be painful and can become infected.
Skipping the bleeding control prep. Having to run to another room for cornstarch while your bird is bleeding wastes the critical first seconds. Everything stays on the table.
Trying to trim alone with a large parrot. A macaw or cockatoo that decides to bite while wrapped can injure the handler badly, and a handler who flinches in pain can drop or squeeze the bird. Two competent people minimum.
Rewarding panic or ending on a bad note. If the session ends with the bird screaming, it learns that nail trims are terrifying. End every session, even a partial one, with calm release and a treat.
Using Cage Setup and Perches to Reduce Nail Growth Naturally
The environment you provide does a large share of the nail maintenance work for you. This is where the bird cage setup conversation connects directly to grooming.
Provide varied perch diameters and textures. A cage furnished only with smooth, uniform dowels gives the feet nothing to grip and nothing to wear the nails. Natural wood branches of varied diameter, safe untreated hardwood from nontoxic species, and textured perch surfaces designed for birds give the toes exercise and gently file the nails with each step. Avian husbandry guidance from the Association of Avian Veterinarians and the Merck Veterinary Manual's pet bird care materials both identify perch variety as a core element of proper bird cage setup, alongside its benefits for foot health.
Position perches so the bird uses them constantly. A single textured perch that the bird never sits on accomplishes nothing. Place the main sleeping perch and the feeding area perches on varied surfaces so the bird's feet contact different textures throughout the day.
Avoid sandpaper perch covers as a nail solution. Sandpaper sleeves glued onto dowels are widely sold for nail wear, but they can abrade the bottom of the feet and cause sores, a problem noted in avian care guidance from VCA Animal Hospitals. They are not a substitute for trims.
Keep the cage floor and perches clean. Droppings accumulated on perches soften wood and create unsanitary footing, which contributes to foot problems.
Check toys and rope perches for frayed threads. Long nails catch on loose strings. A frayed rope perch plus overgrown nails is a common combination behind torn nails and injured toes.
Perch variety reduces how often trims are needed. It does not eliminate the need to inspect the nails and trim when they hook.
Where Nail Trims Fit Into a Parrot Care Checklist
Nail maintenance is one item on a larger routine care list. If you keep parrots, a practical weekly and monthly checklist looks like this:
- Daily: fresh food and water, a visual health check (posture, droppings, appetite, breathing), cage spot cleaning, and interaction time.
- Weekly: full cage cleaning, toy and perch inspection for damage, weighing if you keep records, and a quick look at the nails and feet.
- Monthly: a more thorough nail inspection, beak condition check from a distance, review of perch variety and rotation, and a check of the overall bird cage setup for wear, rust, or loose parts.
- Annually: a wellness examination with an avian veterinarian, including a foot and nail assessment, weight check, and discussion of diet.
Lafeber Company's parrot care resources and the Association of Avian Veterinarians both frame routine grooming tasks, diet, environment, and regular veterinary examinations as interconnected parts of keeping a parrot healthy, rather than as isolated chores. A bird whose nails are checked monthly is also a bird whose feet, weight, and droppings get noticed, which is how early disease gets caught.
Troubleshooting Specific Problems
The bird will not tolerate the towel. Some birds, especially those with limited prior handling, panic when covered. Do not force a long battle. Do a single nail, reward generously, and end. Over weeks, practice short towel sessions with treats and no clipping at all until the bird stays calm. If progress stalls, have the clinic trim the nails and continue cooperative care training at home.
The nail bleeds despite careful cutting. Apply styptic powder or cornstarch with firm pressure as described above. If bleeding does not stop within a few minutes of steady pressure, or if the bird is small, contact your veterinarian. Watch the bird quietly afterward rather than returning it immediately to a high cage where it might climb and reopen the clot.
The nails are deformed, thickened, or growing in odd directions. This is not a home trim situation. Abnormal nail growth in birds can accompany nutritional deficiencies, liver disease, mite infestations, trauma, or other conditions, and the Merck Veterinary Manual lists nail and beak abnormalities among the findings that warrant veterinary evaluation rather than cosmetic correction.
The bird seems painful after the trim. A nail cut slightly short can be sore for a short time even without visible bleeding, and a cut into the quick is genuinely painful. If the bird limps, holds a foot up, refuses to perch, or bites at a toe, contact your veterinarian.
You cannot tell where to cut. On dark nails, if you cannot confidently identify a safe zone, do not experiment. Have the veterinary team demonstrate on your bird, or use a flashlight from beneath the nail if the nail is thin and light enough to transilluminate, and only trim what you can clearly see is dead tip.
Welfare and Safety Points Every Owner Should Know
Birds are prey animals, and restraint itself is stressful for them even when done correctly. Several principles from avian welfare guidance apply directly to nail trims:
- Short and calm beats long and thorough. A partial trim done quietly is better welfare than a complete trim done during a prolonged struggle.
- Never restrain a bird with your hands alone without a towel. Bare handed restraint of a struggling parrot risks bites, broken blood feathers on the wings, and escape.
- Never trim near other pets, children, or open water. A dropped, panicked bird can drown in an open toilet or sink in seconds.
- Watch for signs of distress and stop immediately. Open mouth breathing, wing spreading, and lethargy during restraint are warnings, not inconveniences.
- Wash your hands before and after. This protects both you and the bird, and clean hands prevent contamination of any small cut.
- Keep the experience predictable. The same towel, the same room, the same reward, every time. Predictability lowers stress across sessions.
Limitations and When to Contact a Veterinarian
Individual cases vary, and a veterinarian who has examined your bird is the right person to judge how much nail to remove and how often. That said, these situations call for professional care rather than a home trim:
- Any nail that is bleeding now, torn, split, or missing.
- Nails so overgrown that they curl into a loop or dig into the toe pad.
- Thickened, discolored, crumbly, or deformed nails.
- Lameness, reluctance to perch, or a foot held off the ground.
- Any bird with heart disease, respiratory disease, or a history of problems under stress, since restraint is a physiological stressor.
- Any bird that becomes extremely distressed during handling, particularly older birds or birds with unknown backgrounds.
- A first trim on any bird if no one has shown you the technique in person.
- Bleeding after a home trim that does not stop with firm pressure and a clotting agent within a few minutes.
- Signs of illness after any grooming session, including fluffed feathers, sitting on the cage floor, not eating, or changes in droppings.
Birds are also legally protected animals in the United States, and while routine grooming of a legally owned pet bird raises no regulatory issue, native wild birds cannot be taken in and groomed or kept, so anyone dealing with a wild bird with overgrown nails should contact a licensed wildlife rehabilitator instead of intervening at home.
When in doubt about whether a home trim is safe for your bird, call your avian veterinary clinic and describe what you see. A two minute phone question is cheaper than an emergency visit.
Frequently Asked Questions
How often should I trim my bird's nails at home?
There is no universal interval, because growth depends on the species, age, diet, activity, and especially the perch surfaces in the cage. Check the nails during regular handling, and trim whenever the tips hook sharply enough to scratch skin or catch on fabric. Many pet birds need attention every few weeks to every few months.
Can I use human nail clippers on my bird?
Yes, for small birds, a standard human nail clipper is often an appropriate tool, and many owners of budgerigars and cockatiels use them. For larger parrots, heavier clippers designed for small animals or human toenails usually fit better. The key is a clean, sharp cutting edge and good visibility of the nail tip.
What happens if I cut a bird's nail too short?
The nail will bleed, because you have cut into the blood vessel and nerve inside the nail. Press the tip into styptic powder or cornstarch and hold firm pressure until bleeding stops. Keep the bird calm afterward. If bleeding does not stop within a few minutes, or if the bird is small, contact your veterinarian.
How do I trim a bird's nails when the nails are dark and I cannot see the quick?
Trim only the very tip of the hook and stop, accepting that the nail will remain somewhat long. Never guess deeper on a dark nail. If the nails need significant shortening, have your avian veterinarian perform the trim and teach you what a safe cut looks like on your specific bird.
Is it better to file a bird's nails instead of clipping them?
Filing with an emery board after a trim can smooth sharp edges, but filing alone is usually too slow for nails that are already overgrown, and most birds do not tolerate the prolonged handling it requires. Clipping a small sliver, then filing the edge smooth if the bird tolerates it, is the most practical approach for most owners.
Why are my bird's nails overgrown even though it has perches?
Smooth, uniform perches do not wear nails effectively. Nail growth also increases with age and reduced activity in some birds. If you provide perch variety and the nails still overgrow rapidly, mention it at your bird's next veterinary visit, because abnormal nail growth can occasionally signal an underlying health issue.
Should I restrain my bird myself or have someone help me?
For small, calm birds, one experienced handler can often wrap and trim alone. For medium and large parrots, a helper is strongly recommended so one person restrains while the other trims. A large parrot's beak can cause serious injury, and a helper also lets you focus fully on the clippers.
Can overgrown nails hurt my bird?
Yes. Long nails change how the foot grips a perch, can curl and press into the toe pads, and can catch on cage wire, toys, and fabric, leading to torn nails or injured toes. Overgrown nails also scratch the bird's own legs. Regular inspection and timely trims prevent these problems.