How Often to Clean a Finch Habitat: Cleaning Schedule
By Dr. Zubair Khalid, DVM, MS, PhD ·
Clean the litter tray and change soiled liner paper daily, do a partial clean of perches, dishes, and accessories once a week, and perform a full deep clean of the entire enclosure every three to four weeks. This three-tier rhythm, daily, weekly, and monthly, is the backbone of a sound finch cage cleaning schedule. Finches are small, active birds that produce a surprising volume of droppings and scattered seed husks for their size, and waste accumulates quickly in a compact cage. A consistent routine keeps ammonia and mold from building up, keeps pests away, and gives you a daily chance to notice changes in your birds before they become medical problems.
This guide walks through each tier of the schedule in detail, explains why the timing matters, lists supplies worth keeping on hand, reviews safe cleaning products for finches, and covers the situations that call for cleaning more often than the standard schedule.
At a Glance: Finch Cage Cleaning Schedule
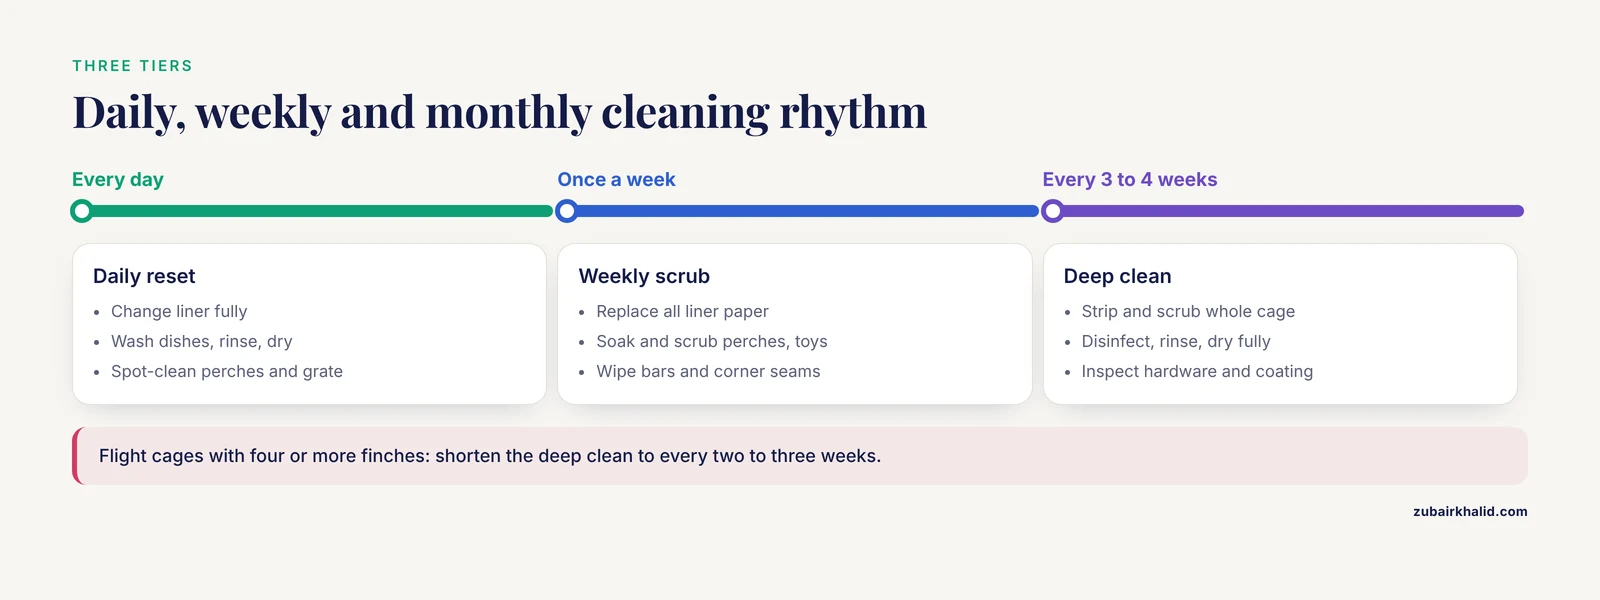
Use this checklist as your working calendar. Adjust the frequency upward if you keep a large flight cage, breed finches, or notice odor and debris building faster than expected.
| Frequency | Task | Time Required |
|---|---|---|
| Daily | Change soiled liner paper or tray substrate | 2 to 3 minutes |
| Daily | Wash food and water dishes with hot soapy water, rinse, dry | 3 to 5 minutes |
| Daily | Spot-clean droppings from perches, grate, and cage walls | 2 to 3 minutes |
| Daily | Scan birds, droppings, and feather condition while cleaning | 1 minute |
| Weekly | Replace all liner paper, wipe bars, scrub perches and toys | 20 to 30 minutes |
| Weekly | Rotate in clean perches and dishes while used ones dry | 5 minutes |
| Every 3 to 4 weeks | Full deep clean of the entire enclosure, including bars, corners, grate, tray, and all accessories | 45 to 60 minutes |
| Seasonally | Inspect cage hardware, replace worn perches and chewed or corroded items | As needed |
One practical habit makes this schedule much easier to sustain. Keep two complete sets of dishes and perches so you can swap clean items in immediately and scrub the used set at your leisure.
Why Finch Habitat Hygiene Affects Health and Well-Being
Adequate housing is the foundation of welfare for captive birds. Research on zebra finches frames adequate housing as a prerequisite for animal well-being and shows that simple, non-invasive assessments can detect how well a bird is coping with its captive environment [1]. A dirty cage undermines that foundation in several ways at once.
Accumulated droppings release ammonia as they break down. Birds have highly efficient respiratory systems, and avian veterinarians consistently warn that airborne irritants affect birds at lower concentrations than they affect humans. In a small room or a cage positioned near a wall where air moves slowly, waste that sits for days creates a microclimate of fumes and moisture around your finches.
Damp seed hulls, spilled food, and moist litter support mold and bacterial growth. Wet areas around water dishes are the usual starting point. Pests such as seed moths and mites are also drawn to neglected cages, and an established infestation is far harder to fix than one prevented by routine cleaning.
There is a monitoring benefit as well. The act of cleaning is a daily health check. When you change the paper each morning, you see the number, color, and consistency of the droppings, how much seed was actually eaten, and whether any feathers look unusual. Researchers studying captive zebra finches developed a plumage scoring system precisely because feather condition is a simple, reliable, non-invasive indicator of well-being in these small songbirds, one that different observers can apply consistently with modest training [1]. You can borrow the same logic at home. A finch with smooth, well-groomed plumage, bright eyes, and steady weight is a finch whose environment is serving it well. Ruffled, soiled, or broken feathers that persist after a cage refresh are a signal worth investigating.
Finches also notice their surroundings more than owners sometimes assume. In zebra finch studies, environmental cues in the birds' surroundings, independent of anything attached to the birds themselves, influenced choice behavior in experimental settings [2]. A habitat that is visually and physically consistent, with clean surfaces and stable placement of familiar items, supports normal behavior rather than disrupting it.
The Daily Routine (5 to 10 Minutes)
The daily routine is the part of finch habitat hygiene that actually prevents most problems. Droppings and damp seed hulls should never sit longer than a day in a finch cage.
Change the Liner or Tray Substrate
Remove the top layer of paper liner or empty the pull-out tray completely. Do not simply lay fresh paper over soiled paper, because moisture trapped between layers feeds bacterial and fungal growth. Plain unscented paper, paper liners sold for cages, or newspaper work well. Avoid cedar and pine shavings, which aromatic oils make a poor choice for small birds, and avoid clumping litters or anything dusty.
As you lift the old paper, glance at the dropping pattern. Normal finch droppings are small, dark, and capped with white urates. A sudden change in volume, color, or consistency across the whole cage deserves attention.
Wash Food and Water Dishes
Wash dishes with hot water and a mild dish soap, rinse thoroughly, and dry before refilling. Water dishes in particular develop a slimy biofilm within a day, and biofilm harbors bacteria that simple rinsing does not remove. If you use water bottles with drinking tubes, scrub the tube with a small brush daily. Many finch keepers prefer to provide water in a way that prevents droppings and bath splashes from contaminating it, such as a hooded dish or a bottle, and whatever system you use needs that daily scrub.
Finches bathe frequently, and bath water fouls quickly. Empty and rinse the bath after each use rather than leaving it in the cage.
Spot-Clean Surfaces
Use a paper towel or a dedicated scraper to remove droppings from perches, cage bars, the grate, and toys. Lined or feathered perches accumulate droppings fastest. Two minutes with a damp cloth keeps the weekly workload manageable.
Observe While You Work
Cleaning time is the best time to watch your birds calmly. Note activity level, posture, feather condition, and whether both birds are eating normally. Zebra finch research demonstrates that plumage condition is a practical, teachable indicator of welfare status in this species [1], and the same principle applies to other commonly kept finch species as a general husbandry observation.
The Weekly Routine (20 to 30 Minutes)
Once a week, replace all liner paper even if it looks acceptable, and take accessories out for real scrubbing rather than spot-cleaning.
Weekly Tasks, Step by Step
- Move the finches to a safe temporary holding cage or, if they are tame and the room is secure, keep them in a closed room away from the open cage while you work.
- Remove all dishes, perches, toys, ladders, and swings. Soak them in hot water with a small amount of mild dish soap.
- Scrub each item with a dedicated brush. Pay attention to the junction where perches meet the cage wall, where droppings pack in.
- Remove all liner paper and wipe or scrape the tray. If the tray has caked debris, let warm water sit on it for a few minutes to soften it before scraping. Never use a metal scraper or knife on plastic tray surfaces in a way that gouges them, because scratches harbor bacteria.
- Wipe cage bars, corner seams, and the grate with a bird-safe cleaner or a vinegar solution, then wipe again with clean water.
- Dry all parts completely before reassembly. Moisture left in seams and corners is where hygiene problems restart.
- Rotate in your spare perches and dishes if the used set is still drying.
- Vacuum or sweep around the cage. Seed hulls and feather dust accumulate on the floor beneath finch cages and belong in the weekly routine, not the monthly one.
Cage position matters here. A cage on a hard floor surface that can be swept or mopped is far easier to keep hygienic than one placed over carpet, where hulls and dust work into fibers.
Deep Cleaning a Finch Enclosure (Every 3 to 4 Weeks)
Even a well-maintained cage develops invisible film and debris in places a weekly wipe misses. A monthly deep cleaning of the finch enclosure resets the whole habitat. If you keep four or more finches in a flight cage, shorten the interval to every two to three weeks.
Step-by-Step Deep Clean
- Relocate the birds. Place your finches in a travel cage or spare cage in a warm, draft-free room. Finches are not handleable birds in the way parrots are, so plan the move around catching them gently with low light if needed, and minimize how long they are held.
- Strip the cage completely. Remove and set aside every accessory. Empty the tray and pull out the grate if your cage has one.
- Take the cage to a washable area if possible. A bathtub, utility sink, or outdoor patio makes deep cleaning far easier. If the cage cannot be moved, lay towels beneath it.
- Pre-soak. Spray or wet all surfaces with warm water and let it sit for five to ten minutes. Dried droppings and seed residue soften and come off without aggressive scrubbing.
- Scrub everything. Use a stiff brush dedicated to cage cleaning, never one shared with the kitchen. Work bars, welds, corner seams, door tracks, the grate, and the tray. Door tracks and the seams where the tray slides in are the two most commonly missed zones in any deep clean.
- Apply a bird-safe disinfectant where needed. After visible debris is gone, apply your chosen disinfectant according to its label, respecting contact time. Disinfectants work on clean surfaces, not on debris, which is why scrubbing comes first.
- Rinse thoroughly. Rinse every surface with clean water until no cleaning product residue remains. Residue is the main chemical risk of deep cleaning, not the product itself.
- Dry fully. Air dry in sunlight if you can, or towel dry and then let the cage stand open until every seam is dry. Reassembling a damp cage traps moisture in joints.
- Clean accessories separately. Scrub perches, toys, and dishes with the same process. Retire any wooden perch that is saturated, cracked, or cannot be cleaned, and any toy with frayed parts or corroded hardware.
- Reassemble with fresh liner, full dishes, and a bath. Return the birds once the cage is completely dry and any cleaning odor has fully dissipated.
While the cage is stripped, inspect it. Check for rust at welds, chipped powder coating, bent bars, and loose fasteners. Finches are not strong chewers compared to parrots, but worn hardware and damaged coating are still worth replacing on discovery rather than waiting for failure.
Safe Cleaning Products for Finches
This is the area where good intentions most often harm birds. Birds' respiratory systems are far more sensitive to airborne chemicals than mammals' systems, and avian care resources from organizations such as the Association of Avian Veterinarians and the Merck Veterinary Manual emphasize fume avoidance as a core element of pet bird safety. Safe cleaning products for finches share three properties: they leave no fumes, they leave no residue, and they are used with the birds out of the room.
Reasonable choices for routine cleaning:
- Hot water and a small amount of mild, unscented dish soap for daily and weekly dish washing and scrubbing, followed by thorough rinsing.
- White vinegar diluted with water, roughly one part vinegar to one or two parts water, for wiping bars, tray, and walls. It cuts mineral deposits and light droppings, and it needs a clean-water wipe afterward because residue is sticky.
- Plain hot water and mechanical scrubbing, which resolves most of the actual cleaning workload.
For disinfection during a deep clean, discuss the product with your avian veterinarian before the first use. Options commonly discussed in avian practice include diluted household bleach solutions, accelerated hydrogen peroxide products, and quaternary ammonium products, but each carries specific dilution, contact time, and rinsing requirements, and mixing products is dangerous. The principle that applies to all of them is the same: visible debris first, disinfectant second, complete rinsing third, full drying fourth, and no birds in the room at any point during the process.
What to keep out of the finch room entirely:
- Aerosol sprays of any kind, including air fresheners, deodorizers, and furniture polish.
- Scented cleaners, pine and citrus oil products, and strong essential oil diffusers near the cage.
- Oven cleaners and drain cleaners, which are acutely dangerous to birds.
- Overheated nonstick cookware and other polytetrafluoroethylene-coated items in the same airspace. Avian toxicity from polymer fumes is a well-recognized emergency in pet bird medicine, and finches sharing a kitchen-adjacent room are exposed to it.
If you can smell a cleaning product strongly, your finch can inhale far more of it. When in doubt, clean in a separate room and let everything air out fully before the birds return.
Supplies Worth Keeping on Hand
Selection criteria matter more than brands. Choose these items with finch-scale safety in mind.
- Plain paper liner or newspaper, enough for at least a month of daily changes.
- Two complete sets of stainless steel or ceramic dishes, so one set can dry while the other is in use.
- Natural wood, rope-free untreated branches, or textured perches in finch-appropriate diameters, in duplicate for rotation. Avoid sandpaper perch covers, which abrade feet without meaningfully cleaning them.
- Two dedicated brushes, one for dishes and one for cage surfaces, plus a narrow bottle brush for tubes.
- A plastic scraper with a softened edge for the tray.
- Unscented mild dish soap and white vinegar.
- A spray bottle for dilution and rinsing, kept labeled and stored away from food.
- A travel or holding cage for deep clean days.
Store all cleaning supplies in a closed cabinet away from the bird room. Curiosity is not a finch trait in the way it is for parrots, but fumes travel, and storage near the cage defeats the purpose of careful product selection.
Common Mistakes Finch Owners Make
Layering paper over paper. It saves thirty seconds today and creates a damp, contaminated layer cake that you will find at the weekly clean. Full liner replacement is a daily task.
Cleaning with the birds in the cage. Sprays, splashes, and fumes reach the birds directly, and finches startle badly at close movement. Move them out or clean around them without any product, never both.
Rinsing inadequately after disinfecting. Residue on perches contacts feet and beaks all day. The rinse step deserves as much time as the scrub step.
Scrubbing everything but the seams. Corner welds, door tracks, grate edges, and the tray channel hold the oldest debris in the cage. A deep clean that skips them is a weekly clean with extra steps.
Ignoring the area around the cage. Hulls, feathers, and dust beneath and behind the cage feed pests and hold odor. Include the cage surroundings in the weekly routine.
Overcleaning to the point of constant disruption. The goal is clean, not sterile. Replacing every perch and rearranging the layout weekly unsettles birds whose sense of security depends on a familiar environment. Keep the layout stable and let deep cleans restore rather than redesign. Environmental stability matters to finches, as work on zebra finches shows that cues in the birds' surroundings can influence their behavior and choices [2].
Cleaning during the quiet hours finches need. Schedule disruptive cleans for the morning after your birds have had their main activity period, never late at night, and let them settle promptly afterward.
Cleaning During Special Situations
Molt
Finches shed and replace feathers periodically, and molted down and pinfeather casings add to the debris load. During an obvious molt, check the bath more often and be slightly more generous with the vacuum. Persistent ruffled or broken plumage after molt ends is not a cleaning problem, it is a health question, and feather condition is precisely the kind of simple visual indicator that research on captive zebra finch well-being supports monitoring [1].
Breeding and Nesting
If your finches are breeding, hygiene requirements rise sharply. Chicks produce concentrated droppings, and nest material combined with moisture creates conditions for bacterial and fungal growth. Change liner daily without exception, keep dishes scrupulously clean, and ask your avian veterinarian before removing or replacing any nest material, because some finch species are sensitive to nest disturbance. Avoid deep cleaning that moves the whole cage or changes the room layout while chicks are in the nest.
Illness or New Arrivals
When a bird is ill, step up cleaning immediately and discuss disinfection with your veterinarian, because the appropriate protocol depends on the suspected problem. Droppings from a sick bird should be removed daily so both you and your veterinarian can observe them, and isolating the affected bird in a separate cage keeps observation easier.
Newly acquired finches should be quarantined away from your established birds, typically in a separate room and a separate cage with separate supplies, for a period your avian veterinarian recommends. The quarantine cage follows the full cleaning schedule, and its supplies are never shared with the main cage until quarantine ends.
How Clean Is Too Clean? Reading Your Finches
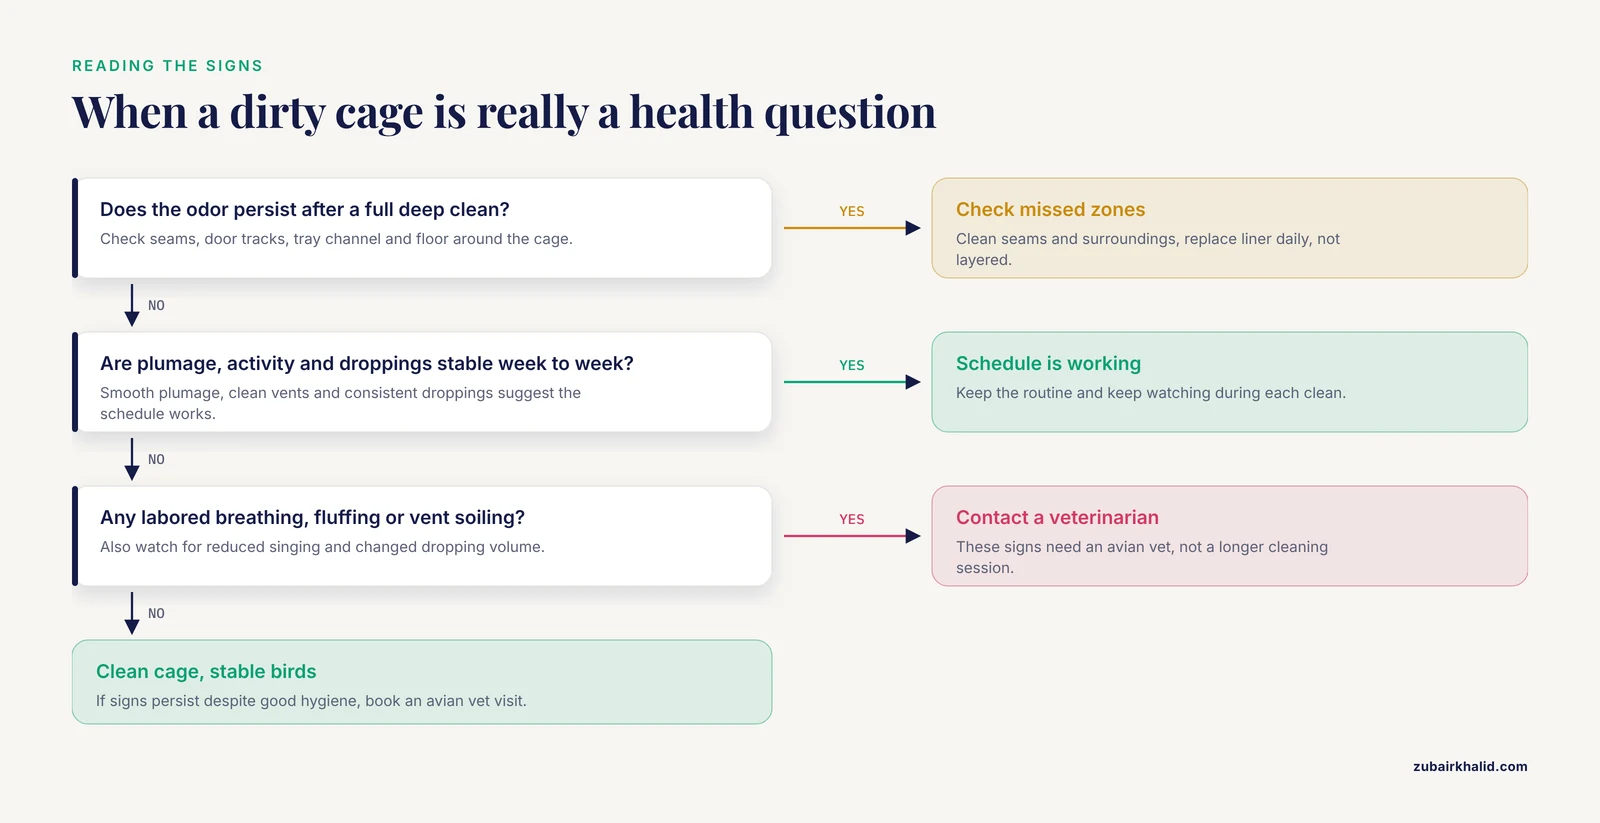
The cleaning schedule is a tool, and your birds' condition is the report card. A habitat with good finch hygiene produces birds with smooth, well-groomed plumage, active and varied behavior, clean vents, and consistent droppings. Zebra finch research validated plumage scoring as a reliable, non-invasive welfare indicator that even minimally trained observers can apply consistently [1], and the practical takeaway for owners is direct. Look at your birds during every clean. If plumage quality, activity, and droppings are stable from week to week, your schedule is working.
Conversely, some signs indicate either an environmental problem or a health problem, and cleaning changes alone will not answer which. Watch for labored or open-mouth breathing, which researchers studying zebra finches treat as a behavior potentially related to discomfort or distress [3]. Watch for persistent fluffing, feather soiling around the vent, flaking or damaged skin, droppings stuck to the vent, reduced singing, and changes in dropping volume or consistency. These findings belong in a veterinary conversation, not in a longer cleaning session.
Limitations and When to Contact a Veterinarian
The schedule in this article reflects widely used husbandry practice for small passerine pets, and individual circumstances vary with cage size, flock size, room ventilation, diet, and species. A cleaning schedule is not a diagnostic tool, and individual cases need a veterinarian. An avian veterinarian can tailor hygiene intervals to your specific setup and help you interpret what you observe during cleaning.
Contact an avian veterinarian promptly if you observe any of the following:
- Open-mouth breathing, tail bobbing at rest, clicky or wet respiratory sounds, or any labored breathing.
- Sitting fluffed on the cage floor, or a finch that stops singing and interacting for more than a day.
- A change in droppings affecting the whole bird, including persistent diarrhea, undigested seed in droppings, blood, or a sudden drop in dropping volume.
- Plumage that remains ruffled, soiled, or degraded for more than a week despite good hygiene and normal feeding.
- A bird that stops eating, which in a small finch is an emergency measured in hours, not days.
- Visible pests on the birds or in the cage, such as mites, or an infestation of seed moths that cleaning has not resolved.
- Any injury, bleeding, or trauma.
- Sudden death of a finch, where a veterinarian can help you assess risk to remaining birds and whether necropsy is worthwhile.
Seek emergency care for respiratory distress, bleeding, a bird on the cage floor, or a bird that has stopped eating and drinking.
This article is educational and is not a substitute for veterinary diagnosis or treatment.
Frequently Asked Questions
How often should I fully clean a finch cage?
Deep clean the entire enclosure every three to four weeks, with daily liner changes and weekly scrubbing of dishes, perches, and bars in between. Shorten the deep clean interval to every two to three weeks for larger flight cages or breeding setups.
Can I clean the cage while the finches are inside?
Spot cleaning with water only and no sprays can be done around calm birds, but any product use, scrubbing, or deep cleaning should happen with the finches in a separate cage or room. Finches startle at close movement, and fumes and splashes reach them directly if they stay in the cage.
What disinfectant is safe around finches?
No disinfectant is safe to apply with finches present. Discuss specific products with your avian veterinarian, use them only after visible debris is removed, follow the label dilution and contact time, rinse completely, dry fully, and keep the birds out of the room until all odor is gone.
Is vinegar safe to use in a finch cage?
Yes, white vinegar diluted with water is a common bird-safe cleaner for bars, trays, and walls. Wipe surfaces with clean water afterward so no residue remains, and keep the birds out of the room while you clean so they do not inhale the vapor.
How do I clean perches and toys?
Soak them in hot water with mild dish soap, scrub with a dedicated brush, rinse well, and dry completely before returning them. Retire wooden perches that are saturated, cracked, or cannot be fully cleaned, and toys with frayed parts or corroded hardware.
Should I remove the nest when cleaning?
Not while eggs or chicks are present, and not without asking your avian veterinarian first, because nest disturbance can disrupt breeding finches. Outside of breeding, clean or replace nest material according to your veterinarian's guidance for your species.
Why does my finch cage smell even after cleaning?
Persistent odor usually means waste is trapped somewhere the routine misses, such as corner seams, door tracks, the tray channel, or the floor and walls around the cage, or the liner is being layered instead of replaced. A full deep clean that targets seams and the surrounding area, plus daily full liner changes, resolves most odor problems. If odor persists with a clean cage and the birds seem unwell, contact your veterinarian.
How often should I change cage liner paper?
Change the liner fully every day. Remove the entire soiled layer rather than placing fresh paper on top, and use the moment to check droppings, food intake, and feather condition.
Sources
- Plumage and Fat Condition Scores as Well-Being Assessment Indicators in a Small Passerine Bird, the Zebra Finch (Taeniopygia guttata).
- Colour Cues That Are Not Directly Attached to the Body of Males Do Not Influence the Mate Choice of Zebra Finches.
- Evaluation of Best Practices for the Euthanasia of Zebra Finches (Taeniopygia guttata).