How to Choose a Bird Carrier for Vet Visits
By Dr. Zubair Khalid, DVM, MS, PhD ·
The best bird carrier for vet visits is a secure, hard-sided or rigid fabric carrier that is slightly larger than your bird, ventilated on at least two sides, easy to clean, and equipped with a perch your bird can grip during travel. Your bird's regular cage is usually too large, too heavy, and too difficult to secure in a car, which is why avian veterinarians recommend a dedicated travel carrier for every appointment, even short ones. Birds are prey animals that hide illness until disease is advanced, so the Association of Avian Veterinarians encourages routine annual examinations by an avian veterinarian, and safe transport is the first step in making those visits possible.
This guide walks through the entire process. You will learn how to choose the right carrier step by step, how to train your bird to accept it calmly, what to pack on appointment day, the mistakes owners make most often, and when to call your veterinarian before you ever leave the house.
This article is educational and is not a substitute for veterinary diagnosis or treatment.
At a Glance: Choosing and Using a Bird Carrier for Vet Visits
| Step | Action | Key Detail |
|---|---|---|
| 1 | Measure your bird | The carrier should let the bird stand, turn around, and perch comfortably without wide open space to flap hard |
| 2 | Choose the carrier type | Hard-sided travel crates, rigid fabric soft carriers, and clear bubble-style carriers all work when they close securely and ventilate well |
| 3 | Check ventilation and latches | Airflow on at least two sides, escape-proof doors, no gaps wide enough for a head or foot |
| 4 | Add a perch | A grippy natural or textured perch positioned so tail feathers do not rub the floor or walls |
| 5 | Line the floor | Paper-based substrate on the bottom, changed after every trip |
| 6 | Train before travel | Introduce the carrier days or weeks ahead, feed treats near and inside it, take short practice drives |
| 7 | Prepare the car | Secure the carrier on a seat or footwell, shield it from direct sun and drafts, keep the cabin temperature comfortable |
| 8 | Pack the appointment kit | Towel, spare liner, snacks if your bird is healthy, your questions written down |
| 9 | Cover partially | A light cover over two or three sides reduces visual stress while keeping airflow open |
| 10 | Drive gently | Smooth starts, slow turns, no loud music, carrier level and strapped in |
Why a Dedicated Carrier Matters for Bird Health
Birds differ from dogs and cats in ways that directly affect transport. Their respiratory system is highly efficient and sensitive to inhaled fumes, their bones are fragile, and they respond to unfamiliar sights with a strong fear response that can escalate to thrashing. Veterinary references on pet bird care describe how easily birds become stressed by environmental change and how that stress can affect eating, droppings, and behavior. A well-chosen carrier reduces that stress before it starts.
There are three reasons a dedicated carrier outperforms improvised options such as cardboard boxes, laundry baskets, or the home cage.
First, security. A bird that escapes in a parking lot or inside a waiting room is in serious danger. Windows, ceilings with fans, other animals, and open doors all pose risks. VCA Animal Hospitals emphasizes secure confinement during transport as a standard part of avian care guidance.
Second, safety in the car. A carrier that can be belted into a seat protects your bird from sudden stops in a way that a loose cage or a box on the floor cannot. The Association of Avian Veterinarians provides owner guidance on safe travel and the importance of minimizing stress during trips to the veterinarian.
Third, diagnostic value. When the carrier is lined with clean paper, your veterinarian can examine fresh droppings during the visit. Dropping color, volume, and consistency are among the most useful daily health indicators in pet birds, and a paper-lined carrier makes them easy to observe.
The Ultimate Bird Carrier Guide: Types Compared
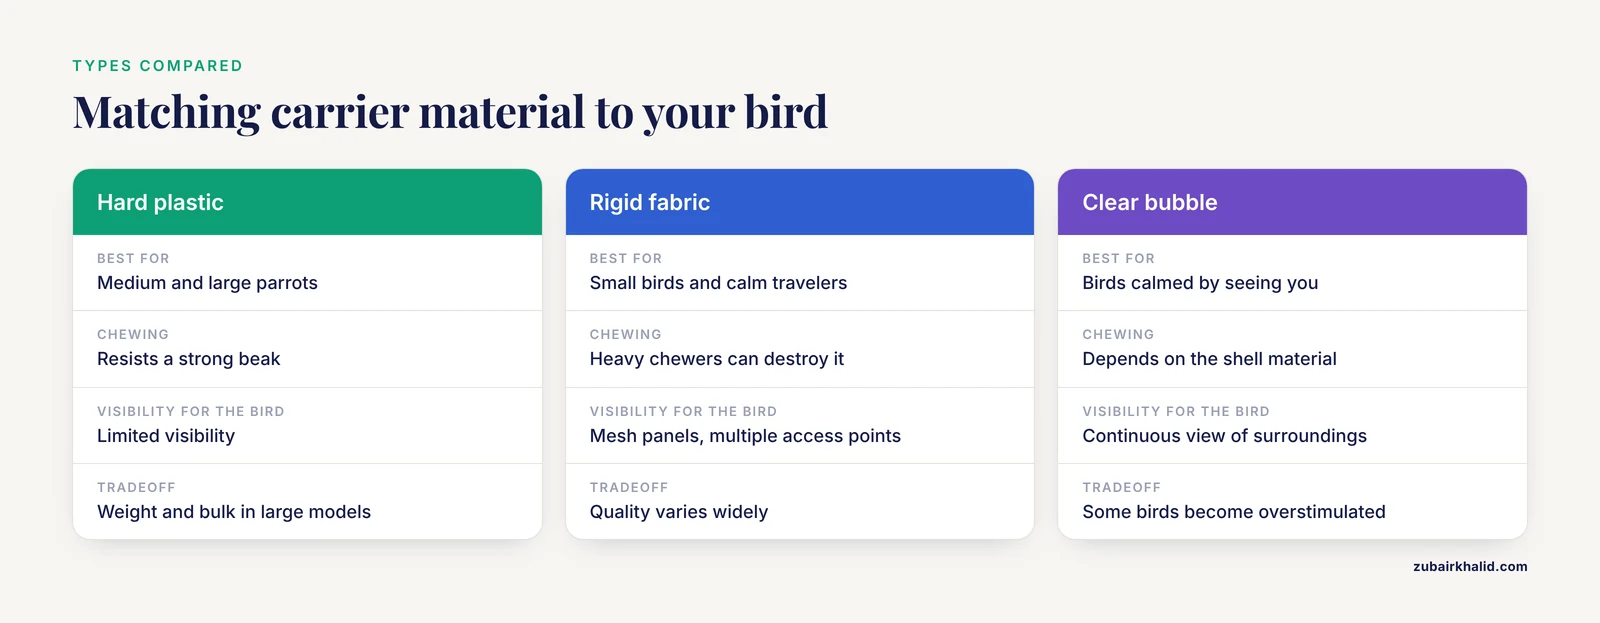
Understanding the main carrier categories helps you match one to your bird's size, temperament, and travel routine.
Hard-Sided Plastic Travel Carriers
These are molded plastic crates with wire door panels, similar in style to small dog and cat carriers. They are the default recommendation for medium and large parrots because they resist chewing, clean easily, and hold up to a strong beak. Choose one with a door latch that a curious beak cannot lift, and add your own perch if the model does not include one.
Advantages include durability, easy disinfection, and stability on a car seat. Disadvantages are weight and bulk for large models, and limited visibility for a bird that finds seeing you calming.
Rigid Fabric and Soft-Sided Carriers
These carriers use a structured frame with mesh ventilation panels. They are lighter, easier to carry, and often have multiple access points, which makes getting a bird in and out less of a wrestling match. Quality varies widely. Check that the mesh is metal or tightly woven and that zippers lock or tuck away, because many parrots open ordinary zippers within minutes. Soft carriers suit small birds and calm travelers. Heavy chewers can destroy them, so know your bird before you buy.
Clear Bubble and Window Carriers
Transparent carriers let the bird see its surroundings and let you monitor it continuously. Some birds relax when they can watch the road and see their owner. Others become overstimulated by passing traffic. If you choose a clear carrier, test your bird's reaction at home first and keep a light cover available to dim the view if needed.
Travel Cages
A small dedicated travel cage, distinct from your bird's main enclosure, is a reasonable choice for long drives or birds who need more room. It offers space for a perch, a small water cup, and footing variety. The tradeoff is weight and the challenge of securing it in a vehicle. For routine veterinary appointments, most owners do better with a compact carrier.
Cardboard and Disposable Options
Cardboard pet carriers are marketed for short trips. They work in emergencies but fail the durability test for any parrot with a functional beak and they offer poor protection in a hard stop. Treat them as a backup, not a primary carrier.
Bird Carrier for Vet Visit Step by Step: Selecting the Right One
Work through this sequence before you buy.
Step 1: Measure Your Bird
Stand your bird on a flat surface and estimate its height from the top of the head to the tip of the tail. The carrier needs interior height that clears the tail when the bird sits on a perch, plus room for the perch itself. Width should let the bird turn around. Excess space is not better. A carrier that is too large lets a bird thrash hard enough to injure wings and feathers, while a correctly snug carrier limits that motion naturally.
Step 2: Match the Carrier to Your Bird's Beak and Personality
A canary and a macaw have opposite requirements. Small finches and canaries do well in fabric carriers with fine mesh. Cockatiels, conures, and other small parrots need chew-resistant materials with secure zippers. Large parrots such as African greys, amazons, and macaws generally require hard plastic or stainless construction. Merck Veterinary Manual husbandry guidance for pet birds underscores that cage and enclosure materials must stand up to the individual bird, and the same logic applies to carriers.
Step 3: Evaluate Ventilation and Airflow
Look for ventilation openings on at least two sides. Cross-flow airflow matters because a carrier with openings on only one side can trap heat when that side faces the sun. Confirm that the openings are too small for a foot or beak to catch.
Step 4: Test the Doors and Latches
Open and close every door several times. Ask yourself three questions. Can my bird reach the latch? Can the latch pop open if the carrier tips? Can I open it one-handed in an emergency? Spring-loaded double latches are the most escape-resistant design for parrots.
Step 5: Plan the Interior
The best veterinary carrier interiors are simple. One perch, positioned so your bird sits comfortably with its tail clear of the walls and floor. A non-slip floor covered with plain paper. No loose toys that can shift during braking. Bare or lightly textured perches are easier to sanitize than rope or sandpaper covers, and sandpaper perch covers are generally discouraged because they can abrade the bottom of the feet.
Step 6: Confirm It Fits Your Car and Your Hands
Place the carrier in your back seat or passenger footwell before purchase if possible. You want a carrier that stays level when belted in, opens toward you, and can be carried without hunching. Two handles are more stable than one for larger models.
Step 7: Buy Ahead of the Appointment
Never buy a carrier the morning of a vet visit. Birds need time to accept new objects, which is covered in the training section below.
Preparing the Carrier Interior: Lessons From Good Cage Setup
The same principles that guide a healthy main cage also apply inside a travel carrier, just in miniature. Sound bird cage setup prioritizes appropriate perch diameter, safe substrate, placement away from drafts and kitchen fumes, and easy cleaning. Those same checks matter in a carrier.
Perch choice. Offer a perch sized to your bird's feet so the toes wrap partway around it. Natural wood branches from bird-safe, pesticide-free trees work well. Avoid sandpaper perch covers, which can abrade the bottom of the feet.
Floor lining. Plain paper or paper-based bedding lines the floor and absorbs droppings. Avoid cedar shavings and dusty litter. Newspaper printed with standard soy-based ink is generally acceptable, and plain unprinted paper is always safe. Change the liner after every trip so the carrier is fresh for the next use and so your veterinarian can read the dropping pattern from the ride.
What to leave out. No food dishes that swing, no mirrors, no loose gravel, no toys with small parts. A vet visit carrier is a short-stay environment. Simple is safer.
Cover. Keep a lightweight breathable cover, such as a thin cotton sheet, with the carrier. A partial cover over the back and sides of the carrier often calms birds during the drive while leaving the front open for airflow and your monitoring. VCA guidance for pet bird owners notes that covering can reduce visual stimulation during transport.
Carrier Training: Getting Your Bird Comfortable Before Travel Day
A carrier your bird has never seen will read as a predator trap on appointment day. Training turns that object into a familiar, even welcome, space. Start at least one to two weeks before the visit, and earlier for nervous birds.
- Place the carrier in a main living area with the door open and secured. Let your bird observe it as ordinary furniture for several days.
- Feed near the carrier. Offer a favorite treat beside it, then on its floor, then inside it. Lafeber Company owner resources emphasize the value of favorite foods as enrichment and positive reinforcement tools in parrot care.
- Encourage voluntary entry. Place a treat or a small foraging item inside and allow the bird to walk in on its own. Close the door briefly, reopen, and reward. Gradually extend closed-door time while you sit nearby.
- Practice the towel. Even with training, some birds need gentle towel restraint for examinations. Practice wrapping your bird in a soft towel at home in calm, short sessions so the towel itself is not terrifying. Ask your veterinary team to demonstrate if you are unsure, because birds must never be restrained by tight squeezing, which prevents the chest from expanding.
- Take short drives. Once the bird steps into the carrier willingly, sit in the parked car with it for a few minutes, then take a five-minute drive around the block. Reward calm behavior when you return home.
- Rehearse the full routine. Carry the carrier to the car, belt it in, drive, return. A bird that has done this three times treats the real appointment as routine.
Bird Carrier for Vet Visit Tips for Travel Day
These practical tips cover the day itself.
Schedule smartly. Book morning appointments when clinics are typically quieter and waiting-room exposure to other animals is lower. Ask the clinic whether you can wait in the car and be texted when an exam room is free. Many avian practices happily accommodate this, and the Association of Avian Veterinarians encourages practices to reduce waiting-room stress for birds.
Check the weather before you leave. Birds are sensitive to temperature extremes and drafts. In summer, pre-cool the car before the bird leaves the house. In winter, pre-warm it and shield the carrier from heater vents blowing directly on it. Never leave a bird in a parked car.
Secure the carrier. Place it on the back seat or the passenger footwell and run the seat belt through the handle or around the base. A carrier that slides under hard braking injures birds even when it never leaves the cabin.
Watch the droppings window. Many birds do not defecate normally when nervous. Mention to your veterinarian if your bird has not passed droppings since leaving home, because that context matters when the doctor evaluates the sample on the paper liner.
Pack a small appointment kit. Include the following:
- A spare paper liner
- A soft towel
- A photo of your bird's normal posture and feathers on your phone
- A written list of your questions and any changes you have noticed in appetite, droppings, vocalization, or activity
- A small container of your bird's regular diet, if your veterinarian has asked for a fresh sample or if the visit involves a procedure
Bring the right history. If this is a first visit, note what diet your bird eats, how long you have owned it, whether other birds live in the home, and any prior illness. Avian veterinarians rely heavily on husbandry history, and diet in particular is a common root cause of health problems in pet parrots.
Common Bird Carrier Mistakes to Avoid
Most transport problems trace back to a short list of predictable errors.
Using the home cage. The main cage is too large to belt securely, too heavy to carry safely, and exposes the bird to wind and debris if carried outside. Save it for home use and dedicate a carrier for travel.
Letting the bird ride loose or on a shoulder. An unrestrained bird in a moving car can be injured by braking, can reach the driver, or can escape out an open door in seconds. This is the single most dangerous mistake in bird transport.
Skipping training. A first carrier appearance on vet day guarantees a panicked bird and a difficult capture, which raises stress for everyone and can complicate the physical examination.
Overcrowding the carrier. Multiple birds in one carrier can injure each other during transport. Each bird travels in its own carrier, even bonded pairs, unless your veterinarian advises otherwise.
Sealing the carrier. Wrapping a carrier completely in a thick blanket or placing it inside a closed bag eliminates ventilation. Covers should be partial and lightweight, always with airflow open.
Ignoring the perch. A bird sliding on a flat plastic floor cannot balance and will panic. A single correctly placed perch transforms the ride.
Wrong positioning in the car. A carrier on a seat under direct sun, in front of an air vent, or on the floor where it can roll under the brake pedal creates avoidable risk. Level, belted, shaded, and draft-free are the four checks before you start the engine.
Arriving without liner paper. Some owners line carriers with fabric towels, which soak through, hide the droppings, and are hard to sanitize. Paper is the practical standard.
Troubleshooting Carrier Problems
My bird panics the moment the carrier door closes. Slow the training timeline. Feed every meal near the open carrier for several days. If panic persists, ask your veterinarian about whether scheduling flexibility or mild calming strategies are appropriate for your individual bird. Individual cases need a veterinarian, and a bird that injures itself thrashing needs professional guidance before its next appointment.
My bird chews through fabric and zippers. Upgrade to hard-sided construction immediately. Inspect any soft carrier after every use, because a compromised mesh panel is an escape risk.
My bird will not step onto the perch in the carrier. Try a slightly smaller diameter perch, move it lower, or briefly make the floor more inviting by placing a familiar piece of plain paper or a favorite foot toy nearby. Some birds settle once the carrier stops moving.
The carrier smells after trips. Disassemble what you can, wash with warm water and mild soap, rinse thoroughly, and dry completely before storage. Avoid scented cleaners and aerosol sprays near birds, because their respiratory systems are sensitive to inhaled fumes.
My bird screams the entire drive. Constant vocalization often reflects fear of an exposed view. Try a partial cover over the back and sides, quieter music, and a familiar low hum of conversation. If screaming continues across several trips, raise it with your avian veterinarian, since persistent distress during transport is a behavior question worth addressing directly.
Welfare and Safety Points Every Owner Should Know
Stress is a real health variable. Research and clinical experience in avian medicine support the principle that minimizing restraint time and handling birds gently reduces stress during veterinary visits. Choose a carrier and a clinic that let the visit go smoothly.
Watch for red flag signs. A bird sitting fluffed on the cage floor, open-mouth breathing, tail bobbing, regurgitation during the drive, or a sudden refusal to eat is not a transport problem. Those are emergency signs. Contact an avian veterinarian immediately rather than completing routine travel.
Fumes are invisible dangers. Never transport a bird in a vehicle where aerosol sprays, scented products, or smoke are present, and never in the enclosed bed or trunk of a vehicle. Bird respiratory tissue is uniquely vulnerable to inhaled toxins.
Hygiene between trips. Clean and dry the carrier after every use. Birds from different households should never share a carrier without disinfection between uses, and if your bird is seen for illness, sanitize the carrier before it is used again at home.
A note on the home cage. Good bird cage setup at home, including perch variety, daily out-of-cage time, appropriate temperature, and a balanced diet, makes veterinary travel easier because a healthy, well-socialized bird handles novelty better. Owner resources from Lafeber Company on parrot nutrition and enrichment, and avian care guides from VCA Animal Hospitals, both frame daily husbandry as the foundation that makes every other part of parrot care, including vet visits, less stressful.
Your Pre-Appointment Parrot Care Checklist
Use this list the week before any veterinary visit.
- Confirm the appointment and ask whether the clinic sees birds regularly or has a board-certified avian specialist on staff
- Verify the carrier is clean, the latch works, and the perch is secure
- Replace the liner with fresh paper the morning of the visit
- Weigh your bird if you own a gram scale and record the number, since weight trends are valuable to avian veterinarians
- Photograph anything abnormal, such as a feather spot or a dropping change
- Write down your questions, including diet, behavior, and housing concerns
- Practice one short drive in the carrier
- Check the weather and plan the car temperature
- Note the clinic's emergency number in your phone
- Charge your phone and bring the appointment kit listed earlier
Limitations and When to Contact a Veterinarian
Every bird is an individual. Species, age, prior handling history, and health status all change what safe transport looks like, and the guidance in this article is general education rather than a plan for any specific animal. Individual cases need a veterinarian, ideally one experienced with birds, and the Association of Avian Veterinarians maintains a public directory to help owners find avian practitioners.
Contact your veterinarian or an emergency avian clinic before traveling, rather than after, in any of these situations:
- Your bird is showing open-mouth breathing, tail bobbing, sitting fluffed at the bottom of the cage, or has stopped eating
- Your bird has not passed droppings for an unusually long period for its size, or droppings are markedly abnormal
- Your bird injured itself thrashing during a previous transport attempt
- You have a bird with a known heart, respiratory, or endocrine condition and you are unsure whether a long drive is safe that day
- Your bird escapes or is exposed to fumes during transport
- You are transporting a newly acquired bird with unknown health status and other birds at home, which raises quarantine and disease-exposure questions your veterinarian should guide
If your bird is currently sick, ask the clinic how and when they want you to arrive, and follow their instructions over any general guidance in this article.
Frequently Asked Questions
What kind of carrier is best for a bird vet visit?
A secure, chew-appropriate carrier with ventilation on at least two sides, an internal perch, and a paper-lined floor. Small birds do well in quality fabric carriers, most parrots need hard-sided construction, and all birds need a latch they cannot defeat.
Can I use my bird's regular cage instead of a carrier?
Usually no. The home cage is heavy, awkward to secure in a car, and difficult to carry through a clinic doorway. A dedicated travel carrier is safer for the bird and easier for you. For very short local trips, a small dedicated travel cage is an acceptable alternative if it can be belted in securely.
How do I get my bird used to a carrier before the appointment?
Start one to two weeks ahead. Place the open carrier in a living area, feed treats near it and then inside it, reward voluntary entry, gradually close the door for short periods, and finish with short practice drives. Most birds accept a carrier within days when it is introduced this way.
What should I put inside the carrier for a vet visit?
One appropriately sized perch, fresh paper on the floor, and nothing else. Skip toys, swinging dishes, and sandpaper perch covers. A partial lightweight cover for the back and sides is helpful for many birds.
How do I keep my bird safe from heat and cold during the drive?
Pre-cool or pre-warm the car before the bird enters, keep the carrier out of direct sun and away from heater or air conditioning vents, never leave the bird in a parked car, and travel during mild parts of the day when possible. Birds are sensitive to temperature extremes and drafts.
Should I cover the carrier during travel?
A partial cover over the back and sides often calms birds by reducing visual stimulation, while leaving the front open for airflow and monitoring. Complete covering blocks ventilation and should be avoided.
What if my bird bites the carrier or tries to escape?
Switch to a chew-proof hard-sided carrier with double latches, inspect equipment after every use, and never open the carrier in an unsecured space such as a parking lot. If escapes or bites happen repeatedly at home during handling, ask your veterinary team for hands-on coaching with towels and transfer techniques.
What should I bring with me to the avian vet appointment?
Bring the carrier lined with fresh paper, a spare liner, a towel, a written list of questions and observed changes, your bird's diet history, and a photo of anything abnormal. If your veterinarian requested a fresh dropping sample or a food sample, bring those in a clean container.