How to Replace a Fluorescent Fish Tank Light Tube
By Dr. Zubair Khalid, DVM, MS, PhD ·

To replace a fluorescent fish tank light tube, unplug the fixture at the wall outlet, let the tube cool for a few minutes, remove the hood or light strip along with its plastic diffuser, then grip the tube at both ends and rotate it about a quarter turn until the pins line up with the slots in the sockets. Lift one end free, lower the other end out, seat the new tube, twist it to lock, replace the diffuser, and restore power. The whole job usually takes under fifteen minutes once you know your fixture type.
Two things make this simple job worth doing carefully. The first is electricity hanging over water, which makes unplugging a hard rule rather than a suggestion. The second is the fish themselves, because a light change alters their environment, and environment drives fish health more than almost anything else you manage. Aquatic veterinary guidance, from the Merck Veterinary Manual's pet fish resources to the World Aquatic Veterinary Medical Association's husbandry work, treats stable environmental conditions as the foundation of fish health. This guide covers the job step by step, the tips that make it easier, the common mistakes that crack tubes and trip breakers, and the short observation period your fish deserve afterward.
This article is educational and is not a substitute for veterinary diagnosis or treatment.
At a Glance
| Item | Details |
|---|---|
| The job | Swap an aging fluorescent tube for a correct, fresh one |
| Time needed | About 10 to 15 minutes |
| Skill level | Beginner friendly |
| Supplies | Correct replacement tube, clean dry cloth, optional gloves |
| The one non-negotiable step | Unplug the fixture from the wall, not just the switch |
| When to do it | Persistent flicker, darkened tube ends, faded output, or roughly once a year as routine upkeep |
Why the Light Matters to Fish Health
An aquarium light does three jobs at once. It sets the day-night rhythm that fish use to time feeding, activity, and rest. It powers photosynthesis in live plants. And it gives you a clear view of the tank so you can spot problems early, from frayed fins to odd swimming. When a tube ages, all three jobs quietly degrade.
Fish respond to light more strongly than most new keepers expect. A steady photoperiod tells a fish when to forage and when to rest, while constant illumination or constant darkness works against that rhythm. A sudden jump in brightness can startle fish and shuffle their behavior for a day or two. That is why a tube swap is both a maintenance task and an animal welfare task.
Aquatic medicine frames it the same way. The Merck Veterinary Manual's pet fish resources emphasize that stable, species-appropriate environmental conditions sit at the center of fish health, and that stress from poor conditions leaves fish open to disease. WAVMA, the World Aquatic Veterinary Medical Association, promotes the same environment-first approach through its husbandry and welfare resources for fish keepers and veterinarians. Academic programs, including the aquatic animal health work at Cornell University College of Veterinary Medicine, train veterinarians around the same principle, that managing the environment comes before medicating the fish.
Aging tubes also tilt the balance between plants and algae. Output falls and the spectrum drifts as the phosphor coating wears, plants slow down, and algae take advantage of the changed light. By the time a tube looks dim to your eye, it has usually been underperforming for months.
Signs Your Tube Needs Replacing
Run through this list before you spend money. Any one of these signs justifies a replacement, and two or more make the case airtight.
- Flicker that persists. A brief shiver when the tube fires is normal. Flicker that continues, or a tube that needs several attempts to start, points to a worn tube, a tired starter, or an aging ballast.
- Dark rings at the ends. Gray or black bands at each end of the glass are the classic signature of a tube near the end of its life.
- Overall dimming. Colors look washed out and the tank seems gloomier than you remember, especially compared with the day you installed the tube.
- Plant and algae changes. Stem plants stretch, lower leaves yellow, and algae creeps across leaves and glass even though your routine has not changed.
- Age. Fluorescent output fades long before the tube fails outright, which is why many experienced keepers replace tubes on a yearly schedule and skip the guesswork.
- Physical damage. Water lines on the glass, green or white corrosion on the pins, cracked end caps, or a hood that hums louder than it used to.
One caution before you buy. Flicker and failure to start can also come from a loose tube, a corroded socket, a worn starter, or a failing ballast. Seat the current tube firmly and test once. If the symptoms persist with a snug tube, plan on a replacement, and budget for a starter or ballast check as well.
Identify Your Fixture and Buy the Right Tube
Fluorescent aquarium fixtures come in a handful of common formats, and buying the wrong tube is the most frequent way this job goes sideways. Identify yours before ordering anything.
- T8 and T12 standard output tubes. The fat tubes in traditional hoods, with a medium bi-pin base, two straight pins at each end. Measure the glass from end to end and match the wattage printed on the tube.
- T5 high output tubes. Slimmer tubes with a mini bi-pin base, common on newer hoods and multi-tube fixtures. Many use waterproof end caps sealed with rubber O-rings, so check whether your replacement includes them.
- Single-pin tubes. Some older shop-style strips use one pin at each end. The removal motion differs slightly, described below.
- Recessed double contact tubes. Higher output T12 setups sometimes use sockets where the pin sits inside a recess. These need a push-and-swing motion rather than a twist.
- Compact fluorescent lamps. Twin parallel tubes on a single base with two or four pins, common on mid-2000s fixtures. Some unplug from a harness, others twist or clip out of a bracket.
- Circline tubes. Round fluorescent rings in some hoods, released by turning a connector and unlatching the ring.
The reliable method is to read the old tube. Photograph its full label and order the exact match. Length, wattage, pin type, and color temperature all have to line up. A tube that is the right length but the wrong pin type will not seat, and a tube that fits but carries a different color rating will change how the whole tank looks.
If your fixture is aging, weigh a different option. Purpose-built LED aquarium fixtures drop onto the same rim or mount points, run cooler, and spare you the ballast and starter conversation entirely. Converting an existing fluorescent fixture to accept LED tubes often involves ballast wiring changes, which is work for a qualified person, not a wet-finger afternoon project.
Safety Before You Start
Water and electricity share this workspace, so the safety steps come before the tools.
- Unplug the fixture at the wall outlet. Hood switches fail, timers confuse, and a switched-off fixture can still be live at the sockets. Pull the plug and you remove the question entirely.
- Let the tube cool for a few minutes. Fluorescent tubes run hot enough to sting bare fingers right after shutdown.
- Dry hands, dry lid. Work with the hood or strip on a towel at table height, not balanced across the open tank.
- Keep cords tidy. Every cord should droop below its outlet in a drip loop so water never travels along the cord to the receptacle. Grounded, moisture-protected outlets are cheap insurance in any aquarium room.
- Never spray cleaners into an open fixture. A damp cloth on the housing exterior, nothing more, and let everything dry before reassembly.
- Retire damaged tubes carefully. A tube with cracks, a broken pin, or water inside gets wrapped in padding and carried out of the room, not flexed over the tank.
How to Replace a Fluorescent Fish Tank Light Tube Step by Step
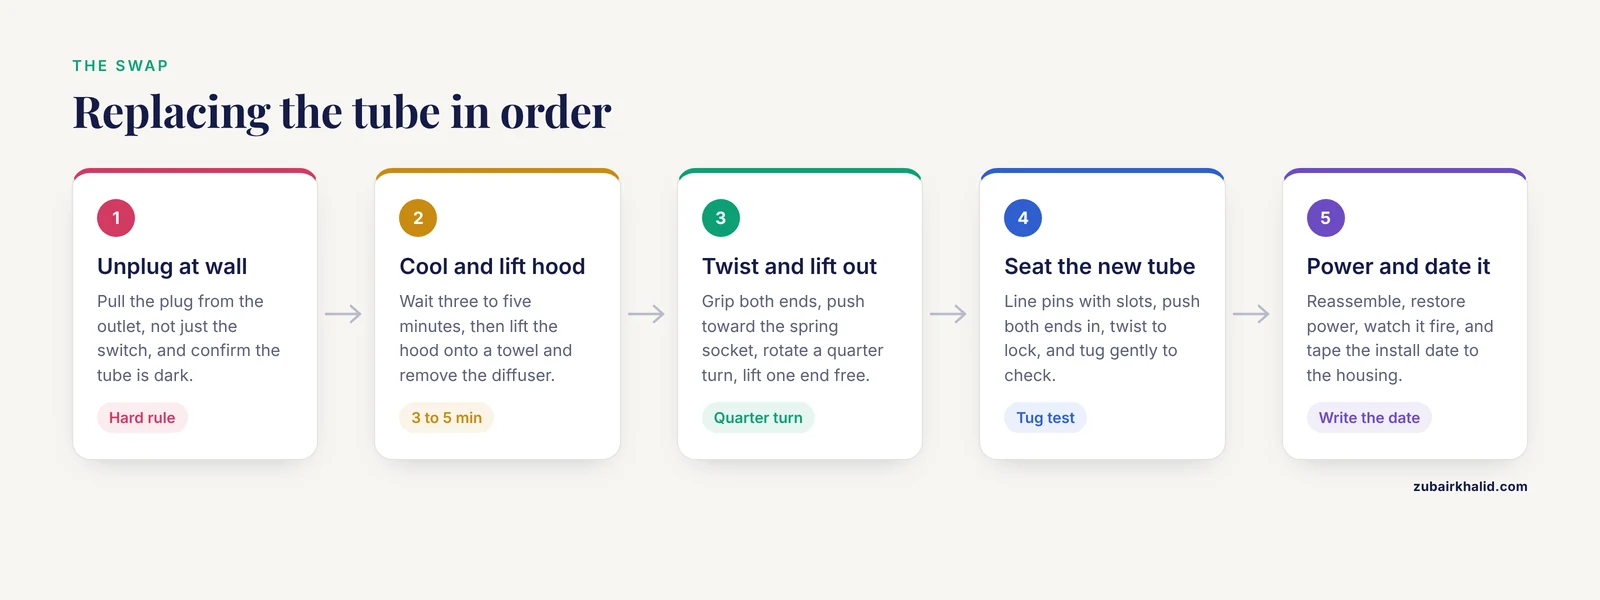
Follow the steps in order for a standard bi-pin tube, the format most fishkeepers own. Variations for other socket types follow at the end.
- Unplug the fixture at the wall. Confirm the tube is dark and any fan noise from the hood has stopped.
- Wait three to five minutes so the glass cools. Use the pause to unpack the new tube and lay it on a towel within reach.
- Lift the hood or light strip off the tank and set it on the towel. If your light connects to its ballast or timer with a plug or connector, disconnect it so the unit lies flat.
- Remove the plastic diffuser or splash guard. Most squeeze out of a channel or lift off clips. Set it aside where it will not collect grit.
- Grip the tube with one hand at each end, fingers around the glass near the sockets, never clamped on the middle.
- Push the tube gently toward the spring-loaded socket to relieve the tension holding it seated.
- Rotate the tube about a quarter turn in either direction until the pins align with the slots in the sockets. If it resists one way, try the other. The tube should feel loose once the pins line up.
- Lift the free end out of its socket, then lower the opposite end out. Support the tube the whole way.
- Inspect while the fixture is open. Look for rust streaks, water marks, brittle insulation, or green corrosion on the pins and sockets. Wipe the reflector and the inside of the diffuser with a damp cloth and let them dry. Wipe fingerprint oil off the new tube's glass with a clean dry cloth.
- Install the new tube. Line the pins up with the slots, push both ends fully into the sockets, and rotate a quarter turn to lock. Tug each end gently to confirm it is seated.
- Reassemble in reverse. Diffuser back in its channel, connectors rejoined, hood back on the tank.
- Restore power and watch the tube fire. A brief flicker at startup is normal. Steady light within a second or two means you are done. Write the installation date on a strip of tape stuck to the housing.
Variations on the same theme:
- Single-pin tubes. Push the tube toward the spring-loaded socket, lift the free end up and out, then release the pinned end.
- Recessed double contact sockets. Press the tube straight inward against the deeper socket, then swing the opposite end out of its shallow pocket.
- T5 tubes with waterproof end caps. Unscrew or unclip the plastic end caps, note the position of the rubber O-rings, slide the tube free, then rebuild the caps and seals onto the new tube. Snug the screws, never crank them.
- Compact fluorescent lamps. Unclip or twist the twin-tube assembly out of its bracket the way the old one came out, and seat the new one until it clicks or bottoms out.
- Older fixtures with a starter. If a fresh tube flickers or refuses to start in an older hood, look for a small metal canister near the tube. Twist it out and replace it with the same rating printed on its side.
Tips for an Easier, Safer Swap
These replace fluorescent fish tank light tips come from the small frustrations that turn a ten-minute job into an afternoon.
- Do the swap early in the tank's light period, not late in the evening, so fish get a normal day after the change.
- On a two-tube fixture, replace both tubes at once so they age together and the tank keeps an even look.
- Keep one spare tube of the exact correct model on the shelf. Tubes die on weekends and holidays.
- Photograph the tube label and the sockets before you remove anything. The photo settles any doubt at the store or when ordering online.
- Handle tubes by the ends. Skin oils on the glass can create hot spots on high output tubes, and a two-handed grip prevents the one-handed fumble that cracks glass.
- Check the O-rings on T5 end caps every time. A cracked seal lets splash reach the pins, and corroded pins cause the very flicker you were trying to fix.
- Match the color temperature printed on the old tube, such as the cooler white ratings common on freshwater plant tubes, unless you deliberately want a different look.
- If the new tube is noticeably brighter than the old one, shorten the light period for the first week or two, then step it back up while you watch plant growth and algae.
- Wipe the diffuser while it is out. A grimy diffuser steals more light than an aging tube does.
Common Mistakes to Avoid
Most tube replacements go wrong in one of a handful of predictable ways. These are the replace fluorescent fish tank light common mistakes worth naming out loud.
- Trusting the switch. The single most dangerous mistake is working on a fixture that is switched off but still plugged in. Timers, tripped circuits, and faulty switches all blur the truth. Unplug at the wall.
- Buying by wattage or length alone. Two tubes can share a wattage and still have different pin bases, diameters, or lengths. Match the full label.
- Forcing a stuck tube. Resistance usually means the pins are not aligned with the release slots, or mineral crust has built up on the pins. Realign, wiggle gently, and clean the pins. Never pry with a screwdriver over an open tank.
- One-handed grips. Twisting torque across the middle of a tube snaps glass. Two hands, both ends.
- Grabbing a hot tube. Freshly shut-down tubes burn fingertips. Give it a few minutes.
- Skipping the wipe-down of the new tube. Fingerprints left on high output glass can etch over time and shorten tube life. One pass with a dry cloth.
- Letting water into the housing. Splashes during cleaning, or a hood stored wet, set up corrosion and shorts. Everything dries before power returns.
- Blaming the tube repeatedly. If new tubes flicker or die young, the real fault is usually a tired ballast, a worn starter, or corroded sockets. Fix the fixture, not just the lamp.
- Trashing the old tube. Fluorescent tubes contain a small amount of mercury. Much of the United States collects them as household hazardous waste rather than curbside trash, and some states run their own stricter collection programs, so use your local drop-off.
- Surprising the livestock. Swapping a dim old tube for a powerful new one is a sudden environmental change. Ramp the light period instead of jumping straight to full days.
- Working over the open tank. A dropped tube in the water means glass fragments, phosphor powder, and a partial teardown. Move the hood to a towel first.
After the Swap: Watching Your Fish
Fish notice a new tube. Fresh fluorescent output can look dramatically brighter than the faded light it replaced, and some fish spend the first hours investigating or ducking into shade. Brief shyness settles on its own.
Give the tank a normal day, then check in. Persistent hiding, clamped fins, gasping at the surface, or frantic darting in the hours and days after the change deserves a closer look. Start with the water, not the bulb. Test temperature, ammonia, nitrite, and pH, because environmental problems rather than the new light are the usual trigger for stress behaviors, a point the Merck Veterinary Manual's pet fish guidance returns to throughout. If the water checks out and the behavior continues past a couple of days, shorten the light period, and if it still persists, bring in a veterinarian experienced with aquatic animals.
Watch plants and algae over the following weeks as well. A healthy new tube restarts strong plant growth, and a modest uptick in algae while the tank rebalances is common. Adjust the light period downward a little if algae outruns the plants.
Your Aquarium Care Checklist
Light care slots neatly into the routine that keeps the whole system stable. Post this aquarium care checklist near the tank.
| Frequency | Tasks |
|---|---|
| Daily | Feed appropriately, check the thermometer, count fish, glance at behavior, confirm the light timer matches your plan |
| Weekly | Scheduled partial water change, test the water parameters you track, clean the front glass, prune plants |
| Monthly | Wipe the tube and diffuser, clean the fixture exterior, rinse mechanical media in removed tank water, check cords and drip loops |
| Quarterly | Inspect the tube for dark ends or flicker, check sockets and end caps for corrosion, verify timer settings |
| Yearly | Replace fluorescent tubes, inspect the ballast area and wiring, revisit stocking with a fish tank calculator if your plans have changed |
A checklist earns its keep because aquarium problems rarely announce themselves. Small, regular touches catch a fading tube, a drifting heater, or a rising nitrate trend while they are still cheap and easy to fix.
Matching Light Output to Your Tank
The right replacement depends on what lives in the tank. A fish-only community aquarium needs enough light for viewing and a consistent day-night rhythm, and almost any correct-format tube delivers that. A planted tank leans on the tube far more, because output and spectrum drive photosynthesis, and an aging tube starves plants long before it stops glowing.
Think system-wide before you upgrade brightness. Light, nutrients, plant mass, stocking level, and feeding all pull on the same rope. More light over an under-planted, heavily stocked tank feeds algae instead of plants. This is where a fish tank calculator earns its name, letting you sanity-check stocking and volume against your plans before you change the light. If the numbers already run close to the limit, solve stocking first and let the lighting follow.
Keep an LED retrofit in mind as the long-term answer. Modern aquarium LED fixtures use less power, run for years without a lamp change, and often dim or ramp on a schedule, which makes light changes gentler on fish. The upfront cost runs higher and spectrum choices matter, so match the fixture to your plants and fish rather than to raw brightness.
Limitations and When to Contact a Veterinarian
Every tank is its own ecosystem, and general guidance only goes so far. Individual cases need a veterinarian, ideally one experienced with aquatic animals, and this article is a maintenance guide rather than a diagnostic tool.
Contact a veterinarian if any of the following shows up, whether or not you recently changed the light.
- Gasping at the surface, labored breathing, or gills working hard
- Any detectable ammonia or nitrite on your test kit
- Hiding, refusal to eat, or clamped fins lasting more than a couple of days
- White spots, frayed fins, red patches, or other visible changes on skin or gills
- Unexplained deaths, even a single small fish in an otherwise settled tank
- Injuries after a broken tube, or any fish exposed to glass fragments
Handle a broken tube over the tank as a maintenance emergency. Unplug everything, net out visible glass, consider a partial water change to remove settling debris, and watch fish closely for several days.
Finding qualified help is easier than it used to be. The AVMA offers fish owner resources and a way to search for veterinarians, and WAVMA maintains a directory of aquatic veterinary professionals. University programs, including Cornell's aquatic animal health group, are useful starting points for serious cases as well.
Frequently Asked Questions
How often should I replace a fluorescent fish tank light tube?
Most keepers replace tubes on a yearly schedule, or sooner when flicker persists, the ends darken, or output fades. Fluorescent output declines long before the tube stops lighting, so age matters more than visible failure.
Can I put an LED tube in a fluorescent fixture?
Only if the LED tube is designed for your fixture type. Some LED tubes run on existing ballasts, while others require rewiring that a qualified person should handle. A purpose-built LED aquarium fixture is the simpler path.
Why is my new fluorescent tube flickering?
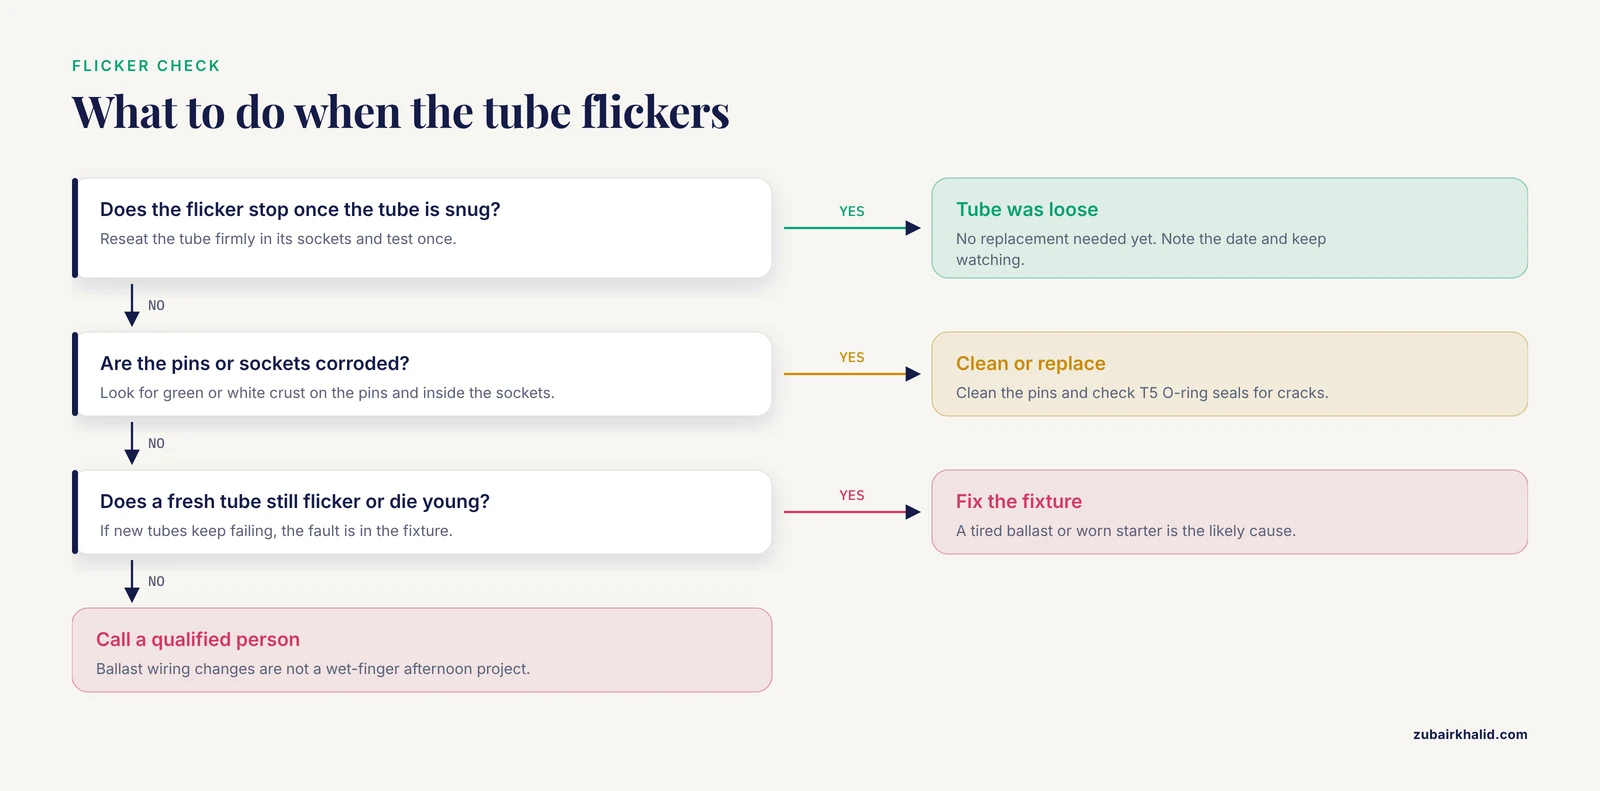
A brief shiver at startup is normal. Steady flicker usually means the tube is not fully seated, the pins are corroded, the starter is worn, or the ballast is failing. Reseat the tube first, then work through that list.
Do fish need the light on at night?
No. Most fish do better with a clear day-night rhythm, and constant light works against it. Put the light on a timer and let the tank rest in darkness overnight.
What should I do if the tube breaks?
Unplug the fixture, air out the room, and scoop glass with stiff card rather than your hands. Lift fine fragments with sticky tape, seal everything in a container, wash your hands, and follow your local hazardous waste guidance.
Is it safe to change the tube with the tank full of water?
Yes, as long as the fixture is unplugged and you keep water away from the sockets. Many owners prefer to lift the hood onto a towel and work at table height instead.
Why are my fish hiding after I changed the light?
A brighter tube can startle them. Shorten the light period for a few days and give them time to adjust. Hiding that persists beyond a couple of days calls for a water test and possibly a visit from an aquatic veterinarian.
Does the light matter if I have no live plants?
Yes. The light sets the day-night rhythm, supports natural behavior, and lets you see the fish clearly. Output still fades with age, so the same replacement schedule applies.