How to Prime an Aquarium Filter
By Dr. Zubair Khalid, DVM, MS, PhD ·
Priming an aquarium filter means filling the filter body, media chambers, and intake tubing with water so the pump can pull a continuous stream and start circulating the tank. To prime a filter, fill the filter chamber with tank water, fill the outflow and intake lines, then start the pump or start a siphon so water flows without air pockets blocking the path. A filter that is primed correctly moves water within seconds to a few minutes and runs quietly. A filter that is not primed hums, gurgles, or spins dry, and it does not move water through the media.
This guide explains how to prime an aquarium filter by filter type, why priming matters for fish health, the most common causes of a filter that will not prime, and the practical solutions that fix each one. It also includes a maintenance checklist you can use today and clear guidance on when water quality problems call for a veterinarian who treats aquatic animals.
At a Glance: Priming Steps by Filter Type
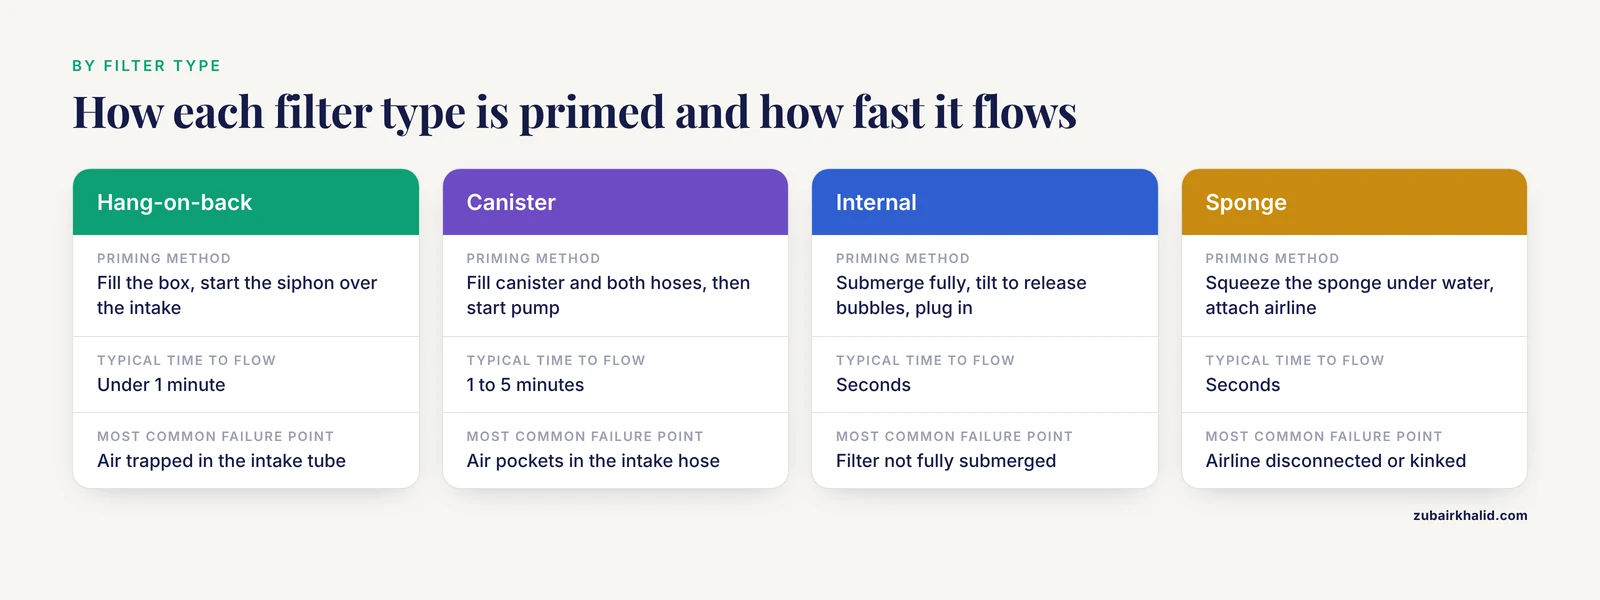
| Filter type | Priming method | Typical time to flow | Most common failure point |
|---|---|---|---|
| Hang-on-back (HOB) | Fill the filter box, then start the siphon over the intake tube | Under 1 minute | Air trapped in the intake tube |
| Canister | Fill the canister and hoses with water, then start the pump or use a self-priming cycle | 1 to 5 minutes | Air pockets in the intake hose |
| Internal (submersible) | Submerge fully, tilt to release bubbles, plug in | Seconds | Filter not fully submerged |
| Sponge filter | Squeeze the sponge under water to flood it, attach airline, start air pump | Seconds | Airline disconnected or kinked |
| Sump | Fill the sump to the running level, then start the return pump | 1 to 3 minutes | Return pump running dry or splashing |
Why Priming Matters for Fish Health
A filter does two jobs. It mechanically removes debris, and it houses the bacterial communities that process fish waste. In recirculating aquarium systems, the microbial community that develops in the tank and filter is shaped by the fish load and the system's conditions, and shifts in that community track with changes in water quality [1]. When a filter loses its prime and stops moving water, the media inside it sits stagnant. Oxygen delivery to the filter bacteria drops, waste stops being processed, and the water in the tank can deteriorate quickly.
This is why a filter that hums but does not pump is a genuine emergency, not a cosmetic annoyance. The fish are still producing waste. The filter is not processing it. The longer the filter runs dry, the more the water quality drifts, and poor water quality is one of the most common underlying factors in aquarium fish disease. The Merck Veterinary Manual's pet fish resources identify poor water quality as a leading cause of illness in ornamental fish, and restoring filtration is a standard first step in correcting it.
Priming also matters after every maintenance session. If you change media, clean the impeller, or move the filter, you reintroduce air into the system. Repriming correctly at that moment prevents the dry-run problem before it starts.
What Priming Actually Does
Priming solves a simple physics problem. Most aquarium pumps are centrifugal pumps. They spin an impeller that flings water outward and pulls new water in behind it. A centrifugal pump can move water, but it cannot pull air and water equally well. If the pump chamber, the intake tube, or the lift tube is full of air, the impeller spins in that air and never establishes the continuous column of water it needs.
Filling the filter with water before startup removes the air. In a hang-on-back filter, priming also means starting a siphon over the intake tube so water from the tank flows down into the filter box continuously. In a canister filter, priming means filling the canister and both hoses so the pump has a solid water path from the tank, through the media, and back to the tank.
Once the water path is complete, the pump sustains it. Gravity and the siphon effect keep feeding the intake, and the impeller keeps pushing water out. The system is self-sustaining until something breaks the path, which is exactly what happens when a filter loses its prime.
Step-by-Step: How to Prime an Aquarium Filter
Hang-on-Back (HOB) Filters
Hang-on-back filters hang on the tank rim and pull water up through a lift tube, spill it through media in the filter box, and return it to the tank. They are the most common filter type in home aquariums and the most common one to lose prime after a power outage.
- Turn off the filter and unplug it.
- Remove the filter lid and lift out the media basket if the design allows.
- Fill the filter box with water taken from the tank or treated tap water that matches the tank's temperature and dechlorination status. Fill it to just below the spillway.
- If the media basket was removed, rinse it briefly in tank water you removed during maintenance, then seat it back in the box. Never rinse biological media under tap water, because chlorine damages the bacterial populations living in the media.
- Fill the intake tube. The easiest method is to submerge the intake strainer in the tank, place a cup or your palm over the top of the tube, and lift a column of water up the tube. Alternatively, pour water down the lift tube from the top until it runs through.
- Reassemble the lid, plug the filter in, and switch it on.
- Listen and watch. Within a few seconds, water should climb the lift tube and spill out of the return. If it gurgles without spilling, the siphon over the intake tube has not started. Tilt the filter body slightly toward the tank, or lift and reseat the intake tube, to release the trapped air.
Some hang-on-back filters have a self-priming feature, usually a small lever or button that pumps water up the tube. If yours has one, press it repeatedly after filling the box. It shortens the priming process considerably.
Canister Filters
Canister filters sit below the tank and push water through sealed hoses and a pressurized media chamber. They hold more media than hang-on-back filters, which makes them popular for larger tanks and heavier fish loads. They are also the most labor-intensive to prime because the hoses hold a lot of air.
- Unplug the canister and close the shut-off valves on both hoses if your model has them.
- Open the canister, check that the media baskets are seated correctly and that the intake and outflow hoses are connected to the right ports. A reversed hose connection is a frequent cause of a canister that will not prime.
- Fill the canister body with tank water or dechlorinated water until it is full to the top.
- Fill the intake hose. Run tank water through the intake line from the tank end, or submerge the intake strainer and use a siphon to draw water down the hose into the canister. Some owners fill the hose by holding it under the tank outflow and letting water run through.
- Fill the outflow hose as well if your model requires it. Many canisters prime faster when both hoses are water-filled.
- Seal the canister, open the valves, and start the pump. Many modern canisters have a self-priming push button that cycles the pump to expel air. Use it, and repeat if the pump gurgles.
- If the pump runs but flow is weak, tilt the canister gently to move trapped air pockets toward the outflow, or open the release valve briefly to let air escape.
Internal and Sponge Filters
Internal filters sit fully submerged inside the tank, so they are the simplest to prime. Submerge the unit completely, tilt it underwater to release any air trapped in the housing, and plug it in. Flow should start immediately.
Sponge filters work differently. They use an air pump to push air up a lift tube, and the rising bubbles draw water through the sponge. Sponge filters are genuinely biological filters, because the porous sponge hosts the same microbial communities that process waste in other filter media. Sponges are filter feeders by nature, and genomic work on aquarium sponges such as Tethya wilhelma and Tethya minuta reflects how these organisms function as living filtration systems in aquatic environments [2]. A sponge filter is not a living sponge, but it mimics the same principle, water being pulled through a porous biological surface.
To prime a sponge filter:
- Submerge the sponge in the tank and squeeze it under water several times until it is fully saturated and no bubbles rise from it.
- Attach the airline tubing from the air pump to the lift tube.
- Plug in the air pump. Bubbles should rise steadily up the tube and water should flow through the sponge.
- If no bubbles rise, check the airline connection and the air pump, and look for a kink in the tubing.
Sponge filters never lose prime the way powered filters do, because they have no sealed water path. They fail when the airline disconnects or the pump stops.
Sump Filters
A sump is a secondary tank below the main aquarium that holds media and equipment. Water drains from the display tank into the sump, and a return pump pushes it back up.
- Fill the sump to the normal running level, which is usually marked on the sump or set by the overflow.
- Fill the return pump chamber and make sure the pump is fully submerged.
- Prime the return line by filling it with water from the sump, or use the pump's priming feature if it has one.
- Start the pump and watch the return. Flow should reach the display tank within a minute or two.
- Check the drain from the display tank into the sump. Confirm that the overflow is running and that the water level in the sump settles at the normal running height.
Sumps are the most forgiving systems to prime because the sump itself acts as a reservoir. The main risk is the return pump running dry if the water level drops too low, which happens with evaporation.
Supplies and Equipment for Priming and Filter Maintenance
You do not need much to prime a filter, but a few inexpensive items make the job faster and safer.
- A dedicated cup or pitcher used only for aquarium work. Never use containers that have held soap, cleaning chemicals, or food.
- Dechlorinated water matched to the tank's temperature. If you top off or refill with tap water, treat it with a water conditioner that neutralizes chlorine and chloramine before it touches the filter or the tank.
- A siphon hose or gravel vacuum for routine water changes, which also lets you refill the filter with water you have already removed.
- Replacement filter media appropriate to the filter type. Mechanical media such as filter floss traps particles, and biological media such as ceramic rings or bio-balls host bacteria.
- A water test kit that measures ammonia, nitrite, nitrate, and pH. Test kits are the only reliable way to know whether the filter is doing its job after a priming failure.
- A thermometer to confirm that any water you add matches the tank temperature.
When selecting a filter in the first place, match the filter's rated capacity to your tank volume and fish load. A fish tank calculator can help you estimate the appropriate filter turnover and stocking level for your tank size, which prevents the chronic under-filtration that makes priming failures more damaging. The microbiome in a recirculating aquarium system shifts with fish type and loading intensity, and heavier loads favor microbial populations associated with enriched, eutrophic conditions [1]. A filter that is too small for the load works harder, clogs faster, and loses prime more often.
Common Mistakes When Priming a Filter
These errors account for most priming failures and most of the damage that follows them.
- Running the pump dry. Plugging in a filter that has not been filled burns out the impeller and can crack the pump housing. Always fill before you power on.
- Rinsing biological media in tap water. Chlorine and chloramine in untreated tap water kill the nitrifying bacteria in the media. Rinse media only in tank water you have siphoned out.
- Replacing all the media at once. Changing every cartridge or every sponge in one session removes most of the bacterial population at the same time. Stagger media changes so the surviving media seed the new media.
- Ignoring the water level. A hang-on-back filter needs the tank water level high enough to cover the intake strainer. If evaporation drops the level below the strainer, the filter sucks air and loses prime.
- Reversing the hoses on a canister. Intake and outflow ports look similar. If the hoses are swapped, the canister will not prime or will push water in the wrong direction.
- Skipping the refill after cleaning. After you rinse the filter box or change the cartridge, the filter is empty. Refill it before you restart.
- Using soap or detergents anywhere near the tank. Residue on hands, buckets, or tools harms fish and disrupts the microbial balance in the system [1].
Troubleshooting: Why Your Filter Will Not Prime
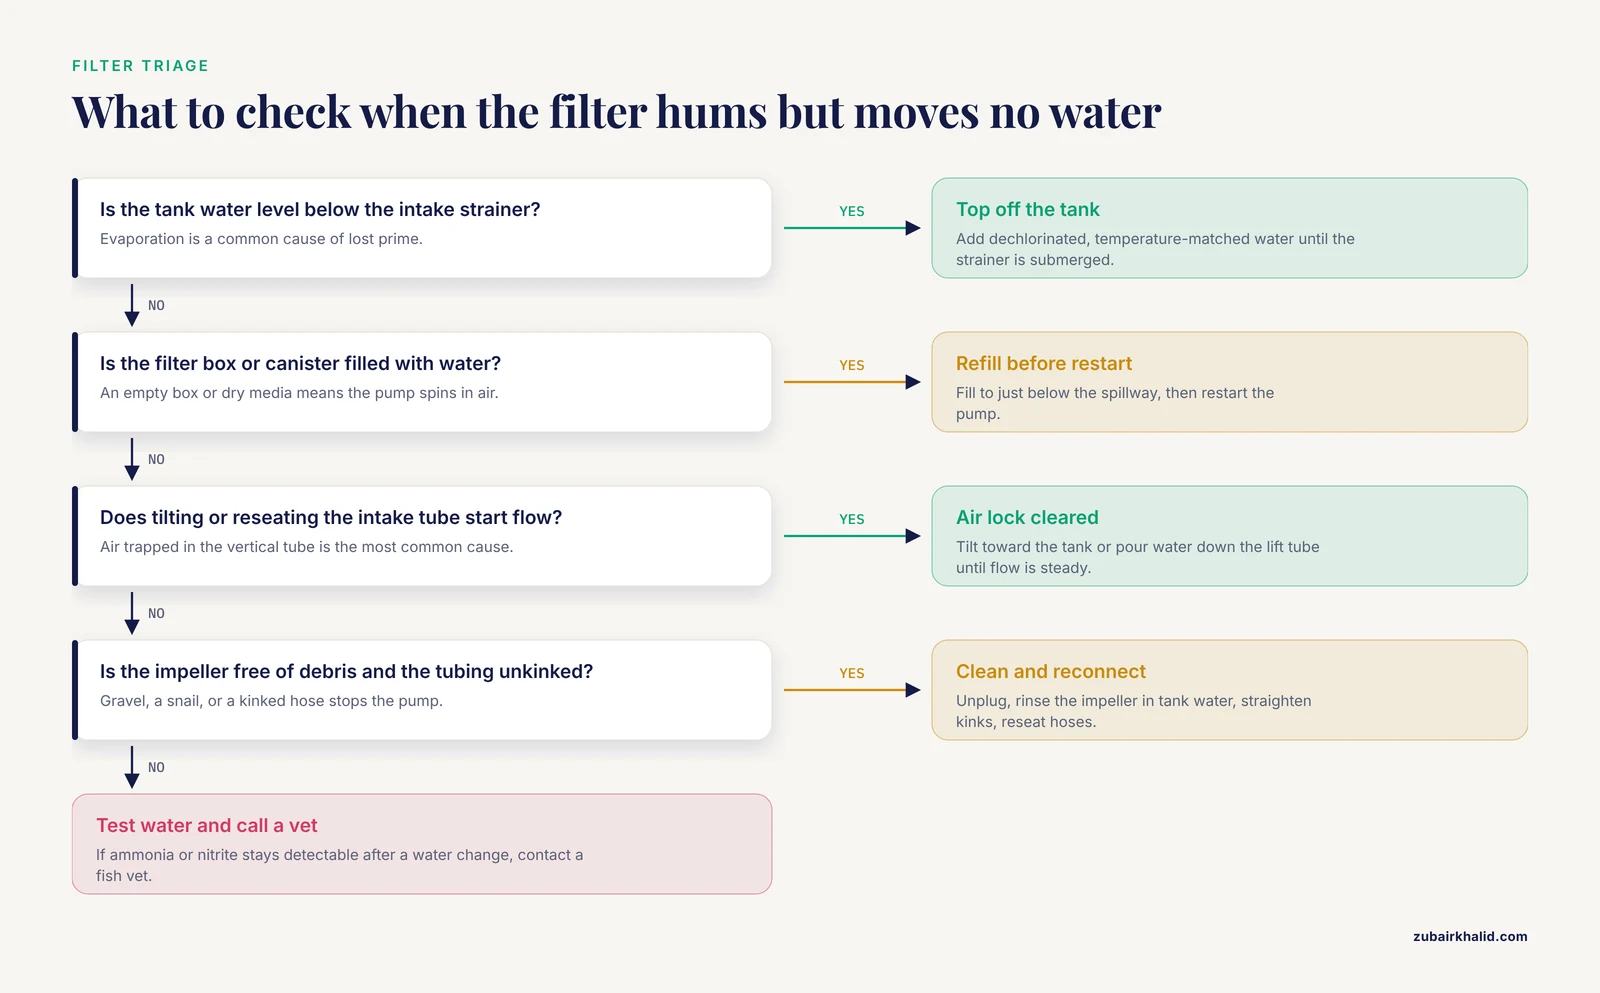
If you have followed the steps and the filter still will not move water, work through the causes below in order. Each one has a direct solution.
Air Locks in the Intake or Lift Tube
Cause: Air trapped in the vertical tube prevents the siphon from starting. This is the single most common cause of a hang-on-back filter that hums but does not spill water.
Solution: Tilt the filter body toward the tank to release the bubble, or lift the intake tube out and reseat it so water rushes down and displaces the air. Pouring a small amount of water down the lift tube from the top also works. Repeat until the flow is steady.
Dry Media or an Empty Filter Box
Cause: The filter was cleaned or the media was changed and the box was never refilled.
Solution: Fill the filter box with tank water or dechlorinated water to just below the spillway, then restart the pump. This is the simplest fix and the most frequently skipped step.
Tank Water Level Too Low
Cause: Evaporation lowers the tank below the intake strainer. The filter pulls air instead of water and loses prime.
Solution: Top off the tank with dechlorinated, temperature-matched water until the strainer is fully submerged. If your tank evaporates quickly, add top-off water to your routine on a schedule.
Clogged or Jammed Impeller
Cause: Debris, gravel, or a snail wedges the impeller so it cannot spin. The motor hums but nothing moves.
Solution: Unplug the filter, remove the impeller cover, and take out the impeller. Rinse it in tank water, clear any debris from the impeller well and the shaft, and reassemble. If the impeller is cracked or the shaft is damaged, replace the impeller. Impellers are inexpensive and widely available as separate parts.
Kinked, Blocked, or Disconnected Tubing
Cause: The intake hose is kinked behind the stand, the airline has slipped off a sponge filter, or debris blocks the intake strainer.
Solution: Trace the entire water path. Straighten kinks, reconnect loose tubing, and rinse the intake strainer in tank water. On sponge filters, push the airline firmly onto the lift tube and confirm the air pump is running.
Worn Check Valve or Failed Shut-Off Valve
Cause: A check valve that no longer seals lets water drain back out of the system between runs, so the filter starts dry every time.
Solution: Replace the check valve. Check valves are cheap and should be replaced whenever they fail to hold water. If a canister's shut-off valves leak or do not seal, replace the valve assemblies.
Power Interruptions
Cause: A power outage or a tripped breaker stops the pump. When power returns, the siphon over the intake tube has broken and the filter box has drained.
Solution: Reprime the filter after every outage, following the full steps for your filter type. If outages are frequent in your area, consider a battery backup pump designed for aquariums, and keep the steps for repriming a hang-on-back filter fresh in mind because they are the ones you will use most often.
After Priming: First Checks
Priming is not finished when the pump starts. Confirm the system is actually working before you walk away.
- Watch the flow. Water should move steadily through the media and return to the tank. Look for the outflow to disturb the water surface.
- Listen. A properly primed filter runs quietly. Gurgling, rattling, or a high-pitched whine signals trapped air or an impeller problem.
- Check for leaks. On canisters and sumps, run a finger along the hose connections and the lid seal. A slow drip becomes a flood.
- Test the water. Within 24 hours of a priming failure or a major media change, test ammonia and nitrite. If either is detectable, the biological filter has been compromised and you should act. Increase aeration, reduce feeding, and perform a partial water change. Retest daily until ammonia and nitrite read zero.
- Observe the fish. Gasping at the surface, rapid gill movement, or lethargy after a filtration failure are signs of water quality stress. Test the water immediately and consider a partial water change.
The microbial community in a closed aquarium system is dynamic and responds to changes in the environment [1]. A filtration failure is an environmental change, and the bacteria that keep the water safe need time and stable conditions to recover. Daily testing for several days after a failure is the practical way to confirm that recovery.
Aquarium Care Checklist
Use this checklist as part of your regular routine. It prevents most of the situations that cause a filter to lose prime in the first place.
Daily
- Confirm the filter is running and water is flowing from the outflow.
- Check the tank water level and top off if it has dropped below the intake strainer.
- Feed the fish only what they consume in a few minutes.
- Look at the fish for changes in behavior, breathing, or appearance.
Weekly
- Test ammonia, nitrite, nitrate, and pH.
- Perform a partial water change using dechlorinated, temperature-matched water.
- Rinse mechanical media, such as filter floss or a cartridge, in tank water.
- Wipe the glass and check equipment for wear.
Monthly
- Check the impeller and clean it if flow has decreased.
- Inspect tubing, valves, and connections for kinks, cracks, or leaks.
- Rinse biological media gently in tank water, only if it is visibly clogged.
- Confirm the filter's rated capacity still matches the tank and its fish load.
Quarterly
- Replace mechanical media as needed.
- Stagger any biological media replacement so no more than a portion is changed at one time.
- Review the whole system, including the sump or canister seals, for wear.
Sizing and the Fish Tank Calculator
Priming failures are more damaging in tanks that are under-filtered or overstocked, because the filter has less reserve capacity to absorb the interruption. Before you buy a filter or add fish, use a fish tank calculator to estimate the appropriate filter turnover for your tank volume and to check whether your planned stocking is realistic. A filter sized correctly for the tank processes waste with margin to spare, clogs less often, and recovers from maintenance without pushing the water quality over the edge.
When you size a filter, consider three things together. The filter's rated flow should suit the tank volume. The media capacity should suit the fish load. And the fish species should suit the tank size, because crowding drives the waste production that the filter must handle. Research on recirculating aquarium systems shows that loading intensity measurably changes the microbial community in the water, with heavier loads favoring organisms associated with enriched conditions [1]. A tank stocked within its capacity keeps that community in a healthier balance.
Welfare and Safety Points
Fish welfare depends on stable water, and the filter is the piece of equipment that maintains it. The American Veterinary Medical Association's pet owner resources emphasize that aquatic animals need appropriate water quality and environment to stay healthy, and the World Aquatic Veterinary Medical Association (WAVMA) promotes standards of care for ornamental fish that include functioning filtration and regular monitoring.
A few practical safety points protect both the fish and you.
- Never run a filter dry. A dry pump overheats and can fail permanently.
- Unplug the filter before you open it. Water and electricity are a dangerous combination, and a filter that starts while your hands are inside it is a shock hazard.
- Use a drip loop on all power cords. The cord should dip below the outlet before rising to it, so water cannot run along the cord into the outlet.
- Handle fish gently during maintenance. Catching fish to work on the filter stresses them. Do filter work without removing the fish whenever possible.
- Keep water changes moderate. Large, sudden changes in water chemistry stress fish more than small, regular ones.
- Quarantine new fish. New arrivals can introduce pathogens that a healthy filter cannot remove.
Limitations and When to Contact a Veterinarian
This article is educational and is not a substitute for veterinary diagnosis or treatment.
The steps above cover the mechanical and routine aspects of priming a filter. They do not cover every aquarium configuration, and they do not replace a diagnosis if your fish are sick. Individual cases need a veterinarian, particularly a veterinarian with aquatic animal experience, and the following situations call for professional help rather than another round of troubleshooting.
- Fish are gasping at the surface, flashing against objects, or showing rapid gill movement, and water tests do not explain it.
- Ammonia or nitrite is detectable in the water and remains detectable after a partial water change and reduced feeding.
- Fish show physical signs of disease, such as white spots, frayed fins, bloating, ulcers, or abnormal growths.
- Multiple fish die or become ill within a short period.
- The filter has failed repeatedly and the water quality has deteriorated despite your corrections.
- You are setting up a new tank and want guidance on cycling, stocking, and filtration before adding fish.
A veterinarian experienced with fish can run water chemistry tests, examine the fish, and identify whether the problem is environmental, infectious, or both. The Merck Veterinary Manual's pet fish section and the AVMA's aquatic animal health resources are reliable starting points for finding qualified help, and WAVMA maintains a directory of veterinarians who work with aquatic animals.
Frequently Asked Questions
What does it mean to prime an aquarium filter?
Priming means filling the filter body, media chambers, and intake tubing with water so the pump can establish a continuous flow. Without priming, the pump spins in air and moves no water.
How do I prime a hang-on-back filter?
Fill the filter box with water to just below the spillway, fill the intake tube with water, then plug in the filter. If the flow does not start, tilt the filter or lift and reseat the intake tube to release trapped air.
Why does my filter lose its prime after a power outage?
When the pump stops, the siphon over the intake tube breaks and the filter box drains back into the tank. When power returns, the filter starts dry and must be refilled and reprimed by hand.
How long does it take to prime a filter?
A hang-on-back or internal filter primes in seconds to a minute once it is filled with water. A canister filter can take a few minutes because the hoses hold more air, and self-priming features shorten the process.
Can I prime a filter with tap water?
Yes, if the tap water is dechlorinated and matched to the tank temperature. Never let untreated tap water contact biological media, because chlorine damages the bacteria living in the media.
Why is my filter humming but not pumping water?
The most common cause is an air lock in the intake tube, followed by a clogged or jammed impeller. Fill the filter, release trapped air by tilting it, and if the hum continues, unplug the filter and inspect the impeller for debris.
Do I need to prime a sponge filter?
Sponge filters do not need priming in the same way. Saturate the sponge underwater, attach the airline, and start the air pump. Bubbles rising through the lift tube draw water through the sponge.
How often should I reprime my filter?
Reprime the filter after every cleaning, media change, power outage, or water level drop that exposes the intake. A filter that runs continuously without interruption should not need priming between maintenance sessions.