How to Clean a Canister Filter: Step-by-Step Guide
By Dr. Zubair Khalid, DVM, MS, PhD ·
The short answer: open the canister, rinse the mechanical media in aquarium water you have already siphoned out, swish the biological media gently in the same water, clean the impeller, reassemble, and prime. The whole routine takes 30 to 45 minutes once you know your filter, and the canister filter cleaning steps below apply to any sealed external unit. The single rule that protects your fish is to keep the biological media wet and never rinse it under untreated tap water, because the bacteria and archaea living on that media are what convert toxic ammonia into far less toxic nitrate [1].
As for frequency, a comparative study that tested six internal aquarium filters and one external canister-style filter measured the operating period before the filter materials needed cleaning or replacement at 168 to 504 hours, which works out to roughly one to three weeks of continuous running [2]. Lightly stocked tanks often stretch further. Treat weak outflow, not the calendar, as your main trigger, and check the flow every time you feed.
This article is educational and is not a substitute for veterinary diagnosis or treatment.
At a Glance: Canister Filter Cleaning Checklist
| Task | How often | Golden rule |
|---|---|---|
| Check outflow strength | At every feeding | Weak flow means the mechanical media are loaded |
| Rinse mechanical sponges and floss | When outflow weakens, often every 2 to 4 weeks | Rinse in old aquarium water, never hot tap water |
| Swirl biological media | At every service | Never scrub it, never let it dry, never replace it all at once |
| Replace chemical media | On the manufacturer's schedule | Exhausted carbon does nothing |
| Clean the impeller and housing | Every 2 to 3 months | No soap, and never run the pump dry |
| Flush the hoses | Every 3 to 6 months | Sludge in the tubing is the top cause of slow flow |
| Test ammonia, nitrite, pH, and temperature | Same day and next morning after a service | Ammonia and nitrite should read zero in an established tank |
Why Cleaning Your Canister Filter Matters
Aquarium water holds a heavy load of impurities, bacteria, and microorganisms generated by the fish, invertebrates, and plants living in it, and the filter's job is to pull that load out of circulation [2]. Mechanical media clog as they do this. As they clog, flow drops, water finds gaps around the media, and waste starts accumulating in the tank instead of inside the filter.
The deeper reason is biological. Nitrification in aquarium biofilters transforms toxic ammonia into nitrite and then into far less toxic nitrate, and the organisms that do it live on the porous surfaces of your biological media. Recent sampling of home aquariums found that complete ammonia-oxidizing Nitrospira dominate most freshwater aquarium biofilters and that these communities take time to establish, with ammonia and nitrite reaching undetectable levels by week 3 in two of three newly set up home aquariums and by week 8 in the third [1]. A careless cleaning can undo weeks of that work.
Filter maintenance is also water quality management. Studies of automated aquarium systems consistently center on the same core parameters, pH, temperature, and turbidity, because those values define whether fish are living in stable conditions [3][4]. Researchers running experimental systems for deep-sea corals describe the same balancing act among water renewal, temperature, flow, and nutrient concentrations [5], and accounts of large public exhibits, such as the closed-system reef display at the Georgia Aquarium, treat filtration upkeep as a designed program rather than an occasional chore [6].
How a Canister Filter Works, and What You Are Actually Cleaning
A canister filter sits outside the tank, usually underneath it. Water is pulled through an intake strainer, travels down a hose into a sealed canister, is pushed by an impeller through stacked baskets of media, and returns through an outlet hose or spray bar. Because the canister is sealed and pressurized, it holds a large volume of media and forces water through all of it.
The media do three different jobs. Mechanical media, sponges and floss, physically trap particles. Biological media, ceramic rings, sintered glass, and similar porous materials, provide surface area for the nitrifying organisms that process nitrogen waste [1]. Chemical media, most often activated carbon or specialty resins, adsorb dissolved compounds the first two stages leave behind.
Flow is part of the treatment too. Research aquariums sometimes engineer current speed and turbidity deliberately because the animals in them depend on those conditions [7]. In a home tank, the outflow pattern decides where waste settles and how much debris ever reaches the intake. Cleaning the filter restores that flow path as much as it removes dirt.
Supplies to Gather Before You Start
- Two clean buckets, one for the dirtiest rinses and one for a final clean rinse
- A siphon or gravel vacuum, which doubles as your source of rinse water
- A flexible hose brush and a small detail brush, an old toothbrush works
- A towel and a tray for the baskets
- Dechlorinator for the water change
- Replacement mechanical floss, plus a spare o-ring and impeller if you can get them
- Silicone grease only if your filter's manufacturer calls for it
- Test kits for ammonia, nitrite, and pH, and a thermometer
Keep a tool set dedicated to the aquarium. Brushes that have touched detergent or household chemicals should never go near tank equipment.
Canister Filter Cleaning Steps, Step by Step
The canister filter cleaning steps, step by step, look like this. Work through them in order and the whole service fits into one short session.
Step 1. Prepare the Tank and the Room
Unplug the aquarium heater before you touch anything else, since a heater that cycles on while sitting in air can crack or overheat. Wash your hands and arms well and skip lotions, because residues end up in the water. Lay an old towel under the filter to catch drips. If you plan to do a partial water change the same day, start it now and siphon the old water into a clean bucket, because that discarded aquarium water is exactly what you will use to rinse the media.
Step 2. Unplug the Filter and Close the Valves
Switch off and unplug the canister at the wall, then close the shut-off valves on both the intake and outlet hoses. Closing the valves holds water in the hoses and preserves the siphon, which makes priming far easier later. Confirm the power cord has a drip loop so water running down the hose cannot follow the cord into the outlet.
Step 3. Relieve Pressure and Open the Canister
A pressurized canister holds water above the tank's water line, so it will spray if you simply unscrew it. Hold the canister over a bucket, open the quick-release latches or unscrew the head slowly, and let the pressure bleed off and the first surge of water drain away. Lift out the media baskets and set them on the towel in the order they came out. If you have never serviced this filter before, take a photo with your phone so the reassembly order is obvious later.
Step 4. Rinse the Mechanical Media
Drop the sponges and floss into the bucket of old aquarium water. Squeeze and knead each sponge repeatedly, refilling the bucket when it turns thick with brown waste, and keep going until the water wrings out only lightly cloudy. Mechanical media are meant to trap waste, so permanent staining is normal. Replace floss that is falling apart, and replace any sponge that is collapsed, torn, or stiff with age.
Step 5. Rinse the Biological Media
Lift the biological media, whether ceramic rings, bio-balls, or sintered glass, into a second bucket of old aquarium water and swish it a few times. The goal is to knock off loose sludge, not to make it look new. The discoloration you see is the biofilm itself, the layer of nitrifying organisms that converts ammonia to nitrite and then to nitrate [1]. Never rinse biological media under untreated tap water, never scrub it, and never let it dry out. If media must be replaced because it is crumbling, swap no more than a portion at a time and wait several weeks before the next change, so the remaining population can recolonize the new material.
Step 6. Refresh the Chemical Media
Activated carbon, resins, and other chemical media exhaust rather than clog, so rinsing does not revive them. Follow the replacement interval printed by the media manufacturer. Rinse new carbon briefly to remove dust, then seat it in the basket after the biological stage so it polishes water that has already been mechanically and biologically processed.
Step 7. Clean the Impeller, Shaft, and Housing
Pull the impeller cover, grip the impeller, and draw it straight out along with the shaft if it is a two-piece design. Scrub the impeller, the magnet groove, and the shaft with a small brush in old tank water, because a hair or a snail shell wrapped around the magnet is the most common cause of noise and lost flow. Check the impeller blades and the shaft for cracks or chips and replace either part if it is damaged. Rinse the empty housing, wipe the lid, and inspect the rubber o-ring. A twisted, flattened, or cracked o-ring is the leading cause of leaks after a service, so replace it if damaged and lubricate it only with the silicone grease your manufacturer recommends.
Step 8. Inspect the Hoses, Intake, and Seals
Look into the intake strainer and brush away debris, snails, and algae. Run a flexible hose brush through the ribbed tubing every few services, since sludge narrows the passage and quietly cuts flow long before the media look dirty. Check for kinks, cracks, and stiff sections near the valves, and confirm the hose clamps are snug.
Step 9. Reassemble and Prime
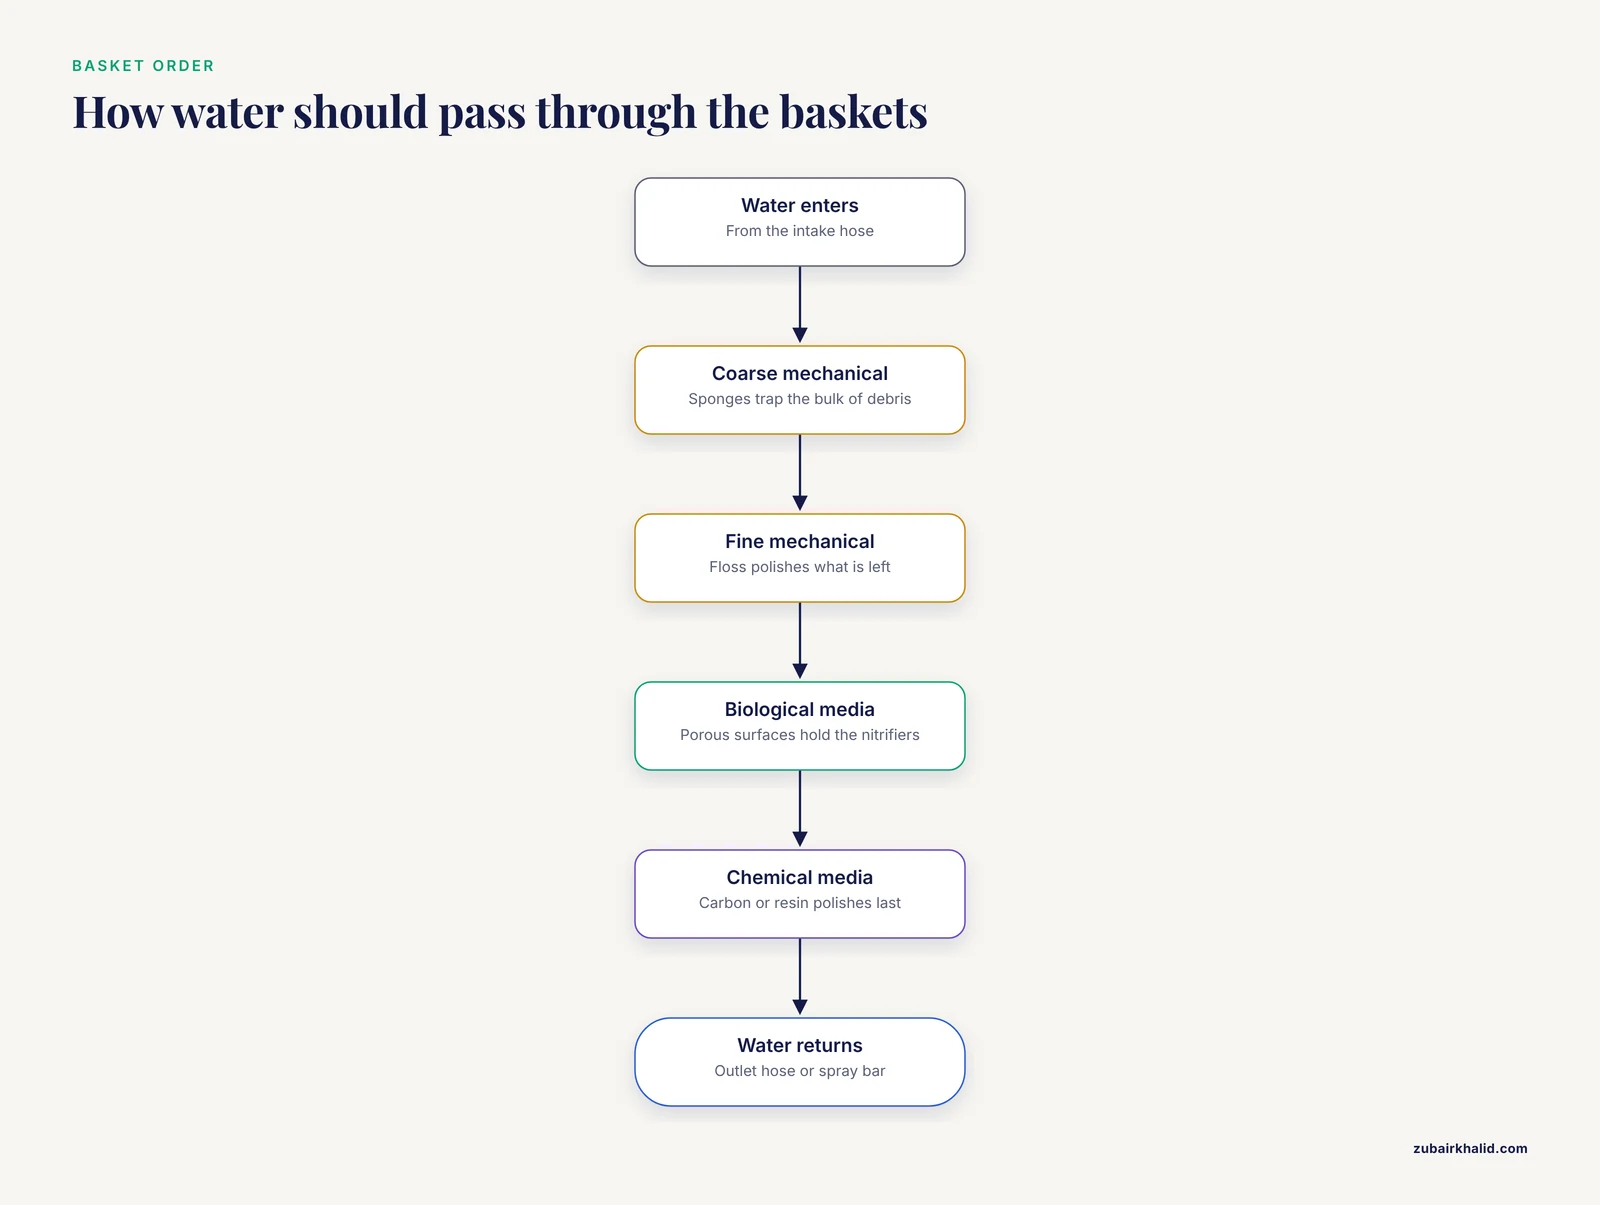
Rebuild the baskets in the order you photographed, coarse mechanical first, fine mechanical next, biological after that, and chemical last. Water should meet the coarse debris-trapping media before it reaches the delicate biological surfaces. Seat the o-ring evenly, close the head, and fill the canister with old aquarium water from your bucket to cut priming time. Reopen the valves, plug the unit in, and use the priming pump or lift-and-fill method your model uses until water moves through the outlet in a steady stream with no sputtering.
Step 10. Restart, Verify, and Log
Let the filter run for ten to fifteen minutes while you watch for leaks at the head, the valves, and the hoses. Confirm the outflow pattern looks like it did before the service. Write the date on a piece of tape on the canister or in a maintenance log, then test ammonia, nitrite, pH, and temperature the same day and again the next morning. Discard the dirty bucket water on ornamental plants, in the toilet, or outdoors, never back into the tank.
Canister Filter Cleaning Tips
- Stagger the work. Rinse mechanical media whenever flow drops, but deep-clean the impeller and hoses on a separate visit. Every disturbance you stack into one session is a disturbance the biofilm has to absorb.
- Keep two buckets, one for the filthy first rinses and one for a clean final rinse of biological media.
- Siphon your water change water into the rinse bucket first, so one bucket of old tank water does double duty.
- Work briskly. Tank temperature drifts while lids are open and hands are in the water, and even small temperature fluctuations can stress fish and upset the tank's balance [8].
- Photograph the basket order and o-ring position before disassembly. Those are the two things owners get wrong most often.
- Stock spares. A spare o-ring, a spare impeller, and a roll of mechanical floss turn a breakdown into a five-minute fix.
- Test before and after. A quick parameter check before the service tells you whether the tank was already drifting, which changes how you read the numbers afterward.
Common Mistakes in Canister Filter Cleaning
- Rinsing everything under the tap. Warm, chlorinated tap water strips the biological film off porous media, and that film is what keeps ammonia from accumulating [1]. Old aquarium water does the job without the damage.
- Replacing all the media at once. A full swap removes most of the established nitrifier population in one move. If media must go, replace a portion and wait several weeks before the next change so recolonization keeps pace.
- Using soap or household cleaners. Residue soaks into plastic and rubber and leaches into the water later. Old tank water and a dedicated brush are all you need.
- Letting media dry out. Nitrifiers need moisture. Media sitting on a towel while you take a phone call loses the water its biofilm depends on. Keep everything submerged until it goes back.
- Stacking disturbances in one day. A full teardown, a large water change, a media swap, and a deep gravel clean in one afternoon is a lot of change at once. Spread them across the month.
- Reinstalling fine floss first. If water hits the fine polishing layer before the coarse sponge, the fine layer clogs within days and water bypasses the baskets. Coarse to fine, always.
- Ignoring the o-ring. A pinched, twisted, or dried-out o-ring leaks the moment the pump pressurizes the canister. Inspect it at every service.
- Running the pump dry. Dry running chews impellers and can overheat the motor. Fill the canister and open the valves before plugging in.
- Pouring dirty water back into the tank. The rinse bucket holds everything the filter spent weeks trapping. Empty it into the garden or the toilet.
- Chasing spotless media. Biological media are supposed to look lived-in. Scrubbing them white discards the part of the filter that keeps fish alive.
Aquarium Care Checklist: Where Filter Cleaning Fits
Filter service is one line in a larger routine. A workable aquarium care checklist looks like this.
Daily
- Feed measured amounts and remove uneaten food within a few minutes.
- Count the fish and watch for gasping, clamped fins, or abnormal swimming.
- Glance at the thermometer and the filter outflow.
Weekly
- Test pH and temperature, plus ammonia and nitrite in newer tanks.
- Change 10 to 25 percent of the water using dechlorinated, temperature-matched water. A goldfish aquarium monitoring project built its water quality program around temperature, pH, and turbidity, with automated water changes to hold them steady [4].
- Rinse the intake strainer and wipe the glass.
Monthly
- Run the canister service above, focused on mechanical media.
- Inspect the o-ring and valves.
Quarterly
- Deep-clean the impeller, flush the hoses, and replace worn seals.
Two tools make the checklist easier to run. A fish tank calculator confirms your true water volume after substrate, rocks, and decorations displace water, which matters when you size water changes and judge stocking against filter capacity. Continuous monitors cover the testing between hands-on sessions, and a recent study of an IoT aquarium system achieved 96 percent average sensor accuracy across pH, TDS, temperature, and turbidity with automated anomaly alerts [3].
Troubleshooting After a Cleaning
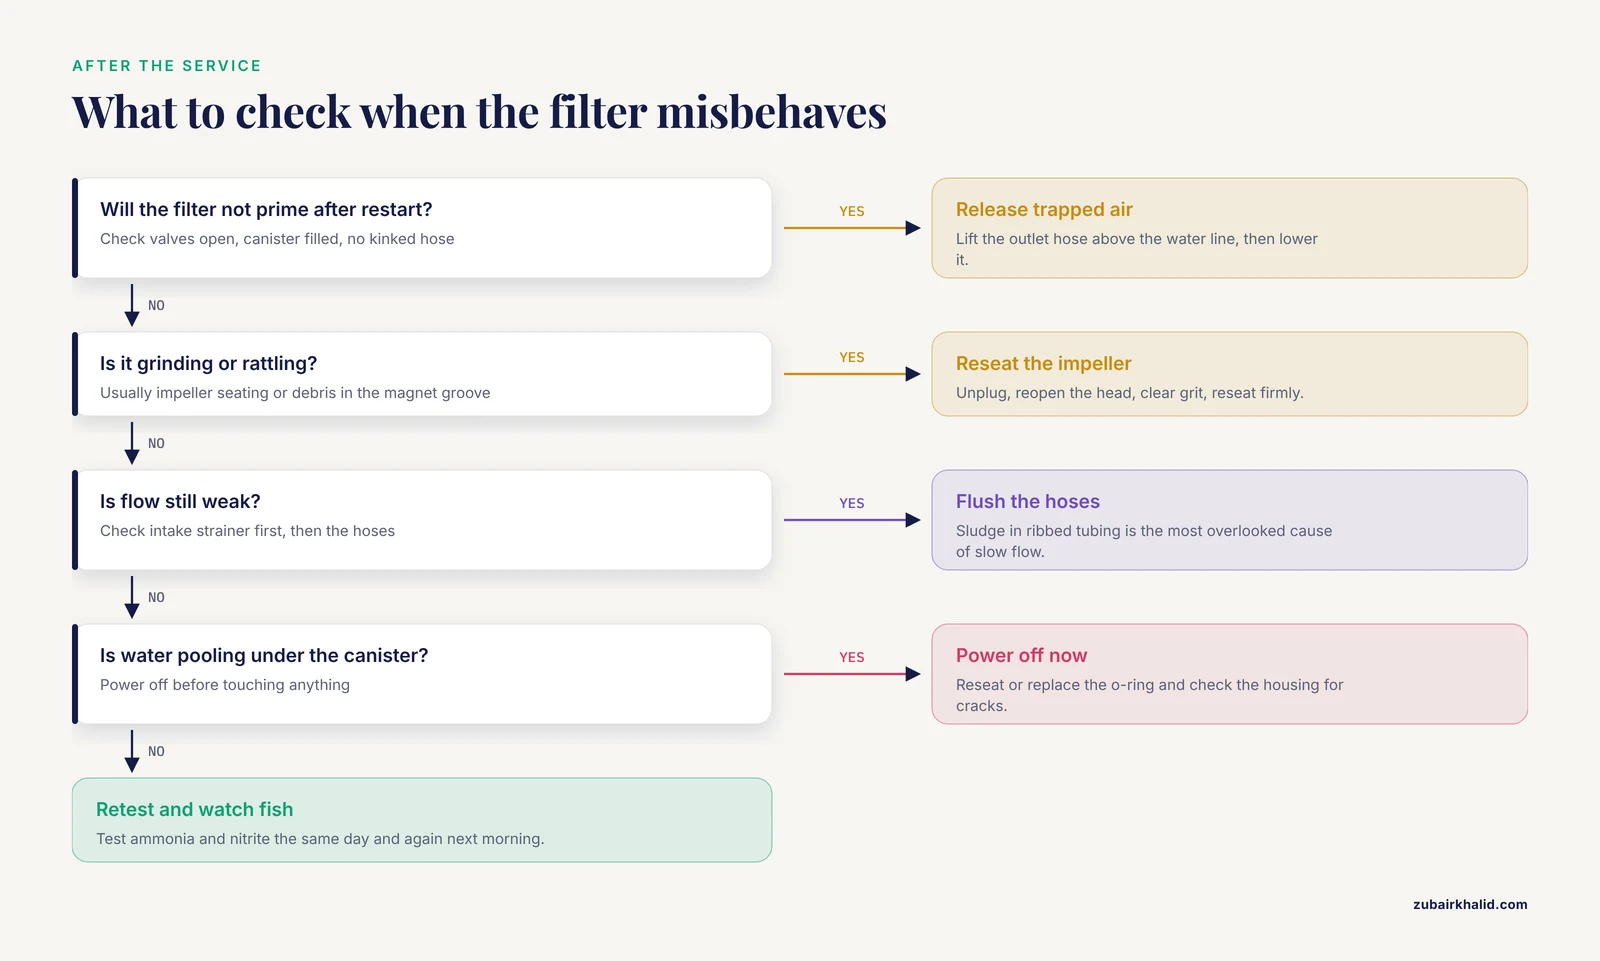
The filter will not prime. Confirm both valves are open, the canister is filled with water, and no hose is kinked. Lift the outlet hose above the water line for a few seconds to release trapped air, then lower it.
The filter is loud. Grinding or rattling usually means the impeller is not fully seated or debris is caught in the magnet groove. Unplug, reopen, and reseat the impeller. Replace a cracked impeller or worn shaft.
Flow is still weak. Check the intake strainer first, then flush the hoses. Sludge inside ribbed tubing is the most overlooked cause of slow flow. Confirm the media are stacked coarse to fine.
Water is cloudy. Stirred-up detritus and mild bacterial blooms typically clear within a day or two. Turbidity is one of the core parameters water quality researchers monitor for exactly this reason [3]. Test ammonia and nitrite, feed lightly, and wait before doing anything else.
Ammonia or nitrite reads above zero. Stop feeding for a day, retest, and watch the fish closely. If readings climb or fish look distressed, treat it as a biofilter problem and follow the escalation guidance below.
Water appears under the filter. Power off immediately. Reseat or replace the o-ring, check the housing for cracks, and confirm the clamps before restarting.
Safety and Fish Welfare During Cleaning
Electricity and water share this project. Unplug the filter and the heater before your hands go into the tank, keep a drip loop in every cord so water cannot travel along the cable to the outlet, and consider ground fault protection on the tank circuit as inexpensive insurance.
Fish stay in the tank during a canister service. Netting them into a container is more stressful than the noise and vibration of the work. Move slowly, keep the session short so temperature and dissolved gas levels hold steady, and keep soap, lotion, and hand sanitizer far away from the water.
Keep the biological media wet from the moment its basket comes out until the moment it goes back. Everything else in this guide is technique. That one habit is what keeps the ammonia-to-nitrate conversion running.
Limitations and When to Contact a Veterinarian
Every aquarium is a unique system, and individual cases need a veterinarian, ideally one with aquatic animal experience. The World Aquatic Veterinary Medical Association offers resources for locating fish veterinarians, the AVMA publishes pet owner guidance on fish health, and the Merck Veterinary Manual's pet fish section is solid background reading for owners who want to go deeper.
Contact a veterinarian or an aquatic specialist if any of the following happens.
- Fish gasp at the surface or show rapid gill movement, especially after a maintenance session.
- Ammonia or nitrite reads above zero and does not fall within a day.
- A fish dies without an obvious cause, or several die in a short period.
- You see white spots, frayed fins, red streaks, skin lesions, or appetite and behavior changes lasting more than a day or two.
- Cloudiness, odor, or recurring parameter crashes persist despite correct maintenance.
- You are considering any medication, because some products affect the biofilter and the choice and dosing deserve professional input.
Frequently Asked Questions
How often should I clean a canister filter?
Rinse the mechanical media whenever outflow weakens, which for most community tanks means every two to four weeks, and give the impeller, hoses, and seals a deeper service every two to three months. Let flow, not the calendar, make the final call.
Can I clean canister filter media with tap water?
No. Rinse media in old aquarium water siphoned out during a water change. Untreated tap water, especially warm tap water, damages the bacterial film that handles ammonia processing [1].
Should I replace my filter media or just clean it?
Clean mechanical media routinely and replace it only when it falls apart. Never replace biological media unless it is crumbling, and then only a portion at a time. Chemical media are the exception, because they exhaust and need scheduled replacement.
Why is my aquarium cloudy after cleaning the filter?
Stirred-up detritus or a mild bacterial bloom is the usual cause, and both typically clear within a day or two. Test ammonia and nitrite to confirm the biofilter is intact, keep feeding light, and hold off on further maintenance until the water clears.
How long can a canister filter stay off during cleaning?
Plan to finish in a single short session, ideally under an hour. Keep the media submerged in old aquarium water the entire time and the biological population handles the pause without trouble.
Why is my canister filter loud after cleaning?
Almost always an impeller seating or debris problem. Unplug the unit, reopen the head, pull the impeller, check the magnet groove for grit or a cracked blade, and reseat it firmly before restarting.
What order should filter media go in a canister filter?
Coarse mechanical media first, then fine mechanical floss, then biological media, then chemical media last. That order traps debris before it can smother the biological surfaces.
Do I need to remove my fish to clean the canister filter?
No. Fish tolerate a filter service far better than being netted and held in a container. Keep the session short, unplug the heater while you work, and leave the fish where they are.
Sources
- Microbial community succession of home aquarium biofilters associated with early establishment of comammox Nitrospira
- Comparative characteristics of functional parameters of aquarium filters
- An IoT-Enabled Smart Aquarium System for Real-Time Water Quality Monitoring and Automated Feeding
- IoT Based Goldfish Aquarium Water Quality Monitoring System Using SDLC Method
- Development of an autonomous aquarium system for maintaining deep corals
- Designing and maintaining a large closed-system reef exhibit at the Georgia Aquarium
- Maintaining turbidity and current flow in laboratory aquarium studies, a case study using Sabellaria spinulosa
- Design and Development of an IoT-based Smart Aquarium Water Temperature Control System with Automatic and Mobile Application-based Manual Regulation