How to Verify Pipetting Accuracy in Your Lab
By Dr. Zubair Khalid, DVM, MS, PhD ·

Every quantitative result in a molecular biology lab flows through a pipette at some point. A qPCR run with a two-fold error in master mix volume, a ligation that fails because the buffer was short, a standard curve that scatters because serial dilutions drifted, all of these trace back to how much liquid actually left the tip. External calibration services confirm performance once or twice a year. Between those visits, you can and should verify pipetting accuracy in-house, on your own bench, with your own tips and your own operators. This article walks through the gravimetric verification method in full detail, including the math, the acceptance criteria, the troubleshooting decisions, and the mistakes that quietly corrupt results.
What This Check Achieves and When to Use It
In-house verification answers one question: does this specific pipette, with the tips you actually use, in the hands of the people who actually use it, deliver the volume it claims? It does not repair a pipette and it does not replace a full calibration service, but it detects drift before drift reaches your data.
Use this check in the following situations:
- On a routine schedule, such as every three to six months for heavily used pipettes, or at least annually for all pipettes in the inventory. Your manufacturer's technical documentation will specify the interval the maker considers appropriate for the model.
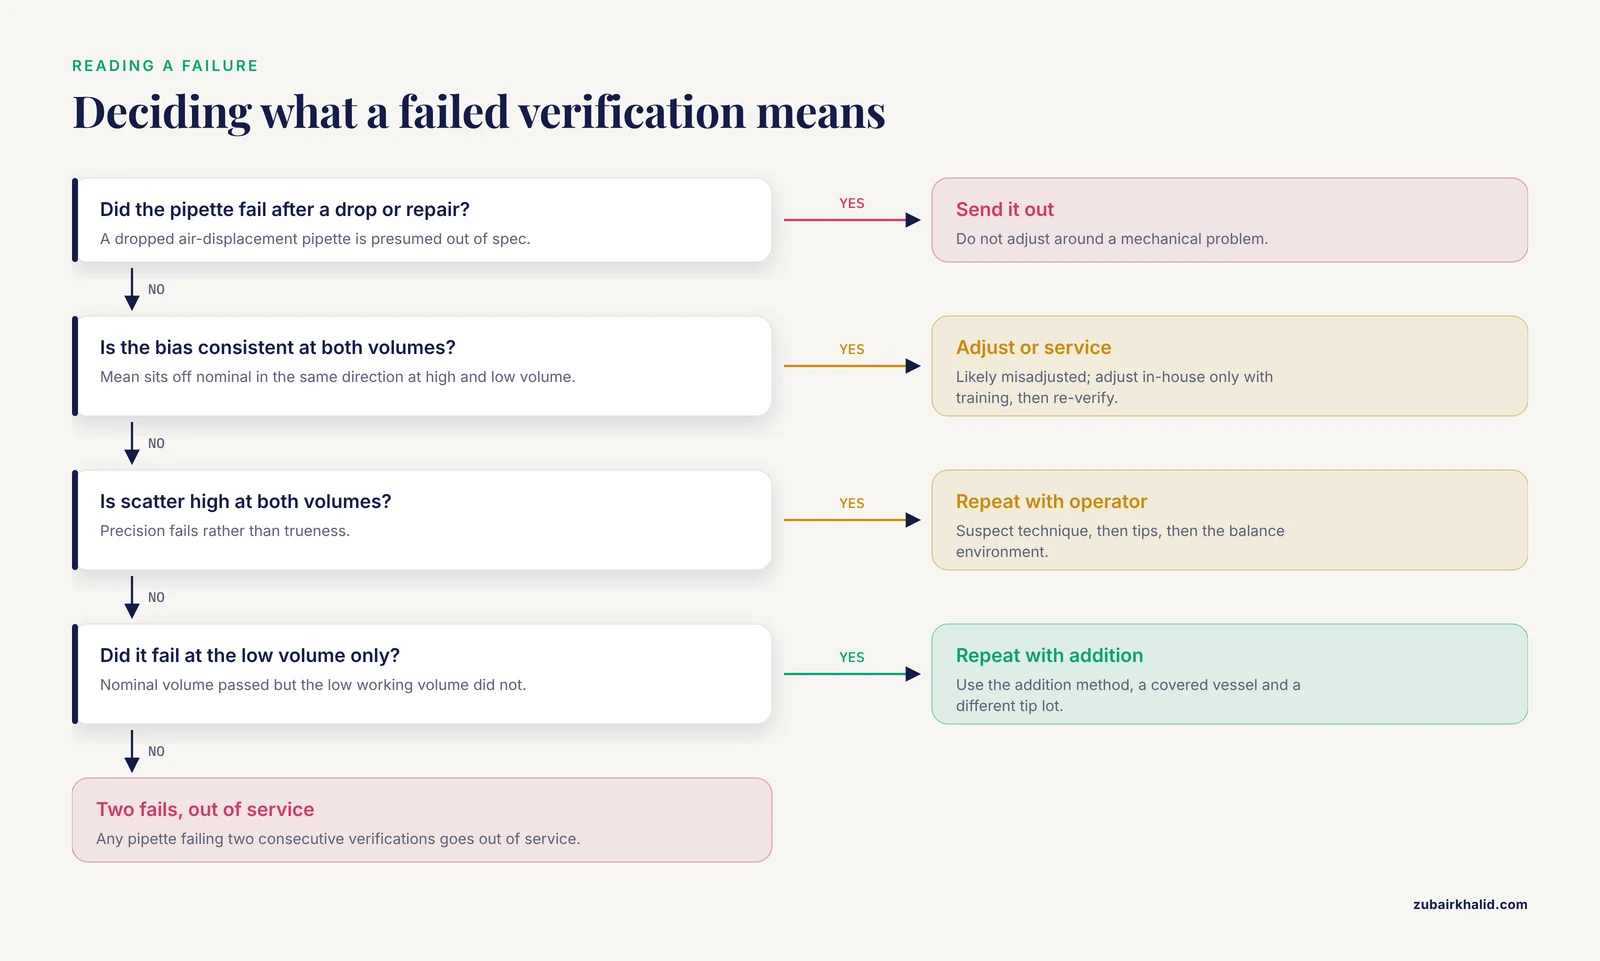
- Immediately after a pipette is dropped, even if it looks fine. A dropped air-displacement pipette is presumed out of spec until verified.
- After any repair, seal replacement, or adjustment.
- When a downstream assay produces unexpected results and you are eliminating variables.
- Before a new operator starts independent work, to establish a pipetting technique baseline.
- When a new tip lot or a new tip brand enters the lab, because tip fit changes delivered volume.
- When a pipette returns from service, before it goes back into circulation.
Time commitment: hands-on work runs about 20 to 30 minutes per pipette per test volume once you are practiced, so a full two-volume check of one pipette takes roughly 45 to 60 minutes of bench time. Elapsed time for a small batch of five to ten pipettes is two to three hours including setup and calculation. Add the balance manufacturer's stated warm-up time, commonly 30 to 60 minutes, before the first weighing. The balance warm-up happens while you do other work, so it does not add hands-on time.
The Principle Behind Gravimetric Verification
The standard method for verifying an air-displacement pipette is gravimetry. You dispense distilled water into a weighed vessel, weigh the vessel again, and convert the mass of water to volume. Water is the test liquid because its density is known precisely at any given temperature, it is safe, it wets most tip materials predictably, and it behaves like the aqueous buffers you pipette daily.
Three terms come up constantly and mean different things:
- Accuracy, more precisely called trueness in metrology documents, is how close the mean of your delivered volumes is to the nominal set volume. A pipette set to 100 µL that delivers a mean of 99.2 µL has a systematic error of -0.8 µL, or -0.8 percent.
- Precision is how repeatable the deliveries are, expressed as the standard deviation or the coefficient of variation (CV), which is the standard deviation divided by the mean, times 100.
- Calibration in the strict sense means comparing the pipette against a reference and documenting the result. Adjustment means physically changing the pipette, usually with an internal trim nut, so it delivers closer to nominal. Manufacturers sometimes use "calibration" loosely to include adjustment, so always clarify which one a service provider is quoting.
The mass-to-volume conversion uses a factor called Z, expressed in microliters per milligram. Z accounts for the density of water at the working temperature, the buoyancy of air acting on the water, and the buoyancy acting on the balance weights. The general relationship is:
Volume (µL) = mass (mg) × Z (µL/mg)
Approximate Z values at typical lab conditions, taken from the standard gravimetric conversion tables used for piston-operated volumetric instruments, are:
| Water temperature (°C) | Approximate Z factor (µL/mg) |
|---|---|
| 20 | 1.0032 |
| 22 | 1.0036 |
| 24 | 1.0041 |
| 26 | 1.0045 |
If you skip the Z correction and treat 1 mg as 1 µL, the error is only about 0.3 to 0.5 percent, which sounds small until you remember that the pipette specification you are testing against may itself be around 1 percent. Always apply Z.
For very small volumes, below roughly 10 µL, the mass of a single delivery approaches the readability limit of ordinary analytical balances. Two workarounds exist. The first is a microbalance with 0.01 mg or better readability. The second is the addition method, in which you dispense a series of aliquots into one vessel and calculate each volume as the difference between successive weighings. The addition method averages balance noise across the series and slows evaporation losses because the vessel stays closed longer. Both approaches are accepted practice in gravimetric pipette verification.
Materials and Equipment
| Item | Specification or working concentration | Purpose and notes |
|---|---|---|
| Analytical balance | Readability 0.1 mg | For test volumes of 100 µL and above. Must have a current calibration sticker and a draught shield. |
| Semi-micro or microbalance | Readability 0.01 mg or better | Required for test volumes between roughly 10 and 100 µL. Check that the minimum sample mass the balance maker specifies is compatible with your smallest delivery. |
| Distilled or deionized water | Reagent grade, used neat, equilibrated to room temperature | The test liquid. Temperature must match the room within about 1 °C for the Z table to be valid. |
| Weighing vessel | Small glass vial or polypropylene weigh boat, large enough that the tip does not touch liquid already delivered | Holds the dispensed water. Glass reduces static. |
| Pipette tips | The exact brand and type routinely used with that pipette, fresh from an unopened rack | Tip geometry and seal quality drive delivered volume more than most users expect. |
| Room thermometer | Resolution of about 1 °C | Needed to select the correct Z value and to confirm water and room are equilibrated. |
| Hygrometer | Optional but useful | Low humidity accelerates evaporation losses during small-volume weighing. |
| Pipette stand | Upright holder | Protects the pipette between runs and keeps liquid out of the shaft. |
| Ethanol, 70 percent v/v in water | Surface decontaminant for the pipette exterior and nosecone | Flammable. Keep away from open flame and heat sources. |
| Nitrile gloves, lab coat, safety glasses | Standard PPE | Protects the pipette from skin oils and protects you from decontamination chemicals. |
| Forceps | Clean, powder-free | Handles tips without contaminating them when working sterility-sensitive checks. |
| Notebook or spreadsheet | With columns for date, serial number, operator, temperature, tips, set volume, and each mass reading | Verification only counts if it is documented. |
| Photometric alternative kit | Spectrophotometer or plate reader, plus a water-soluble dye stock | Optional substitute for gravimetry when no suitable balance exists. See the dedicated section below. |
One note on the balance: its readability should be at least ten times finer than the smallest error you need to detect. To verify a 20 µL delivery against a 1 percent limit, you must resolve 0.2 µL, which is 0.2 mg of water. A 0.1 mg balance cannot do that job credibly. This is the single most common reason small-volume verifications fail in-house.
How to Verify Pipetting Accuracy In-House Step by Step
The procedure below follows the widely used gravimetric approach described in the international standard for piston-operated volumetric instruments, ISO 8655, adapted for routine bench use. Manufacturers publish their own gravimetric procedures in their service documentation, and they follow the same logic.
Step 1: Plan the Test Volumes
Test each pipette at two volumes: the nominal (maximum) volume and the lowest volume you routinely use, which should be at least 10 percent of the pipette's range. A 100 to 1000 µL pipette gets tested at 1000 µL and at 100 µL, assuming you actually work at 100 µL. Performance degrades disproportionately at the bottom of the range because fixed losses in the tip and dead air volume become a larger fraction of the delivery. A pipette that passes at nominal volume can fail badly at 10 percent, so testing only one volume gives false confidence.
Step 2: Equilibrate Water and Equipment
Place the bottle of distilled water, the pipette, and the tips in the room where you will test, and let them equilibrate for at least two hours. Record the water temperature and the room temperature.
Reason: The Z factor depends on water temperature. Cold water dispensed from a 4 °C fridge will read several percent off before it warms. Thermal expansion of the pipette shaft and the air cushion inside it also shifts delivered volume until everything reaches thermal equilibrium.
Step 3: Prepare the Balance
Turn the balance on and let it warm up for the time the manual specifies, typically 30 to 60 minutes. Check that it sits level, that the bubble in the level indicator is centered, that the draught shield closes fully, and that its calibration status is current. Wipe the pan. Position the balance away from HVAC vents, doorways, and busy walkways.
Reason: Air currents, vibration, and thermal drift across the pan are large relative to the masses you are measuring. A 100 µL delivery weighs about 100 mg, and an open door can move a 0.1 mg balance reading by more than the tolerance you are testing.
Safety note: The balance is a mains-powered instrument. Keep liquids away from it, and never place a wet vessel directly on the pan. Clean spills immediately.
Step 4: Inspect and Prepare the Pipette
Examine the nosecone for cracks or dents, check that the tip ejector moves freely, and wipe the outside with 70 percent ethanol. Attach a fresh tip of the brand you normally use. Seat the tip by pressing the pipette onto the tip with a firm twist, using slightly more force than a routine attachment.
Reason: A half-seated tip leaks air and delivers low. A cracked nosecone makes the tip seat at an angle and produces both low deliveries and high scatter. Cleaning removes dried residue that can wick liquid or contaminate your weighings.
Step 5: Pre-Wet the Tip
With the pipette set to the first test volume, aspirate and dispense the full volume into a waste container three to five times, keeping the tip immersed in the liquid while aspirating.
Reason: The air cushion inside the pipette is saturated with water vapor by the liquid left on the tip wall after pre-wetting. Without pre-wetting, evaporation into the dry air cushion during the seconds between aspiration and dispensing reduces the delivered volume, sometimes by more than the entire tolerance at small volumes.
Step 6: Tare the Weighing Vessel
Place the empty vessel on the pan, close the draught shield, wait for the reading to stabilize, and tare. Record the tared state in your worksheet.
Reason: Taring between readings, rather than subtracting mentally, eliminates the balance's own drift over the run from contaminating your differences.
Step 7: Perform the Conditioning Dispense
Dispense one full test volume into the vessel and discard the vessel contents, or simply deliver this first aliquot to waste. Then tare a fresh or dried vessel.
Reason: The first delivery from a dry tip is systematically low because more liquid wets the inner tip wall. Standard practice discards the first delivery so the ten measured deliveries come from a consistently wetted tip.
Step 8: Run the Ten Measured Deliveries
Dispense ten individual test volumes, weighing and recording after each one. For each delivery:
- Hold the pipette vertically, at 90 degrees to the bench, both when aspirating and when dispensing.
- Immerse the tip only 2 to 3 mm into the source water.
- Aspirate smoothly with the thumb release controlled, then pause about one second before withdrawing from the liquid.
- Dispense against the inside wall of the weighing vessel, holding the pipette vertical, and pause again to let residual liquid drain.
- Touch off the last drop on the vessel wall.
- Close the draught shield, wait for stabilization, and record the mass.
Reason: Vertical pipetting keeps the hydrostatic head consistent. Angled pipetting shifts delivered volume because the air pressure inside the pipette changes with tilt. Immersing the tip too deeply creates a rising-liquid effect that over-aspirates. Rushing the plunger leaves liquid behind in the tip. The one-second pauses let the meniscus and the air cushion settle, and they matter most at small volumes where the entire delivery is a few microliters.
Evaporation control: For deliveries under about 50 µL, work briskly and keep the vessel covered between weighings, or switch to the addition method described in Step 9. At very low humidity, evaporation during the seconds a tiny droplet sits on the pan can exceed the tolerance you are testing.
Step 9: Use the Addition Method for Small Volumes
For test volumes below roughly 10 µL, or whenever single-weighing scatter looks dominated by balance noise:
- Tare the vessel.
- Dispense a single aliquot, weigh, record the mass, and leave the accumulated liquid in place.
- Dispense the next aliquot into the same vessel, weigh, and record.
- Repeat for ten aliquots.
- Calculate each delivered volume as the difference between successive weighings, applying the Z factor to each difference.
Reason: Each individual weighing carries the balance's readability noise, but the differences between successive weighings share a common baseline, and the series takes only slightly longer than ten separate weighings. The vessel contents also create a humid microenvironment over the liquid surface, which slows further evaporation.
Step 10: Convert Mass to Volume
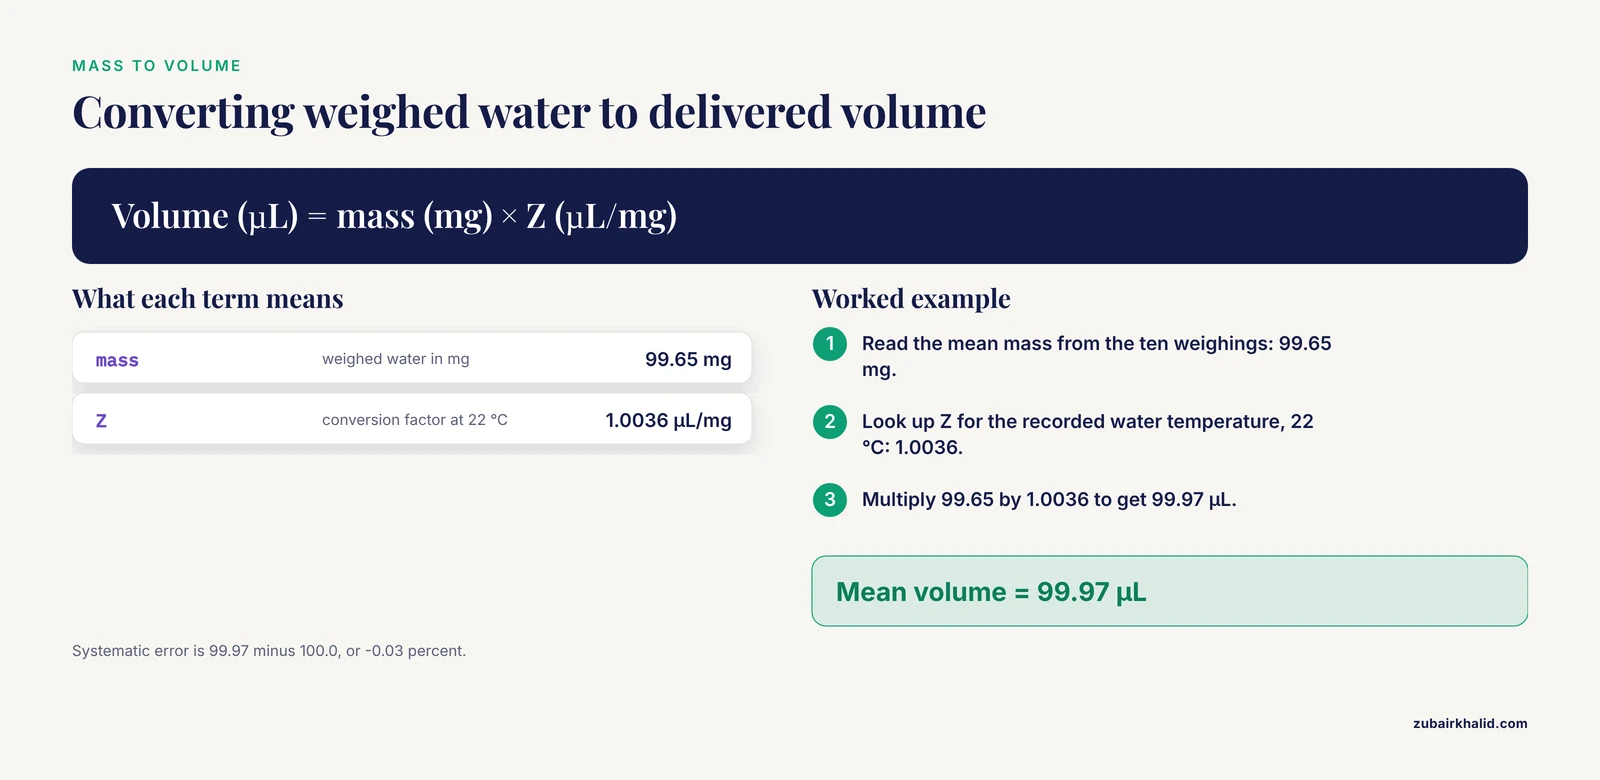
For each of the ten readings, multiply the mass in milligrams by the Z factor for your water temperature. Work the example below by hand before trusting any spreadsheet you build.
Step 11: Calculate the Statistics
From the ten converted volumes at each test volume, calculate:
- The mean delivered volume.
- The standard deviation, using n minus 1 in the denominator.
- The CV in percent.
- The systematic error, which is the mean minus the nominal set volume, expressed in microliters and as a percentage of nominal.
Worked example, 100 µL setting, room at 22 °C, Z = 1.0036:
Ten mass readings range from 99.2 mg to 100.1 mg. The mean mass is 99.65 mg with a standard deviation of 0.45 mg.
- Mean volume = 99.65 × 1.0036 = 99.97 µL.
- Systematic error = 99.97 - 100.0 = -0.03 µL, which is -0.03 percent.
- Standard deviation in volume = 0.45 × 1.0036 = 0.45 µL.
- CV = 0.45 / 99.97 × 100 = 0.45 percent.
These are healthy numbers for a well-maintained 100 µL class pipette operated by a practiced user.
Step 12: Repeat at the Second Volume
Install a fresh tip, pre-wet, and repeat Steps 6 through 11 at the low test volume. Do not reuse the tip from the high-volume run, because a tip that has been maxed out at nominal volume can relax and distort small deliveries.
Step 13: Document and Decide
Record the pipette serial number, manufacturer and model, date, operator, tip lot, both test volumes, water temperature, all raw masses, calculated statistics, and the pass or fail decision. File the record where the next person can find it.
Acceptance Criteria and How to Read Your Results
Your primary acceptance criterion is the manufacturer's own specification for that pipette model, printed in its manual or specification sheet. Manufacturers state two numbers at each test volume, one for the maximum permitted systematic error and one for the maximum permitted random error, usually expressed as a standard deviation or a CV. For good-quality air-displacement pipettes, typical published specifications at nominal volume fall near ±1 percent systematic error and around 1 percent or less CV, with substantially wider permitted errors at 10 percent of range. Read your own specification sheet, because numbers vary considerably between models and volume classes, and a specification for a 2 µL pipette looks nothing like one for a 5 mL pipette.
If your lab has written quality requirements, for example a policy that any pipette used for quantitative PCR must hold within ±2 percent at its working volumes, verify against the stricter of the two limits, the manufacturer's or your own policy.
Reading your results:
- Pass at both volumes. The pipette stays in service. Log the results and the next due date.
- Fail on systematic error only, consistent bias at both volumes. The pipette is likely misadjusted. Some labs adjust in-house using the manufacturer's trim tool and then re-verify. If you lack training on the adjustment mechanism, send the pipette for adjustment and calibration.
- Fail on precision only, high scatter at both volumes. Suspect technique first, then tips, then the balance environment. Have a second experienced operator repeat the run before touching the pipette.
- Fail at the low volume only. Suspect evaporation losses in your weighing setup, tip quality at small deliveries, or rushing during the dispense. Repeat with the addition method before condemning the pipette.
- Fail after a drop or repair. Send the pipette out. Do not adjust around a mechanical problem.
One decision rule worth adopting: any pipette that fails two consecutive verifications goes out of service regardless of how the failure reads, because a marginal pipette between failures is worse than an obviously broken one that everyone avoids.
Controls
Gravimetric verification is self-referential, but three controls make the run trustworthy:
- Balance control. Check the balance with a certified reference weight before the run, at a mass close to your expected test mass. If the reference weight does not read within its tolerance, the whole verification is invalid.
- Operator control. When you are evaluating a technique question rather than a pipette question, have the same pipette and tip lot run by two operators. A pipette that passes in one operator's hands and fails in another's has found a training gap, not a hardware fault.
- Environmental control. Record temperature and, for small volumes, humidity at the start of each run. A result that cannot be reproduced because conditions changed is not a result.
An Alternative: Photometric Verification
When no balance of adequate readability is available, a spectrophotometer can verify pipettes photometrically. The principle is Beer-Lambert behavior: the absorbance of a solution is proportional to the concentration of dissolved dye. You dispense a fixed, precisely known volume of concentrated dye stock into a fixed, large volume of diluent, so the final absorbance depends only on how much stock you actually delivered. A calibration curve prepared with known stock-to-diluent ratios converts absorbance back to delivered volume.
Practical setup:
- Choose a water-soluble dye with a stable absorbance peak, and prepare a stock such that when your test volume is diluted into your chosen diluent volume, the working solution reads an absorbance between roughly 0.3 and 1.0 at the peak wavelength. That window keeps you in the range where spectrophotometers are most linear.
- Prepare a standard curve by delivering known dilution ratios, for example ten points spanning the absorbance range, using volumetric glassware or a reference pipette known to be in specification.
- Run your test pipette the same way as gravimetry, one conditioning dispense followed by ten measured deliveries, each into a fresh tube of diluent.
- Convert each absorbance to a delivered volume using the curve, then compute mean, standard deviation, CV, and systematic error exactly as in the gravimetric workflow.
Photometric verification suits low volumes well, because dye sensitivity far exceeds microbalance sensitivity at the nanoliter-to-microliter boundary, and evaporation is suppressed because each delivery lands in a tube of diluent. Its weakness is the curve: any error in the standards propagates into every result, and dye adsorption to tube walls can bias low deliveries. Treat photometry as a verification method with its own controls, not as a shortcut.
Safety note: Handle dye concentrates with gloves and eye protection. Some dyes stain skin and surfaces persistently, and concentrated stocks can be irritants. Discard dye waste according to your institution's chemical waste policy.
Troubleshooting
| Symptom | Likely cause | Fix |
|---|---|---|
| Mean delivery is consistently low at both volumes | Pipette out of adjustment, worn piston or seal, or tip not seated | Reseat the tip and repeat. If the bias persists, send for adjustment and calibration service. |
| Mean delivery is consistently high at both volumes | Pipette out of adjustment upward, or droplet retained on the outside of the tip during weighing | Verify touch-off technique, confirm the tip exterior is dry, and repeat. Persistent positive bias needs service. |
| High scatter at all volumes | Technique variation, loose tip fit, bench vibration, or draught across the balance | Have a second operator repeat. Check tip seating, move the balance or close the draught shield fully, and add a vibration-damping surface under the balance. |
| High scatter at the low volume only | Evaporation in the weighing vessel, tip wicking or tip quality, or dispensing too quickly | Switch to the addition method, keep the vessel covered, slow the plunger stroke, and try a tip from a different lot. |
| Readings drift upward through the run | Water evaporating from the vessel between weighings | Shorten the run, keep the vessel covered between readings, or use the addition method. |
| Readings drift downward through the run | Tip wetting out progressively, or the pipette seal degrading with use | Replace the tip partway through a repeat run to separate tip effects from pipette effects. |
| One extreme outlier among ten | A bubble aspirated, a partial dispense, or a droplet lost during transfer | Repeat that delivery. Do not delete an outlier unless you observed a physical cause. |
| Balance reading unstable or slow to settle | Static charge on plastic vessels, draught, or an uneven bench | Use glass vessels, ground yourself before touching the vessel, close the draught shield, and confirm the balance is level on a rigid surface. |
| Passes at nominal volume, fails at 10 percent | Operator rushes small deliveries, or tip geometry performs poorly at low volumes | Practice the low-volume stroke, add the full one-second pauses, and test an alternative tip. |
| Results differ between two operators | Technique differences in angle, speed, or pause time | Observe both operators side by side against the technique points in Step 8 and retrain to a single written method. |
| New tip lot changed the results | Tip cone geometry or hydrophobicity differs from the previous lot | Verify with the new lot specifically, and record the passing tip lot in the pipette's file. |
Variations and Special Cases
Multichannel pipettes. Verify each channel separately. Dispense from one channel at a time into individual weighing vessels, and treat every channel as its own pipette with its own statistics. A twelve-channel pipette is really twelve pipettes sharing a handle, and channels fail individually.
Viscous liquids. The gravimetric check with water validates the pipette hardware. If you routinely pipette glycerol-containing buffers or serum, standard forward pipetting under-delivers relative to the set volume because the liquid is slow to leave the tip. The standard remedy in routine pipetting technique is reverse pipetting: press the plunger to the second stop, aspirate, and dispense only to the first stop, which leaves excess liquid in the tip to compensate for the film left on the tip wall. Verify viscous-liquid delivery by gravimetry with the actual liquid if the application demands it, and record that the verification applies to that liquid, not to water.
Volatile liquids. Ethanol, chloroform, and similar solvents evaporate during the aspiration-to-dispense interval and under-deliver with forward pipetting. Reverse pipetting also helps here. For a verification-grade check on volatile solvents, photometric methods adapted to the solvent, or manufacturer-recommended positive-displacement pipettes, are the appropriate tools.
Positive-displacement pipettes. These use a piston that directly contacts the liquid, so they suit viscous, volatile, and dense samples. Verify them gravimetrically with the same workflow, but consult the manufacturer's documentation for the correct test liquid, because capillary and piston assemblies can have material-specific wetting behavior.
Low-volume work below 10 µL. Combine the microbalance route with the addition method, or move to fluorescence-based verification, which offers far more sensitivity than absorbance at these volumes. Fluorescence requires careful control of dye photobleaching and instrument gain, so it is best adopted with a validated commercial kit and its own standard curve run fresh on the day.
Maintenance, Storage, and Recalibration Schedule
Verification tells you where the pipette stands today. These practices keep it standing there:
- Storage. Hang pipettes upright on a stand, set to their maximum volume, with no tip attached. Setting to maximum relaxes the spring and extends seal life. Never lay a pipette down with liquid in the tip, because liquid can wick into the shaft and corrode the piston.
- Cleaning. Wipe the exterior and nosecone with 70 percent ethanol during routine use. Disassemble the nosecone and clean or replace internal seals according to the manufacturer's service schedule, or send the pipette for preventive service annually under typical use. Confirm with the manufacturer's manual before autoclaving any part, since only certain components tolerate autoclaving.
- Decontamination before service. If a pipette has contacted biological material, chemical hazards, or radioactivity, decontaminate it thoroughly before it leaves your lab. Service technicians refuse contaminated instruments, and shipping an uncleaned pipette endangers everyone handling the package.
- Recalibration and adjustment. Adjust a pipette only after a verified failure and only with the manufacturer's tool and procedure, then re-verify immediately afterward. An adjustment without a re-verification is an unverified claim.
- Schedule. A defensible default for a research lab is in-house verification every three to six months for high-use pipettes and annually for all others, plus event-driven checks after drops, repairs, suspicious assay results, or tip lot changes. Adjust the interval by failure history. Pipettes that repeatedly fail early earn shorter intervals.
Common Mistakes and Limitations
These are the errors that most often invalidate an in-house verification, in rough order of how frequently they appear:
- Testing only the nominal volume. Pipettes fail at the bottom of their range far more often than at the top. Always test the low working volume.
- Skipping pre-wetting. The first several deliveries from a dry tip run low, and at small volumes the effect alone can exceed the tolerance. Pre-wet every tip before the first measured delivery.
- Using the wrong tips or a mixed tip lot. Verification with tips you never use in real work validates a pipette you do not own. Use the routine tip, and keep the lot uniform through the run.
- An inadequate balance. A 0.1 mg balance cannot credibly verify a 20 µL delivery. Match balance readability to the volume class, or use the addition method and a finer balance.
- Ignoring water temperature. Water straight from the refrigerator carries a density offset of several percent. Equilibrate and record the temperature, then apply the correct Z factor.
- Angled pipetting. Holding the pipette at 45 degrees instead of vertical shifts delivered volume and adds scatter. Verify and practice with the pipette vertical.
- Rushing the stroke. Fast aspiration splashes liquid into the tip cone, fast dispensing leaves liquid behind. The one-second pauses are not decorative.
- Bad balance environment. Open draught shields, HVAC vents, foot traffic, and bench vibration all move readings by more than a microliter at small masses. Control the environment before blaming the pipette.
- Deleting outliers without cause. An outlier with an observed physical cause, like a visible bubble, can be repeated and replaced. An outlier deleted because it looks bad is data falsification, and it hides exactly the instability you are testing for.
- Adjusting a failing pipette and skipping re-verification. The adjustment is only as good as the check that follows it.
- Verifying once and never again. A single passing check says nothing about the pipette's behavior six months later. The schedule is the point.
- Confusing verification with calibration service. In-house verification detects problems. Periodic professional service, with traceable reference balances and documented uncertainty, fixes and certifies them. The two activities complement each other and neither replaces the other.
The main limitation of any in-house check is traceability. Your balance and your procedure carry lower documented uncertainty than a metrology lab, so your in-house numbers are for surveillance and decision-making between service intervals, not for certificates that auditors treat as calibration records. Document what you did and what your uncertainty roughly was, and the limitation stays managed.
Individual cases vary. If a pipette behaves erratically after a failure, or if an assay result hinges on a borderline verification outcome, escalate to a qualified service provider rather than forcing a decision from a single bench run.
Safety Notes
Gravimetric verification with water is among the safest procedures in a molecular biology lab, but a few hazards deserve explicit mention:
- Electrical. Balances are mains-powered instruments sitting next to open cups of liquid. Keep vessels stable and wiped dry, and never reach across a balance with wet gloves.
- Flammable solvent. 70 percent ethanol used for decontamination is flammable. Use it away from flames and hot surfaces, and let it evaporate before replacing electrical components on the pipette.
- Chemical dyes. Photometric verification uses dye stocks that may be skin and eye irritants and that stain persistently. Wear gloves and eye protection, and follow your institution's chemical waste procedures for dye disposal.
- Contaminated pipettes. Never verify a pipette that has been used with infectious material, toxic reagents, or radioactivity until it has been decontaminated and cleared under your biosafety or radiation safety protocols. Keep the verification pipettes dedicated to clean water and dye only.
Frequently Asked Questions
How often should I verify pipetting accuracy in-house?
For a typical research lab, verify heavily used pipettes every three to six months and every pipette at least annually, with additional checks after any drop, repair, suspicious assay result, or tip lot change. Let each pipette's failure history drive its interval.
What is the difference between pipette calibration and verification?
Verification compares the pipette's current performance against a specification and documents the result. Adjustment, often loosely called calibration, physically changes the pipette to bring its delivery closer to nominal. Verify first, adjust only if needed, and re-verify after any adjustment.
Can I verify a pipette without an analytical balance?
Yes, using a photometric method. Dispense a dye stock into a fixed volume of diluent, read the absorbance, and convert to delivered volume with a standard curve built from a reference source. It works well for small volumes, though the standard curve must be prepared carefully with a trusted reference.
How many measurements do I need per test volume?
Standard practice is one conditioning dispense to waste, followed by ten weighed deliveries at each of two test volumes, the nominal volume and the lowest routine volume. Ten points give a stable mean and a usable standard deviation.
My pipette passes at full volume but fails at low volume. Is it broken?
Not necessarily. Low-volume failures often come from evaporation during weighing, dispensing technique, or tip performance rather than from the pipette itself. Repeat the low-volume run with the addition method, a covered vessel, slower strokes, and a different tip lot before sending the pipette for service.
Can I use tap water or saline instead of distilled water?
Use distilled or deionized water. Dissolved salts change density slightly, tap water carries variable impurities, and both shift the mass-to-volume conversion away from the published Z table. Reagent-grade water costs nothing extra and keeps the math clean.
Do multichannel pipettes need special handling during verification?
Treat every channel as its own pipette. Dispense from one channel at a time into separate weighing vessels and calculate independent statistics for each channel, because individual channels commonly drift before the whole pipette does.
What should I do when a pipette fails verification?
Stop using it for quantitative work immediately, tag it, and decide from the failure pattern. A consistent bias at both volumes usually means the pipette needs adjustment or service. High scatter points to technique, tips, or the balance environment first. Any pipette that fails two consecutive verifications, or that fails after a drop, goes to a professional service provider.