5 Stretching Exercises to Prevent Pipetting Injuries: A Quick Routine
By Dr. Zubair Khalid, DVM, MS, PhD ·

Pipetting is one of the most repetitive tasks in a molecular biology lab. A single plasmid prep, qPCR plate, or 96-well assay can involve several hundred aspiration and dispense cycles. Over weeks and months, that repetition loads the thumb, fingers, wrist tendons, forearm muscles, neck, and shoulder in the same narrow range of motion, thousands of times per day. The result is a family of overuse problems that clinicians call repetitive strain injuries, including tendon irritation at the thumb and wrist, forearm pain, and nerve compression symptoms such as tingling in the fingers.
This article walks through 5 stretching exercises to prevent pipetting injuries, written as a short routine you can do at the bench. The whole sequence takes about 5 minutes of hands-on time and roughly 7 minutes total, including getting settled. You do not need equipment, a gym, or a change of clothes. You need a chair, a wall or doorway for one stretch, and your own hands.
The routine works by restoring the range of motion that pipetting narrows, reducing sustained muscle tension in the forearm and shoulder, and giving the tendons a periodic break from one fixed posture. Stretching does not replace good pipetting technique, an ergonomically arranged workstation, or regular pipette calibration. It works alongside them. Later sections cover those supporting habits, because a stretch routine layered on top of a bad setup only delays the problem.
Use this routine on days you pipette for more than about 30 minutes. Run the full sequence once before a long pipetting session, once midway through, and once at the end of the day. On heavy days, such as plate-based workflows with hundreds of wells, add one extra round at the midpoint.
Why Pipetting Causes Injury in the First Place
Understanding the mechanism makes the exercise choices obvious, so start here.
Pipetting loads the hand in a distinctive way. The thumb operates the plunger against spring resistance, often hundreds of times per session. The index finger rests on the ejector. The wrist sits in a slightly extended or deviated position while the forearm muscles hold a static contraction to stabilize the pipette. The shoulder hovers in partial abduction to keep the pipette over the plate or tube rack. The neck flexes and rotates to watch the meniscus and the tip. None of these positions is extreme. The problem is the combination of low force, long duration, and high repetition.
Tendons glide inside sheaths as the fingers and thumb move. Repetitive motion with limited rest increases friction and fluid in those sheaths, which produces the aching and stiffness pipettors describe along the thumb side of the wrist or across the forearm. Sustained static contraction also compresses the soft tissues at the wrist and along the shoulder and neck, which can irritate nerves passing through those regions. Occupational health guidance for laboratory workers consistently identifies pipetting as a high-risk task for these upper limb disorders, and most institutional ergonomics programs recommend the same three-part response. Reduce the physical demands of the task, arrange the workstation well, and add regular recovery for the working muscles.
Stretching is the recovery part. When a muscle and its tendons are repeatedly held in a shortened or fixed position, the resting range of motion drifts shorter over time. Regular, gentle stretching maintains tissue extensibility, promotes blood flow during breaks, and interrupts the cycle of sustained tension. Controlled stretching programs are a standard first-line conservative approach for work-related upper limb discomfort in ergonomics practice, which is why this routine targets the exact muscle groups that pipetting loads.
One point of anatomy explains most of the routine. The muscles that move your fingers and thumb do not live in the hand. They live in the forearm, with long tendons crossing the wrist to reach the fingers. That is why forearm stretches, not hand shakes, are the core of a pipetting recovery routine. You are lengthening the muscle bellies that do the work.
Materials and Setup
No reagents are involved. The setup requirements are minimal, but they matter for form.
| Item | Specification | Purpose |
|---|---|---|
| Stable chair | Standard lab or office chair, feet flat on the floor | Supports upright posture during seated stretches |
| Wall or doorframe | Any clear doorway | Anchor point for the chest and shoulder stretch |
| Bench or desk edge | Waist height | Optional support for one wrist stretch variation |
| Timer or phone | Optional | Keeps stretch holds honest and consistent |
| Mirror or lab window reflection | Optional | Lets you check shoulder and neck position |
| Your pipettes | Any air-displacement model | Not used during the routine, but relevant to the technique sections below |
A short safety note before the steps. Stretching should never be painful. Work to a point of mild tension or a gentle pull, never to sharp pain, tingling, or numbness. If you already have a diagnosed hand or wrist condition, persistent numbness, swelling, or pain that wakes you at night, see a clinician before adding any stretching routine. Stretching an already irritated tendon sheath aggressively can make symptoms worse. The routine below is designed for prevention in people without current injury.
The 5 Stretching Exercises to Prevent Pipetting Injuries, Step by Step
This is the core routine, presented as stretching exercises for pipetting step by step. Each exercise includes the reason for the movement, because understanding why you are doing something is the difference between therapeutic stretching and random arm waving.
Do the sequence in the order listed. It moves from the most pipetting-specific structures, the wrist and thumb, outward to the neck and chest, which lets each body part warm the next.
Exercise 1. Wrist Extensor Stretch
Why this one first. The wrist extensors run along the top of your forearm from just below the outer elbow to the wrist. They stabilize the wrist every time you grip a pipette. Holding a pipette for hours keeps these muscles in a semi-contracted state, and overuse of this group is one of the most common sources of lateral forearm pain in repetitive hand tasks.
Steps.
- Extend your right arm straight in front of you at shoulder height, palm facing down.
- Flex the wrist so your fingertips point toward the floor. Keep the elbow straight. An elbow even slightly bent takes tension off the target muscles and ruins the stretch.
- With your left hand, gently pull the back of the right hand toward your body until you feel a mild stretch along the top of the right forearm, from the wrist up toward the elbow.
- Hold for 20 to 30 seconds while breathing normally. Do not bounce.
- Release, then repeat on the left arm.
- Complete 2 to 3 repetitions per side.
Critical detail. The stretch should register along the top of the forearm, not in the wrist joint itself. If you feel it only in the wrist, you are pulling too hard at the joint and not lengthening the muscle. Reduce the pull and focus on straightening the elbow.
Exercise 2. Wrist Flexor Stretch
Why this one. The wrist flexors run along the palm side of the forearm. Pipetting keeps them active for fine grip control, and a chronically shortened flexor group contributes to that tight, ropey feeling pipettors get in the forearm after long sessions. This group also sits near the median nerve at the wrist, so keeping the tissues supple supports the nerve environment as well.
Steps.
- Extend your right arm in front of you, palm facing up, elbow straight.
- Extend the wrist so your fingertips point toward the floor, palm still facing forward.
- With your left hand, gently pull the right palm and fingers back toward your body until you feel a mild stretch along the inside of the forearm.
- Hold 20 to 30 seconds, breathing steadily.
- Release and repeat on the left arm.
- Complete 2 to 3 repetitions per side.
Critical detail. Keep the shoulder relaxed. Most people shrug the stretching arm toward the ear without noticing, which shortens the forearm muscles and cancels the stretch. Drop the shoulder blade down before you begin the pull.
Exercise 3. Thumb and Finger Stretch
Why this one. The thumb takes more load than any other digit during pipetting. The plunger stroke is a thumb-driven movement against spring resistance, repeated hundreds or thousands of times. The tendon at the base of the thumb is a classic site of overuse irritation in high-volume pipettors. This stretch lengthens the thumb and finger flexors and opens the web space between thumb and index finger, the exact region that closes around the pipette grip.
Steps.
- Hold your right hand in front of you, palm facing you, fingers pointing up.
- Use your left hand to gently pull the right thumb back and out, away from the palm, until you feel a stretch across the base of the thumb and the web space.
- Hold 15 to 20 seconds.
- Next, extend the right arm forward and spread all five fingers wide, then curl them gently into a loose fist. Move slowly between wide open and gently closed, 5 full cycles.
- Finish by making a soft fist and slowly rotating the wrist in circles, 5 in each direction.
- Repeat the whole sequence on the left hand.
Critical detail. Pull the thumb with gentle, steady pressure. The thumb joint tolerates less force than people assume, and yanking it back causes exactly the irritation you are trying to prevent. If any step of this sequence reproduces sharp pain at the thumb base, stop that movement and note the symptom for the troubleshooting section below.
Exercise 4. Upper Trapezius and Neck Stretch
Why this one. Pipetting posture pulls the neck forward and tilts the head to one side while you align the pipette tip with a tube or well. The upper trapezius, the muscle running from the top of the shoulder up the side of the neck, holds that tilted posture statically. Chronic shortening here produces the burning between the shoulder blade and neck that pipettors describe at the end of a long session, and it contributes to tension-type neck pain.
Steps.
- Sit or stand tall. Drop your right shoulder down and back.
- Tilt your left ear toward your left shoulder. Do not rotate the face, just side bend.
- For a deeper stretch, place your left hand lightly over the right side of your head and let the weight of the arm assist. Do not pull.
- Hold 20 to 30 seconds, feeling the stretch along the right side of the neck and the top of the right shoulder.
- Repeat on the other side.
- Finish with 5 slow shoulder rolls backward on each side.
Critical detail. The shoulder drop comes first. If you tilt the head without lowering the shoulder on the stretching side, the muscle is already shortened and you will feel almost nothing. Shoulder down, then ear toward shoulder.
Exercise 5. Doorway Chest Stretch
Why this one. Hours of holding a pipette in front of the body round the shoulders forward and tighten the pectoral muscles across the chest. Tight chest muscles pull the shoulders further forward, which worsens the neck posture from Exercise 4 in a reinforcing loop. This stretch opens the front of the shoulder and chest and resets the shoulder blade position.
Steps.
- Stand in a doorway. Place your right forearm vertically against the doorframe, elbow at or slightly below shoulder height.
- Step forward slightly with the foot on the same side until you feel a stretch across the chest and the front of the right shoulder.
- Keep the ribs down. Arching the lower back cheats the stretch by lifting the chest.
- Hold 20 to 30 seconds, breathing normally.
- Repeat on the left side.
- Complete 2 repetitions per side.
Critical detail. The elbow height controls where you feel the stretch. Elbow at shoulder height targets the pectoral muscles. If you feel a pinching sensation at the front of the shoulder joint rather than a stretch across the chest, lower the elbow a few inches and step back slightly.
The Full Routine at a Glance
| Order | Exercise | Target tissue | Hold | Repetitions |
|---|---|---|---|---|
| 1 | Wrist extensor stretch | Top of forearm | 20 to 30 seconds | 2 to 3 per side |
| 2 | Wrist flexor stretch | Palm side of forearm | 20 to 30 seconds | 2 to 3 per side |
| 3 | Thumb and finger stretch | Thumb base, finger flexors, web space | 15 to 20 seconds plus 5 movement cycles | 1 to 2 per hand |
| 4 | Upper trapezius and neck stretch | Side of neck, top of shoulder | 20 to 30 seconds | 2 per side |
| 5 | Doorway chest stretch | Chest, front of shoulder | 20 to 30 seconds | 2 per side |
Total time, about 5 minutes. That is a reasonable trade against the alternative, which for many pipettors is weeks of forearm pain and modified duty.
How to Fit the Routine Into Real Lab Work
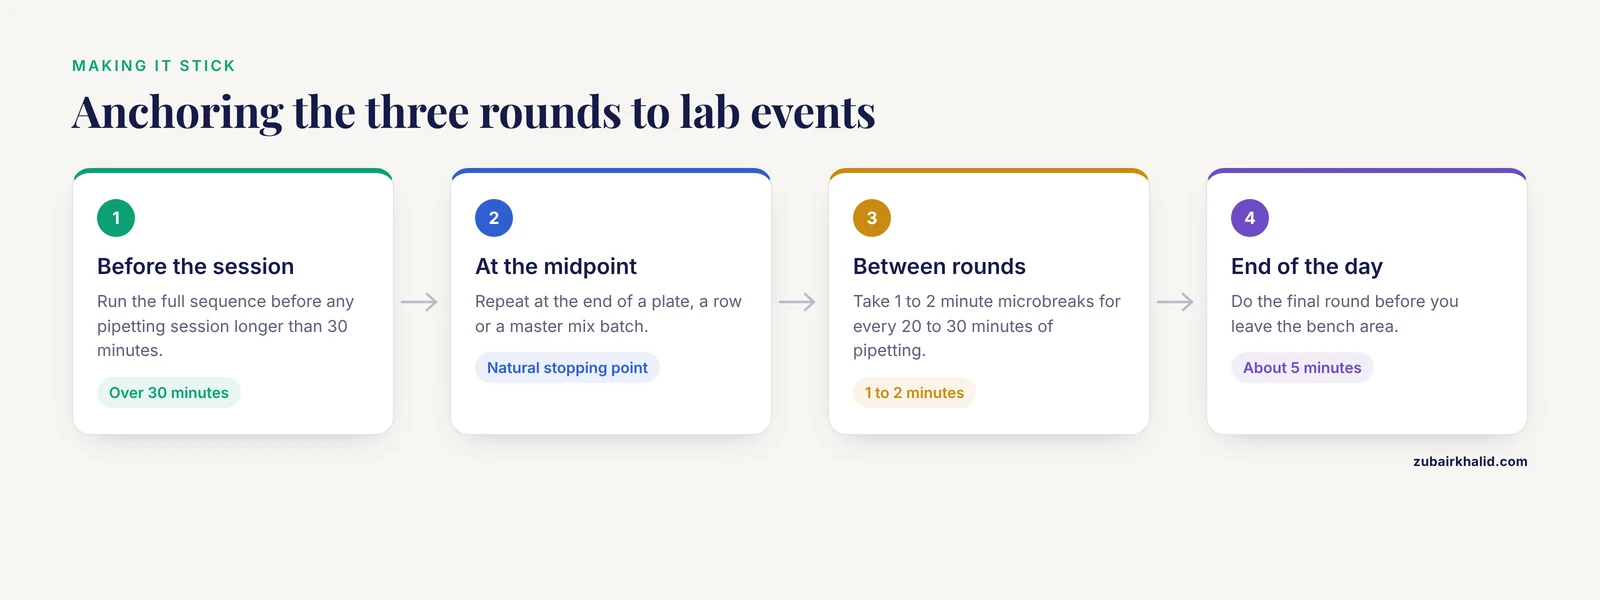
A routine that exists only on paper does nothing. The stability of this habit depends on anchoring it to events that already happen at the bench.
Anchor the first round to the start of any pipetting session longer than 30 minutes. Do it while waiting for a centrifuge, an incubation, or a thermocycler ramp, which turns dead time into recovery time. Anchor the second round to the midpoint of the session. A practical trigger is the end of a plate, a row, or a master mix batch, any natural stopping point. Anchor the final round to the end of the pipetting day, ideally before you leave the bench area.
Between rounds, build in microbreaks. Occupational ergonomics guidance for laboratory pipetting generally recommends a short break of 1 to 2 minutes for every 20 to 30 minutes of continuous pipetting, along with task rotation where staffing allows. During a microbreak, put the pipette down, shake out the hands, do 3 or 4 cycles of the finger opening and closing from Exercise 3, and reset your posture. The microbreak is where most of the recovery actually happens. The formal routine maintains range of motion. The breaks interrupt the static loading that drives the problem.
Pair the routine with something you already do. Stretch while a 10-minute incubation runs. Stretch during the RNA elution spin. The specific anchor matters less than having one, because habits attached to existing events survive busy weeks and habits that depend on memory do not.
Supporting the Stretches With Better Pipetting Technique
Stretching treats the symptom load. Better pipetting technique reduces the load itself. The two work together, and this section on stretching exercises for pipetting tips would be incomplete without it, because most of the cumulative strain in a pipetting day is decided by technique and workstation choices, not by the stretches.
Start with grip. Hold the pipette with a relaxed hand. The hook grip, where the pipette rests against the soft tissue between the thumb and index finger rather than being clamped in the palm, lets the hand muscles stay relatively relaxed. A white-knuckle grip transfers every plunger force through a rigid hand and multiplies forearm fatigue. If your hand aches at the end of a session, examine how hard you are squeezing between strokes.
Next, align the wrist. Keep the wrist as straight and neutral as you can while pipetting. Wrist deviation and extension during pipetting increase the tendon load in the forearm and compress structures at the wrist. Adjust your chair height and work surface so that your forearm and hand form a roughly straight line when the pipette tip meets the liquid. If you constantly bend your wrist to reach wells in the back rows of a plate, move the plate closer or stand up for those rows rather than holding a deviated wrist.
Manage elbow and shoulder position. Keep the upper arms relaxed at your sides and the elbows near 90 degrees when seated. Reaching forward with a protracted shoulder for every dispense loads the trapezius and neck. Raise or lower the chair, or bring the work toward you, instead of reaching toward the work.
Reduce the repetition load directly. Where the assay allows, use multichannel pipettes for plate work, electronic pipettes for high-volume dispensing, and reservoirs positioned to minimize arm travel. Use low-retention tips where appropriate so you are not fighting stubborn droplets with extra plunger force. Reserve manual pipetting for the volumes and steps that genuinely require it.
Finally, respect the plunger. Plunge to the first stop with smooth, controlled pressure and pause consistently. Rapid, forceful plunger strokes with the thumb locked in extension are the highest-load movement in the whole task. Slow, even strokes are gentler on the thumb and, as a bonus, more accurate.
Pipette Calibration and Its Ergonomic Role
Pipette calibration belongs in an article about pipetting injuries for a reason that surprises most people. The force required to move a plunger depends on the pipette's internal spring and seal condition. A pipette with degraded seals, a corroded spring, or a plunger that sticks requires more force and more repetitions of that force to deliver the same volume. Every extra newton of plunger resistance is multiplied by hundreds of strokes per session.
Regular calibration keeps plunger resistance within the manufacturer's specification, keeps volumes accurate, and by doing so keeps the physical demand of pipetting predictable. Manufacturer technical documentation for air-displacement pipettes specifies calibration and maintenance intervals, and those intervals exist partly for metrology and partly because a well-maintained pipette is easier on the operator. When your pipetting technique feels like it is getting harder over months, or when you catch yourself bearing down harder on a plunger that used to move easily, that is a calibration and maintenance signal, not a sign that you need to grip harder.
Practical points. Follow your institution's calibration schedule, which is typically tied to the manufacturer's recommended interval and to any quality system the lab operates under. Between formal calibrations, watch for the ergonomic warning signs of a failing pipette. Increasing plunger stiffness, a tip ejector that needs a hard thumb strike, inconsistent volumes requiring repeated pipetting to correct, and a seal that catches on the downstroke all mean the pipette is costing your thumb extra work. Send it for service rather than compensating with force.
Calibration also matters at the volume-selection end. Pipetting at the very bottom of a pipette's range, for example using a 1000 microliter pipette to dispense 20 microliters, produces poor accuracy and often repeated corrective dispensing, which multiplies the motion count. Choose the pipette whose range matches the volume. Fewer corrective strokes means less cumulative load.
Expected Results and How to Read Them
What should this routine actually deliver, and how do you know it is working. Set expectations by timeline.
In the first week, the realistic expectation is awareness, not cure. You will notice how much tension you carry in the forearms and shoulders during pipetting. Some people feel immediate relief from the neck stretch because they had never once released that muscle during the workday.
Over 2 to 4 weeks of consistent use, the expected results are less end-of-day stiffness in the forearms and thumb, an easier time keeping the wrist neutral because the tissues are not fighting you, and fewer of the late-session grip aches that come from sustained static contraction. The stretches themselves should feel easier to perform deeper, which reflects improved tissue extensibility.
Over months, the goal is absence of symptoms. Repetitive strain injuries develop over weeks to months of accumulated load, and prevention is measured in what does not happen. No progressive aching at the thumb base. No forearm tightness that persists into the weekend. No tingling in the fingers after long sessions.
Read your own results with three simple checks. First, a symptom diary on days you pipette more than an hour. A one-line note on any discomfort, its location, and its severity on a 0 to 10 scale is enough. Second, a range-of-motion spot check. Once a week, perform the wrist extensor stretch and note roughly how far the wrist flexes before you feel tension. Improving or stable range is a good sign. Declining range across several weeks is a signal to review technique, workload, and workstation setup. Third, a grip-feel check. Notice whether the pipette feels comfortable at the start of a session. Persistent discomfort from the first stroke, rather than fatigue at the end of one, suggests a developing problem that stretches alone will not resolve.
If symptoms progress despite consistent stretching and technique work, that is the point to involve a clinician and your institution's occupational health or ergonomics service. Early reports get addressed cheaply. Late reports cost tendon rehabilitation.
Troubleshooting
| Symptom | Likely cause | Fix |
|---|---|---|
| You feel the stretch only in the wrist joint, not the forearm | Elbow bent, or pulling too hard at the hand | Straighten the elbow fully and reduce the pull force. Aim the sensation into the muscle belly |
| No stretch sensation at all in the wrist stretches | Shoulder shrugged, or the target muscle already adapted | Drop the shoulder blade down first, then reapply gentle pressure |
| Thumb stretch produces sharp pain at the thumb base | Excessive force, or an already irritated tendon | Stop the stretch. Reduce workload on the thumb, use an electronic pipette where possible, and seek evaluation if pain persists beyond a few days of rest |
| Neck stretch aggravates dizziness | Head position compresses sensitive structures near the neck | Skip the hand-assist. Use a gentle side bend only and keep the motion small. Mention dizziness to a clinician |
| Chest stretch causes shoulder pinching | Elbow too high or stepping too deep | Lower the elbow below shoulder height, reduce the step distance, and keep the movement pain free |
| You keep forgetting the routine | No anchor to an existing lab event | Attach rounds to incubations, spins, or plate completion rather than to memory |
| Stiffness returns within an hour of stretching | Static loading continues without microbreaks | Add 1 to 2 minute breaks every 20 to 30 minutes of pipetting. Stretching alone cannot offset continuous loading |
| Symptoms worsen week over week despite the routine | Load exceeds recovery, or an underlying condition exists | Reduce pipetting volume through task rotation or electronic pipettes, review workstation setup, and consult occupational health |
Variations and Progressions
The base routine fits most people. A few variations address specific situations.
For standing work or crowded benches. If no doorway is available for Exercise 5, perform the chest stretch at a wall. Place the forearm against the wall with the body turned slightly away, or clasp both hands behind your back and lift gently while squeezing the shoulder blades together.
For severe tightness. Add a second variation of each wrist stretch using a bench edge. Place the palm flat on the bench, fingers pointing back toward you, and gently straighten the arm to load the flexors from a different angle. Keep the pressure light. This version loads more tissue at once, so introduce it gradually.
Nerve glide variation. For people who notice tingling rather than pure aching, a median nerve glide is a common ergonomic addition. Make a fist with the thumb tucked inside, then slowly straighten the fingers and finally extend the wrist while keeping the fingers extended, moving through the positions like a slow motion wave. Keep it gentle and stop any movement that increases tingling. Because nerve symptoms warrant professional assessment, treat this as a supplement rather than a substitute for evaluation.
For heavy plate days. On days with several hundred dispense cycles, add a forearm strengthen-and-release element after the stretches. Slowly open and close the fist 10 times, then squeeze a soft object, such as a closed tip box insert or a stress ball, for 5 seconds and release, 5 times per hand. Light rhythmic loading followed by release promotes blood flow through the forearm muscles after long static work.
For teams. Make the routine a shared event. A lab that stretches together at the start of a plate-loading session sustains the habit far better than individuals relying on willpower, and it normalizes microbreaks, which many technicians skip under time pressure.
Common Mistakes and Limitations
These are the stretching exercises for pipetting common mistakes seen over and over, plus the honest limits of what stretching can do.
Mistake 1. Stretching into pain. The most common error by a wide margin. People treat the sensation as a competition and pull hard. Stretch receptors respond to gentle sustained tension. Aggressive pulling irritates tendon sheaths and can create the very inflammation the routine is meant to prevent. Mild tension, held steadily, is the correct dose.
Mistake 2. Bouncing. Ballistic stretching, pulsing quickly at the end of range, triggers a protective contraction in the target muscle and adds joint stress. Hold still instead.
Mistake 3. Skipping the non-hand stretches. Many pipettors do the wrist stretches and ignore the neck and chest work, usually because the wrist symptoms are the loudest. The neck and chest stretches are not decoration. Forward head and rounded shoulder posture increases the load on everything downstream, including the wrist, by changing the mechanical chain the arm works through.
Mistake 4. Treating stretching as a substitute for workload management. This is the deepest limitation. If you pipette 6 hours a day with a manual pipette and no breaks, no stretching routine will fully protect you. Stretching is one of three pillars. The other two are an ergonomic workstation with sound pipetting technique and task design that limits continuous repetition. If a pillar is missing, say so to your supervisor, because workload distribution is an institutional responsibility, not an individual coping problem.
Mistake 5. Ignoring early symptoms. Stretching is prevention and early-stage relief. Numbness, tingling, night pain, swelling, or weakness that persists or progresses needs clinical assessment. A stretch routine does not treat a compressed nerve or a damaged tendon, and delaying evaluation turns a two-week problem into a two-month one.
Mistake 6. Inconsistency. Tissue adaptation comes from repeated low-dose stimulus over weeks. Doing the routine twice, feeling nothing dramatic, and quitting is the most common failure pattern of all. Five minutes, three times on pipetting days, sustained for a month, is the actual intervention.
Limitations. Individual anatomy, prior injury, and underlying conditions vary. What feels like mild tension for one person is painful for another, so calibrate all holds to your own sensation rather than to the numbers above. And as noted once already, anyone with a diagnosed hand, wrist, or neck condition should clear a stretching program with their clinician or occupational health provider before starting, since individual cases need professional judgment that a general routine cannot supply.
Safety Notes
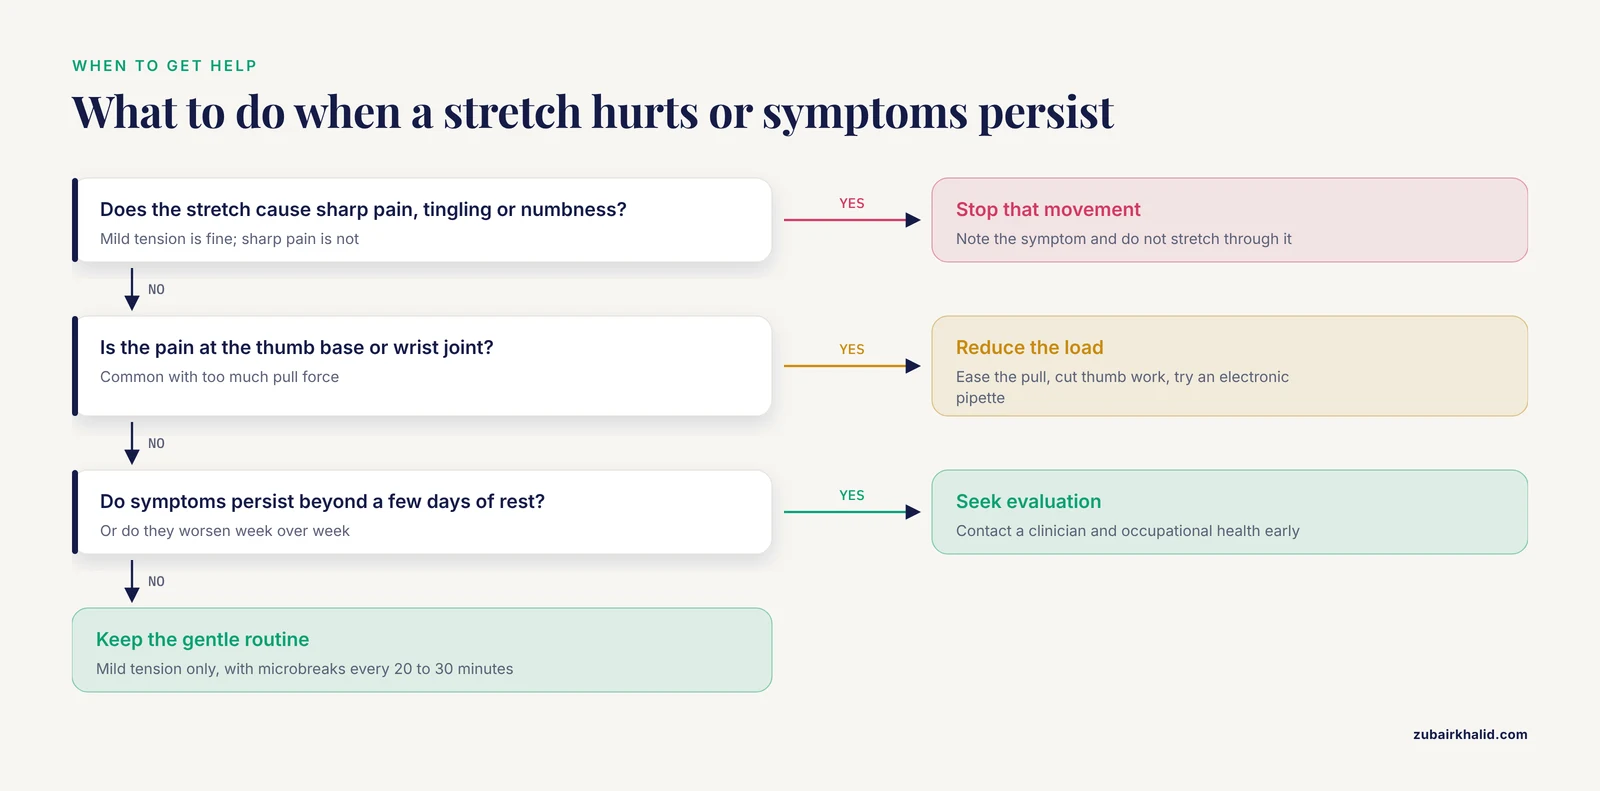
Three hazards deserve explicit mention in an otherwise equipment-free routine.
First, stretching near the pain threshold. Tendons and nerves do not adapt as quickly as muscles, and overstretching an already loaded forearm tissue is a real risk for someone who pipettes daily. All holds should sit at mild tension. Sharp pain, tingling, or numbness during any stretch means stop that movement.
Second, the doorway stretch near lab traffic. A doorway stretch places your forearm at head height in a passage. In a busy lab, choose a doorway outside the main corridor flow, or perform the wall variation instead, so no one walks into your arm and no one blocks an emergency exit.
Third, pre-existing conditions. Aspirin and anti-inflammatory medication do not make stretching through an inflamed tendon safe, and reduced pain from medication can mask the warning signal that tells you to stop. If you take medication for an existing upper limb condition, follow your prescriber's guidance on activity rather than relying on how the arm feels during the routine.
Frequently Asked Questions
How long does the whole routine take?
About 5 minutes of hands-on time, or roughly 7 minutes including setup. Each stretch involves 2 to 3 holds of 20 to 30 seconds per side.
How often should I do these stretching exercises for pipetting?
On any day you pipette for more than about 30 minutes, run the full routine once before the session, once midway, and once at the end. Add microbreaks of 1 to 2 minutes for every 20 to 30 minutes of continuous pipetting.
Can stretching fix pain I already have?
Stretching can relieve mild, recent, activity-related stiffness, but it cannot fix an inflamed tendon, a compressed nerve, or a progressive condition. Persistent numbness, tingling, swelling, night pain, or symptoms that worsen over days need clinical evaluation, not more stretching.
Do I need any equipment?
No. The routine needs a chair, a wall or doorway for the chest stretch, and your hands. Everything else, such as a timer or a mirror for posture checks, is optional.
Why do my forearms get tight when the work is in my hands?
The muscles that move your fingers and thumb are located in the forearm, with long tendons crossing the wrist. Hours of static grip work shortens and loads those forearm muscles, which is why forearm stretches, not hand shakes, are the core of the routine.
Does using an electronic pipette remove the need to stretch?
No. Electronic pipettes reduce thumb loading from the plunger stroke, which is genuinely protective, but they do not remove static grip work, wrist postures, or neck and shoulder strain. Keep the routine and the microbreaks regardless of pipette type.
How does pipette calibration relate to injury prevention?
A poorly maintained pipette with worn seals or a stiff plunger requires more force per stroke, and you repeat that force hundreds of times per session. Regular calibration per the manufacturer's interval keeps plunger resistance within specification, which keeps the physical demand predictable and low. Increasing plunger stiffness is an ergonomic warning sign, not just an accuracy problem.
What if my lab has no ergonomic program and my workload cannot change?
Start with what you control. Use the routine and microbreaks, improve your own grip and wrist posture, request a pipette that matches your volumes, and report symptoms early to your supervisor or occupational health service. Workload distribution is an institutional responsibility, and documented early reports are how ergonomic problems get fixed at the lab level.