Standardizing Pipetting Protocols Across Your Lab
By Dr. Zubair Khalid, DVM, MS, PhD ·

By the end of this article you will be able to write a single, standardized pipetting protocol that any trained member of your lab can follow, verify your pipettes gravimetrically at the bench, and roll the standard out with a training and sign-off plan. You will also leave with a free pipetting protocol template you can copy directly into a spreadsheet and adapt to your own assays.
Before you start, make sure you have on hand:
- A set of adjustable-volume air displacement pipettes covering your routine volumes (typically a P10, P20 or P200, and P1000)
- Matched high-quality pipette tips, including filtered and low-retention types where needed
- An analytical balance readable to 0.1 mg for gravimetric checks
- Distilled or deionized water equilibrated to room temperature
- A spreadsheet program such as Excel or Google Sheets for the template and calibration calculations
- A shared drive or document system where the final protocol will live
Why Standardizing Pipetting Protocols Across Your Lab Matters
Pipetting looks like the simplest operation in molecular biology and it is one of the most common sources of avoidable variation. Two operators using the same model of pipette can deliver measurably different volumes if they differ in aspiration angle, immersion depth, pre-wetting, or dispensing rhythm. When each operator improvises, your replicate wells absorb that variation and your error bars grow for reasons that have nothing to do with biology.
The stakes scale with what is downstream. In next-generation sequencing workflows, library preparation is a multistep, reagent-intensive process where the authors of a major review identify standardization as a central requirement for robustness and reproducibility, and where pipetting workstations are one of the main automation strategies used to reduce hands-on variability [1]. Even in clinical translation, systematic reviews of new therapeutic modalities point to the absence of standardized evaluation frameworks as a barrier to moving results from the bench into practice [2]. A lab that standardizes its most fundamental manual operation is fixing the same class of problem at its root.
Standardization also protects new people. A student who joins your lab in September should produce the same serial dilution curve as someone with six years of experience, because the protocol, not memory, carries the method.
What a Standardized Pipetting Protocol Template Contains
A good standardize pipetting protocol template format has a fixed structure so every assay document in the lab looks the same. That consistency is what makes protocols auditable, trainable, and transferable. The format below works for everything from a plasmid miniprep to an NGS library prep.
Header block
- Protocol title and unique ID (for example, MOL-PCR-001)
- Version number and date
- Author and approver
- Intended application (which assays use this protocol)
- Required pipettes and tips, by model and volume range
Step table
The heart of the template is a step table with one row per pipetting action. Each row should specify the step number, the action, the source and destination vessels, the volume, the pipette and tip to use, the technique (forward or reverse pipetting, mix or no mix), the number of cycles, and a notes field. Published analytical protocols show how effective this discipline is. A recent GC-MS method for chiral profiling of secondary amino acids compresses an entire derivatization and extraction workflow into 12 explicitly enumerated pipetting steps, each commented and explained, which is exactly the level of granularity you want in your own template [3].
Quality control block
- Volumes to verify gravimetrically and how often
- Controls to include (no-template control, positive control, dilution standard)
- Acceptance criteria and what to do if they fail
Change log
A dated list of who changed what and why. Version 2 of a protocol that silently differs from version 1 is worse than no protocol at all.
The Free Standardize Pipetting Protocol Template (Copy and Adapt)
Here is a free pipetting protocol template you can paste into a spreadsheet. The first block is the header, the second is the step table shown in CSV form so it imports cleanly.
Protocol ID,MOL-PCR-001
Version,2.0
Date,2026-11-11
Author,J. Doe
Approver,R. Smith
Application,SYBR qPCR 20 uL reactions in 96-well plate
Pipettes required,P20 (2-20 uL), P200 (20-200 uL)
Tips required,Filtered low-retention, aerosol-resistant
Technique default,Forward pipetting with pre-wet x2

Step,Action,Source,Vessel_Destination,Volume_uL,Pipette,Tip,Technique,Mix,Cycles,Notes
1,Add diluent,Nuclease-free water tube,Each well A1-H3,9.0,P20,Filtered,Forward,Yes x3,24,Change tip per column
2,Add 2X master mix,Master mix tube,Each well A1-H3,10.0,P200,Filtered,Reverse,Yes x3,24,Viscous solution use reverse mode
3,Add primer-probe working mix,PP working mix tube,Each well A1-H3,1.0,P20,Filtered,Forward,No,24,Pre-wet x2 then single dispense
4,Add template,DNA plate rows A-E,Matching well,2.0,P20,Filtered,Forward,Yes x5,15,Aerosol-resistant tips required
5,Add NTC water,Water tube,Wells F1-H3,2.0,P20,Filtered,Forward,Yes x3,9,Last to avoid cross-contamination
Adjust the columns freely, but keep the structure. The discipline of naming the pipette, tip, technique, and cycle count for every single dispense is what converts a loose recipe into a standardized protocol. A published protocol that follows this pattern, enumerating its 12 pipetting steps with per-step explanation, demonstrates how compact and unambiguous the result can be [3].
Pipetting Technique Fundamentals Every Template Should Lock In
Before you standardize across people, make sure the technique you are standardizing is the correct one. These fundamentals come from standard laboratory practice and manufacturer documentation for air displacement pipettes.
Air displacement pipettes
An air displacement pipette holds a piston inside the body with a column of air between the piston and the liquid in the tip. Depressing the plunger moves the piston and displaces that air. Because the air cushion is compressible, factors that change air behavior (temperature, vapor pressure of the liquid, barometric pressure) affect delivered volume. This is why technique details matter more than most beginners expect.
Forward pipetting (the default)
- Press the plunger to the first stop.
- Immerse the tip a few millimeters into the liquid, held vertically.
- Release the plunger slowly to aspirate.
- Pause briefly, then withdraw the tip from the liquid, touching off against the vessel wall if permitted.
- Dispense by pressing to the first stop, then press to the second stop to blow out the residual volume.
Use forward pipetting for aqueous solutions below about 1 percent viscosity and when you do not need the last trace of liquid preserved.
Reverse pipetting (for viscous, foaming, or volatile liquids)
- Press the plunger all the way to the second stop.
- Immerse the tip and release slowly to aspirate. The tip now contains more liquid than the set volume.
- Dispense by pressing only to the first stop. A small excess remains in the tip and is discarded.
Use reverse pipetting for detergent-containing buffers, protein solutions, glycerol-rich mixes, and volatile solvents, where forward pipetting under-delivers because liquid clings to the tip or vapor displaces the air cushion. Your template has a Technique column for exactly this reason.
Pre-wetting
Aspirate and dispense the set volume two to three times into the source liquid before the first real draw, especially below 10 µL. Pre-wetting saturates the air cushion with vapor and conditions the tip surface. Skipping it is one of the largest correctable sources of small-volume error.
Rules that belong in every SOP
- Never pipette below roughly 10 to 20 percent of a pipette's nominal maximum volume. Precision degrades sharply at the bottom of the range. On a P20, treat 2 µL as the practical floor and move to a P10 or P2 below that.
- Keep the pipette vertical during aspiration. Angles beyond about 20 degrees from vertical change hydrostatic pressure on the tip and bias the draw.
- Aspirate smoothly. A fast plunger release creates aerosols, bubbles, and turbulence that distort the meniscus.
- Immerse the tip only as deep as needed, roughly 2 to 3 mm for microliter volumes, deeper only for large volumes.
- Use a fresh tip whenever carryover would matter. Filtered tips block aerosol transfer into the pipette shaft when you are handling template DNA, RNA, or infectious material. Low-retention tips reduce adsorption losses of dilute nucleic acid and protein.
- Equilibrate reagents and samples to room temperature before pipetting small volumes. A cold master mix pipetted into a warm plate delivers the wrong volume because the trapped air column contracts or expands.
Step-by-Step Walkthrough: Building and Rolling Out Your Standard
Follow these seven steps to go from informal bench habits to a documented, enforceable standard.
Step 1. Inventory your pipettes and volumes
List every pipette in the lab with model, serial number, volume range, and last calibration date. Note which are used for which assay classes. This inventory becomes the header block of every protocol and the sampling frame for calibration scheduling.
Step 2. Choose one high-value assay and write its protocol with the template
Pick the assay your lab runs most often. Fill the step table row by row as you would actually perform it at the bench, not as you remember performing it. If you find yourself writing "add appropriate amount," stop and assign a number. Ambiguity in a protocol is a future error.
Step 3. Work the volumes on paper before touching a pipette
Small-volume work rewards arithmetic done in advance. Worked example for a 20 µL qPCR reaction scaled to 26 wells (24 samples plus no-template and positive controls) with a 10 percent overage:
Components per 20 uL reaction:
  2X SYBR master mix          10.00 uL
  Forward primer (10 uM)       0.50 uL
  Reverse primer (10 uM)       0.50 uL
  Nuclease-free water          7.00 uL
  Template DNA                 2.00 uL (added per well, not in master mix)

Master mix covers the first three lines: 18.00 uL per reaction
Number of wells: 24 samples + 1 NTC + 1 positive control = 26
Overage 10%: 26 x 1.1 = 28.6, round up to 29 reactions

Expected output:
  2X master mix   10.00 x 29 = 290.0 uL
  Forward primer   0.50 x 29 =  14.5 uL
  Reverse primer   0.50 x 29 =  14.5 uL
  Water            7.00 x 29 = 203.0 uL
  Master mix total 18.00 x 29 = 522.0 uL
Notice the primer volumes of 0.50 µL per reaction. Those sit at the very bottom of a P20 range and invite error. The standard fix is to prepare a concentrated primer working stock so the per-reaction volume rises into the comfortable zone. Build this rule into your template rather than relying on people to remember it.
Step 4. Pilot the protocol with two operators
Have two people of different experience levels run the same protocol independently. Compare a measurable output, for example Cq values of identical template dilutions, absorbance of matched dye dilutions on a plate reader, or gravimetric masses of a dispense series. Agreement between operators is your evidence that the protocol, not individual habit, is now controlling the outcome.
Step 5. Verify the pipettes used in the protocol
Run the gravimetric check described in the next section on every pipette named in the protocol header before sign-off. A standardized protocol executed with an out-of-calibration pipette standardizes the wrong volume.
Step 6. Train and sign off every operator
Training is a demonstration plus a supervised run plus a recorded result. Each lab member signs the protocol's training log with a date. New protocols do not go live until every expected user has signed.
Step 7. Schedule review and recalibration
Assign the protocol an owner. Set a review interval (many labs re-review annually or whenever a reagent or vessel changes) and a pipette recalibration schedule tied to usage. Record both in the header block.
Verifying the Standard: Pipette Calibration and Gravimetric Checks
Pipette calibration means comparing the volume a pipette actually delivers against its set volume, and adjusting or servicing it when the difference exceeds the manufacturer's permissible error. The bench method is gravimetry: deliver water into a tared vessel on an analytical balance and convert the mass to volume.
The conversion from mass to volume
Water density varies with temperature, so calibration uses a dimensionless factor Z (in µL per mg) that accounts for density, buoyancy, and evaporation at the test temperature. Z values are tabulated in the ISO 8655 standard that governs piston-operated volumetric apparatus. As a working illustration, Z is approximately 1.003 µL/mg at 22 °C near sea level, so a delivered mass of 99.80 mg corresponds to about 100.1 µL. Look up the exact Z for your measured temperature and local barometric pressure from the standard's tables or your balance manufacturer's documentation rather than reusing this illustrative value.
Worked gravimetric check
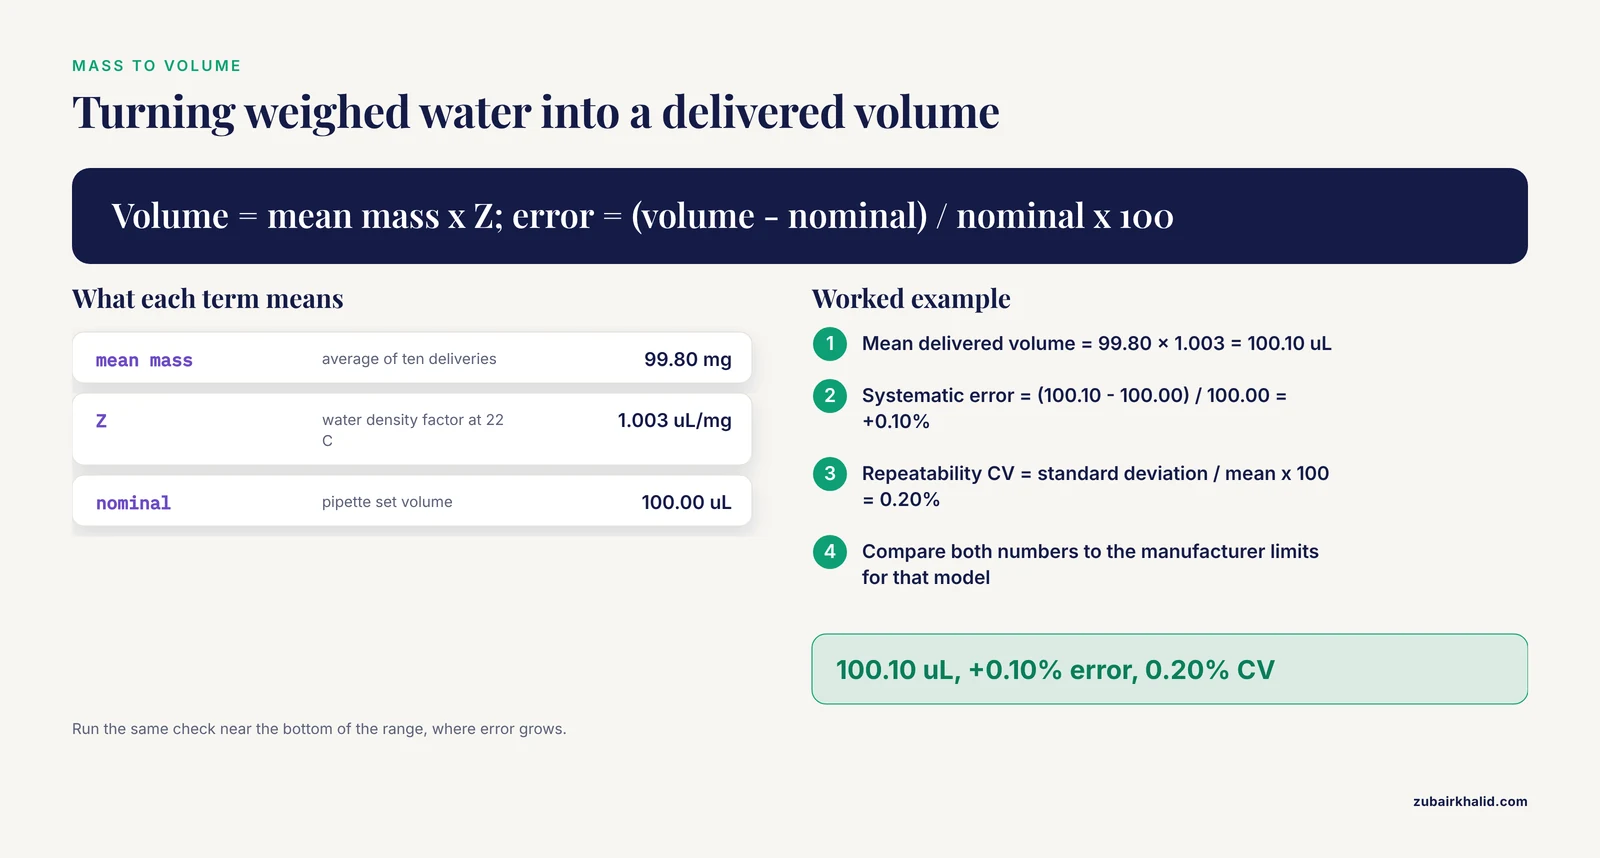
Test each pipette at 100 percent of its nominal volume, and ideally also near the bottom of its usable range, because error grows there. Example for a P200 set to 100 µL, ten deliveries weighed on a 0.1 mg balance at 22 °C:
Delivered masses (mg):
  99.6, 99.8, 100.1, 99.7, 99.9, 100.0, 99.5, 99.8, 99.9, 99.7

Mean mass:      99.80 mg
Z factor (22 C): 1.003 uL/mg

Mean delivered volume = 99.80 x 1.003 = 100.10 uL
Systematic error      = (100.10 - 100.00) / 100.00 = +0.10%
Repeatability (CV)    = standard deviation / mean x 100 = 0.20%
Compare both numbers against the permissible systematic and random error limits listed on the manufacturer's specification sheet for that exact pipette model and test volume. If the pipette is within limits, log the result. If it fails, service or adjust it before the standardized protocol goes live. Many labs verify high-use pipettes every three to six months and all pipettes at least annually, with immediate verification after any drop, any suspected mis-operation, or before a critical experiment.
Spreadsheet formulas for the check
Put the ten masses in cells B2 through B11 of a sheet:
Mean mass (mg):        =AVERAGE(B2:B11)
Standard deviation:    =STDEV.S(B2:B11)
Mean volume (uL):      =AVERAGE(B2:B11)*1.003
Systematic error (%):  =((AVERAGE(B2:B11)*1.003)-100)/100
Repeatability CV (%):  =STDEV.S(B2:B11)/AVERAGE(B2:B11)*100
Expected output for the example masses: mean volume 100.10, systematic error 0.001 (formatted as 0.10 percent), repeatability 0.20 percent.
Common spreadsheet errors during this step and their fixes:
#DIV/0!in the CV formula means the AVERAGE range is empty or contains no numeric values. Check that masses were entered as numbers, not text with units.#VALUE!means a cell contains text where a number is expected, often a mass typed as "99.8 mg". Strip the unit and keep units in the column header.- A negative standard deviation is impossible and signals a typo in the range or a swapped STDEV argument.
Key Options and Formulas at a Glance
| Parameter | Recommendation | Rationale |
|---|---|---|
| Forward vs reverse pipetting | Forward for aqueous, reverse for viscous or foaming liquids | Reverse mode keeps an excess in the tip to compensate for retention and vapor loss |
| Pre-wetting | 2 to 3 cycles, mandatory below 10 µL | Saturates the air cushion, improves first-draw accuracy |
| Minimum working volume | At least 10 to 20 percent of nominal capacity | Precision degrades sharply near the bottom of the range |
| Aspiration angle | Vertical, within about 20 degrees | Tilt changes hydrostatic pressure and biases the draw |
| Tip immersion | 2 to 3 mm for microliter volumes | Deep immersion wets the outer tip and inflates delivery |
| Test volumes for calibration | Nominal volume and a low-end volume | Error is worst at the bottom of the range |
| Mass-to-volume conversion | Volume = mass × Z factor | Z corrects for water density, buoyancy, and evaporation |
| Systematic error | (Mean delivered - nominal) / nominal × 100 | Measures inaccuracy, compare to manufacturer limits |
| Repeatability | Standard deviation / mean × 100 (CV) | Measures precision across deliveries |
| Calibration interval | Per usage, commonly 3 to 12 months, plus after any drop | Usage rate drives drift risk |
Common Errors and Their Fixes at the Bench
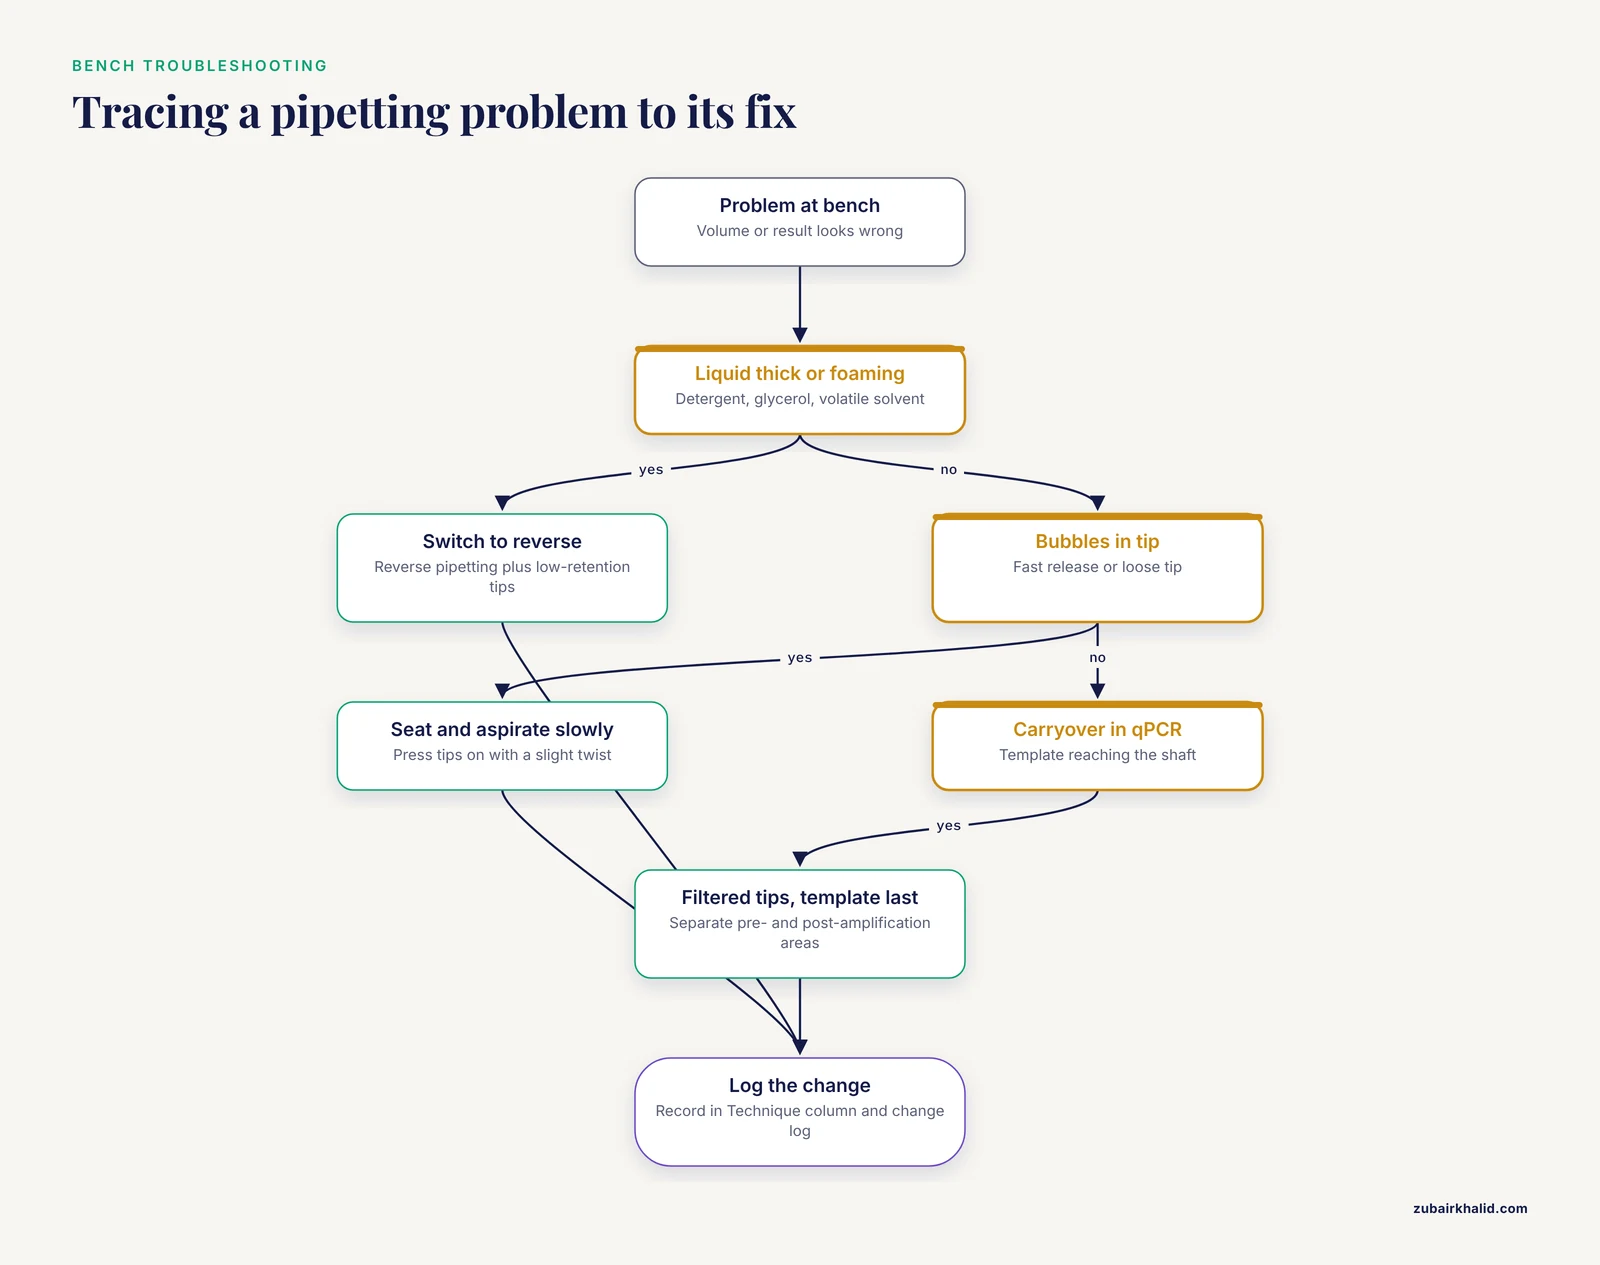
- Under-delivery with detergent or glycerol solutions. Cause is liquid retention and air cushion behavior. Fix by switching the protocol to reverse pipetting and low-retention tips, and note the change in the Technique column.
- Bubbles during aspiration. Cause is plunger release that is too fast or a tip not fully seated. Fix by pressing tips on firmly with a slight twist, aspirating slowly, and letting foam settle before dispensing.
- Volume drift within a long dispense series. Cause is evaporation from small source tubes and thermal disequilibrium. Fix by preparing source plates fresh, keeping them covered, equilibrating to room temperature, and dispensing promptly.
- Carryover contamination in qPCR or NGS setups. Cause is aerosolized template transferred through an unfiltered tip into the pipette shaft. Fix by mandating filtered aerosol-resistant tips for template addition, adding template last, and physically separating pre- and post-amplification areas.
- Inconsistent multichannel results across a plate row. Cause is nonuniform tip seating or a warped plate. Fix by seating all tips against a flat surface, inspecting the plate, and rotating the pipette during the operator's training check.
#DIV/0!or#VALUE!in the calibration sheet. Fixes are listed in the calibration section above and belong in the template's QC block so anyone can debug the sheet without calling you.
When to Move from Manual Pipetting to an Automated Workstation
Manual standardization has a ceiling. For high-throughput library preparation, a review of automation strategies classifies pipetting workstations as platforms that allow high-throughput processing with limited flexibility, while microfluidic solutions trade flexibility for miniaturization and lower investment cost, including nanolitre droplet handling for single-cell applications [1]. The practical read for a working lab is this: keep a rigorous manual standard as your baseline, and consider a liquid-handling workstation when your bottleneck is hands-on time across many samples rather than assay complexity. Automation does not remove the need for the discipline in this article, because a robot executing an ambiguous protocol simply reproduces the ambiguity faster. The step table format above converts directly into a worklist, which is one more reason to keep the template structured.
Common Mistakes and Limitations
- Standardizing only the document, not the training. A protocol nobody follows is shelf literature. The sign-off log is not bureaucracy, it is the enforcement mechanism.
- Testing pipettes only at their maximum volume. Most real work happens in the lower half of the range where error is worst. Verify at both ends.
- Treating calibration as a repair step. Calibration is a measurement step. If a pipette fails verification, it leaves service for adjustment. Do not recalibrate your expectations to match a drifting instrument.
- Ignoring tip brand and lot. Accuracy specifications are quoted for the manufacturer's own tips. Switching tip brands silently changes performance, so record tip type and lot in the protocol header.
- Letting the template drift. If someone edits a protocol without a version bump, two versions circulate and results become incomparable. Route every change through the owner and the change log.
- Over-trusting single-point checks. One gravimetric run tells you about today. Levey-Jennings style control charts of verification results over time reveal drift long before a failure.
- Assuming automation replaces technique. Automated stations still need calibrated tips, defined speeds, and validated liquid classes. The same volume-verification logic applies.
- The limits of any written standard. A template captures what is known today, and individual experiments can still behave unexpectedly. Unusual results warrant consultation with your supervisor or a more experienced colleague rather than silent improvisation at the bench.
Frequently Asked Questions
What is a standardized pipetting protocol template?
It is a fixed-format document that specifies every pipetting step in an assay, including volumes, pipette model, tip type, technique, and cycle counts, so any trained operator produces the same result. The template structure (header, step table, QC block, change log) stays constant across all assays in the lab.
How often should pipettes be calibrated?
Verify high-use pipettes every three to six months and all pipettes at least annually, plus immediately after a drop or suspected misuse. The right interval depends on usage frequency, the criticality of the assays, and your institution's quality system, so set it deliberately and record it.
What is the difference between forward and reverse pipetting?
Forward pipetting dispenses the full set volume by pressing through both stops and suits aqueous liquids. Reverse pipetting aspirates from the second stop and dispenses only to the first stop, leaving excess in the tip, which compensates for viscous, foaming, or volatile liquids that otherwise under-deliver.
What volume range should each pipette be used for?
Work within roughly 10 to 100 percent of nominal capacity, and treat the bottom of that window as a warning zone because precision degrades at low volumes. On a P20, volumes below about 2 µL belong on a P10 or P2 instead.
How can I verify a pipette myself without sending it away?
Use gravimetry: dispense water ten times onto a tared analytical balance readable to 0.1 mg, convert mean mass to volume with a Z factor from ISO 8655 tables, and compare systematic error and repeatability against the manufacturer's specification sheet for that model.
How do I get every lab member to actually follow the same protocol?
Make compliance easier than improvisation by giving people a complete step table, requiring supervised training with a signed log, and comparing operators' outputs on a shared assay to confirm equivalence. Review adherence during periodic protocol re-certification rather than assuming it.
When should our lab invest in an automated pipetting workstation?
Consider automation when hands-on pipetting time across large sample numbers becomes your main bottleneck, as it commonly is in multistep library preparation workflows. Keep your manual standardization first, since an automated system inherits and accelerates whatever protocol you give it.
Do I need filtered tips or low-retention tips, or are they optional extras?
They are tools for specific problems, not luxuries. Filtered aerosol-resistant tips protect samples and pipettes from cross-contamination when handling template nucleic acids, and low-retention tips recover more of dilute nucleic acid or protein solutions. Specify the required tip type in every protocol row rather than leaving it to chance.