Pipetting Posture 101: How to Align Your Body for Comfort and Accuracy
By Dr. Zubair Khalid, DVM, MS, PhD ·

Proper pipetting posture is the deliberate alignment of your chair, bench, sample containers, and pipette grip so that your hand, wrist, arm, shoulder, and neck stay in neutral positions during liquid handling. Done well, it accomplishes two things at once. It reduces the repetitive load on your thumb, wrist, forearm, shoulder, and neck that builds up over hundreds or thousands of pipetting cycles per day. It also improves accuracy, because a stable body produces steadier plunger strokes, more consistent tip immersion angles, and fewer systematic volume errors.
Use proper pipetting posture every time you perform extended liquid handling, including serial dilutions, PCR setup, plate loading, media changes, and aliquoting. It matters most during long sessions, anything longer than about 20 to 30 minutes of continuous pipetting, and it matters for short tasks too, because habits built during quick transfers carry into marathon ones. Initial setup takes 5 to 10 minutes at the start of a session. The posture itself is then maintained continuously while you work, with brief reset breaks recommended every 20 to 30 minutes of pipetting. There is no elapsed time cost beyond setup, because the posture is simply the way you position yourself for work you were already doing.
This article walks through the principle behind ergonomic liquid handling, the exact setup and body alignment step by step, how to confirm your technique is working, a troubleshooting table for the problems pipettors actually run into, variations for standing work and multichannel pipettes, and the mistakes that cause most pipetting-related strain.
Materials and Equipment
You do not need special purchases to sit and pipette well. You need a height-adjustable chair, a bench you can organize, and a pipette that fits your hand. The table below lists the standard items and what to look for in each.
| Item | Specification or typical range | Purpose and notes |
|---|---|---|
| Adjustable lab chair | Seat height adjustable, five-caster base, lumbar support, no armrests that block bench approach | Lets you set seat height so feet rest flat and forearms sit level with the work surface. Armrests often prevent you from sitting close to the bench edge, so low-profile or removable armrests are preferable for pipetting work. |
| Adjustable bench or riser blocks | Work surface at or near elbow height when seated | If your bench is fixed and too high, raise your chair and use a footrest. If it is too low, raise the work itself on racks or cooler boxes rather than slouching down to it. |
| Air-displacement pipettes | Single-channel 2 to 20 µL, 20 to 200 µL, and 100 to 1,000 µL cover most molecular biology work | Choose the smallest volume range that fits the task. Lighter pipettes and low plunger-force models reduce thumb load over long sessions. |
| Compatible sterile tips | Matched to pipette shaft, low-retention tips for viscous or low-surface-tension liquids | Tips seat more consistently when the pipette shaft and tip mold match. Poor tip seating is both an accuracy problem and a force problem, because a loose tip tempts you to jam it on harder. |
| Tip boxes and waste receptacle | Full rack plus a shallow sharps-resistant tip waste container placed inside your work zone | Keeping tip pickup and tip ejection inside your immediate reach triangle prevents hundreds of reach cycles per session. |
| Tube racks, cooler blocks, reagent reservoirs | Positioned so all liquids sit between roughly elbow and shoulder height | Elevating sample racks on ice buckets or benchtop coolers keeps your wrist from bending downward over a low rack. |
| Anti-fatigue mat | For standing work at a biosafety cabinet or fume hood | Reduces leg and lower back fatigue during prolonged standing. Optional for seated work. |
| Gravimetric calibration balance or access to your facility's calibration service | Analytical balance readable to at least 0.1 mg for microliter-volume verification | Used to confirm that your posture and pipetting technique deliver accurate volumes. Calibration is covered in its own section below. |
Safety note. If your protocol involves infectious material, corrosives, or volatile solvents, perform the work in the correct containment device, such as a certified biosafety cabinet or chemical fume hood, and follow your facility's exposure-control plan. Posture adjustments inside a hood or cabinet never override containment requirements. Keep the sash or work opening at its marked height, and do not lean your face into the cabinet to get a closer view of the meniscus. Raise the sample instead, as described in the step-by-step section.
The Principle: Why Posture Controls Both Comfort and Accuracy
Pipetting is a repetition task. A single pipetting cycle involves thumb flexion to the first stop, aspiration, thumb extension or release, and a firm press to the second stop for blow-out. Across a full day of plasmid prep, a dilution series, or a 96-well plate setup, that cycle can repeat thousands of times. Ergonomics, the applied science of fitting the task to the human body rather than forcing the body to fit the task, treats three factors as the drivers of overuse injury in repetitive work: force, repetition, and posture. Pipetting scores on all three. The thumb applies real force against the plunger, the motion repeats at high frequency, and poor posture multiplies the effective load by placing joints at the ends of their range of motion.
The neutral-position concept is the core of proper pipetting posture. A joint is neutral when it sits near the middle of its natural range, with muscles and tendons under low tension. For the wrist, neutral means straight in line with the forearm, neither bent toward the thumb, bent toward the little finger, flexed down, nor extended up. For the shoulder, neutral means the upper arm hangs relaxed at your side or close to it, with the elbow near your torso rather than lifted or held out to the side. For the neck, neutral means the head balanced over the spine, looking forward or down at a shallow angle rather than craned forward or tilted back.
Three mechanisms connect this to injury risk. First, deviated joints lengthen or shorten the tendons and muscles crossing them, which raises the force those tissues must generate to do the same job. A wrist bent toward the little finger while the thumb works the plunger is the classic example, because the thumb tendons must then work across an angled wrist. Second, static loading matters as much as motion. Holding your arm raised to reach across the bench for 30 minutes fatigues the shoulder girdle even though the arm is barely moving. Third, grip force creeps upward unnoticed. Under time pressure, people squeeze the pipette handle well beyond what control requires, and sustained squeeze restricts blood flow to the small muscles of the hand.
Accuracy connects to posture through stability. Air-displacement pipettes deliver volume based on piston travel and the behavior of an air cushion between piston and liquid. Steady, consistent plunger strokes produce consistent aspiration speed, and consistent tip immersion depth and angle produce consistent liquid uptake. A pipettor leaning sideways to reach a far rack tilts the pipette, changes immersion geometry, and introduces volume variability. A fatigued thumb releases the plunger unevenly on aspiration, which is a well-known source of drift in serial dilution series. Good posture is therefore not a comfort luxury layered on top of technique. It is part of the technique.
One boundary worth drawing early: posture and calibration are separate quality systems. A perfect posture cannot rescue an out-of-tolerance pipette, and a perfectly calibrated pipette cannot rescue a technique that consistently touches the tip to the vessel wall or releases the plunger at an angle. Both must be right. The calibration section later in this article explains how to verify the instrument so that posture corrections are not chasing the wrong problem.
Proper Pipetting Posture Step by Step
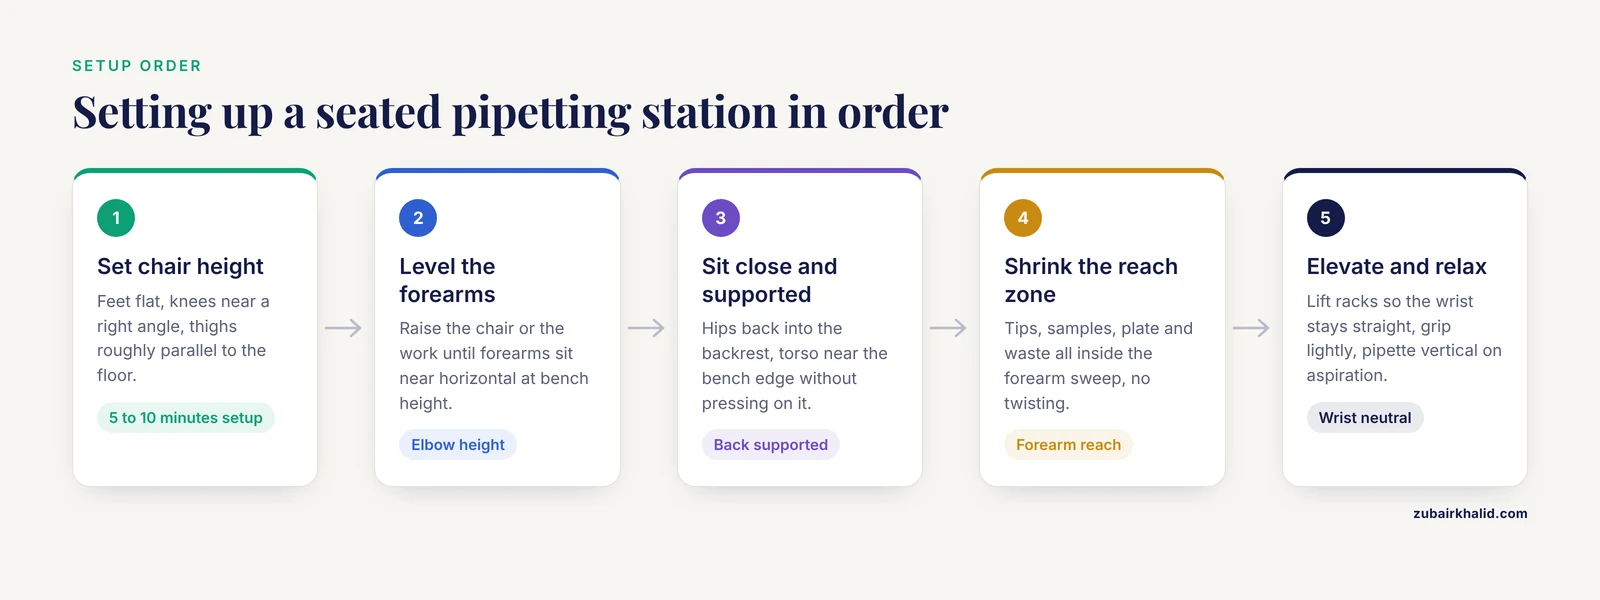
The steps below assume seated work at a standard bench, which is the majority of molecular biology liquid handling. Adjustments for standing work appear in the variations section. Work through the setup steps in order, because each one depends on the one before it. Recheck the setup whenever you change benches, chairs, or pipettes.
1. Set your chair height so your feet rest fully flat on the floor
Sit on the chair and adjust the seat height until both feet rest flat, your knees are bent to roughly a right angle, and your thighs are approximately parallel to the floor. If your bench is fixed at a height that forces you to raise the chair above this point, keep the raised chair and place a footrest, or a sturdy box, under your feet so they are supported rather than dangling. The reason: unsupported feet shift your weight onto the backs of your thighs and the base of your spine, which promotes lower back slouching over the course of a session. A stable base is the foundation for everything above it.
2. Adjust the work surface relationship so your forearms sit near horizontal
Sit directly in front of your work area and look at your elbows. Your goal is for your forearms to sit at or near horizontal, roughly at the height of the bench surface, when your upper arms hang relaxed at your sides. If the bench is too high, raise the chair and restore foot support with a footrest. If the bench is too low, raise the work materials on racks or boxes instead of lowering your shoulders toward them. The reason: each degree of reach below or above this comfortable band gets paid for with sustained shoulder and neck muscle activity, and the cost compounds across a full pipetting session.
3. Sit close to the bench edge with your back supported
Move your hips back into the chair so your lower back contacts the backrest, then scoot the chair in until your torso is comfortably close to the bench edge without your chest pressing on it. Do not perch on the front edge with your back unsupported, and do not lean your mid-back into the chair while your body angles forward to reach the work. The reason: forward leaning rounds the lower back and pushes the head and neck forward, and a forward-head position multiplies the effective load on the neck muscles. Supported sitting with a short, easy reach is the target.
4. Arrange your work zone so everything you touch sits within easy forearm reach
Organize the bench so that your tip box, samples, reagents, tubes or plate, and tip waste container all fall within the sweep of your forearm without your elbow leaving your side or your torso twisting. Keep the items you touch most frequently, usually tips and the plate or tube rack you are filling, closest to you. Place the tip waste container on the same side as your pipetting hand, near the rack you fill. The reason: every reach beyond about forearm length is a repeated cycle of shoulder elevation or trunk rotation, and at pipetting frequency those cycles add up quickly. Bench organization is one of the highest-leverage ergonomic changes available, and it costs nothing.
5. Elevate your samples to keep your wrist neutral
This is the step most people skip. Look at your sample rack or reagent reservoir. If it sits flat on a low bench and you must bend your wrist downward to reach the liquid, raise it. Set tube racks and reservoirs on top of cooler blocks, ice buckets with a floating rack, or empty tip box lids until the liquid surface sits high enough that you can insert the tip with your wrist straight and your forearm roughly parallel to the floor. Similarly, position the vessel you are dispensing into so you do not bend the wrist up or sideways to enter it. For a deep vessel such as a flask or a tall tube, tilt it gently on a rack rather than angling your wrist to reach the bottom. The reason: sustained wrist deviation is one of the strongest posture risk factors in pipetting, and elevation removes it at the source rather than asking your wrist to tolerate it.
Safety note. When you elevate a rack on an ice bucket, confirm the rack sits stable and cannot tip. An unstable elevated rack holding biohazardous or toxic liquid is a spill hazard. Never raise a rack by balancing it on a container with a narrow or sloped lid.
6. Grip the pipette with a relaxed hand and a full palm contact
Wrap your fingers around the handle so the pipette rests against the flesh of your palm and fingers, not pinched between fingertips. Keep your grip light enough that you could easily relax it. Many modern pipettes have contoured handles and a hook or finger rest, and using the designed contact points distributes force better than a tight fist. Keep your wrist straight as you grip. The reason: excessive grip force is one of the most common uncorrected habits in pipetting. The muscles that squeeze the handle are small, and holding them contracted for a full session produces hand fatigue that feels mysterious because the squeeze itself goes unnoticed.
7. Keep the pipette vertical during aspiration
Hold the pipette as close to vertical as practical when aspirating liquid, and immerse the tip to the depth recommended for the volume range, generally just deep enough to keep the tip orifice below the meniscus without touching the vessel bottom. Immerse smoothly and at a consistent speed. The reason: pipette manufacturers specify vertical aspiration because tip angle changes hydrostatic effects and the wetting of the tip interior, which shifts delivered volume. Vertical aspiration is simultaneously an accuracy practice and a posture practice, because the tilted-head, tilted-pipette combination people use to peek down narrow tubes is a major source of neck strain.
8. Operate the plunger with smooth, controlled strokes
Press to the first stop with a steady motion, immerse the tip, release the plunger smoothly and consistently to aspirate, then dispense by pressing steadily to the first stop, pausing, and pressing on to the second stop for full blow-out when the protocol requires it. Avoid slamming the plunger to either stop. The reason: smooth strokes produce consistent aspiration and dispensing, which is the mechanical basis of reproducible volumes. Slamming adds shock to the thumb and hand and creates splashing and aerosol risk with hazardous liquids.
9. Eject tips with a light touch, into a nearby waste container
Position the tip waste container within your work zone, then eject each tip by pressing the ejector with your thumb in a single controlled motion. Do not use your free hand to pull tips off the shaft, and do not lean or twist toward a distant waste beaker. The reason: manual tip removal forces the small joints of the fingers and is a repetitive force task hidden inside every cycle. The ejector exists to remove that task. A nearby container removes the reach.
10. Alternate tasks and take short posture resets
After roughly 20 to 30 minutes of continuous pipetting, take a brief break of 30 seconds to a few minutes. Set the pipette down, let your hands hang relaxed at your sides, gently stretch the fingers back, roll the shoulders, and stand up if you have been seated. If your protocol allows, alternate pipetting tasks with non-pipetting tasks, such as incubation waits, centrifugation, or documentation, rather than batching all the pipetting into one unbroken block. If a task permits it and your protocol and lab rules allow, alternate hands for compatible steps. The reason: brief recovery intervals interrupt the accumulation of tissue loading that drives overuse symptoms, and task variety spreads the load across different muscle groups instead of concentrating it in the thumb and shoulder of one arm.
11. Verify your setup once per session
Before starting your run, run through the checklist quickly: feet flat and supported, forearms near horizontal and level with the work surface, back supported, all materials in easy reach, racks elevated so the wrist stays straight, waste container nearby, grip relaxed, pipette vertical on aspiration. The reason: posture drifts within a session, and it resets poorly between sessions. A 30-second checklist at the start rebuilds the habit each time you sit down.
Pipetting Technique Details That Interact With Posture
Posture and liquid-handling mechanics reinforce each other, so a few technique points belong in any discussion of body alignment. These are standard air-displacement pipetting practices taught in laboratory fundamentals courses.
Pre-rinse the tip. For accurate delivery of aqueous solutions, aspirate and dispense the liquid once or twice into the source or a waste vessel before taking the volume you will transfer. This conditions the interior of the tip with a consistent liquid film and improves reproducibility, particularly for small volumes below about 20 µL where the film is a meaningful fraction of the total volume. Pre-rinsing also reduces foaming with proteinaceous solutions.
Watch the first stop versus the second stop. The first stop displaces the volume you intend to deliver. The second stop purges residual liquid from the tip. Forward pipetting, the standard mode, aspirates from the released position and dispenses to the second stop. Reverse pipetting, used for viscous or foaming liquids, aspirates to the second stop and dispenses only to the first, leaving excess in the tip. Confusing the two modes is a systematic error source. Whichever mode your protocol specifies, the thumb motion should stay smooth and rhythmic.
Immerse shallowly and consistently. Deeper immersion adds hydrostatic pressure against the air cushion and leaves more liquid on the outside of the tip. Both effects shift volume, and both grow with deep plunges into narrow tubes. Shallow, consistent immersion keeps delivery uniform and also keeps your arm in a comfortable position, because there is no reason to angle your wrist to probe the bottom of a tube.
Match the pipette to the volume. Use a pipette whose range centers on the volume you need. Setting a 1,000 µL pipette to 100 µL, when a 200 µL instrument covers that volume comfortably, sacrifices accuracy because you are operating at the bottom of the instrument's specification range. This is a technique point, not a posture point, but a pipettor juggling oversized instruments compensates with grip force and awkward wrist angles, so instrument selection and posture support each other.
Expected Results and How to Read Them
When your setup is correct, you will notice specific, observable outcomes. Use these as your quality checks.
During the session. Your shoulders stay relaxed and low rather than creeping toward your ears. Your wrist stays visibly in line with your forearm through both aspiration and dispensing, rather than kinking over a rack. Your thumb works the plunger without the rest of your hand clenching. Tip pickup from the box happens without lifting your elbow. Tip ejection lands in a container you can reach without turning your trunk.
At the end of the session. You finish with residual awareness of having worked, not with acute aching in the thumb base, wrist, forearm, shoulder, or neck. Mild general tiredness after a genuinely long day is normal. Localized pain, tingling, numbness, or stiffness in a specific joint is not, and persistent symptoms of that kind warrant evaluation by a medical professional, ideally one experienced with occupational overuse conditions, before they become entrenched.
In your data. Replicate volumes agree within the pipette's specification, and serial dilutions hit their intended concentrations. When posture and technique are steady, your replicate coefficient of variation tightens compared with sessions where you were reaching, twisting, and rushing. If replicate precision stays poor after your posture is dialed in, the problem usually lies in technique mechanics or instrument condition, which takes you to the calibration section and the troubleshooting table.
A practical self-check that many experienced pipettors use: run a short gravimetric check with water on a calibrated analytical balance at the start of a demanding project. Dispense the nominal volume repeatedly onto the balance, record the mass readings, and convert them to volumes using the density of water, which is approximately 1 mg per µL at typical room temperature. If your mean delivered volume sits close to the set value and your replicate spread is tight, both the instrument and your hands are in working order. If the mean is off, instrument calibration or technique, such as inconsistent plunger release, is the likely cause. If the spread is wide, look at pacing, tip seating, and steady plunger strokes.
Pipette Calibration: Verifying the Instrument Your Posture Serves
Pipette calibration is the process of verifying and adjusting a pipette so that its displayed volume matches the volume it actually delivers, within the tolerance specified by the manufacturer for that model and volume setting. It is a separate discipline from posture, but the two meet at a single question: when your replicates disagree, is it you or the instrument?
Calibration is done gravimetrically as standard practice. The pipette dispenses repeatedly onto a calibrated analytical balance, the mass of each dispense is recorded, and mass converts to volume using the density of water at the test temperature. From those replicate measurements you compute the mean delivered volume and the scatter around it, and you compare both against the manufacturer's accuracy and precision specifications for that model. Many facilities perform in-house interim checks with a calibration kit and send pipettes for full service at fixed intervals, commonly every 6 to 12 months, with the exact schedule set by the laboratory's quality system, the manufacturer's recommendation, and how heavily the instrument is used. Automatic pipettes that fail the check are taken out of service for adjustment, seal or piston replacement, and re-verification.
Three calibration-adjacent practices protect your accuracy between formal checks. First, never lay a pipette flat with liquid in the tip, because liquid can run into the shaft and contaminate or corrode the piston assembly. Store pipettes upright on a stand, ideally with the volume dial backed off toward the top of the range to relax the spring. Second, never pipette with the pipette held past its stated volume range, and avoid autoclaving or decontaminating an instrument in a way its manufacturer does not specify, because heat and chemicals degrade seals and shift calibration. Third, after any event that could jar the instrument, such as a drop onto the floor, verify performance before trusting results, because dropped pipettes can shift calibration even when they look undamaged.
The connection to this article is simple. Calibrate on the schedule your facility specifies, then use proper posture so that the variability you introduce, rather than the variability the instrument introduces, is the only remaining question when results drift.
Troubleshooting
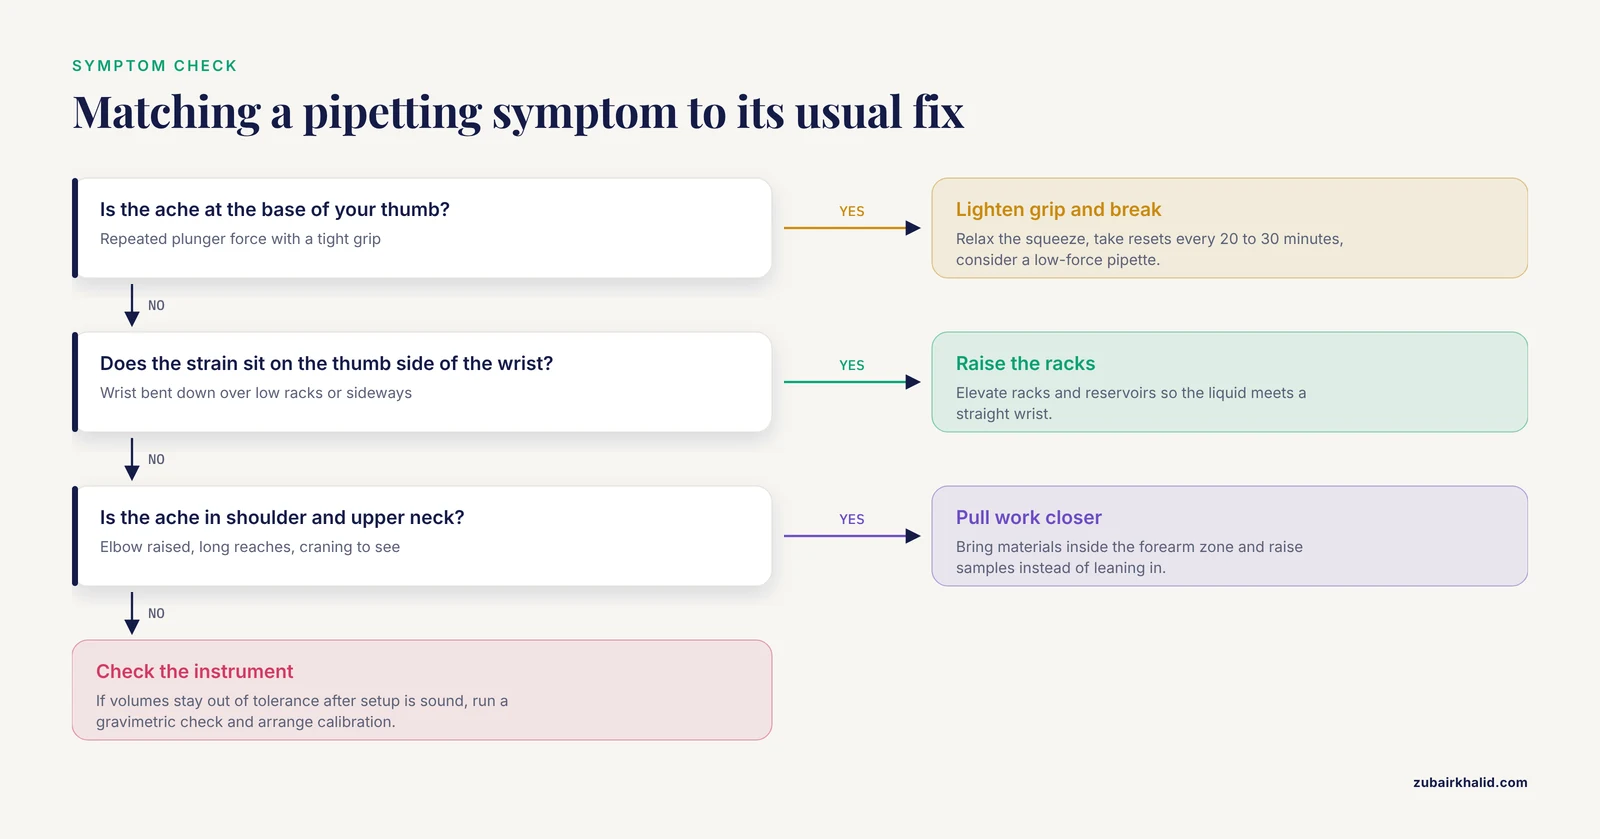
Most pipetting problems trace to a small set of causes. Use this table to match what you feel or observe to its likely origin and fix.
| Symptom | Likely cause | Fix |
|---|---|---|
| Ache at the base of the thumb during or after pipetting | Plunger force repeated at high volume, tight grip, or a pipette with a heavy plunger spring | Reduce session length with scheduled microbreaks, relax grip pressure, select a low-plunger-force or electronic pipette for high-cycle work, and alternate hands where the protocol allows. |
| Wrist pain or a feeling of strain along the thumb side of the wrist | Wrist held in deviation or flexion while pipetting, usually from reaching down into low racks or sideways into far racks | Elevate racks and reservoirs on coolers or boxes so the liquid surface comes to your wrist-neutral height, and reorganize the bench so nothing requires lateral wrist bending. |
| Shoulder and upper neck ache by mid-session | Working with the elbow raised, reaching outside forearm range, or craning forward to see small volumes | Bring all materials inside the forearm zone, sit closer to the bench, and raise samples to eye-adjacent height rather than lowering your head to them. Use a mirror or angled setup rather than leaning into a cabinet window. |
| Lower back fatigue when seated | Feet unsupported, perching on the chair edge, or working on a surface far below elbow height | Add a footrest, sit fully into the backrest, and raise the work on racks rather than slumping down to it. |
| Forearm and hand fatigue that builds steadily | Sustained grip force, no task alternation, and no microbreaks | Consciously lighten grip, alternate pipetting with bench tasks, and take a 30-second to few-minute reset every 20 to 30 minutes. |
| Replicate volumes vary more than the pipette's specification | Inconsistent plunger release speed, inconsistent tip immersion depth, tilted aspiration, or poorly seated tips | Slow down and standardize the plunger rhythm, keep the pipette vertical, immerse shallowly and consistently, and press tips on firmly with a slight twist to seat them. |
| Serial dilution series drifts systematically from intended concentrations | Reverse-pipetting mode confusion, first-stop versus second-stop error, or small-volume error from unconditioned tips | Confirm the pipetting mode the protocol intends, use forward pipetting for aqueous solutions, pre-rinse tips, and choose a pipette whose range centers on the transfer volume. |
| Delivered volumes are consistently off even with steady technique | Instrument out of calibration, worn seals, or a clogged or damaged tip cone | Run a gravimetric check, pull the pipette from service if it fails, and arrange calibration service. Verify after any drop event. |
| Difficulty seeing the meniscus without leaning forward or tilting the head | Samples in tall, narrow, or dark-walled vessels placed too low | Raise the vessel, use well plates or wide-format tubes where the protocol allows, and tilt the vessel on a rack instead of angling your head and pipette together. |
| Fatigue and discomfort during long sessions in a biosafety cabinet | Fixed cabinet work height combined with sustained arm extension and limited reach | Pull materials as close to the front work opening as containment rules allow, keep elbows near the torso, and take frequent short arm-drop breaks. Standing on an anti-fatigue mat helps for long sessions. |
Proper Pipetting Posture Tips That Make the Biggest Difference
These are the tips that experienced pipettors and laboratory trainers return to most often, in rough order of impact.
- Elevate your samples. A rack lifted 10 to 15 cm on a cooler block converts a wrist-bent reach into a straight-wrist pick. No single change removes more strain from the wrist.
- Shrink your reach zone. Tip box, source, and destination all inside your forearm sweep. Twisting and reaching are the least sustainable motions in pipetting.
- Sit to the bench, do not bend to it. Chair height first, then raise the work, never lower your shoulders.
- Relax your grip on purpose. Set a mental cue, such as checking your squeeze at every tip change, because grip force creeps up without awareness.
- Keep the pipette vertical on aspiration. It protects your neck as much as your accuracy, because it removes the reason to crane and tilt.
- Schedule microbreaks before you feel fatigue. Waiting until something hurts means the session already did its damage.
- Rotate hands and tasks when your protocol permits. Load spread across tissues is load that accumulates more slowly in any one of them.
- Invest effort in instrument selection for high-throughput work. For thousands of daily cycles, lighter pipettes, low plunger-force designs, and electronic pipettes change the force budget of the day in a way no posture adjustment can fully offset.
- Do not ignore early symptoms. Overuse conditions respond far better to early correction of the task than to long rest after they are established.
Variations
Standing pipetting at a biosafety cabinet or fume hood
Bench-top posture principles carry over with three adjustments. First, set the cabinet or hood work surface as close to your standing elbow height as the unit allows, and stand back from the opening just far enough to keep containment, with elbows near your torso. Second, use an anti-fatigue mat for sessions longer than about 20 minutes, and shift your weight or rest one foot on a small rail or footrest periodically. Third, be strict about reach discipline, because cabinet geometry tempts you to extend deep into the work zone. Pull the tip box and waste container to the front area permitted by your facility's containment rules, and raise materials on approved supports inside the cabinet rather than bending your wrist over the work surface. Never compromise airflow discipline for posture, and never place materials in a way that blocks grilles or the work opening.
Multichannel pipettes and plate work
Multichannel instruments, commonly 8- and 12-channel models for 96- and 384-well plates, are heavier than single-channel pipettes and require two-handed control, one hand on the handle and the other steadying the body of the pipette or assisting tip loading. Three posture points matter here. Keep the plate or reservoir at a height that lets both forearms work near horizontal, because a low plate forces both wrists into flexion simultaneously. Align the pipette head squarely with the plate row before pressing tips on, because angling to seat eight or twelve tips at once strains the wrist and seats tips unevenly. Consider electronic multichannel pipettes for high-throughput plate work, because their reduced plunger force across many more cycles per plate changes the total daily load substantially.
Small-volume and microvolume work
Work below about 10 µL amplifies both accuracy and posture demands, because small absolute errors matter proportionally more and the vessels are small enough to encourage leaning in for a close look. Resist the lean. Raise the tube or plate, use good lighting aimed at the work, and rely on shallow, consistent immersion rather than visual confirmation deep inside a tube. Pre-rinse tips consistently, and consider a pipette rated for the low range rather than operating a mid-range instrument at its floor.
Viscous and foaming liquids
Serum, glycerol-containing stocks, detergents, and protein solutions behave differently from aqueous buffers. Reverse pipetting, aspirating to the second stop and dispensing to the first, reduces under-delivery with viscous liquids. Slow aspiration reduces bubbles with foaming liquids. Both modes slow your rhythm, which is ergonomically useful information, because slow, deliberate strokes are also the strokes that spare your thumb. Plan more time for these steps rather than compensating with force.
Left-handed pipetting
Most laboratory benches, tip boxes, and workflows are arranged for right-handed pipettors by default. Left-handed users should apply every principle in this article symmetrically, organizing tip boxes and waste containers on their own work side, and should test both left- and right-handed versions of pipette models before choosing a personal instrument, because handle contours and ejector positions differ between handed configurations. Consistency of arrangement matters more than which side it sits on.
Storage and Stability Notes
Posture has no storage requirements, but the equipment that supports it does, and instrument condition feeds back into how your hand works.
Store air-displacement pipettes upright on a pipette stand, clean, with the volume set backed off from its maximum to relieve spring tension. Return them to the stand rather than laying them on the bench, where they can roll into spills, be knocked off the bench, or pick up shaft contamination. Clean the exterior with a soft cloth and the decontamination method the manufacturer specifies, and never immerse a pipette unless its documentation states that it is fully autoclavable or liquid-tight for that purpose. Inspect tip cones periodically for scoring or cracks, because a damaged cone prevents consistent tip sealing and forces you to press harder, which converts an instrument defect into a hand strain problem.
Tips should be stored sealed in their boxes in a clean, dry location and handled with the same aseptic discipline your protocol requires. Reagents used in elevated racks, such as chilled enzymes on cooler blocks, remain stable according to their own storage specifications, and elevating them does not change their handling requirements.
Facility calibration intervals, commonly set at 6 or 12 months with interim in-house checks, belong in your laboratory's quality records. Keep your personal instrument on the schedule, and log its gravimetric check results so that a slow accuracy drift becomes visible across checks rather than discovered as a failed experiment.
Common Mistakes and Limitations
The mistakes below account for most of the discomfort and most of the avoidable volume error seen in teaching and working laboratories. Each is phrased so you can check yourself against it.
Bending the wrist over low racks. This is the single most common postural error. The fix is elevation, not endurance. If you catch your wrist kinking downward even occasionally, raise the rack.
Reaching across the bench. Pipettors accumulate hundreds of long-reach cycles per session for tips, tubes, and waste. Every long reach is a shoulder-elevation event. Shrink the zone instead.
Craning the neck to see volumes. Leaning forward to peer down a narrow tube or into a plate places the head forward of the spine, where neck muscle load rises sharply. Raise the sample and improve lighting rather than lowering your head.
Squeezing the pipette harder when concentrating. Grip force rises with time pressure and fatigue, unnoticed. Build a periodic grip check into your routine.
Pipetting with the elbow above shoulder height. This happens when dispense vessels sit high or when pipetting upward into tall vessels. Rearrange the vessel or use a different vessel format rather than working overhead with the thumb pulling against a raised arm.
Manual tip removal. Pulling tips off by hand loads the finger joints at high frequency. Use the ejector and keep the waste container within reach.
Batching long pipetting blocks without breaks. Continuous sessions convert mild, recoverable loading into accumulating strain. Insert microbreaks by schedule, not by symptom.
Treating posture as separate from accuracy. A stable, neutral posture produces steadier strokes and better replicates. Pipettors who improve their setup often find their precision improves with no change in technique mechanics, because the two are the same system.
Chasing accuracy with posture when the instrument is the problem. The mirror error. If replicate volumes stay out of tolerance after your setup and technique are sound, run a gravimetric check and arrange calibration service. Posture cannot compensate for worn seals or a dropped pipette.
Ignoring early symptoms. Tingling, numbness, or localized joint pain during or after pipetting is data about your task. Correct the setup promptly and, if symptoms persist, consult a medical professional, ideally one with experience in occupational overuse conditions. Individual cases need professional evaluation, and self-assessment does not replace it.
Limitations of posture alone. Proper pipetting posture reduces but does not eliminate the mechanical load of high-volume liquid handling. For workflows demanding many thousands of cycles per day, such as high-throughput screening or large-scale plate replication, the appropriate solution combines posture, task rotation, instrument selection, and, where available, automated liquid handlers. Posture is the foundation, not the whole building.
Frequently Asked Questions
What is proper pipetting posture?
Proper pipetting posture is the alignment of your chair, bench, and work materials so your feet are supported, your forearms sit near horizontal at the work surface, your back is supported, and your wrist, arm, shoulder, and neck stay in neutral, low-strain positions throughout each pipetting cycle.
How often should I take breaks during long pipetting sessions?
Take a short reset of 30 seconds to a few minutes after every 20 to 30 minutes of continuous pipetting, and interleave non-pipetting tasks whenever your protocol allows. Schedule breaks before fatigue appears rather than after.
Why does my wrist hurt when I pipette even though my technique looks fine?
The usual cause is wrist deviation from reaching down into low racks or sideways across the bench, which forces the wrist out of neutral during every cycle. Elevate your sample racks and reservoirs so the liquid surface comes to your wrist-neutral height, and pull all materials inside your forearm reach.
How does posture affect pipetting accuracy?
A neutral, supported posture steadies your plunger strokes, keeps the pipette vertical during aspiration, and prevents the tilting and rushing that produce inconsistent tip immersion and volume drift. Posture and technique are one system, so improving alignment often tightens replicate precision on its own.
How do I know if my pipette needs calibration?
Run a gravimetric check by dispensing the set volume repeatedly onto a calibrated analytical balance and comparing the converted volumes with the manufacturer's accuracy and precision specifications. If the mean or the scatter falls outside specification, remove the pipette from service and arrange calibration, and always verify a pipette after it has been dropped.
Is it better to pipette sitting or standing?
Sitting is generally easier to hold in a neutral posture because you can set chair and surface heights independently. Standing work at cabinets and hoods is fine when the work surface sits near your elbow height, you use an anti-fatigue mat, and you keep your reaches short. Whichever you use, the same neutral-joint principles apply.
Can the right pipette reduce strain, and should I buy an electronic pipette?
Yes, instrument selection changes the daily force budget, especially for high-cycle work. Low plunger-force manual pipettes and lighter handles reduce thumb load, and electronic pipettes remove most plunger force entirely, which makes them worth considering for multichannel plate work and thousands of daily cycles. For occasional low-volume use, a well-chosen manual pipette plus good posture is usually sufficient.
What are the most common pipetting posture mistakes?
The most frequent are bending the wrist over low racks, reaching beyond forearm range for tips and samples, craning the neck to see small volumes, gripping the pipette too tightly, pipetting with the elbow raised, removing tips manually instead of using the ejector, and working in unbroken long sessions without microbreaks. All of them are correctable with bench organization and the setup steps in this article.