Pipetting Training Program Design: Step-by-Step Guide
By Dr. Zubair Khalid, DVM, MS, PhD ·

A well-designed pipetting training program takes a trainee from zero to demonstrated competence with manual air displacement micropipettes in about five hours of hands-on work, spread across two weeks. The program produces three verifiable outcomes. First, the trainee can set and correctly read a micropipette dial. Second, the trainee can deliver volumes accurately and reproducibly, confirmed by weighing water on a balance rather than judged by eye. Third, the trainee can carry those skills into an applied task, such as a serial dilution, and document the result for a training record.
Use this program when onboarding undergraduate students, new laboratory staff, or anyone transferring from another lab with unknown technique habits. It also works as a refresher before assay work that demands tight precision, such as quantitative PCR setup or cell culture passaging. The design works for one trainee or a cohort, and it scales to a full teaching laboratory without adding expensive equipment.
Two ideas shape the whole program. One, the cognitive task of reading a micropipette dial is separate from the motor task of operating the plunger, and trainees learn faster when the two skills are taught deliberately rather than all at once. Researchers at two independent universities showed that an interactive digital simulation focused on dial reading produced significant gains in both student confidence and dial-reading accuracy before students ever touched a physical pipette [1]. Two, competence decays and drifts, so the program ends with a lightweight quality-control routine rather than a single pass or fail event. The same logic that clinical laboratories use to separate real-time internal checks from periodic external assessment applies directly to pipetting competency, an approach demonstrated in clinical flow cytometry where instant quality assessment panels doubled as training and education tools [2].
What a Pipetting Training Program Design Must Achieve
Most pipetting instruction fails in predictable ways. The instructor demonstrates once, the student copies the motion, and nobody measures whether the delivered volume is actually correct. A program built on that model produces confident students with inaccurate technique. Evaluation data from a pre-post mixed methods study showed that targeted, skill-isolated instruction measurably improved what self-guided practice often does not, namely unit conversion and scale-reading accuracy [1].
A complete pipetting training program design needs to cover four layers in order:
- Cognitive knowledge. The trainee knows what volume the dial shows, converts between microliters and milliliters without hesitation, and understands which pipette covers which volume range.
- Motor technique. The trainee executes forward and reverse pipetting with correct plunger stops, tip immersion depth, and dispensing angle.
- Objective verification. An instructor confirms performance with a measurement, not an impression. Gravimetry on an analytical balance is the standard method.
- Sustained competency. The trainee enters a schedule of quick periodic checks, with records that a supervisor can audit.
Skipping any layer creates a specific, diagnosable failure later. Skipping layer one produces students who set a P20 to "200" and deliver 20 microliters when they meant 2. Skipping layer three produces instructors who pass students on a smile and a nod. Skipping layer four produces a lab where nobody notices that the P200 left on the bench a year ago now under-delivers by six percent.
The Principle: What Correct Pipetting Technique Looks Like
Every training decision downstream depends on the technique standard you teach. This section defines that standard.
How an air displacement pipette works
A manual air displacement micropipette uses a piston to compress a fixed column of air inside the shaft. When the plunger returns, the expanding air cushion draws liquid into the disposable tip. The delivered volume equals the displaced air volume, which is why anything that changes the air cushion, including temperature, liquid viscosity, and vapor pressure, changes what actually leaves the tip.
The plunger has two defined stops:
- First stop. The resistance point reached when you begin pressing. Pressing to the first stop displaces exactly the volume set on the dial. You always aspirate from the first stop.
- Second stop. The harder point beyond the first stop. Pressing past the first stop expels the residual film of liquid clinging inside the tip. You only use the second stop to blow out the last drop during forward pipetting.
Forward pipetting, the default technique
Forward pipetting suits aqueous solutions of low viscosity. The sequence is:
- Set the volume within the pipette's stated range. Never force a pipette above its maximum, since overwinding damages the piston assembly.
- Attach a fresh tip and press the pipette body down with a slight twist to guarantee an airtight seal.
- Pre-wet the tip by aspirating and dispensing the set volume two to three times into the source liquid. Pre-wetting equilibrates the air cushion with the humidity of the sample, which prevents the first delivery from running low as vapor fills the cushion.
- Press to the first stop, hold, and immerse the tip 2 to 3 millimeters below the liquid surface for small volumes. Deeper immersion causes liquid to cling to the outside of the tip and inflates the delivered volume.
- Release the plunger slowly and smoothly. Releasing fast pulls bubbles or splashes liquid up into the shaft.
- Pause about one second inside the liquid, then withdraw the tip along the vessel wall.
- Dispense by pressing to the first stop, then press to the second stop to expel the residual drop, touching the tip end against the vessel wall or the liquid surface.
- Eject the tip into a waste container while the pipette is still vertical.
Reverse pipetting, for viscous and foamy liquids
Reverse pipetting inverts the stop order. Press the plunger to the second stop before aspirating, draw the liquid, dispense only to the first stop, and discard the excess remaining in the tip. The excess acts as a buffer against the film that viscous liquids leave behind. Use reverse pipetting for glycerol-containing buffers, detergent solutions, and protein-rich samples. Teach it after forward pipetting is solid, because students who learn both at once routinely confuse the stop order.
Factors that corrupt accuracy
The training program must explicitly address the classic sources of error, because students rarely discover them on their own:
- Temperature mismatch. Cold liquid drawn with a room-temperature pipette over-delivers as the air cushion cools and contracts. Equilibrate liquids to room temperature before precision work.
- Angle. Aspirate with the pipette vertical. Even a modest tilt shrinks the effective hydrostatic head and alters the drawn volume.
- Speed. Fast aspiration causes bubbles and splashing onto the shaft wall. Slow, controlled release is a trainable habit that needs reinforcement.
- Tip fit. Generic or worn tips seal imperfectly and behave differently from the tips the manufacturer validated. Pick one tip brand per pipette for training and stay with it.
- Volume range mismatch. Each pipette is most accurate in the upper half of its range. Setting a P1000 to 100 microliters sacrifices accuracy that a P200 would deliver easily. Teach students to choose the smallest pipette that comfortably covers the target volume.
Materials and Equipment
| Item | Specification | Working amount or condition | Purpose |
|---|---|---|---|
| Manual air displacement pipettes | One pipette per trainee, covering P20, P200, and P1000 | Verified within calibration tolerance before the session | The training instrument itself |
| Compatible pipette tips | One brand per pipette, racked and sealed | At least 3 racks per trainee per session | Consistent tip-to-shaft seal |
| Deionized or distilled water | Room temperature, in a reservoir beaker | 50 to 100 milliliters per trainee | Gravimetric test liquid |
| Analytical balance | Readable to 0.1 milligram or better, draught shield closed | Calibrated internally before use | Objective verification of delivered volumes |
| Weighing vessels | Small glass vials or weighing boats | One per trainee, tared before each series | Receiving the delivered water |
| Food coloring or aqueous dye stock | Any strongly colored water-soluble dye, prepared as a 1 percent weight per volume stock in water | Diluted 1 to 10 for the practice series | Visible feedback during serial dilution practice |
| 96-well microplate or cuvettes | Clear, flat-bottom if using a plate reader | One plate per trainee pair | Format for the dilution exercise |
| Spectrophotometer or plate reader | Set to the absorbance maximum of the chosen dye | Wavelength chosen from the dye specification | Quantitative readback of dilution accuracy |
| Pipette stands and calibration log | Wall stand plus service log sheet per pipette | Updated at each session | Protects calibration status between sessions |
| Training worksheets and record folder | Dial-reading quiz, gravimetry worksheet, sign-off form | One set per trainee | Documentation of competency |
Safety note. Water and dilute food dye are low-hazard, but general laboratory rules still apply. Wear a lab coat, safety glasses, and gloves. Dyes stain skin and clothing, and dye droplets on a balance or bench create slip and contamination hazards, so wipe spills immediately. Never use biological samples, radioisotopes, or corrosive reagents in a training session. The training bench should teach technique with materials that forgive mistakes.
Step-by-Step Program Design
This is the core sequence. Each step states what to do and why the step exists, so you can adapt the details to your own laboratory without breaking the logic.
Step 1. Define the competency standard before the first session
Write down, on one page, what competence means in your laboratory. Specify which pipettes the trainee must master, which volumes will be tested, and what evidence will count as a pass. Point to the manufacturer's specification sheet for each pipette, because the printed accuracy and precision tolerances for each volume are the objective bar the trainee must reach. A trainee working with a verified instrument should be able to deliver water within the manufacturer's stated tolerance at the tested volumes.
Why this step matters. Without a written standard, assessment becomes opinion. With one, every instructor grades against the same bar, and the trainee knows the target from minute one.
Step 2. Verify pipette calibration before any teaching begins
Check the calibration status and service log of every pipette in the training set. If a pipette has no recent verification record, run a quick gravimetric check before the session, or pull a spare with a current certificate. This is the calibration step in the program, and it is distinct from the trainee's skill assessment. Pipette calibration asks whether the instrument delivers what its dial claims. The training program asks whether the person delivers what the calibrated instrument claims. Both questions need answers, and the instrument question comes first.
Piston-operated volumetric instruments are verified gravimetrically under the international standard ISO 8655, and manufacturers publish the acceptance tolerances for each model and volume. Many laboratories verify pipettes at least annually and add checks after any drop, corrosion event, or suspected misuse.
Why this step matters. A trainee practicing on an out-of-tolerance pipette learns to distrust correct technique. Every systematic error the student sees becomes noise in the feedback loop, and the instructor cannot distinguish a student error from an instrument error.
Step 3. Deliver the cognitive module before hands-on work
Assign a short pre-laboratory module that isolates dial reading and unit conversion from physical pipette operation. The published evidence for this design comes from an interactive simulation built in Articulate Storyline, which deliberately separated the cognitive task of reading a micropipette dial from the physical skill of using the tool. Students at two universities showed significant improvement in self-rated confidence, unit conversion, and dial-reading accuracy after using it, and feedback was strongly positive regarding self-efficacy [1]. A simulation of this type is inexpensive to deploy at scale and fits naturally as preparation before a hands-on session [1].
At minimum, the module should cover dial-to-volume reading for each pipette class, microliter to milliliter conversion, and pipette selection for a target volume. A ten-question quiz with immediate feedback closes the loop.
Why this step matters. Students who arrive already fluent in dial reading spend their precious bench time on motor learning instead of decoding numbers. Splitting the two skills shortens total time to competence and reduces the frustration that erodes confidence.
Step 4. Demonstrate the technique with narration
The instructor performs forward pipetting at the bench while talking through every decision point: stop positions, immersion depth, pre-wetting, release speed, dispensing against the wall. Then demonstrate the same maneuver once with a deliberate error, such as releasing the plunger too fast, and let the class spot the bubble that results. Repeat the demonstration in pairs of two or three students so everyone sees the hand position from a close distance.
Why this step matters. Watching a correct performance with named decision points builds the mental model that guided practice then attaches to. Watching a deliberate error with its visible consequence teaches diagnosis, which the trainee will later apply to their own work.
Step 5. Run structured hands-on practice with progressive volumes
Give the trainee 60 to 90 minutes at the bench in a fixed progression:
- Mount the tip, pre-wet, and aspirate water at the pipette's maximum volume, ten repetitions, focusing only on smooth plunger release.
- Repeat at the pipette's minimum comfortable volume, again ten repetitions.
- Practice delivery into a small vial against the wall, watching where the meniscus lands.
- Switch to reverse pipetting with a viscous mock sample, such as a glycerol-spiked aqueous solution, for ten repetitions.
- Load a row of a 96-well plate with equal target volumes and compare well-to-well fill heights by eye as a coarse self-check.
The instructor circulates, corrects grip and angle immediately, and answers questions. One instructor can supervise four to six trainees at this ratio.
Why this step matters. Progressive volume work forces the student to feel how the first stop travels differently at different settings, and early volume errors get caught while the student is still forming habits rather than after they harden.
Step 6. Assess objectively with gravimetry
Run the formal assessment. The trainee sets the test volume, pre-wets, and delivers ten replicate volumes of room-temperature water into a tared weighing vessel on the analytical balance. Record the mass after each delivery. Because the density of water is close to 1 milligram per microliter at room temperature, mass readings convert directly to volume for a training-level check, with a formal density correction applied in instrument calibration work.
A worked example makes the reading concrete. A trainee sets a P20 to 20.0 microliters and delivers ten replicates. The masses read 19.8, 20.1, 19.9, 20.0, 20.2, 19.9, 20.0, 19.7, 20.1, and 20.0 milligrams. The mean is 19.97 milligrams, which corresponds to about 20.0 microliters, so the accuracy is good. The readings span 0.5 milligrams from lowest to highest, which describes the reproducibility the instructor records. Compare both values against the manufacturer's stated tolerance for that pipette and volume, from the specification sheet pulled in Step 1.
Assess at least three volumes per pipette class: a low setting, a mid-range setting, and a high setting. Total assessment time is roughly 30 to 45 minutes per trainee.
Why this step matters. Gravimetry converts "your technique looks fine" into a number on a form. It protects the trainee from an instructor's bias and protects the laboratory from an unmeasured pass. It also gives the trainee a baseline for comparison at reassessment.
Step 7. Run the applied exercise, a serial dilution with quantitative readback
Hand the trainee a task that chains many pipetting events, because assays in real research are chains, not single transfers. A standard exercise is a serial dilution in a 96-well plate. The trainee prepares a 1-to-10 dilution of the 1 percent dye stock to make the working solution, then performs a 1-to-2 serial dilution across a row of eight wells, using fresh tips between transfers and mixing each well thoroughly before transfer. Read the plate on a spectrophotometer or plate reader at the dye's absorbance maximum.
Interpret the readout with the trainee. Absorbance should fall from well to well in roughly equal steps on a logarithmic scale. A flat jump between two adjacent wells usually traces back to a missed mix or a skipped tip change. A first well that reads low points to an error in the initial working dilution. The exercise takes 30 to 45 minutes including the readout and discussion.
Why this step matters. Serial dilution multiplies small per-transfer errors down the row, which makes it the most sensitive applied test of pipetting technique available without specialized equipment. The readback also teaches the trainee that their bench work has a measurable signature in the final data.
Step 8. Debrief with corrective, specific feedback
Sit with the trainee and review the gravimetric worksheet and the dilution readout together. Name what was right before naming what was wrong. Tie every correction to a physical cause: "your third replicate ran 2 percent low, which usually traces to releasing the plunger too quickly" teaches more than "be more careful." Agree on one or two specific technique targets for the next session.
Why this step matters. Feedback tied to a physical cause is actionable. Feedback tied to attitude is noise. The debrief is also where the trainee sees their own data, which builds the habit of self-checking that competent pipettors carry for a career.
Step 9. Schedule spaced reassessment
Set reassessment at intervals that match the risk of the work. A practical default for a research lab is a quick gravimetric spot check of three to five deliveries on one pipette at one and three months after initial training, then annually or after any notable event such as a dropped pipette. Teaching laboratories often align reassessment with each new course cycle.
Why this step matters. Technique drift is real, and reassessment catches it while the cost of correction is a ten-minute check rather than a failed experiment. Spaced practice also consolidates the motor skill, which single-session training cannot do.
Step 10. Fold pipetting checks into ongoing laboratory quality control
Between formal reassessments, embed lightweight internal checks into normal work. A simple internal quality control resembles what clinical laboratories use as a real-time go, no-go signal that a system is performing within specification before patient samples are run [2]. In a molecular biology lab, the equivalent is a routine first-use check: the trainee or staff member delivers a set volume of water or buffer, confirms the dispensed volume visually against a marked vessel, and logs the check. Periodically, compare results across trainees or against an external reference, which mirrors the role external quality assessment plays as a snapshot of full testing process performance in clinical settings [2].
Why this step matters. Formal training events are sparse. Point-of-use checks are frequent. The combination catches both slow calibration drift and fast technique regressions, and it creates a written record that survives staff turnover.
Controls and Expected Results
Controls to include in every assessment session
- Instrument control. One pipette with a current verification record serves as the reference. If a trainee's numbers look uniformly poor across pipettes, the instructor tests the reference pipette to separate instrument problems from trainee problems.
- Replicate series. Ten replicate deliveries per tested volume. Replication is what separates a single lucky delivery from reproducible technique.
- Blank and known standard in the dilution exercise. A well containing water only establishes the absorbance baseline, and a well containing the undiluted working dye establishes the starting absorbance. Without both, a strange readout cannot be interpreted.
- Order control. Have trainees test volumes from high to low on each pipette. If performance degrades steadily through the series, fatigue or concentration lapse, not technique, is the likely story.
How to read the gravimetric results
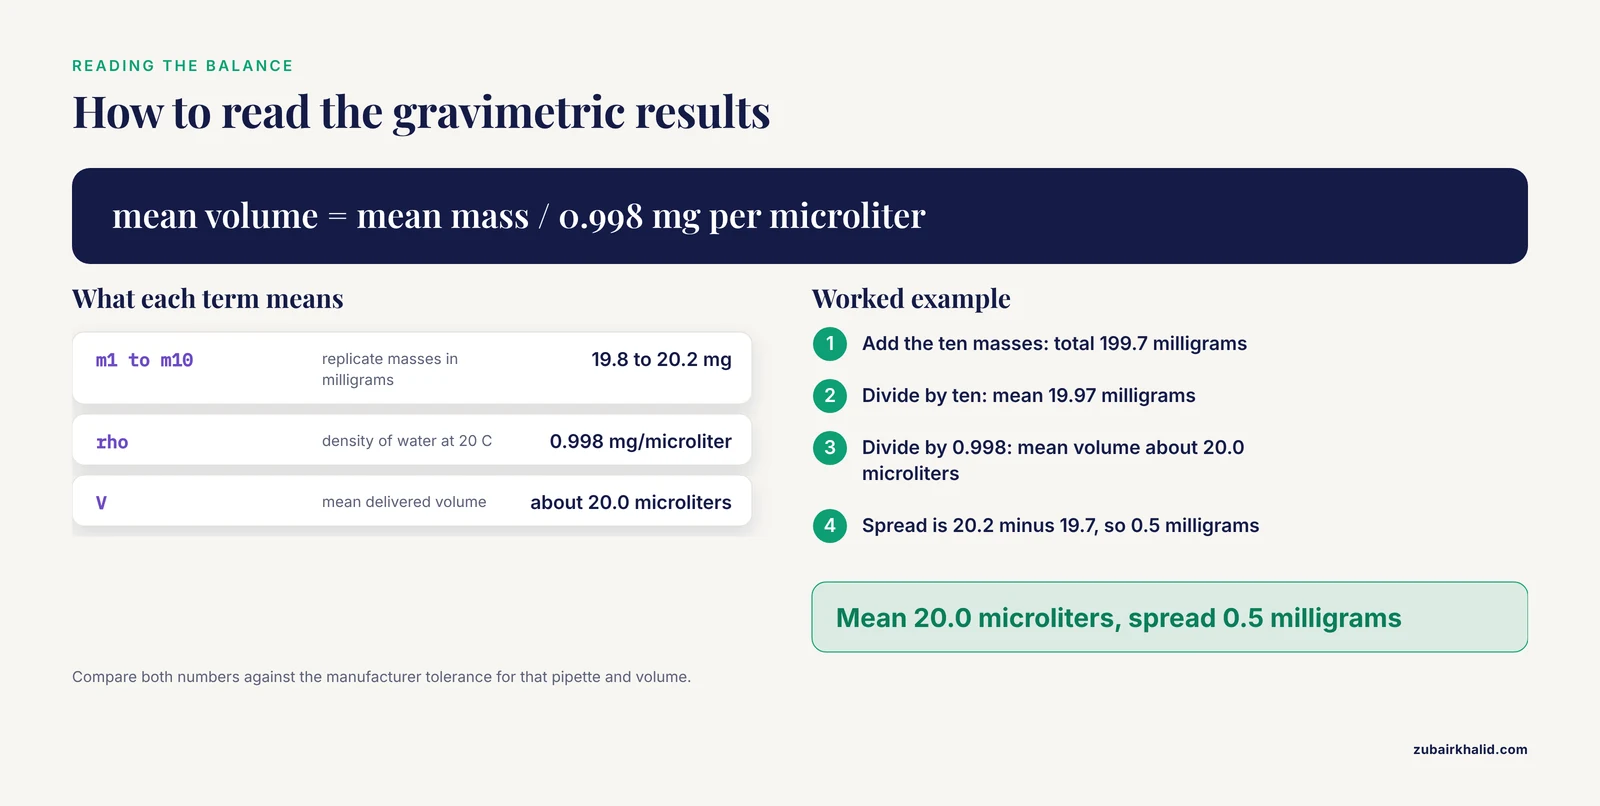
For each tested volume, compute the mean of the ten deliveries and the spread of the readings. Convert the mean mass to mean volume using the density of water at the ambient temperature, approximately 0.998 milligrams per microliter at 20 degrees Celsius. A trainee passes a given volume when the mean sits within the manufacturer's accuracy tolerance and the spread stays narrow relative to the manufacturer's precision specification. Record the numbers, not just a pass mark, so later reassessments can be compared against the baseline.
How to read the dilution exercise results
A competent trainee produces a dilution series whose absorbance decreases smoothly, with each step close to half the previous well on a 1-to-2 series. Two failure signatures matter. Random scatter across the row points to inconsistent technique under repetition. A single discontinuity points to one identifiable mistake, usually a missed mixing step. The second pattern is actually the more useful teaching result, because the trainee can usually recall and name the error themselves.
What typical results look like
In the published evaluation of the dial-reading simulation, students showed significant improvements in self-rated confidence and in micropipette scale-reading accuracy across the pre-post comparison, with highly positive feedback on the learning experience [1]. For hands-on sessions, expect an honest range rather than uniform passes. Trainees who complete the cognitive module first typically reach gravimetric competence in fewer hands-on repetitions than trainees who start cold at the bench, which is the core argument for the blended sequence [1].
Troubleshooting
| Symptom | Likely cause | Fix |
|---|---|---|
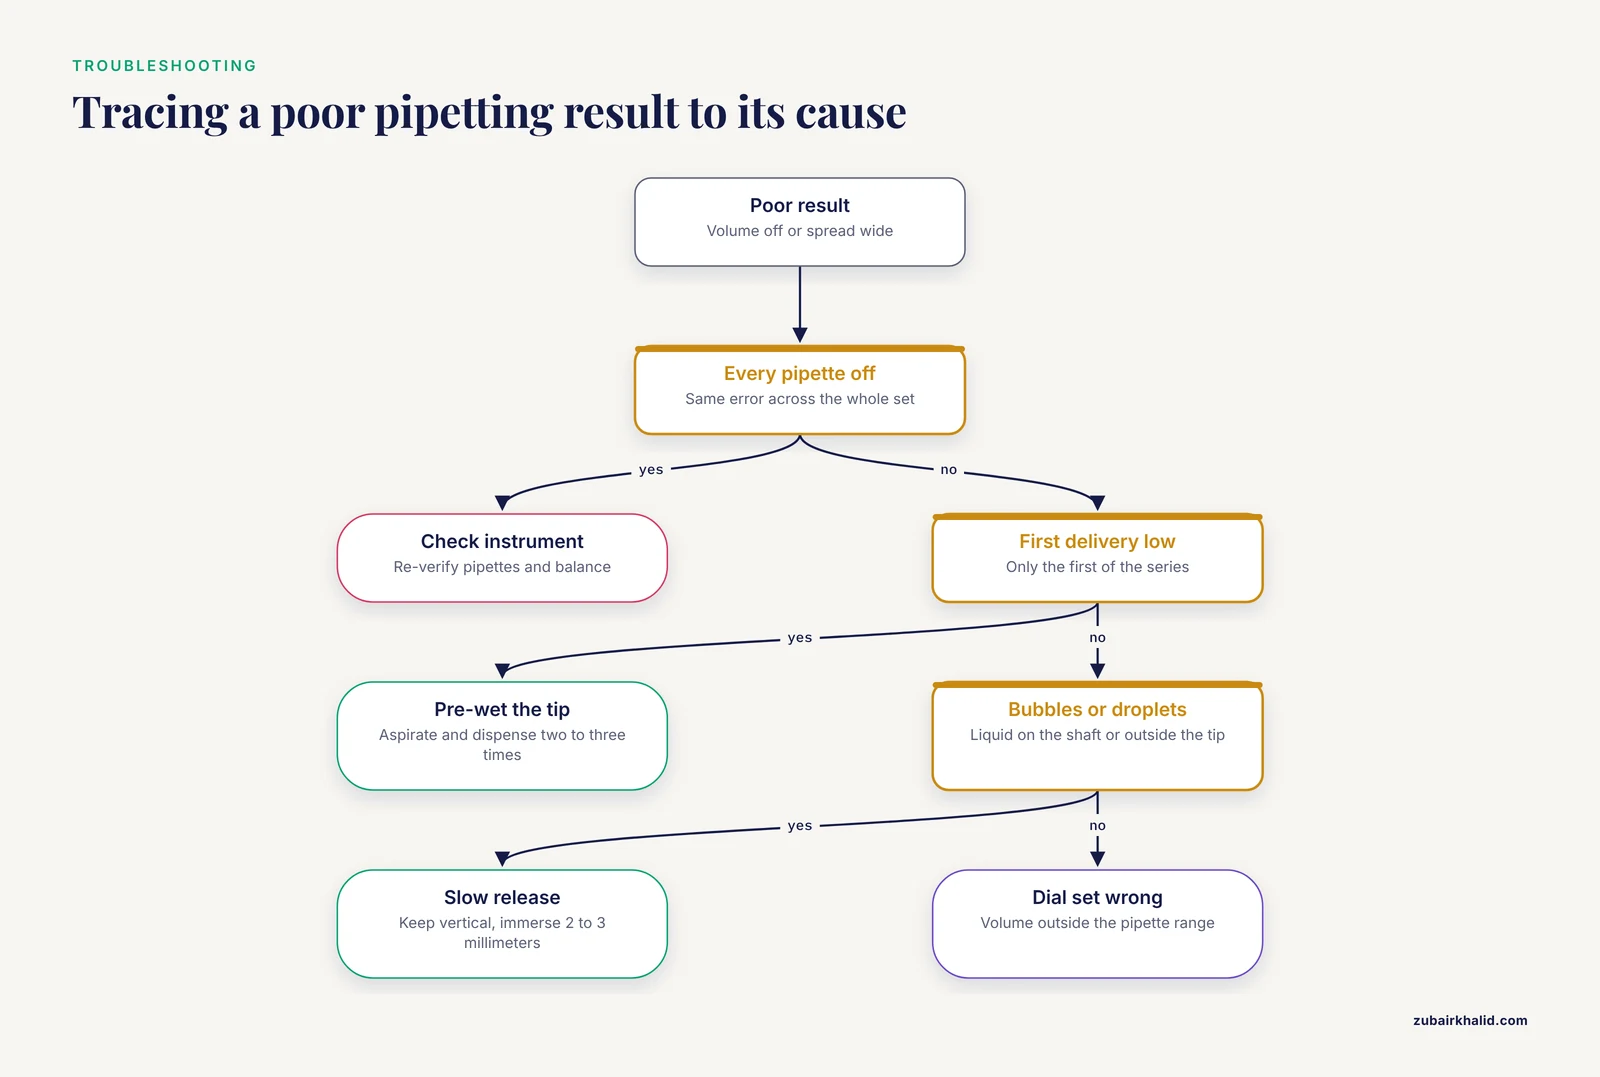
| Delivered volume consistently low on the first delivery after mounting a tip | Air cushion not equilibrated, no pre-wetting | Pre-wet the tip two to three times before the measured series |
| Bubbles appear in the tip during aspiration | Plunger released too quickly, or tip immersed too deep at an angle | Slow the release, keep the pipette vertical, immerse 2 to 3 millimeters |
| Droplets cling to the outside of the tip | Immersion depth too great, or liquid drawn up during withdrawal | Reduce immersion depth and touch off against the vessel wall |
| High spread across ten replicates at one volume | Inconsistent release speed or grip tension between deliveries | Slow the whole cycle down, brace the elbow on the bench, re-run the series |
| Gravimetric mean off target on every pipette in the lab | Instrument calibration drift across the set, or balance issue | Re-verify pipettes gravimetrically and check the balance with a reference weight before blaming trainees |
| Dilution series shows one flat step | Missed mixing step or reused tip between wells | Re-run that step alone with fresh tips, then confirm with the reader |
| Viscous liquid under-delivers with forward pipetting | Film of liquid retained in the tip | Switch to reverse pipetting, aspirate from the second stop, dispense to the first |
| Trainee performance collapses in the last third of the session | Fatigue and loss of concentration | Split long sessions, cap hands-on blocks at 45 minutes with a break |
| P20 results erratic but P200 results clean | Trainee using the wrong pipette class for the volume, or the P20 is out of tolerance | Confirm pipette selection logic, then gravimetrically verify the P20 against its specification |
| Trainee sets a volume outside the pipette range | Dial-reading or unit conversion gap from the cognitive layer | Return to the pre-laboratory module and quiz before resuming bench work [1] |
Variations and Extensions
Fully digital pre-laboratory preparation. Where physical pipettes or instructor time are scarce, the cognitive module can carry more of the load. The published simulation was designed specifically as a scalable, cost-effective alternative to physical micropipettes for the dial-reading skill, positioned as preparation within a blended curriculum rather than a replacement for bench practice [1]. Deploy it before the first hands-on session and again as a refresher before assessment.
Robot-assisted engagement for younger or mixed audiences. For outreach settings, science camps, or teaching labs that want to connect manual technique to automation, low-cost liquid-handling robots built from Lego Mindstorms components have been used to run real pipetting routines from 1 milliliter down to the sub-microliter range on standard labware such as cuvettes and multiwell plates, and they were tested successfully with elementary, middle, and high school students [3]. Building instructions and experiment protocols were published to support dissemination [3]. A trainee who programs a robot to perform the same dilution series they just performed by hand sees pipetting as a defined, transferable operation rather than a personal knack.
Multichannel pipettes. After single-channel competence, add a P200 multichannel session. The core stops and pre-wetting rules carry over, but even row loading and tip seating are new motor skills, so run the same progression at reduced length.
Small-volume work below 2 microliters. For labs doing qPCR or NGS library preparation, extend the program with a dedicated small-volume module using a P2 or P10 pipette and, where available, a finer balance. Gravimetric verification becomes harder at these volumes, so lean more heavily on the dilution readback and on replicate consistency.
Cohort format. The program scales to a teaching lab by running Steps 4 through 7 as stations. Rotate trainees through demonstration, practice, gravimetry, and dilution stations in 20-minute blocks. The cognitive module from Step 3 runs asynchronously beforehand, which is exactly the deployment the published simulation was built for [1].
Documentation, Ongoing Assessment, and Quality Control
Every completed assessment should generate three records: the gravimetric worksheet with raw masses, the dilution readout, and a signed competency form naming the pipettes, volumes, and dates covered. File these where a supervisor or auditor can retrieve them.
The long-term quality system then runs on two tracks. The first track is internal and continuous, consisting of the point-of-use checks from Step 10 and the scheduled reassessments from Step 9. The second track is comparative and periodic, in which pipetting results from different operators or different sessions are compared against one another to detect drift that no single session reveals. Clinical laboratory science formalizes this pairing as internal quality control for real-time assurance and external quality assessment for periodic benchmarking across laboratories, and the instant quality assessment concept developed for CD4 T lymphocyte counting showed in a proof-of-principle pilot how a single tool can serve training, education, and quality assessment at once [2]. A molecular biology laboratory does not need the clinical apparatus itself, but it should borrow the architecture: frequent cheap checks, periodic comparisons, and one record system that serves both training and quality assurance.
Common Mistakes and Limitations
Teaching on an unverified pipette. The most common and most corrosive mistake. An instructor who skips Step 2 cannot tell a student's error from an instrument's error, and students internalize noise as personal failure. Verify the instruments first, every time.
Skipping the cognitive layer. Putting a student at the bench before they can read a dial reliably wastes bench time and damages confidence. The controlled evaluation evidence supports isolating dial reading first, with measurable gains in accuracy and confidence following the digital module [1].
Judging competence by eye. "That looks about right" is not an assessment. Without gravimetry or an equivalent quantitative readout, the program cannot distinguish a competent pipettor from a confident one.
One-and-done training. A single session with no reassessment produces a snapshot, not a competency. Technique drifts within months, and pipettes drift too. The spaced reassessment and point-of-use checks are not optional extras, they are the parts of the program that keep the first session's work intact.
Practicing with real samples. Trainees should never practice on patient material, primary cultures, or precious library preparations. Use water and dye. A student learning reverse pipetting will aspirate glycerol solution into a shaft eventually, and the cost of that lesson should be a cleaning step, not a lost experiment.
Volume range mismatch as a habit. Students who learn on one pipette use it for everything. Explicitly test pipette selection during assessment, not just execution.
Ignoring ergonomics. Repetitive pipetting is a well-known source of musculoskeletal strain in laboratory workers. Teach relaxed grip, work at elbow height where possible, take breaks during long plating sessions, and rotate tasks. A program that produces accurate pipettors with sore shoulders has traded one problem for another.
Treating a simulation as complete training. The digital module is preparation for bench work, not a substitute for it. The published design positions it explicitly within a blended curriculum [1]. Students still need hands-on hours, gravimetric assessment, and applied exercises.
Overlooking the limits of the program itself. This program trains manual technique and verifies it at defined checkpoints. It does not make anyone a perfect pipettor, it does not replace instrument calibration by a qualified service, and it does not cover specialized methods such as anaerobic transfers or air-sensitive reagent handling, which need their own protocols. Individual trainees learn at different rates, and some will need additional supervised sessions before sign-off. Where trainees will handle biohazardous or chemical materials afterward, that work requires its own safety training and, for relevant animal or clinical contexts, oversight by the responsible veterinary or medical authority.
Safety Notes
The training session uses low-hazard reagents, so the safety burden is mostly behavioral. Wear gloves, a lab coat, and safety glasses for the full session. Food dyes and protein stains persist on skin and surfaces, so wipe drips immediately and keep the balance zone dry, since liquid near an analytical balance risks both the instrument and the measurement. Keep reservoirs on a bench mat, away from the balance. Never mouth-pipette, and never recap broken tips by hand, both habits are obsolete but worth naming aloud to a new cohort. If your program later adds viscous mock samples containing detergents or solvents, review their safety data sheets before the session and add the appropriate handling notes to the worksheet.
Storage and Stability of Training Materials
Dye stock. A 1 percent weight-per-volume aqueous dye stock in a sealed amber bottle is stable for months at room temperature and longer at 4 degrees Celsius. Label it with the preparation date. Discard stock that shows precipitate or microbial growth, which appears as cloudiness. Prepare the 1-to-10 working dilution fresh on the day of the session.
Water for gravimetry. Use deionized or distilled water at room temperature. Fill the reservoir beaker at the start of the session and keep it covered between uses to limit dust and evaporation. Do not reuse water that has sat open overnight in an open beaker, because absorbed dust and shifted temperature both add noise to a gravimetric series.
Tips. Keep racks sealed until use and store them away from direct sunlight, which embrittles polypropylene over time. Return unused tips to their original rack rather than a loose bag, so the tip brand stays traceable to the pipette it was validated with.
Pipettes. Store pipettes on stands at their minimum dial setting, which relieves spring tension between sessions. Hang them clean and dry. A pipette stored with liquid in the shaft corrodes, and corrosion is one of the silent causes of calibration drift that Step 2 is designed to catch.
Records. Keep training worksheets and sign-off forms for the retention period your institution specifies. The gravimetric baseline recorded at initial training is the reference against which every later reassessment is judged, so losing it resets the whole quality system.
Frequently Asked Questions
How long does a complete pipetting training program take?
Plan roughly five hours of scheduled hands-on time plus a short pre-laboratory online module, spread over two weeks. The online cognitive module takes under an hour, the demonstration and practice block takes 60 to 90 minutes, assessment takes 30 to 45 minutes, and the dilution exercise takes 30 to 45 minutes.
What is the difference between pipette calibration and pipetting training?
Pipette calibration verifies that the instrument delivers what its dial claims, done gravimetrically against the manufacturer's specification. Pipetting training verifies that the person can exploit a calibrated instrument correctly. Both are required, and the instrument check comes first because a trainee cannot learn sound technique on an inaccurate pipette.
How often should pipettes be calibrated?
Most manufacturers recommend gravimetric verification at least annually, with more frequent checks for heavily used instruments or after any drop, corrosion event, or suspected misuse. Labs running critical quantitative assays often add quick in-house gravimetric spot checks between formal service visits.
Can students learn pipette dial reading from a simulation before touching a pipette?
Yes, and the evidence supports it. An interactive simulation that isolated dial reading from physical operation produced significant improvements in both student confidence and dial-reading accuracy at two universities [1]. Simulation prepares students for the bench, it does not replace bench practice.
Which volumes should beginners practice first?
Start at the maximum volume of the pipette, where accuracy is most forgiving and the plunger travel is easiest to feel, then progress to the lower end of the range. Always choose the smallest pipette class that comfortably covers the target volume during real work.
How do you verify that a trainee is actually competent?
Weigh it. The trainee delivers ten replicate volumes of room-temperature water onto an analytical balance, the instructor converts mean mass to volume, and the result is compared against the manufacturer's stated tolerance for that pipette and setting. An applied serial dilution with absorbance readback completes the assessment.
When should reverse pipetting be used instead of forward pipetting?
Use reverse pipetting for viscous, foaming, or high-vapor-pressure liquids such as glycerol-containing buffers, detergent solutions, and concentrated protein samples. Press to the second stop to aspirate, dispense only to the first stop, and discard the excess left in the tip.
Do liquid-handling robots eliminate the need for manual pipetting training?
No. Automated platforms handle routine high-volume transfers, but manual pipetting remains essential for method setup, small batches, troubleshooting, and verifying robot performance. Educational platforms built from Lego components have made robot pipetting accessible down to the sub-microliter range and are a useful complement to manual training rather than a replacement [3].
Sources
- Click Before You Pipette: Building Foundational Pipetting Skills and Confidence With an Interactive Prelaboratory Simulation.
- VERITAS?: A time for VERIQAS™ and a new approach to training, education, and the quality assessment of CD4+ T lymphocyte counting (I).
- Liquid-handling Lego robots and experiments for STEM education and research.