Pipetting Precious Samples: How to Minimize Loss and Maximize Recovery
By Dr. Zubair Khalid, DVM, MS, PhD ·

Pipetting precious samples recovery is the practice of planning and executing liquid transfers so that small, irreplaceable volumes arrive at their destination essentially intact. A precious sample is any material you cannot simply go back and collect again. Examples include a 5 µL plasma aliquot from a clinical cohort, 200 cells collected by flow sorting, RNA isolated from a laser-capture microdissection, a forensic extract, or an enzyme preparation that took a week to purify. The technique treats every transfer as a quantitative step, applies specific fixes for the two dominant loss mechanisms (liquid retained on plastic surfaces and analyte adsorbed to plastic), and verifies the result with a measured recovery rather than an assumption.
Use this approach whenever losing even 10 percent of the sample would change the experiment. You do not need it for buffers, wash solutions, or abundant reagents, where a standard careful pipetting technique is enough. You do need it for dilute analytes, sub-20 µL volumes, sticky molecules such as peptides and single-stranded oligonucleotides, intact cells, and any sample with no replacement.
At a glance:
- Hands-on time: about 5 to 15 minutes for a typical set of transfers once materials are staged
- Elapsed time: 30 to 60 minutes when you include a tracer-based recovery check
- Difficulty: basic manual skill, but it rewards discipline and planning
- Equipment: standard calibrated pipettes, low-retention and low-bind consumables, and a balance or fluorometer for verification
Why Small Volumes Disappear: The Principle
You cannot fix a loss you cannot see. Small-volume transfers fail in four distinct ways, and each has a different fix. The unifying idea is surface area to volume ratio. A 10 µL droplet in a microcentrifuge tube touches a large plastic surface relative to the amount of liquid present, so every surface-related loss grows worse as volume goes down.
The Wetting Film and the Retained Droplet
After a delivery, a thin film of liquid clings to the interior wall of the tip, and a droplet often hangs at the orifice. For a 1000 µL delivery this film is negligible in relative terms. For a 1 to 2 µL delivery it is a visible fraction of the sample. Standard polypropylene tips leave a measurable film, while low-retention tips use smoother polymer or a hydrophobic coating to thin it. The blow-out stroke and a touch-off against the tube wall recover part of the film, and a rinse-through step recovers most of the rest.
Adsorption of the Analyte to Plastic
Proteins, peptides, and single-stranded nucleic acids bind to polypropylene surfaces. The loss depends on analyte identity, concentration, contact time, temperature, and available surface area. At low concentrations, wall binding can remove a large fraction of the analyte even when the delivered volume looks perfect on the meniscus. This is why a volume check alone cannot certify recovery of a dilute peptide. Low-bind tubes and tips carry surface treatments that reduce binding, and carrier molecules such as BSA compete with the analyte for the surface.
Dead Volume and the Inaccessible Meniscus
Conical tube bottoms, wall films left after most of the liquid is removed, and droplets stranded above the liquid line after mixing all hold back the last few microliters of a sample. In a standard 1.5 mL tube, the final microliters pool in the cone where a straight tip at a normal angle cannot reach them. Tilting the tube, spinning it first, using a narrow tip placed into the corner, and finishing with a buffer chase recover this volume.
Air-Cushion Physics and Environmental Error
Air-displacement pipettes deliver liquid through a captive cushion of air between the piston and the sample. That cushion compresses and expands with hydrostatic pressure from immersion depth, temperature mismatch between pipette and liquid, and vapor from volatile solvents. Viscous samples aspirate slowly and leave more liquid behind. Volatile solvents inflate the cushion and cause dripping. These are equipment problems more than technique problems, and they have equipment answers, namely positive-displacement pipettes and reverse pipetting.
| Loss mechanism | Typical sign | First-line fix |
|---|---|---|
| Wetting film | Delivered volume low at small volumes | Low-retention tips, pre-wetting, blow-out, rinse-through |
| Adsorption | Volume correct, measured concentration low | Low-bind plastics, carrier molecule, fewer transfers, shorter contact time |
| Dead volume | Last microliters stranded in the source tube | Tilt the tube, spin first, narrow tip, buffer chase |
| Air-cushion error | Dripping, variable delivery | Positive displacement, reverse pipetting, temperature matching |
| Evaporation | Volume shrinks during the session | Keep tubes capped, work in small batches, use a cool block |
| Aerosol carryover | Signal appears in blank controls | Filter tips, fresh tip per sample, unidirectional workflow |
Materials and Equipment
| Item | Specification or working concentration | Why it matters |
|---|---|---|
| Air-displacement pipettes | P2 or P10, P20, P200, P1000, each calibrated within the last 6 to 12 months | Match the pipette range to the volume |
| Positive-displacement pipette | With matching piston-capillary tips | Viscous, volatile, or temperature-mismatched samples |
| Low-retention filter tips | Aerosol-resistant membrane with low-retention resin or coating | Thins the wetting film and blocks carryover |
| Standard sterile tips | Certified RNase- and DNase-free where relevant | Baseline buffer transfers |
| Wide-bore tips | Enlarged orifice | Cells and viscous lysates with low shear |
| Low-bind microcentrifuge tubes | Nucleic-acid grade or protein grade as appropriate | Reduces wall adsorption |
| Screw-cap O-ring tubes | For storage aliquots | Evaporation control and leak-proof freezing |
| BSA carrier | 0.05 to 0.1 mg/mL (0.005 to 0.01 percent w/v) in the working buffer | Competes for plastic surfaces in dilute protein and peptide work |
| Tween-20 | 0.01 percent (v/v) where the assay tolerates detergent | Passivates surfaces in plate and immunoassay workflows |
| Carrier glycogen or linear polyacrylamide | About 20 µg glycogen per precipitation tube | Co-precipitant for recovery of dilute nucleic acids |
| TE buffer | 10 mM Tris-HCl, 0.1 mM EDTA, pH 8.0 | Diluent and storage buffer for DNA, EDTA chelates nucleases |
| Nuclease-free water | For rinses and buffer chases | Avoids introduced nucleases |
| Calibrated balance | 0.1 mg readability for 100 to 1000 µL checks, 0.001 mg microbalance below 20 µL | Gravimetric verification of delivery |
| Fluorescent tracer | Fluorescein or a labeled oligonucleotide or peptide, working range roughly 10 nM to 1 µM | Direct measurement of recovery |
| Ice bucket or 4 °C block | As needed | Keeps labile samples stable during the session |
Safety note. Treat human- or animal-derived specimens as potentially infectious, wear gloves and eye protection, and handle open transfers of such material in a biosafety cabinet under BSL-2 practices. Many fluorescent tracers ship dissolved in DMSO, which carries dissolved compounds through the skin, so change gloves after any contact. Some nucleic acid stains are mutagenic, so handle stocks with dedicated gloves and dispose of them as hazardous waste.
Step-by-Step Procedure: Pipetting Precious Samples for Maximum Recovery
The following sequence covers a single quantitative transfer from a source tube to a destination tube. Reason notes explain why each step exists, so you can decide which steps are critical for your own sample.
- Plan the transfer route before touching the sample. Sketch how many moves the sample will make from collection to final destination. Reason: every transfer costs a few percent of the material through film, dead volume, and adsorption, so the plan with the fewest transfers wins. If you need a dilution series, make one bulk dilution and split it rather than chaining small transfers. For example, six sequential 1:10 dilutions of a 12 µL RNA sample require six risky small transfers, while a single 1:10 dilution of the whole sample followed by splitting requires one.
- Equilibrate temperatures. Place the pipette, tips, and sample in the same room for at least 20 to 30 minutes, and handle cold samples on a cool block. Reason: the air cushion inside an air-displacement pipette expands or contracts with temperature mismatch, which shifts the delivered volume in a systematic way.
- Confirm the pipette status with a 60-second check. Set the working volume, pre-wet a tip, hold the pipette vertical, and watch the orifice for 10 to 20 seconds for drips. Reason: a pipette that was dropped or has a worn seal fails silently, and no transfer technique can compensate for a leaking instrument.
- Select the pipette that puts the target volume in the upper half of its range. For a 15 µL transfer, use a P20 rather than a P1000. Reason: accuracy specifications degrade near the bottom of a pipette range, and a worked example makes the point. A P200 set to 20 µL that delivers a mean of 19.6 µL carries a 2 percent systematic error, while the same pipette at 200 µL delivering 199.4 µL carries only a 0.3 percent error.
- Select the tip type. Use low-retention tips for small volumes and sticky liquids, filter tips whenever carryover would ruin the experiment, and wide-bore tips for cells. Reason: the tip is the part of the system the sample actually touches, so tip choice controls both film loss and adsorption.
- Pre-wet the tip 2 to 3 times. Aspirate and dispense the working buffer (or the sample itself if buffer carryover is unacceptable) before the real transfer. Reason: pre-wetting humidifies the air cushion and coats the tip surface, so the first delivery is not systematically low. Pre-wet with buffer rather than sample whenever possible so no sample is wasted.
- Immerse the tip to the correct depth and hold the pipette near vertical. Typical manufacturer guidance is about 2 mm of immersion for 2 to 20 µL, 3 to 4 mm for 100 to 200 µL, and 5 to 7 mm for 1000 µL, kept within roughly 20 degrees of vertical. Reason: deep immersion adds hydrostatic pressure that drives liquid into the tip and coats the outside, while shallow immersion risks vortexing and aspirating air.
- Aspirate slowly and steadily, then pause about 1 second at the first stop. Reason: a smooth stroke avoids turbulence and bubbles, and the pause lets the film on the tip wall drain so the full set volume is actually captured.
- Dispense into the destination correctly. Place the tip against the side wall or just under the surface of the receiving liquid, press to the first stop, pause, then press to the second stop to expel the residual, and finish with a touch-off against the wall above the liquid line. Reason: the second stop stroke pushes out the film and orifice droplet, and the touch-off transfers the clinging droplet instead of leaving it on the tip.
- Rinse through. With the tip still in the destination, aspirate the receiving buffer back into the tip and dispense it again, twice if the analyte is sticky. Reason: this washes the interior wall of the tip and recovers most of the remaining film and adsorbed analyte, converting a good delivery into a quantitative one.
- Chase the source tube. If the transfer was not into an excess of destination liquid, add a small measured volume of buffer to the source tube, pipette mix 3 times against the walls, and transfer the rinse to the destination. Worked example: if 8 µL of a 10 µL sample moved and 2 µL is unaccounted for, add 10 µL of buffer to the source, mix, and move the entire rinse. The destination now holds the analyte in 18 µL at a calculable concentration. Reason: the chase converts stranded film and dead volume into recoverable liquid.
- Spin and inspect. Pulse the destination tube 5 to 10 seconds in a mini centrifuge and confirm the meniscus sits where the arithmetic says it should. Reason: the spin collects wall droplets, and the visual check catches gross delivery errors before they propagate into downstream steps.
- Switch to reverse pipetting or positive displacement for viscous, foamy, or volatile samples. Reason: these samples defeat the air cushion, and the alternatives remove the cushion from the problem. See the variations section for the exact technique.
- Handle cells gently. Use wide-bore tips, move the plunger slowly, pre-coat the tip and destination tube with a compatible protein such as BSA if the cells adhere to plastic, and minimize the number of aspiration passes. Reason: shear lyses fragile cells and adhesion strips them from the suspension within seconds of contact with untreated plastic.
- Cap, label, and record immediately. Close the destination tube before opening the next one, and write the actual volumes transferred into the notebook or LIMS entry. Reason: open tubes lose volume to evaporation and gain aerosol exposure, and an accurate volume record is what makes the final concentration calculable.
- Change tips between samples. Never reuse a tip that touched one precious sample for another. Reason: carryover contaminates the very samples you are protecting, and a filter tip plus a fresh tip per sample is cheap insurance.
Safety note. If the source material is human or animal tissue, blood, or a primary culture, keep tubes closed whenever possible, open them only inside a biosafety cabinet, and decontaminate the work surface and pipette handles after the session. Never mouth-pipette under any circumstances.
Pipette Calibration and Verification
What Full Calibration Involves
Gravimetric calibration is the reference method used by pipette manufacturers and metrology laboratories, and it is defined in ISO 8655, the international standard for piston-operated volumetric instruments. Set the pipette to the test volume, typically 100, 50, and 10 percent of nominal, pre-wet the tip, then dispense 10 replicate deliveries into a tared vessel on a calibrated balance. Record each mass, convert mass to volume using the density of water at the test temperature (about 0.998 mg per µL near 20 to 25 °C), and compute the mean delivered volume, the systematic error as a percent of the set volume, and the repeatability as the coefficient of variation. Use an evaporation trap on the balance and work quickly, because a 1 µL droplet loses measurable mass in seconds on an open pan.
Match the balance to the volume. A 0.1 mg readability balance resolves a 1000 µL delivery to 0.01 percent but a 10 µL delivery to only about 1 percent, so checks below roughly 20 µL need a 0.001 mg microbalance.
Verification Between Services
Most laboratories schedule full gravimetric calibration every 6 to 12 months under their quality system, with quicker in-use checks monthly or quarterly, and immediate service after any drop, overload, or exposure to corrosive liquid. A photometric check, in which a dye of known absorptivity is dispensed into a measured volume and read on a spectrophotometer, is a common alternative for quick verification. Between checks, store pipettes clean and upright on a stand, and follow the manufacturer manual for seal and O-ring replacement and piston lubrication. Many manufacturers recommend storing the volume setting at or near the top of the range.
Reading the Calibration Numbers
A P20 checked at 2 µL that delivers a mean of 1.85 µL has a 7.5 percent systematic under-delivery. That error is predictable, so you can either service the pipette or account for it in your math. A coefficient of variation in the low single digits is typical at small volumes, and a value several times higher signals a worn seal, a contaminated piston, or inconsistent technique, none of which arithmetic can fix. Precision matters as much as accuracy for recovery, because a pipette that delivers 2.0, 1.7, and 2.2 µL in three tries destroys replicate comparability even if the mean looks acceptable.
Controls, Expected Results, and How to Read Them
Build a Recovery Assay
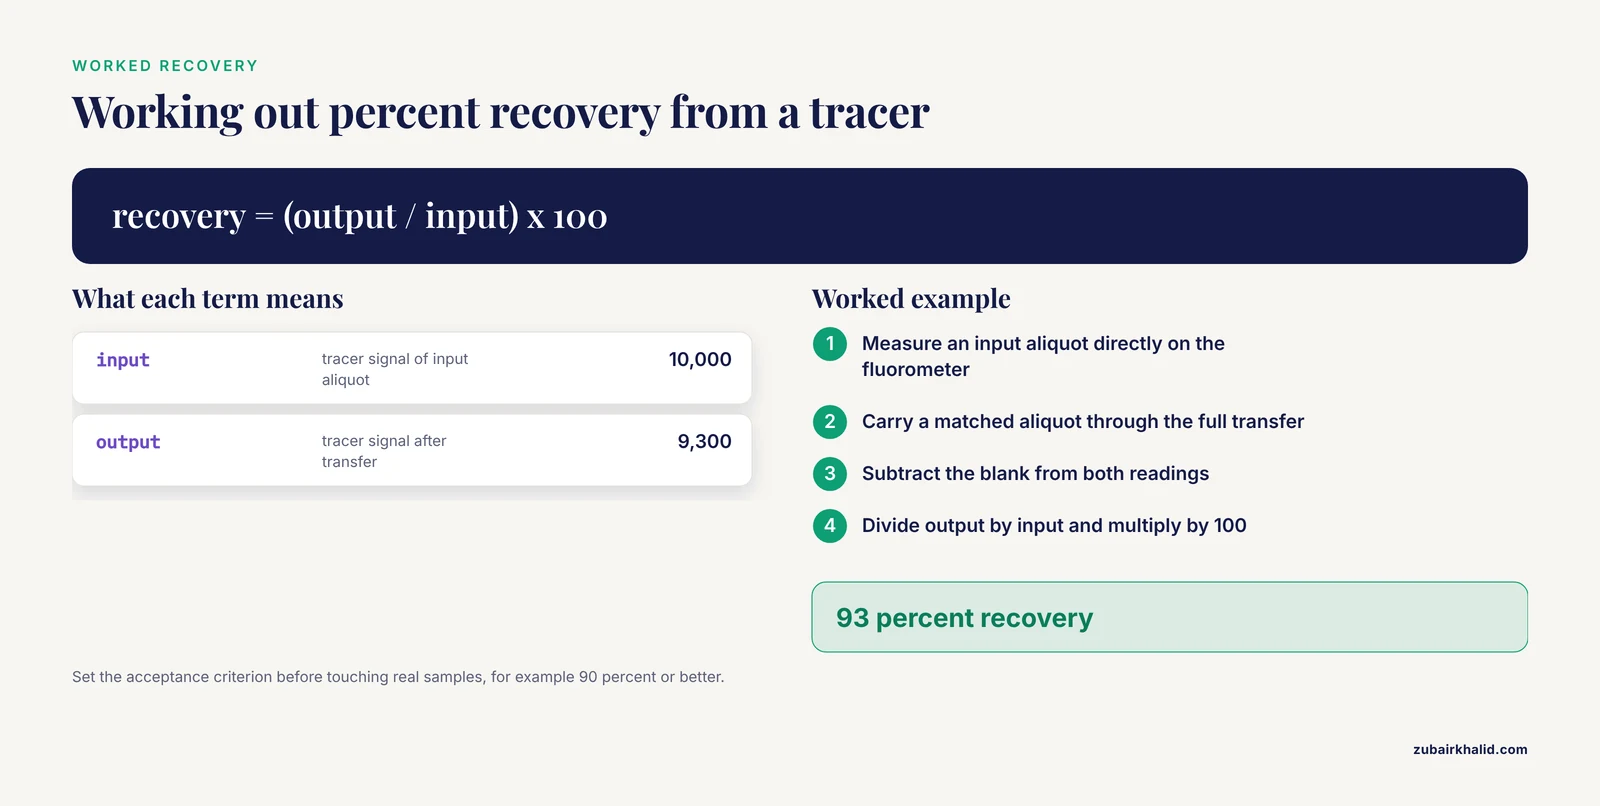
Choose a tracer that resembles your analyte in size and surface behavior as closely as practical. Fluorescein works for general aqueous transfers, a fluorescently labeled oligonucleotide for nucleic acid work, and a labeled peptide for peptide work. Measure an input aliquot directly, carry a matched aliquot through the complete transfer workflow, measure the output on a fluorometer or plate reader after blank subtraction, and calculate percent recovery as output divided by input times 100. Worked example: an input tracer reads 10,000 relative fluorescence units and the output reads 9,300, so recovery is 93 percent. If your recovery check uses a radiolabeled tracer instead, follow your institution's radiation safety program for shielding, surveys, and waste.
Controls to Run
Run a buffer blank through every plastic and step to catch background signal and carryover. Run a matrix blank if the real samples sit in serum, lysate, or detergent, because those matrices change both viscosity and adsorption. Run a positive control with an abundant, well-behaved tracer to validate the technique itself, separate from the analyte. Repeat the whole check on a second day to catch day effects, and run at least three replicates per condition so you see precision and not just the mean.
Expected Results and How to Read Them
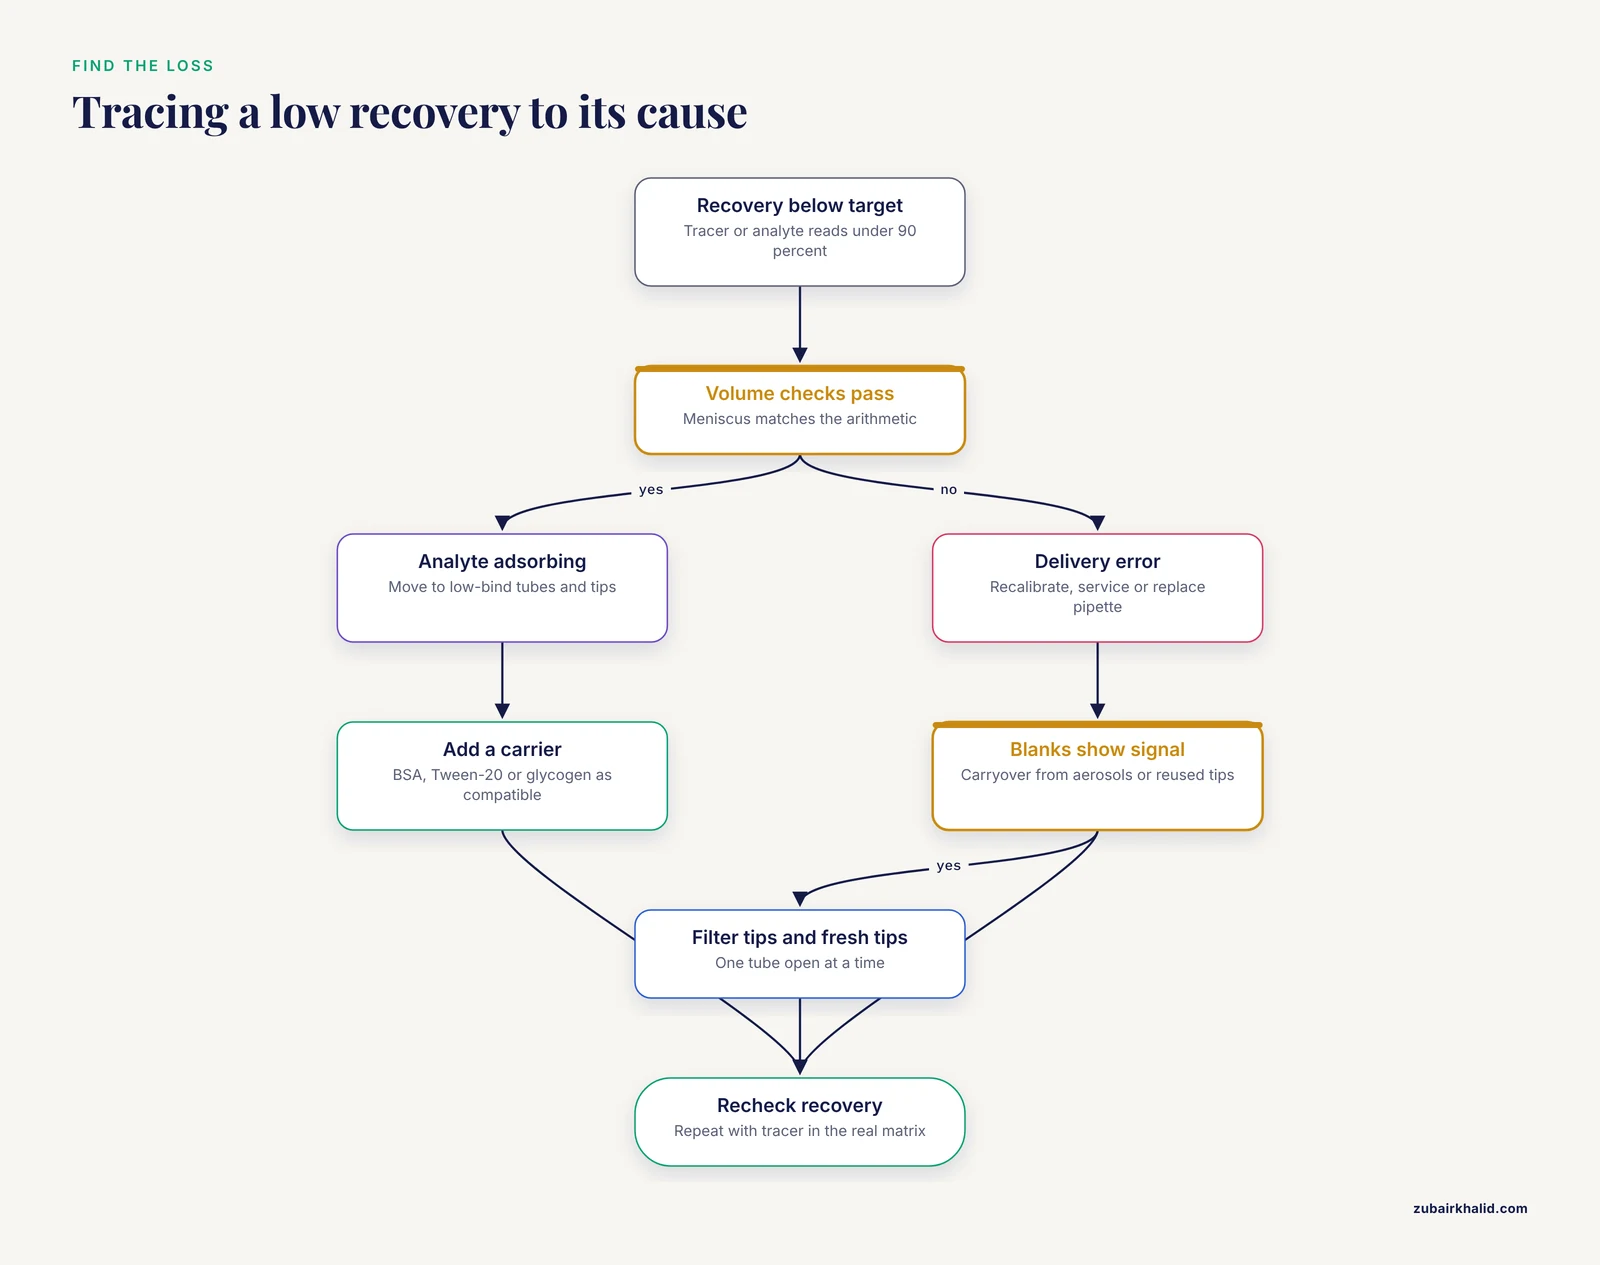
With the full procedure, an aqueous tracer should recover at or above 90 percent with tight replicates, and many labs set an acceptance criterion in that range, for example recovery of 90 percent or better with a replicate coefficient of variation below 10 percent, recorded in the notebook before the real samples are touched. Read the pattern, not just the number:
- Tracer recovers well but the real analyte does not. The analyte is adsorbing to plastic. Move to low-bind consumables and add a compatible carrier.
- Volume checks pass but mass balance fails. Adsorption again, because the meniscus cannot see molecules stuck to the wall.
- Both volume and mass run low. Delivery error. Recalibrate, service, or replace the pipette.
- Blanks show signal. Carryover. Change to filter tips, open one tube at a time, and enforce a unidirectional workflow.
- Replicates scatter widely. Technique inconsistency or static. Standardize angle, depth, and stroke speed, and address static in dry rooms.
Troubleshooting Guide
| Symptom | Likely cause | Fix |
|---|---|---|
| Delivered volume consistently low at small volumes | Dry tip, skipped pre-wet, or heavy wetting film | Pre-wet 2 to 3 times, switch to low-retention tips, finish with blow-out and touch-off |
| Delivered volume varies between replicates | Inconsistent angle, immersion depth, or plunger speed | Standardize a near-vertical posture, shallow immersion, and a smooth stroke |
| Volume correct but measured concentration low | Adsorption of the analyte to plastic | Low-bind tubes and tips, compatible carrier, fewer transfers, shorter contact time |
| Drips or slow delivery with volatile samples | Vapor inflating the air cushion | Positive-displacement pipette or reverse pipetting |
| Viscous sample under-delivers | Air cushion cannot equilibrate during aspiration | Aspirate slowly, use reverse pipetting or positive displacement, consider a wider orifice |
| Foam forms in protein samples | Fast aspiration or blow-out into liquid | Aspirate slowly from below the surface, dispense against the wall, keep the second stop out of the liquid |
| Droplets cling to the outside of the tip | Over-immersion | Immerse only a couple of millimeters, touch off on the wall after delivery |
| Signal appears in blank controls | Aerosol carryover | Filter tips, fresh tip per sample, open one tube at a time, unidirectional workflow |
| Last microliters stay in the source tube | Dead volume in the cone and wall film | Spin first, tilt the tube, place a narrow tip into the corner, finish with a buffer chase |
| Sample volume shrinks during a long session | Evaporation from open tubes | Keep tubes capped, work in small batches, use a cool block or humid chamber for plates |
| Droplets jump toward the tip in dry winter air | Static electricity | Anti-static tips or an ionizer, raise humidity, discharge yourself before touching tubes |
| Pipette leaks or drips between steps | Worn seal or O-ring, contaminated piston | Send for service, replace seals, never force a stuck piston |
Variations and Special Situations
Reverse Pipetting in Detail
Press the plunger to the second stop, aspirate the sample plus a deliberate excess, then dispense only to the first stop so the excess stays in the tip. Discard the excess or use it for the next aliquot of the same sample. This mode improves delivery accuracy for viscous, foamy, or high-vapor liquids because the cushion state is fixed by the extra volume. The trade-off for precious samples is that the excess is sample you throw away, so reserve reverse pipetting for cases where the accuracy gain outweighs the small discard.
Positive Displacement
A positive-displacement pipette carries its piston inside the tip, so liquid contacts a moving solid rather than a compressible air cushion. Delivery is nearly independent of viscosity, vapor pressure, and temperature, which makes it the right tool for glycerol-rich enzyme stocks, serum, and organic solvents. The piston-capillary tips cost more than standard tips and are single-use, so reserve them for the transfers that need them.
Low-Retention Versus Low-Bind Consumables
These solve different problems and you may need both. Low-retention tips thin the wetting film so more of the set volume actually leaves the tip, which improves volume delivery. Low-bind tubes reduce adsorption of proteins, peptides, and nucleic acids to the tube wall, which improves mass recovery. The treatments are not interchangeable across analyte classes, so check the manufacturer's stated application, because a nucleic-acid low-bind surface and a protein low-bind surface are engineered differently.
Carriers and Surface Passivation
Add a carrier when the analyte is dilute and sticky. BSA at 0.05 to 0.1 mg/mL competes for plastic surfaces in dilute protein and peptide work. Tween-20 at about 0.01 percent passivates surfaces in plate-based and immunoassay workflows. Carrier glycogen at about 20 µg per tube, or linear polyacrylamide as an alternative, co-precipitates dilute nucleic acids during ethanol precipitation. Each carrier has downstream costs. BSA interferes with protein assays and some downstream chemistry, detergents interfere with enzyme assays, mass spectrometry, and some chromatography, and carrier nucleic acid inflates absorbance- or dye-based quantification unless it is accounted for. Validate compatibility with the next step before committing irreplaceable material.
Cells and Shear-Sensitive Samples
Wide-bore tips, slow plunger strokes, and protein pre-coating where compatible protect suspended cells. Keep the pipette vertical, avoid foaming, and minimize the number of passes through the tip, because each pass adds shear and surface contact. For very fragile cells, consider a positive-displacement pipette with a wide-bore capillary so the stroke is gentle and consistent.
Sub-Microliter and Automated Transfers
Below about 1 µL, manual accuracy falls off sharply even with a dedicated low-volume pipette. Work at the top of the smallest pipette's range, verify with a 0.001 mg microbalance, and restructure the experiment so fewer tiny transfers are needed. For nanoliter-scale work, acoustic droplet ejection transfers droplets without any tip at all, which eliminates wall losses by design, and many core facilities offer it for exactly the precious-sample cases described here.
Glass and Alternative Surfaces
For severe peptide adsorption, silanized glass vials present a much less adsorptive surface than polypropylene, and amber glass protects light-sensitive analytes. Glass introduces breakage and handling risk, so use padded racks, cap vials securely, and never carry uncapped glass vials across the bench.
Storage and Stability Notes
Recovery work does not end at the transfer, because storage conditions can undo a perfect pipetting session.
- Aliquot on arrival. Split the sample into single-use volumes and freeze them, so no aliquot ever sees a second freeze-thaw cycle. Repeated cycles degrade most proteins and nucleic acids and concentrate analyte at surfaces.
- Choose the right tube. Screw-cap O-ring tubes limit evaporation and survive freezing without popping open. Minimize headspace to slow evaporation and oxidation, but leave expansion room for freezing.
- Buffer for the analyte. Store DNA in TE buffer, 10 mM Tris-HCl and 0.1 mM EDTA at pH 8.0, because EDTA chelates the divalent cations nucleases require. Use low-EDTA TE or water when the sample goes directly into enzyme reactions or platforms that are EDTA-sensitive.
- Keep proteins concentrated and cold. Surface losses scale with dilution, so store proteins as concentrated as the analyte tolerates. Many enzymes are supplied in 50 percent glycerol and can be stored at -20 °C and aliquoted directly without thawing. Add glycerol or a compatible carrier where the downstream work allows it.
- Watch evaporation over months. Small aliquots stored at -20 °C lose water slowly through imperfect seals, which raises the true concentration. Check volumes periodically and record every withdrawal in a volume log so the next user knows the real remaining amount.
- Use low-bind tubes for storage of dilute analytes. Adsorption continues during storage, and each thaw gives the analyte a fresh chance to stick to the wall.
Common Mistakes and Limitations
The mistakes below account for most failed recoveries in practice.
- Using a pipette at the bottom of its range. A 20 µL transfer set on a P1000 is far less accurate than the same transfer on a P20 or P200 at mid-range.
- Skipping the pre-wet. The first delivery from a dry tip is usually low, and with a precious sample that first delivery is often the only one.
- Aspirating at an angle or too shallow. Inconsistent immersion changes hydrostatic pressure and risks pulling air into the tip.
- Blowing the residual into the sample. The second stop stroke can splash and aerosolize when fired into liquid. Fire it against the wall or use it inside the rinse-through instead.
- Trusting the dial without verification. Pipettes drift with wear, and a dropped pipette can be silently far off. A 60-second check catches this.
- Assuming delivered volume equals recovered mass. A correct meniscus proves nothing about molecules stuck to the wall. Adsorption is invisible to volume checks.
- Using the wrong low-bind plastic. Nucleic-acid and protein low-bind coatings are engineered for different analytes, so match the consumable to the sample.
- Adding carriers without checking downstream compatibility. BSA, detergents, and carrier nucleic acid each interfere with specific assays, and a carrier that saves the transfer can ruin the measurement.
- Chaining many small transfers. Each transfer compounds loss and error. Restructure the dilution so one bulk move replaces a chain of tiny ones.
- Validating in buffer only. Serum, lysate, and detergent matrices change both viscosity and adsorption, so a recovery validated in buffer may not hold in the real matrix.
- Ignoring temperature. A cold sample in a warm pipette delivers a systematic error that no careful stroke can remove.
- Reusing tips between precious samples. The few cents saved per tip cannot justify carryover between irreplaceable specimens.
Limitations. These techniques reduce loss but do not eliminate it. Carriers and low-bind consumables add cost and can interfere with downstream assays. Some analytes, notably highly hydrophobic peptides, need solvent changes rather than pipetting changes. Every matrix behaves differently, so validate recovery in your own system with your own tracer before committing irreplaceable material, and treat the measured recovery, not the technique description, as the final authority.
Frequently Asked Questions
How much sample do I lose in a single pipetting step?
For a clean aqueous solution moved with good technique, loss is usually a small percentage of the volume. For 1 to 2 µL transfers, sticky analytes, or casual technique, losses can reach double-digit percentages through wall film, stranded droplets, and adsorption. The only way to know your number is to measure recovery with a tracer.
What is reverse pipetting and when should I use it?
Reverse pipetting aspirates an extra volume by starting at the second stop and dispenses only to the first stop, which improves accuracy for viscous, foamy, or volatile liquids. It deliberately leaves the excess in the tip, so it costs a small amount of extra sample, which matters for precious material.
How often should a pipette be calibrated?
Most labs schedule full gravimetric calibration every 6 to 12 months under their quality system, with quicker in-use checks monthly or quarterly. Calibrate immediately after any drop, overload, or exposure to corrosive liquids, and whenever verification checks drift.
Do low-retention tips and low-bind tubes really help?
Yes, and they solve different problems. Low-retention tips thin the wetting film so more of the set volume actually leaves the tip, while low-bind tubes reduce adsorption of proteins, peptides, and nucleic acids to the tube wall. Use both when volume and analyte mass both matter.
Why pre-wet the tip, and does it waste sample?
Pre-wetting humidifies the air cushion and coats the tip surface so the first delivery is not low. Pre-wet with buffer rather than sample whenever possible, so no sample is wasted.
How do I recover the last microliters left in a tube?
Spin the tube briefly to collect droplets, tilt it so the remaining liquid pools at the cone, and use a narrow tip placed into the corner. Follow with a buffer chase, add a small volume of buffer, pipette mix against the walls, and transfer the rinse to the destination.
When should I switch from an air-displacement to a positive-displacement pipette?
Switch when the sample is viscous, volatile, hot or cold relative to the room, or prone to foaming, because the air cushion in an air-displacement pipette distorts delivery under those conditions. A positive-displacement pipette puts the piston directly against the liquid and is largely immune to those effects.
How can I prove that my transfer method actually recovers the sample?
Run a tracer through the entire workflow, measure the amount that goes in and the amount that comes out with a fluorometer or plate reader, and calculate percent recovery. Use a tracer that resembles your analyte, run it in the real matrix, and set an acceptance criterion before you start.