Pipetting Competency Assessment: Step-by-Step Guide
By Dr. Zubair Khalid, DVM, MS, PhD ·

Manual pipetting looks simple and is anything but. Two trained operators running the same assay with the same pipettes can deliver measurably different volumes, and a single operator can drift over the course of a long bench session. A pipetting competency assessment puts a number on that variation. The operator performs a defined series of aspirate-and-dispense cycles, the delivered volume is measured independently by weighing or absorbance, and the results are converted into two figures: inaccuracy (how far the average delivery sits from the target volume) and imprecision (how much the deliveries scatter around that average).
This guide walks through a gravimetric (mass-based) assessment step by step, covers the spectrophotometric alternative, explains how to interpret the numbers, and catalogs the mistakes that most often corrupt the result. Expect roughly 60 minutes of hands-on bench time for one operator tested at three volumes, with about half a day of elapsed time once you account for water equilibration, balance warm-up, the full replicate series, and the calculations.
The need for this assessment is well documented. A 2023 mini-review on manual pipetting variation noted that, although pipettes are as fundamental to biomedical and analytical laboratories as workstations are to computer scientists, the extent of operator-to-operator and day-to-day variation in pipetting had been under-investigated, and that unaddressed variation compounds across assay steps until it compromises data quality [1]. The same year, a separate study of clinical LC-MS/MS technicians found that technicians who performed well when pipetting water showed significantly greater imprecision and bias when pipetting serum, whole blood, and methanol, meaning that water-based proficiency checks alone create a false sense of technical ability [2]. A structured competency assessment addresses both problems.
The Principle Behind the Assessment
The logic is the same as calibrating any measuring device: compare what the system delivers against what it claims to deliver, using an independent measurement.
For gravimetry, the operator dispenses liquid onto an analytical balance and the delivered volume is calculated from mass and density:
Volume = mass / density
Water at room temperature has a density of approximately 1.00 g/mL, so a 100 μL delivery weighs close to 100 mg. From a series of individual deliveries you calculate the mean volume and compare it to the set volume (this is inaccuracy, sometimes reported as bias or systematic error) and calculate the standard deviation and coefficient of variation (this is imprecision, or random error). A pipette-and-operator pair can be accurate but imprecise, precise but inaccurate, or both. Only measuring both tells you which problem you have.
For spectrophotometry, the operator dispenses a colored solution into a fixed volume of diluent and the absorbance of the resulting solution is read on a spectrophotometer or plate reader. Because absorbance is proportional to the amount of dye delivered, the signal maps directly to delivered volume once a standard curve is prepared. A 2023 review of pipetting assessment methods identified gravimetry and spectrophotometry as the two common readouts for determining pipetting accuracy and precision, and provided working protocols for both single-channel and multichannel pipettes [1].
Both approaches share one key feature: they measure the whole system, the pipette, the tip, and the hands using it. That is exactly what a competency assessment needs. A pipette calibration certificate tells you what the instrument did on the calibration bench. A competency assessment tells you what a specific operator actually delivers on a specific day with real reagents.
When to Run an Assessment
Run a pipetting competency assessment at these points:
- Onboarding. Every new technician, student, or visiting researcher should be assessed before they handle quantitative assays. This is the single highest-value moment for assessment.
- After training interventions. If you retrain an operator, measure whether the retraining worked rather than assuming it did.
- Periodically for ongoing assurance. The clinical LC-MS/MS study cited above emphasized that laboratories should evaluate pipetting variability on an ongoing basis rather than treating it as a one-time hiring hurdle [2].
- Before critical studies or validations. Any assay where pipetting error propagates into a reported result, such as quantitative LC-MS/MS, qPCR standard curves, or serial dilutions, justifies a documented assessment beforehand.
- After an unexplained shift in assay performance. When control charts drift and reagent lots and instrument performance check out, operator pipetting variation is a candidate root cause.
The frequency of periodic checks is a laboratory policy decision. What the literature supports is the principle of regular checks with a common protocol, so results are comparable across operators, instruments, and time points, and potentially across laboratories [1].
Materials and Reagents
| Item | Specification | Notes |
|---|---|---|
| Analytical balance | Readability of 0.1 mg is preferred for volumes of 100 μL and below; 1 mg readability is acceptable for volumes of 1 mL and above | Position away from air currents, direct sunlight, and vibration. Allow the balance to warm up per manufacturer documentation |
| Test liquid | Distilled or deionized water, equilibrated to room temperature | Density approximately 1.00 g/mL at typical room temperature. Equilibrate on the bench for at least 1 hour after refrigerated storage |
| Alternative matrices | Methanol, serum, or whole blood if you are extending the assessment to realistic matrices | Methanol is flammable and toxic by inhalation and skin contact. Handle in a fume hood away from ignition sources. Human serum and blood require biosafety approval, gloves, and splash protection |
| Air-displacement pipettes | Single-channel and, if used routinely, multichannel | Verify the pipette's calibration status before assessing the operator, otherwise you cannot separate instrument error from operator error |
| Compatible tips | The tip brand and type the operator uses routinely | Tip fit varies between brands. Do not assess with a tip you never use in real work |
| Weigh vessels | Small beakers or weigh boats | Large enough to catch the dispensed volume without splash-out |
| Record sheet or spreadsheet | Columns for set volume, dispense number, mass or absorbance, calculated volume | Pre-build the density conversion and statistics so results are calculated identically every time |
| PPE | Laboratory coat, gloves, eye protection | Mandatory. Add face protection and work inside a fume hood for methanol or biosafety precautions for human specimens |
Safety note. Water is benign. Methanol is toxic and flammable and must be handled in a fume hood with no open flames nearby. Unfixed human blood and serum are treated as potentially infectious under standard biosafety practice, so wear gloves, contain splashes, and decontaminate surfaces after use.
Pipetting Competency Assessment Step by Step
The following gravimetric procedure follows the approach described for determining accuracy and precision of manual pipetting in the published protocols referenced earlier [1]. Adapt the volumes to match what the operator actually does in your laboratory.
Phase 1: Preparation
Step 1. Confirm the pipette's calibration status. Check the calibration sticker or record before you begin. If the pipette is overdue for calibration or has a known fault, fix the instrument first. An assessment performed with an out-of-tolerance pipette measures the instrument, not the operator, and the results are uninterpretable. (Section "Pipette Calibration Versus Competency Assessment" below explains the distinction in full.)
Why this matters: the entire point of a competency assessment is to isolate the human contribution to variation. A miscalibrated pipette contaminates that measurement.
Step 2. Equilibrate the test liquid and equipment. Place the water bottle, tips, pipettes, and weigh vessels on the bench for at least an hour so everything reaches room temperature. Record the ambient temperature.
Why this matters: air-displacement pipettes deliver a column of air above the liquid in the tip. Cold liquid is denser and changes the vapor pressure inside the tip, both of which shift the delivered volume. Temperature mismatch between liquid, tip, and air is one of the largest avoidable sources of gravimetric error.
Step 3. Choose the test volumes. A thorough assessment tests each pipette at three points across its range: a high volume near the top of the range (for example, 100 μL on a 100 to 1000 μL pipette would be 1000 μL, with 500 μL and 100 μL as the mid and low points). At minimum, test the volume the operator uses most in real assays. Manufacturer specifications and standard metrology practice for pipettes both treat low-volume performance as the hardest case, because fixed losses such as tip wetting and vapor effects represent a larger fraction of the target volume.
Step 4. Prepare the balance environment. Warm up the balance, level it, close the draft shield doors between readings, and place a waste container and tips within easy reach so the operator never leans on the bench mid-series.
Why this matters: air currents and vibration show up as random mass noise, which inflates the calculated imprecision and unfairly penalizes the operator.
Phase 2: The Delivery Series (Single-Channel)
Step 5. Set the pipette to the first test volume and attach a fresh tip with a firm, twisting motion. Verify the tip is seated evenly.
Why this matters: a partially seated tip lets air escape during aspiration, which is a classic cause of under-delivery.
Step 6. Pre-rinse (pre-wet) the tip. Aspirate and dispense the test liquid into the source reservoir two to three times before the first recorded delivery. Keep the tip in the liquid during each aspiration and dispense at the same rhythm you will use throughout.
Why this matters: the first aspiration from a dry tip loses a film of liquid to the inner tip wall, so the first delivery is systematically low. Pre-rinsing conditions the tip and removes that bias. This step is standard pipetting technique and is included in published assessment protocols [1].
Step 7. Tare the balance with the receiving vessel in place. Close the draft shield, wait for a stable reading, and tare.
Step 8. Deliver the first replicate. Aspirate from the source reservoir by pressing the plunger to the first stop, immersing the tip a few millimeters into the liquid, and releasing the plunger smoothly. Move to the balance, touch the tip tip against the inside wall of the vessel at a consistent angle, dispense by pressing smoothly to the first stop, then blow out by pressing to the second stop only if your pipetting technique specifies forward mode. Withdraw the tip along the vessel wall to avoid dragging liquid out. Close the draft shield and record the mass.
Why this matters: consistent immersion depth and dispense angle matter more than most trainees expect. Deep immersion adds hydrostatic pressure that inflates the aspirated volume. A tilted dispense leaves residual droplets on the vessel wall unevenly. The published clinical assessment used gravimetric analysis of exact volumetric delivery with defined technique, and found that technique details drive measurable differences in imprecision and bias [2].
Step 9. Repeat for the full replicate series. Perform and record at least 10 individual deliveries at each test volume, taring between each delivery. Do not batch-weigh several deliveries into one vessel, because that averages away the very scatter you are trying to measure.
Why this matters: imprecision is a statement about the distribution of individual deliveries. Pooling deliveries destroys the distribution and leaves you with only the mean.
Step 10. Repeat at the remaining test volumes, using a fresh tip for each volume and pre-rinsing each new tip.
Step 11. Repeat the whole series if you are comparing operators. Each operator being assessed performs the identical series with the same pipette, the same tips, the same liquid, and the same balance session where possible. This is what makes results comparable across people.
Phase 3: Multichannel Pipettes
Multichannel pipettes get their own assessment because they add a failure mode that single-channel testing cannot see: unequal delivery between tip positions.
Step 12. Test each tip position separately if resources allow. Dispense from each numbered tip position into its own vessel and weigh each vessel. A position that consistently under-delivers points to a channel seal problem or a warped tip holder, not to operator technique.
Step 13. Alternatively, dispense the full row into a reservoir-based format matched to how the multichannel is actually used, for example into a 96-well plate, and evaluate the combined gravimetric result. Published multichannel protocols cover this configuration.
Why this matters: a multichannel pipette can pass a single-position check while one dead channel quietly corrupts every third column of your plate.
Phase 4: Calculations
Step 14. Convert each mass to volume. Divide each recorded mass by the density of the test liquid at the recorded temperature. For water near room temperature, 1.00 g/mL is an acceptable working value for training purposes, though precise work uses the exact density at the measured temperature.
Step 15. Calculate the mean delivered volume at each test volume.
Step 16. Calculate inaccuracy. Express the difference between the mean and the set volume as a percentage of the set volume:
Inaccuracy (%) = (mean delivered volume - set volume) / set volume × 100
A positive value means the operator-pipette system over-delivers on average. A negative value means it under-delivers.
Step 17. Calculate the standard deviation of the deliveries and the coefficient of variation (CV):
CV (%) = standard deviation / mean × 100
The CV is your imprecision figure. It is the number most often tracked over time, because it normalizes scatter against the mean.
Step 18. Record the results on a competency record with the date, operator, pipette serial number, tip lot, matrix, temperature, and raw masses. Keep the raw data, not just the summary, so anomalous deliveries can be investigated later.
Choosing the Test Matrix: Water Is Not Enough
The choice of test liquid is where most competency programs quietly fail.
In the clinical LC-MS/MS study mentioned earlier, technicians pipetted four matrices, water, methanol, serum, and whole blood, and exact volumetric delivery was determined gravimetrically from mass and literature density values for each matrix. Imprecision and bias were low when pipetting water, which is the matrix used by common commercial pipetting assessment programs. Imprecision and bias rose significantly for serum, whole blood, and methanol. The authors concluded that water-based proficiency assessment gives a false sense of technical ability [2].
The physical reasons are straightforward. Water is thin, has high surface tension relative to viscous biological fluids, and wets tips predictably. Serum and plasma are viscous and proteinaceous, so they cling to the tip exterior and interior. Whole blood is viscous, particulate, and heterogeneous. Volatile organic solvents such as methanol evaporate from the tip during the aspiration-to-dispense interval, inflating the air cushion and changing delivery dynamics. Each matrix punishes a different technical weakness.
Two practical implications follow:
- Run at least some assessments in the matrices the operator actually pipettes. If a technician's daily work involves serum and organic solvent, a water-only assessment is a screen for gross incompetence, not a measure of real proficiency.
- A visible training environment helps. In the same study, events conducted within illuminated viewing areas led to improved imprecision and bias, meaning that letting operators see and correct their technique in real time improved measured performance [2]. A well-lit bench, a mirror, or an observer at the first assessment is a training tool, not an intrusion.
The Spectrophotometric Alternative
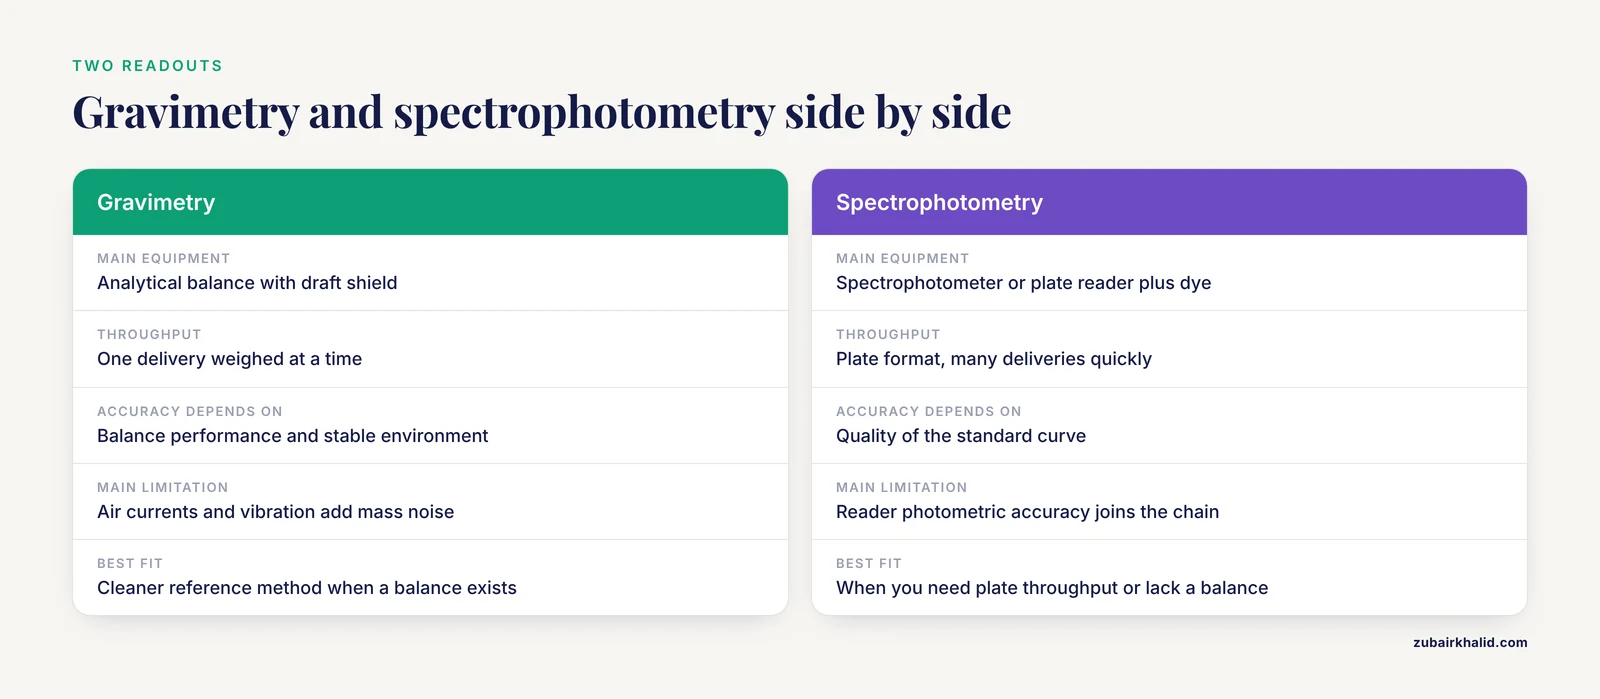
When a suitable analytical balance is unavailable, or when you want to assess many deliveries quickly in plate format, spectrophotometry is the second validated readout [1].
The general structure is:
- Prepare a standard curve by dispensing known volumes of a colored solution into a fixed volume of diluent, replicating each point.
- Have the assessed operator deliver the same target volume in the same format, in replicate.
- Read absorbance on a spectrophotometer or plate reader.
- Interpolate each delivery from the standard curve to a delivered volume.
- Calculate mean, inaccuracy, and CV exactly as in the gravimetric workflow.
Advantages: no balance needed, plate-format compatibility, high throughput, and the same cuvette or well geometry as many real assays.
Limitations: accuracy depends on the quality of the standard curve, the dye must be stable and behave like a true solution in your diluent, and the reader's own photometric accuracy becomes part of the measurement chain. Every instrument added to the chain adds a potential bias. For this reason, gravimetry is generally the cleaner reference method when a suitable balance exists, and the published review treats both methods as complementary options available to any laboratory [1].
Controls and How to Read the Results
A competency assessment needs internal references to be meaningful.
Instrument control. Have one known-competent operator, or the same assessor every time, run the identical series with the identical pipette. If the reference operator's numbers are also poor, the problem is the pipette, the tips, the balance, or the environment, not the trainee. This control separates instrument error from operator error, which is the central interpretive challenge of the whole exercise.
Volume control. Results at the top of the pipette range should be better than results at the bottom. If they are not, suspect technique or an instrument fault.
Reading the numbers.
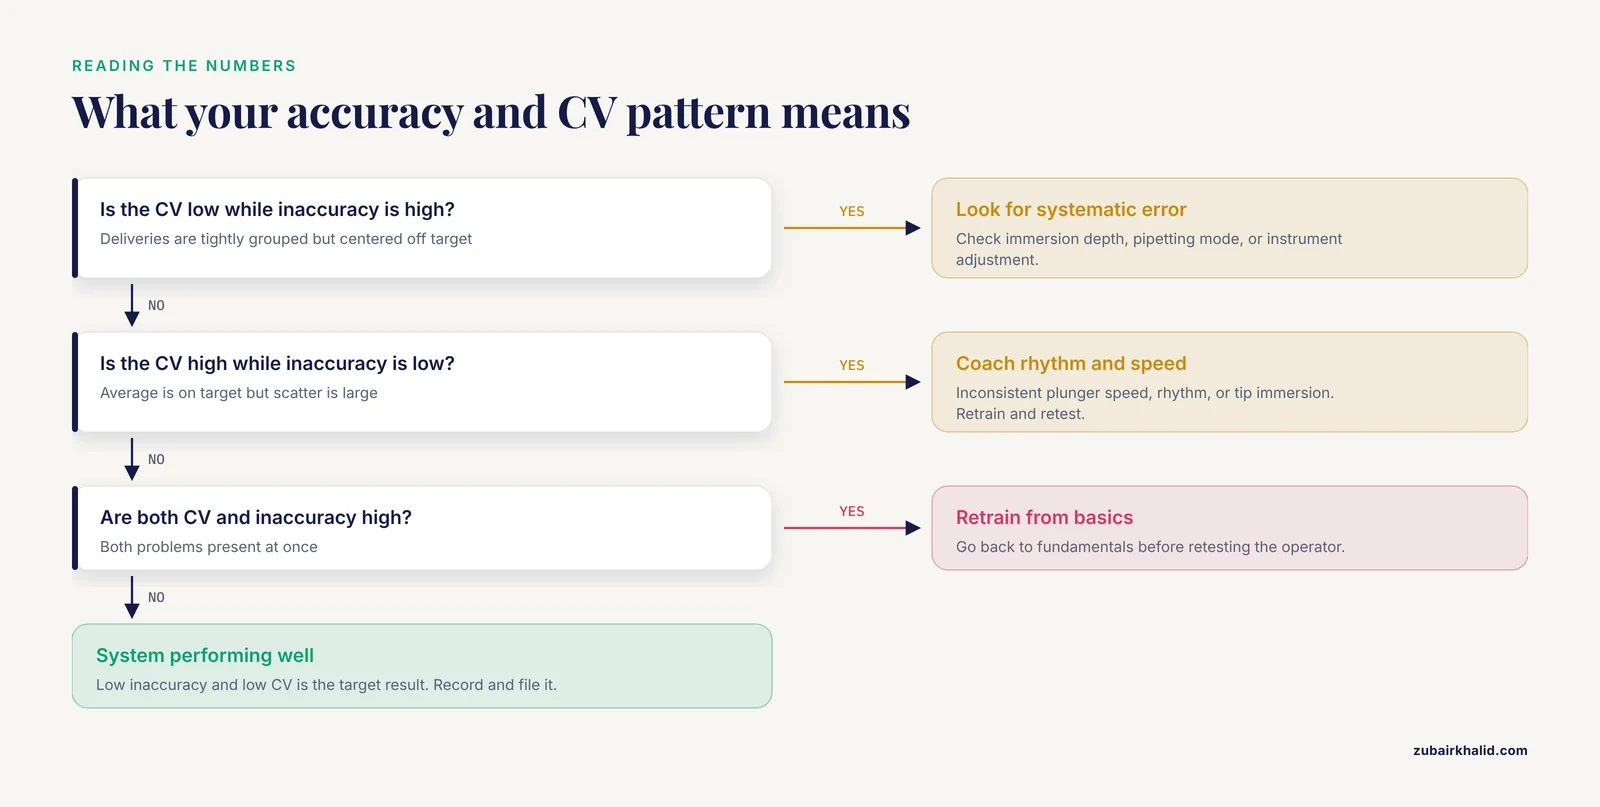
- Low inaccuracy, low CV. The operator-pipette system is performing well. This is the target.
- Low CV, high inaccuracy. Deliveries are tightly grouped but centered on the wrong volume. This pattern suggests a systematic technique error, such as consistently shallow immersion, reverse-pipetting mode used unintentionally, or an instrument that needs adjustment.
- High CV, low inaccuracy. The average is on target but the scatter is large. This pattern suggests inconsistent rhythm, inconsistent plunger speed, or inconsistent tip immersion. It is the signature of an unpracticed operator and usually improves with training.
- High CV, high inaccuracy. Both problems at once. Retrain from fundamentals before retesting.
- Drift across the replicate series. Deliveries that creep upward or downward across ten replicates suggest fatigue, evaporation from the source reservoir, warming of the liquid, or a developing tip leak.
Interpreting pass and fail. There is no universally accepted numeric threshold for operator pipetting performance. The review of assessment methods noted that a common protocol across laboratories would enable cross-laboratory comparison and could eventually establish reference values of acceptable ranges for operator error, but that such benchmarks were not yet established [1]. Until community reference values exist, set your laboratory's acceptance criteria based on what your assays tolerate. A quantitative mass spectrometry assay tolerates far less pipetting scatter than a buffer exchange. Whatever criteria you adopt, write them down before the assessment, apply them consistently, and record the justification.
Troubleshooting
| Symptom | Likely cause | Fix |
|---|---|---|
| First delivery of each series is always low | Dry tip, no pre-rinse | Pre-rinse the tip two to three times before recording. Never count the first delivery from a dry tip |
| CV inflates at low volumes only | Normal physics of small air columns plus technique inconsistency at low volume | Slow down, reduce immersion depth, and use reverse pipetting for small volumes of viscous liquids if your protocol permits |
| Mass readings drift steadily upward during the series | Evaporation from the receiving vessel or the balance chamber is adding mass, or liquid is accumulating | Use a smaller, covered receiving vessel where practical. Work briskly and consistently. Note drift and investigate separately from operator performance |
| Mass readings unstable between tares | Air currents, vibration, or static on plastic vessels | Move the balance away from HVAC vents and doors, close the draft shield, use antistatic measures for plastic weigh boats |
| Delivered volumes consistently below target | Tip not fully seated, shallow or inconsistent immersion, slow plunger release, blowing out when the technique calls for forward mode only | Re-seat the tip with a twist, standardize immersion depth at a few millimeters, release the plunger smoothly, and match the pipetting mode to the liquid |
| Delivered volumes consistently above target | Plunger pressed past the first stop during aspiration, tip immersed too deeply | Aspirate to the first stop only unless performing reverse pipetting, and standardize immersion depth |
| Multichannel shows one bad position | Channel seal failure or warped tip holder | Weigh each position separately to identify the faulty channel, then service the pipette |
| Operator looks fine in water but fails in serum or solvent | Real-world matrix effects on delivery | This is an expected finding, not a pipette fault. Extend training to the problem matrix and consider reverse pipetting for viscous or foaming liquids [2] |
| Operator performs well under observation but poorly in routine work | Observation effect | Schedule a follow-up unannounced or lightly observed assessment, and emphasize that the goal is improvement, not penalty |
Variations on the Standard Assessment
Forward versus reverse pipetting. Forward mode, press to the first stop, aspirate, dispense to the first stop, suits aqueous liquids. Reverse mode, press to the second stop, aspirate, dispense only to the first stop, leaves excess liquid in the tip and suits viscous, foaming, or volatile liquids. Assess the mode the operator will actually use, and make sure the operator knows which mode they are in.
Matrix panel. The published clinical assessment used water, methanol, serum, and whole blood to expose differences that a water-only test hides [2]. A scaled-down version for a molecular biology laboratory might be water plus the most challenging matrix the operator handles routinely, such as a protein-containing buffer or the laboratory's extraction solvent, with the matching biosafety and flammability controls in place.
Illuminated or observed training format. Because illuminated viewing conditions improved measured performance in the clinical study [2], a first-assessment format with good lighting and an instructor watching serves a dual purpose, it measures and it trains. Treat the first assessment as formative and later ones as summative.
Speed stress. Real bench work is rushed. Once baseline competency is documented, a timed variant reveals whether performance holds under realistic pressure. Keep the timing consistent if you want results comparable over time.
Cross-laboratory comparison. One argument for adopting a published, common protocol is that identical protocols allow results to be compared across laboratories, which is a step toward community reference ranges for operator error [1]. If your organization runs multiple sites, use the same volumes, replicate counts, matrix, and calculations everywhere.
Pipette Calibration Versus Competency Assessment
These two activities are often conflated and answer different questions.
Pipette calibration is the periodic verification, and if needed adjustment, of the instrument itself against traceable mass standards, following the manufacturer's technical documentation and the intervals the laboratory defines. Calibration asks: does this pipette, in skilled hands, deliver its set volume within its stated tolerance? Calibration belongs to the instrument.
Pipetting competency assessment asks: does this operator, with this pipette, deliver the right volumes under real conditions? It belongs to the person and the technique.
Both are necessary and neither substitutes for the other. A perfectly calibrated pipette in untrained hands still delivers poorly. A perfectly trained operator with an out-of-tolerance pipette also delivers poorly. Sequence matters practically: confirm calibration before assessing competency, so that a failed assessment can be attributed to the operator with confidence. Conversely, if every operator fails with the same pipette and passes with another, the pipette is the problem regardless of its calibration sticker, and it should go to service.
Maintenance habits that protect both activities include storing pipettes upright, never racking them with liquid in the tip, using tips matched to the pipette's specification, and servicing pipettes on a schedule rather than only after a failure.
Pipetting Technique Tips That Move the Numbers
These points come directly from the elements that the published assessment protocols and the clinical pipetting study isolate as drivers of measured performance [1] [2], expressed as coaching points.
- Pre-rinse every new tip for the matrix in question. Two to three cycles is standard practice. This removes the first-delivery deficit.
- Keep immersion depth constant and shallow, a few millimeters below the liquid surface. Deeper immersion adds back-pressure. During aspiration of viscous liquids, withdraw the tip more slowly than for water.
- Hold the pipette vertical during aspiration. Angled aspiration changes the hydrostatic head and is a reproducible source of bias.
- Move with a rhythm. Consistent cadence between aspiration and dispense matters especially for volatile solvents, where dwell time in the tip lets vapor expand.
- Dispense against a wall at a consistent angle. Wall contact recovers the external film and makes deliveries reproducible.
- Do not touch the tip to anything between aspiration and dispense. A brushed tip wicks liquid unpredictably.
- Watch the aspirated meniscus. A curved or wobbling meniscus inside the tip signals a poor seal, a leaking tip, or an aspiration performed too fast. Trainees who learn to read the meniscus self-correct most technique errors.
- Work in good light. The documented improvement under illuminated viewing [2] is a reminder that vision is part of technique. If your pipetting station is dim, fix that before you blame the operator.
- Match the pipette to the volume. Delivering 15 μL with a 1000 μL pipette is a guarantee of poor relative accuracy. Use the smallest pipette whose range comfortably covers the target.
- Log pipetting as a variable. In any assay where results drift inexplicably, the operator, the pipette, the tip lot, and the technique are part of the record worth reviewing.
Common Mistakes and Limitations
These are the errors most frequently seen in pipetting competency programs, drawn from the failure modes documented in the assessment literature [1] [2] and from routine bench experience.
- Testing only with water. As documented, technicians who excel with water can show significantly worse imprecision and bias in serum, whole blood, or methanol [2]. A water-only program certifies the easiest case.
- Testing only one volume. Performance at 1000 μL says little about performance at 100 μL. Test at least the low end of the range, where relative errors are worst.
- Assessing without confirming calibration first. This is the most common interpretive error. If the pipette is out of tolerance, the assessment measures the instrument.
- Pooling deliveries before weighing. Ten deliveries into one vessel give you one number, not ten. You lose the imprecision measurement entirely.
- Skipping the pre-rinse and then recording the first delivery. This manufactures a negative bias that belongs to the protocol, not the operator.
- Ignoring the environment. Balance placement under an HVAC vent, plastic weigh boats with static charge, and a cold water bottle straight from the refrigerator each corrupt the numbers in ways that look like operator error.
- Treating the first assessment as the verdict. First assessments are formative. People improve with feedback, and illuminated, observed training demonstrably improves measured performance [2]. A single poor first result should trigger coaching and retesting, not a final judgment.
- No common protocol across the team. If each operator is assessed with different volumes, replicate counts, or calculations, results cannot be compared. The value of a common protocol for competency training and regular checks, and eventually for cross-laboratory benchmarking, is a central recommendation of the assessment literature [1].
- Confusing competency assessment with calibration. As covered above, they measure different things. Doing one and skipping the other leaves a gap.
- One-time assessment, never repeated. Pipetting skill decays with habit drift and fatigue, and the case for ongoing evaluation of pipetting variability has been made explicitly in the clinical laboratory literature [2]. A competency file with a single dated record satisfies nobody.
- Limitation to state plainly. The published protocols characterize accuracy and precision under the assessment's conditions. They do not capture every real-world stressor, and universal acceptance thresholds for operator error have not been established, so laboratories must set and document their own criteria [1]. Individual performance questions, like any individual case, should be resolved through documented local policy and, where relevant, the laboratory's quality management system.
Frequently Asked Questions
How often should pipetting competency be assessed?
Assess at onboarding, after retraining, before critical quantitative work, and on a regular recurring schedule defined by your laboratory. The clinical literature supports ongoing evaluation of pipetting variability rather than a single hiring-time check [2].
Which volumes should I test during a pipetting competency assessment?
Test at least three points across each pipette's range, including the low end, plus the specific volumes the operator uses daily. Low-volume delivery is the hardest case and reveals problems that high-volume testing hides.
Is water a good test liquid for pipetting assessment?
Water is fine for gross screening and easy to weigh, but it is not sufficient. Technicians assessed on water can show significantly higher imprecision and bias on serum, whole blood, and methanol, so include the matrices your operator actually handles [2].
Should I use gravimetry or spectrophotometry for my assessment?
Use gravimetry when you have a suitable analytical balance, because it is the more direct readout. Use spectrophotometry when you need plate-format throughput or lack a balance, and build a proper standard curve first. Both are recognized readouts for pipetting accuracy and precision [1].
How many replicate deliveries do I need per volume?
At least 10 individual deliveries per test volume, each weighed separately. Fewer replicates make the standard deviation, and therefore the imprecision figure, unstable.
What CV counts as a pass?
There is no established universal threshold for operator pipetting performance. Community reference ranges have been proposed as a goal but do not yet exist, so set acceptance criteria based on what your specific assays tolerate and document them before testing [1].
Does a competency assessment replace pipette calibration?
No. Calibration verifies the instrument against traceable standards, while competency assessment verifies the operator-pipette pair under working conditions. Confirm calibration first, then assess competency, so you can attribute results correctly.
How do I assess a multichannel pipette and its operator?
Weigh dispenses from each tip position separately to catch a failing channel, and additionally run a full-row dispense into a plate to reflect real use. Published multichannel protocols cover both configurations.