How to Match Pipette Tip Volume to Your Pipette
By Dr. Zubair Khalid, DVM, MS, PhD ·

The pipette sets the volume, the tip holds the liquid, and every transfer is only as accurate as the match between the two. A well calibrated pipette delivers badly through a loose or undersized tip, and a premium tip cannot rescue a volume set below the pipette's reliable range. The working rule for how to match pipette tip volume to your pipette is simple: use a tip whose rated volume matches your pipette's maximum setting, seat it with a firm click, and keep routine transfers in the upper two thirds of the pipette's adjustable range.
This guide covers pipette tip volume selection from the ground up. It defines the terms, lays out the standard pipette and tip pairings in one table, walks through the tip options with their pros and cons, connects the match to accuracy and pipette calibration, and closes with pipetting technique, worked scenarios, and the mistakes that cost labs the most time.
What Pipette Tip Volume Selection Actually Means
Most bench pipettes are air displacement pipettes. A spring loaded piston moves a column of air inside the body, and that expanding or contracting air pushes liquid into or out of the tip. The liquid never touches the piston. Everything about volume accuracy therefore depends on the air column, the tip, and the liquid behaving the way the manufacturer assumed at calibration. A smaller family, positive displacement pipettes, pushes the piston directly against the liquid through a disposable piston and capillary built into the tip. Those instruments earn their keep with viscous, volatile, or dense samples, and their tips follow the same nominal volume logic with even less room for substitution, because the piston lives inside the tip.
Three terms carry the whole topic.
Nominal pipette volume is the top of the adjustable range, printed on the plunger or the display. A P200 has a nominal volume of 200 µL.
Nominal tip volume is the volume a tip is molded and rated to handle at full draw. A 200 µL tip holds a full 200 µL draw plus the small residual film that blow out, the second plunger stop that clears the tip, leaves behind.
Working window is the span of settings where the pipette still meets its stated accuracy and precision limits.
The match itself has two parts. Capacity is hydraulic: the tip must hold the maximum draw without liquid climbing into the pipette cone. Collar fit is mechanical: the upper ring of the tip must seal against the seal ring on the nose cone. A tip that satisfies both is matched. A tip that satisfies only one is a leak or a contamination event waiting to happen.
Manufacturers state accuracy and precision at a few test points across each range, usually near the maximum, the midpoint, and a low fraction of the range, in line with the test structure of the ISO 8655 series for piston operated volumetric apparatus. Below roughly 20 percent of the nominal volume, fixed errors such as seal leakage, evaporation inside the cone, and the surface film left in the tip become large relative to the delivered volume. That arithmetic is why the upper two thirds of the range is the comfortable zone.
Put together, the rule of thumb reads this way. The best pipette tip volume selection for a task is the smallest pipette whose maximum meets or exceeds the target volume, paired with the tip rated for that pipette. Everything else in this article is detail hanging on that sentence.
The Pipette and Tip Matching Table
Standard air displacement pipettes step up in classes that increase by roughly a factor of five to ten, and tip racks follow the same ladder. The table below is the core reference for a typical molecular biology lab.
| Pipette class | Typical adjustable range | Matching tip nominal volume | Comfortable working window | Typical jobs |
|---|---|---|---|---|
| P2 | 0.2 to 2 µL | 10 µL tip | 0.5 to 2 µL | qPCR master mixes, trace additives |
| P10 | 1 to 10 µL | 10 µL tip | 2 to 10 µL | Gel loading, enzyme aliquots |
| P20 | 2 to 20 µL | 20 µL tip | 5 to 20 µL | PCR component assembly, small dilutions |
| P100 | 10 to 100 µL | 100 µL tip, or 200 µL tips where the collar seals | 25 to 100 µL | Reaction setup |
| P200 | 20 to 200 µL | 200 µL tip | 50 to 200 µL | Routine transfers, plasmid work |
| P1000 | 100 to 1000 µL | 1000 µL tip | 200 to 1000 µL | Buffer exchanges, media changes |
| P5000 | 500 to 5000 µL | 5 mL tip | 1000 to 5000 µL | Media preparation, large aliquots |
| 10 mL | 1 to 10 mL | 10 mL tip | 2 to 10 mL | Bulk reagents, wash steps |
Three notes keep the table honest. Exact ranges vary by manufacturer and model, so the printed range on your instrument is the authority, not the class label. The alternative pairings in the tip column depend entirely on collar fit, which the fit test below settles in about a minute. And a 300 µL tip is a common alternative on 200 µL class pipettes where a lab standardizes on one rack format, with the same fit test as the deciding vote.
Rack colors follow loose conventions, blue for the 1000 µL class and yellow for the 200 µL class, but the printed nominal volume on the rack is the only reliable label. Multichannel pipettes follow the same ladder, and collar fit matters even more there, because one loose seat among twelve tips silently skews a single column of a plate.
The One Minute Fit Test
- Seat the tip with a firm press and a slight twist. Many models give an audible or tactile click.
- Look for an even seal line where the collar meets the cone, with no gaps.
- Aspirate water to the top of the range and hold the pipette still for a few seconds. The meniscus, the curved surface of the liquid column inside the tip, should not creep down.
- Hang the filled tip downward for five seconds. A slow drip means the seal is weeping.
- Before trusting the pair for quantitative work, run a quick gravimetric check at your most used setting.
Pipette Tip Volume Selection Options
Tip racks offer more variety than the volume ladder suggests. These are the pipette tip volume selection options you will meet at the bench, grouped by what changes inside the tip.
Standard Universal Tips
Standard tips are molded polypropylene cones with no internal features, rated to a nominal volume, and sold either as universal fit or as brand specific. Universal tips are molded with collar dimensions meant to seal on nose cones from several pipette brands. Brand specific tips are molded for one geometry and usually seal with the least play. Standard tips are the cheapest option per rack, most are autoclavable, and they are the default for aqueous buffers and nonhazardous work. Their weakness is variability, because collar tolerances differ between brands, and a tip that seals on one pipette can weep on another. Buy one brand, test it on your fleet, and stay with it.
Filtered (Aerosol Barrier) Tips
Filtered tips carry a porous hydrophobic plug, usually polyethylene, seated partway down the cone. The plug stops aerosols, the tiny airborne droplets generated when liquid is aspirated or dispensed, from reaching the pipette cone, and it stops liquid from reaching the piston seal if a tip is overdrawn. That protects both the sample and the instrument, which is why filtered tips are standard for PCR setup, RNA work, and anything involving infectious or radioactive material. The filter adds a small dead volume above the plug and slightly changes the air column, so a pipette verified with standard tips should be verified again with filtered tips before quantitative work. Cost runs higher, which is the main reason labs reserve them for applications that need the barrier.
Low Retention Tips
Low retention tips have an inner surface treatment, either a polished mold finish or a chemical coating, that reduces the film of liquid left behind after dispensing. The benefit shows up with viscous or sticky liquids, including protein solutions, detergent containing buffers, glycerol rich stocks, and concentrated DNA. With plain aqueous buffers the difference is small enough that standard tips are the better buy. One caution applies to coated versions, because some coatings can leach into sensitive downstream assays, so labs running mass spectrometry or enzyme kinetics often choose polished rather than coated low retention tips.
Specialty Geometries
Extended length tips reach the bottom of deep vessels and 96 well plates without the pipette nose cone entering the well. Wide bore tips have a larger orifice for viscous slurries and particulate suspensions that would shear or clog in a standard tip. Gel loading tips narrow to a fine point for loading polyacrylamide wells. Beveled orifices reduce dripping in dispensing work. Every geometry change alters hold up volume and flow behavior, so when a quantitative result depends on the transfer, verify the pipette with that tip geometry rather than assuming the rating transfers.
Functionalized Tips That Act as Miniature Devices
Functionalized tips pack a device into the cone. Pipette tip solid phase extraction, usually abbreviated PT-SPE, packs a sorbent, a solid material that binds target molecules as liquid passes through, into the tip so that repeated aspirate and dispense cycles extract and concentrate the analyte, the substance being measured. The format turns a hand pipette into a miniature sample preparation cartridge, and published methods now cover pesticides, vitamins, hormones, drugs of abuse, and environmental contaminants. Magnetic tips hold a small magnet that retrieves magnetic sorbent dispersed in the sample. Monolith tips are polymerized in place as a single porous block, and one published design sintered 40 mg of molecularly imprinted polymer, a polymer cast around a template molecule so its binding sites match the target analyte, into a 0.20 mL tip specifically to reduce back pressure and wall effects, both of which the authors tied directly to extraction efficiency [1].
Commercial selection can be empirical, as in a retinol method that compared nine commercial pipette tips on recovery, sample volume, solvent use, handling difficulty, duration, price, and greenness before choosing a tip containing an ion exchanger and salt [2]. Electroextraction devices have even been built to deposit analyte onto a solid support sized to fit a pipette tip [3]. For any of these devices the matching question has two layers. The collar still has to seal on your pipette or controller, and hydrophilic PT-SPE has been run with a manual pipette controller when volumes moved beyond a hand pipette's comfort zone [4]. The device capacity also sets the sample and eluent volumes, and back pressure through the bed sets how fast you can cycle, so a stiff monolith needs a slower stroke than an empty tip of the same size.
Pros and Cons of Each Tip Option
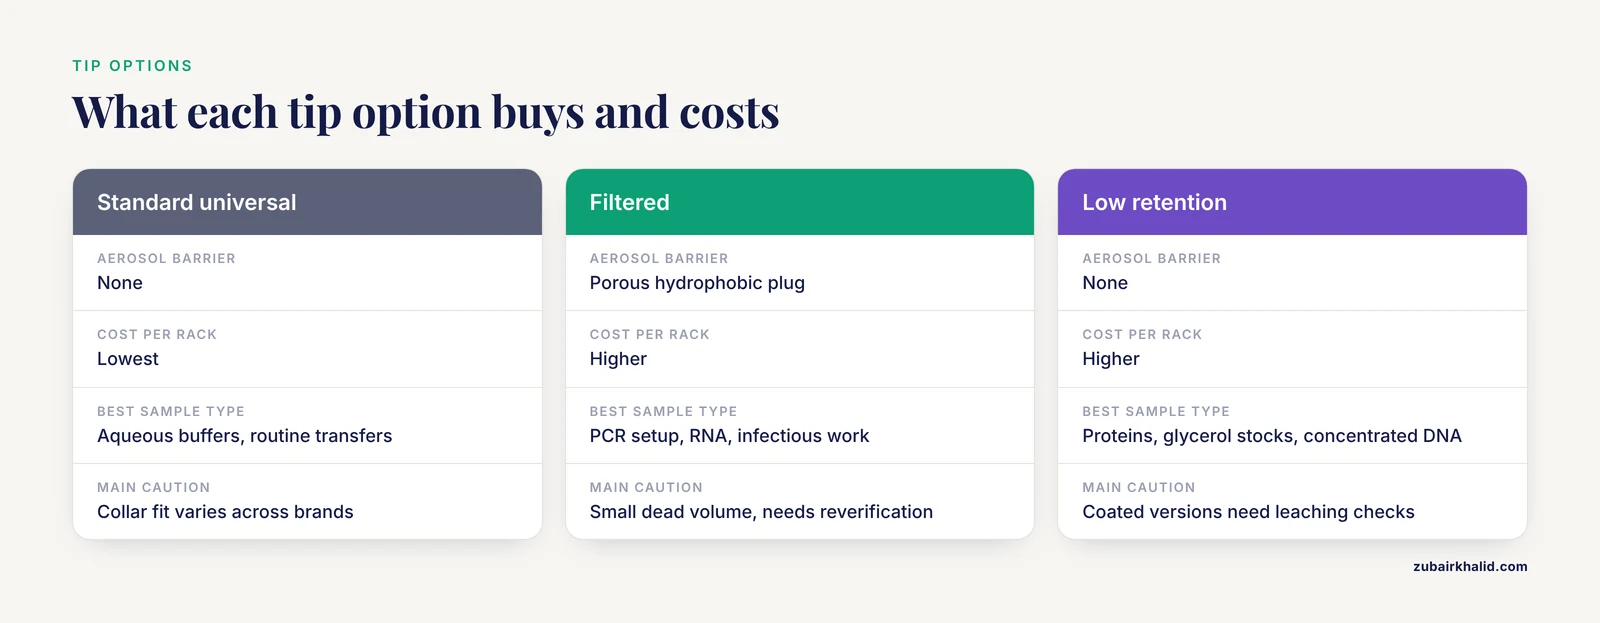
The right choice balances sample type, hazard, budget, and throughput. This table condenses the pipette tip volume selection pros and cons by tip type.
| Tip option | Pros | Cons | Best for |
|---|---|---|---|
| Standard universal | Lowest cost, widest availability, autoclavable | Collar fit varies across brands, no aerosol barrier | Aqueous buffers, routine noncritical transfers |
| Filtered | Blocks aerosols, protects sample and pipette, standard for contamination control | Higher cost, small dead volume, needs reverification with the pipette | PCR setup, RNA, infectious and radioactive work |
| Low retention | Recovers more of viscous or sticky liquids | Higher cost, little benefit with plain buffers, coated versions need leaching checks | Proteins, detergents, glycerol stocks, concentrated DNA |
| Extended, wide bore, gel loading | Reaches difficult vessels, handles particulates, fits tiny wells | Geometry changes hold up and flow, needs verification | Plate work, slurries, gel extraction |
| Functionalized (PT-SPE, magnetic, enzyme) | Combines cleanup with transfer, tiny footprint, published protocols exist | Device specific capacity and back pressure, higher cost per sample | Sample prep for HPLC, LC-MS, spectrophotometry |
Volume still comes first in every row. A filtered 200 µL tip and a standard 200 µL tip match the same P200, but they are not interchangeable for a calibrated transfer until the pipette has been verified with each.
How the Match Affects Accuracy, Precision, and Pipette Calibration
Why Mismatched Tips Cause Error
Four failure modes dominate.
Seal failure. A collar that does not seat on the seal ring lets air leak past during aspiration. The draw falls short, and the shortfall varies from stroke to stroke, which shows up as poor precision at the top of the range where the piston travels farthest.
Capacity mismatch. A tip smaller than the draw either short strokes the liquid or lets it climb into the cone. Liquid in the cone contaminates the next sample and can corrode the piston seal.
Geometry mismatch. Orifice diameter and cone taper change how liquid wets the inner wall and how cleanly the last droplet leaves. A pipette calibrated with a narrow 20 µL tip delivers slightly differently through a wide 100 µL tip even when the seal is perfect.
Calibration validity. A pipette's stated accuracy applies to the tip type used during calibration. Switching tip brand, filter type, or lot can shift delivery by an amount that matters for quantitative work, so the practical habit is to verify after any switch.
Reading the Specifications
Accuracy is how close the mean delivered volume sits to the set volume, usually stated as a percent systematic error. Precision is how tightly repeats cluster, usually stated as a percent coefficient of variation, the standard deviation divided by the mean. Near the maximum, a good air displacement pipette holds accuracy on the order of one percent or better and precision at a fraction of a percent. At the bottom of the range, the allowed error is several times larger. That gap is the arithmetic reason the upper two thirds rule exists.
Pipette Calibration and Verification Step by Step
Calibration compares the delivered volume against a reference and adjusts the instrument. Verification makes the same comparison without adjusting. Both rely on the gravimetric method, the standard approach for piston pipettes under the ISO 8655 framework.
- Equilibrate the pipette, tips, and distilled water to room temperature.
- Place a weighed vessel on a calibrated analytical balance, readable to 0.1 mg for 200 µL class work and finer for micro volumes, and tare it.
- Dispense ten or more replicates at each test point, recording the mass after each delivery.
- Convert each mass to volume using the density of water at the test temperature. Water at 20 °C has a density of about 0.99821 g/mL, so a 200 µL setting should deliver roughly 199.6 mg on the balance.
- Compute the mean, the standard deviation, and the coefficient of variation, then compare against the manufacturer's limits for that setting.
- Log the pipette, the tip type, and the tip lot on the record so the next person knows what the numbers apply to.
Frequency follows risk. A common institutional schedule verifies pipettes every three to six months, with an immediate check after any drop, after autoclaving the body where the manufacturer allows it, or whenever assay results drift. Heavy use pipettes and pipettes feeding quantitative assays sit at the short end of that window. The tip connection is the part labs skip most often. Calibrate and verify with the exact tip type and, for the tightest work, the tip lot you will use at the bench.
Pipetting Technique That Protects the Match
Even a perfect pipette tip pair fails under sloppy handling. These habits make up the core of sound pipetting technique.
Pre-wet every tip. Aspirate and dispense two or three times before the first measured transfer. A dry tip loses volume to evaporation inside the cone and to wetting of the inner wall, so the first delivery runs low, sometimes by a noticeable margin at small volumes.
Watch immersion depth. Keep the orifice just below the surface, about 2 to 3 mm for micro tips and a few millimeters deeper for 1000 µL tips. Deeper immersion adds hydrostatic pressure that pushes extra liquid into the tip and coats the outside, while shallow immersion risks drawing air at the surface.
Hold the pipette near vertical during aspiration. A steep tilt changes the effective head pressure and wets a different length of cone. The error is systematic, so it hides in your data.
Keep the stroke smooth and consistent. Press the plunger to the first stop at the same speed every time, pause about a second at full draw, then dispense at a steady rate. Viscous liquids need a slower stroke in both directions.
Dispense against the wall. Touch the tip to the inside of the vessel at a slight angle, dispense to the first stop, then press to the second stop to blow out the residual film before lifting away.
Use reverse pipetting for viscous, foaming, or volatile liquids. Press to the second stop, aspirate a slight excess, dispense only to the first stop, and leave the excess in the tip. The excess compensates for the film that would otherwise stay behind.
Never tilt a loaded tip past horizontal. Liquid running into the cone contaminates the instrument and changes the next draw.
Respect temperature. Cold liquid aspirated with a warm pipette reads low until the air column equilibrates, so let reagents and pipettes sit together when a quantitative transfer matters.
Eject with the ejector. Pressing tips off by hand stresses the seal ring and puts your fingers near the contaminated cone.
Worked Scenarios from the Bench
Choosing a Pipette for 15 µL Transfers
You need to move 15 µL per well across a plate. On a P20 the setting is 75 percent of range, comfortably inside the accurate zone. On a P100 it is 15 percent, marginal. On a P200 it is 7.5 percent, where fixed errors dominate. The answer is the P20 with 20 µL tips, pre-wetted and held vertical.
Assembling 100 µL Reactions
A recipe calls for 100 µL of buffer per tube. A P200 at 50 percent of range handles it cleanly, and a P100 at 100 percent works as well. A P1000 at 10 percent sits at the floor, where accuracy specifications end for many models. If the same recipe also adds 2 µL of enzyme, use the P20 for the enzyme and the P200 for the buffer rather than stretching one pipette across both.
Serial Dilutions Near the Top of the Range
A 1:10 dilution series moves 900 µL into 100 µL of stock. The P1000 at 90 percent of range is the ideal working point. Use 1000 µL tips, pre-wet each one, keep the rhythm identical across the series, and change tips between standards to stop carryover.
Repeated Cycling with Functionalized Tips
Tip based extraction protocols lean on repeated aspirate and dispense cycles, and each cycle stresses the collar seal. MonoTip C18 tips with a stated pipette tip volume of 200 µL were cycled 25 times with a manual micropipettor to extract methamphetamine and amphetamine from 0.1 mL of whole blood, then eluted with 5 cycles of methanol [5]. The same 200 µL tip format processed 0.5 mL urine samples under the identical scheme [6]. An enzyme reactor built inside a 200 µL commercial tip needed 40 pipette cycles to complete a deglycosylation reaction in about 8 min [7]. Before the first cycle, seat the tip with a firm press, check for wobble, and watch the first aspiration for bubbles that betray a leak.
Microsamples and Large Volume Cleanup
Volume extremes test the match hardest. At the micro end, magnetic sorbent was dispersed in 10 µL serum and urine microsamples and retrieved through a tip holding a small cubic neodymium magnet, aspirated with a (semi)automatic pipette [8]. At that scale there is no margin for a loose seal or a skipped pre-wet, so the smallest suitable pipette and tip win. At the large end, a 1000 µL tip packed with 4 mg of graphene processed 3 mL of fruit juice in 12 min using 1.5 mL of eluent [9], a case where the tip is the device and its rated volume defines what the paired pipette or controller must handle. Eluent volume can also exceed the tip rating, as in an arsenic speciation method that eluted its packed micro pipette tip with 700 µL of 0.25 M ammonia [10], so plan the receiving vessel and the pipette class for the elution step.
Common Mistakes and Limitations
- Using a 1000 µL tip on a P200 because it happens to fit. A loose collar leaks at the top of the stroke, and the wetted geometry no longer matches the calibration. Use the rated tip.
- Living below 10 to 20 percent of the range. A 15 µL transfer on a P200 sits in the zone where fixed errors dominate. Drop to a smaller pipette.
- Skipping the pre-wet. The first delivery from a dry tip runs low, and on a multichannel pipette the first column quietly differs from the rest of the plate.
- Trusting the word universal. Universal describes intent, not a guarantee. Check the manufacturer fit chart, then run the seat test on your own pipette.
- Reusing tips. Carryover, degraded seals, and bent collars all follow. Change tips between samples whenever the assay cares.
- Ignoring brand and lot changes. A pipette verified with one tip lot is not automatically verified with the next. Run a quick gravimetric check after a switch.
- Aspirating at a steep tilt out of habit. The error is systematic and biases every sample in the same direction.
- Forward pipetting viscous liquids. The film left behind can be several percent of the set volume. Reverse pipetting exists for this.
- Forgetting that functionalized tips have their own capacity and back pressure. A packed monolith needs a slower stroke than an empty tip of the same nominal size.
- Storing pipettes with tips mounted. Constant compression on the seal and any residue in the cone work against the instrument between uses. Remove tips before storage.
A written guide cannot replace hands-on training or a gravimetric check on your own instruments, so treat any new pipette tip pair as unverified until you have tested it on your bench.
Frequently Asked Questions
Can I use a larger tip than my pipette's rated maximum?
Only if the collar seals cleanly, and many pairs do not. A larger tip also changes the wetted geometry the pipette was calibrated with, so the stated accuracy no longer applies. Use the tip rated for your pipette unless a fit chart and a gravimetric check both say otherwise.
How often should a pipette be calibrated?
A common schedule is verification every three to six months, with an immediate check after any drop or suspected misuse. Pipettes in heavy daily use or feeding quantitative assays belong at the short end of that window.
Do filtered tips change the delivered volume?
They can, slightly. The filter adds a small dead volume and changes the air column inside the tip. Verify your pipette with the filtered tips you actually use before quantitative work.
How low can I go on a P1000?
Stay at or above roughly 100 µL, which is 10 percent of the range and the floor for many accuracy specifications. Below that, move to a P200 or P100 with the matching tips.
Are low retention tips worth it?
For viscous, protein rich, detergent containing, or concentrated nucleic acid samples, yes, because more of the set volume actually leaves the tip. For plain aqueous buffers, standard tips deliver the same result at a lower price.
How do I check tip fit before buying a full case?
Seat one tip on your pipette and look for an even seal line with no wobble. Fill it with water, hang it downward for a few seconds to check for weeping, then run a quick gravimetric check at your most used setting.
Sources
- A molecularly imprinted polymer based monolith pipette tip for solid-phase extraction of 2,4-dichlorophenoxyacetic acid in an aqueous sample.
- Effective, convenient, and green sample preparation for the determination of retinol and retinol acetate in human serum using pipette tip microextraction.
- Large-volume electric field-assisted multiphase extraction of malachite green from water samples: A multisample device and method validation.
- A simple liquid chromatography-high resolution mass spectrometry method for the determination of glyphosate and aminomethylphosphonic acid in human urine using cold-induced phase separation and hydrophilic pipette tip solid-phase extraction.
- Pipette tip solid-phase extraction and gas chromatography - mass spectrometry for the determination of methamphetamine and amphetamine in human whole blood.
- Simultaneous determination of methamphetamine and amphetamine in human urine using pipette tip solid-phase extraction and gas chromatography-mass spectrometry.
- A fast and convenient solid phase preparation method for releasing N-glycans from glycoproteins using trypsin- and peptide-N-glycosidase F (PNGase F)-impregnated polyacrylamide gels fabricated in a pipette tip.
- Analysis of microsamples by miniaturized magnetic-based pipette tip microextraction: determination of free cortisol in serum and urine from very low birth weight preterm newborns.
- Graphene-based pipette tip solid-phase extraction with ultra-high performance liquid chromatography and tandem mass spectrometry for the analysis of carbamate pesticide residues in fruit juice.
- Arsenic speciation in water and snow samples by adsorption onto PHEMA in a micro-pipette-tip and GFAAS detection applying large-volume injection.