Pipette O-Rings and Seals: How to Inspect, Lubricate, and Replace Them
By Dr. Zubair Khalid, DVM, MS, PhD ·

A leaking or worn pipette seal quietly corrupts volumes long before anyone notices a problem on the bench. Replacing the o-rings and seals on an air displacement pipette restores the airtight piston system that every measurement depends on, and it is one of the few pipette repairs a trained bench scientist can perform safely without service center support. This article walks through the full procedure: how the seal system works, how to inspect it, how to apply grease correctly, and how to replace worn parts and confirm the pipette still delivers accurate volumes.
Plan on roughly 20 to 30 minutes of hands-on work for a single-channel pipette, plus 10 to 15 minutes for a gravimetric verification check afterward. Add time for a full pipette calibration if the verification fails or if the pipette is due for scheduled service. The procedure applies to most common single-channel and multichannel air displacement pipettes. Positive displacement pipettes and electronic models differ in details, which are covered later in the article.
Why O-Rings and Seals Matter: The Principle
An air displacement pipette works by moving a piston inside a shaft. When the pushbutton is pressed to the first stop, the piston retracts and creates negative pressure in the air column above the tip. Released liquid pressure draws sample into the tip, and the second stop expels it. The entire system depends on an airtight boundary between the piston and the shaft wall. That boundary is formed by soft polymer parts, usually called the piston seal, the o-ring, or the shaft seal, depending on the manufacturer and the pipette model.
If that boundary degrades, air leaks past the piston during aspiration. The piston still travels its full stroke, but the pressure change in the air column no longer matches the volume the dial or electronic setting requests. The result is systematic under-delivery, usually paired with poor repeatability. On small volumes, the effect is dramatic. A 2 µL setpoint can lose a meaningful fraction of its target from a leak that would barely register at 1,000 µL.
Two separate failure modes make seal maintenance non-negotiable in any lab that cares about pipetting technique:
- Gradual wear. Elastomer parts age with every actuation cycle. The surface loses its glossy finish, takes on a flattened or compressed shape, and eventually develops visible cracks. Wear is slow and easy to miss because the pipette keeps functioning.
- Sudden contamination or damage. Corrosive vapors, crusty dried buffer, or a dropped pipette can compromise the seal in a single day.
Both failure modes end the same way. The pipette delivers the wrong volume, your quantitative PCR or nucleic acid quantification drifts, and the fault does not show up until someone runs a check or an experiment fails for no obvious reason. Routine inspection and timely pipette o-ring replacement are cheap insurance against weeks of wasted work.
There is also a documentation angle. Accredited laboratories track instrument performance, and a pipette that fails its calibration check is often traced back to a worn or dry seal. Doing this maintenance on schedule keeps pipettes inside tolerance between formal service events and reduces the frequency of out-of-tolerance findings during scheduled pipette calibration.
O-Rings, Seals, and Related Parts: What Is Actually Inside the Pipette
Terminology varies between manufacturers, so it helps to define the parts precisely before you start handling them.
Piston seal. A shaped polymer component, often with a lip or cup profile, fitted directly around the piston head. It is the primary barrier against air escaping around the piston. In some designs it is a soft sleeve, in others a machined collar with an embedded sealing face.
O-ring. A toroidal (doughnut-shaped) elastomer ring seated in a groove, most often on the piston shaft or inside the nose cone assembly. It provides secondary sealing and, in many designs, keeps the piston centered so it does not scrape the shaft wall. Small-volume pipettes commonly rely on one or more very small o-rings that are easy to overlook during cleaning.
Shaft seal or nose cone seal. A gasket that seals the joint between the shaft assembly and the body or between the shaft and the tip cone. It prevents liquid that enters the cone area from wicking into the internal mechanism and prevents aerosols from reaching the piston.
Lubrication film. Not a part but functionally essential. A thin, chemically compatible silicone grease film on the piston and seal surfaces reduces friction, prevents the elastomer from sticking or chafing, and helps the seal maintain contact under pressure.
Most manufacturers sell these parts as model-specific service kits that include the correct seals, o-rings, and a small tube of approved grease. Always order by exact pipette model. Seals from one model family rarely fit another, and an incorrect part is one of the most common causes of a pipette that gets worse after home maintenance.
When to Inspect, Lubricate, and Replace
Three schedules govern this work.
Routine inspection should happen whenever the pipette is cleaned and decontaminated. For a pipette in daily use, that typically means every few weeks. The inspection takes about two minutes once you know what to look for.
Lubrication follows the interval stated in the manufacturer's manual. Most manufacturers express it either as a number of actuation cycles or as a time interval, and a pipette in heavy daily use generally needs grease attention more often than a lightly used one. The manual for your specific model is the authority here. If the manual is unavailable, a reasonable bench practice is to clean and re-grease the piston at every major decontamination and to watch for the performance signs below.
Replacement is condition-based. Replace an o-ring or seal when inspection shows damage, or when performance testing shows a leak or repeatability problem you cannot otherwise explain. Signs that point directly at the seal system include:
- The liquid level in the tip visibly rises or falls while the tip is held stationary after aspiration.
- Aspiration feels slower or "mushy," with air bubbles drawn into the tip.
- Volume delivery is consistently low, especially at the low end of the pipette's range.
- The piston motion feels gritty, jerky, or requires more force than usual.
- The pipette fails a gravimetric check with large standard deviations across replicate dispenses.
- You see dried liquid residue or corrosion inside the shaft when the nose cone is removed.
Any one of these justifies opening the pipette. Two or more make the diagnosis almost certain.
Materials and Reagents
| Item | Specification or Working Concentration | Notes |
|---|---|---|
| Manufacturer service kit | Correct for exact pipette model | Includes o-rings, seals, and approved grease |
| Silicone grease | Manufacturer-supplied or explicitly manufacturer-approved | Never substitute petroleum-based or generic greases |
| Ethanol | 70% (v/v) in water | For cleaning piston, shaft interior, and external surfaces |
| Lint-free wipes | Low-lint, non-abrasive | Cotton swabs can leave fibers that abrade the seal |
| Fine-tip forceps | Plastic-tipped preferred | Metal tips can nick soft elastomer parts |
| Nitrile gloves | Clean pair for the disassembly itself | Skin oils interfere with grease and sealing |
| Pipette stand or holder | Stable, prevents rolling during disassembly | Protects the exposed piston from knocks |
| Analytical balance and beaker | Readable to 0.1 mg for small volumes | Used for post-repair verification with deionized water |
| Soft plastic pick or wooden applicator | Blunt | For lifting old o-rings without scratching the groove |
| Small container or parts tray | Labeled | Seals and springs are tiny and easy to lose |
Safety note. Wear gloves and eye protection during disassembly. Some internal mechanisms contain a compressed spring that can eject small parts when the nose cone or button assembly is released, and flying metal parts are a real hazard. Work over a bench pad rather than a hard floor. 70% ethanol is flammable, so keep it away from open flames and use it in a ventilated space. If the pipette has been used with infectious, toxic, or radioactive materials, decontaminate it fully before opening it, and follow your institution's biosafety procedures for the waste.
Pipette O-Ring Replacement Step by Step
The sequence below reflects the standard disassembly approach used across the major air displacement pipette families. Exact latching mechanisms differ between brands, so keep the manufacturer's service manual open for the model-specific steps, especially anything involving the ejector arm or the internal spring. The reasoning for each critical step is stated alongside the action.
- Empty, unload, and prepare the pipette. Set the volume to the maximum setting, eject the tip, and confirm the pipette is visually clean outside. Setting the volume to maximum (or to the storage position if the manual specifies one) unloads spring tension on the volume adjustment mechanism, which protects the internal gears during handling.
- Decontaminate the exterior. Wipe the whole pipette with 70% ethanol and let it dry. This step keeps contaminants out of the internal mechanism you are about to open, which matters most if the pipette has been used near cell culture or nucleic acid work.
- Remove the tip cone or nose cone. Most manual pipettes have a nose cone secured by a retaining ring or a bayonet-style latch. Follow the manual for your model. If resistance is high, do not force it. Some designs require the ejector to be pressed or partially removed first. Forcing a latched assembly is the leading cause of cracked shaft housings during home service.
- Partially withdraw the piston. Follow the manual's instructions for freeing the piston from the drive mechanism. On many models this means pressing the ejector or removing the piston-spring assembly so the piston shaft can be drawn out partway. Grip the piston by its metal body, never by the polished shaft surface.
- Inspect the exposed piston and seals before removing anything. Photograph or note the position and orientation of every seal and o-ring. This record makes reassembly unambiguous and lets you compare old and new parts. Look for the wear signs described in the inspection section below.
- Remove the old o-ring and seals. Use a blunt plastic pick or the edge of a gloved fingernail to lift the o-ring out of its groove. Work slowly. A stretched or torn old o-ring can leave fragments in the groove, and even a thin sliver will prevent the new seal from seating flush. Remove piston lip seals by sliding them off the piston, noting which face pointed toward the tip.
- Clean the piston, groove, and shaft interior. Moisten a lint-free wipe with 70% ethanol and wipe the piston shaft from the tip end toward the body, in one direction, turning the piston as you go. Clean the o-ring groove and the inside of the shaft with a fresh wipe or a lint-free swab. Dry everything completely. Reason: grease performs properly only on a clean, dry, undamaged surface, and any residue left in the groove will be trapped under the new o-ring and create a leak path.
- Inspect the piston surface. Hold the piston to the light and rotate it. The polished shaft should look uniformly smooth and bright. Any scoring, pitting, or discoloration means the piston itself is damaged, and greasing or re-sealing will not fix it. Report a scored piston to your service provider, because a damaged piston typically requires professional replacement rather than bench repair.
- Compare the old and new seals. Confirm the new parts match the old ones in diameter, cross-section, and profile. Even subtle differences indicate the wrong kit, and installing it will undo all the work that follows.
- Lubricate the piston. Apply a small quantity of the approved silicone grease to a clean gloved fingertip or a lint-free wipe and coat the piston shaft with a thin, even film. Then wipe most of it off with a fresh section of wipe. Reason: the correct film is nearly invisible. It should make the surface look wet, not build up in ridges. Excess grease collects at the shaft end, gets pushed into the tip cone, and then contaminates your samples or interferes with tip sealing. Details on grease selection and quantity follow in the lubrication section.
- Lightly lubricate the new o-ring or seal. Place the new o-ring in its groove, or slide the new piston seal onto the piston in the same orientation as the old one. Run a grease-film fingertip over the sealing surface. Do not stretch an o-ring over sharp edges. If the installation path passes a corner or thread, cover the edge with a wiped-on smear of grease or use a blunt guide so the elastomer slides rather than snags.
- Reassemble in reverse order. Seat the piston back into the shaft, reattach the nose cone, and refit any retaining rings or ejector parts exactly as recorded in your step 5 notes. Tighten retaining rings firmly by hand but do not apply tools beyond what the manual specifies. Over-tightening distorts the nose cone and can pinch the very seal you just replaced.
- Cycle the pipette before testing. Press the pushbutton through its full stroke, first stop to second stop, ten to twenty times with no tip attached. Reason: this distributes the grease film evenly and lets the new seal settle into its working position before you evaluate performance. New or freshly greased seals often feel stiff for the first few cycles, which is normal. Persistent stiffness after twenty cycles means too much grease or a mis-seated part.
- Perform a verification check. Run a gravimetric check with deionized water on an analytical balance, described in detail below. If the pipette meets its accuracy and precision expectations, return it to service and note the maintenance in your instrument log. If it fails, move to the troubleshooting table.
Lubrication Done Right: Grease Type, Quantity, and Coverage
Lubrication errors cause more post-maintenance problems than installation errors do. Three rules cover nearly every situation.
Use only the grease the manufacturer supplies or explicitly approves. The elastomers and plastics inside a pipette are chosen for compatibility with specific silicone formulations. Petroleum-based grease, silicone household lubricant sprays, and generic laboratory greases can swell or degrade the seal material, and a swollen o-ring binds the piston within days. If your service kit includes a grease tube, use only that tube for that pipette family.
Apply a thin, uniform film, then remove the excess. The correct end state is a polished shaft that looks slightly glossy. Grease should never be visible as a ridge, a blob, or a ring at the shaft end. A practical method is to apply a rice-grain-sized amount to a wipe, wipe it along the shaft, then wipe the shaft again with a clean section of the same wipe. For the o-ring itself, a fingertip-thin smear over the sealing surface is enough. The seal needs lubrication to slide and maintain contact, not a reservoir.
Keep grease off the tip cone and out of the sample path. The lower shaft, the tip cone exterior, and the tip sealing surfaces should stay dry and clean. Grease in these areas causes tips to seat inconsistently, which produces its own accuracy and precision errors that are easy to mistake for a seal problem. After lubricating, wipe the exterior of the tip cone with a clean, dry, grease-free wipe before reassembly.
Frequency follows your manufacturer's schedule, which is usually expressed in cycles or months. Two situations override the schedule. Re-grease immediately if the piston was cleaned with solvent or if the pipette sat unused for an extended period, because lubricant migrates and dries during storage. And re-grease any time you replace a seal, since the new elastomer needs its initial film.
Inspection Criteria: What a Good Seal Looks Like
When the piston and seals are exposed, evaluate each part against this checklist.
A healthy o-ring is round in cross-section, uniformly glossy, and elastic. Press it gently with a gloved fingertip and release. It should spring back immediately. A flat spot, a permanent set where the ring no longer springs back, or a shiny but flattened profile means the elastomer has compressed beyond recovery.
Reject any seal with visible cracks, cuts, or chunking. Cracks usually start on the inner sealing face and can be hard to see without rotating the ring under good light. A magnifying loupe helps at this step and costs almost nothing.
Reject any part that feels stiff or takes a crease when you flex it gently. Aged elastomer loses its suppleness. This happens with storage age and with heat, which is one reason pipettes should never be stored near heat sources or sterilized by methods the manufacturer has not approved.
Look at the groove and seat, not just the ring. Corrosion, dried salt crust, or a scratched groove will defeat a brand-new o-ring. Clean and, if needed, address corrosion before reassembly.
Check the piston for shine and straightness. A hazy, gray, or pitted piston surface indicates lubrication failure or corrosion, and it will destroy the next seal quickly. Any scoring calls for professional evaluation.
Photograph worn parts when you find them. A record of what failure looks like on your own pipette fleet makes it much easier to train new lab members on inspection, and it documents the maintenance history if a calibration certificate later flags an issue.
Verifying Performance After Pipette O-Ring Replacement
Never return a serviced pipette to the bench on faith alone. A simple gravimetric check with water takes fifteen minutes and catches most reassembly errors.
The principle is straightforward. Deionized water has a well-characterized density at a known temperature, so the mass of a dispensed volume, read on an analytical balance, converts directly to volume. Dispense onto the balance, record the mass, convert mass to volume using the water density at your room temperature (approximately 0.998 g/µL near 20 °C, though your calibration provider will use the exact density value for the measured temperature), and compare against the set volume.
A practical bench-level protocol:
- Place a small beaker or weighing vessel on an analytical balance and tare it.
- Pre-rinse the tip by aspirating and dispensing the test volume three to five times to condition the air column and wet the tip interior.
- Dispense one full test volume into the vessel using consistent pipetting technique, touch off against the vessel wall, and record the reading.
- Return to tare and repeat for at least ten replicate dispenses.
- Calculate the mean and the standard deviation of the ten volumes.
Compare against the pipette's specification. Manufacturers state accuracy (systematic error, as a percentage of the set volume) and precision (random error, as a percentage or coefficient of variation) for each model and volume range. A pipette within specification can go back to work. A pipette with a good mean but a large standard deviation suggests an intermittent leak or an unstable seal seat, and a pipette outside its accuracy tolerance after successful reassembly needs formal pipette calibration by a qualified service, not further home adjustment.
Test at more than one volume when time allows. A leak that is subtle at 1,000 µL may be obvious at 100 µL. Testing near the bottom of the pipette's range gives the most sensitive detection of seal problems, and testing near the top confirms full-stroke function.
Log the result. Even an informal bench record with the date, the part replaced, the test volume, and the mean and standard deviation builds a useful performance history for each pipette.
Troubleshooting After Service
| Symptom | Likely Cause | Fix |
|---|---|---|
| Volumes read low and repeatability is poor | New o-ring not fully seated in its groove | Disassemble, reseat the o-ring flush, reassemble, re-test |
| Piston feels gritty or jerky | Insufficient grease, or grit trapped under the seal | Clean everything again, re-grease with a proper thin film |
| Piston binds or will not complete its stroke | Excess grease, wrong grease type, or swollen o-ring | Strip all grease, verify correct part and grease, repeat the procedure |
| Air bubbles enter the tip on aspiration | Grease on the tip cone, or a damaged tip cone seal | Clean the tip cone thoroughly, inspect and replace the cone seal if worn |
| Liquid rises in the tip while holding | Leak past piston or damaged shaft seal | Recheck seal orientation and groove cleanliness, inspect for a torn seal |
| Large standard deviations on the balance check | Loose nose cone, mis-seated seal, or intermittent leak | Confirm all retaining rings are tightened per manual, reseat seals, re-test |
| Pipette drips when held vertically with liquid in tip | Liquid has entered the shaft, or the seal failed during use | Disassemble fully, clean, dry, replace seals, then test before use |
| Accuracy good but stiffness persists after cycling | Too much grease on the piston | Wipe the shaft down and re-apply a minimal film |
If two rounds of correction do not resolve the problem, stop. Repeated disassembly risks damaging the piston and the drive mechanism, and at that point the pipette belongs with the manufacturer's service center or your calibration provider.
Variations Across Pipette Types
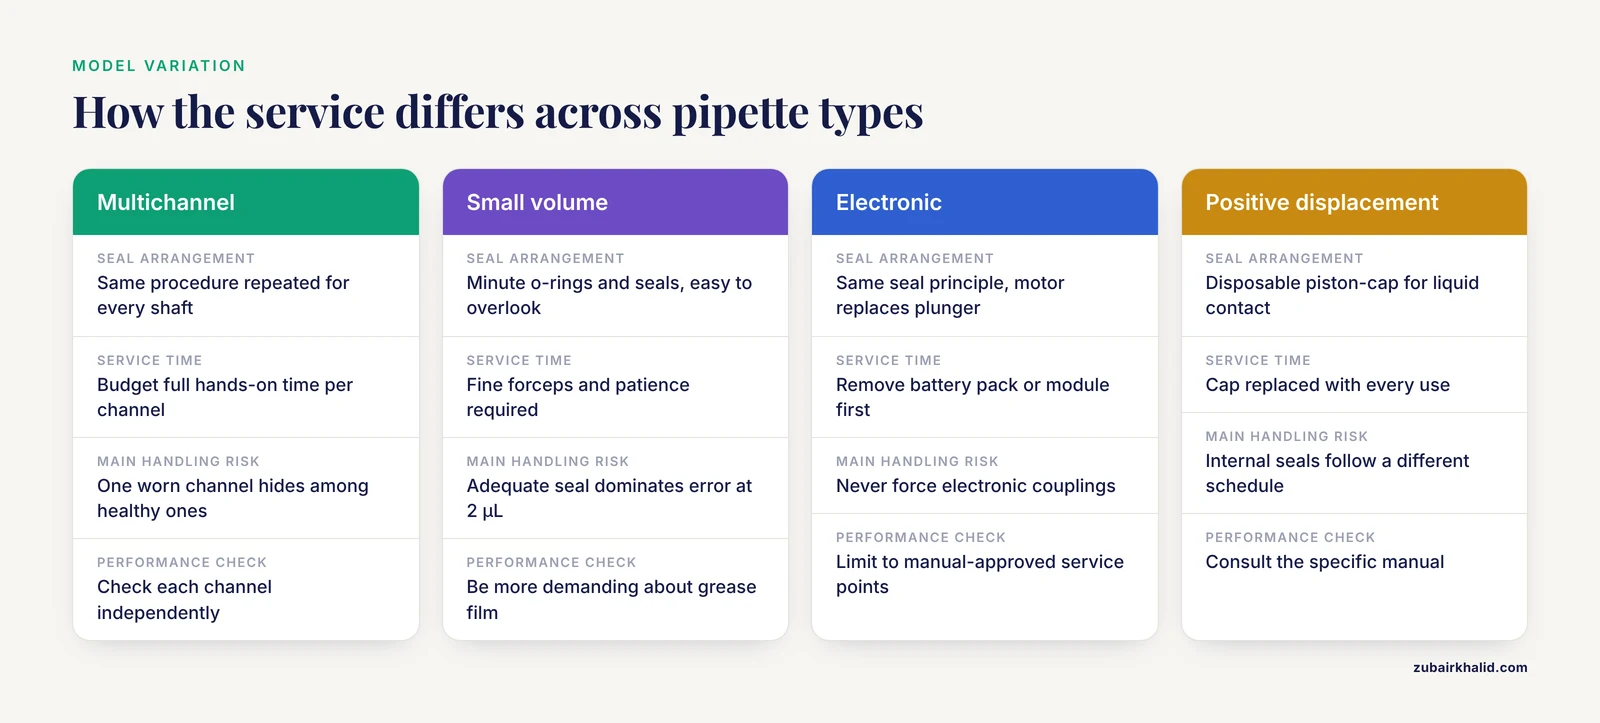
Multichannel pipettes. The procedure is identical per channel, repeated for every shaft. Budget the full hands-on time per channel, not per pipette, and work systematically from channel one to the last so nothing is missed. Multichannel shafts are the most common place where one worn channel hides among seven healthy ones, which is why each channel should be performance-checked independently when a multichannel pipette misbehaves.
Small-volume pipettes (2 µL and 10 µL class). The o-rings and seals are minute, handling them demands fine forceps and patience, and their performance ceiling is low. A seal that is merely adequate at 200 µL can dominate the error budget at 2 µL. Be more demanding about surface finish and grease film on small-volume instruments.
Electronic pipettes. The motor and encoder replace the manual plunger, but the seal system is the same principle. Disassembly usually involves removing a battery pack or electronic module first. Follow the manual strictly, never force electronic couplings, and if the manual reserves internal service for authorized technicians, limit yourself to the exterior cleaning, tip cone inspection, and lubrication points the manual allows.
Positive displacement pipettes. These use a disposable piston-cap that physically displaces liquid, so they tolerate viscous and volatile liquids that defeat air displacement designs. The cap is replaced with every use, and internal seal maintenance follows a different schedule. Consult the specific manual rather than general air displacement guidance.
Storage and Stability Notes
Grease has a shelf life and a working life. Tubes of manufacturer grease should be capped tightly and stored at room temperature, away from direct sunlight. Discard a tube that has dried out, separated, or picked up dust and lint, because contaminated grease carries particles directly into the piston bore.
Assembled pipettes should be stored mounted vertically on a pipette stand, set to their maximum volume or the storage position the manual specifies, which relieves spring tension on the internal mechanism. Never store a pipette lying on the bench where liquid in the shaft can run into the housing, and never store it with a tip attached.
A pipette that will be idle for months still benefits from a brief check before its next use. Cycle the plunger a few times. If the action feels dry or sticky, clean and re-grease before trusting the instrument, since lubricant migrates during storage even with no use at all.
Common Mistakes and Limitations
These are the errors that most often turn a straightforward maintenance job into a service center visit or a failed experiment.
Using the wrong grease or too much of it. Petroleum products and household silicone sprays degrade seal elastomers, and heavy grease application fouls the tip cone and migrate into samples. Thin film, correct grease, every time.
Touching the piston or sealing surfaces with bare fingers. Skin oils and salts create micro-roughness that accelerates wear and can corrode some piston coatings. Clean gloves, changed before the reassembly phase, are part of the procedure, not a formality.
Replacing the o-ring but not cleaning the groove. A perfect new seal seated on old grease, lint, or a fragment of the previous ring will leak. The cleaning step exists because the groove, not just the ring, is part of the seal.
Skipping the verification check. Reassembly errors are common and invisible from the outside. The gravimetric check is the only way to confirm the work, and skipping it means the next experiment is the test.
Replacing seals without checking the piston. A scored or corroded piston will chew through a new seal in weeks. Inspect the piston every time and route damaged pistons to professional service.
Assuming calibration survives the repair. Piston stroke settings and volume adjustment can drift during disassembly on some models, and manufacturers may void the calibration certificate when non-authorized service occurs. If your lab operates under a documented calibration program, record the maintenance and schedule a formal pipette calibration check if your quality system requires it after any internal service.
Force-tightening retaining rings and nose cones. Overtightening deforms the housing, pinches seals, and cracks plastic parts. Hand-tight per the manual is the standard.
Ignoring the limits of home service. Piston replacement, motor repairs on electronic pipettes, and recalibration require manufacturer tooling and certified reference procedures. Know where the boundary is for your model and respect it.
One general limitation applies to all of this. The acceptable accuracy and precision tolerances, the lubrication intervals, and the approved grease are defined by the manufacturer for each pipette model, and individual instruments can behave differently depending on age and usage history. When a pipette's performance matters to a specific result, verify that specific pipette and consult the manufacturer's documentation for that model.
Frequently Asked Questions
How often should a pipette o-ring be replaced?
Replace an o-ring whenever inspection shows wear, cracking, flattening, or loss of elasticity, or whenever performance testing reveals a leak you cannot otherwise explain. For frequency guidance between inspections, follow the lubrication and service interval in your pipette's manual, since it varies by model and usage intensity.
Can I use regular silicone grease on my pipette piston?
No. Use only the grease supplied by the manufacturer or explicitly approved for your pipette model in the manual. Household silicone lubricants and generic laboratory greases can contain additives that swell or degrade the seal elastomer, and the wrong viscosity changes the piston's feel and stroke dynamics.
Why is my pipette still inaccurate after replacing the o-ring?
The most common causes are an o-ring that is not fully seated, residue left in the seal groove, grease on the tip cone interfering with tip seating, a damaged piston that needs professional replacement, or a volume adjustment that drifted during disassembly. Work through the troubleshooting table, and if two attempts do not fix it, send the pipette for formal calibration and service.
How much grease should I apply to a pipette piston?
A thin, nearly invisible film, wiped down so no ridges or blobs remain. Apply a small amount along the shaft with a lint-free wipe, then wipe again with a clean section. Lightly coat the new o-ring's sealing surface as well. Grease should never be visible as a buildup, and none of it should reach the tip cone.
Do all pipettes have o-rings?
Nearly all air displacement pipettes use some combination of piston seals, o-rings, and shaft seals, but the specific arrangement varies by manufacturer and model. Positive displacement pipettes rely on disposable piston caps instead of an internal seal for the liquid contact, though they still have internal sealing parts with their own maintenance needs.
Can I autoclave a pipette with the o-rings installed?
Only if the manufacturer states that the model is autoclavable and gives the exact conditions, such as temperature, duration, and whether the pipette must be partially disassembled first. Some elastomers and grease films degrade at autoclave temperatures, so steam sterilization without checking the manual can ruin the seal system you are trying to protect.
How do I know if the seal is the problem or if the pipette needs calibration?
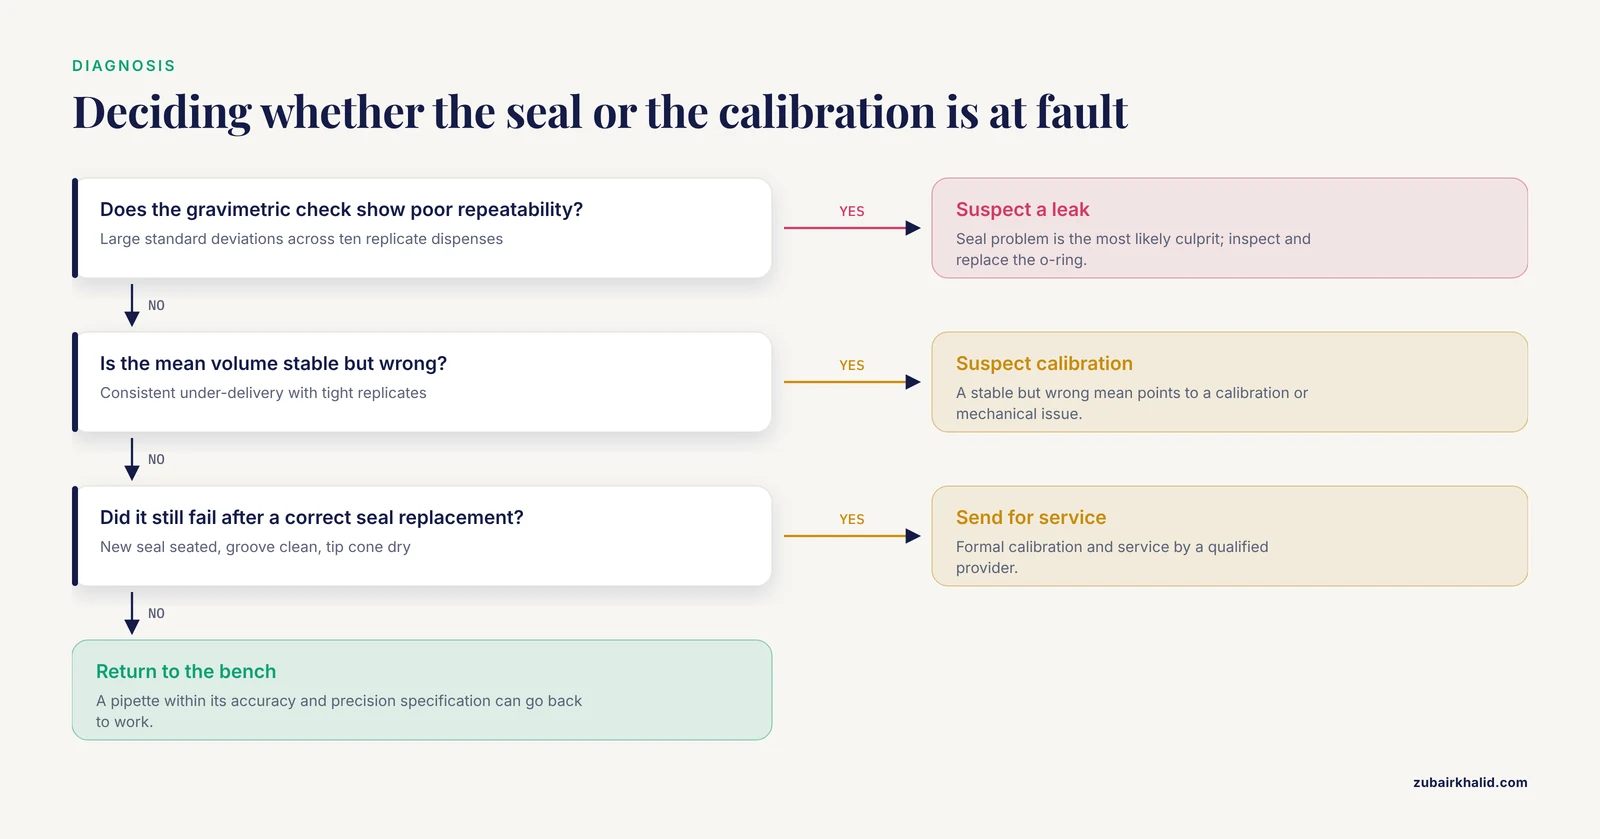
Run a gravimetric water check. Consistent under-delivery with poor repeatability points toward a leak, and a seal problem is the most likely culprit. A stable but wrong mean volume, or a pipette that fails even after successful seal replacement, points toward a calibration or mechanical issue that requires professional service.
What happens if I never lubricate or replace the seals?
Seal wear progresses silently from slight under-delivery to obvious leaks, and the first sign is often a failed experiment or an out-of-tolerance calibration finding that invalidates data. In the worst case, a completely failed seal lets liquid enter the shaft, which corrodes the piston and can turn a seal kit into a full piston replacement. Regular inspection is minutes of work against weeks of troubleshooting.