Pipette Calibration Kits and Equipment: What You Need to Get Started
By Dr. Zubair Khalid, DVM, MS, PhD ·

A pipette calibration kit verifies how much liquid your pipette actually delivers, while the surrounding equipment (an analytical balance, calibrated thermometers, and service tools) lets you document, adjust, and maintain that performance. A simple rule of thumb for choosing: if you need traceable certificates or regulatory compliance, budget for an accredited calibration service plus a basic in-house gravimetric kit for interim checks, if you need fast routine verification of many pipettes, a gravimetric kit with a good balance is the best pipette calibration kit for most labs, and if you pipette very small volumes or want to eliminate balance reading error entirely, a photometric kit is worth the higher price.
This article explains what pipette calibration means, walks through each pipette calibration kit option with its pros and cons, compares the options on the criteria that actually decide a purchase, and covers the pipetting technique habits that keep a calibrated pipette accurate between checks.
What Pipette Calibration Actually Means
Pipette calibration is the process of measuring the volume a pipette truly delivers and comparing it against the volume you set on the display. Two independent properties describe the result:
- Accuracy (systematic error). How close the mean delivered volume is to the set volume. A pipette set to 100 µL that delivers 101.5 µL on average has a positive bias of 1.5 percent.
- Precision (random error). How tightly repeated deliveries cluster around their own mean. A pipette that delivers 98.2, 104.1, 100.9, and 97.4 µL is imprecise even if it averages close to 100 µL.
Calibration is distinct from adjustment. Calibration only measures. Adjustment changes the pipette (usually through a span nut or volume adjustment mechanism) so it delivers the set volume, and calibration is then repeated to confirm the result. Accredited services report both an as-found reading (the state you sent it in) and an as-left reading (the state it came back in). The as-found value matters because it tells you how wrong your recent data may have been.
Calibration standards for piston-operated volumetric apparatus, most prominently the ISO 8655 family, define the test method, the number of measurements, and the maximum permissible error limits that a pipette must meet at set points typically spanning 10, 50, and 100 percent of nominal volume. Manufacturer documentation for any adjustable air-displacement pipette lists model-specific accuracy and precision limits at each volume, and those limits are the practical pass or fail criteria for your in-house checks.
Why Calibration Deserves the Effort
Every quantitative molecular biology workflow that involves serial dilution or volume transfer is only as good as its volume transfers. The clearest published illustration comes from quantitative PCR (qPCR), where a standard curve built from serial dilutions of a DNA standard anchors every unknown sample's calculated concentration.
Grgicak and colleagues investigated the reproducibility of qPCR results generated with the Quantifiler Duo DNA quantification kit and found that cycle threshold (Ct) variation between assays was larger than the variation of the internal PCR control. When they traced the source of the variability, they modeled how pipette errors propagate through a dilution series and concluded that a more rigorous approach to external calibration curve production is required, and that curve stability improves when pipette conditions are carefully chosen or a single validated curve is used as the calibrator [1]. In plain terms, the dilution series itself, made by a human with pipettes, was a bigger source of run-to-run variability than the PCR chemistry.
Serial dilution is the worst case for an inaccurate pipette because the error compounds. A 2 percent over-delivery at every tenfold dilution step shifts the apparent standard curve slope, which then systematically skews every quantification that depends on it. This is exactly the problem that motivated an alternative approach: Xu and colleagues developed a single-tube quantitative PCR method that uses an internal quantitative standard co-amplified with the target, eliminating the calibration curve entirely and with it, in their words, the pipette errors that serial dilutions propagate through traditional quantification workflows [2]. Their method achieved R² values of 0.9951 for plasmid samples, 0.9889 for serum standards, and 0.9727 for clinical samples, with slopes close to the ideal value of 1 [2].
The lesson for anyone setting up a bench is straightforward. You can design around pipette error with clever assay design, or you can control pipette error directly with calibrated equipment and sound pipetting technique. Most labs need to do both, because most workflows cannot escape dilution series.
The Core Equipment: Pipette Calibration Kit Options Compared
There are four main routes to a verified pipette, each with different equipment needs. The table below is the core of this article, and the sections that follow explain each row in detail.
| Option | What you buy | Measures | Best for | Key pros | Key cons |
|---|---|---|---|---|---|
| In-house gravimetric kit | Analytical or precision balance, evaporation trap, weigh vessels, thermometer, hygrometer or barometer, log sheets or software | True mass of delivered water, converted to volume | Routine scheduled checks of any pipette, any volume range the balance supports | Full control, lowest long-run cost, works for every pipette type, detects precision problems directly | Needs a suitable balance (readability roughly tenfold finer than the smallest volume tested), operator training, environment control |
| Photometric calibration kit | Dual-dye or dual-wavelength photometric system with certified test solutions and reader | Absorbance ratio of two dyes, converted to delivered volume | Sub-microliter and low-volume pipettes, high-throughput checks, labs without a good balance | Fast, minimizes evaporation error at small volumes, independent of balance quality | Expensive consumable reagents, dye chemistry must suit the volume range, less transparent than weighing |
| Pipette service and depot calibration | Shipping container, service contract | Same gravimetric or photometric tests performed externally | Annual certified calibration, regulated environments, adjustment and repair | Traceable certificate, as-found and as-left data, professional adjustment | Cost per unit, turnaround time, shipping risk, no visibility into day-to-day drift |
| Adjustment and repair toolset | Brand-specific span nut tools, seal and O-ring kits, piston tools, calibration software templates | Not a measurement tool, enables adjustment after calibration | Labs that service their own pipettes between certified calibrations | Restores accuracy in-house, cheap per pipette, keeps pipettes in service | Does not verify anything by itself, brand-specific, warranty concerns, risk of damage without training |
In-House Gravimetric Calibration Kits
Gravimetric calibration is the reference method. You dispense distilled water into a vessel on a balance, record the mass, and convert mass to volume using the density of water at the measured temperature, with corrections for air buoyancy. This is the method specified in ISO 8655 and the method underlying essentially every calibration certificate.
What a complete gravimetric setup contains:
- A balance with adequate readability. Readability should be roughly an order of magnitude finer than the smallest mass you intend to measure. A 1 µL water delivery weighs about 1 mg, so verifying 1 µL deliveries reasonably requires a balance reading to 1 µg (0.001 mg). A 100 µL delivery weighs about 100 mg, which a 0.1 mg readability balance handles adequately. Match the balance to your smallest pipette.
- An evaporation trap or anti-evaporation chamber. Small deliveries evaporate while you weigh them. A covered vessel with a small access port, and where practical a weighting-well design, keeps the loss small and repeatable.
- Weigh vessels or a calibrated weighing well. Glass or metal vessels with enough capacity to catch repeated deliveries without refilling between measurements.
- A thermometer for the water or the room. Water density changes with temperature, roughly 0.2 to 0.3 percent per degree Celsius near room temperature, so the conversion from mass to volume needs the temperature.
- A barometer and hygrometer, or local data. Air buoyancy correction depends on air density, which depends on pressure, temperature, and humidity.
- Calibration software or a spreadsheet. The software applies the Z factor (the mass-to-volume conversion factor that folds in density and buoyancy), computes mean, standard deviation, and coefficient of variation, and compares results against the manufacturer's error limits.
- A log system and labels. Date, operator, pipette serial number, tip lot, test volumes, and results.
Pros. Gravimetric testing is universally applicable, transparent, and traceable to the balance's calibration. It measures what you actually care about, delivered volume, and repeated measurements expose both bias and imprecision. Once the balance and accessories are bought, the marginal cost per check is nearly zero, which makes frequent interim verification practical. This combination is why gravimetric kits are usually the best pipette calibration kit choice as the backbone of a lab's own program.
Cons. The equipment investment is front-loaded and the balance is the bottleneck. If the balance itself is out of calibration or placed on an unstable bench near an air vent, the results are worse than no results. Small volumes are the weak point, because evaporation, static, and balance readability all bite hardest below roughly 10 µL. Finally, an untrained operator adds measurement noise on top of pipette noise.
Photometric Calibration Kits
Photometric systems solve the small-volume problem differently. Instead of weighing, you dispense a test solution into a reader and the instrument measures the ratio of absorbance at two wavelengths for two dyes with different spectral properties. Because one dye dilutes with the delivered volume while the reference dye does not, the ratio reports the delivered volume independently of the total liquid in the well. This design suppresses evaporation error and does not depend on balance quality.
Pros. Photometric checks are fast, well suited to volumes in the sub-microliter to low-microliter range, and practical for screening a bench full of pipettes in a single session. The dual-dye design tolerates conditions that would wreck a gravimetric reading at 1 µL.
Cons. The reader and certified reagents cost more than a weighing setup's consumables, reagents have shelf lives, and the chemistry has volume-range limits printed by the manufacturer. Results are less transparent than a mass measurement, so traceability rests on the reagent and instrument certification. Photometric kits complement rather than replace a gravimetric setup in most labs, though a small lab working exclusively at low volumes can run on photometry alone.
Calibration Services: Depot and On-Site
A calibration service performs the gravimetric or photometric test for you, adjusts the pipette if needed, and issues a certificate. ISO 17025-accredited services, meaning laboratories assessed for technical competence under the international standard for testing and calibration laboratories, provide measurement traceability that auditors and regulators recognize.
Pros. You get a defensible document, professional adjustment with as-found and as-left values, and repair of worn seals and pistons discovered during service. For labs operating under GLP, GMP, ISO 15189, or CLIA frameworks, annual certified calibration of each pipette is the standard baseline.
Cons. Services cost more per pipette per year than running your own interim checks, turnaround removes pipettes from the bench, and a once-a-year certificate tells you nothing about drift in month eight. The practical model used by most well-run labs pairs the two: certified annual service plus in-house gravimetric or photometric checks at shorter intervals.
Adjustment and Repair Toolsets
Once calibration reveals a bias, you have three choices, send the pipette out, live with it, or fix it yourself. An adjustment toolset for your pipette brand typically includes span nut wrenches or adjustment tools, shaft and seal removal tools, spare seals and O-rings, and sometimes a piston replacement kit. These are brand and model specific, so buy for the models you actually own.
Pros. Adjusting a drifting pipette in-house takes minutes once trained, keeps pipettes in service, and dramatically reduces the number sent for external service.
Cons. Adjustment tools verify nothing. They are the "fix" half of calibrate-and-fix, and they belong only alongside a measurement method. Opening a pipette with the wrong tool or without training can damage the piston or seal, and doing it yourself may affect warranty terms. Check the warranty before your first adjustment.
Choosing the Best Pipette Calibration Kit: Criteria That Decide the Purchase
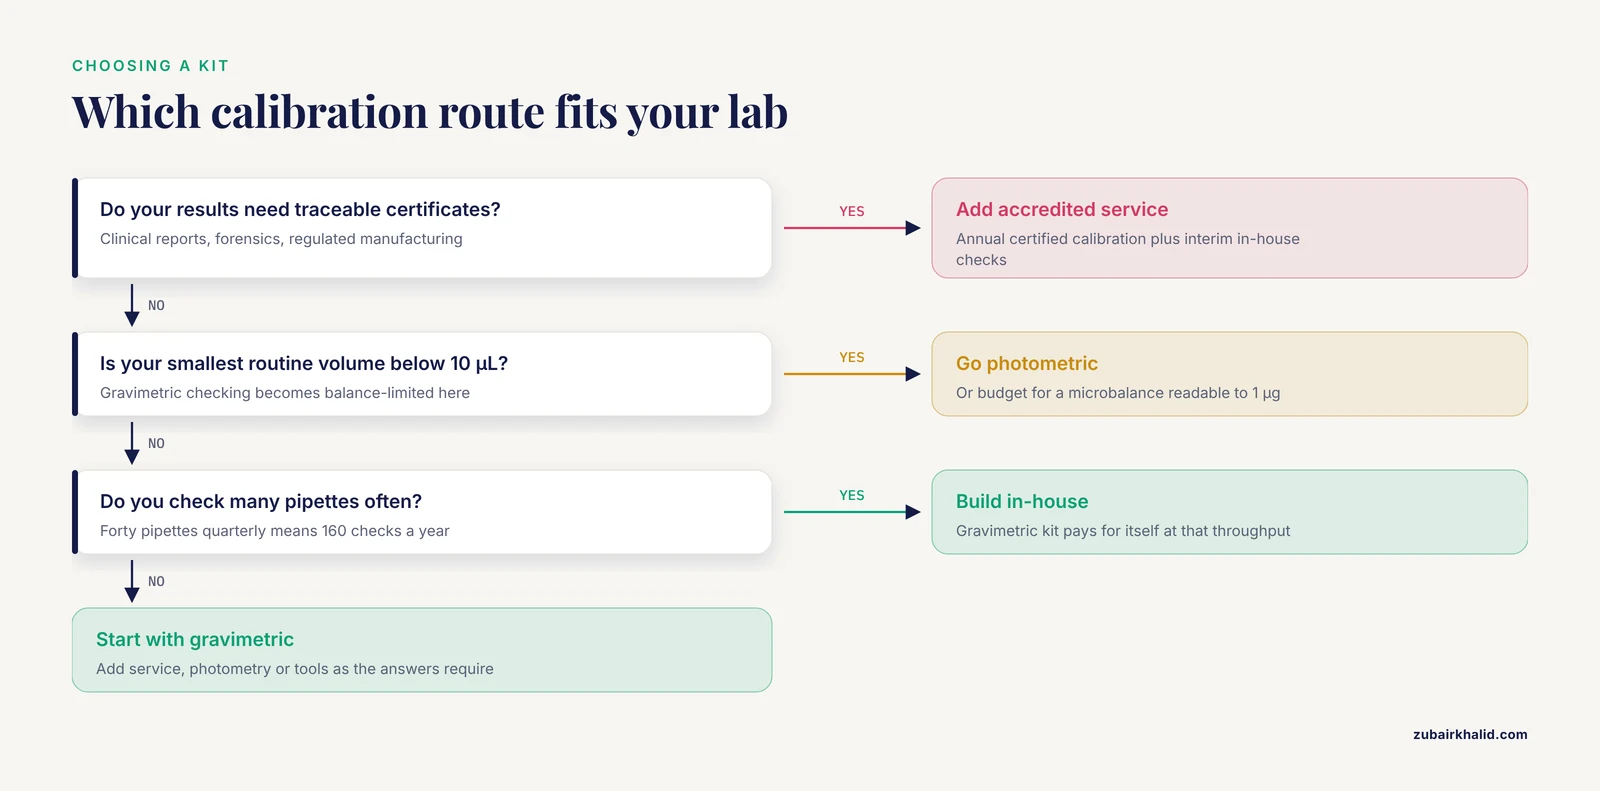
With the options on the table, the decision comes down to six questions.
1. What uncertainty do your data tolerate? If your results feed clinical reports, forensics, or regulated manufacturing, you need traceable certificates, which means an accredited service is not optional, and your in-house kit supports interim verification between certificates. If your work is exploratory research, an in-house gravimetric kit alone may be sufficient.
2. What volumes do you pipette? Below roughly 10 µL, gravimetric verification becomes balance-limited and evaporation-sensitive. If your smallest routine volume is 2 µL, budget for either a microbalance-class balance (readable to 1 µg) or a photometric system. If your smallest routine volume is 50 µL, an ordinary analytical balance is fine.
3. How many pipettes and how often? A lab with 40 pipettes checked quarterly generates 160 checks a year. At that throughput, in-house gravimetric testing pays for itself quickly, and external service handles annual certification. A lab with 6 pipettes may find that service visits plus occasional in-house spot checks suffice.
4. What does your quality system require? Regulated labs usually need documented calibration intervals, traceability, and out-of-tolerance investigation. Your kit choice should produce records that satisfy the requirement, which often means gravimetric results with stated uncertainty, not just a pass or fail.
5. Who operates it? Gravimetric calibration done badly is worse than none. If the person running the kit cannot dedicate the time to controlled technique, a simpler photometric workflow or a service contract reduces operator dependence.
6. Does anyone fix pipettes in-house? If yes, add the brand-specific adjustment toolset. If no, do not buy tools that will sit in a drawer.
Worked Scenarios
Scenario 1: A molecular biology lab running qPCR standard curves. The lab's data depend directly on dilution series accuracy, and published work shows that pipette-driven variability in standard curve production can exceed the variability of the PCR chemistry itself [1]. This lab should run certified annual service on every pipette used for standards, quarterly in-house gravimetric checks (a 0.1 mg readability analytical balance covers pipettes of 20 µL nominal and above, with a photometric system or microbalance for smaller models), and a written rule that any pipette failing an in-house check is pulled from standard curve work until adjusted and re-verified. The cost of the kit is trivial against the cost of repeating failed runs.
Scenario 2: An undergraduate teaching lab. Thirty student pipettes take heavy abuse and need frequent screening, but no certificates are needed. The best setup is a modest gravimetric kit (a precision balance readable to 0.1 mg, one evaporation trap, one spreadsheet) used by teaching staff at the start of each term, with a service contract for annual professional calibration and repair. Students additionally benefit from a gravimetric check as a lesson, because weighing their own deliveries makes abstract accuracy and precision concrete.
Scenario 3: A small startup with expensive 2 µL and 10 µL pipettes doing library preparation. The volumes are small enough that gravimetric checking is awkward without a microbalance, and errors at these volumes propagate directly into quantification. A photometric kit is the fit here, paired with annual accredited service. The startup's scientists should also adopt reverse pipetting for viscous or small-volume transfers, described in the technique section below.
Scenario 4: A core facility with 80 pipettes under a quality system. Full in-house gravimetric capability (a good balance, software, trained operators) plus a rotating service contract, with the in-house program used to catch failing pipettes early and to stretch the certified intervals where the quality system allows risk-based intervals.
Pipetting Technique That Protects Calibration
A calibration certificate describes the pipette in the hands of a trained operator using correct technique. Most pipettes are used daily with habits that no calibration can survive. The habits below are standard practice taught in every manufacturer's user guide.
Pre-wet the tip. Aspirate and dispense the liquid once or twice before the measured delivery, especially for small volumes and volatile or viscous liquids. This equilibrates the dead-air volume inside the tip and reduces evaporation into it, which otherwise causes under-delivery.
Use forward pipetting for aqueous liquids. Press to the first stop, aspirate, then dispense to the first stop and blow out to the second stop. Use reverse pipetting (press to the second stop to aspirate, dispense only to the first stop) for viscous, foaming, or volatile liquids, where the extra liquid in the tip compensates for film and vapor losses.
Hold the pipette vertical during aspiration. A tilted pipette changes the hydrostatic head and the liquid column inside the tip, and the error grows as the tilt angle increases. Immersion depth also matters, generally just a few millimeters below the surface for small-volume tips, deeper for large tips, and never so deep that the shaft wets.
Watch the plunger stops. The most common technical error, releasing the plunger from the second stop when aspirating, introduces a volume error equal to the difference between the stops. The second stop exists for blow-out during dispensing, not for aspiration.
Keep everything at the same temperature. A pipette and liquid that differ in temperature from the ambient air exchange heat through the dead-air volume and change the delivered volume. Let pipettes and liquids equilibrate to room temperature before precision work.
Match the pipette to the volume. Delivering 25 µL with a 1000 µL pipette uses the bottom of its range, where the relative error is several times worse than near nominal volume. Pick the smallest pipette whose range comfortably covers the target volume.
These habits matter precisely because of the compounding described earlier. The qPCR modeling study concluded that improving calibration curve stability requires either carefully chosen pipette conditions or a single validated calibrator curve [1]. Carefully chosen pipette conditions is a fair description of everything in this section, from pre-wetting to volume-matching.
A Worked In-House Gravimetric Check
The following walkthrough reflects the standard gravimetric procedure used across the industry.
- Prepare the environment. Work away from drafts, sunlight, and vibration. Record room temperature and, if your software needs them, pressure and humidity.
- Prepare the pipette and tips. Fit fresh tips from a lot you use routinely. Let the pipette, tips, and distilled water sit in the room long enough to reach thermal equilibrium, typically 30 minutes for water in its container.
- Choose set points. Test three volumes, commonly 100 percent, 50 percent, and 10 percent of the pipette's nominal (maximum) volume. For a 100 µL pipette, test 100, 50, and 10 µL.
- Prepare the balance. Level it, tare a weigh vessel inside an evaporation trap, and let the reading settle.
- Deliver and weigh, ten times. For each set point, aspirate and dispense water into the vessel ten times using consistent forward pipetting, pre-wetting the tip first. Record each mass. Many labs dispense repeatedly into the same vessel and record the cumulative mass after each delivery, which reduces handling between measurements.
- Convert and calculate. Convert each mass to volume using the density of water at the measured temperature (with the buoyancy correction your software applies). Compute the mean, the systematic error (mean minus set volume), and the random error (standard deviation) at each set point.
- Judge against limits. Compare against the manufacturer's accuracy and precision limits for that model and volume, or against your lab's internal limits.
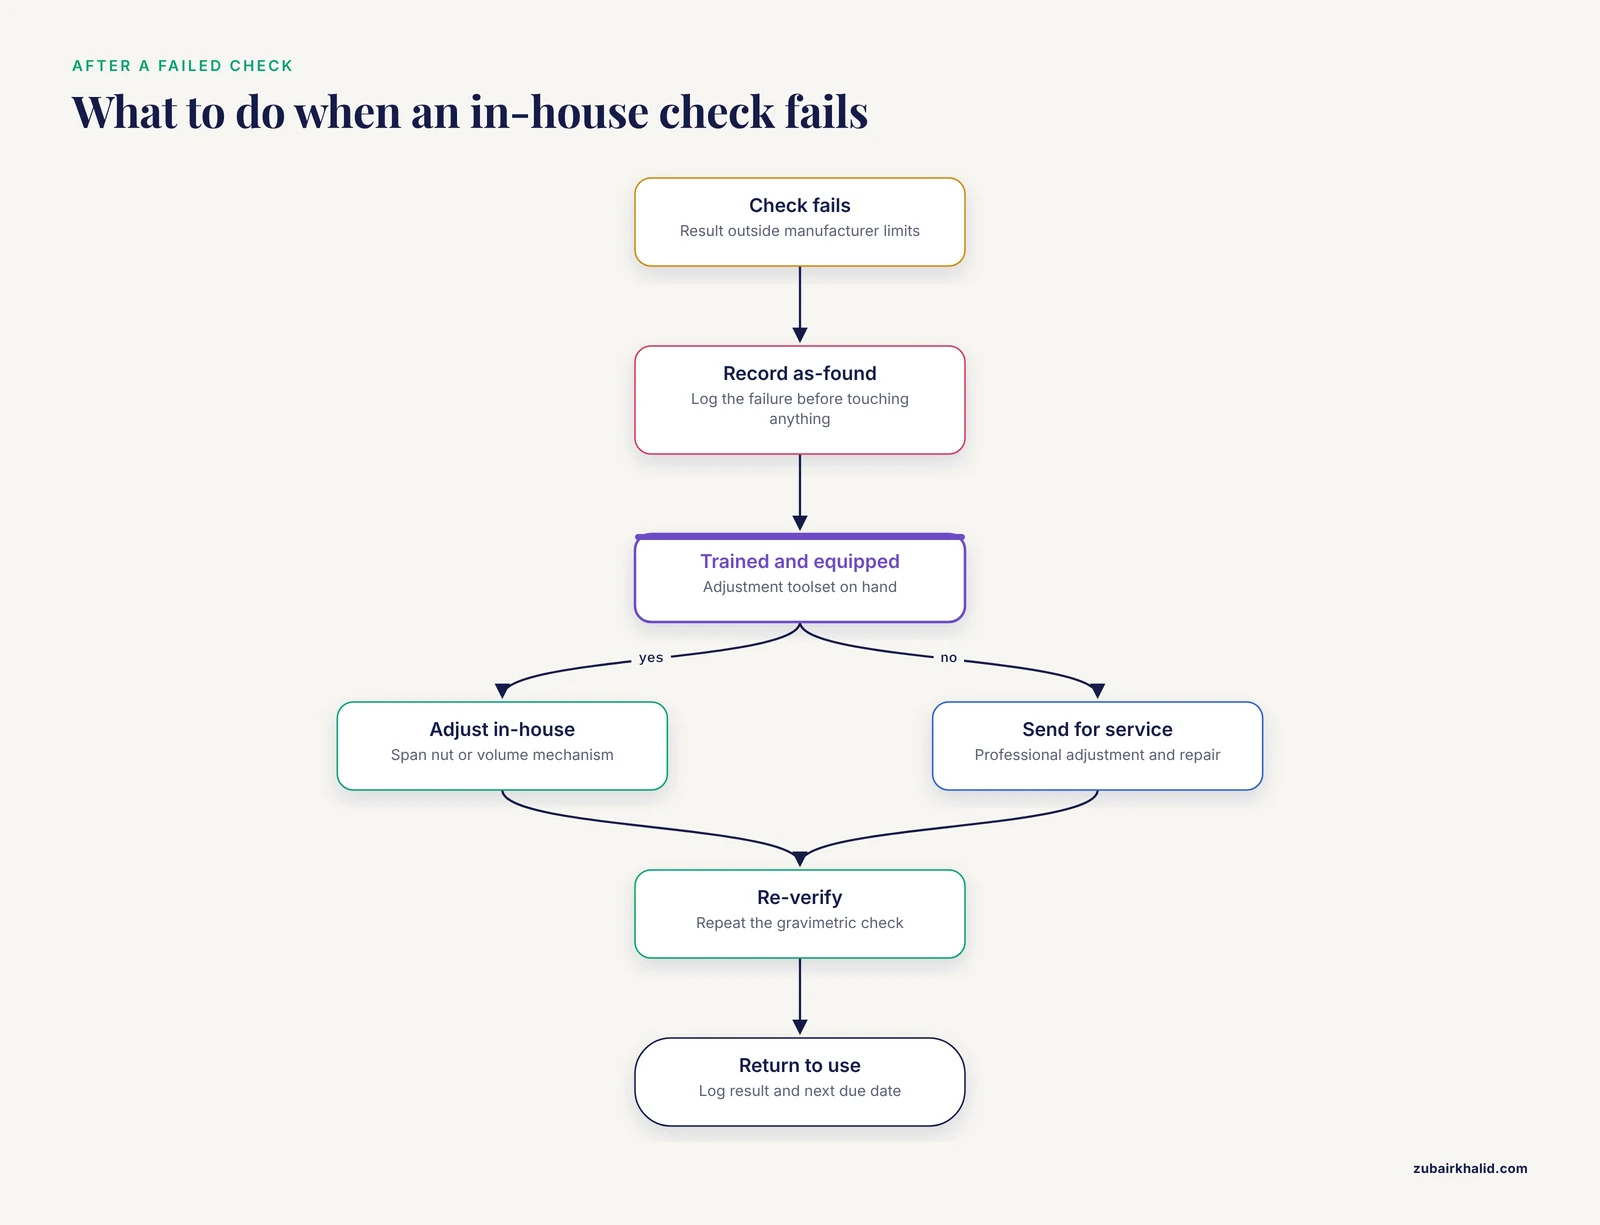
- Document and decide. If the pipette passes, log it and label the next due date. If it fails, remove it from critical use, adjust it if you are trained and equipped, and re-verify, or send it for service.
Ten weighings per set point is the customary number because it gives a stable estimate of the mean while staying practical. If the ten readings scatter widely, you have learned something important, that the problem may be technique or environment rather than the instrument.
Common Mistakes and Limitations
Treating the annual certificate as continuous assurance. A pipette can be knocked, dropped, or corroded the week after service. Interim in-house checks exist to catch that, and skipping them because "it was calibrated in January" is the most common failure of calibration programs.
Checking only the top of the range. Many pipettes are accurate at 100 percent of nominal and unacceptable at 10 percent. A single-volume check at full scale will hide a real problem at the volumes you actually use for dilutions.
Ignoring the balance's own calibration. Your gravimetric results inherit the balance's traceability. If the balance's calibration lapses, every pipette result built on it is unsupported.
Weighing without controlling evaporation. An open weigh boat at 2 µL per delivery loses a meaningful fraction of the delivered volume to evaporation during the measurement, biasing results low. Use a trap and consistent timing.
Confusing accuracy problems with technique problems. If ten deliveries scatter widely, suspect operator technique, tip fit, or environment before concluding the pipette is broken. A pipette check by an untrained operator measures both of them at once.
Using the wrong tips. Calibration results are only valid for the tip type used during calibration. Switching to a different tip brand or design can shift delivered volume, particularly at small volumes, so verify with the tips you use daily.
Buying adjustment tools without a measurement method. Span nut wrenches do not tell you anything. A toolset without a kit or service is guesswork with extra steps.
Reprocessing a failed pipette without an as-found record. If a pipette that failed in-house checks gets adjusted and re-passed without recording the failure, you have no basis for deciding whether to review data produced in the interim. Record the as-found result before you touch anything.
One general limitation applies to any kit or service. Calibration tells you about the instrument at a moment in time under defined conditions, and maintaining day-to-day accuracy still depends on trained operators using correct pipetting technique and appropriate tips for each liquid.
Frequently Asked Questions
How often should a pipette be calibrated?
Most labs combine an annual certified calibration with in-house checks every three to six months, adjusted by usage, criticality, and history. Any pipette that has been dropped, or that produces suspect results, should be checked immediately regardless of schedule.
What is the difference between pipette calibration and pipette adjustment?
Calibration measures how much volume the pipette actually delivers, adjustment changes the pipette so it delivers the set volume. A proper service cycle does both, records the as-found calibration, adjusts, then records the as-left calibration.
Can I calibrate my own pipettes instead of sending them out?
Yes, with a gravimetric kit built around a balance of adequate readability, you can verify pipettes in-house, and many regulated labs do exactly that for interim checks. For traceable certificates, adjustment and repair, and annual documentation, most labs also use an accredited external service.
What do I need in a basic pipette calibration kit?
A balance readable roughly tenfold finer than the smallest mass you will test, an evaporation trap with weigh vessels, a thermometer for water density correction, a barometer and hygrometer if your software uses buoyancy corrections, and a spreadsheet or software for calculating means and errors.
Why do my qPCR standard curves vary between runs?
One well-documented cause is pipette error compounding through the serial dilutions used to build the curve, which can produce more cycle threshold variability than the PCR chemistry itself [1]. Checking the pipettes used for dilution series, standardizing pipetting technique, and reusing a single validated calibrator curve are the published remedies [1].
Is there a way to quantify nucleic acids without a calibration curve?
Yes, single-tube quantitative PCR designs use an internal quantitative standard co-amplified with the target, so the difference in quantification cycle between the standard and the target reports concentration without serial dilutions, avoiding the pipette errors that traditional calibration curves propagate [2]. Published validation reported R² values of 0.9951 for plasmid, 0.9889 for serum standard, and 0.9727 for clinical samples [2].