Pipette Calibration Checklist: What to Check Before You Calibrate
By Dr. Zubair Khalid, DVM, MS, PhD ·

By the end of this article you will be able to run a complete pre-calibration inspection of an air-displacement pipette, standardize your pipetting technique so that it does not bias the result, perform a gravimetric calibration on an analytical balance, and calculate systematic error and repeatability with a worked example you can copy into a spreadsheet or script. You will need an analytical balance (0.1 mg readability at minimum, 0.01 mg preferred for volumes below 100 µL), a thermometer, a barometer or local weather station pressure reading, a hygrometer, deionized water, appropriate pipette tips, a weighing vessel with a lid, a lab notebook or calibration form, and lint-free wipes. A calibration log template is provided so you can adopt the format directly.
Why a Pre-Calibration Check Matters
A pipette that looks clean and moves smoothly can still be wrong. In quantitative PCR work, one recognized problem with traditional nucleic acid quantification is that pipette errors propagate through serial dilutions and inflate the uncertainty of every downstream concentration value [1]. That single fact explains why laboratories treat pipette calibration as a controlled activity rather than a housekeeping chore.
The tolerance for error in modern assays is small. Validated bioanalytical methods commonly require intra-assay and inter-assay precision within 15 percent, and no more than 20 percent at the lower limit of quantification [2]. Dispensing methods published for forensic and doping-control work report inter-assay precision in the range of roughly 5 to 15 percent alongside calibration curves with correlation coefficients at or above 0.99 [3]. Residue methods in food analysis achieve relative standard deviations below about 12 percent across replicate days [4]. Every one of those numbers sits downstream of a pipette. If your pipette drifts by a few percent, that drift consumes the entire precision budget of the method before the instrument even records a signal.
The consequence is practical: when a validated method reports a relative standard deviation of 6 percent or better, as pipette-tip solid-phase extraction methods coupled to HPLC do [5], the liquid-handling step must contribute almost nothing to that variability. A pipette calibration checklist exists to make sure the conditions on the day of calibration do not manufacture errors that belong to the environment, the tips, or the operator rather than the instrument itself.
What You Need on Hand
Gather everything before you touch the pipette. Interrupting a calibration to hunt for a missing item breaks temperature equilibrium and wastes the equilibration time you already invested.
- Analytical balance with draught shield, leveled and warmed up. Readability of 0.1 mg works for 100 to 1000 µL. For 1 to 100 µL, use a semi-micro balance with 0.01 mg readability.
- Calibrated reference weight close to the expected mass of your test volume. For 100 µL of water, a 100 mg class weight is the right check standard.
- Deionized or distilled water, Type 2 grade or better, equilibrated to room temperature for at least 2 hours.
- Pipette tips specified by the pipette manufacturer for the model being calibrated, from a sealed, unopened rack if possible.
- A small glass or polypropylene weighing vessel with a lid. Evaporation control matters more than the vessel material.
- Thermometer readable to 0.1 °C, barometer or reliable local pressure reading, and hygrometer. You need these to look up the conversion factor Z.
- Timer, lint-free wipes, nitrile gloves, and your calibration log or form.
- The manufacturer specification sheet for the pipette, which lists the maximum permissible systematic error and repeatability at each test volume. Those published limits are your pass and fail criteria.
The Pipette Calibration Checklist
The checklist below covers everything to verify before a single droplet is dispensed onto the balance. Work through it in order. Each item either protects the balance, protects the pipette, or removes a variable that would otherwise contaminate your measurement of the pipette itself.
1. Verify the Environment
Gravimetric pipette calibration assumes a controlled room. The reference conditions in ISO 8655, the international standard for piston-operated volumetric apparatus, are 20 °C, 1013.25 hPa, and 50 percent relative humidity. Real labs rarely match those exactly, which is exactly why the Z correction factor exists. What you must guarantee on the day is stability, not a perfect match to reference conditions.
Check and record the following.
- Air temperature stable within about 1 °C over the session, ideally between 20 and 25 °C.
- Water, pipette, tips, and weighing vessel all equilibrated to that same air temperature. A 2-hour equilibration is the standard conservative practice. Thermal disequilibrium between the water and the air changes density and causes buoyancy-driven mass errors that no adjustment on the pipette can fix.
- No drafts from HVAC vents, open doors, or nearby fume hoods. Place the balance away from all of them.
- Relative humidity recorded. Low humidity, especially below about 40 percent, promotes evaporation losses and static cling on tips.
- The balance table is rigid, level, and free of vibration. The balance bubble indicator must be centered.
If the room cannot hold a stable temperature, reschedule the calibration. Calibrating against a drifting environment produces a certificate for a pipette that does not exist.
2. Inspect the Pipette Physically
A damaged pipette should be repaired or replaced before calibration, because calibration cannot compensate for mechanical defects.
- Check the body and nose cone for cracks, chips, or chemical damage such as swelling or discoloration from solvent exposure.
- Move the plunger through its full stroke. It should travel smoothly with no gritty resistance, catching, or sticking at any stop.
- Depress the ejector through its full travel and confirm a tip ejects cleanly.
- Rotate the volume adjustment across the whole range and back. Every detent should click positively, and the digits should align squarely in the display window. A misaligned digit window is a classic sign of internal damage.
- Confirm the volume readout matches the set volume at the low, middle, and high ends of the range.
- Check the pipette identification. The serial number on the instrument must match the serial number on your calibration record and the specification sheet you will use.
- Note the last calibration date and service history. A pipette that was dropped since its last event warrants internal inspection, not just recalibration.
3. Check Tip Fit and Seal
Tips are consumables, and the interface between tip and nose cone is where a surprising number of calibration failures begin.
- Use only the tip type the manufacturer specifies for that pipette. Generic tips that fit loosely are the most common self-inflicted cause of a failed calibration.
- Mount a tip by pressing the nose cone into the tip with a slight twist. A properly seated tip shows no gap and no wobble.
- Aspirate and dispense water several times and watch the tip nose for weeping or drip formation during the hold phase.
- Look inside a mounted tip against the light after aspiration. A meniscus that drops while the pipette is held still indicates a micro-leak at the seal.
If a leak appears, try a fresh tip from a different rack before suspecting the pipette. If leaks persist across tip lots, the seals or O-rings inside the nose cone are worn and the pipette needs service, not calibration.
4. Run a Functional Leak Test
A quick leak test before calibration saves you from calibrating an instrument that will fail for a mechanical reason.
- Aspirate the nominal volume, hold the pipette vertically for 10 to 15 seconds, and confirm the meniscus does not fall.
- Aspirate, then hold the pipette with the tip pointing down at a 45-degree angle for a few seconds. No drop should form at the orifice.
- Dispense completely and confirm no residual liquid clings inside the tip beyond the normal film.
A pipette that fails this test should go to service. Document the as-found condition in your log either way.
5. Prepare and Verify the Balance
The balance is the actual measuring instrument in a gravimetric calibration, so it deserves as much attention as the pipette.
- Confirm the balance itself is within its calibration interval and that the last external verification passed.
- Level it using the feet and bubble indicator.
- Allow it to warm up per the manufacturer documentation. Most laboratory balances require a warm-up period after power-on before readings are trustworthy.
- Place the reference weight on the pan and confirm the reading matches the certificate value within the balance tolerance. If it does not, run the balance internal calibration routine or stop and resolve that first.
- Tare a clean, dry, lidded weighing vessel. To limit evaporation losses, especially for small volumes, the accepted practice from ISO 8655 is a vessel containing a small amount of water or a dampened sponge in the bottom, covered, with the actual weighing done in a small inner vessel or on a raised platform inside the covered outer vessel. Set this up now so evaporation is suppressed during the whole run.
6. Prepare the Test Liquid
- Use freshly opened or well-covered deionized water. Dissolved gases from cold tap water can cause microbubble formation and volume error, so let water that was refrigerated warm fully to room temperature and stand uncovered briefly before use.
- Never use buffer, saline, or any liquid other than water for calibration. The Z factor and the physical assumptions of gravimetry apply to water.
- Keep the water container capped between aliquots to prevent evaporative concentration and temperature drift. Water chemistry changes little with brief exposure, but temperature changes are immediate.
7. Define the Test Points and Replicates
A single test point cannot characterize a pipette. The convention, following ISO 8655 and manufacturer service documentation, is to test three volumes.
- 100 percent of the nominal (maximum) volume.
- 50 percent of the nominal volume.
- 10 percent of the nominal volume, which is the lowest volume where the pipette is rated to operate.
At each test point, run at least 10 replicate dispenses for formal verification. For a quick quarterly check between annual calibrations, many laboratories run 4 to 6 replicates at the nominal volume only, but that is a trend check, not a calibration. Plan the full three-point, ten-replicate design when the record will support instrument fitness decisions.
Write the planned design into the log before starting, including which test point each replicate belongs to. Mixing the order mid-run is a common and avoidable documentation error.
8. Standardize the Pipetting Technique
Calibration measures the pipette plus the operator plus the tip. If the operator component varies between replicates, your repeatability number will describe your hand, not your instrument. The next section covers technique in detail, and the short version for the checklist is this: decide before you start which pipetting mode you will use, at what angle, and at what immersion depth, and then hold those constant for every replicate.
9. Record the Acceptance Criteria Before the Data
Deciding pass and fail limits before you see the data is what makes a calibration objective. Open the manufacturer specification sheet and copy the maximum permissible systematic error and the maximum permissible repeatability at each of your three test volumes into the log. If your laboratory follows ISO 8655, use the limits for the pipette's stated accuracy class from that standard. Write the limits down first. A result that would have failed yesterday but passes today because you looked at the data first is not a result, it is a negotiation.
A Pipette Calibration Checklist Format You Can Copy
The following plain-text template is a complete pipette calibration checklist format suitable for a bench binder or a digital form. Copy it, adapt the fields to your laboratory's document control requirements, and use it for every pipette.
PIPETTE CALIBRATION PRE-CHECK LOG

Date:                       Time:
Room / location:            Ambient temp:      °C
Barometric pressure:        hPa    Relative humidity:      %
Balance ID:                 Balance verified with ref weight:  Y / N
Reference weight value and ID:

PIPETTE
Model:                      Serial number:
Type (air displacement / positive displacement):
Nominal volume range:       µL
Last calibration date:      Manufacturer spec sheet attached:  Y / N

PHYSICAL INSPECTION (pass = P, fail = F, note any F)
Body and nose cone intact:            Plunger smooth through full stroke:
Ejector functional:                   Digits align at low/mid/high settings:
Volume readout matches set volume at low/mid/high:
Tip holder and seals undamaged:       Evidence of drop or misuse since last event:

LEAK TEST
Vertical hold 15 s, no meniscus fall:      Angled hold, no drip formation:

TIPS
Manufacturer-specified tip type used:      Lot number:
Seated without gap or wobble:              No weeping or drip during hold:

TEST DESIGN
Test volumes (nominal, 50%, 10%):     ,      ,       µL
Replicates per volume:        Pipetting mode:  forward / reverse
Aspiration angle:      °   Immersion depth:     mm

ACCEPTANCE CRITERIA (from spec sheet, recorded BEFORE testing)
Max systematic error at nominal:       µL (      %)
Max systematic error at 50%:           µL (      %)
Max systematic error at 10%:           µL (      %)
Max repeatability (RSD) at each volume:      %,      %,      %

NOTES / DEVIATIONS:

Performed by:                Reviewed by:
This example doubles as a pipette calibration checklist template for building an electronic version in a spreadsheet, with one column per field and one row per pipette.
Pipetting Technique That Does Not Sabotage Calibration
Poor or inconsistent technique is the single largest controllable source of error in manual pipetting, and it will masquerade as instrument failure. Before calibrating, make sure your technique is deliberate and repeatable.
Pre-wet every tip. Aspirate and dispense the full test volume two or three times into a waste vessel before the first measured dispense. Dry tips, especially for small volumes, lose water film to the inner wall during the first aspiration and deliver less than the set volume. Pre-wetting saturates the humidity inside the tip and stabilizes delivery.
Aspire vertically, dispense against the vessel wall. Keep the pipette vertical during aspiration. Immersion depth should be shallow, roughly 2 to 3 mm below the liquid surface for small volumes, deeper only for larger ones. Immersing deeply adds hydrostatic pressure to the air cushion and inflates the aspirated volume. During dispensing, touch the tip orifice against the angled inside wall of the receiving vessel so the retained film leaves the tip completely.
Control the plunger speed. Press to the first stop at a smooth, consistent pace, aspirate steadily, and dispense fully. Fast aspiration creates turbulence and aerosol in the tip, which changes the delivered volume and can aerosolize hazardous samples.
Choose forward or reverse pipetting and stay with it. In forward pipetting, the standard mode for aqueous solutions, you press to the first stop to dispense the calibrated volume and blow out the residual film at the second stop only when the manufacturer instructs. In reverse pipetting, used for viscous or foaming liquids, you aspirate past the set volume by pressing to the second stop first, then dispense only to the first stop, leaving excess liquid in the tip. Reverse mode delivers a slightly different volume for the same dial setting, so a calibration performed in one mode does not validate the other. Record the mode on your checklist and use that mode in your daily work if it differs from the mode your protocol assumes.
Hold the angle constant. A 20-degree deviation from vertical during aspiration changes delivered volume by a measurable amount, and the deviation is larger for small volumes. Pick one angle, near vertical, and repeat it.
Keep your hand and the pipette thermally steady. Prolonged gripping warms the nose cone and the air column inside it. Warm air expands, and an expanded air cushion aspirates less liquid. Rest between sets of replicates rather than gripping the pipette continuously.
Automated liquid-handling platforms such as those used in forensic drug-testing laboratories exist largely to remove this operator variability from high-volume workflows [6]. For a manual bench, the equivalent investment is deliberate, uniform technique, because the calibration you are about to run will faithfully record whatever your hands actually do.
Step-by-Step: The Gravimetric Calibration Walkthrough
Gravimetric calibration works because water has a known density at a known temperature. You dispense the set volume into a weighing vessel, record the mass, and convert mass to volume using a conversion factor that accounts for water density and air buoyancy. The factor is called Z, and it is tabulated in ISO 8655 as a function of temperature, barometric pressure, and humidity. At 20 °C, 1013 hPa, and moderate humidity, Z is approximately 1.0032 µL per mg. Always look up the value for your measured conditions rather than reusing a remembered constant.
Step 1. Equilibrate and Record Conditions
Confirm all items from the pre-calibration checklist pass. Record temperature, pressure, and humidity, then look up and write down your Z factor.
Step 2. Perform the As-Found Check
Before any adjustment, test the pipette exactly as it arrives. This as-found data is what your quality system reviews to judge whether the pipette drifted out of tolerance while in service. Adjusting first destroys that evidence.
Step 3. Weigh the Replicates
Set the pipette to the first test volume, usually the nominal volume. Pre-wet a tip three times. Dispense one measured aliquot into the tared, covered weighing vessel, replace the lid, wait for the balance to stabilize, and record the mass. Change to a fresh tip for each replicate to avoid cumulative carryover effects, or keep the same tip only if your SOP specifies it and pre-wets consistently. Repeat for 10 replicates. Repeat the whole procedure at 50 percent and 10 percent volumes.
Step 4. Calculate Volume, Systematic Error, and Repeatability
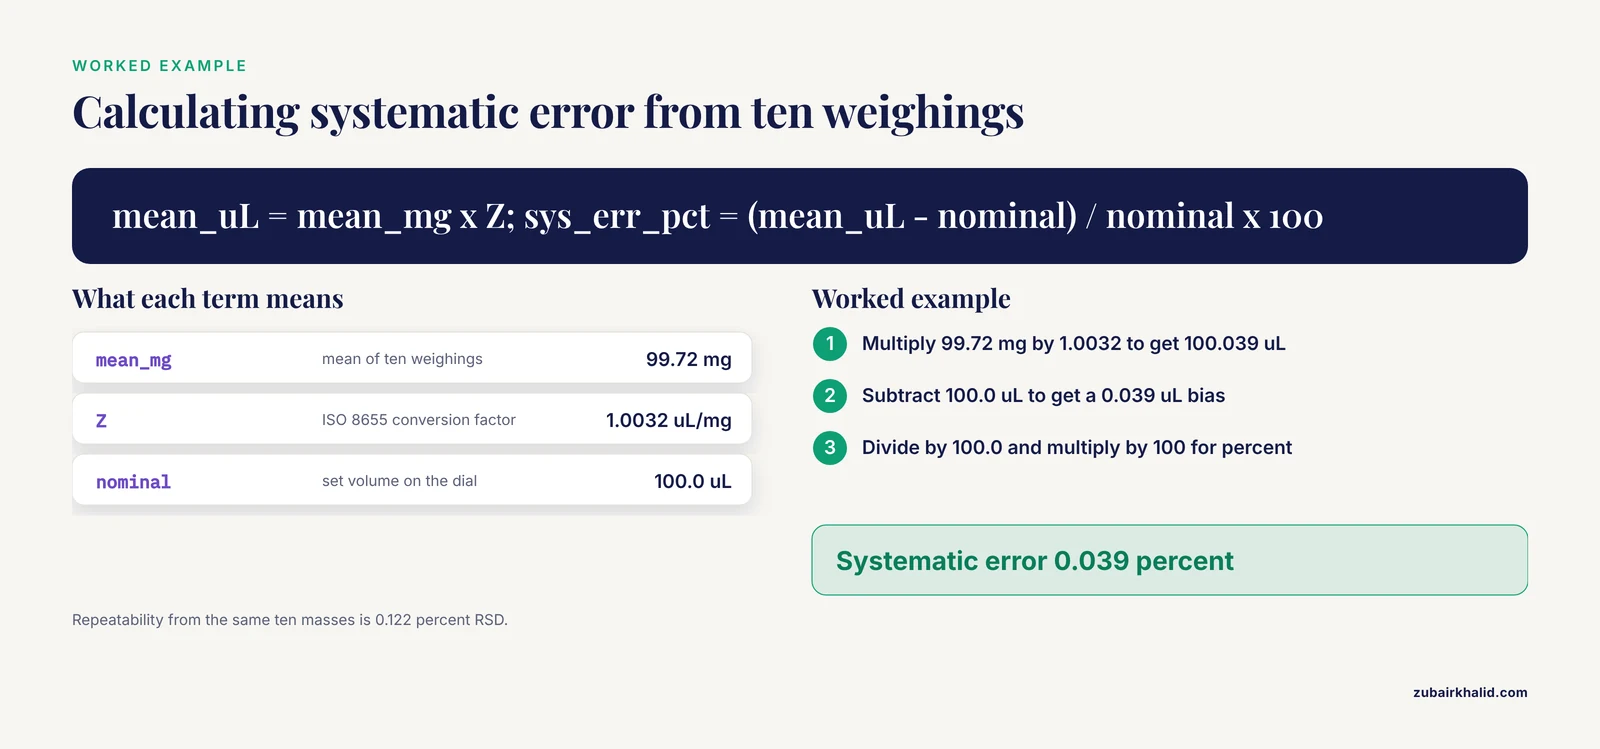
Convert each mean mass to a mean volume and compute the two figures of merit. Here is a complete worked example for a P200 pipette set to 100 µL, with 10 weighings at 20 °C.
# Gravimetric pipette calibration calculation
# P200 set to 100 uL, 10 replicates, 20 C, Z = 1.0032 uL/mg

masses_mg = [99.55, 99.82, 99.61, 99.90, 99.74,
             99.58, 99.86, 99.70, 99.65, 99.79]

n       = len(masses_mg)                      # 10
mean_mg = sum(masses_mg) / n                  # 99.72 mg
Z       = 1.0032                              # uL per mg, from ISO 8655 table
nominal = 100.0                               # uL

mean_uL    = mean_mg * Z                      # mean delivered volume
sys_err_uL = mean_uL - nominal                # systematic error, absolute
sys_err_pct = sys_err_uL / nominal * 100.0    # systematic error, relative

variance = sum((m - mean_mg)**2 for m in masses_mg) / (n - 1)
sd_mg    = variance ** 0.5                    # repeatability as SD, mg
rsd_pct  = sd_mg / mean_mg * 100.0            # repeatability as RSD, %

print("mean mass (mg):      ", round(mean_mg, 2))
print("mean volume (uL):    ", round(mean_uL, 3))
print("systematic error (%):", round(sys_err_pct, 3))
print("repeatability RSD (%):", round(rsd_pct, 3))
Expected output:
mean mass (mg):       99.72
mean volume (uL):     100.039
systematic error (%): 0.039
repeatability RSD (%): 0.122
Interpretation. The mean delivered volume is 100.04 µL against a 100 µL setting, so the systematic error is about +0.04 percent, a 0.04 µL bias. The repeatability is 0.12 percent RSD. Both figures now go directly into the log beside the acceptance limits you recorded in Step 9 of the checklist. Repeat the calculation at the 50 percent and 10 percent volumes. Expect relative systematic error and RSD to grow as the test volume shrinks, which is normal and is why the specification sheet lists separate, wider limits at low volumes.
Step 5. Decide Pass or Fail
Compare each systematic error and RSD against the pre-recorded limits. If every test point passes, the pipette is verified, and you record the as-found data and the as-left data as the same numbers.
Step 6. Adjust if Needed
If a test point fails, most air-displacement pipettes allow a calibrated adjustment. Follow the manufacturer service documentation exactly. Typically you remove the calibration tool access point, use the provided key or tool to change the internal volume calibration while the display shows the target value, then re-run the full replicate series at the affected volume. Never adjust by feel or guess. After adjustment, re-run all three test points, because correcting one volume can shift the others. The post-adjustment data is the as-left record.
Step 7. Document the As-Left Record
Record the as-left systematic error and repeatability at all three volumes, the environmental conditions, the tip lot, the balance ID, the operator, and the next due date. Sign and have the record reviewed. File it where the next person can find the trend, not just the latest numbers.
Checklist Summary Table
| Checklist item | What to verify | Action if it fails |
|---|---|---|
| Environment | Temperature stable within about 1 °C, no drafts, humidity recorded, Z factor looked up | Reschedule until the room is stable |
| Equilibration | Water, pipette, tips, vessel all at room temperature for at least 2 hours | Wait. Do not start early |
| Physical inspection | No cracks, smooth plunger, aligned digits, correct serial number | Send for repair. Do not calibrate a damaged pipette |
| Tip fit | Manufacturer-specified tip, seated without gap, no weeping | Try a different tip lot, then service the pipette if leaks persist |
| Leak test | No meniscus fall on 15 s vertical hold, no drip on angled hold | Send for seal or O-ring service |
| Balance | Leveled, warmed up, verified with reference weight, evaporation-suppressed vessel prepared | Verify or service the balance before testing |
| Test liquid | Deionized water only, degassed and temperature-equilibrated | Replace the water, wait for equilibrium |
| Test design | Three volumes, at least 10 replicates each, mode and angle fixed | Redesign before starting, not after |
| Technique | Pre-wetting, vertical aspiration, consistent speed, one mode throughout | Practice on a waste vessel until replicates on a trial volume look tight |
| Acceptance criteria | Copied from the spec sheet before testing, limits recorded | Do not proceed until limits are written down |
| Documentation | As-found data, adjustments, as-left data, signatures, next due date | Close out the record the same day |
Common Mistakes and Limitations
Calibrating before fixing technique. If your pipetting varies replicate to replicate, the RSD you measure is yours, not the pipette's. Practice on a waste vessel until you can hit a consistent rhythm, then calibrate.
Using the wrong tips. Off-brand tips with poor nose cone fit create a leak path that reads as systematic under-delivery. The calibration then "fixes" a problem that returns the moment anyone uses the correct tips.
Skipping the as-found measurement. Adjusting first destroys the evidence of in-service drift. Quality systems and auditors expect the as-found data, and a missing as-found record is itself a finding.
Ignoring the Z factor. Treating 1 mg as exactly 1 µL introduces a small but real bias. At 20 °C the correction is about 0.3 percent, which is comparable to an entire tolerance band on a small-volume pipette. Look up Z for your measured conditions every time.
Testing one volume only. Pipettes that are perfect at the nominal volume can fail badly at 10 percent of range. A one-volume check cannot clear the instrument for its full range of use.
Letting evaporation eat small volumes. For 10 µL dispenses, evaporation during a slow weighing sequence is a significant fraction of the volume. Use the covered vessel arrangement from the checklist, work briskly, and keep the lid on between weighings.
Recalibrating a contaminated or solvent-swollen nose cone. Calibration adjusts the volume relationship inside a healthy instrument. Chemical damage to the seals changes with every dispense and no adjustment holds. Clean and inspect, and service when in doubt.
Assuming calibration transfers across tips and liquids. Calibration validates the pipette with water and the specified tips. Viscous, volatile, or dense samples behave differently. For those, forward or reverse pipetting mode selection, or a positive-displacement instrument, is the correct tool rather than an adjustment to an air-displacement pipette.
Forgetting that calibration reflects the day. A certificate from last year says nothing about a pipette that was dropped in March. Interim verification checks at the nominal volume between formal calibrations catch most real-world drift.
When to Send a Pipette Out for Service
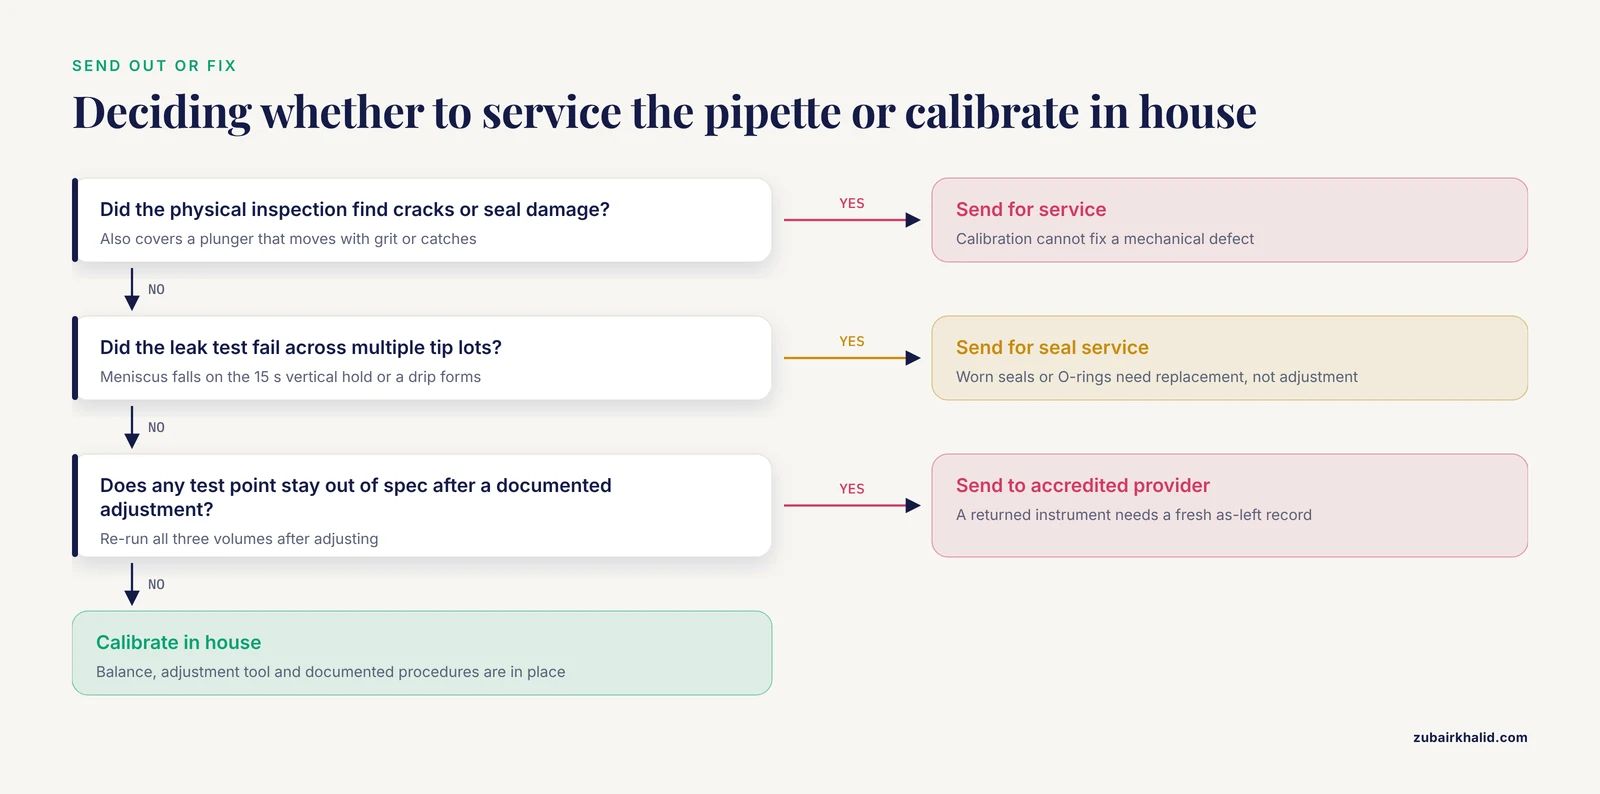
Some findings end the in-house process. Send the pipette to the manufacturer or an accredited service provider when the physical inspection finds cracks or seal damage, when the leak test fails across multiple tip lots, when the plunger moves with grit or catches, when a volume dial will not hold its setting, when any test point remains out of specification after a documented adjustment attempt, or when the pipette has been dropped, autoclaved against the manufacturer instructions, or exposed to liquid inside the body. After service, run the full gravimetric verification again, because a returned instrument should re-enter service with a fresh as-left record, not an old certificate.
Frequently Asked Questions
How often should a pipette be calibrated?
Most laboratories perform formal calibration annually, with interim verification checks every 3 to 6 months. The correct interval for your pipette comes from your laboratory's quality system, the manufacturer documentation, and usage intensity, since high-use or corrosive-sample pipettes drift faster and need shorter intervals.
What volumes should I test during calibration?
Test the nominal volume, 50 percent of nominal, and 10 percent of nominal, which is the standard three-point design. Each point should include at least 10 replicate dispenses for a formal calibration, and every point must be compared against its own specification limits.
Can I calibrate a pipette myself or does it need a service provider?
You can perform gravimetric verification and adjustment in-house if you have a suitable analytical balance, the manufacturer adjustment tool, and documented procedures. Send the pipette out for physical damage, persistent leaks, mechanical faults, or whenever your quality system requires an accredited certificate.
What is the difference between calibration, verification, and adjustment?
Verification is measuring a pipette and comparing results against limits. Adjustment is changing the internal calibration to bring delivery closer to the set value. Calibration is the full controlled process of verification, adjustment when needed, re-verification, and documentation of the as-found and as-left results.
Why does my pipette fail calibration even though it dispenses visibly fine?
The most common causes are worn nose cone seals that leak invisibly, off-brand or poorly seated tips, evaporation losses at small volumes, an unverified balance, and temperature disequilibrium between the water and the room. Work through the pre-calibration checklist before blaming the instrument itself.
Does pipetting technique really affect calibration results?
Yes, substantially. Inconsistent aspiration angle, plunger speed, immersion depth, and pre-wetting practice show up directly as poor repeatability in your data. Standardize the technique first so the calibration measures the pipette rather than the operator.
What equipment do I need for gravimetric calibration?
You need an analytical balance, with 0.01 mg readability for volumes below 100 µL, a verified reference weight, deionized water equilibrated to room temperature, manufacturer-specified tips, a lidded weighing vessel, a thermometer, a barometer, a hygrometer, and a calibration record form.
What acceptance criteria should I use for pass or fail?
Use the maximum permissible systematic error and repeatability values published in the manufacturer specification sheet for your exact model, or the limits for your pipette's class in ISO 8655 if your laboratory follows the standard. Record those limits in your checklist before collecting any data.
Sources
- Accurate nucleic acid quantification in a single sample tube without the need for calibration.
- A Disposable Pipette Extraction-UHPLC-MS/MS Method Based on Removal of Phospholipids to Determine Anandamide, 2-Arachidonoylglycerol, Cannabidiol, and Δ(9)-Tetrahydrocannabidiol in Plasma Samples.
- Analysis of Stimulants in Sweat and Urine Using Disposable Pipette Extraction and Gas Chromatography Coupled to Mass Spectrometry in the Context of Doping Control.
- Determination of Cyclaniliprole in Fruits and Vegetables Using Disposable Pipette Extraction Cleanup and Ultrahigh-Performance Liquid Chromatography-Tandem Mass Spectrometry.
- Natural Biosorbents for Detecting Emerging Contaminants in Tap and River Water via Pipette Tip Solid-Phase Extraction (PT-SPE).
- Implementation of the first comprehensive state oral fluid drug testing program for roadside screening and laboratory testing in DUID cases-A 5-year review.