Pipetting Training for Multichannel Pipettes
By Dr. Zubair Khalid, DVM, MS, PhD ·

Multichannel pipetting training builds two things at once: the hand skills to deliver identical volumes from all eight or twelve channels of a pipette in a single stroke, and the measurement habits to prove it. A complete session pairs deliberate technique drills with a per-channel gravimetric check, so progress is documented rather than assumed. Use it when onboarding students and new staff, after a pipette returns from service, when an audit or an odd-looking plate readout flags pipetting variation, and on a fixed schedule between full pipette calibration events. Plan on 60 to 90 minutes of hands-on time for a full session on one instrument, and about half a day of elapsed time once repeats, documentation, and any retesting are included.
The training produces three deliverables: a per-channel accuracy and precision dataset for the pipette, a documented competency record for the operator, and a short list of specific technique corrections. Those deliverables matter because manual pipetting variation is real, measurable, and easy to underestimate. A published review of pipetting practice describes variation in manual pipetting as a known unknown, generally accepted to exist but rarely quantified, with errors that compound and can compromise data quality [1]. Multichannel work raises the stakes, because one plunger stroke drives eight or twelve separate pistons, and a single weak channel quietly biases every row it touches.
This article covers the principle behind the instrument, the materials, a step-by-step training session, how to read the numbers, troubleshooting, and the mistakes that most often skew results.
Why Formal Multichannel Pipetting Training Matters
Pipettes are to a molecular biology laboratory what workstations are to a computational one. Nearly every result passes through one, and the review literature makes the analogy explicitly. Manual pipetting looks simple, yet inaccuracy and imprecision exist in practice, and the extent of operator-to-operator and day-to-day variation has been under-investigated [1]. When small delivery errors stack across a dilution series, or across the channels of a single multichannel pipette, they compound and can compromise data quality [1].
A multichannel pipette multiplies the problem in a specific way. One plunger and one spring drive eight or twelve pistons in parallel, and each channel has its own seal, its own nose cone, and its own tip interface. A channel that delivers 97 µL when the others deliver 100 µL will not announce itself. It will show up later as a row-wise artifact in a qPCR plate, an uneven gel loading pattern, or a sample-to-sample difference in a high-throughput assay.
Training also needs measurement. Gravimetry and spectrophotometry give two straightforward readouts for pipetting accuracy and precision, and published protocols exist for both single and multichannel pipettes, written explicitly so that any laboratory can use them for competency training and regular checks [1]. A shared protocol across laboratories could eventually support cross-laboratory comparison and a reference range for acceptable operator error, something the field does not yet have [1]. The session below turns that framework into a practical training block you can run this week.
The Principle: How an Air-Displacement Multichannel Pipette Works
Most laboratory pipettes, including nearly all multichannel models, are air-displacement instruments. A piston inside the body moves through a fixed stroke and compresses a column of air, the air cushion, which in turn pushes liquid out of the tip. The piston never touches the liquid. The spring-loaded plunger has two detents. The first stop corresponds to a stroke equal to the set volume. The second stop adds extra travel called blow-out, which expels the residual film of liquid that the air cushion alone cannot move.
Forward pipetting, the default mode, works like this. Press the plunger to the first stop, immerse the tips, release the plunger smoothly to aspirate, then dispense by pressing to the first stop, pausing, and finishing on the second stop to clear the tip.
The air cushion is both the design feature and the main error source. Because air is compressible, the cushion responds to temperature, humidity, the vapor pressure of the liquid, and how fast the operator moves the plunger. Hand warmth from a long session gradually expands the cushion and shifts delivery. A dry tip loses part of the aspirated volume to evaporation and wall wetting. A fast plunger release pulls liquid in turbulently, leaves bubbles, and under-delivers. Every drill in this session exists to control one of those variables.
In a multichannel body, a common plunger drives all pistons through a shared coupling, so the mechanical parts that differ between channels are the per-channel seals, the nose cones, and the tip seals. Operator inputs add more channel-to-channel risk: how squarely the whole row of tips is pressed onto the rack, whether the reservoir is level, and whether the rhythm of each stroke is the same across a full plate.
Two terms anchor the measurement side. Accuracy is how close the delivered volume is to the set volume, a systematic property also called bias. Precision is how repeatable the deliveries are, a random property reported as standard deviation or coefficient of variation. A pipette can be perfectly precise and badly inaccurate, which is why the competency check reports both.
Materials and Equipment
| Item | Specification or working preparation | Why it matters |
|---|---|---|
| Air-displacement multichannel pipette | 8- or 12-channel, the instrument under training, for example a 20 to 200 µL 8-channel model | The training target and the test subject |
| Pipette tips matched to the model | Manufacturer-validated or high-quality universal tips, low-retention optional for protein or nucleic acid work | Tip geometry sets the seal quality and the dead volume |
| Distilled or deionized water | Room temperature, equilibrated on the bench for at least an hour, covered between uses | The reference liquid for gravimetry, one microliter weighs about one milligram |
| Analytical balance | 0.1 mg readability for 100 µL test volumes, 0.01 mg preferred for 10 µL volumes | Converts delivered mass into delivered volume |
| Microcentrifuge tubes, 1.5 mL, with rack | One tube per channel per replicate set | Isolates each channel for per-channel statistics |
| Dilute dye solution | A water-soluble dye such as tartrazine, about 0.1 percent weight per volume as a starting point, adjusted so the absorbance of test dilutions stays within the reader's linear range | Plate-format competency checks without a balance |
| Flat-bottom 96-well plate and plate reader | Read at the dye's absorbance maximum | Detects row-to-row and well-to-well variation |
| Reagent reservoirs | Sterile multichannel troughs, one per liquid | Keeps aspiration depth consistent across the row |
| 70 percent ethanol | For wiping the pipette body and the bench | Routine decontamination between sessions |
| Competency log or spreadsheet | Columns for channel, set volume, mass or absorbance, mean, bias, standard deviation, coefficient of variation | Turns practice into a documented record |
| Pipette stand | Vertical storage between sessions | Keeps liquid from running into the shafts and corroding the pistons |
| Personal protective equipment | Lab coat, gloves, safety glasses | Standard chemical handling protection |
Safety note: dye solutions can stain skin and clothing and may irritate eyes, so consult the safety data sheet before preparing the stock. Seventy percent ethanol is flammable, keep it away from open flames and hot surfaces. If you substitute biological samples for water or dye during practice drills, follow your institution's biosafety procedures and decontaminate the work surface afterward.
Multichannel Pipetting Training Step by Step
The session has three phases: prepare the instrument and bench, drill the technique, and measure the outcome. Steps are numbered continuously so you can run them as a checklist.
Phase 1: Prepare
- Check the calibration status of every pipette in the session. Pull the calibration certificate or the last in-house check record and confirm the due date. Training on an out-of-calibration instrument teaches the wrong muscle memory and produces competency data that cannot be trusted.
- Inspect the pipette before the first stroke. Remove a tip and look at each nose cone for cracks, dried residue, or a wobble that suggests a loose shaft. Cycle the plunger ten times through its full travel and watch that the volume display does not drift. A worn seal on one channel is invisible during normal use but obvious in per-channel testing.
- Choose test volumes that span the range. For a 20 to 200 µL 8-channel pipette, test at 200 µL, 100 µL, and 20 µL. Performance degrades toward the low end of the range because the air cushion is proportionally larger relative to the delivered volume, so a pipette that passes at 200 µL can still fail at 20 µL.
- Equilibrate the test water on the bench. Set out distilled or deionized water at least an hour before testing so it reaches room temperature. A temperature difference between the liquid, the pipette, and the room changes air cushion behavior and skews the mass-to-volume conversion.
Phase 2: Drill the technique
- Set the volume by dialing down from a higher value. Turn the setting ring past the target and approach it from above. This takes up mechanical backlash in the volume-setting mechanism and is standard guidance in pipette manufacturer documentation.
- Seat the full row of tips with even pressure. Press the shaft row straight down into a tip rack, then give each tip a light twist and tug to confirm it holds. Never hammer the pipette onto the rack. Uneven tip seating is the most common source of channel-to-channel variation in multichannel work, because a tip that is not fully seated changes the effective dead volume beneath the piston.
- Pre-wet every tip two to three times. Aspirate and dispense the working liquid back into the reservoir two or three times before the first measured delivery. The residual film that coats the tip wall equilibrates the air cushion with vapor from the liquid and reduces the liquid lost to evaporation inside the tip during the stroke. The effect is largest with volatile solvents and warm benches.
- Aspirate vertically and slowly. Hold the pipette within about 20 degrees of vertical, which is the usual manufacturer recommendation, and immerse the tips a few millimeters into the liquid, slightly deeper for large-volume tips. Press the plunger to the first stop, hold a moment, and release at a slow, steady rate. A fast release pulls liquid in too quickly, leaves bubbles, and under-delivers. Keep the immersion depth the same for every stroke, because hydrostatic pressure on the tips changes with depth.
- Dispense against a wall, through both stops. Touch the tips against the inside wall of the receiving vessel at a consistent angle, press smoothly to the first stop, pause for about a second, then press to the second stop to blow out the residual film. Keep the plunger on the second stop while you draw the tips up along the wall, then release clear of the liquid. The air cushion never displaces all of the liquid on its own, and withdrawing while still on the second stop prevents suck-back.
- Fix the rhythm. Use the same cadence for every stroke, for example aspirate over one second, pause, dispense over two seconds, pause, blow out. Operator timing is a real component of pipetting variation [1], and a fixed cadence removes most of it. Practice on a plate with water or dye until the meniscus heights across each row look identical.
Phase 3: Measure the outcome
- Run a per-channel gravimetric test. Label and tare one microcentrifuge tube per channel on the analytical balance. Dispense the set volume from each channel into its own tube, cap the tube immediately to limit evaporation, and record the mass. Repeat for at least ten deliveries per channel at each test volume, which is the common design for gravimetric checks. Mass is the reference readout because one microliter of water weighs almost exactly one milligram at room temperature.
- Convert mass to volume with the density correction. Divide each mass by the density of water at the bench temperature. At 22 °C the density is about 0.998 mg per µL, so the correction is under 0.3 percent, and many laboratories apply the simple 1 mg equals 1 µL approximation for training while reserving the full correction for formal calibration.
- Compute bias and scatter for each channel. For each channel, calculate the mean delivered volume, the percent bias against the set volume, and the standard deviation and coefficient of variation. Compare the results against the manufacturer's specification sheet for that exact model and volume, and against your laboratory's own acceptance limits.
- Run the spectrophotometric check for plate-format practice. Deliver dye dilutions into a 96-well plate and read absorbance in a plate reader. This mirrors real plate workflows, catches row-to-row effects such as a tilted reservoir, and needs no balance. Gravimetry and spectrophotometry are the two readouts reviewed for pipette accuracy and precision testing, with protocols for both single and multichannel pipettes [1].
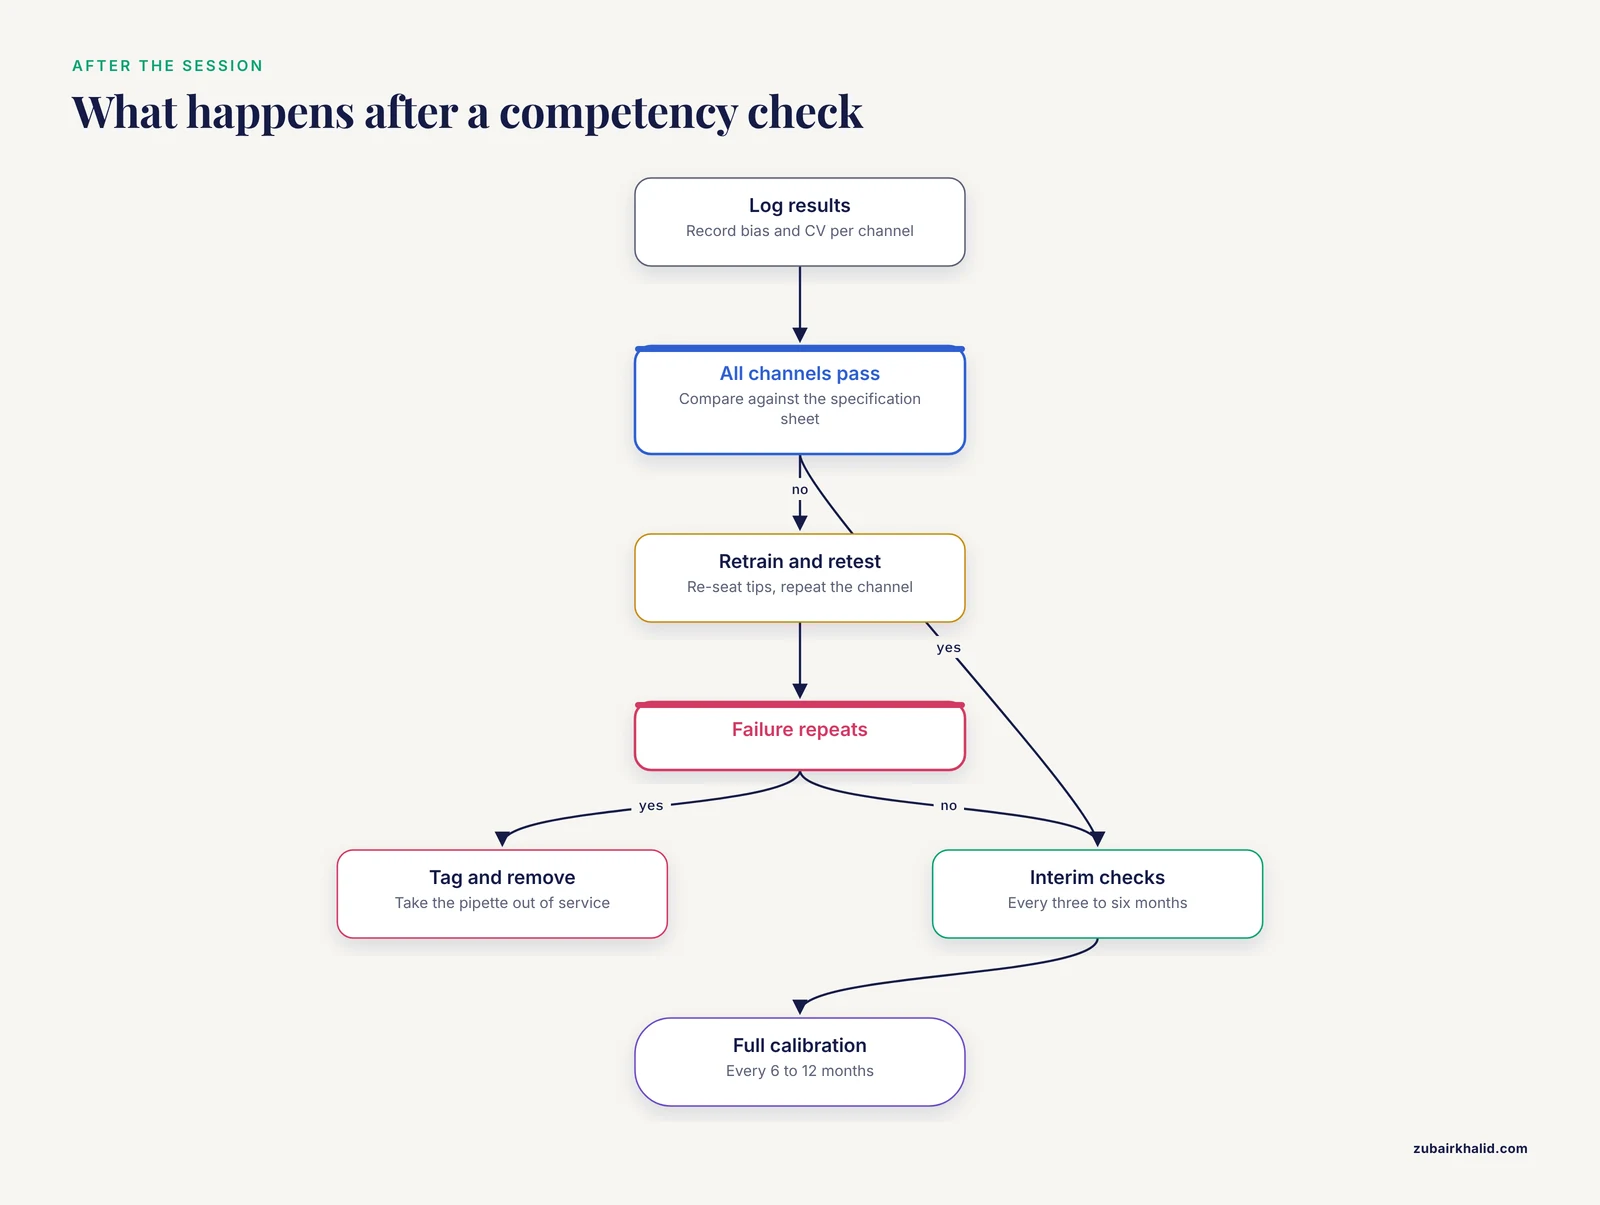
- Document, retrain, and retest. Log every result in the competency record. Re-seat tips and repeat any channel that fails. If a failure persists, tag the pipette, remove it from service, and schedule service. Competency is a loop, not a certificate.
Reading the Results: Accuracy, Precision, and Channel Uniformity
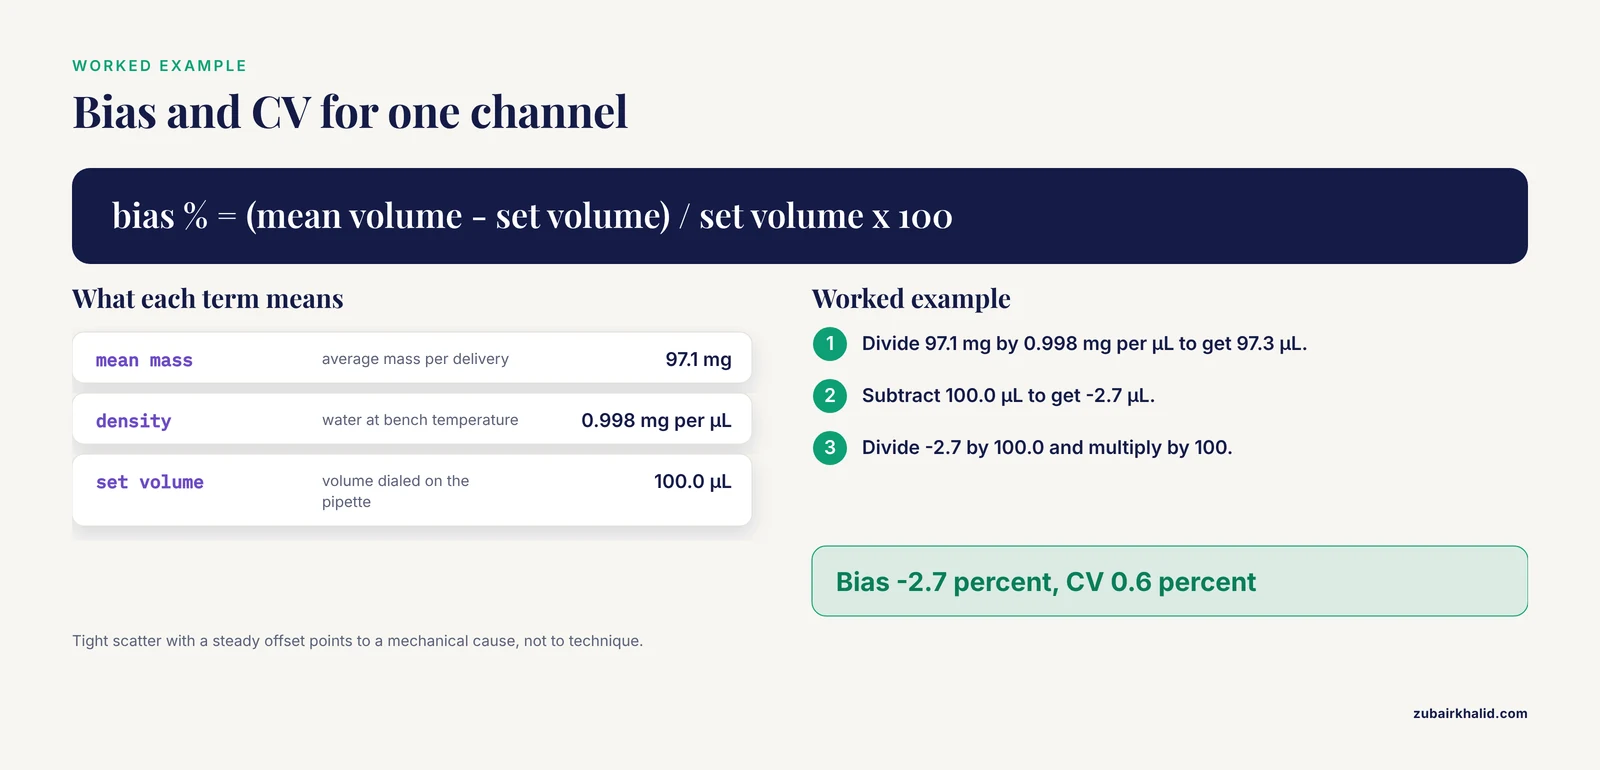
Bias is the signed difference between the mean delivered volume and the set volume, expressed as a percent of the set volume. The coefficient of variation, abbreviated CV, is the standard deviation divided by the mean, expressed as a percent. Bias describes systematic error, and CV describes random error. Read them separately, because they point to different fixes.
Controls. Verify the balance with a calibrated check weight before the session. Run a blank tare with an empty capped tube. Where available, include a certified single-channel pipette as a reference instrument. For the dye plate, include reagent blank wells filled with water only, and subtract their absorbance from the test wells.
The table below shows a worked example for an 8-channel pipette set to 100 µL, with ten replicate deliveries per channel, masses converted at 0.998 mg per µL. The numbers are illustrative, not benchmark data.
| Channel | Set volume (µL) | Mean mass (mg) | Mean volume (µL) | Bias (%) | SD (µL) | CV (%) |
|---|---|---|---|---|---|---|
| 1 | 100.0 | 99.6 | 99.8 | -0.2 | 0.7 | 0.7 |
| 2 | 100.0 | 97.1 | 97.3 | -2.7 | 0.6 | 0.6 |
| 3 | 100.0 | 100.1 | 100.3 | +0.3 | 0.8 | 0.8 |
| 4 | 100.0 | 99.8 | 100.0 | 0.0 | 0.9 | 0.9 |
| 5 | 100.0 | 100.0 | 100.2 | +0.2 | 0.7 | 0.7 |
| 6 | 100.0 | 99.5 | 99.7 | -0.3 | 0.8 | 0.8 |
| 7 | 100.0 | 99.9 | 100.1 | +0.1 | 3.2 | 3.2 |
| 8 | 100.0 | 99.7 | 99.9 | -0.1 | 0.8 | 0.8 |
Channels 1, 3, 4, 5, 6, and 8 show the signature of a healthy instrument, small bias and small scatter. Channel 2 is precise but biased low by 2.7 percent. That combination, tight scatter with a consistent offset, points to a mechanical cause such as a worn seal, an obstructed nose cone, or a poorly seated tip. Re-seat the tip and retest first, then service the shaft if the bias persists. Channel 7 is accurate on average but scatters at 3.2 percent. That combination points to technique, usually inconsistent rhythm or immersion depth, or to an intermittent seal. Coach the timing, standardize the depth, and retest before blaming the instrument.
Whether a given bias or CV passes depends on the manufacturer's specification sheet for the exact model and volume, plus any tighter limits your laboratory sets. Published community reference ranges for operator error do not yet exist, which is why laboratories define their own limits and why a common evaluation protocol has been proposed as a step toward benchmarking [1].
Multichannel Pipetting Training Tips
- Treat posture as part of pipetting technique. Set the bench height so your forearms are roughly level, keep your elbows close to your body, and keep your wrists straight through the stroke. Alternate hands when the workflow allows, use the tip ejector rather than pulling tips by hand, and take a short break every 20 to 30 minutes during long plates. Repetitive pipetting is a recognized contributor to work-related musculoskeletal strain in laboratory staff, so build these habits during training rather than after pain starts.
- Work in the upper part of the pipette's range. Choose the smallest pipette that comfortably covers the target volume, then set the volume as high within its range as the protocol allows. Relative error grows at the low end of any air-displacement pipette's range.
- Manage the reservoir. Keep enough liquid in the trough to cover all tips to the same depth, tilt the trough when the volume runs low so every tip still meets the liquid identically, and avoid scraping the bottom, which can pick up debris and disturb the seal.
- Count the cadence out loud during early drills. A spoken or counted rhythm, or a quiet metronome app, standardizes stroke timing until it becomes automatic. Timing consistency is one of the few pipetting variables fully under operator control.
- Use visual self-checks. A practice plate with dye makes volume errors visible. Uneven meniscus heights across a row, or a gradient along a row, tells you which channel or which stroke drifted before any instrument test does.
- Pre-wet consistently, even when the protocol does not say so. The first stroke from a dry tip under-delivers, and the effect is largest for volatile liquids and warm rooms.
- Switch to reverse pipetting for problem liquids. For viscous buffers with glycerol or detergent, foaming protein solutions, and volatile solvents, aspirate by pressing to the second stop and dispense by pressing only to the first stop, leaving the excess in the tip to discard. The over-aspirated volume compensates for the film that clings to the tip wall.
- Slow down at small volumes. Below about 20 percent of the pipette's range, give the plunger release and the dispense pause extra time. Small volumes forgive nothing.
- Keep the pipette vertical during aspiration. Angled aspiration changes the hydrostatic and air-cushion conditions and usually inflates the delivered volume.
- Protect the tips. Never touch the tip orifices, change gloves if your hands get damp, and keep the row of tips capped with the pipette's own tip holders between strokes when moving across the bench.
Troubleshooting Guide
| Symptom | Likely cause | Fix |
|---|---|---|
| One channel consistently low | Worn or leaking seal on that shaft, or a poorly seated tip | Re-seat the tip and retest, then inspect and service the shaft if the bias persists |
| Bubbles in the tip during aspiration | Plunger released too fast, or immersion too shallow | Slow the release, deepen the immersion slightly, pre-wet again |
| All channels read low | Dry tips, fast aspiration, or angled pipetting | Pre-wet, slow the stroke, hold the pipette vertical |
| All channels read high | Angled aspiration, liquid carried on the tip exterior, or a calibration offset | Aspirate vertically, touch off the tip exterior against the vessel wall, verify calibration |
| High scatter in one channel only | Inconsistent rhythm or immersion depth, or an intermittent seal | Standardize the cadence and depth, retest, service the channel if it persists |
| Results drift over a long session | Hand warmth transferring to the pipette body, evaporation in the reservoir | Rest the pipette between blocks, pre-wet more often, cover the reservoir |
| Tips leak or fall off | Wrong tip brand, damaged nose cone, or debris on the cone | Switch to validated tips, clean or service the nose cones |
| Balance readings wander | Air drafts, static, or evaporation from open tubes | Close the balance shield, discharge static, cap tubes immediately |
| Meniscus heights differ across a row | Tilted reservoir or uneven tip seating | Level the reservoir, re-seat the row of tips, repeat the drill |
Variations and Applications
Reverse pipetting is the main technique variation and is described in the tips section above. Reserve it for liquids where the forward mode under-delivers, and discard the excess left in the tip after each stroke.
Serial dilutions across a plate are the classic multichannel workflow. The pipette transfers a fixed volume row to row, then mixes by aspirating and dispensing in place several times before moving on. Mixing quality depends entirely on rhythm consistency, which is why the cadence drill pays off here.
Electronic multichannel pipettes replace the spring with a motor and deliver a constant piston speed regardless of operator input. They remove most of the timing variation and are useful as a comparison instrument during training, but they do not remove seal wear, tip seating problems, or reservoir handling errors.
Positive-displacement multichannel pipettes use a piston that sits inside the tip and contacts the liquid directly through a capillary. They are the choice for viscous, volatile, or dense liquids where an air cushion cannot deliver reliably. The training drills transfer, but the gravimetric check should be rerun with the specific liquid once the application is validated.
The case for per-channel competency is clearest in high-throughput chemistry. In one published proteomics workflow, a multichannel synchronous rapid enrichment strategy let operators process eight sample sets in parallel with simple aspiration-dispersion cycles in under five minutes, without the frequent centrifugation steps that traditional enrichment workflows require [2]. In a format like that, every channel must track the others, because a weak channel appears downstream as a sample-to-sample difference in enrichment yield rather than as anything visible at the bench. Per-channel competency data is what lets you rule the pipette out when that happens.
Maintenance, Storage, and Pipette Calibration
Daily care is short. Wipe the shafts and nose cones with 70 percent ethanol, check each cone for cracks and residue, cycle the plunger through its full travel, and confirm that tips seat without wobble. Never store the pipette with a tip attached, and never lay it flat while liquid is in a tip, because liquid can wick into the shaft and corrode the piston. Store vertically on a stand or hang it by the hook. Follow the manufacturer's instructions for deeper decontamination, and autoclave only instruments rated fully autoclavable.
Between full services, run interim in-house checks with the gravimetric protocol above. Published competency protocols for single and multichannel pipettes were written for exactly this purpose, so that regular checks can be done with simple equipment in any laboratory [1]. A five-minute, single-volume check after any suspicious plate catches most developing problems early.
Full pipette calibration is a gravimetric, multi-point test across the instrument's range, followed by adjustment, seal replacement as needed, and a documented certificate. Many laboratories schedule full calibration every 6 to 12 months depending on usage, with interim checks in between, following the manufacturer's documentation and their own quality system. Keep the certificates and the in-house check logs with each instrument so that any result can be traced back to the calibration state of the tool that produced it.
Common Mistakes and Limitations
The mistakes below are the ones that show up most often in multichannel pipetting training sessions.
- Testing the row average instead of each channel. Averaging hides the one weak channel that biases whole plates. Per-channel testing is the entire point of multichannel competency.
- Skipping the pre-wet when accuracy matters. The first stroke from a dry tip under-delivers, and the error is systematic, not random.
- Aspirating at an angle. Tilt changes the pressure conditions in the cushion and usually inflates the delivered volume.
- Releasing the plunger too fast. Fast release causes bubbles, turbulence, and under-delivery, and it is the most common technique error in new trainees.
- Working below 10 percent of the pipette's range. Relative error balloons at the bottom of the range. Switch to a smaller pipette instead.
- Ignoring one outlier channel. A channel that fails once will fail again. Retest it, and service it if the failure repeats.
- Training without measuring. Watching someone pipette smoothly is an impression, not competency data. The gravimetric check is what converts practice into a record.
- Assuming calibration is permanent. Seals wear, cones get chipped, and drift happens between services. Interim checks exist for this reason.
- Letting hand warmth build during long sessions. Rest the pipette between blocks on long plates, because a warm body shifts the air cushion.
Limitations. Water-based gravimetry measures the instrument and the operator, not your actual reagents. Viscous, volatile, dense, or proteinaceous solutions behave differently, so validate the pipetting step within each new application. A single training session is a snapshot, and day-to-day variation persists, which is part of why pipetting variation remains under-quantified across laboratories and why common evaluation protocols have been proposed [1]. Per-channel gravimetry is also slow for 12-channel instruments, so plan the session time accordingly. Acceptance limits are model-specific and laboratory-specific, and new reagents, unusual plates, or new workflows need their own validation before the training results are treated as transferable.
Frequently Asked Questions
How often should multichannel pipetting competency be checked?
Check competency at onboarding, after any pipette service or repair, and on a fixed interim schedule between full calibrations. Many laboratories run interim checks every three to six months, with the exact interval set by the quality system and the level of use.
What is the difference between accuracy and precision in pipetting?
Accuracy is how close the delivered volume is to the set volume. Precision is how repeatable the deliveries are. A pipette can deliver 97.3 µL every single time at a 100 µL setting and be perfectly precise but badly inaccurate.
How do I find a failing channel on a multichannel pipette?
Run a per-channel gravimetric or spectrophotometric test with one receiving vessel per channel. The failing channel shows either a consistent bias away from the set volume or a scatter pattern the other channels do not have.
Can I use any brand of tips with a multichannel pipette?
Use tips validated for your pipette model. Poorly matched tips seat unevenly, leak, and change the dead volume, and those defects appear as channel-to-channel variation that looks like instrument failure.
What is reverse pipetting and when should I use it?
Reverse pipetting aspirates by pressing to the second stop and dispenses by pressing only to the first stop, leaving excess liquid in the tip that you discard. Use it for viscous, foaming, or volatile liquids where forward pipetting under-delivers.
How does pipette calibration work?
A calibration service dispenses water gravimetrically at several volumes across the pipette range, compares the results with the manufacturer's specifications, adjusts the mechanism or replaces seals as needed, and issues a documented certificate. Interim in-house checks keep the instrument honest between services.
Why is my pipetting less accurate at small volumes?
At small settings the air cushion is large relative to the delivered volume, so seal friction, evaporation, and timing errors take a proportionally bigger bite. Use the smallest pipette that covers the volume and work in the upper part of its range.
Should I use an 8-channel or a 12-channel pipette for 96-well plates?
Match the channel count to the workflow. An 8-channel pipette matches rows and standard reservoir troughs, while a 12-channel pipette matches columns for column-wise transfers. The technique and the training are the same for both.