Best Practices for Multichannel Pipetting
By Dr. Zubair Khalid, DVM, MS, PhD ·

Multichannel pipetting lets you fill, dilute, or transfer samples across an entire row or column of a microplate in a single motion. A 96-well plate that would require 96 separate transfers with a single-channel pipette takes 12 transfers with an 8-channel instrument and 8 transfers with a 12-channel instrument. Beyond speed, multichannel pipetting reduces the number of hand movements that can introduce variation, which is why it is the default tool for ELISAs, qPCR setup, serial dilutions, and cell seeding in 96-well and 384-well formats.
Use multichannel pipetting whenever you work with microplates, multi-well reservoirs, or matched sets of tubes arranged in racks. Do not use it when you need to dispense different volumes into adjacent wells, when well spacing does not match the channel spacing, or when a single precious sample is involved and a dedicated single-channel pipette gives finer control.
In terms of time, learning the core technique takes one focused training session of about an hour. Loading a full 96-well plate with reagent becomes a matter of a few minutes once the motion is practiced. A formal accuracy and precision check of a multichannel pipette, using gravimetry or spectrophotometry, is straightforward to perform and can be completed within a routine laboratory session, which is why these checks are recommended for competency training and regular in-use verification [1].
Why Pipetting Technique Deserves Attention
Manual pipetting is the most frequently repeated manual operation in a molecular biology laboratory, and it is also a source of error that most laboratories underestimate. A review of pipetting variation describes the problem well: variation in manual pipetting is a known unknown, generally accepted to exist but rarely quantified in practice, and if it is not addressed, errors compound and compromise data quality [1]. Small systematic errors matter more in multichannel work than in single-channel work because a single pipetting motion copies the same behavior into 8 or 12 wells at once. If a channel seals poorly or the operator aspirates too quickly, that error appears in an entire row of samples, and it looks identical to a biological difference.
Good pipetting technique is therefore not cosmetic. It is a component of data quality, and treating it the way you treat instrument maintenance, with defined procedures and periodic checks, is the foundation of the practices described below.
The Principle Behind Air Displacement Pipetting
Most laboratory pipettes, including nearly all multichannel models, are air displacement pipettes. A piston inside the body moves through a fixed travel distance. Between the piston and the liquid sits a column of air, the air cushion. When you press the plunger to the first stop, the piston expels a set volume of that cushion. When you release the plunger with the tip immersed, the spring returns the piston and the expanding cushion draws liquid into the tip. The volume of liquid taken in equals the volume swept by the piston, provided the cushion behaves as expected.
That proviso explains nearly every pipetting error. The air cushion is compressed or expanded by temperature differences between the pipette, the air, and the liquid. It is disturbed by vapor from volatile solvents, by foam from proteins and detergents, and by operator behavior. Aspirating too quickly creates turbulence and aerosol bubbles that inflate the delivered volume. Aspirating too slowly from a viscous solution leaves the tip underfilled. Holding the pipette at an angle changes the hydrostatic pressure at the tip opening. All of these effects are magnified across a multichannel head, where each of the 8 or 12 channels has its own piston, spring, and seal, and where a worn tip cone on one channel produces a distinct, repeatable error in one column of every plate you run.
Positive displacement pipettes remove the air cushion entirely by using a piston that moves inside the tip itself. They are the correct choice for viscous, volatile, or foaming liquids, but they are less common in multichannel format and are not the focus here. For standard aqueous reagents, buffers, and dilution series, an air displacement multichannel pipette with good technique is appropriate.
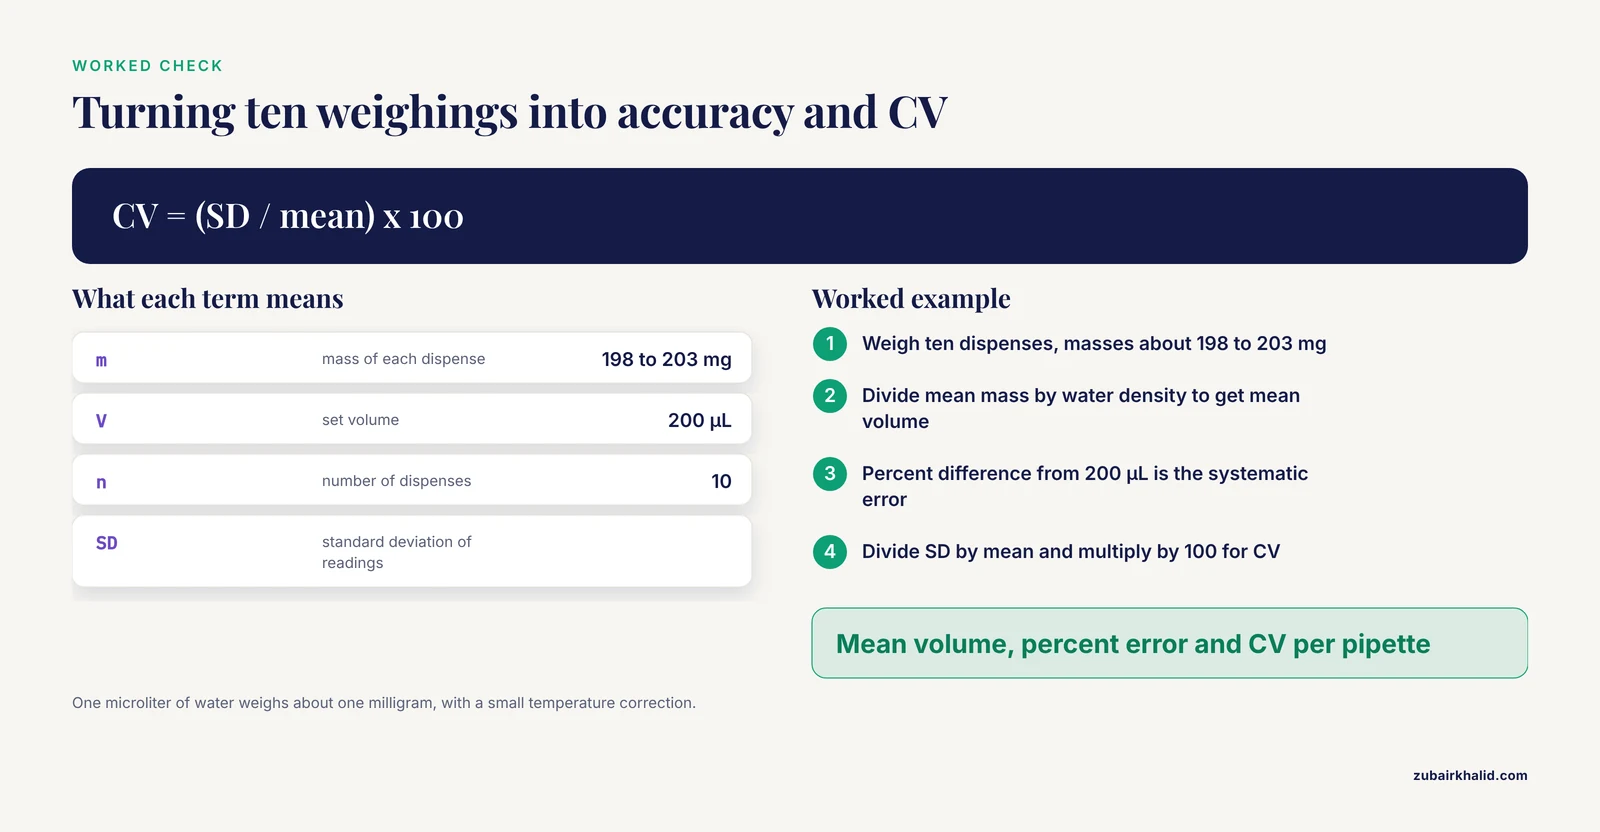
Two terms appear throughout this article and are worth defining now. Accuracy describes how close the dispensed volume is to the set volume. Precision describes how reproducible the dispensed volumes are, usually reported as the coefficient of variation, or CV, which is the standard deviation divided by the mean and multiplied by 100. A pipette can be precise without being accurate, delivering exactly 198.0 µL every time when you set 200 µL, and it can be accurate on average while scattering widely across individual dispenses. You need both.
Materials and Equipment
| Item | Specification | Notes on use |
|---|---|---|
| Multichannel pipette | 8- or 12-channel, commonly 10, 20, 100, 200, 300, or 1000 µL maximum volume | Match the pipette volume range to the volume you dispense, staying in the upper half of the range when possible |
| Pipette tips | Sterile, certified RNase- and DNase-free for nucleic acid work, matched to the pipette brand and volume range | Use full racks of level tips so all channels seat uniformly |
| Reagent reservoirs | Sterile, single-use multichannel troughs with a V-bottom or ridged bottom | Width matched to the channel spacing so every tip reaches liquid |
| Microplates | 96-well (8 rows by 12 columns) or 384-well as appropriate | Standard SBS footprint matches 8-, 12-, 16-, and 24-channel spacing |
| Distilled or deionized water | Reagent grade, equilibrated to room temperature | The test liquid for gravimetric and spectrophotometric checks |
| Analytical balance | Readability appropriate to the dispensed volume, placed on a vibration-free bench, draft-shielded | Used for gravimetric verification |
| Spectrophotometer or plate reader | UV-Vis absorbance reader capable of reading the assay wavelength of your dye solution | Used for spectrophotometric verification and for per-channel assessment |
| Dye solution | A stable, nonvolatile dye diluted so the absorbance falls in the mid-range of the reader's linear response | Dilute fresh on the day of the check and protect from light |
| 70% ethanol (v/v in water) | Surface disinfectant for the work area and pipette exterior | Flammable, keep away from open flames |
| Pipette stand or carousel | Vertical storage | Prevents the pipette lying on a bench with liquids inside the nose cone |
| Calibration tools and log | Manufacturer adjustment tool where provided, and a written maintenance log | Supports the pipette calibration schedule described below |
Multichannel Pipetting Best Practices Step by Step
The following procedure covers a typical reagent addition or dilution series in a 96-well plate. Each critical step includes the reason behind it, because operators who understand the reason stop making the error when conditions change.
- Select the correct pipette and set the volume before mounting tips. Choose a pipette whose maximum volume comfortably exceeds your target volume. Adjust the volume by turning the plunger button, and on digital models read the window at eye level to avoid parallax error. Reason: a volume set near the bottom of a pipette range falls at the steepest, least forgiving part of the accuracy specification, so a 40 µL dispensation belongs on a 100 µL pipette, not on a 1000 µL pipette.
- Inspect the tip cones and mount a full, level rack of tips. Press the pipette nose cones into the tips with a firm, even rocking or twisting motion, and visually confirm that every tip is seated at the same depth and angle. Reason: a tip that is seated loosely or unevenly breaks the seal on that channel, and the error appears as one short column in every plate. A tip rack that is not level causes exactly this pattern in a subtle form.
- Pre-wet the tips by aspirating and dispensing the working volume two to three times from the reservoir. Keep the liquid in the reservoir during this step. Reason: the air cushion inside a dry tip is desiccated, and evaporation of the pre-wet film into that cushion during the first aspirate removes liquid volume. Pre-wetting equilibrates the humidity in the cushion and improves delivery of small volumes, particularly for the first dispense of a series.
- Hold the pipette as close to vertical as practical when aspirating. Reason: tilt changes the hydrostatic pressure at the tip orifices and allows liquid to creep up the outer tip wall, both of which alter the volume drawn in. This is one of the most common differences between trained and untrained operators.
- Immerse the tips only a few millimeters below the liquid surface. In a multichannel trough, ensure every tip reaches liquid, which is why ridged or V-bottom reservoirs exist. Reason: shallow immersion risks drawing air on one channel, and deep immersion increases the hydrostatic pressure pushing liquid into the tips and leaves liquid films on the outer tip surface that drip into wells.
- Release the plunger smoothly and steadily to aspirate, then pause about one second before withdrawing. Reason: a fast release creates turbulence, bubbles, and aerosol in the tips and under-delivers. An abrupt pull out of the liquid can splatter into adjacent wells or lose droplets. The pause lets the liquid level in the tips stabilize before movement.
- Dispense at a consistent angle into the well wall. Touch the tip end to the inside wall of the well, above the liquid meniscus, at an angle of roughly 20 to 45 degrees, press to the first stop, then press to the second stop to blow out the residual film, and hold briefly before withdrawal. Reason: dispensing against the wall leaves the delivered liquid on the plastic rather than dangling from the tip, and the second stop expels the film that would otherwise remain in every tip. Consistency of angle matters as much as the angle itself, because a changing angle changes the delivered volume between columns.
- Touch off after each dispense. Gently touch the tip against the well wall away from the liquid to remove the clinging droplet. Reason: carried-over droplets transfer reagent into the next well when tips are reused within a series, which is a classic source of dilution series artifacts.
- Work in a consistent rhythm down the plate, one row or column per motion. Keep your seated posture, wrist angle, and plunger speed constant across the whole plate. Reason: operator speed and angle are measurable sources of variation in manual pipetting, and fatigue over a long plating session makes later rows different from earlier ones. A consistent rhythm also limits the time difference between the first and last wells, which matters for time-sensitive reactions.
- For serial dilutions, mix thoroughly by aspirating and dispensing in place, typically eight to ten cycles, then change tips before the next dilution step. Reason: incomplete mixing leaves a concentration gradient in the well and produces dilution curves that flatten or sag unpredictably. Carryover on a reused tip adds concentrated stock to the next dilution and biases the whole series. Some operators change tips between every dilution step as a matter of routine, and this is the safer default.
- Eject tips directly into a sharps or tip waste container using the ejector button, without touching the tips. Reason: touching used tips contaminates your gloves and everything you touch afterward.
- Return the plunger to its maximum setting when the session ends and store the pipette vertically on a stand. Reason: backing off the plunger relaxes the spring, and vertical storage keeps liquid from entering the nose cone if a tip retained residual volume.
Verifying Performance with Gravimetry and Spectrophotometry
Technique and maintenance both need objective verification. Two standard approaches exist, both of which are simple to run in any laboratory and are suitable for competency training and regular checks, for single-channel and multichannel pipettes alike [1].
Gravimetric verification. Gravimetry means weighing what the pipette delivers. Equilibrate distilled water and the balance environment to room temperature, tare a suitable vessel on an analytical balance, dispense the test volume repeatedly, and record each mass. Because one microliter of water weighs approximately one milligram at typical laboratory temperatures, with a small temperature-dependent correction, each mass reading converts directly to a volume. From the series you calculate the mean delivered volume, which reports accuracy as the percent deviation from the set volume, and the standard deviation, which reports precision.
A worked example illustrates the calculation. Suppose you set a 12-channel pipette to 200 µL and dispense ten times into a tared vessel, obtaining masses from about 198 to 203 mg. The mean mass divided by the water density at your working temperature gives the mean delivered volume, and the percent difference from 200 µL is your systematic error. The standard deviation of the ten readings, divided by the mean and multiplied by 100, is your CV. This exercise is deliberately simple, which is exactly why it functions well as a competency check for trainees and as a scheduled in-use verification for experienced staff [1].
Spectrophotometric verification. Spectrophotometry replaces the balance with an optical readout. You dispense a dye solution into wells or cuvettes, measure absorbance, and use the absorbance values to calculate accuracy and precision against a standard curve or reference dispense [1]. The practical advantage for multichannel work is per-channel resolution. When you dispense a full row of dye into a 96-well plate and read every well, each well corresponds to one channel, so the absorbance map across the row reveals whether one channel delivers systematically more or less than its neighbors. Gravimetry of a full multichannel dispense averages the channels together and can hide a single misbehaving channel, which makes the spectrophotometric plate-based check particularly valuable for 8- and 12-channel instruments.
Run both checks on a schedule. A quick in-use check when the pipette is new, after any drop or repair, and whenever plate data begin to look noisy, combined with a scheduled full calibration, covers the realistic failure modes.
Controls and Expected Results
Build a small set of controls into each verification session. Include a blank, meaning wells or vessels containing only the diluent without dye, to establish the zero absorbance. Include a reference dispense using a known good single-channel pipette or a freshly serviced instrument, which serves as the comparator. Where feasible, have a second operator run the same check, because operator-to-operator variation is one of the components that these simple protocols are designed to make visible [1].
The expected result is a row of dye dispenses whose absorbances sit within a narrow band, with no single channel standing apart from the others. In gravimetric terms, the mean delivered volume should sit close to the set volume within the manufacturer's stated tolerance for that model and volume, and the individual readings should cluster tightly. Manufacturers publish accuracy and precision specifications for each pipette and volume range, typically on the order of one to a few percent, and the model-specific figures on your certificate of calibration are the appropriate acceptance criteria for your own checks.
Reading the results is straightforward. A shifted mean with a small spread indicates a calibration problem, which an adjustment or recalibration addresses. A correct mean with a large spread indicates an operator or mechanical reproducibility problem, most often inconsistent plunger speed or a worn seal. A single outlier channel in a plate-based spectrophotometric check points to a specific tip cone, seal, or spring on that channel, which targets your repair instead of a full teardown.
Troubleshooting
| Symptom | Likely cause | Fix |
|---|---|---|
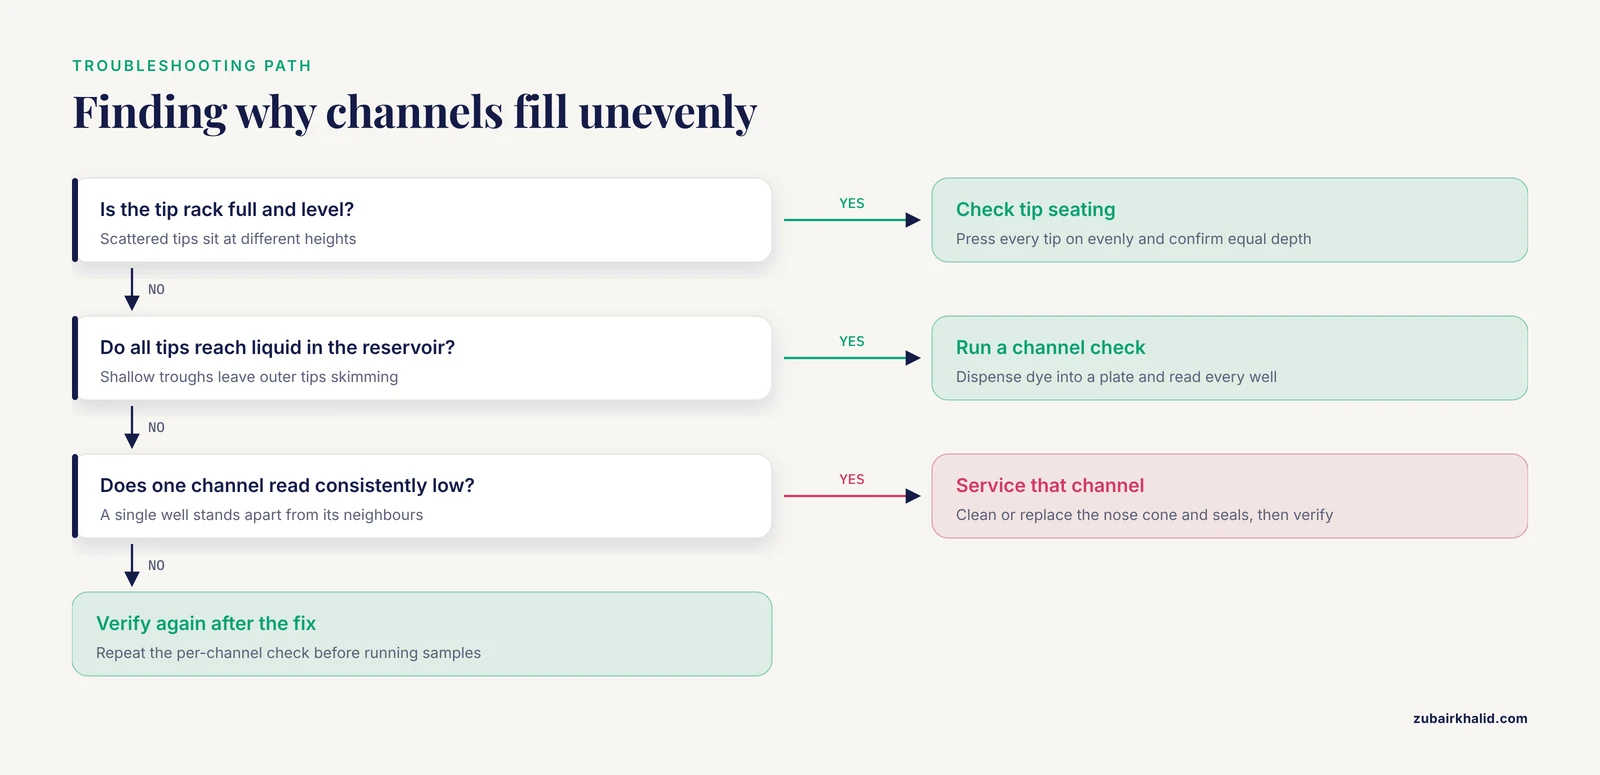
| One column of every plate is consistently low or high | Worn tip cone, seal, or spring on a single channel, or a tip that never seats on that cone | Run a per-channel spectrophotometric check to identify the channel, then clean or replace the nose cone and seals, and verify again [1] |
| Tips fill unevenly across the row | Rack tips not level, reservoir too shallow, or channel spacing mismatch | Use level full racks and ridged multichannel reservoirs sized to the pipette |
| Visible bubbles in the tips | Aspirating too fast, foaming reagent, or immersing too deep | Slow the plunger release, immerse only a few millimeters, and consider reverse pipetting for foaming liquids |
| Delivered volumes drift smaller over a long session | Evaporation from the reservoir, warming of the air cushion, or operator fatigue | Pre-wet tips, work briskly but steadily, cover the reservoir between transfers, and take a break on long plating runs |
| Droplets cling to the outer tip and splash into adjacent wells | Withdrawing from liquid too fast or dispensing without touch-off | Touch off on the well wall and lift out vertically and slowly |
| Dilution series curves flatten or sag | Incomplete mixing or carryover on reused tips | Mix eight to ten cycles per step and change tips between dilution steps |
| Liquid enters the nose cone | Tip retained liquid at storage, or pipette stored horizontally | Eject tips fully, blow out residuals, store vertically on a stand, and have the pipette serviced if liquid entered the body |
| Accuracy fails but precision is good on gravimetric check | Calibration drift | Have the pipette professionally recalibrated and adjusted, then re-verify |
| Precision fails on gravimetric check | Operator technique, worn seals, or a vibrating balance bench | First repeat with attention to consistent plunger speed and vertical hold, then examine seals and the balance environment |
Practical Tips for Routine Work
Multichannel pipetting best practices tips that experienced users rely on in daily bench work are mostly about consistency and preparation rather than exotic manipulations.
Prepare the plate layout before you pick up the pipette, and map which wells receive reagent so you never pipette into a well twice. Use separate reservoirs for each reagent rather than refilling one trough, which prevents cross-contamination and concentration changes from repeated dipping. Keep the reservoir covered with its lid or a clean.replenishment plan between rows, because evaporation in an open trough changes concentration across the time it takes to fill a plate. When pipetting cell suspensions, keep the reservoir and plate on ice or at the culture temperature as your protocol requires and mix the suspension frequently, because cells settle within minutes and the row-to-row cell density will otherwise track your pipetting order rather than your intended design.
Use the same pipette for a given step within an experiment. Different models with the same nominal range have different specifications and different wear histories, and switching instruments mid-plate adds a second variable. Record which pipette, which tips, and which lot of reagent you used, because when a plate looks wrong, the pipetting record is the first thing that narrows the cause.
Finally, respect the limits of the tool. A multichannel pipette is a precision instrument with 8 or 12 independent pistons, and treating it like a paddle shortens its calibration life. Never pipette with the pipette in your mouth region, never force the plunger when a volume is jammed, and never autoclave a pipette body unless the manufacturer explicitly rates it autoclavable.
Variations on the Standard Method
Reverse pipetting. For viscous, foaming, or high-vapor-pressure liquids, press the plunger to the second stop before aspirating, draw the liquid, and dispense with a press only to the first stop. The excess liquid drawn into the tip compensates for the film that coats the tip interior, and the reserved excess is discarded. This mode improves delivery of serum, glycerol-containing buffers, and detergent solutions. It wastes reagent, so plan the reservoir volume accordingly.
Positive displacement multichannel work. When a protocol requires accurate delivery of volatile solvents or very viscous solutions in plate format, a positive displacement design removes the air cushion and its associated errors. Availability is more limited than in air displacement format, so this remains a specialized choice.
Low-retention tips. Hydrophobically treated low-retention tips reduce the film that clings to the tip interior, which improves delivery of small volumes and of viscous or protein-rich solutions. They cost more, so reserve them for the steps where residual film actually matters, such as small-volume qPCR master mix dispensing.
384-well format. A 384-well plate has 16 rows and 24 columns at 4.5 mm spacing. Standard 8- and 12-channel pipettes do not match this spacing, so 16-channel and 24-channel pipettes exist for this format, filling a full row or column in one motion. The same technique rules apply, but the smaller well volume and smaller well mouth leave less room for error, so pre-wetting and touch-off become even more consequential.
Electronic multichannel pipettes. Motorized pipettes standardize plunger speed and can automate repeat dispensing and stepping modes for serial dilutions. They remove the operator speed variable, which is a genuine advantage for long plate sessions, but they still depend on tip seating, angle, and calibration, so the verification protocols above apply unchanged.
Repeater and stepping workflows. For dispensing one volume into many wells sequentially from a single aspirate, dedicated repeater pipettes or electronic stepping modes fill a reservoir-free workflow. Verify delivery gravimetrically across the full sequence, not only for the first dispense, because the delivered volume can drift as the aspirate volume depletes.
Storage, Handling, and Pipette Calibration
Store multichannel pipettes vertically on a stand or carousel with the plunger backed off to its maximum setting and no tip attached. Vertical storage prevents residual liquid from running into the nose cone and body. Clean the exterior and nose cones with 70% ethanol during routine bench cleaning, and disassemble the nose cones for cleaning only per the manufacturer's instructions, because reassembling a nose cone incorrectly disturbs the seal on individual channels.
Pipette calibration is the scheduled, documented verification and adjustment of a pipette's delivered volume against a traceable reference. The gravimetric and spectrophotometric protocols described above are exactly the simple-to-use methods recommended for laboratories to determine accuracy and precision of single- and multichannel pipettes, for competency training and regular checks, without specialized equipment beyond an analytical balance or a spectrophotometer [1]. A practical schedule combines three layers. First, a daily or per-session sanity check, such as pre-wetting and observing whether all tips fill evenly. Second, an in-use verification at a defined interval, such as monthly or quarterly, using gravimetry or spectrophotometry with results logged per instrument and per operator. Third, an annual professional calibration with adjustment and a certificate, performed more frequently for heavily used or high-stakes instruments.
Calibration should never be a one-time event after purchase. Springs relax, seals age, and tip cones wear, and the delivered volume changes silently. Because a common protocol for evaluating pipetting variation also enables cross-laboratory comparison, laboratories that log their checks with the same method can benchmark their operator error against other laboratories and, over time, contribute to reference ranges of acceptable operator error for good laboratory practice [1]. A written log of gravimetric or spectrophotometric results per pipette, per operator, and per date turns pipette calibration from a vague obligation into a data set you can act on.
Common Mistakes and Limitations
The common mistakes in multichannel pipetting cluster into three groups, mechanical, procedural, and inferential.
Mechanical mistakes begin with using the wrong tips or a partially used rack whose tips are scattered at different heights, which produces one channel sealing well and its neighbors sealing poorly. They include ignoring a dropped pipette, which can bend a nose cone invisibly, and running a pipette past its calibration date because it still feels fine. Feel is not a metrological instrument, and the whole point of scheduled gravimetric or spectrophotometric checks is to replace feel with measurement.
Procedural mistakes include aspirating too quickly, which is the single most common operator error and produces bubbles and under-delivery. Holding the pipette at a steep angle during aspiration changes the volume drawn in. Skipping the pre-wet on the first dispense of a small-volume series systematically under-delivers that first column. Filling a reservoir too shallow so the outer tips skim the liquid surface produces partially filled channels that look like a bad tip. Dragging a used tip across well rims during a serial dilution transfers carryover between wells. Dispensing into the first well of a row from directly above splashes aerosol into neighboring wells. Mixing a dilution step with two half-hearted cycles instead of a genuine eight to ten leaves gradients that masquerade as biological effects.
Inferential mistakes are the most subtle. Operators assume that competence with a single-channel pipette transfers automatically to multichannel work, but the per-channel mechanics and the plate-scale rhythm are distinct skills, and competency should be assessed separately with protocols designed for both pipette types [1]. Operators also assume that a pipette with a current calibration certificate is delivering accurately on every channel in daily use, when wear between calibrations can affect individual channels. Finally, operators attribute plate edge effects and row gradients entirely to evaporation or incubator behavior when the pipetting rhythm itself can generate the same pattern.
The honest limitations are these. No pipetting technique corrects for a poorly maintained instrument, so technique and calibration must be verified together. There is currently no universally accepted reference value for acceptable operator pipetting error, which is why laboratories should establish their own baseline with the simple gravimetric and spectrophotometric protocols available and track their results over time [1]. And technique, however disciplined, cannot compensate for the wrong tool, so viscous, volatile, and foaming liquids call for reverse pipetting or positive displacement equipment rather than more careful standard technique.
Safety Notes
Handle 70% ethanol away from open flames and hot surfaces, because it is flammable, and allow cleaned surfaces to dry before any flame work nearby. Wear gloves and eye protection when preparing dye solutions, which can stain skin and clothing, and dispose of dye waste according to your institution's chemical waste procedures. When pipetting biological samples, human or animal material, follow your institution's biosafety procedures, use filtered tips where aerosol control matters, and decontaminate the pipette and work surface afterward. Nucleic acid work with RNases present requires certified RNase-free tips and reservoirs and dedicated bench areas.
Frequently Asked Questions
Should I choose an 8-channel or 12-channel pipette?
Choose based on your plate layout. A 12-channel pipette fills all 8 rows of a 96-well plate column by column in 8 motions, while an 8-channel pipette fills the 12 columns row by row in 12 motions. Many laboratories keep both, since some plate readers and washers are oriented to work with either dimension.
Why do some channels fill more slowly or less fully than others?
Uneven filling almost always comes from tip seating or channel mechanics rather than technique. Check that the tip rack is level and that every tip is pressed on evenly, then run a per-channel spectrophotometric check to identify whether a specific channel delivers consistently low, which points to that channel's tip cone, seal, or spring.
How often should pipette calibration be performed?
Combine a quick visual check every session, a gravimetric or spectrophotometric verification at a set interval such as monthly or quarterly, and a professional calibration and adjustment on an annual schedule or more often for heavily used instruments. Always re-verify after a drop, a repair, or any change in your plate data quality.
Can I use any brand of tips with my multichannel pipette?
Use tips designed and certified for your pipette model whenever possible. Tip cone geometry varies between brands, and a poor fit on even one of 8 or 12 channels produces a column-specific error in every plate. If you must use an alternate brand, verify delivery gravimetrically or spectrophotometrically before committing samples.
What is the difference between the first and second plunger stops?
The first stop corresponds to the set volume and is the correct stop for aspirating and for most dispensing. The second stop expels an additional volume that clears the residual film from the tip wall, so it is used for blow-out during dispensing and for drawing extra liquid in reverse pipetting. Aspirating from the second stop over-fills the tip and produces errors.
How many times should I pre-wet tips before the first dispense?
Two to three aspirate and dispense cycles with the working volume is the standard practice. Pre-wetting humidifies the air cushion so evaporation inside the tip does not reduce the volume delivered on the first dispense, which matters most for small volumes and viscous or volatile liquids.
How can I check whether my multichannel pipetting is accurate?
Dispense distilled water repeatedly onto an analytical balance and convert the masses to volumes using the water density, or dispense a dye solution and read the absorbance in a plate reader. Both methods are simple, suitable for competency training and regular checks, and the plate-based dye method reveals channel-to-channel differences that a balance would average out.
Can a multichannel pipette handle viscous or volatile liquids?
Not accurately in standard forward mode. Use reverse pipetting for viscous or foaming liquids, and consider a positive displacement pipette for volatile solvents. Test any new liquid type with a gravimetric or spectrophotometric check before running it on real samples.