Lab Cleaning and Disinfection SOP Template
By Dr. Zubair Khalid, DVM, MS, PhD ·

By the end of this article you will be able to write a complete, inspection-ready standard operating procedure (SOP) for cleaning and disinfecting a molecular biology laboratory. You will have a copy-paste template, a worked dilution calculation with expected output, a parameters table, a monitoring plan, and a short companion procedure for PCR contamination prevention.
Before you start, have these on hand:
- Your lab's inventory of work surfaces, shared equipment, and high-touch items
- The safety data sheets (SDS) for every chemical you plan to use
- Manufacturer instructions for use (MIFU) for any shared instrument that cannot be flooded or soaked
- The contact times listed on your disinfectant labels
- Your institution's biosafety manual or chemical hygiene plan, if one exists
Everything below is written so you can adapt it to a teaching lab, a research bench, or a core facility.
Why a Written SOP Matters More Than Good Intentions
Cleaning that is not written down does not reproduce. That problem shows up in the literature repeatedly, and molecular biology labs have a second reason to care, because residual nucleic acids and microbes on surfaces sabotage their own experiments.
Two lines of evidence make the case.
First, even trained personnel skip spots. In a study of 20 examination tables used by osteopathic medical students, researchers sampled each table in the morning after professional environmental services cleaning and again after students used and disinfected the tables. Students consistently overlooked regions of the tables that required disinfection, and the authors concluded that the finding exposed a need to re-educate users on thorough disinfection technique [1][2]. A lab bench is no different. If your SOP does not name specific zones, the zones people cannot see or do not want to move get skipped.
Second, real laboratories are dirtier than anyone assumes. A cross-sectional study in a hospital microbiology laboratory collected 4,000 surface swabs from workstations, incubators, and other areas, cultured them, and found a 39% culture positivity rate, with 1,563 samples positive for bacteria. More than 90% of positive samples carried multiple isolates, and workstations and incubators were the most contaminated locations. Cleaning measurably reduced bacterial presence, with a p-value below 0.00001 [3]. The takeaway is direct. Cleaning works, but only where it is actually applied, and the places people clean least are often the places that matter most, like shared incubators.
A written SOP converts good intentions into a checkable, auditable, trainable procedure. The rest of this article gives you the format and the content.
How to Write a Lab Cleaning and Disinfection SOP
A usable SOP has eight sections. Write them in this order and the document almost writes itself.
Step 1: Define Scope and Responsibility
State exactly which rooms, benches, and instruments the SOP covers and who performs each task. Separate three roles:
- Daily user cleaning. Everyone who touches the bench wipes it down at the end of a work session.
- Scheduled deep cleaning. A named person or rotation performs weekly or monthly tasks such as disinfecting water baths, fridge handles, and drawer pulls.
- Verification and records. A lab manager or biosafety officer reviews logs and schedules surface sampling.
Assign names or role titles, not "staff." An SOP that says "users will clean benches" produces the missed-zone problem seen in the student study.
Step 2: Divide the Lab Into Zones With Different Risk Levels
Laboratory contamination control starts with zoning. A common and defensible scheme:
| Zone | Examples | Cleaning frequency | Notes |
|---|---|---|---|
| Pre-PCR clean area | Reagent prep bench, template-free hood | Daily plus before each PCR setup session | Strictest nucleic acid hygiene |
| Post-PCR and template area | Amplification bench, gel casting, gel imager | Daily plus after spills | Highest amplicon load |
| Cell culture area | Biosafety cabinet, incubator | Before and after each session plus scheduled deep clean | Follow MIFU, never flood |
| Shared equipment | Thermal cyclers, centrifuges, water baths | Weekly plus after spills | Rotor buckets are routinely missed |
| High-touch non-lab surfaces | Door handles, light switches, keyboards, chair backs | Daily | Frequent drivers of cross-contamination |
The zoning principle generalizes across settings. Infection control guidance for extended reality equipment used in healthcare makes the same point, that shared reusable devices need a defined cleaning and disinfection protocol built around the manufacturer's instructions, because these devices are touched by many people and often lack healthcare-specific cleaning guidance [4].
Step 3: Choose Agents by Function, Not Habit
Separate three functions that people constantly conflate:
- Cleaning removes soil, organic matter, and residue. It lowers microbial load but does not reliably kill.
- Disinfection kills or inactivates microbes on a precleaned surface. It does not remove soil.
- Sterilization eliminates all viable microbes, typically by autoclave, and applies to reusables like forceps and spreaders, not to benches.
The order is nonnegotiable. Soil protects microbes. In a study of commercial agents against robust biofilms of a Pseudomonas fluorescens strain isolated from a poultry meat plant, the single application of an alkaline detergent, an enzymatic detergent, a peracetic acid and hydrogen peroxide disinfectant, or detergent-disinfectant formulations all failed to completely eradicate the biofilm. Only two-step procedures, applying a detergent (alkaline or enzymatic at 50 degrees C) followed by the peracetic acid and hydrogen peroxide disinfectant, succeeded. A seven-step clean-in-place protocol against mature Enterococcus faecalis biofilms on stainless steel told the same story, combining 2% sodium hydroxide cleaning, an enzyme mixture at 50 degrees C for 20 minutes, 1% nitric acid at 55 degrees C for 20 minutes, and a final 0.5% quaternary ammonium treatment at 25 degrees C for 20 minutes, achieving a 5.32 log reduction while shorter protocols reached only 3.14 to 4 log reductions [5]. More steps and more contact time bought more kill.
For a molecular biology bench, a practical two-step standard is detergent and water first, then your lab's approved disinfectant, with the label contact time respected.
Step 4: Specify Concentration, Contact Time, and Method
For every disinfectant in your SOP, record:
- The working concentration and how to prepare it from stock
- The contact time from the label, meaning how long the surface must stay visibly wet
- The application method (spray, wipe, immersion, fogging) and any rinse step
- Incompatibilities, for example bleach and ammonia, or bleach and acids
- Shelf life of the diluted working solution, since diluted bleach loses activity over days
Step 5: Write the Sequence of Actions
Number every action in order, from putting on gloves to final waste disposal. Include what to do when a task cannot be completed, for example an incubator that cannot be emptied that day.
Step 6: Add a Verification Step
Define how you will prove the SOP works. Surface swabbing with culture, or molecular detection, both appear in the literature and are described later in this article. The point for now is that the SOP must state who samples, where, how often, and what result triggers corrective action.
Step 7: Define Records
Specify the log format, where completed logs live, and how long you keep them. An SOP without a record is a suggestion.
Step 8: Set Review and Training
State the review interval, commonly annually or after any equipment, agent, or layout change, and require documented training before anyone signs the daily log.
The Lab Cleaning SOP Template
The following is a complete lab cleaning sop template format you can copy into a document and fill in. Every bracketed field is a placeholder you replace with your lab's specifics.
STANDARD OPERATING PROCEDURE
Title: Cleaning and Disinfection of [Room Number / Lab Name]
SOP ID: [e.g., CLEAN-001]
Version: [1.0]     Effective date: [YYYY-MM-DD]
Author: [Name, Title]     Approved by: [Name, Title]
Review due: [YYYY-MM-DD or annually]

1. PURPOSE
   This SOP describes routine cleaning and disinfection of [rooms/surfaces/
   equipment] to protect personnel, maintain laboratory contamination
   control, and prevent sample and PCR contamination.

2. SCOPE
   Applies to: [room numbers, benches, shared instruments]
   Applies to: [all personnel roles that perform cleaning]
   Excludes: [e.g., radioactive areas governed by SOP X]

3. RESPONSIBILITIES
   - All bench users: [daily end-of-session wipe-down, Section 6.1]
   - [Name/rotation]: [weekly deep clean, Section 6.2]
   - Lab manager: [records review, agent inventory, verification, Section 7]
   - Biosafety officer: [annual review, spill response oversight]

4. DEFINITIONS
   Cleaning: removal of soil and residue with detergent and water.
   Disinfection: inactivation of microbes on a precleaned surface.
   Contact time: the period a surface must remain visibly wet with
     disinfectant, per the product label.
   PCR contamination: unwanted nucleic acid or amplicon presence that
     causes false-positive amplification.

5. MATERIALS AND AGENTS
   5.1 Approved agents (list each with working concentration, dilution
       instructions, contact time, shelf life of working solution, and SDS
       location):
       [Agent A: e.g., sodium hypochlorite solution, 0.5%, prepared
        1:10 from X% stock, contact time per label, prepare fresh weekly]
       [Agent B: e.g., 70% ethanol or approved quaternary ammonium,
        contact time per label]
       [Enzymatic detergent for instruments, per MIFU]
   5.2 Consumables: [lint-free wipes, nitrile gloves, spray bottles
       labeled with contents, date prepared, and initials]
   5.3 PPE: [gloves, lab coat, eye protection for bleach work]
   5.4 Storage: [where agents and PPE are stored]

6. PROCEDURE
   6.1 Daily end-of-session bench cleaning (all users)
       a. Remove all items from the work surface. Return reagents to
          [location].
       b. Inspect for spills or residue.
       c. Step 1, clean: wipe the entire work surface with detergent
          solution or wipes, moving from cleanest area to dirtiest.
       d. Step 2, disinfect: apply [Agent A/B], ensure the surface stays
          visibly wet for the full contact time of [X minutes].
       e. Air dry or wipe dry per product label.
       f. Dispose of wipes in [waste stream]. Remove gloves, perform
          hand hygiene.
       g. Record completion in the daily log (Section 8).
   6.2 Weekly deep cleaning ([Name/rotation])
       a. Empty and clean [refrigerator shelves / drawer handles /
          door handles / light switches / chair backs / keyboard].
       b. Clean and disinfect shared equipment exteriors per MIFU:
          [thermal cycler lid and keypad, centrifuge rotors and buckets,
           water bath interior, incubator exterior].
       c. Disinfect pipettes and racks: [method per MIFU].
       d. Drain, clean, and disinfect the water bath: [method,
          frequency of full drain].
       e. Check and clean the biosafety cabinet per MIFU: [schedule].
       f. Record completion in the weekly log.
   6.3 After a spill of biological material
       a. Alert [person]. Evacuate the immediate area if aerosols were
          generated and allow [time] for aerosols to settle.
       b. Don PPE: [list].
       c. Cover the spill with absorbent material, apply disinfectant
          from the perimeter inward, ensure the listed contact time.
       d. Remove material, clean with detergent, disinfect again.
       e. Dispose of all material in [waste stream]. Log the event.

7. VERIFICATION
   7.1 Surface sampling: [swab locations, frequency, method,
       acceptance criteria]
   7.2 Corrective action: if results fail criteria, repeat cleaning,
       re-train staff, and re-sample within [X days].
   7.3 Records review: the lab manager reviews logs [monthly].

8. RECORDS
   Log location: [paper binder / electronic system]
   Retention: [X years per institutional policy]

9. TRAINING
   All personnel complete documented training on this SOP before
   signing the daily log. Re-training occurs [annually / after
   revisions / after failed verification].

10. REVISION HISTORY
    Version | Date | Author | Summary of changes
Save this as a version-controlled document. When someone asks for a free lab cleaning sop template, this block is the deliverable. The value is not the words, it is the bracketed fields, because each one forces a decision your lab must own.
Filling In the Template: A Worked Example
Here is a numbered walkthrough for a typical molecular biology teaching lab, with a real calculation.
Step 1: Assign Zones
The lab has a reagent prep bench near the door, an amplification bench with two thermal cyclers, a gel station, a water bath, two 4 degree C refrigerators, a minus 20 degrees C freezer, and a shared keyboard. Assign the prep bench to the clean zone, everything downstream to the template zone, and the door handles, keyboard, and chair backs to the high-touch list.
Step 2: Pick the Agents
Use detergent and water for the cleaning step. For disinfection, use a diluted sodium hypochlorite (bleach) solution for benches and a 70% ethanol solution for surfaces near electronics where corrosion is a concern, following each product label for contact time. Both are standard laboratory practice covered in basic biosafety teaching.
Step 3: Calculate the Bleach Dilution
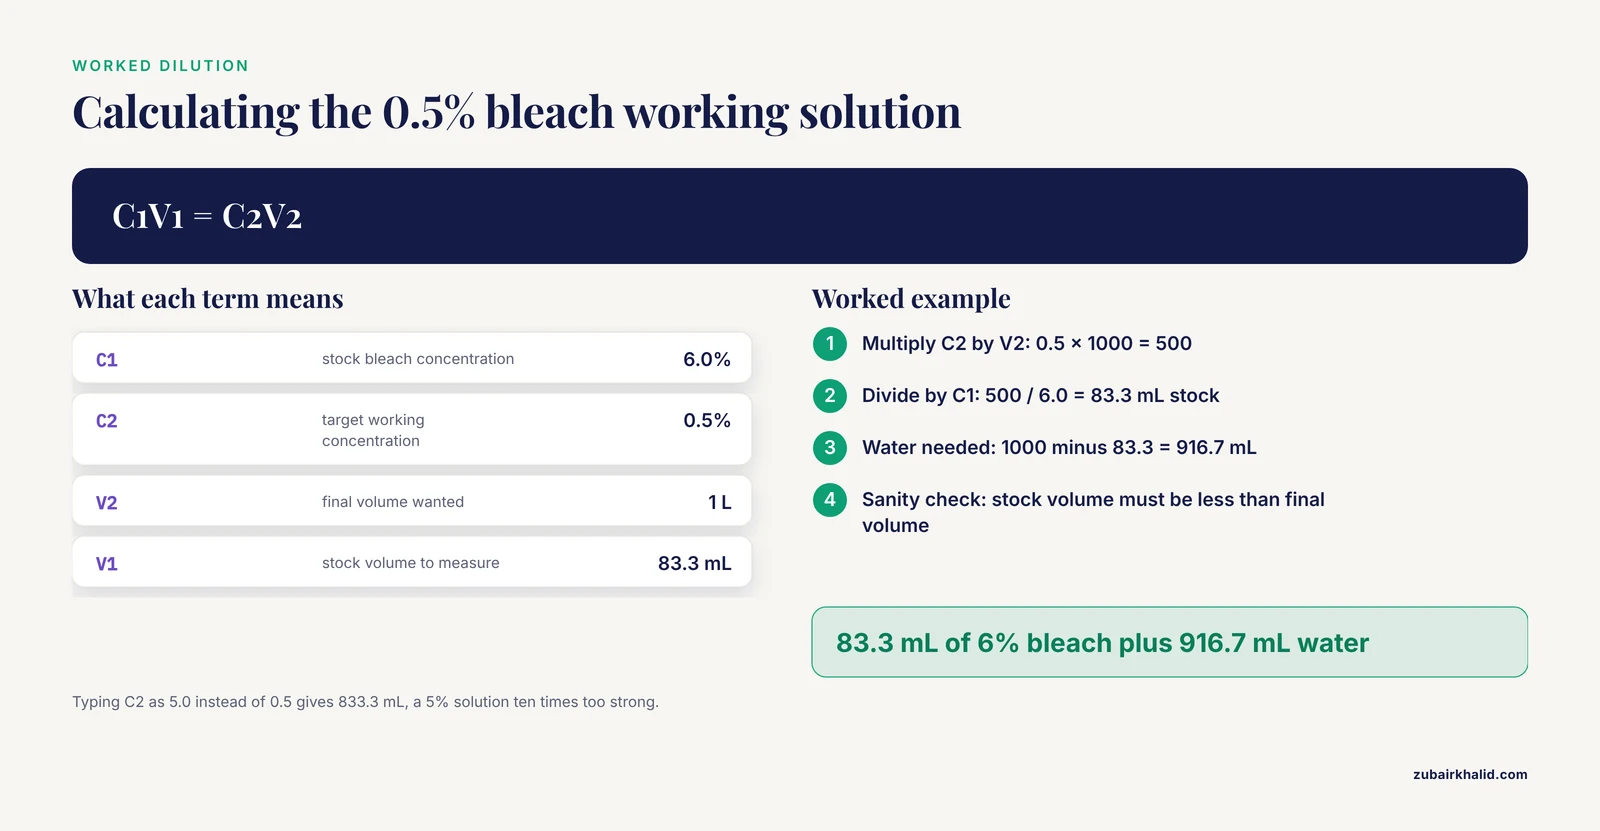
Household bleach in the United States is commonly 5.25% to 6% sodium hypochlorite by weight. A widely used laboratory working concentration is roughly 0.5%, which corresponds to a 1:10 dilution of 5.25% stock. To prepare 1 liter of 0.5% working solution from 6% stock, use C1V1 = C2V2:
# Dilution calculator: C1V1 = C2V2
C1 = 6.0        # percent NaOCl in stock bleach
C2 = 0.5        # target working concentration, percent
V2 = 1000.0     # target final volume, mL

V1 = C2 * V2 / C1
print(f"Stock bleach needed: {V1:.1f} mL")
print(f"Water needed:        {V2 - V1:.1f} mL")
Expected output:
Stock bleach needed: 83.3 mL
Water needed:        916.7 mL
So the SOP reads: measure 83.3 mL of 6% bleach into a labeled 1 L bottle, fill to volume with water, cap, invert to mix, label with contents, date, and initials, and prepare a fresh bottle weekly.
A common error appears as a wrong output here. If you accidentally type C2 = 5.0 instead of 0.5, the output becomes:
Stock bleach needed: 833.3 mL
Water needed:        166.7 mL
That is a 5% working solution, ten times the intended strength, corrosive to stainless steel and hazardous to breathe. The fix is the same one you apply to any calculation: sanity-check the answer. A working dilution should always be smaller than the stock, so the stock volume should always be less than the final volume.
Step 4: Define Contact Time
Read the label on the actual product you buy. Concentrated bleach products and ready-to-use disinfectant wipes differ, and the contact time on the label governs. Write the specific number from your bottle into Section 5.1 of the template. A wipe that flashes across a bench and evaporates in ten seconds has not met any contact time, which is one mechanism behind the missed-zone failures observed in the student disinfection study [1].
Step 5: Write the Daily Procedure
Using the template's Section 6.1, fill in the details. A realistic completed line looks like this:
   6.1 Daily end-of-session bench cleaning (all users)
       a. Remove all items from the work surface. Return reagents to
          the shelf above the bench.
       b. Inspect for spills or residue.
       c. Step 1, clean: wipe the entire work surface with detergent
          solution, moving from the door side to the window side.
       d. Step 2, disinfect: spray 0.5% sodium hypochlorite until the
          surface is visibly wet, keep wet for 5 minutes per label.
       e. Wipe dry with a clean lint-free wipe.
       f. Dispose of wipes in the regular trash (no biological
          material present). Remove gloves, wash hands.
       g. Record completion in the daily log.
Step 6: Build the Log
DAILY CLEANING LOG - Room [number] Prep Bench
Date | Time | User | Detergent wipe done (Y/N) | Disinfectant applied
(Y/N) | Contact time met (Y/N) | Spills or issues | Initials
Print a month of blank rows, keep the binder at the bench, and have the lab manager review it monthly per Section 7.3.
Key Parameters and Options at a Glance
| Parameter | What it controls | How to set it | Common error |
|---|---|---|---|
| Working concentration | Antimicrobial strength | From product label, calculated with C1V1 = C2V2 | Using "a splash of bleach" with no measured dilution |
| Contact time | Kill achieved | From product label, timed with a clock | Wiping dry before the label time elapses |
| Two-step order | Whether disinfectant reaches microbes | Clean first, then disinfect | Spraying disinfectant onto visible soil |
| Zone assignment | Where strict hygiene applies | Map the workflow from clean to dirty | Using the same pipettes in prep and post-PCR areas |
| Solution shelf life | Retained activity | Per label or institutional standard, always dated | Using a faded month-old bleach bottle |
| Verification frequency | Proof of performance | Monthly or quarterly swabs at fixed sites | Assuming cleaning works without checking |
Laboratory Contamination Control: What the Evidence Says About Hard Cases
Three recurring problems deserve their own SOP lines, because routine wiping does not solve them.
Biofilms Resist Simple Disinfection
A biofilm is a structured microbial community enclosed in a self-produced exopolysaccharide matrix. Bacteria inside biofilms resist disinfectants far better than planktonic cells. In livestock drinking water systems, an evaluation of commonly used agents, including peroxides, peracetic acid, chlorine dioxide, formic acid, chlorine, and enzymatic treatments, found that disinfectants reduced multispecies viable biofilm cells in laboratory reactors but the effects varied with microbial composition, and the in situ results on a working farm showed little effect of the cleaning and disinfection protocols. The authors concluded that targeted intervention strategies supported by regular monitoring are essential [6]. The laboratory analogue is the drain, the sink overflow, the water bath, and any warm wet crevice. For these, your SOP should schedule mechanical scrubbing with detergent, not just a spray, and periodic replacement of parts such as water bath fluid.
Grime and Inaccessibility Cut Efficacy
Physical soil and hard-to-reach geometry both lower decontamination performance. In a study that attached bacteriophage MS2-inoculated metal coupons to the undercarriages of animal mortality transport vehicles, cleaning with a pressure washing system followed by dilute sodium hypochlorite achieved greater than 5 log reduction of MS2 at almost all locations, but the location with the heaviest grime, an inside-back bumper, reached only a 4 log reduction, and the authors attributed lower efficacy at some sites to grime and lack of accessibility [7]. Translated to the lab, move the equipment. Your SOP should require pulling out instruments and cleaning underneath and behind them on the deep-clean schedule, because the floor gap under a centrifuge will never be disinfected by anyone standing in front of it.
Disinfectants Can Damage Materials
Aggressive cleaning has a cost on incompatible surfaces. Testing of flexible denture base material exposed to ten cleaning and disinfection regimens over 30 days found no statistically significant hardness change for most groups, but daily cleaning with one commercially available tablet formulation produced a statistically significant increase in hardness compared with the control group [8]. The lesson generalizes. Check MIFU compatibility for every surface class in your lab, and keep strong oxidizers like bleach off optics, unpainted aluminum, and electronics housings, where your instrument manual will usually confirm the incompatibility.
Adherence Is the Real Bottleneck
A qualitative evidence synthesis of cleaning and disinfection practices during the COVID-19 pandemic identified six analytical themes and found that uptake was shaped by individual judgment, historic norms and practices, the ability to implement rapid guideline change, and resource considerations such as workload and institutional support [9]. Practical consequence for your SOP, keep the daily procedure short enough that it actually gets done under time pressure, and give the deep-clean rotation protected time. In medical school OMM labs, the same re-education need appeared after students overlooked table regions during disinfection [2], which is why the template above names zones and movements explicitly instead of writing "wipe down the bench."
PCR Contamination Prevention: The Companion Procedure
PCR contamination prevention is a distinct discipline from surface hygiene, and your cleaning SOP should reference a companion procedure. Amplicons, the products of completed reactions, are the dominant threat because a few molecules in the wrong tube at the wrong moment will amplify.
Physical Separation
Dedicate separate areas for pre-PCR work (reagent preparation) and post-PCR work (adding template, running gels). The prep bench must never see amplified DNA, plasmid templates, or post-amplification tubes. Equipment follows the same rule, so keep a dedicated set of pipettes, filtered tips, and tube racks in the clean zone and color-code them.
Unidirectional Workflow
Move materials in one direction only, from clean to dirty. Researchers enter the pre-PCR area first, handle template and amplified material last, and never walk a post-PCR tube back into the prep area. This single rule prevents more contamination than any spray bottle.
Decontamination of Amplicons
Standard chemical disinfection of DNA is imperfect, so PCR labs add specific tools covered in standard molecular biology practice:
- UV irradiation of work surfaces and hood interiors between sessions, which damages nucleic acids
- dUTP/UNG carryover prevention, where reactions incorporate dUTP and a uracil-N-glycosylase step destroys carryover products before amplification
- Separate reagent aliquots, so an opened master mix is never carried between zones
Surface disinfection still matters. The pre-PCR bench gets the full two-step cleaning from your main SOP, plus a UV or wipe-down step before each setup session.
Contamination Checks
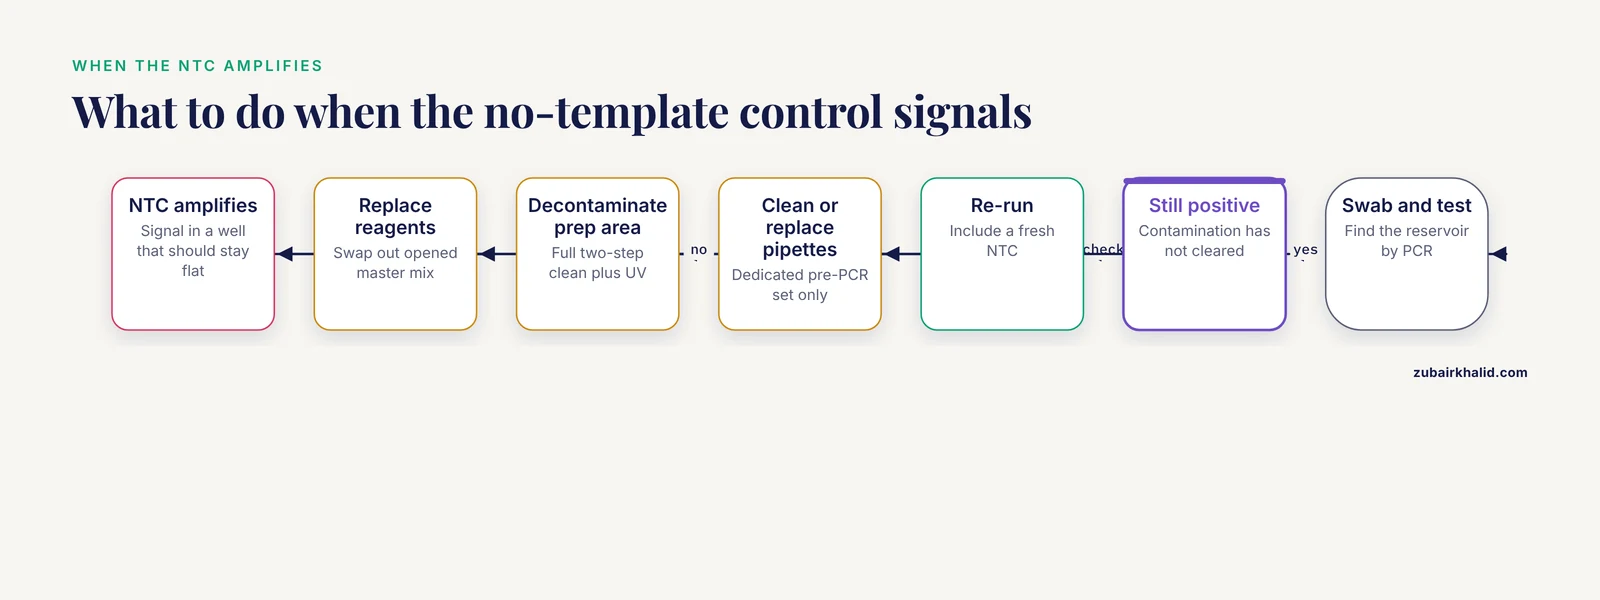
Include a no-template control (NTC) in every run. An amplification signal in the NTC is the classic error indicator, reported by the instrument as a crossing threshold in a well that should stay flat. The fix ladder, in order, is to replace reagents, decontaminate the prep area, replace or clean pipettes, and re-run. If contamination persists after all four, swab the prep area surfaces and test the swabs by PCR to find the reservoir.
Monitoring by Molecular Detection
Environmental molecular detection works as a surveillance tool. In the African swine fever study cited above, environmental swabs from six farms that had undergone decontamination were tested by real-time PCR, and viral DNA was detected at five of the six farms even after at least three months of downtime and intensive cleaning, with median Ct values ranging from 33.4 to 37.3 across farms, while one farm returned completely negative results across all 25 swabs [10]. Ct values near the assay limit of detection indicate residual, low-level signal. The same logic applies to a PCR lab, where periodic swab-and-test surveillance of the prep bench, door handles, and pipettes will find contamination reservoirs before they find your experiments.
Verifying That the SOP Actually Works
A cleaning SOP without verification is an opinion. Build verification into Section 7 of the template.
Culture-Based Surface Sampling
The hospital microbiology laboratory study mentioned earlier collected 4,000 surface swabs and cultured them on blood and MacConkey agar with standard 24-hour incubation and colony identification, using the results both to map contamination and to show that cleaning significantly reduced bacterial presence [3]. A scaled-down version is straightforward for any lab:
- Select fixed sentinel sites, for example the center of the prep bench, one refrigerator handle, one pipette barrel, and the keyboard.
- Swab each site with a sterile swab moistened with sterile saline, using a defined template area, for example 10 cm by 10 cm.
- Plate or inoculate per your facility's microbiology support, or send to a service provider.
- Record colony counts per site over time.
Culture positivity is expected in any working lab. What matters is the trend, so sample at the same sites, at the same time relative to cleaning, and compare before-and-after counts against your acceptance criteria.
PCR-Based Surveillance
For molecular labs, swab sites and test the eluate with a universal 16S assay or an assay for your most common amplicon. Follow the same fixed-site design. A rising signal at a sentinel site localizes a reservoir.
Triggering Corrective Action
Write the response before you need it. A sensible ladder:
- Re-train the responsible role, using the missed-zone finding from the student study as the teaching example [1].
- Escalate the cleaning intensity for the affected zone, adding mechanical scrubbing for biofilm-prone sites.
- Re-sample within a defined interval, for example two weeks.
- If a biofilm-prone site fails repeatedly, replace or redesign the item, since some persistent reservoirs cannot be reliably cleared, as the drinking water system study concluded for biofilms that persist after routine treatment [6].
Document the Verification
Every sampling event gets a dated record with site names, results, and any corrective action taken. This record is what turns the SOP from a wall decoration into a controlled process.
Common Mistakes and Limitations
These are the errors that most often invalidate a lab cleaning program.
- Skipping the cleaning step. Spraying disinfectant onto visible soil wastes the product. The biofilm studies cited above show that single-step treatments fail where two-step detergent-then-disinfectant sequences succeed.
- Wiping before contact time elapses. The label time defines the kill. Set a timer or read a protocol step while you wait.
- Vague instructions. "Clean the bench" fails exactly the way the student disinfection study failed, by leaving zones untouched [1]. Name zones, name directions, name tools.
- Unmeasured dilutions. Eye-balled bleach dilutions range from harmless to corrosive. Use the C1V1 = C2V2 calculation and label every bottle.
- Expired working solutions. Diluted bleach loses activity. Date every bottle and prepare fresh on schedule.
- Never verifying. Without swab data, a lab discovers contamination through failed experiments. Schedule verification in the SOP, not after a crisis.
- Ignoring shared equipment interiors. The Delhi laboratory survey found incubators among the most contaminated locations [3], and rotor buckets, water baths, and cabinet interiors are the analogous lab hot spots.
- Treating one agent as universal. Disinfectant choice varies with microbial composition and surface material [6][8], and manufacturer instructions govern what can be safely applied to an instrument.
- Assuming DNA decontamination is simple. Standard disinfectants are not designed to destroy nucleic acid, which is why PCR labs layer UV, dUTP/UNG chemistry, and physical separation on top of surface hygiene.
- Assuming successful cleaning equals successful removal of all targets. Even intensive multi-month decontamination programs can leave detectable molecular signal in a substantial fraction of sampled sites [10]. Design your assays and your facility layout to tolerate residual contamination rather than betting on its absence.
One limitation applies to this article as a whole. It provides a framework and template, not site-specific clearance criteria, and individual labs must set acceptance thresholds with their biosafety office, institutional policy, and any applicable regulatory program.
Frequently Asked Questions
How do I write a lab cleaning and disinfection SOP?
Start with eight sections in this order, scope and responsibility, zoning, agents with concentrations and contact times, a numbered procedure, verification, records, training, and revision history. Use the copy-paste template above, replace every bracketed field with your lab's specifics, and have the lab manager and biosafety officer approve version 1.0 before use.
What should a lab cleaning sop template example include at minimum?
At minimum it must name the agents with working concentrations and contact times from the product labels, a two-step clean-then-disinfect sequence, zone-specific frequencies, a spill procedure, a log format, and a verification method. A template that omits verification and records is a checklist, not an SOP.
How often should lab surfaces be cleaned and disinfected?
Daily at the end of each work session for benches and high-touch surfaces, weekly for shared equipment exteriors, drawer pulls, and handles, and after every spill or template-handling event in sensitive zones. Deep-clean frequencies for water baths, incubators, and cabinets follow the manufacturer instructions for each instrument.
Where can I find a free lab cleaning sop template?
The template block in this article is free to copy into your own document and adapt, and it contains every required section from purpose through revision history. Pair it with the worked dilution example and the log format shown above.
How do I verify that my cleaning SOP works?
Sample fixed sentinel sites on a schedule, either by swabbing for culture or by swabbing for molecular detection, and compare results before and after cleaning against written acceptance criteria. Document every sampling event and trigger the corrective-action ladder whenever a site fails.
How do I prevent PCR contamination in my lab?
Physically separate pre-PCR and post-PCR areas with dedicated equipment, enforce one-way workflow from clean to dirty, decontaminate the prep area between sessions, use dUTP/UNG carryover prevention chemistry, aliquot reagents, and include a no-template control in every run to catch contamination early.
What is contact time and why does it matter?
Contact time is the period a surface must remain visibly wet with disinfectant as stated on the product label, and it determines whether disinfection succeeds. Wiping the product dry before the labeled time elapses leaves surviving microbes behind even when the correct agent was used.
Who is responsible for lab cleaning in a shared facility?
Every user performs the daily end-of-session cleaning, a named person or rotation performs scheduled deep cleaning, and the lab manager reviews records and verification results. Assigning tasks to roles rather than to "everyone" is what prevents the missed-zone failures seen when cleaning relies on individual judgment.
Sources
- The Effectiveness of Cleaning Protocols in Medical School OMM Labs by Medical Students
- The effectiveness of disinfection protocols in medical school osteopathic manipulative medicine labs
- Evaluation of Pattern of Bacterial Contamination of Microbiological Laboratory in Relation to Cleaning and Disinfection Practices in a Super Specialization Hospital in Delhi, India
- Applying principles to practice: cleaning and disinfection of extended reality equipment used in healthcare settings
- Assessment of the efficiency of cleaning and disinfection protocols against Enterococcus faecalis biofilms recovered from milk pipes
- Laboratory and pilot-farm evaluation of cleaning and disinfection protocols for biofilms in livestock drinking water systems
- Evaluation of cleaning and disinfection protocols for commercial farm equipment following a foreign animal disease outbreak
- EFFECT OF DIFFERENT CLEANING PROTOCOLS ON THE HARDNESS OF FLEXIBLE DENTURE BASE MATERIAL "THERMOSENS”
- Factors shaping cleaning and disinfection practices during the COVID-19 pandemic: A qualitative evidence synthesis
- African swine fever (asf) control and repopulation strategies in tropical condition: effectiveness of cleaning and disinfection protocols