How to Attach Pipette Tips Correctly
By Dr. Zubair Khalid, DVM, MS, PhD ·

Attaching a pipette tip correctly creates an airtight mechanical and liquid seal between the shaft of the pipette and the opening of the tip. A properly seated tip lets the pipette aspirate and dispense the exact volume shown on the display, protects the internal piston from aerosols and liquids, and keeps contamination out of both your sample and your stock reagents. A poorly seated tip does the opposite. It leaks air, draws up too little liquid, drips precious sample, and can quietly wreck an experiment before you notice anything wrong.
You use this technique every time you fit a disposable polypropylene tip to a manual air displacement pipette, an electronic pipette, or a multichannel pipette. It applies to standard tips, filter tips, low retention tips, and the specialty tips used in micro solid phase extraction workflows. The physical action takes about two seconds per tip. Building reliable, reflexive technique takes roughly half an hour of deliberate practice, and verifying your pipettes against a balance takes about 30 to 60 minutes per instrument.
This article walks through how to attach pipette tips correctly step by step, explains the physics that make the seal work, lists the most common mistakes with fixes, covers pipetting technique and pipette calibration as they relate to tip seating, and describes the specialty tip variations you will meet in a working molecular biology lab.
Why Tip Attachment Is a Technique, Not an Afterthought
The air displacement pipette works by an indirect mechanism. The piston inside the pipette body moves a fixed column of air. When you press the plunger to the first stop, that air is pushed out. When you release the plunger, negative pressure inside the system draws liquid into the tip until the pressure balances. The tip is the interface between that moving air column and your liquid. Everything depends on the air volume inside the pipette tip behaving predictably.
If the tip is seated loosely, air escapes around the shaft during aspiration. The pressure drop inside the system is smaller than the pipette expects, so the tip fills with less liquid than the set volume. The error is silent. The liquid level in the tip looks plausible, the dispensed volume is plausible, and the mistake only surfaces later as failed PCR, uneven assay replicates, or a standard curve that refuses to fit.
Educators who teach undergraduate laboratory courses have documented how persistent these skill gaps are. In a survey of first year undergraduate students, researchers found that students struggle with choosing the correct pipette for a given volume, setting the pipette, and using the plunger correctly to aspirate and dispense liquid, and that many fail to retain these skills across semesters [1]. Tip attachment sits at the start of that chain. If the tip is wrong, every downstream step inherits the error.
The same principle holds at industrial scale. Robotic liquid handling systems treat tip attachment as a precision step worth solving with dedicated engineering. One collaborative robot system was built specifically to attach manual pipettes to disposable tips accurately, using vision based classifiers to predict and correct positioning errors before the attachment motion. A later refinement of that system attached pipettes and tips precisely without prior calibration by using hand mounted cameras and visual classifiers, confirming that tip alignment accuracy directly determines dispensing precision. If an automated laboratory invests cameras and motion planning to seat a tip correctly, a human operator should not treat the step as trivial.
The Principle: What Makes a Pipette Tip Seal
A standard air displacement pipette has a shaft or nose cone, usually a cylindrical metal or plastic projection with an O ring or a tapered sealing surface. A universal tip has a molded collar with a central bore sized to that shaft. When you press the tip on, the collar slides over the shaft and elastically grips it.
Three things determine whether the seal is sound.
First, radial fit. The tip collar must be the correct internal diameter for the pipette shaft. Manufacturers design tips in matched families. A P1000 shaft accepts a 1000 microliter tip, and the collar diameter differs from that of a P200 or P20 shaft. Pushing a 200 microliter tip onto a P1000 shaft either fails to seat or seats crooked and leaks.
Second, insertion depth. The shaft must enter far enough for the collar or O ring to compress fully. A tip seated only a few millimeters deep holds under dry handling but slips or leaks the moment you immerse it in liquid and draw against negative pressure. This is why the standard instruction is to press the pipette down firmly into the tip with a slight twisting motion rather than just touching the tip to the shaft.
Third, axial alignment. The tip must sit straight on the shaft. A crooked tip tilts the tip orifice relative to the liquid surface during aspiration and gives volume errors that get worse as the angle increases, especially at small volumes where a fraction of a millimeter of liquid column height matters.
Robotic pipetting studies quantify how demanding this alignment problem is. The team that integrated a manual pipette into a six degree of freedom robot reported that precise attachment of the pipette to disposable tips required a vision system that predicted and corrected positioning errors, and that this planning and visual recognition work was what secured high precision dispensing. In human hands, your eyes and thumb perform the same job. You verify alignment by feel and by sight in the same two seconds.
Materials and Equipment
No reagents are required for tip attachment itself. The following table lists what you need for the technique and for verifying it with a volume check.
| Item | Specification or working details | Purpose |
|---|---|---|
| Air displacement pipettes | Manual single channel set, for example P20, P200, P1000 | Match pipette size to target volume |
| Disposable polypropylene tips | Sterile or clean, matched to each pipette (10 microliter, 200 microliter, 1000 microliter sizes) | Liquid contact surface and seal interface |
| Filter (aerosol barrier) tips | Hydrophobic barrier inside the tip, matched to shaft | Protect pipette shaft during work with biohazards, RNA, or volatile solvents |
| Low retention tips | Polypropylene with reduced liquid binding surface | Viscous, foaming, or protein rich liquids where retention matters |
| Tip racks or refill systems | Compatible with your tip family | Clean, aligned source of tips |
| Analytical balance | Readable to 0.1 milligram for small volumes | Gravimetric verification of delivered volume |
| Distilled or deionized water | Room temperature, equilibrated before testing | Test liquid for gravimetric checks |
| Laboratory gloves | Nitrile or latex, powder free | Protect tips from skin contamination, protect hands from biohazards |
| Laboratory coat and eye protection | Standard personal protective equipment | Splash protection when handling samples or solvents |
| Pipette calibration service or calibration tools | Manufacturer service or gravimetric kit | Periodic accuracy verification |
Work at a clean bench or a tidy bench top with the tip rack within easy reach. If the tips are sterile, open the rack only when you are ready to attach, and never touch the nozzle end of a tip with a gloved hand or any surface.
Safety note. Treat every tip as contaminated the moment it contacts a sample. Eject tips into a sharps resistant or autoclavable waste container, never onto the bench. If you work with infectious material, blood, or toxic reagents, wear gloves, a laboratory coat, and eye protection, and follow your institution's biosafety procedures.
How to Attach Pipette Tips Correctly, Step by Step
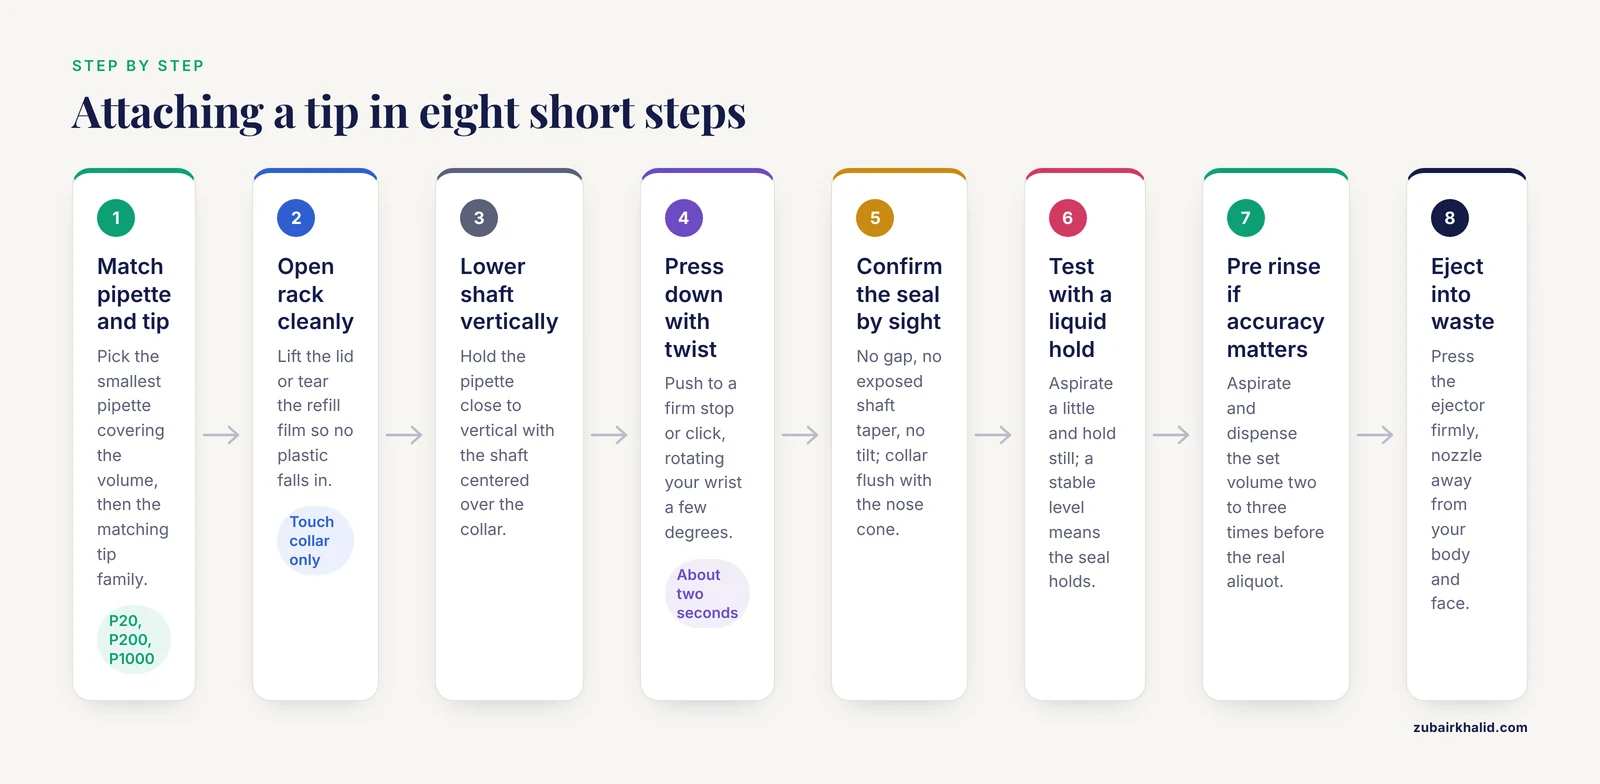
The following procedure covers a manual single channel air displacement pipette with a standard tip. Multichannel and electronic pipettes follow the same logic with small variations noted later.
- Select the correct pipette and tip for the volume. Choose the smallest pipette whose volume range comfortably covers the volume you need, so that the target volume sits in the upper portion of the range where accuracy is best. Then take the matching tip family. A P20 uses the narrowest tips, a P200 uses mid sized tips, and a P1000 uses the large blue collar tips in most common systems. The reason for this pairing is mechanical. The collar bore must match the shaft diameter for the seal to compress evenly. Educators who built an interactive pipette training simulation noted that choosing the correct pipette for a given volume is one of the aspects students struggle with most, which is why this pairing is drilled early [1].
- Open the tip rack and select a tip without touching the nozzle end. Grip the rack lid and lift or slide it open, or tear the refill film cleanly so no plastic fragments fall into the tips. If you need to pick a tip by hand, for example when loading a filter tip for RNA work, touch only the wider collar end. The reason is contamination control. The nozzle end is a sterile interior surface that your liquid will contact, and powder or skin residue from a glove can inhibit downstream enzymatic reactions.
- Hold the pipette vertical and lower the shaft onto the tip collar. Keep the pipette close to vertical, with the shaft centered over the collar opening. The reason for vertical orientation is seating quality. Pushing the shaft in at an angle seats the collar crooked, and the tip will sit tilted on the shaft even though it feels attached.
- Press down firmly with a slight twist to seat the tip. Push the pipette down onto the tip until you feel or hear a distinct click or a firm stop, rotating your wrist a few degrees as you press. The press compresses the tip collar over the shaft or O ring. The twist ensures the collar seats evenly around the full circumference instead of catching on one side. The reason for the firmness is the negative pressure test the tip must survive. During aspiration the internal pressure drops below atmospheric, and an under seated tip leaks air inward around the collar, producing an undershot volume.
- Visually confirm the seal. Look at the junction between the tip collar and the pipette body. There should be no visible gap, no exposed shaft taper, and no crooked tilt. On most pipettes the collar should sit flush against the nose cone. The reason for the visual check is that under seated tips often feel attached because the collar has started to grip, even though the depth is insufficient for a leak free seal.
- Test the seal before critical work. Aspirate a small amount of liquid and hold the pipette still for a few seconds. The liquid level in the tip should remain stable. A slow upward creep of liquid, a growing drop forming at the nozzle, or a wet ring around the shaft all indicate a leaking seal. The reason for the test is early detection. Finding a bad seat now costs you two seconds. Finding it after loading a 96 well plate costs you the plate.
- Pre rinse the tip when accuracy matters. Aspirate and dispense the full set volume two to three times into the source liquid, keeping the tip in the liquid, before taking the real aliquot. The reason is vapor pressure equilibration. The air inside a dry tip is humidified during the first aspirates, and this reduces the evaporative losses that otherwise make the first aspirated volume systematically low, especially with volatile solvents and small volumes.
- Eject the tip correctly when finished. Press the tip ejector button or ring firmly so the tip drops cleanly into the waste container, and hold the nozzle away from your body and face. The reason for a clean ejection is both contamination control and physical safety. A tip that hangs half ejected can drip onto your glove, the bench, or an open plate, and the ejector motion can generate a small aerosol.
Multichannel pipettes use the same press and twist motion, applied by pressing the whole head down into the tips in the rack at once. Confirm that every channel is seated by sighting along the row of tips. Any channel sitting higher than its neighbors is under seated and will fail on the first aspiration. Electronic pipettes with motorized pistons follow the same attachment rule, since the seal geometry is identical even though the plunger is not manual.
Common Mistakes and How to Fix Them
The step by step list above prevents most errors, but the mistakes below account for nearly all of the failed seals and silent volume errors seen in teaching laboratories and working labs.
Touching the nozzle end of the tip. Fingers, even through gloves, deposit residues on the interior surface. Pick tips by the collar or load directly from the rack onto the shaft. If you need sterile tips for cell culture or RNA work, open the rack only briefly and close it immediately.
Pressing the tip on at an angle or with insufficient force. A gentle tap seats the collar only shallowly. Press firmly and twist. If the pipette has a nose cone with an O ring, you should feel the collar pass over the ring and settle behind it.
Jamming the pipette sideways into the rack to load. Some operators try to load a tip by stabbing sideways across the rack. This bends the shaft, cracks the collar, and misaligns the tip. Always load from above with the pipette vertical. Training research on micropipette skill acquisition shows that handling small liquid volumes demands hand dexterity and deliberate practice to reach proficiency, and that motor patterns learned casually are hard to unlearn later [3].
Using the wrong tip family for the pipette. A 200 microliter tip forced onto a P1000 shaft will not seal, and a 1000 microliter tip on a P200 shaft sits so loosely that it falls off mid aspiration. Match families every time.
Reusing a single tip across incompatible liquids. A tip that held concentrated salt solution, detergent, or protein will carry residue into the next liquid and can change both delivered volume and downstream chemistry. Change tips between reagents unless the workflow explicitly permits carryover, as in a serial dilution of the same solution.
Ignoring a wet shaft after ejection. Liquid inside the nose cone means liquid traveled past the tip, either through over aspiration past the tip capacity, an imperfect seal, or aspirating with the tip too deep and liquid contacting the shaft. Wipe the shaft with a lint free tissue, never insert anything into the nose cone bore, and investigate the cause before the next aliquot.
Storing pipettes with tips attached. Residual moisture in the tip condenses inside the nose cone during storage, corroding metal shafts and contaminating the piston chamber. Eject tips before storage and hang the pipette on a stand or store it upright.
The consequences of sloppy technique are not just volume errors. Specialty tip formats exist because tip preparation and attachment precision determine analytical performance. In one solid phase extraction format, hybrid monolithic material was assembled inside plastic pipette tips supported by a melamine sponge skeleton, and the enrichment of a target protein from biological samples depended on the liquid passing through the packed tip in a controlled way [4]. In another format, a monolithic polymer network containing multi walled carbon nanotubes was covalently attached to the inner surface of a polypropylene tip, and the precision of the extraction method varied between 3 and 5 percent within a single tip and from 4 to 14 percent between tips [5]. Those numbers show how much variability lives in the tip itself, before any operator error is added. A loose seat or a crooked tip on top of that baseline variability can dominate the error budget.
Pipetting Technique After the Tip Is Attached
Correct attachment is the first half of accurate liquid handling. The second half is how you use the plunger and the tip in the liquid. The two skills are inseparable, because a perfect seal with poor plunger technique still gives the wrong volume.
Two stop plunger mechanics. The plunger has a first stop and a second stop. The first stop corresponds to the set volume. To aspirate, press to the first stop, hold the tip in the liquid, release the plunger slowly to draw liquid up, pause, then withdraw the tip from the liquid. To dispense, press to the first stop to deliver the set volume, then press to the second stop to blow out the residual drop clinging to the tip wall. The blow out exists because a small volume of liquid always wets the tip interior, and the second stop pushes that residual volume out.
Tip immersion depth. Immerse the tip just enough to cover the orifice, roughly 2 to 3 millimeters for small volume tips and up to 5 millimeters for 1000 microliter tips. Too shallow, and you risk aspirating air. Too deep, and liquid pressure on the tip orifice plus liquid film clinging to the outside of the tip inflate the delivered volume.
Vertical vs angled dispensing. Aspirate and dispense with the pipette vertical. Tilt during dispensing, especially against the wall of a receiving tube at 30 to 45 degrees, is a legitimate technique for complete delivery, but the aspiration should still occur from a vertical position with the orifice level with the liquid surface.
Speed of release. Release the plunger smoothly. A fast release pulls liquid in turbulently, creates aerosols and bubbles, and draws a volume that overshoots because the liquid column has inertia. A slow, controlled release is gentler and more accurate. This is one of the core motor skills the Pipette Master simulation was built to teach, alongside setting volumes and converting between microliters and milliliters [1].
Haptic skill and deliberate practice. Virtual reality training research has examined how operators acquire these motor patterns. A comparative study with 34 participants evaluated a custom haptic training device called Smart Pipette against a standard consumer hand controller, with both integrated into the same self paced virtual simulation offering audiovisual instructions and real time guidance. The researchers emphasized that accurate operation and correct technique are essential for reliable assay data, and that mastering correct equipment use is a fundamental skill for laboratory training [3]. The lesson for a working bench scientist is the same. Treat the press, the twist, the immersion depth, and the plunger release as a rehearsed sequence, not four improvised motions.
Controls, Expected Results, and How to Read Them
You verify your tip attachment and pipetting technique with a gravimetric check. This is the same physical basis used in formal pipette calibration.
The gravimetric check. Place a small beaker on an analytical balance and tare it. Set the pipette to a defined volume, for example 1000 microliters on a P1000. Attach a tip using the standard press and twist. Aspirate distilled water at room temperature and dispense it into the beaker, using the first and second stops as described. Record the mass. Because water at room temperature has a density close to 1.00 grams per milliliter, a delivered mass of 1.000 gram corresponds to roughly 1000 microliters, after applying the small density and buoyancy corrections that formal calibration protocols require. Repeat the delivery at least ten times.
Expected results. A well maintained, correctly used air displacement pipette should deliver volumes close to the manufacturer accuracy specification, which for most pipettes is on the order of one percent or better at the upper part of the volume range, with repeat dispenses agreeing within a similarly small coefficient of variation. The exact tolerance values come from the manufacturer documentation for your specific model, so consult that document for the pass or fail thresholds.
How to read a failure. A consistent low bias, where every dispense is short by the same proportion, points to a systematic cause such as an under seated tip, a leaking O ring, or a piston that needs calibration. High scatter with a roughly correct mean points to technique, most often variable plunger speed or variable immersion depth. High scatter plus droplets on the shaft points to a bad seal. Fix the seating first, rerun the check, and only then consider calibration.
A practical control experiment. Run the gravimetric check twice, once with a tip attached the casual way and once with the tip attached with the full press and twist, same pipette, same volume. If the two series differ, you have quantified the cost of your own attachment technique. This small experiment teaches the point more convincingly than any instruction.
Pipette calibration as the backstop. Tip technique controls the interface. The pipette itself still drifts over time as springs, seals, and pistons wear. Manufacturers typically recommend periodic formal calibration, most commonly on an annual schedule with more frequent checks for heavily used instruments, and many laboratories implement internal verification between formal calibrations. If your gravimetric check shows a consistent bias that persists across correctly seated tips, the pipette needs calibration, not better thumbwork. Keep a log of check dates, mean delivered volume, and scatter for each pipette so drift becomes visible.
Troubleshooting Guide
| Symptom | Likely cause | Fix |
|---|---|---|
| Liquid level in the tip drops or drips during the pause | Tip under seated, leaking around the shaft | Remove the tip, reattach with a firm press and twist, confirm the collar is flush |
| Aspirated volume is consistently low | Air leak at the collar, or piston or seal wear | Reseat the tip, run a gravimetric check, arrange pipette calibration if the bias persists |
| Aspirated volume is consistently high | Tip immersed too deep, or plunger release too slow against viscous liquid | Reduce immersion depth, standardize release speed |
| Bubbles form during aspiration | Tip orifice near the liquid surface, or fast plunger release | Immerse 2 to 3 millimeters below the surface and release smoothly |
| Tip falls off during dispensing | Wrong tip family, worn collar, or sideways loading | Match the tip family, load from above with a firm press |
| Wet liquid inside the nose cone after use | Over aspiration past tip capacity, bad seal, or liquid drawn into the shaft | Never exceed tip capacity, wipe the shaft, verify the seal, and inspect the piston |
| One channel of a multichannel pipette under fills | That channel's tip is not seated | Reseat the whole row, press evenly across the head, confirm all collars are flush |
| First dispense of a session reads low with volatile solvents | Dry tip air not humidified | Pre rinse the tip two to three times before the measurement aliquot |
| Deliveries vary widely between repeats | Variable plunger speed or variable angle | Slow the release, keep the pipette vertical during aspiration, practice with a gravimetric check |
| Residual drop remains on the tip after dispensing | Second stop not pressed, or viscous liquid retained | Press fully to the second stop, consider low retention tips for viscous liquids |
Variations: Specialty Tips and Automated Tip Attachment
Filter and aerosol barrier tips. A filter tip contains a hydrophobic porous barrier a short distance above the nozzle. Use these when aspirating biohazardous material, RNA, PCR products, or volatile solvents. Attachment is identical to standard tips, but the barrier adds a second benefit. If liquid is over aspirated, the barrier stops it before the shaft. Because the barrier slightly restricts airflow, some pipettes need a small calibration adjustment when used with filter tips, so check the manufacturer documentation for your combination.
Low retention tips. These have a smoother interior surface that reduces the liquid film left behind after dispensing. Use them for viscous solutions, concentrated protein, detergents, and small volumes where the retained film is a meaningful fraction of the delivered volume. Attachment is unchanged.
Specialty analytical tips. Pipette tips are also analytical devices in their own right. Monolithic hybrid materials have been assembled inside plastic pipette tips for solid phase extraction of trace analytes from biological samples, with a melamine sponge used as the supporting skeleton inside the tip [4]. Carbon nanotube modified monolithic polymethacrylate tips have been used for micro solid phase extraction of antidepressants from urine, with the polymer layer covalently bound to the inner polypropylene surface by ultraviolet grafting [5]. A semi automated format packed graphene nanosheets into a 100 microliter pipette tip connected to a plastic syringe on a programmable infusion pump, achieving excellent linearity for triclosan analysis in environmental waters with a detection limit of 0.5 nanograms per milliliter [6]. In each of these formats, the tip must be attached and operated so that liquid flows through the packed bed in a controlled, repeatable way. A partially seated tip or an angled tip changes the flow path and degrades extraction reproducibility, so attachment discipline matters even more than it does for simple transfer.
Robotic tip attachment. Laboratory automation treats tip attachment as a solved but nontrivial problem. The collaborative robot work described above used an end effector designed to hold and trigger a manual pipette, combined with vision based classifiers that predicted and corrected positioning errors before each attachment. The later version extended this by attaching pipettes and tips precisely without prior calibration, using hand mounted cameras, and the authors confirmed that these planning and recognition methods secure high precision liquid dispensing [2]. The practical takeaway for a human operator is the underlying requirement. Alignment before compression, then compression with full, even force.
Storage and Handling Notes
Tips themselves are usually supplied sterile or clean and dry in sealed racks or reload stacks. Keep racks closed when not in use. Do not autoclave tips that are already loaded into a pipette. If you need sterile tips in bulk, use manufacturer packaged sterile refills rather than repacking open tips, because repacking destroys the sterility guarantee.
Pipettes should be stored with the plunger fully released and no tip attached, hung on a stand or racked vertically. Storing a pipette upright with a wet tip attached lets condensed liquid or vapor enter the nose cone and migrate toward the piston. If a pipette has been used with biohazardous or corrosive material, decontaminate it according to the manufacturer instructions before storage, because many shaft assemblies can be removed and autoclaved while the body cannot.
Filter tips have a shelf life tied to their packaging. Use sealed packs within the printed expiry period and discard any pack whose seal has been broken for an extended period, because a compromised hydrophobic barrier no longer guarantees protection of the shaft.
Pipette Calibration in Brief
Calibration and tip technique address different parts of the accuracy chain, and both are needed. Tip technique controls the seal and the fluid interface. Calibration restores the pipette's internal volume accuracy when mechanical parts drift or wear.
A formal gravimetric calibration aspirates and dispenses distilled water under controlled conditions and compares delivered mass, corrected for water density, air buoyancy, and evaporation, against the set volume. From this, the calibration computes the accuracy error and the repeatability, and the service adjusts the pipette if either falls outside the manufacturer specification. Many laboratories send pipettes to an accredited service on an annual cycle and run internal gravimetric spot checks in between, with the interval shortened for pipettes in daily use, for pipettes handling corrosive liquids, and for pipettes whose accuracy directly affects quantitative assays.
The connection back to this article is direct. A pipette that passes calibration can still deliver wrong volumes every day if tips are attached badly, and a perfectly seated tip cannot rescue a pipette that is out of calibration. Run the gravimetric check described earlier after any change in technique, after any suspected leak event, and on a fixed schedule.
Common Mistakes and Limitations
This section consolidates the failure modes that appear most often, together with the honest limits of what correct attachment can achieve.
Mistake: trusting feel alone. A tip can feel attached while it is seated only half depth. Confirm with the visual check and, for critical work, the short liquid hold test.
Mistake: loading tips while walking to the bench. Pressing a tip on while moving risks an angled seat and a dropped tip. Load from a stable position with the rack in front of you.
Mistake: mixing tip brands within a workflow. Different manufacturers use slightly different collar geometries. A tip that seals adequately on one pipette brand may seat poorly on another. Standardize within an experiment and within a pipette.
Mistake: blaming the pipette first. The majority of sudden accuracy complaints trace to technique or tips, not to the instrument. Reseat the tip and rerun before scheduling a calibration.
Mistake: working with a damaged shaft. A bent or dropped shaft cannot seat any tip concentrically. Inspect the shaft after any pipette is dropped or jammed, and remove the pipette from service if the shaft is deformed.
Limitation: attachment fixes the seal, not the liquid. Correct attachment guarantees that the air column inside the pipette behaves as designed. It cannot compensate for a volatile liquid evaporating during aspiration, a viscous liquid equilibrating slowly, a foaming protein solution, or a density far from that of water. For those matrices, calibrate with the actual liquid when quantitative accuracy is required, and use pre rinsing and slow plunger speeds.
Limitation: skill decays without practice. Survey data from undergraduate teaching show that pipetting skills are not reliably retained between semesters without reinforcement [1]. Working researchers should treat the two second attachment and the ten repeat gravimetric check as maintenance for their own technique, not as remedial exercises.
Individual cases, unusual liquids, and regulated assays need the specific guidance of your laboratory's standard operating procedures and your institution's metrology or quality unit.
Safety Notes
Three hazards cluster around pipette tip work. First, biological and chemical exposure. Any tip that contacted a sample is a contaminated sharp object once ejected, and the ejection motion can aerosolize small drops. Point the nozzle down and away, eject into a closed waste container, and wear gloves, a laboratory coat, and eye protection whenever the material is not sterile water. Second, repetitive strain. High volume pipetting with a poorly fitted grip or excessive plunger force is a well recognized source of hand and shoulder strain in laboratories. Use an ejector that fits your hand, alternate hands when the workflow allows, and take short breaks during long plate loading sessions. Third, sharps behavior. Never recap, bend, or pocket used tips. Dispose of them in the designated container immediately after ejection.
Frequently Asked Questions
Do you really need to twist the pipette when attaching a tip?
Yes. The twist distributes the compression of the tip collar evenly around the shaft. A straight push seats the collar from one side, which can leave a small gap on the opposite side of the O ring. A few degrees of rotation during the press costs no time and produces a more reliable seal.
How do I know a tip is attached correctly?
Look at the junction between the tip collar and the pipette nose cone. A correctly attached tip sits flush with no visible gap, no exposed shaft taper, and no tilt. For critical work, aspirate a small volume and hold it for a few seconds. A stable liquid level confirms the seal holds under negative pressure.
Why does my pipette tip leak even when it looks attached?
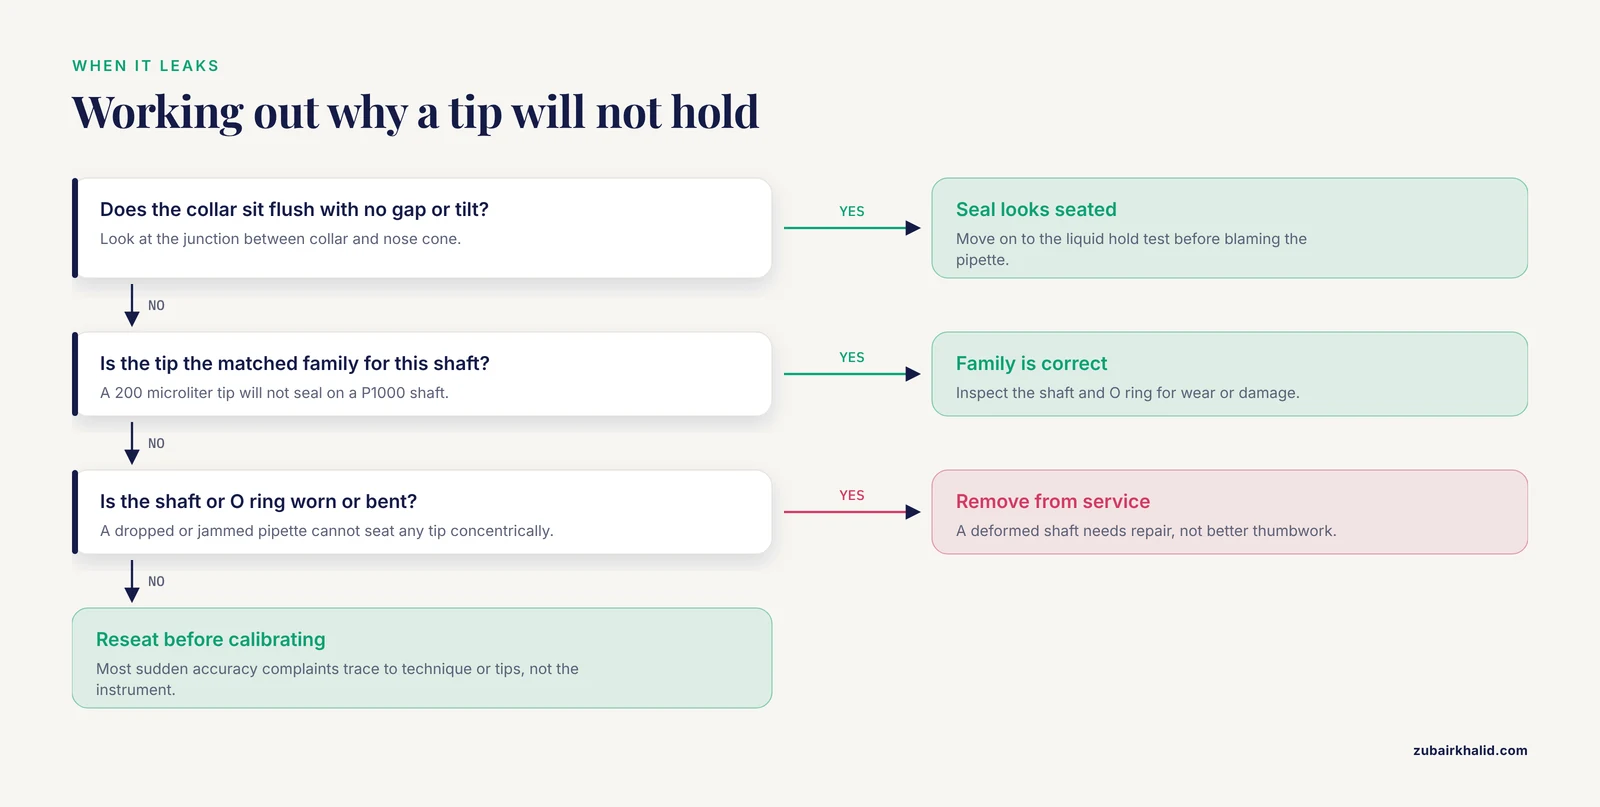
A tip that looks attached can still be seated too shallowly, so the collar grips but the O ring seal is incomplete. It can also be the wrong tip family for the shaft, or the pipette's O ring may be worn or damaged. Reseat the tip first, then match the tip family, then inspect the shaft and O ring before considering a calibration.
Can I jam or tap the pipette into the tip rack to load tips?
No. Jamming sideways or tapping hard bends the shaft, cracks tip collars, and produces crooked seats that leak during aspiration. Always load from above with the pipette held vertically, pressing straight down with a slight twist.
Do filter tips attach differently from standard tips?
No. Filter tips attach with the same press and twist onto the same matched shaft. The difference is the internal hydrophobic barrier, which protects the pipette shaft from aerosols and over aspiration. Because the barrier can slightly restrict airflow, check your manufacturer documentation for whether the combination needs a calibration adjustment.
How often should a pipette be calibrated?
Most laboratories follow an annual formal calibration schedule, with more frequent checks for heavily used instruments and pipettes used with corrosive or biohazardous liquids. Between formal calibrations, run a quick internal gravimetric check with a balance, ten repeat dispenses at a fixed volume, whenever accuracy matters or after any suspected leak.
Why is my pipette inaccurate even with a new, correctly attached tip?
Correct attachment removes seal error but not technique error or instrument error. Variable plunger speed, inconsistent immersion depth, and angled aspiration cause scatter, while piston or seal wear causes a consistent bias. Run the gravimetric check to distinguish scatter from bias, then adjust your technique or send the pipette for calibration accordingly.
Can I reuse pipette tips to save money?
Not when quantitative accuracy or contamination control matters. A used tip carries a residual liquid film and can transfer nucleic acids, proteins, or chemicals into the next sample. The only routine exception is serial dilution of the same solution in the same series, where the workflow is explicitly designed for carryover. For everything else, use a fresh tip for each new liquid.
Sources
- Development of an interactive simulation and app (Pipette Master) to teach undergraduate students how to read, set and use and automatic laboratory pipette
- Integrating a Pipette Into a Robot Manipulator With Uncalibrated Vision and TCP for Liquid Handling
- Smart Pipette: Elevating Laboratory Performance With Tactile Authenticity and Real-Time Feedback
- Aptamer based hybrid monolithic pipette tips supported by melamine sponge for enrichment of proteins.
- Carbon nanotube-modified monolithic polymethacrylate pipette tips for (micro)solid-phase extraction of antidepressants from urine samples
- Novel semi-automated graphene nanosheets based pipette-tip assisted micro-solid phase extraction as eco-friendly technique for the rapid detection of emerging environmental pollutant in waters.