How to Document Pipetting Conditions for Reproducible Experiments
By Dr. Zubair Khalid, DVM, MS, PhD ·

By the end of this article you will be able to write a pipetting conditions block that lets any competent colleague repeat your liquid handling without asking you a single question. You will fill in a reusable template, run a five-minute weighing-based check (gravimetric verification) on your own pipette with worked math you can copy, and keep a pipette calibration record that survives review by a collaborator, a reviewer, or an auditor.
A pipette is the hand-held instrument that aspirates and dispenses a set volume of liquid, and it is the most used tool in molecular biology. It is also the least documented. Protocols say "add 2 µL of enzyme" and stay silent about every decision that determines whether 2 µL actually moved: which pipette, which tip, how deep the tip sat, how fast the plunger traveled, whether the enzyme was still cold. Documenting pipetting conditions means writing those decisions down, and it is the cheapest reproducibility upgrade available to a lab.
Have the following on hand before you start:
- Your pipettes, with the serial number visible on the body (engraved or printed on the shaft, rather than only on the calibration sticker)
- Unopened tip boxes, so you can read the lot number
- A thermometer and, ideally, a hygrometer for the bench
- A paper notebook or an electronic lab notebook (ELN, a structured digital replacement for the paper notebook)
- Recommended for the verification steps: an analytical balance readable to 0.1 mg, plus a computer with a spreadsheet or Python 3
Why Pipetting Conditions Decide Whether an Experiment Repeats
Reproducibility means a second person, working from your record, obtains your result. Most failed reproductions in bench work trace back to undocumented small differences, and liquid handling is the largest undocumented variable in many protocols because it is the step every protocol performs hundreds of times without comment.
Consider what the sentence "transfer 200 µL" hides:
- Which of the three P200s on the rack (same-model pipettes drift independently, which is why each carries a serial number)
- Which tip, from which lot (tip geometry and plastic change how liquid wets and drains)
- Whether the operator pre-wetted the tip (a dry tip underdelivers the first volume, especially with volatile liquids)
- How deep the tip went and at what angle (deep immersion drags extra liquid on the outside, shallow immersion risks vortexing and air)
- How fast the plunger moved (fast aspiration puts bubbles into viscous liquids and mismeasures them)
- Whether the liquid was at room temperature or straight from the freezer (temperature distorts the air cushion inside an air-displacement pipette)
Each factor moves the delivered volume by a small amount. In one transfer that is noise. In a serial dilution (a stepwise series in which each tube is diluted from the previous one) the errors compound, and a standard curve built on top inherits the drift. The same logic applies to master mixes (pooled reagent blends distributed across many reactions, so one pipetting error propagates into every sample) and to cell culture splits, where passage ratios depend on accurate volume delivery. When a collaborator repeats the protocol text exactly and gets a different curve, the difference usually lives in one of the bullets above, unrecorded.
The pipetting conditions block fixes this by converting silent decisions into five short fields that take about ninety seconds to fill in. The same block later becomes the source of your methods section, so the writing happens once, at the bench, while the facts are still in front of you.
The Parameters That Belong in the Record
A complete block has five parameter groups. Fill them in before the first aspiration and amend them during the run.
Instrument identity and state
Two pipette designs exist, and the difference changes what you can pipette well:
- An air-displacement pipette moves a piston that compresses a trapped column of air, and the air pushes the liquid. This is the standard bench pipette for aqueous solutions.
- A positive-displacement pipette places the piston in direct contact with the liquid inside a disposable capillary. Use it for volatile solvents, viscous solutions, and dense liquids, where an air cushion gives unstable volumes.
For each pipette, record the type, the model, the serial number, the volume range, the channel count (single or multichannel, and which channels you used), and the calibration status (last calibration date and next due date). If you use an electronic pipette, also record the program or speed setting, because electronic models
Finishing the Parameter Set: Electronic Settings, Tips, Technique, Environment, and Reagent State
For an electronic pipette, record the program or speed setting, because electronic models store separate aspiration and dispense speeds, and a speed change alone can move a delivered volume enough to matter for viscous or volatile samples. Write the program name exactly as it appears on the device display, translate the speed into plain words, and re-check the setting at the bench rather than trusting memory from the last run. If you changed speeds mid-protocol, note where in the run the change happened.
The remaining parameter groups, continuing from the instrument identity fields already introduced, look like this.
Tip selection and state. Record the manufacturer, the catalog number if it is printed on the box, and the lot number. Note whether the tips are filtered, low-retention, or sterile, and when the box was opened, because tips that sat open on a dusty bench behave differently from fresh ones, and some labs date boxes for exactly this reason. Mounting matters more than most people expect: a tip pressed straight down may seal differently from one pressed with a slight twist, and a tip that is not fully seated is a classic source of volumes that read low with no visible fault. Write the mounting convention your lab uses once, in the template header, and refer back to it rather than rewriting it every time.
Environment. Record the bench temperature, the humidity if you have a hygrometer, and the location: open bench, laminar hood, or elsewhere. Airflow from an open sash or an HVAC vent changes evaporation during the seconds a tip sits loaded, which is invisible at 200 µL and visible at 2 µL. Also record when the reagents came out of the cold, because the interval between "removed from the freezer" and "aspirated" is one of the strongest hidden variables in the whole operation.
Technique. This group captures how the hand moved. Pre-wetting, meaning one or more aspiration and dispense cycles before the measured transfer, belongs here with the number of pre-wets or an explicit "none." Immersion depth should be recorded as a category, shallow, standard, or deep, with your lab defining those words once in a short note, for example shallow as just enough to cover the tip opening. Record the angle, vertical or tilted, and the plunger speed as a description, such as "pressed over about one second" or "slow, deliberate press." Record the mode, forward or reverse, whether blow-out was used, whether the tip touched the vessel wall on the way out, and whether the tip was changed between different reagents.
Reagent state. Write what was in the tube and its condition at the moment of handling: cold from the fridge, at room temperature, viscous, volatile, or carrying visible precipitate. If you mixed it first, record how, for example vortexed briefly or flicked and spun down.
These five groups turn the silent decisions described earlier into ink (see "Why Pipetting Conditions Decide Whether an Experiment Repeats"). The point is not bureaucracy. The point is that when a standard curve drifts or a qPCR efficiency looks odd, the block tells you, in ninety seconds of reading, which of the hidden variables could have moved.
A Fill-In Template You Can Paste Into Any Notebook
The template below is the practical answer to anyone searching for a document pipetting conditions reproducibility template. It is deliberately short enough to complete at the bench and complete enough to reconstruct the run. Some fields describe stable facts about your pipette and tips, and those can be filled once and copied forward. Others change every run and must be filled fresh.
PIPETTING CONDITIONS BLOCK
Date: __________        Operator: __________
Protocol / step ID: __________

INSTRUMENT
Type: air-displacement / positive-displacement
Model: __________   Serial: __________
Range: __________   Channels used: __________
Calibration last done: ______  Next due: ______
Last in-house verification: date ______  result ______
Electronic program / speed (if any): __________

TIP
Manufacturer / catalog: __________
Lot: __________   Filtered (Y/N): ____
Low-retention (Y/N): ____   Box opened on: ______
Mounting: pressed straight / pressed with twist / other: ____

TECHNIQUE
Pre-wet: number of pre-aspirations ______  or none
Immersion depth: shallow / standard / deep
Angle: vertical / tilted (describe) ______
Plunger speed: slow / medium / fast (describe) ______
Mode: forward / reverse
Blow-out (Y/N): ____   Touch-off on dispense (Y/N): ____
Tip changed between reagents (Y/N): ____

REAGENT
Name: __________
Temperature at handling: cold / room / warmed
Viscosity class: aqueous / viscous / dense
Volatile (Y/N): ____   Precipitate or particulate (Y/N): ____
Mixed before handling: how __________

ENVIRONMENT
Bench temp: ______   Humidity (if measured): ______
Location: open bench / hood / other: ______
Airflow or draft notes: __________

OBSERVATIONS
Bubbles, drips, foaming, slow dispense, anything unusual:
____________________________________________

Operator initials: ____   Witness (optional): ____
A few usage rules make this template earn its keep. First, fill the stable fields, instrument and tip identity, before the first aspiration, and the variable fields, technique and reagent state, as the run proceeds. Second, amend rather than overwrite: if you switched tips after the third tube, write that in observations with the tube number, because a mid-run switch is exactly the kind of event a reader needs to know about. Third, attach the block to the page or entry that holds the raw data, so the volumes and the numbers that depend on them never travel separately. Fourth, keep one canonical definition of shallow, standard, and deep immersion in your lab notebook front matter, and reference it by name. The analytical balance recommended in the supply list is used in the verification section below, which is the natural companion to this template.
Worked Example 1: A Serial Dilution With Everything Written Down
This example shows the template in use and doubles as a document pipetting conditions reproducibility example you can imitate. The values are illustrative placeholders; replace them with your own.
Scenario: you are building an eight-point standard curve by twofold serial dilution of a fluorescent dye stock, starting from 200 µL of the top standard.
PIPETTING CONDITIONS BLOCK
Date: 2026-11-11   Operator: Z.K.
Protocol / step ID: dilution-curve-04, steps 2 to 9

INSTRUMENT
Type: air-displacement
Model: example P200   Serial: EX-20481
Range: 20 to 200 µL   Channels used: 1
Calibration last done: 2026-08-02   Next due: per lab schedule
Last in-house verification: 2026-11-04, passed (gravimetric, 10 x 200 µL)

TIP
Manufacturer / catalog: example brand, filtered, low-retention
Lot: EX-88713   Box opened on: 2026-11-10
Mounting: pressed straight with firm seat, per lab note

TECHNIQUE
Pre-wet: 2 pre-aspirations at the working volume
Immersion depth: standard (per lab note definition)
Angle: vertical
Plunger speed: medium, about one second down
Mode: forward, with blow-out
Tip changed between reagents: N (single dye stock throughout)

REAGENT
Name: dye stock, aqueous, no detergent
Temperature at handling: room, out of fridge 30 min prior
Viscosity class: aqueous
Volatile: N   Precipitate: N
Mixed before handling: vortexed 5 s, quick spin

ENVIRONMENT
Bench temp: 22 C (thermometer at bench)   Humidity: not measured
Location: open bench, away from HVAC vent
Airflow notes: hood sash closed, no drafts noticed

OBSERVATIONS
None. All dispenses clean, no foam.
Operator initials: Z.K.
Why does this satisfy reproducibility? Because every question a second operator would otherwise have to ask is already answered (see "Why Pipetting Conditions Decide Whether an Experiment Repeats"). Which of the rack's pipettes: the one with serial EX-20481. Which tips: lot EX-88713, low-retention. Dry tip or wet: pre-wetted twice. Temperature: reagent sat out for half an hour. Speed: about one second down. Mode: forward with blow-out. If the curve comes out different in someone else's hands, this block eliminates the liquid handling as a suspect, or identifies it as the suspect, within minutes.
Worked Example 2: A Viscous Glycerol Stock With a Positive-Displacement Pipette
A second example shows how the same template flexes when the chemistry changes. Scenario: aliquoting a 50 percent glycerol stock into small tubes.
PIPETTING CONDITIONS BLOCK
Date: 2026-11-11   Operator: Z.K.
Protocol / step ID: glycerol-aliquots, step 1

INSTRUMENT
Type: positive-displacement
Model: example PD-200   Serial: EX-33022
Range: per capillary type   Calibration status: in date

TIP (capillary)
Manufacturer / lot: example capillaries, lot EX-55190
Mounting: per manufacturer, piston seated before first use

TECHNIQUE
Pre-wet: none (piston contacts liquid directly)
Immersion depth: standard
Angle: vertical
Plunger speed: slow and steady
Mode: forward, no blow-out needed (piston expels fully)
Tip change: new capillary per reagent container

REAGENT
Name: 50 percent glycerol stock
Temperature: room   Viscosity class: viscous
Mixed: inverted ten times before first withdrawal

ENVIRONMENT
Bench temp: 22 C   Location: open bench

OBSERVATIONS
Capillary change every ten aliquots; no air pockets observed.
Two choices here are worth noticing. The positive-displacement instrument was chosen because an air cushion over a viscous liquid drains slowly and leaves an unpredictable film, so the piston's direct contact is the honest tool. And no pre-wet was recorded because pre-wetting an air-displacement tip addresses a problem that a positive-displacement design does not have. Recording "none" with the reason in mind is better documentation than leaving the field blank, and the reasoning belongs in your head while the note belongs on the page. This pairing of instrument type to liquid class extends the guidance introduced in the instrument identity section.
Gravimetric Verification Step by Step, With Worked Math
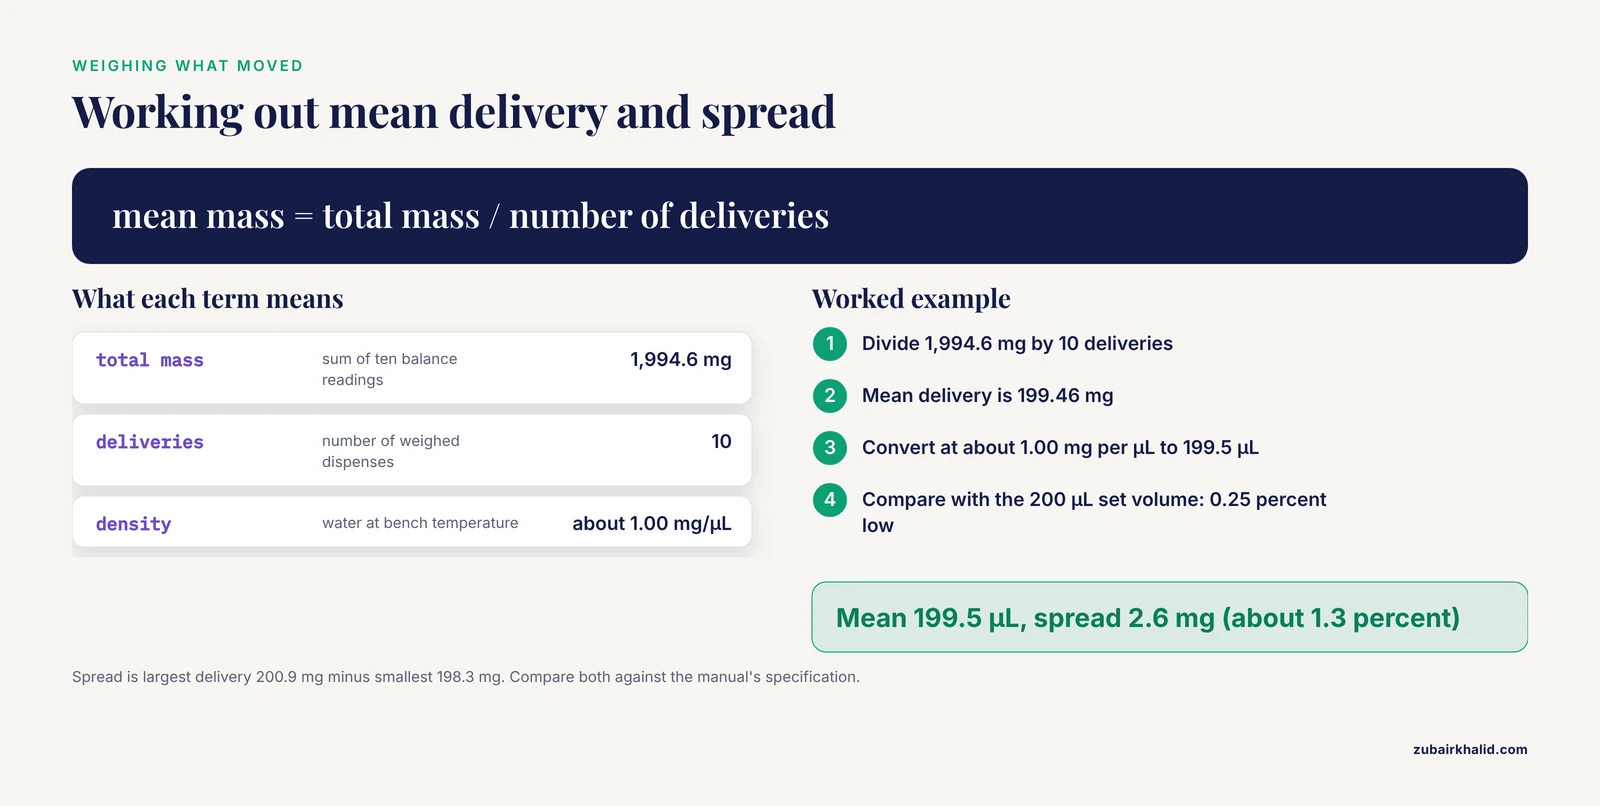
Gravimetric verification means checking a pipette by weighing what it delivers. Water is the standard test liquid because its density is known and close to one milligram per microliter at typical bench temperatures; for a review-grade calculation, take the density at your measured temperature from a density table your lab keeps or from the pipette manual. The five-minute version works like this.
Step 1. Equilibrate. Put a beaker of distilled water, the pipette, and a box of tips on the bench together long enough to reach room temperature, and record the bench temperature. A pipette and liquid that differ in temperature is one of the distortion sources listed in the reproducibility section.
Step 2. Prepare the balance. Confirm the balance is level, close the draft shield if it has one, place a small vessel inside, and tare. An analytical balance readable to 0.1 mg supports this check comfortably at the 200 µL scale.
Step 3. Set and pre-wet. Set the pipette to a volume you actually use, ideally near its nominal maximum for the clearest signal. Mount a tip, pre-wet by aspirating and dispensing several times, then aspirate a measured volume.
Step 4. Dispense and weigh, delivery by delivery. Dispense into the tared vessel and record the reading after each delivery, then re-tare or read cumulatively, whichever your balance makes easier. Recording each delivery separately lets you compute imprecision, not just accuracy. Ten deliveries is a practical count.
Step 5. Convert and compare. Here is the worked math with illustrative numbers. Suppose you set 200 µL and dispense ten deliveries. The expected total mass is about 2,000 mg, because 200 µL of water weighs about 200 mg. Your ten readings sum to 1,994.6 mg. The mean delivery is 1,994.6 divided by 10, which is 199.46 mg. Using a density of about 1.00 mg per µL, the mean delivered volume is about 199.5 µL, which is 0.5 µL below the set volume, or 0.25 percent low. Now the spread: your largest single delivery read 200.9 mg and your smallest 198.3 mg, a range of 2.6 mg, which is about 1.3 percent of the mean. Compare both numbers, the mean offset and the spread, against the accuracy and precision specifications printed in your pipette's manual, not against a memorized rule, because those specifications are model-specific.
Step 6. Write it down. The result becomes the "last in-house verification" line in the template: date, set volume, mean, spread, pass or fail against the manual's specification. That line is what a collaborator or reviewer will look for first.
Two honest caveats. First, small volumes punish gravimetry: at 2 µL the expected mass is about 2 mg, close to the 0.1 mg resolution of a good balance, and evaporation during weighing biases the result downward, so treat small-volume checks as trend data and weigh quickly, keep the vessel covered between deliveries, or run more replicates. Second, verification tells you how the pipette performs today with your tips and your technique. It does not replace periodic calibration by a qualified service, which is the subject of the next section.
Pipette Calibration Records That Survive Review
The word calibration gets used loosely, so pin it down. Verification, which you just performed, is a check with no changes made. Adjustment is what a service technician does when a pipette is out of tolerance, altering the mechanism so it delivers the set volume. Calibration, in the record-keeping sense, is the documented event containing the verification or adjustment, performed by a qualified person, with results retained. A record that survives review has the following parts.
Identification. Model and serial number, matching the body of the pipette, not only the sticker. The article's reproducibility section explains why same-model pipettes drift independently; the record's job is to tie a specific serial number to a specific status.
The event. Date, who performed it, what method was used, and the as-found and as-left data. As-found means the readings before any adjustment, and as-left means the readings after. The as-found number matters enormously, because it tells you whether the pipette was in tolerance during the work you did before the service visit.
The decision. Whether the pipette passed, was adjusted, or was removed from use, and the next due date, which should come from your lab's quality plan or the manufacturer's recommendation rather than habit.
The traceability thread. When a pipette fails verification, quarantine it with a physical label, and then walk backward through your pipetting conditions blocks to find which experiments used that serial number and when. This is the quiet payoff of recording serial numbers at the bench: a failed instrument becomes a bounded problem instead of a lab-wide panic.
The between-service log. Keep a running sheet or spreadsheet with one row per verification: date, serial, set volume, mean delivery, spread, operator, pass or fail. Over months, this log shows drift trends, flags a pipette that fails shortly after service, and demonstrates to a reviewer that accuracy is monitored between official calibrations rather than assumed.
Store records where they are findable: a binder by the balance, or better, an electronic system with one entry per serial number. The physical inspection advice from the supply list, serial engraved on the body rather than only on a sticker, is what makes this linkage possible, because stickers fall off and bodies do not.
Troubleshooting: Symptoms, Causes, and What to Record
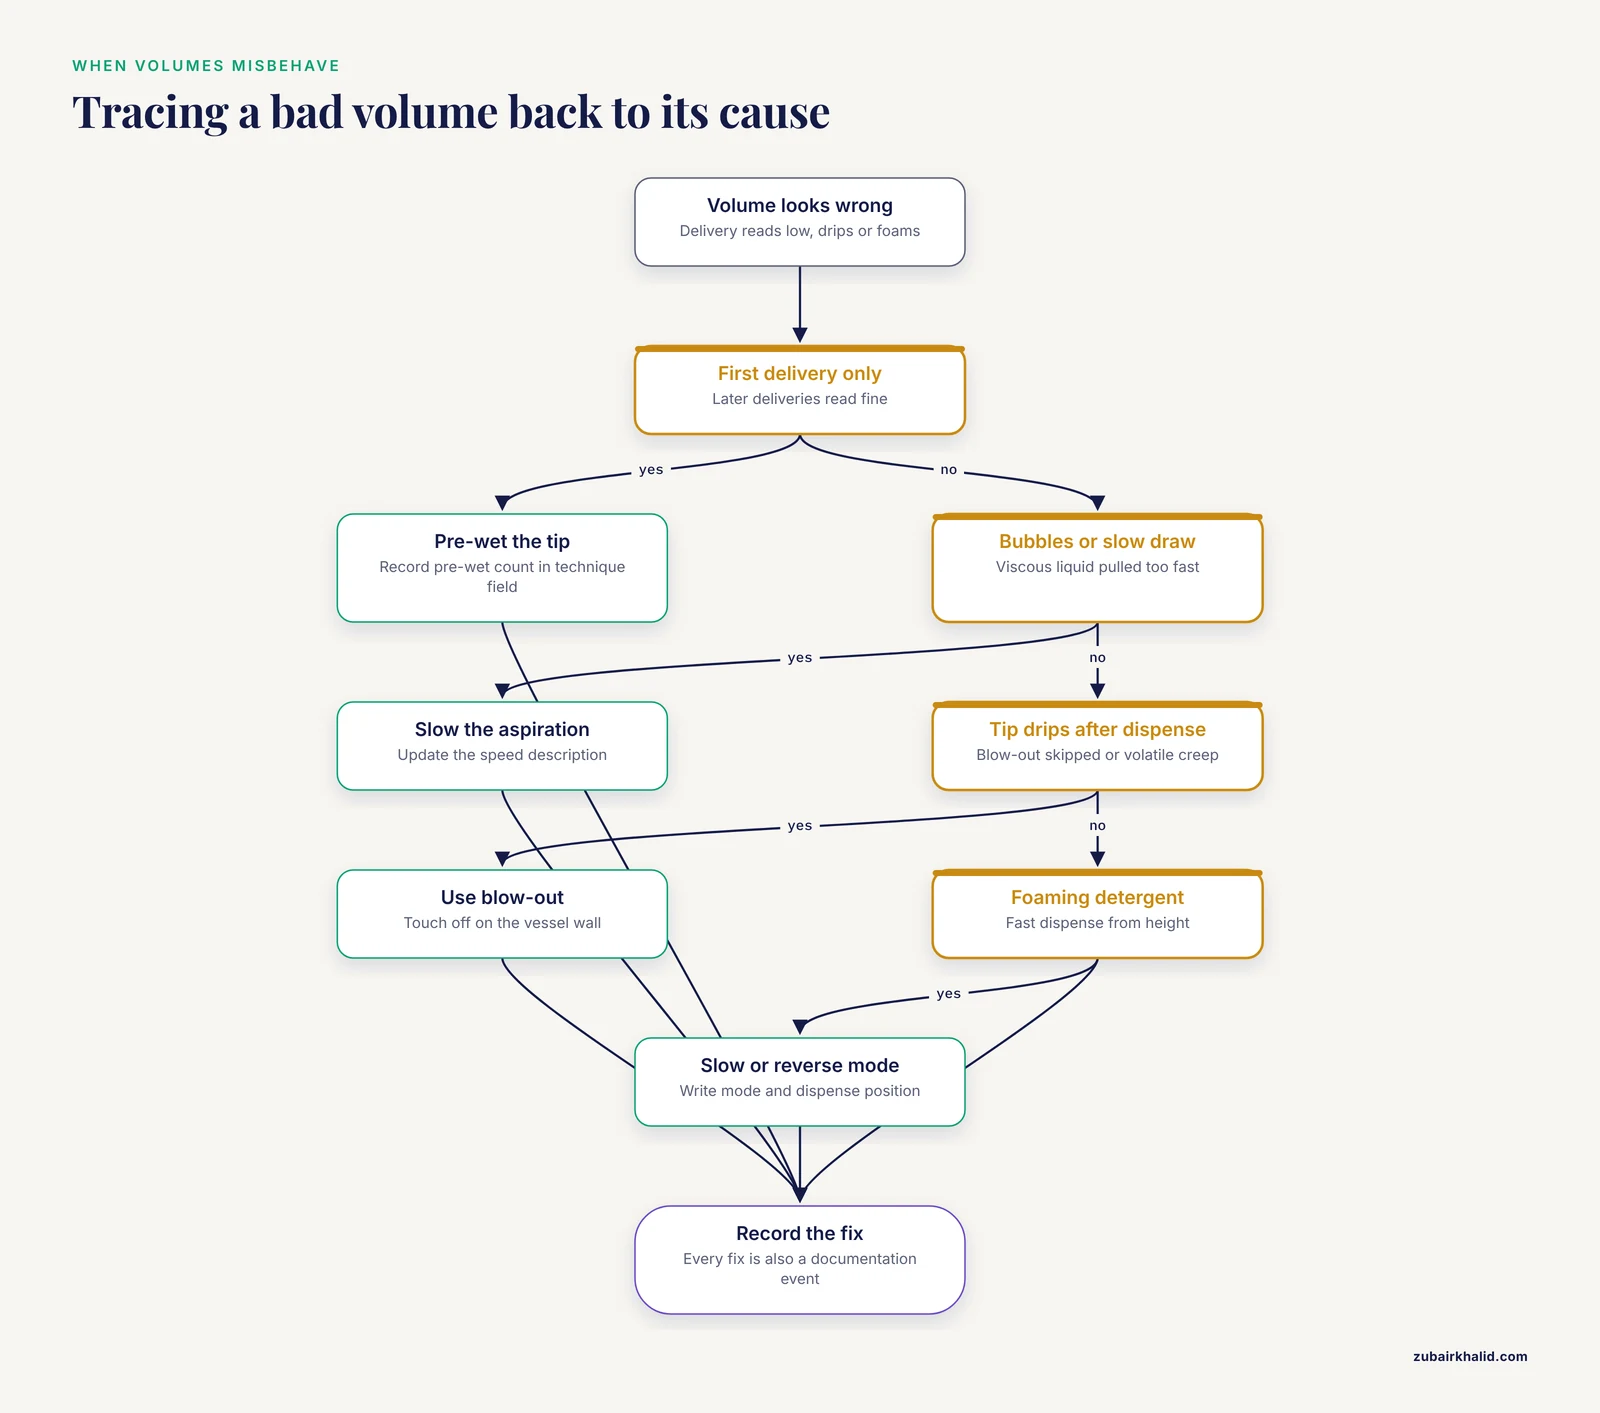
When volumes misbehave, the pipetting block usually contains the clue. The table below pairs common symptoms with likely causes and the note to add to your record.
| Symptom | Likely cause | What to change | What to write down |
|---|---|---|---|
| First delivery reads low, later ones fine | Dry tip, especially with volatile liquids | Pre-wet before the measured transfer | Pre-wet count in the technique field |
| Bubbles during aspiration of viscous liquid | Plunger pressed too fast | Slow the aspiration speed | Speed description updated |
| Volume drifts downward through a long run | Evaporation from the source tube, or reagent warming | Work in smaller batches, recover source temperature | Time on bench, batch boundaries in observations |
| Multichannel gives inconsistent volumes across columns | Uneven tip seating or worn seals on one channel | Re-seat tips with firm, even pressure; flag the channel | Channel numbers used, seating method |
| Tip drips after dispense | Blow-out skipped, or volatile liquid creeping | Use blow-out, touch off on the wall | Blow-out and touch-off fields |
| Foaming when dispensing detergent solutions | Fast dispense from height | Slow dispense, dispense against the wall or under the surface, consider reverse mode | Mode and dispense position |
| Serial dilution curve looks warped despite good technique | Compounding carryover or inconsistent immersion | Fresh tip per transfer if carryover matters; fix immersion depth | Immersion depth, tip-change field |
| Balance readings wander during verification | Drafts, evaporation, static on the vessel | Close the shield, work quickly, cover between deliveries | Balance conditions in observations |
Notice the pattern in the last column: every fix is also a documentation event. Troubleshooting without recording turns a solved problem into a problem you will solve again next month.
Common Misconceptions About Pipetting and Its Records
"The calibration sticker means the pipette is accurate." A calibration is a snapshot of one day, one technique, and usually one tip type. Between service visits the pipette lives a full life of drops, bumps, and autoclave-adjacent heat. The between-service verification log exists precisely because the sticker cannot tell you about last Tuesday.
"Tips are interchangeable." Tip geometry, polymer, and orifice shape change how liquid wets and drains, and a poor physical fit changes the seal. The tip lot field in the template exists because two lots of nominally identical tips can behave differently, and the earlier reproducibility section names tip geometry as a hidden variable.
"Reverse pipetting is always more accurate." Reverse mode, explained stepwise in a later section, helps with viscous and foamy liquids and with small volumes where the film left in the tip matters. For plain aqueous work at mid-range volumes, forward pipetting with proper pre-wetting is entirely adequate, and switching modes mid-series without documenting it introduces inconsistency rather than removing it.
"Pre-wetting wastes precious reagent." The wetted film in a pre-wetted tip makes the very first measured delivery honest. With expensive reagents, pre-wet at the working volume and the cost is trivial; without pre-wetting, the first data point in a series is quietly wrong, and a wrong first point poisons a dilution series more than a few microliters of sacrificial reagent ever could.
"Small volumes do not matter because the assay is robust." Robustness is not the issue; compounding is. In a serial dilution each point inherits every earlier error, and in a master mix one pipetting event feeds every sample. Small errors are exactly the ones worth documenting, because they are the ones that hide.
"We always pipette the same way, so writing it down is redundant." Two people in the same lab hold the same pipette at different angles, press at different speeds, and define "just below the surface" differently. "Always" is a claim about intent, and a pipetting block is a claim about fact. Reviewers and collaborators can only use the second one.
"An electronic pipette removes technique from the equation." Electronics standardize speed and timing, which helps, but immersion depth, angle, tip lot, pre-wetting, and reagent temperature all remain manual variables. The block still applies; only the speed field gets a program name instead of a prose description.
Air-Displacement Versus Positive-Displacement in Daily Practice
The instrument identity section introduced both designs; here is the practical comparison that decides which one reaches for.
The air-displacement pipette is the default for aqueous buffers, dilution series, and most molecular biology work. It is fast, its tips are inexpensive and widely available, and its accuracy depends on a stable air cushion, which is precisely why it struggles when that cushion is destabilized. Volatile solvents evaporate into the cushion and inflate it, delivering less than set. Viscous liquids aspirate slowly and leave a film that underdelivers, because the cushion compresses against a resistance it did not expect. Dense liquids, such as concentrated salt or glycerol solutions, push on the cushion with their own weight and distort the trapped-air volume.
The positive-displacement pipette places the piston inside a capillary in direct contact with the liquid, so none of those distortions apply. The tradeoffs are real: capillaries cost more than standard tips, the technique differs enough to need its own habit, and the piston must be seated correctly or the whole advantage vanishes. For volatile solvents such as phenol-containing mixes or ethanol-heavy solutions, for viscous glycerol stocks and protein concentrates, and for any liquid where you have watched an air-displacement pipette give inconsistent volumes, the positive-displacement tool is not a luxury, it is the correct instrument.
A useful documentation rule: when you switch designs mid-protocol, which is legitimate, for example using air-displacement for buffer and positive-displacement for a glycerol-containing enzyme stock, each switch gets its own conditions block or its own clearly labeled section within one block. A reader should be able to see, per reagent, which physics moved the liquid.
Forward and Reverse Pipetting, Step by Step
Forward mode, the default. Press the plunger to the first stop, immerse the tip, release the plunger smoothly to aspirate the set volume, move to the receiving vessel, press to the first stop to dispense most of the volume, then press to the second stop to blow out the remainder, and withdraw the tip while touching off against the wall if your technique includes that. Forward mode is right for aqueous liquids at comfortable volumes.
Reverse mode, for viscous, foamy, or very small volumes. Press the plunger all the way to the second stop first, immerse and release to aspirate, which draws extra liquid beyond the set volume, then dispense by pressing only to the first stop, which delivers the set volume and leaves the excess in the tip, and discard the residual by pressing to the second stop into waste. The logic: instead of asking an unwilling liquid to leave the tip cleanly, you overfill and deliver only the reliable portion.
Three rules make reverse mode safe to use. First, it delivers slightly differently from forward mode, so within a single dilution series pick one mode and stay with it, and record which. Second, it consumes more reagent per transfer, which matters when the stock is precious; say so in observations. Third, it pairs naturally with the viscous and foamy rows of the troubleshooting table above, so if you reach for reverse mode because of foaming, write that reason down, because the reason is data about the reagent.
Choosing a Documentation Format: Paper, Spreadsheet, or Electronic Notebook
The question behind the search phrase document pipetting conditions reproducibility format is really about storage and retrieval. Three formats dominate, and each has a distinct failure mode.
Paper notebook. Fastest at the bench, immune to software, and easy to initial and witness. Its weakness is retrieval: six months later, finding every run that used serial EX-20481 means flipping pages. Mitigate by keeping the template reproduced or pasted at a fixed position on each relevant page, and by maintaining a small index page that maps serial numbers to page numbers.
Shared spreadsheet registry. Best for the stable facts. One sheet lists every pipette: serial, model, range, last calibration, next due, last verification, and assigned tips. A second sheet logs verifications over time. A third logs tip lots with open dates. The registry answers the audit-style questions instantly, but it is a poor home for per-run technique details, which belong with the experiment.
Electronic lab notebook. Best when configured properly: the pipetting block becomes a reusable template object that each new entry inherits, with the stable fields pre-filled from the registry and only the variable fields left to complete. The weakness is governance: without naming conventions and a review habit, ELNs fill with half-finished blocks. Assign ownership, require the observations field before an entry is marked complete, and have a second person spot-check blocks weekly.
The strongest system combines all three: the registry holds instrument and tip facts, the ELN or notebook holds per-run blocks, and the two cross-reference by serial number and date. Whatever you choose, keep the template text identical across the lab, because a reproducibility format only works when everyone's blocks parse the same way in a reader's head.
Turning the Block Into a Methods Paragraph
A pipetting block is raw material for the methods section, and writing the paragraph straight from the block, while the facts are fresh, is faster than reconstructing it at manuscript stage. Compare the block from Worked Example 1 with what it becomes:
"Serial dilutions were prepared on the bench at approximately 22 C using a single-channel air-displacement pipette (example model, serial EX-20481, calibration in date, gravimetrically verified within the week at 200 µL) with filtered low-retention tips (example manufacturer, lot EX-88713). Tips were pre-wetted twice at the working volume, immersed to the standard depth defined in the laboratory procedure, held vertically, and pressed over approximately one second in forward mode with blow-out. The dye stock was equilibrated to room temperature for 30 minutes and vortexed briefly before the first withdrawal, and no tip changes were made within the dilution series."
Every clause traces to a field, and the paragraph took two minutes to write because the thinking already happened at the bench. Notice what the paragraph omits: humidity that was not measured, drafts that were absent, observations that were empty. Documentation for reproduction is complete, and documentation for publication is selective; the block holds the complete version, and the methods section quotes it honestly.
Documenting Batch Work: Master Mixes, Plates, and Multichannel Pipettes
Batch workflows multiply the stakes of every pipetting decision, because a single error propagates into every downstream sample, as the reproducibility section explains for master mixes. Three additions to the block cover the common cases.
Master mixes. Record the order in which components entered the tube, because adding enzyme to a concentrated salt pool without buffer between them is a different chemistry from the reverse. Record which pipette prepared the mix and which pipette distributed it, because those may differ and each needs its own verification status. Record the overage: how much extra volume you prepared beyond the calculated requirement, and whether the final reaction count changed because of it.
Plate work. Record the reservoir you dispensed from and how many refills it received, because the liquid depth in a reservoir falls across a plate and immersion depth categories quietly shift as it does. Record the plate map identifier so that the block and the map travel together. Note any wells that were touched twice or skipped and corrected, with the well coordinates.
Multichannel pipettes. Record which channels were used and how tips were seated, and periodically verify channel-to-channel uniformity by dispensing from each channel onto the balance and comparing the readings. A multichannel whose outer channel runs low will bias one side of every plate you fill, and that bias is invisible until someone weighs it. If your block shows the same channel repeatedly flagged in observations, the pipette, not the technique, is the suspect.
A Fifteen-Minute Onboarding Exercise That Makes the Point Permanent
New members of a lab believe documentation is pedantic right up until the moment it saves them. This exercise converts them in one session.
Pair two people. Each fills out a pipetting conditions block for the same simple task, for example transferring 200 µL of water ten times, without showing the other. Person A executes their own block while person B watches silently. Then they swap: person B reproduces the task using only person A's written block, asking no questions. Almost every pair discovers at least one unstated decision, an unrecorded pre-wet, an undefined immersion depth, a plunger speed that felt identical but was not. Then both run the gravimetric check from the earlier section on the same pipette and compare their means and spreads side by side. Two honest technique differences usually show up in the numbers, which is the moment the lesson lands: reproducibility is not a virtue, it is a deliverable, and the pipetting block is its receipt.
Close the exercise by having each person file their block and their gravimetric result in the lab's system, dated and initialed. The lab's verification log gains two rows, and the new members gain a habit with their name already on it.
Pre-Run Checklist and Closing Perspective
Before you start any run whose results you might ever need to defend, run through this list in under a minute:
- Correct pipette selected for the liquid class, serial number visible and recorded
- Calibration in date, last verification noted, quarantine labels absent
- Tip lot recorded, box open date noted, mounting convention applied
- Reagent temperature, viscosity class, and mixing state recorded
- Pre-wet, immersion, angle, speed, and mode decided and written, not improvised
- Bench temperature noted, drafts considered, location recorded
- Observations field left open and actually used
The larger point is cultural. Pipetting is the one operation every molecular biologist performs hundreds of times per week, which makes it both the largest source of undocumented variance and the cheapest place to fix it. A pipetting conditions block costs ninety seconds. The gravimetric check costs five minutes. The calibration record costs a spreadsheet. Together they convert your bench from a place where results happen into a place where results can be rebuilt, which is the only definition of reproducibility that survives contact with a second pair of hands.