Biosafety Risk Assessment for Teaching Labs: Adapting the Framework
By Dr. Zubair Khalid, DVM, MS, PhD ·
A teaching lab biosafety risk assessment is a documented, exercise-by-exercise analysis of the agents, the procedures, and the people in a course, ending in a containment assignment and a control plan that a novice population can actually follow. Done well, it does three things. It gives every experiment a defensible biosafety level instead of a habit-based one. It converts safety rules into trained, observed behaviors. And it creates the record you will need after a spill, an exposure, or an inspection.
Use this method before each semester, whenever you add an exercise or an agent, when a room or instructor changes, and after any incident or near miss. For a typical one-semester introductory microbiology course, plan on about 4 to 6 hours of hands-on assessment work and 2 to 4 weeks of elapsed time to cover instructor review, biosafety committee sign-off, and student training.
The method adapts two frameworks that were built for other rooms and fits them to the teaching bench. The Procedure-Specific Risk (PSR) framework treats the exposure a procedure generates, rather than the taxonomy of the organism, as the primary driver of containment, and packages that logic into an eight-step protocol with a structured template and a digital tool [1]. The American Society for Microbiology (ASM) maintains Guidelines for Biosafety in Teaching Laboratories, and its 2019 update added a section on service animals in the microbiology teaching laboratory, complete with the legal framework and the additional risk-assessment considerations a biosafety professional should weigh [2]. What follows is the combined, bench-ready version.
Why Teaching Labs Need Their Own Risk Assessment
A biosafety risk assessment is a systematic process: identify the hazards, estimate how likely an exposure is and how bad it would be, then select controls that bring the residual risk to an acceptable level. In clinical and research settings, the assessor can assume a trained population with years of bench hours. A teaching lab breaks that assumption every August.
Teaching labs have a distinct risk profile. Students arrive with zero bench experience and rotate out at the end of term, so no competency record ever accumulates. Sections are large, benches are shared, and the curriculum is fixed months in advance, which means the assessment must be written before anyone knows how the cohort will behave. Students culture their own unknown isolates, which are uncharacterized by definition. Instructors rotate, so the document has to carry the safety program instead of any single person's memory.
Two vocabulary terms anchor everything that follows. A risk group (RG) classifies an agent by its inherent hazard. RG1 agents are not known to cause disease consistently in healthy adults. RG2 agents are associated with human disease but are rarely serious, and preventive or therapeutic interventions are usually available. A biosafety level (BSL) describes containment: the combination of practices, safety equipment, and facility features used for the work. BSL-1 suits well-characterized agents of no known consistent hazard to healthy adults, handled with standard aseptic technique and no special equipment. BSL-2 adds restricted access during work, a biological safety cabinet for aerosol-generating manipulations, and enhanced PPE for agents of moderate hazard.
The traditional shortcut, assigning a BSL directly from the RG of the agent, fails in both directions when the same organism is used across very different procedures. A heat-fixed, stained smear of a RG2 organism is a different exposure from vortexing an open liquid culture of the same organism. Modern frameworks address this by making the procedure, not the agent name, the primary unit of analysis [1].
The Principle: Procedure Drives Containment, Not Just the Agent
The Procedure-Specific Risk framework was built from a structured comparative analysis of ten national and international reference documents, including the World Health Organization Laboratory Biosafety Manual (4th edition), the publication Biosafety in Microbiological and Biomedical Laboratories (BMBL, 6th edition), and the CDC Biological Risk Assessment (2024). It integrates agent risk group classification, procedural exposure characterization, and modulating factor evaluation into a BSL assignment matrix, supported by an assessment template and a digital implementation tool [1]. Its validation combined content validity, meaning every component traces back to the analyzed reference documents, with convergent validity of the BSL assignments it produces [1].
The World Health Organization's Laboratory Biosafety Manual, fourth edition, requires risk assessments tailored to the specific pathogen, the specific activity, and the specific operational setting, an approach that reviews of high-consequence zoonotic pathogens such as henipaviruses operationalize for diagnostics and preparedness planning [3]. A teaching laboratory is exactly such a distinct operational setting, and in teaching labs the modulating factors dominate the calculation. Novice hands, first-week pipetting, crowded benches, shared microscopes, students with immunocompromising household contacts, and service animals all shift both the likelihood and the consequence of an exposure. The same exercise can be acceptable in week 12 and reckless in week 2, which is the strongest argument for assessing each exercise and each cohort rather than writing one blanket document per course.
Materials and Setup
Gather these before you start writing. The table lists the assessment materials and the physical reagents and equipment your assessment will govern, with working concentrations for the items where a number matters.
| Item | Specification or working concentration | Purpose | Notes |
|---|---|---|---|
| Risk assessment worksheet | One page per exercise, with fields for agent, procedure steps, exposure routes, controls, training | The core record | Reuse across semesters, version and date every copy |
| Agent inventory | Every strain and source, with RG assignment | Baseline hazard | Include supplier strain designations and all student unknowns |
| Safety data sheets (SDS) | One per chemical reagent, printed or LMS-linked | Chemical hazard reference | SDS defines hazards, handling, and first aid for each reagent |
| Household bleach, 5.25 to 6.15 percent sodium hypochlorite | Diluted 1:10 in water (about 0.5 percent, roughly 5,000 ppm available chlorine), prepared fresh each lab day | Bench and surface disinfection | Corrosive. Never mix with acids or ammonia, the combination releases chlorine gas. Label the bottle with date and time |
| Ethanol, 70 percent (v/v) | Ready to use | Wiping nonporous surfaces and small equipment | Flammable, keep away from open flames. Ineffective against bacterial spores |
| Hydrogen peroxide, 3 percent | Ready to use | Catalase test reagent | Low hazard, mild oxidizer and skin irritant |
| Gram stain reagents (crystal violet, Gram iodine, decolorizer, safranin) | Commercial kit or course protocol | Smear staining | Decolorizer is flammable near Bunsen burners, stains discolor skin and clothing permanently |
| Nitrile gloves, button-cuff lab coats, splash goggles | One set per student | PPE | PPE is the last layer of control, not the first |
| Autoclave (steam sterilizer) with liquid cycle | 121 °C, about 15 psi, 15 to 20 minutes depending on load volume | Decontamination of cultures and contaminated waste | Validate cycles with chemical indicators, log every run |
| Sharps container and biohazard bags | Puncture-resistant, autoclavable | Waste segregation | Place at the point of use, never overfill |
| Spill kit | Absorbent material, fresh 1:10 bleach, forceps, biohazard bag, gloves | Response to culture spills | Check contents at the start of each semester |
| Service animal accommodation plan | Written document per ASM 2019 guidance | Accessibility and safety planning | Address bench access, spill contingencies, and animal and student safety [2] |
Safety note. Hypochlorite solutions corrode metal and eyes and lose activity within days, so prepare the 1:10 dilution fresh for every session. Ethanol and stain decolorizer ignite readily around Bunsen burners, which is why many teaching labs have switched to electric loop sterilizers or disposable inoculating loops. Autoclaves cause scald burns, so require heat-resistant gloves and a cooldown period before opening any load.
Teaching Lab Biosafety Risk Assessment Step by Step
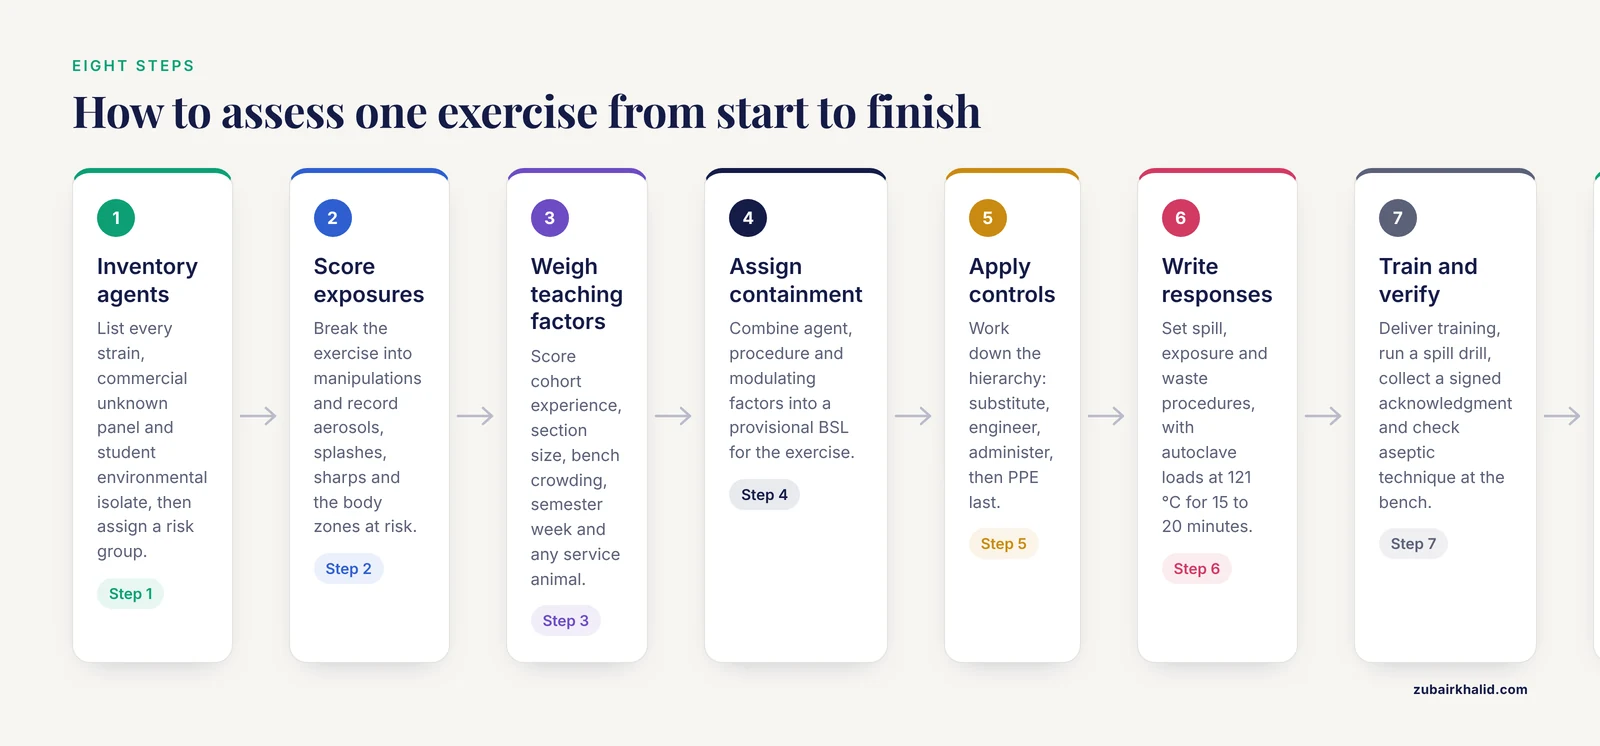
The following eight steps adapt the PSR logic to the teaching bench. Work through them in order, one exercise at a time, and write everything down. An assessment that lives only in the instructor's head is not an assessment.
- Inventory every agent and assign its risk group. List each organism used in each exercise, including stock strains, commercial unknown panels, and any environmental isolates students collect. Assign an RG from supplier documentation and standard classifications. Reason: the agent sets the hazard floor for the exercise, and unknown isolates are the classic teaching-lab blind spot because an environmental isolate can turn out to be a moderate-hazard organism such as Staphylococcus aureus.
- Break each exercise into manipulations and score the exposure. For every step (loop transfer, pipetting, vortexing, centrifugation, smear preparation, heat fixation, plate flooding, staining), record whether it can generate aerosols, splashes, or sharps injuries, and which body zones it threatens. Reason: the exposure generated by the procedure, not agent taxonomy, serves as the primary determinant of containment in current frameworks [1], and this inventory is what makes two exercises with the same organism score differently.
- Evaluate the teaching-specific modulating factors. Score the cohort and the room: first bench experience, section size, instructor-to-student ratio, bench crowding, week of the semester, presence of a service animal, and students who need alternative assignments for health reasons. Reason: modulating factors shift both likelihood and consequence, and in teaching labs they swing more than in any research setting. The ASM added a service animal section to its teaching guidelines in the 2019 update precisely because these factors are real, legally significant, and manageable with advance planning [2].
- Assign a provisional containment level to each exercise. Combine agent RG, procedural exposure, and modulating factors in a simple matrix. Most introductory exercises with RG1 organisms and no aerosol-generating steps land at BSL-1. Exercises that culture moderate-hazard organisms or generate aerosols move to BSL-2 logic, with restricted access during work and a biological safety cabinet for any aerosol-generating manipulation. Reason: reproducible, procedure-aware BSL assignment is the entire point of the framework, and it prevents both under-containment and wasteful over-containment [1].
- Apply the hierarchy of controls, in order. Eliminate or substitute first: replace a RG2 demonstration with a RG1 strain, a recorded demonstration, or a simulation. Add engineering controls next: needle-free transfers, sealed centrifuge cups, and a Class II biological safety cabinet (a ventilated enclosure with high-efficiency particulate air, or HEPA, filtration that protects the worker, the sample, and the room) for any aerosol-generating step. Then administrative controls: written standard operating procedures (SOPs), no mouth pipetting, lab coats that stay in the lab, and a food and drink ban. PPE comes last. Reason: controls higher in the hierarchy do not depend on human perfection, and a novice population guarantees imperfect behavior.
- Define the response procedures for each exercise. Write the spill response (cover, disinfect from the edges inward, hold the contact time, dispose as biohazard), the exposure response (wash, report, occupational health referral), and the waste streams (liquids autoclaved at 121 °C for 15 to 20 minutes, sharps straight into containers). Reason: controls only hold if the response to their failure is rehearsed, and teaching labs have spills every semester.
- Train, verify competency, and document. Deliver microbiology biosafety training before the first bench session: hazard orientation, an SOP walk-through, a spill drill, a signed acknowledgment, and a demonstrated aseptic technique check at the bench. Reason: an assessment that is not trained is not implemented. Education research supports this order of operations, since nursing students who practiced biosafety through clinical simulation reported better understanding of PPE use and risk perception before live work [4], and the same transfer applies to the teaching bench.
- Review and revalidate on a schedule. Set a review date each semester and trigger an immediate reassessment when you add an agent, change a procedure, move rooms, or record a near miss. Reason: frameworks evolve, as the 2019 ASM service animal update demonstrates, and a stale assessment is a liability rather than a defense [2].
A Semi-Quantitative Option for Larger Programs
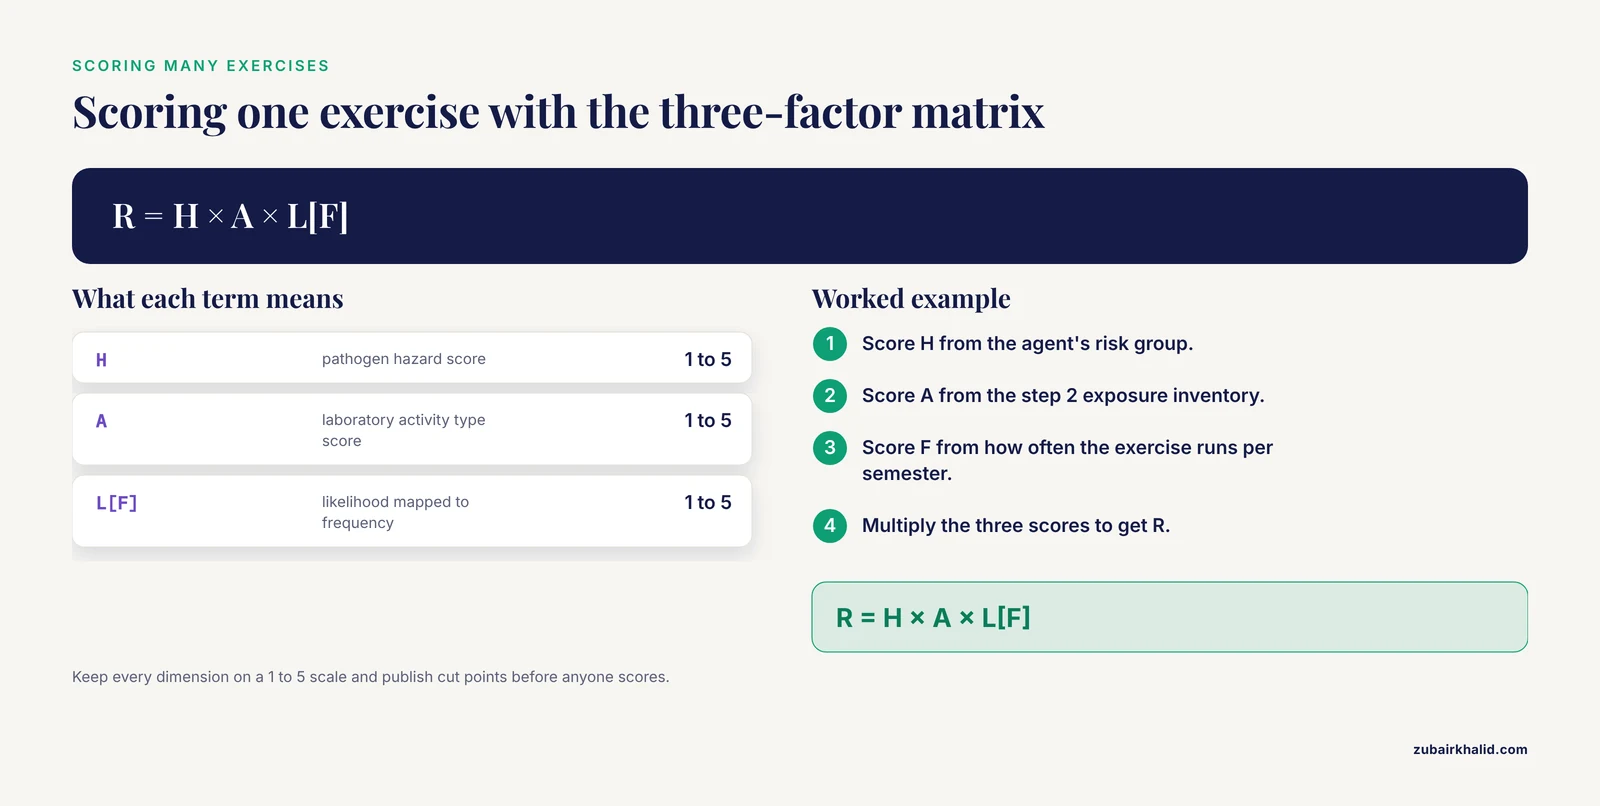
When a department runs many sections and dozens of exercises, qualitative judgment becomes inconsistent between instructors. A semi-quantitative approach fixes this. A three-dimensional risk matrix model developed for public health laboratories quantifies three dimensions: pathogen hazard (H), laboratory activity type (A), and the likelihood of event occurrence mapped to annual operation frequency (L[F]), combined as R = H × A × L[F] to yield a risk score that maps to defined levels and targeted control measures [5]. In validation across 16 district CDC laboratories in Beijing, most of the 130 tested activities involved Category III pathogens (a moderate-hazard class in China's pathogen classification), workload intensity varied widely between rooms, and only one activity was rated unacceptable, which is exactly the behavior you want from a scoring tool, separating routine from exceptional work [5].
The teaching adaptation is direct. Score H from the agent's risk group, A from the exposure inventory produced in step 2, and F from how often the exercise runs per semester, since a one-session staining demo and a weekly unknown project carry different cumulative exposure. Keep each dimension on a simple 1 to 5 scale, publish the cut points before anyone scores, and let the score select the control package rather than the instructor's mood.
Controls, Expected Results, and How to Read the Output
Controls. Your control plan should read down the hierarchy from step 5, and it needs verification controls on top of the operational ones. Verification controls are the checks that prove the program runs: spot audits of bench technique, autoclave cycle logs with indicator results, observation of glove changes and doffing, and a review of the incident and near-miss log each term. Without verification, a control list is a wish list.
Expected results. A completed assessment produces a predictable set of deliverables: a one-page worksheet per exercise, a containment assignment for each, a control list organized by hierarchy, a training matrix mapping each student to completed sessions, and a signed acknowledgment on file. The agent inventory and the SDS binder round out the package.
How to read it. Read the output the way you would read a plate. Residual risk after controls should be low for every step of every exercise. No exercise should require BSL-2 practices for a routine step in week 1, because that signals the exercise was designed for a population that does not exist yet. If an exercise scores high, redesign it rather than compensating with more PPE, since PPE-dependent safety fails exactly when the population is least skilled. If an exercise cannot be brought down by substitution or redesign, cut it. This is the Three Rs logic (replacement, reduction, refinement) applied to biosafety, an approach developed in regulatory assessment and now extending into education programs [6].
Troubleshooting. Use this table when the program on paper and the program on the floor diverge.
| Symptom | Likely cause | Fix |
|---|---|---|
| Students still mouth-pipette or eat in the lab | Rules written but never trained or enforced | Add a competency check and enforce a leave-the-room policy for violations |
| Repeated minor spills in the same exercise | An exposure step was missed in the assessment | Re-run step 2 for that exercise, add an engineering control at the failing step |
| Benches not reliably disinfected, no chlorine odor | Bleach diluted days earlier | Prepare 1:10 bleach fresh each session, label with date and time |
| Assessment says BSL-1 but an exercise mixes open cultures vigorously | Exposure inventory incomplete | Re-score the exercise, add a biological safety cabinet or eliminate the step |
| Instructors apply different rules across sections | No shared SOP set or training matrix | Publish one SOP set and one training matrix, audit sections against them |
| Unknown isolates handled like stock strains | Unknown-isolate policy missing from the assessment | Add the policy, require BSL-2 practices for all unknowns until identified |
| Service animal conflict arises mid-semester | No accommodation plan on file | Draft the plan using the ASM 2019 guidance before the term starts [2] |
| Autoclave loads fail indicator checks | Overloading or wrong cycle for the volume | Reduce load volume, confirm the 121 °C cycle, retrain and log |
Variations on the Framework
Simulation-First Courses
Run the biosafety content as simulation before any live agent reaches the bench. In a qualitative study of 26 undergraduate nursing students, clinical simulation of biosafety practices was perceived to improve understanding of PPE use, sharpen risk perception, and integrate theory with practice, while also surfacing technical limitations and building teamwork [4]. A teaching lab can simulate a spill, a glove tear, or an exposure referral with nothing hazardous on the bench, then repeat the scenario live once the cohort has the motor patterns down.
Replacement and Reduction
The Three Rs, replacement, reduction, and refinement, originated in animal-use ethics and are being incorporated into basic and applied research and education [6]. The teaching-lab translation is straightforward. Replace pathogen demonstrations with RG1 strains or recorded demonstrations, reduce the number of live-agent exercises to those that teach a skill no video can, and refine protocols to remove aerosol-generating steps such as vortexing open cultures. Each substitution removes risk at the source instead of managing it downstream.
Environmental Verification
Programs with the resources can verify that engineering controls actually work by measuring bioaerosols. Occupational hygiene studies quantify inhalation exposure by impactor sampling at breathing-zone height (1.5 m) and estimating non-carcinogenic inhalation risk with hazard quotient and hazard index metrics, an approach demonstrated across 320 air samples in a wastewater treatment plant [7]. Treat this as periodic verification of ventilation and work practices, not as routine teaching-lab practice, since the sampling itself requires equipment and expertise most courses do not carry.
Zoonotic and Veterinary Teaching Modules
Courses that handle animal or environmental specimens should tailor the assessment to the pathogen, the activity, and the setting, the tailoring the WHO Laboratory Biosafety Manual fourth edition requires and that henipavirus biosafety reviews illustrate for high-consequence zoonoses [3]. For teaching labs this usually resolves to a simple rule: high-consequence agents are excluded entirely, and related concepts are taught with inactivated materials, images, or demonstrations.
Storage, Documentation, and Stability of the Assessment
Treat the risk assessment like a dated reagent. Store the current signed version in the department's shared repository and link it from the course site in the learning management system, and keep superseded versions for the retention period your institution requires, because the value of an assessment after an incident lies partly in showing what was known and when.
Define validity explicitly: one academic year, or until a trigger event. The triggers are a new agent, a changed procedure, a room or equipment change, an instructor change, an incident or near miss, and a revision to an applicable guideline. Every one of these degrades the fit between the paper and the bench, the same way a bleach bottle degrades on the shelf. A short revalidation meeting each semester, walking the worksheet against the actual syllabus, is usually enough to catch drift. Record the revalidation with a date and initials on the worksheet itself, so the document shows its own freshness the way a media bottle shows its expiration date.
Common Mistakes and Limitations
- Copying a research lab assessment. Research assessments assume trained staff working fixed protocols. Teaching assessments must assume the opposite on both counts, and a copied document will be wrong in exactly the places that matter.
- Assigning containment from the agent name alone. The same organism in a fixed smear and in a vortexed culture are different exposures, and procedure-aware assignment is what keeps the level defensible [1].
- Ignoring the unknown-isolate problem. Environmental isolates may be RG2 organisms. Handle every unknown with BSL-2 practices until it is identified, and choose unknown sources deliberately rather than letting students swab whatever they like.
- Treating gloves as the control program. PPE is the last layer of the hierarchy. If the control plan starts and ends with gloves, the plan has no redundancy.
- Quiz-only training. A signed quiz is evidence of attendance, not of competence. Pair it with a demonstrated technique check at the bench.
- Preparing bleach days in advance. Hypochlorite loses activity in storage, so a 1:10 dilution mixed on Monday is not protecting anyone on Thursday. Prepare it fresh each session and label it.
- No service animal plan. Accommodations are expected, and the 2019 ASM update exists because biosafety professionals needed a framework for planning them rather than improvising mid-semester [2].
- Never revalidating. An assessment without a review date and a trigger list will drift out of contact with the course within a year.
Limitations. An assessment documents judgment, it does not supervise the bench, and no document substitutes for an instructor watching novice hands work. Any actual exposure or potential exposure needs occupational health evaluation, not just a file entry. The institutional biosafety committee or equivalent authority at your institution has the final word on containment decisions, and this method produces the proposal that body will approve, amend, or reject.
Frequently Asked Questions
What is a teaching lab biosafety risk assessment?
It is a documented, exercise-level analysis that identifies the agents, the procedural exposures, and the modulating factors in a course taught to novices, then assigns a containment level and a control plan to each activity.
How is a teaching lab risk assessment different from a research lab one?
It assumes a novice population with high turnover and uncharacterized unknown isolates, so it is written per exercise before the semester starts and includes training verification, while a research assessment assumes trained staff and per-project review.
Which biosafety level applies to a general microbiology teaching course?
Most introductory courses operate at BSL-1 with RG1 organisms and standard aseptic technique, rising to BSL-2 practices for specific exercises that use moderate-hazard agents or generate aerosols, with the assignment coming from the assessment rather than from habit.
How should student unknown isolates be handled?
Treat every unknown as potentially hazardous and handle it with BSL-2 practices, including restricted access and no open aerosol-generating manipulation, until it is identified, and choose the sampling source deliberately.
How often should a teaching lab risk assessment be reviewed?
At minimum once per academic year, and immediately after any new agent, procedure change, room change, staffing change, incident, or guideline revision.
Can a service animal be accommodated in a microbiology teaching lab?
Yes, with advance planning. The 2019 ASM teaching laboratory guidelines added a service animal section with the legal framework and the risk-assessment considerations to work through, so build the accommodation plan before the semester begins [2].
Is there a quick way to score risk across many exercises?
Yes, adapt a three-factor semi-quantitative matrix that scores agent hazard, procedure exposure, and exercise frequency, then assigns control packages by score band, an approach modeled on the R = H × A × L[F] matrix used in public health laboratories [5].
What training must students complete before bench work?
Microbiology biosafety training delivered before the first hands-on session, covering hazard orientation, SOPs, spill and exposure response, a signed acknowledgment, and a demonstrated aseptic technique check.
Sources
- An 8-step procedure-specific risk framework enables reproducible biosafety level assignment beyond agent-based classification.
- A Section on Service Animals in the Microbiology Teaching Laboratory Has Been Included in the 2019 Update to the Guidelines for Biosafety in Teaching Laboratories.
- Hendra and Nipah viruses: Biosafety evidence for risk-based containment, inactivation practices, and one health preparedness.
- Nursing students' perceptions of the use of clinical simulation in biosafety education.
- A semi-quantitative risk assessment of pathogenic microorganism laboratories in Beijing's CDCs based on a three-dimensional risk matrix model.
- The Implementation of the Three Rs in Regulatory Toxicity and Biosafety Assessment: The Indian Perspective.
- Inhalation exposure and non-carcinogenic risk assessment of bacterial and fungal bioaerosols among wastewater treatment plants workers.