Sharps Safety in Microbiology Labs: Best Practices
By Dr. Zubair Khalid, DVM, MS, PhD ·
Sharps safety in microbiology labs is the discipline of handling, using, and disposing of needles, blades, glassware, and other puncture hazards so that no one gets a percutaneous exposure to infectious material. A single contaminated needlestick can transmit hepatitis B virus, hepatitis C virus, or HIV, and in a microbiology setting the inoculum may also include bacterial and fungal cultures that no bloodborne pathogen vaccine covers. Good sharps practice prevents those exposures at the bench, in the animal room, and at the waste station.
This guide covers the full working system: what counts as a sharp, how to run a biosafety risk assessment before any sharp enters a protocol, a step-by-step procedure for safe handling and disposal, controls that verify the program works, a troubleshooting table, and the common mistakes that cause most sharps injuries.
When to use this guide. Use it when setting up a new lab, when introducing a new procedure that involves a sharp, when training new staff and students, and when reviewing your exposure control plan during the annual cycle that the OSHA Bloodborne Pathogens Standard requires of covered employers.
Time commitment. Individual safe behaviors take seconds. Changing and documenting a sharps container takes minutes. Building the complete program described here, including the risk assessment, container placement, first training cycle, and injury log, takes a small lab roughly one working week of preparation spread over two to four weeks.
What Counts as a Sharp in a Microbiology Lab
A sharp is any object that can puncture or cut skin. In a microbiology laboratory this category is wider than most people expect.
- Hypodermic needles, with or without attached syringes
- Scalpel and lancet blades
- Glass Pasteur pipettes and glass serological pipettes
- Broken glassware of any size, including cracked tubes and chipped flasks
- Microscope slides and coverslips, which cut more often than people expect because wet coverslips are nearly invisible
- Inoculating needles and glass hooks
- Capillary tubes and hematocrit tubes
- Vials and ampoules that must be snapped open
- Scalpel blades used during necropsy or specimen trimming
- Suture needles used in animal work
- Glass pipette tips and glass transfer pipettes
A percutaneous exposure is an injury in which a sharp breaches the skin. In a microbiology lab the hazard is twofold. The sharp may carry blood or body fluids from a human or animal source, which creates risk of bloodborne pathogen transmission. It may also carry a working culture, an environmental isolate, or a contaminated environmental sample. The OSHA Bloodborne Pathogens Standard, 29 CFR 1910.1030, treats needles, blades, broken glass, and capillary tubes contaminated with blood or other potentially infectious material as regulated sharps, and the engineering control requirements in that standard are the legal floor for US laboratories.
Safety note. Any sharp that has contacted human blood, animal tissue, cultures, or clinical specimens is potentially infectious. Handle every contaminated sharp as if it carries a bloodborne pathogen and a transmissible culture organism at the same time.
The Principle: Hierarchy of Controls
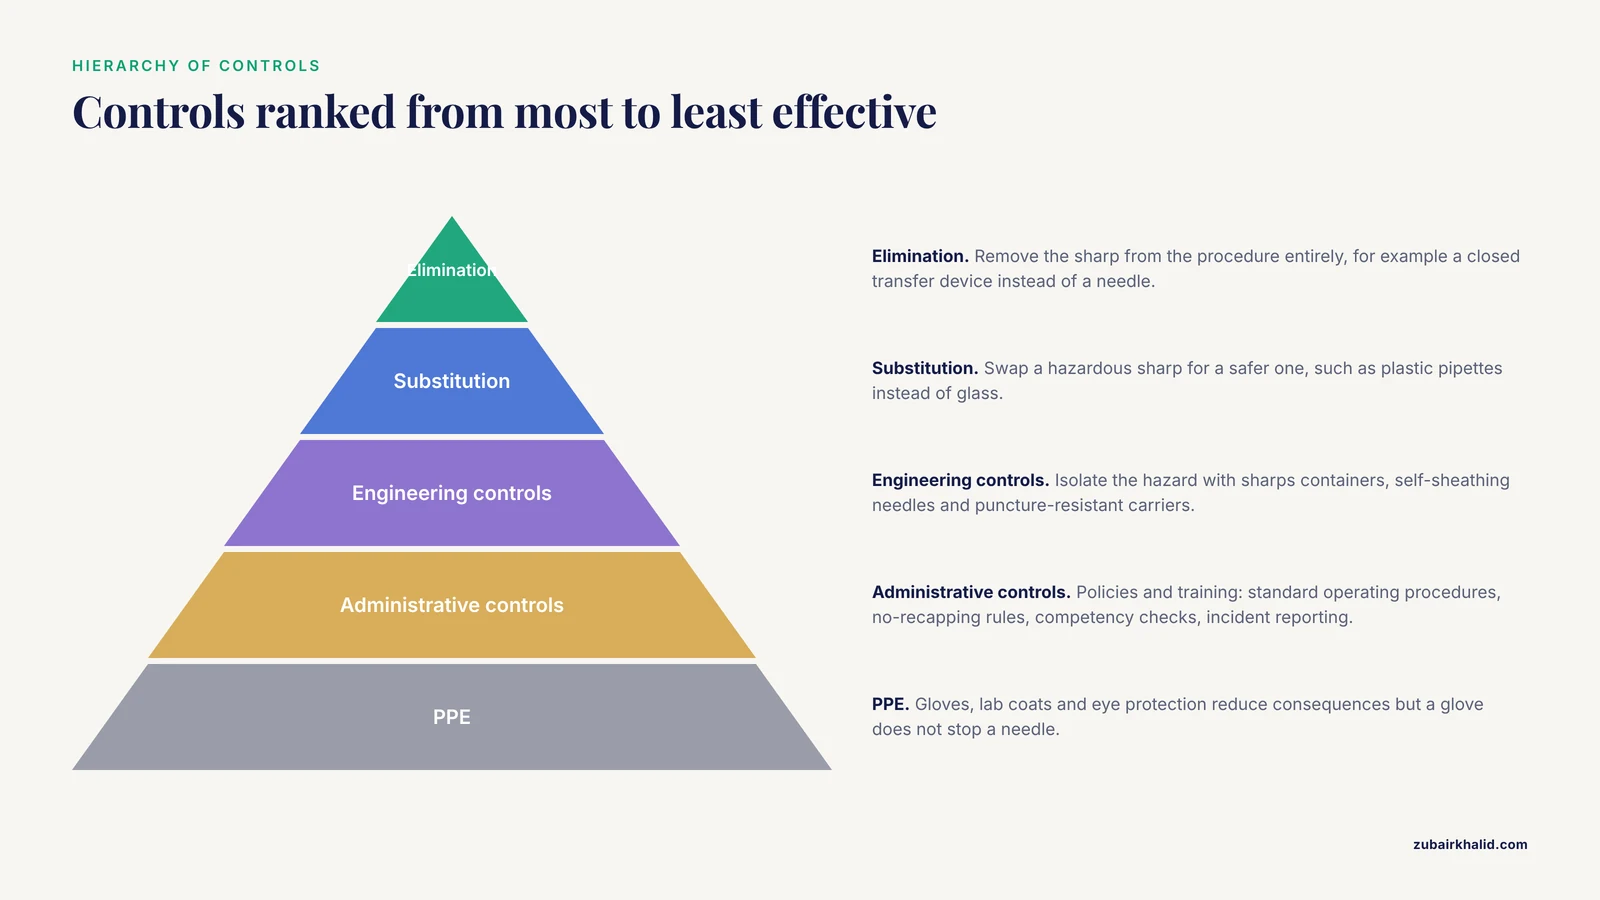
Sharps safety rests on the hierarchy of controls, a framework used by occupational safety authorities including OSHA and NIOSH. Controls are ranked from most to least effective.
- Elimination. Remove the sharp from the procedure entirely. Replace a needle transfer with a closed transfer device or a pouring step.
- Substitution. Replace a hazardous sharp with a safer alternative. Plastic Pasteur pipettes instead of glass, plastic culture tubes instead of glass, safety needles instead of standard needles.
- Engineering controls. Isolate the hazard with equipment. Sharps containers, self-sheathing needles, needleless connectors, blade-removing devices, puncture-resistant transport carriers. Engineering controls are the heart of the OSHA standard and of the Needlestick Safety and Prevention Act, which directed employers to prefer devices with engineered sharps injury protections.
- Administrative controls. Policies and training. Standard operating procedures, no-recapping rules, exposure control plans, competency checks, incident reporting systems.
- Personal protective equipment (PPE). Gloves, lab coats, and eye protection. PPE is the last layer because it reduces consequences rather than preventing the event. A glove does not stop a needle.
Define each layer for your lab in writing. Most sharps injuries happen when a lab relies only on layers four and five while layer three is missing or misused.
Materials and Equipment
| Item | Specification | Purpose in the program |
|---|---|---|
| Sharps containers | Rigid, puncture-resistant, closable, leakproof on the sides and bottom, marked with the biohazard label, sized to the point of use | Immediate disposal of all contaminated sharps at the work surface |
| Point-of-use container stands or wall brackets | Secure mount at bench height near the hazard | Keeps the opening accessible with one hand and prevents tipping |
| Broken glass boxes or rigid glass waste bins | Cardboard or plastic bins labeled for glass only, lined if required by your institution | Separate uncontaminated glass from biohazard sharps so disposal streams stay clean |
| Forceps, tongs, hemostats, or a broom and dustpan | Dedicated, decontaminable tools | Removing broken glass and sharps from sinks, benches, and floors without using hands |
| Safety-engineered needles and devices | Self-sheathing needles, retractable lancets, needleless transfer sets | Substitution and engineering controls for procedures that require percutaneous work |
| Puncture-resistant transport carriers | Closed, rigid secondary containers for moving sharps between rooms | Prevents injuries during transport to decontamination or waste areas |
| Autoclave or approved decontamination method | Validated cycle appropriate to the waste type | Renders biohazardous sharps noninfectious before final disposal, where your waste stream requires it |
| Biosafety cabinet (for open sharps work) | Certified Class II cabinet for manipulations with splash or aerosol risk | Contains cultures during inoculation, needle transfers, or necropsy follow-up work |
| Exposure control plan and sharps injury log | Written documents maintained per OSHA 29 CFR 1910.1030 | Records hazard review, control selection, and injury surveillance |
| PPE | Disposable gloves, fluid-resistant lab coat, eye protection, cut-resistant glove for necropsy where appropriate | Reduces skin and mucous membrane exposure during unavoidable sharps work |
Safety note. Cut-resistant gloves protect against scalpel and glass lacerations during necropsy and glassware cleanup. They do not make a needlestick impossible, and they never substitute for a sharps container at the bench.
Starting Point: The Biosafety Risk Assessment
A biosafety risk assessment is the structured process of identifying what can cause harm in a procedure, estimating how likely and how severe that harm is, and selecting controls in proportion to the risk. The CDC and NIH manual Biosafety in Microbiological and Biomedical Laboratories (BMBL) and the WHO Laboratory Biosafety Manual both treat the risk assessment as the foundation of every laboratory biosafety decision, and sharps decisions are no exception.
Run the assessment for every new protocol before the first sharp is unpacked.
- Identify the agent and its hazard group. Name the organism or specimen type. Note whether the agent is handled at biosafety level 1, 2, or 3, and whether the specimen source is human, animal, or environmental.
- List every sharp in the procedure. Write down each needle, blade, glass item, and slide, step by step. Most labs find at least one forgotten sharp in this exercise, often a glass Pasteur pipette used for transferring supernatant.
- Assess exposure routes for each sharp. Ask three questions for each. Can it puncture skin during normal use. Can it puncture skin during cleanup, storage, or disposal. Can it generate a splash or aerosol while being used.
- Evaluate the concentration and volume. A dense broth culture on a needle differs from a single colony on a loop. Quantify what a puncture would inoculate.
- Select controls in hierarchy order. Ask elimination first, then substitution, then engineering controls, then administrative controls, then PPE. Document why a higher control was rejected.
- Assign a trained second reviewer. A biosafety officer, supervisor, or experienced colleague reviews the assessment. Fresh eyes catch the sharps the protocol author has stopped noticing.
- Document and date the assessment. Review it annually and after any sharps injury, any near miss, and any change in agent, procedure, or equipment.
This single document is what turns sharps safety from a set of habits into a defensible program, and it is also the evidence of good-faith practice that occupational health reviewers and inspectors look for first.
Sharps Safety in Microbiology Labs: Step by Step
The following procedure describes the complete working practice from assessment through post-exposure response. Follow it as a sequence. Each step includes the reason it matters.
Step 1. Complete the biosafety risk assessment before the sharp arrives
Work through the seven-part assessment above for the procedure in question. Reason: every downstream decision, from container size to device selection, should trace back to a documented hazard evaluation rather than to habit.
Step 2. Eliminate or substitute wherever possible
Before choosing a safety needle, ask whether the sharp is needed at all. Replace needle-based transfers with closed transfer devices, replace glass Pasteur pipettes with plastic, replace glass culture tubes with plastic, and replace glass slides with disposable plastic carriers where microscopy permits. Reason: a sharp that does not exist cannot injure anyone, which is why elimination and substitution outrank every other control in the hierarchy.
Step 3. Select safety-engineered devices for the sharps that remain
For procedures that require needles, use devices with active sharps injury protection, such as self-sheathing needles, retractable lancets, or blunting mechanisms, and activate the safety feature immediately after use, before the device leaves your hand. Reason: OSHA requires employers to select engineering controls that reduce the risk of injury, and a safety feature that is activated at the point of use protects the next person who touches the waste stream.
Step 4. Place a compliant sharps container at the point of use
Install a rigid, puncture-resistant, closable, leakproof container bearing the biohazard label within arm's reach of every bench where sharps are used, mounted on a stand or bracket so it cannot tip. Choose a size that fits the space. Reason: the single strongest predictor of safe disposal is distance, and a container more than a few steps away becomes a full countertop of used sharps by the end of a shift.
Step 5. Establish the handling rules and post them
Write and post these rules at every sharps work station.
- Never recap a needle using two hands.
- If recapping is genuinely unavoidable, use a one-handed scoop technique or a mechanical recapping device.
- Never bend, break, or shear a needle by hand.
- Never remove a needle from a syringe by hand. Use a needle-removal device mounted on the container.
- Never leave a sharp on the bench, in a sink, in an ice bucket, in a water bath, or in a centrifuge rotor.
- Never carry an uncapped sharp across the room. Work at the point of use.
- Dispose of the sharp immediately after use, before removing gloves.
Reason: these six behaviors correspond to the exact mechanisms recorded in most laboratory sharps injury reports, so posting them converts policy into a visible reminder at the moment of risk.
Step 6. Handle broken glass without hands
Use forceps, tongs, or a brush and dustpan for every piece of broken glass, including pieces that appear clean. Sweep the area and inspect with a light before resuming work. Dispose of contaminated broken glass in the sharps container and uncontaminated broken glass in the broken glass box. Reason: hands are the most frequently injured instrument in glassware cleanup, and contaminated glass is a biological hazard as well as a mechanical one.
Safety note. Glass from a dropped culture tube may carry the full contents of the tube. Treat all glass from a spill zone as contaminated until it has been decontaminated or placed in the biohazard sharps stream.
Step 7. Control the glass items people forget
Establish disposal routes for slides, coverslips, capillary tubes, and opened ampoules. A used coverslip smeared with a Gram stain preparation is contaminated and sharp. Provide a small rigid container at each staining station and each microscope station. Reason: slide and coverslip injuries cluster at staining benches because there is rarely a designated disposal point there.
Step 8. Manage sharps in animal work
In necropsy and in vivo work, keep scalpel blade removers and a rigid container inside the procedure room, pass instruments on a tray rather than hand to hand, and announce blade handoffs verbally. Cut-resistant gloves reduce laceration risk during specimen trimming. Remove needles from animals with the safety feature engaged or a capped cap immediately ready, and never leave an uncapped needle on the surgery table. Reason: animal work concentrates multiple sharp types with live animals that can move, which multiplies the mechanisms of injury.
Step 9. Watch the fill line
Retire each sharps container when it reaches the three-quarter mark or its printed fill line, whichever comes first. Close the lid, label it, and move it through your institution's waste stream. Reason: an overfilled container is the most common cause of finger sticks during disposal, because sharps protrude through the opening and the lid cannot close.
Step 10. Transport sharps in rigid secondary containment
Move filled containers and individual sharps between rooms only in closed, rigid, puncture-resistant carriers. Never carry a sharp in a pocket, a glove, a lab coat cuff, or an open rack. Reason: transport is where sharps meet hands that did not use them, and the receiving person has no way to see the hazard.
Step 11. Decontaminate and dispose through the correct stream
Follow your institutional regulated medical waste procedure. Where the stream requires it, autoclave biohazardous sharps in approved autoclavable containers before final disposal, and never place a loose sharp directly into an autoclave bag. Reason: decontamination protects waste handlers downstream, and loose sharps in soft bags injure autoclave staff during unloading.
Safety note. Sharps containers may not be mechanically compacted, crushed, or opened. Autoclave cycles process them as closed units.
Step 12. Respond to any exposure immediately
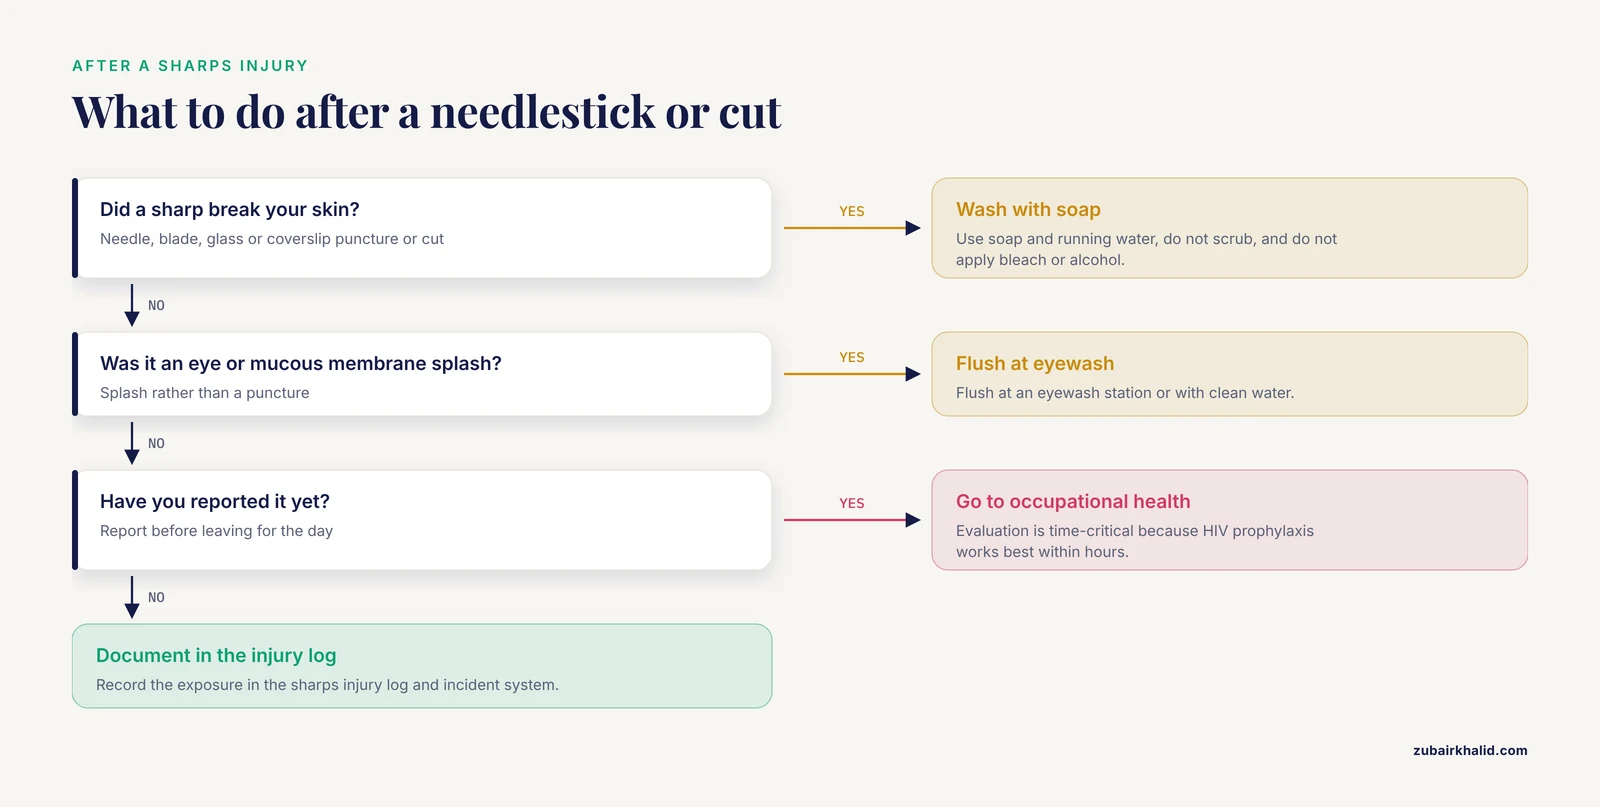
If a sharp breaks your skin, take these actions without waiting to finish the task.
- Wash the site with soap and running water. Do not scrub, and do not apply bleach, alcohol, or disinfectant to skin or mucous membranes.
- For an eye or mucous membrane splash, flush at an eyewash station or with clean water.
- Report the injury to your supervisor immediately, before leaving for the day.
- Go to occupational health or the emergency department for evaluation. For a potential HIV exposure, post-exposure prophylaxis works best when started as soon as possible, ideally within hours, so the evaluation is time-critical.
- Document the exposure in the sharps injury log and incident system.
Reason: the window for effective HIV post-exposure prophylaxis is short, and hepatitis B immunity status must be verified so that vaccination or immunoglobulin can be given when indicated.
Step 13. Record, review, and close the loop
Log every sharps injury and near miss in the sharps injury log that OSHA requires covered employers to maintain. Review the log and the exposure control plan at least annually, and after every incident, and update device selection based on what the log shows. Reason: the log is not paperwork. It is the dataset that tells you which device, which bench, and which behavior is producing your risk.
Step 14. Train every person who touches a sharp
Deliver documented sharps safety training at onboarding and annually thereafter, and verify competency by observation, not just by attendance sheet. Include students, visiting researchers, custodial staff who handle waste, and anyone supporting animal work. Reason: training obligations under the Bloodborne Pathogens Standard apply at assignment and annually, and observational competency checks catch the drift between what people were taught and what they do under time pressure.
Controls: How You Verify the Program Works
In analytical terms, sharps safety is a method with controls and expected results. The controls are your verification activities. The expected results are what a functioning program looks like on paper and on the bench.
Control 1. Bench audit. Once a month, a supervisor walks the lab and records three things. Whether every sharps work area has a container within arm's reach, whether any container is over the fill line, and whether any sharp is found outside a container. Expected result: zero loose sharps and zero overfilled containers. Any finding is a training event, not just a cleanup task.
Control 2. Observation audit. Twice a year, observe a working session for each procedure involving sharps and score it against the posted handling rules from Step 5. Expected result: no two-handed recapping, immediate disposal, safety features activated before handoff. A single observed recap is a finding to address in training.
Control 3. Injury and near-miss log review. Quarterly, review the sharps injury log and the near-miss reports. Expected result: near-miss reports outnumber actual injuries. A healthy reporting culture produces many low-stakes reports and no surprise injuries.
Control 4. Mock exposure drill. Once a year, run a drill in which a staff member simulates a needlestick and walks the response path, from washing the site to reporting to occupational health. Expected result: the staff member can name every step and the actual elapsed time from simulated injury to evaluation is consistent with the clinic's hours.
Control 5. Training records. Verify that every person on the roster has current onboarding or annual training. Expected result: one hundred percent coverage, including short-term staff and students.
Read the controls together. An injury rate of zero with no near-miss reports usually means underreporting, not safety. A lab that logs many near misses and no injuries has the healthier system.
Troubleshooting
| Symptom | Likely cause | Fix |
|---|---|---|
| Needles or blades found in regular trash or autoclave bags | Container too far from the bench, or staff unaware of the rule | Relocate containers to the point of use, retrain, and audit for two consecutive months |
| Container lid will not close | Container past the fill line, or large syringes wedged sideways | Retire the container, replace with a larger one or a wider opening appropriate to the waste, and reinforce the three-quarter rule |
| Repeated injuries from glass Pasteur pipettes | Substitution step skipped in the risk assessment | Switch to plastic pipettes, or require forceps and a designated glass disposal box at the bench |
| Injuries during cleanup at shift end | Loose sharps left on benches, in sinks, or in water baths | End-of-shift sweep as a listed duty, posted handling rules, and container placement at sinks where glass collects |
| Injuries to waste-handling or autoclave staff | Loose sharps in soft waste bags, or container lids left open | Audit bench practice at the source, require closed lids at all times, and autoclave sharps in approved rigid containers only |
| Staff report injuries days later | Fear of blame, unclear reporting path | Publicize a nonpunitive reporting policy, post the reporting steps next to the occupational health contact, and have supervisors ask about near misses at lab meetings |
| New students recap needles two-handed | Habit carried from previous training, or rule never stated | Make the one-handed scoop demonstration part of onboarding with an observed competency check |
| Containers tip over in crowded workspaces | Freestanding containers, no bracket | Mount containers on stands or wall brackets and reduce bench clutter so the placement is possible |
| Mixed waste confusion, sharps in biohazard bag, clean glass in sharps container | No visible distinction between streams at the bench | Color-code and label streams, place the broken glass box beside the sharps container, and cover the distinction in training |
Variations by Laboratory Setting
Clinical microbiology. Blood culture bottle inoculation, needle aspirates, and specimen receipt bring bloodborne pathogen risk to the front of the process. Place sharps containers inside the intake area and in the biosafety cabinet room, and treat every primary specimen as infectious on arrival.
Research laboratories. Needle-based animal injections and large-volume culture transfers dominate. Use needleless or closed transfer systems wherever the science permits, and require a safety-engineered device justification form when a standard device is requested instead.
Biosafety level 3 work. All sharps manipulations occur inside the containment barrier, and disposal happens within the containment suite with decontamination before the waste crosses the barrier. Risk assessment for sharps at this level should be reviewed by the institutional biosafety committee or biosafety officer before approval.
Teaching laboratories. Reduce the number of sharps to the minimum the curriculum requires, prefer plastic and pre-poured media, and brief students at the start of every session rather than once per term. Student turnover makes the onboarding cycle effectively continuous.
Field and farm sampling. Veterinary field teams carry sharps into environments without fixed containers. Carry a rigid portable sharps container in the kit, fill it at the animal side, and never transport used needles loose in a vehicle.
Storage, Stability, and Waste Handling Notes
Sharps containers themselves have no shelf life concern, but the waste stream has rules that protect everyone downstream. Keep closed, labeled containers upright in a designated, secured waste accumulation area until pickup. Do not store filled containers on open shelves in general corridors. If your waste stream requires autoclaving, process containers in the approved cycle and let them cool before handling, since melted container walls release their contents. Keep the biohazard label intact and legible through decontamination and storage, because the label is what directs the disposal stream after the container leaves your lab.
Sharps devices in storage, such as boxes of needles and blades, belong in closed drawers or cabinets, inventoried, and never stored loose in a drawer where hands reach in blind. Check device boxes periodically for damaged packaging, since a pierced needle package is a hazard sitting in storage.
Common Mistakes and Limitations
These are the errors that recur in laboratory sharps injury records and in audits, phrased as the specific behavior to avoid.
- Recapping with two hands. This is the classic cause of needlestick injuries to the non-dominant hand. If recapping cannot be eliminated, use the one-handed scoop or a mechanical device.
- Overfilling containers. Past three-quarters full, the lid cannot close and sharps protrude. Retire early rather than squeezing one more item in.
- Leaving sharps in hidden places. Ice buckets, water baths, centrifuge rotors, incubator shelves, and under bench paper are where loose sharps hide and where the next person finds them with a fingertip.
- Keeping glass Pasteur pipettes out of habit. Plastic alternatives exist for most transfers. Every glass pipette in circulation is a future laceration risk.
- Treating PPE as the control. Gloves and coats reduce consequences. They do not prevent puncture. If your plan starts and ends with PPE, the engineering control layer is missing.
- Carrying sharps across the lab. An uncapped needle or an open blade in hand during a walk is an injury waiting for a stumble. Work at the point of use and dispose immediately.
- Underreporting minor injuries and near misses. Small injuries carry real infection risk and represent the signal your program needs. A suppressed report is a lost data point and an unprotected colleague.
- Failing to train transient staff. Students, visitors, and rotating personnel are injured at higher rates because they never received the onboarding cycle. Train before the first bench session, not after.
- Skipping the risk assessment for familiar procedures. Habit hides hazards. Review even long-standing protocols when agents, devices, or personnel change.
Limitations. This guide describes general best practice drawn from established occupational safety frameworks and standard laboratory biosafety references. It does not replace your institution's exposure control plan, your biosafety officer's determinations, or occupational health guidance for a specific exposure. Individual exposure cases require evaluation by a qualified medical provider, and any laboratory-specific requirement that is stricter than the practices here takes precedence.
Building a Culture: Microbiology Biosafety Training
Microbiology biosafety training is what keeps the controls above functioning after the initial enthusiasm fades. Structure it in three layers.
Onboarding training. Before any bench work, cover the handling rules, the container locations, the broken glass procedure, the exposure response steps, and the reporting contact. Include a hands-on demonstration of one-handed recapping and safe blade handling. Document attendance with a signature and a date.
Annual refresher training. Required under the Bloodborne Pathogens Standard for covered work, and best delivered with updates drawn from the past year's injury log and near-miss reports. Trainees learn fastest from their own lab's incidents, so anonymized local case review is the highest-value content you can present.
Competency verification. Observation is the check that matters. A supervisor watches each person perform a sharps-containing procedure and confirms the behaviors in Step 5. Repeat after any change in device, procedure, or observed lapse.
Pair training with a reporting culture. When a supervisor publicly thanks a student for reporting a near miss, the reporting rate rises and the injury rate follows it downward. When a near-miss report is met with silence or blame, reports stop, and the next event is an injury.
Frequently Asked Questions
Can I ever recap a needle in the lab?
Recapping should be eliminated wherever possible. When a protocol genuinely requires a recap, use a one-handed scoop technique or a mechanical recapping device, never two hands.
What should I do immediately after a needlestick?
Wash the site with soap and running water, report to your supervisor at once, and go to occupational health or emergency care for evaluation, because post-exposure treatment for some pathogens is time-critical.
How full can a sharps container be before I replace it?
Replace the container when it reaches the three-quarter mark or its printed fill line, whichever comes first, then close it, label it, and route it through your waste stream.
Do glass Pasteur pipettes count as sharps?
Yes. Glass pipettes can puncture or cut skin, and when contaminated they go in the sharps container, while clean broken glass goes in the broken glass box.
Do plastic pipette tips count as sharps?
Standard plastic tips are not sharps and go in biohazard or solid waste according to your institution's rules, but any tip that can pierce skin, or a glass tip, is handled as a sharp.
Where should sharps containers be placed?
Place a compliant container within arm's reach of every work area where sharps are used, mounted so it cannot tip, and keep additional containers at staining benches, sinks, and specimen intake.
What PPE protects against sharps injuries?
Gloves, lab coats, and eye protection reduce skin and mucous membrane exposure but do not stop a needle, so PPE supplements rather than replaces engineering controls, and cut-resistant gloves add protection against blades and glass.
How often should sharps safety training be repeated?
Train every person at onboarding and annually thereafter, with an observed competency check and a refresh after any injury, near miss, or change in procedure or equipment.