Monthly Biosafety Audits: A Checklist
By Dr. Zubair Khalid, DVM, MS, PhD ·

By the end of this article you will be able to run a complete monthly biosafety audit in a clinical or research microbiology laboratory. You will verify engineering controls, decontamination cycles, waste streams, signage, documentation, and personnel training. You will score the audit, log corrective actions, and leave with a reusable checklist template and a filled example you can adapt to your own bench.
Have these items on hand before you start:
- The current laboratory biosafety manual and the facility biosafety risk assessment for each work area
- The prior month's audit record and the open corrective action log
- A printed or tablet-based copy of the checklist template shown below
- Laboratory coat, gloves, and safety glasses, because you will enter every work area
- A small flashlight for checking behind equipment and under biosafety cabinets
- Access to autoclave cycle logs, biological indicator records, and the certification stickers on biological safety cabinets
- The training matrix listing each staff member and the dates of their last biosafety training
The framework in this article follows the principles of the CDC and NIH publication Biosafety in Microbiological and Biomedical Laboratories (BMBL), the OSHA Bloodborne Pathogens Standard (29 CFR 1910.1030), and the laboratory biorisk management approach described by the World Health Organization. Those documents define the standards. The monthly audit is how you prove, on paper and on the bench, that your laboratory still meets them.
Why Monthly Biosafety Audits Matter
Monthly biosafety audits are short, structured inspections performed on a fixed schedule to catch drift before it becomes an exposure. Annual certification checks the hardware once a year. A monthly audit checks the daily habits: whether the biological safety cabinet sash is where it should be, whether someone propped the self-closing door open, whether the sharps container passed the fill line two weeks ago, and whether the autoclave log has gaps.
Drift is the core problem. A laboratory that passes an annual inspection in January can be quietly out of compliance by March. A new hire pipettes above the cabinet grille. A waste container loses its label. A bottle of media sits unlabeled in a shared refrigerator. None of these cause an immediate incident. All of them raise the probability of one. The monthly audit exists to find and fix these conditions while the fix is still a conversation rather than an exposure investigation.
A monthly cycle also fits the rhythm of clinical microbiology. Stains, media, and control records are often reviewed weekly or monthly. Adding the biosafety audit to the same quality cycle means the laboratory director, supervisor, and biosafety officer see the same calendar and the same documentation trail.
What a Monthly Audit Can and Cannot Catch
A monthly audit catches visible and documentary conditions: engineering control status, housekeeping, waste handling, signage, inventory of hazardous agents, training records, and incident report completeness. It does not replace annual biological safety cabinet certification, annual facility-wide inspections by the biosafety officer or institutional biosafety committee, or the routine competency assessments built into the personnel quality program. Treat the monthly audit as the fast, frequent layer in a three-layer system: monthly self-audit, annual certification and inspection, and continuous risk assessment review.
The Biosafety Risk Assessment That Drives the Audit
A biosafety risk assessment is a written evaluation of the agents handled in a work area, the procedures performed with them, the routes by which exposure could occur, and the controls in place to reduce that risk. In microbiology, risk assessment normally follows five steps described in the BMBL: identify the agent hazards, identify the procedure hazards, make a determination of the appropriate biosafety level, evaluate the proficiency of staff, and review the assessment periodically and after incidents.
Biosafety levels are the outcome of that assessment. BSL-1 covers work with well-characterized agents not known to consistently cause disease in healthy adults. BSL-2 covers agents of moderate potential hazard, such as most routine clinical isolates handled in a diagnostic bacteriology or mycology laboratory. BSL-3 covers agents that can cause serious or potentially lethal disease by inhalation. BSL-4 covers dangerous and exotic agents with high risk of life-threatening disease. Most clinical microbiology laboratories operate at BSL-2, with BSL-3 practices added for specific procedures such as aerosol-generating manipulation of certain respiratory pathogens.
The risk assessment determines what your monthly checklist contains. A BSL-2 bench needs items on sharps handling, splash protection, and decontamination of work surfaces. A laboratory that also handles Mycobacterium tuberculosis cultures needs additional items on respirator fit testing, sealed centrifuge rotors, and the procedure for opening safety cups inside the cabinet. A laboratory registered to hold select agents and toxins carries additional federal inventory and access requirements under the Federal Select Agent Program, and those inventory checks belong on the monthly list at the frequency the registration requires.
Revisit the risk assessment whenever the audit finds a condition the assessment did not anticipate, whenever a new agent or assay is introduced, and at least annually. The audit and the assessment feed each other. Audit findings are the evidence that tells you whether the written assessment still describes the real bench.
Monthly Biosafety Audit Checklist: Format and Template
A usable monthly biosafety audit checklist format has seven columns. Every row answers one question with one observable fact. Avoid compound items, because a row that combines three conditions can be marked "pass" when only two are true.
| Column | Content | Example |
|---|---|---|
| Item ID | Short unique code | BSC-01 |
| Area | Room or bench | Bacteriology, Room 214 |
| Item | The single observable condition | BSC certification sticker is current |
| Method | How the auditor verifies it | Read sticker, record date and certifier |
| Result | Pass, Fail, or NA | Pass |
| Action | Corrective action and owner, or blank | Blank |
| Due | Target completion date, or blank | Blank |
Store the template as a CSV file so it works in any spreadsheet program or quality management system:
item_id,area,item,method,result,action,owner,due,verified_by,date
BSC-01,Bacteriology 214,Class II cabinet certification sticker is current,Read sticker and record date and certifier,,,,,,
BSC-02,Bacteriology 214,Cabinet interior free of clutter and broken glass,Visual inspection with flashlight,,,,,,
BSC-03,Bacteriology 214,Sash or viewscreen at correct working height,Check sash mark on frame,,,,,,
AUT-01,Media Room,Autoclave cycle log complete for the month,Review log against cycle counter,,,,,,
AUT-02,Media Room,Biological indicator result negative for last cycle,Read BI incubator record and lot documents,,,,,,
WST-01,Bacteriology 214,Sharps containers below fill line and not overfilled,Visual check at eye level,,,,,,
SGN-01,Bacteriology 214,Door signage current with agent list and contacts,Read placard against agent inventory,,,,,,
TRN-01,All staff,All staff current on biosafety training,Check training matrix dates,,,,,,
The first field, the item ID, is the thread that ties the audit to your corrective action log and to your annual inspection. When an inspector asks how you handled the March sharps finding, the trail runs from BSC-01 through the monthly records to the corrective action entry. Keep the IDs stable from month to month. Renumbering rows breaks the trend data that makes monthly audits valuable.
How to Run the Audit: A Numbered Walkthrough
Step 1: Review the Prior Month and the Open Actions
Open the previous audit and the corrective action log before you leave your desk. List every item still open. Those items get verified first, and their verification becomes part of this month's record. An action that was marked complete without evidence is a finding in itself.
Record the date, your name, and the areas you will cover. If the audit covers a single laboratory suite, the whole process below takes 60 to 120 minutes for one auditor.
Step 2: Walk the Facility With Fresh Eyes
Enter each work area the way an outsider would. Look at the floor path from the entry door to the bench. Ask the three layout questions from the BSL-2 baseline: is there space to work safely at each station, is the exit path clear, and is there a handwashing sink with soap and paper towels that is not blocked by equipment.
Check the physical separation between laboratory and office or break space. Food and drink have no place on the bench or in laboratory refrigerators, and the audit should confirm this both by observation and by opening the refrigerator doors. Look at the bench surfaces themselves. They should be impervious, intact, and free of accumulated clutter.
Expected output at this step is a set of marked rows on the checklist. Everything you observe gets a Pass, Fail, or NA. Nothing gets left blank, because a blank row cannot be audited later.
Step 3: Verify Engineering Controls
Engineering controls are the first line of the hierarchy of controls, so they get the most careful part of the audit.
For each Class II biological safety cabinet, confirm the annual certification sticker is current, because certification is required at installation, after relocation, after filter or motor work, and at least annually under NSF/ANSI 49 practice. Confirm the viewscreen or sash sits at the marked working height. Confirm the interior grille and drain valve area are unobstructed and that the cabinet contains only what is needed for current work. Confirm airflow alarms, where fitted, are powered and silent. Record the cabinet serial number or asset tag so findings map to the right unit over time. A Class II Type A2 cabinet maintains a minimum average inflow velocity of 100 linear feet per minute at the sash working height, and you rely on the certifier to have measured that. Your monthly job is to confirm nothing has changed since certification.
For chemical fume hoods, confirm the continuous monitoring device or telltale indicator reads within its marked operating band and that the certification sticker is current. For centrifuges used with biohazardous material, confirm sealed rotors or safety cups are present, intact, and used as the written procedure requires.
For eyewash stations and safety showers, confirm monthly activation with documentation, consistent with the ANSI/ISEA Z358.1 practice for weekly or monthly flushing depending on the unit type. Confirm the path to each unit is clear and the station is clean and labeled.
Step 4: Audit Decontamination and Waste
Decontamination is where monthly audits most often find real failures, so spend time here.
Autoclaves. Review the cycle log for the month. Every run should show date, load contents, cycle type, time at temperature, operator, and indicator result. Standard gravity cycles for biohazardous waste run at 121 degrees Celsius and approximately 15 psi, with hold times set by the validated cycle for that load type. Confirm biological indicators were run at the frequency your validation requires. A biological indicator uses a known spore suspension, most commonly Geobacillus stearothermophilus, on a strip or vial processed with the load and then incubated in tryptic soy broth. A rapid-readout vial is incubated and read for a color or fluorescence change, and a conventional strip is incubated for up to 7 days. No growth means the cycle killed the spores. Growth means the cycle failed, and the response is immediate quarantine of processed waste since the last negative indicator, a repeat cycle, and a service call.
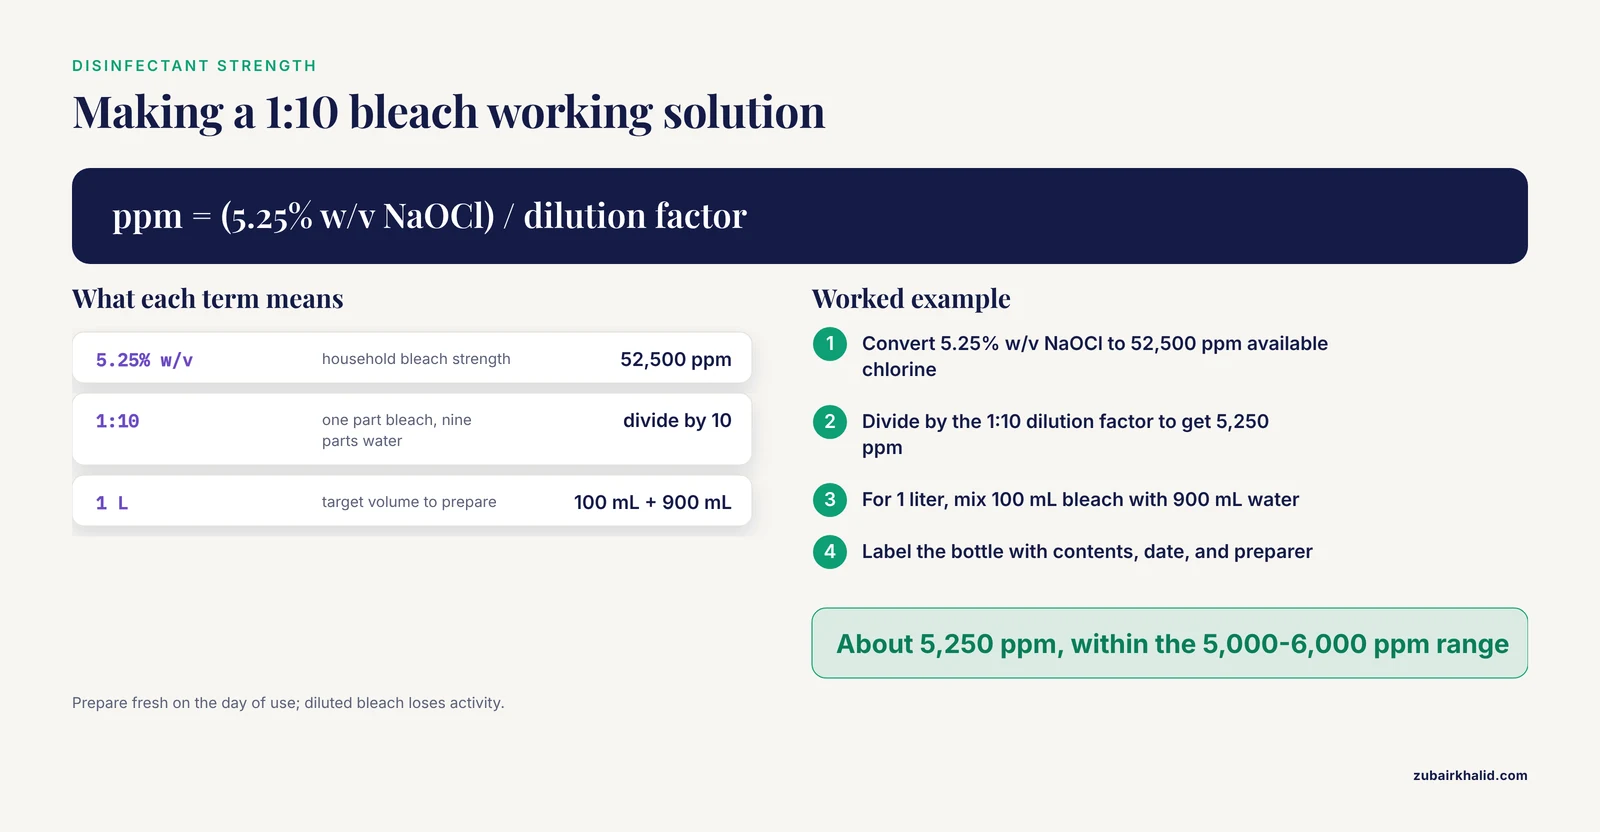
Surface disinfectants. Confirm an appropriate disinfectant is present at each bench, freshly prepared, and labeled with the preparation date. A 1:10 dilution of common household bleach (roughly 5.25 to 6.15 percent sodium hypochlorite) in water yields approximately 5,000 to 6,000 parts per million free chlorine, which is the working strength the BMBL describes for most laboratory surface decontamination, applied with a contact time of at least 10 minutes for contaminated surfaces. Diluted bleach loses activity and should be prepared fresh, so the audit checks the date on the working bottle. Seventy percent ethanol in water is the standard alternative for surfaces where bleach would corrode equipment, with the limitation that it evaporates and must wet the surface for the required contact time.
Waste streams. Confirm sharps containers are rigid, puncture resistant, labeled with the biohazard symbol, and replaced before contents reach the fill line. Confirm regulated medical waste is in approved containers with closed lids and correct labeling. Confirm the route from bench to final treatment does not pass through public or office space. Confirm chemical waste is segregated as the written chemical hygiene plan requires.
Worked dilution calculation, useful when training staff or verifying a bottle someone prepared:
Goal: 1:10 working dilution of 5.25% sodium hypochlorite bleach

Household bleach = 5.25% w/v NaOCl = 52,500 ppm available chlorine
1:10 dilution    = 1 part bleach + 9 parts water
                 = 52,500 ppm / 10
                 = 5,250 ppm available chlorine (target range ~5,000-6,000 ppm)

To make 1 liter: 100 mL bleach + 900 mL water
Prepare fresh on the day of use. Label the bottle with contents, date, and preparer.
Step 5: Check Signage, Inventory, and Documentation
Confirm the entry sign on each door carries the universal biohazard symbol where required, the agent names actually in use, entry requirements such as specific PPE, the name and telephone numbers of the responsible personnel, and any special instructions for emergencies. Compare the sign against the actual agent inventory. A sign that still names an agent the laboratory stopped handling in August is a documentation failure and a distraction during an emergency response.
Confirm inventories of infectious agents are current and stored per the biosafety manual, with restricted access where required. Confirm the laboratory's standard operating procedures on the bench match the controlled master versions, and that superseded copies are not circulating. Confirm incident and exposure reports from the month are complete, including near misses, because near-miss reporting is the cheapest surveillance system a laboratory owns.
Step 6: Audit Personnel and Microbiology Biosafety Training
Microbiology biosafety training is the administrative control that makes every other control work, and the audit should treat it with the same rigor as the autoclave log. Open the training matrix and verify three things for every person listed as working in the covered areas: completion of biosafety training before independent bench access, currency of refresher training at the frequency your institution sets (annual is the most common interval), and documented competency for any specialized procedure, such as BSC work, centrifuge use with biohazardous material, or packaging and shipping of diagnostic specimens under DOT and IATA rules where that applies.
A training matrix can be as simple as a spreadsheet:
name,role,bsl_baseline_training,last_completed,refresher_due,competency_signed
A. Rivera,Technician II,BSL-2,2026-09-14,2027-09-14,2026-09-20
J. Chen,Technician I,BSL-2,2026-10-02,2027-10-02,2026-10-08
M. Okafor,Student,BSL-1,2026-08-30,2027-08-30,pending
The pending entry is a finding. A student with pending competency sign-off should not be performing the restricted procedure until the record closes, and the audit is the mechanism that catches this.
Step 7: Score the Audit and Close Out
Scoring turns a stack of rows into a trend line. A simple method that works well for monthly reviews: each applicable item is worth one point. Pass earns the point, Fail earns zero, NA is removed from the denominator. Track critical items separately, because a 94 percent score with a failed biological indicator is not a good month.
# monthly_audit_score.py
rows = [
    # (item_id, result)   result in {"PASS", "FAIL", "NA", "CRITICAL_FAIL"}
    ("BSC-01", "PASS"),
    ("BSC-02", "PASS"),
    ("BSC-03", "FAIL"),
    ("AUT-01", "PASS"),
    ("AUT-02", "PASS"),
    ("WST-01", "CRITICAL_FAIL"),
    ("SGN-01", "PASS"),
    ("TRN-01", "PASS"),
]

applicable = [r for r in rows if r[1] != "NA"]
passed     = [r for r in applicable if r[1] == "PASS"]
criticals  = [r for r in applicable if r[1] == "CRITICAL_FAIL"]

score = 100 * len(passed) / len(applicable)

print(f"Applicable items : {len(applicable)}")
print(f"Passed           : {len(passed)}")
print(f"Score            : {score:.1f}%")
print(f"Critical failures: {len(criticals)} -> {[r for r in criticals]}")
Expected output for the data above:
Applicable items : 8
Passed           : 6
Score            : 75.0%
Critical failures: 1 -> ['WST-01']
Interpretation: 75 percent is not the story. The single critical failure on WST-01 (sharps container overfilled) is the story. The score exists to show the trend across months, and the critical failure list exists to drive same-week corrective action.
Close the audit by writing corrective actions with an owner and a due date, then entering them in the log. A corrective action entry has the form: item ID, finding stated as an observable fact, root cause if known, action, owner, due date, and the evidence that will show completion. Here is a filled example:
Item:    WST-01
Area:    Bacteriology, Room 214
Finding: Sharps container 3 exceeded fill line, observed 2026-11-04 at 09:20.
Root:    Replacement stock not restocked after move to new storage cabinet.
Action:  Restock sharps containers in Room 214 storage; add container stock to
         the weekly supply checklist.
Owner:   J. Chen (Supervisor)
Due:     2026-11-06
Evidence: Photograph of restocked cabinet and revised weekly supply checklist.
Status:  OPEN
The audit is complete when every Fail has an open or closed corrective action, the record is signed and dated, and the next month's audit date is on the calendar.
Monthly Biosafety Audit Checklist Example, Filled
The table below is a monthly biosafety audit checklist example for a BSL-2 clinical bacteriology suite, filled the way a completed record should look. Adapt the items to your own risk assessment. A one-page summary table of the highest-value checks, their methods, and acceptance criteria:
| Item | What you verify | Method | Acceptance criteria |
|---|---|---|---|
| BSC certification | Annual certification current | Read sticker | Certified within 12 months, legible sticker |
| BSC work practice | Sash height, uncluttered grille, no Bunsen burner | Visual check | Sash at mark, grille clear, no open flame |
| Autoclave records | Cycle log complete | Log review | Every run has date, time, temperature, operator |
| Autoclave BI | Last biological indicator negative | Incubator record | No growth, current lot documented |
| Surface disinfectant | Fresh, labeled, correct strength | Read bottle label | Dated within the day, 1:10 bleach or 70% ethanol |
| Sharps | Containers below fill line | Visual at eye level | Contents below fill line, lids closed |
| Waste | Regulated waste labeled and routed correctly | Follow the waste path | Biohazard labeled, route avoids public space |
| Signage | Door placard matches inventory | Compare to agent list | Current agents, contacts, PPE requirements |
| Handwashing | Sink accessible, stocked | Visual check | Soap, paper towels, clear access |
| Food and drink | None in lab refrigerators or on bench | Open refrigerator doors | Zero food or drink containers |
| Eyewash | Monthly flush documented | Read flush log | Current month signed |
| Training | All staff current | Training matrix | No overdue refresher, no pending competency |
| Incident reports | Month's reports complete | Report log | Every exposure and near miss documented |
A filled example for one section of that table:
item_id,area,item,method,result,action,owner,due,verified_by,date
BSC-01,Bacteriology 214,Certification sticker current,Read sticker,Pass,,,,K. Lopez,2026-11-04
BSC-02,Bacteriology 214,Interior free of clutter,Visual inspection,Pass,,,,K. Lopez,2026-11-04
BSC-03,Bacteriology 214,Sash at working height,Check sash mark,Fail,Sash stop screw loosened, tape new mark,F. Aziz,2026-11-05,K. Lopez,2026-11-04
WST-01,Bacteriology 214,Sharps below fill line,Visual at eye level,Fail,Container overfilled, restock and retrain bench, J. Chen,2026-11-06,K. Lopez,2026-11-04
SGN-01,Bacteriology 214,Door signage matches inventory,Read placard,Pass,,,,K. Lopez,2026-11-04
TRN-01,All staff,Training matrix current,Check dates,Fail,One competency pending, M. Okafor, J. Chen,2026-11-15,K. Lopez,2026-11-04
Notice what the Fail entries have in common. Each one states the observation, names one person, gives one date, and defines the evidence that will close it. That is the whole discipline of the checklist format in one sentence.
Common Mistakes and Limitations
- Auditing by walking and not by reading. Half of a monthly audit is documentary. If you only inspect the room and never open the autoclave log, the training matrix, and the incident file, you will miss the failures that cause the most downstream harm.
- Compound checklist items. "Cabinet is certified, clean, and uncluttered" lets one true condition mask two false ones. One row, one observable condition, always.
- Leaving result cells blank. Blank is unreadable. Every row gets Pass, Fail, or NA. If you did not check it, mark it NA and say why in the notes.
- Closing corrective actions without evidence. An entry that says "fixed" with no photograph, log line, or re-inspection date is not closed. Require named evidence at the moment you open the action.
- Treating the score as the goal. A high score with an open critical failure is a failed month. Track critical items on their own line, and let the overall score describe the trend.
- Never updating the risk assessment. If the audit finds the same condition three months running, the problem is the assessment or the procedure, not the bench. Escalate to the biosafety officer rather than writing the same corrective action a fourth time.
- Auditing only what is easy. Everyone checks sharps containers. Fewer people check the waste route, the sign against the inventory, and the pending competency line. The unpopular rows are where findings live.
- Auditing alone when the area is new to you. Pair with a bench technologist the first time you audit an unfamiliar area. They know where the work actually happens, which is often not where the procedure says it happens.
Monthly audits complement, and do not replace, annual cabinet certification, institutional biosafety committee review, and the professional judgment of a biosafety officer or laboratory director. Unusual agents, suspected high-consequence pathogens, and any actual exposure require escalation beyond the checklist on the day they occur, not at the next audit.
Frequently Asked Questions
How long does a monthly biosafety audit take?
Plan 60 to 120 minutes for a single laboratory suite with one auditor, including document review before the walk and scoring afterward. A facility covering several suites should budget time per suite rather than per building.
Who should perform the monthly biosafety audit?
Ideally someone with biosafety knowledge who does not work in the audited area daily, such as a supervisor from an adjacent bench, the laboratory safety officer, or the biosafety officer on a rotating schedule. Fresh eyes find drift that familiar eyes stop seeing.
What is the difference between a monthly biosafety audit and an annual inspection?
The monthly audit is a frequent self-check of conditions and habits that drift, such as housekeeping, waste, signage, and logs. The annual inspection is the comprehensive review that includes certification of engineering controls and assessment of the program itself.
What should I do when an audit item fails?
Write the finding as an observable fact, open a corrective action with an owner and due date, fix critical items the same day, and verify closure with named evidence at the next audit or sooner.
How does a biosafety risk assessment change the checklist?
The risk assessment determines the biosafety level and the specific agents and procedures in each area, and the checklist inherits those requirements. Add rows for every specialized practice the assessment requires, such as respirator fit testing or sealed rotor use.
How often must biological safety cabinets be certified?
At least annually, and also at installation, after relocation, and after filter or motor replacement, following NSF/ANSI 49 practice. The monthly audit verifies the sticker is current and work practices have not drifted.
What records must I keep from each monthly audit?
Keep the completed checklist, the corrective action log with evidence of closure, and any updated risk assessment or procedure versions. Retention follows your institution's quality program, and the sequence of monthly records is itself the evidence of an functioning program.
How do I build a template from scratch for my laboratory?
Start with your risk assessment, list one observable condition per row in the seven-column format, pilot the checklist for two months, delete rows that are always NA, and then freeze the item IDs so monthly results become a stable trend.