Waste Disposal in Microbiology Labs: A Biosafety Checklist
By Dr. Zubair Khalid, DVM, MS, PhD ·
A microbiology lab waste disposal checklist turns waste handling from an improvised chore into a controlled, repeatable procedure with verifiable outcomes. It covers segregation at the bench, chemical disinfection of liquid waste, steam sterilization of solid waste, routing of sharps and chemical streams, documentation, and the verification steps that prove each treatment actually worked. Followed as written, it keeps infectious, toxic, and hazardous material out of the general trash, the sanitary sewer, and the environment.
Use it when you set up a new laboratory, when you write or revise a standard operating procedure (SOP), when you onboard new staff, and as a daily close-out routine plus a quarterly audit. The daily close-out takes 15 to 30 minutes of hands-on time at the end of a work session, plus 5 to 10 minutes to load the autoclave (a pressure vessel that sterilizes with steam under pressure). Elapsed time is longer. A waste autoclave cycle typically runs 30 to 60 minutes at 121 °C, followed by 20 to 30 minutes of cool-down before bags can be handled safely. Chemical disinfection of liquid waste needs a contact time of at least 30 minutes, and heavily contaminated material is best left in disinfectant overnight. A full quarterly audit against this checklist takes 1 to 2 hours.
Principle: Segregate, Decontaminate, Document
Waste disposal in microbiology labs rests on three pillars: segregate at the point of generation, decontaminate before anything leaves institutional control, and document what was done.
The first pillar exists because of volume control. Laboratory and healthcare waste separates naturally into lab debris, chemical waste, and biological waste, and each stream demands a different treatment route [1]. Sorting at the bench means only the fraction that genuinely carries pathogens pays the cost of autoclaving or incineration, while clean packaging, paper, and unopened reagent boxes follow cheaper, lower-risk routes.
The second pillar exists because untreated waste is not inert. Laboratory and healthcare waste carries contaminants and pathogenic microbes that become more dangerous, not less, once they leave a controlled building, which is why specific treatment is required before disposal [1]. Waste rich in antimicrobial drugs and disinfectants also exerts selective pressure on bacteria in the environment and promotes the development and spread of multidrug-resistant (MDR) strains. An investigation of waste disposal sites serving hospitals and pharmaceutical manufacturers recovered MDR bacteria from the sampled sites, including a Pseudomonas aeruginosa isolate resistant to all 15 antibiotics tested [2]. Microbial activity does not stop when waste leaves the bench either. Waste disposal systems host active microbial communities of their own, a subject with its own microbiology literature [3], and that ongoing biological activity is why pretreatment before disposal is studied so carefully, including lab-scale evaluations of management strategies for pretreated hazardous waste such as co-landfilling [4].
The third pillar exists because regulators, contractors, and downstream facilities act on paper. A completed autoclave log, a signed waste manifest, and current training records are what turn a stack of treated bags into a defensible, traceable disposal event.
Chemical waste deserves its own sentence of principle. Microbiology benches generate more chemistry than people expect, from Gram stain and acid-fast stain reagents to copper and silver reagents. A study carried out to implement a control and disposal program for waste from microbiology and chemical analysis laboratories focused on heavy metal levels in that waste precisely because metals need separate capture and licensed disposal [5]. Liquid waste, the highest-volume stream in most labs, likewise has a dedicated methods literature on its disposal [6], [7].
Start With a Biosafety Risk Assessment
Before you handle any waste, know what is in it. A biosafety risk assessment is the written judgment that identifies the agents you work with, the procedures that generate waste, the volumes involved, the routes by which staff could be exposed, and the training and equipment that close those gaps. Its output drives every downstream choice in this checklist, from disinfectant selection to autoclave cycle length to who is allowed to handle each stream at all.
Start by assigning each organism you culture to a risk group. Risk group 1 agents are not known to cause disease in healthy adults. Risk group 2 agents cause disease but are unlikely to spread in the community, and effective treatment or prevention usually exists. Risk group 3 agents cause serious disease and can spread, and risk group 4 agents cause severe, often untreatable disease. Most clinical microbiology work with enteric pathogens and Staphylococcus aureus sits at risk group 2 and is handled at biosafety level 2 (BSL-2), the containment level that pairs standard microbiological practices with personal protective equipment (PPE) and physical containment.
For waste specifically, the risk assessment should answer five questions.
- Which agents appear in the waste, and at what concentration?
- Which procedures generate the waste, and do they aerosolize or splash?
- What volumes accumulate per day, and where do they wait before treatment?
- Who handles each stream, and what are they trained and vaccinated for?
- What is the validated treatment for each stream, and how is success verified?
Reassess whenever you bring in a new agent, change a procedure, move to a new facility, or after any spill, exposure, or near miss. Write the result into the SOP so the checklist and the risk assessment stay attached to each other.
A Worked Example
A hospital microbiology bench cultures stool for Salmonella and Shigella and blood cultures for common pathogens, all risk group 2 organisms handled at BSL-2. The assessment identifies four waste streams: plates and broths (about 4 kg of solids per day), liquid supernatants and spent media (about 8 L per day), stain and reagent waste, and sharps. Solids are bagged and autoclaved at the end of each shift with a Class 5 indicator in every load and a biological indicator weekly. Liquids are bleached in the flask for at least 30 minutes, then drained with running water under written policy. Chemical containers go to the licensed contractor monthly, and the sharps container is swapped at three quarters full. That single page is the risk assessment, and every step of the checklist below now has a reason and an owner.
Materials and Reagents
| Item | Working concentration or specification | Purpose and notes |
|---|---|---|
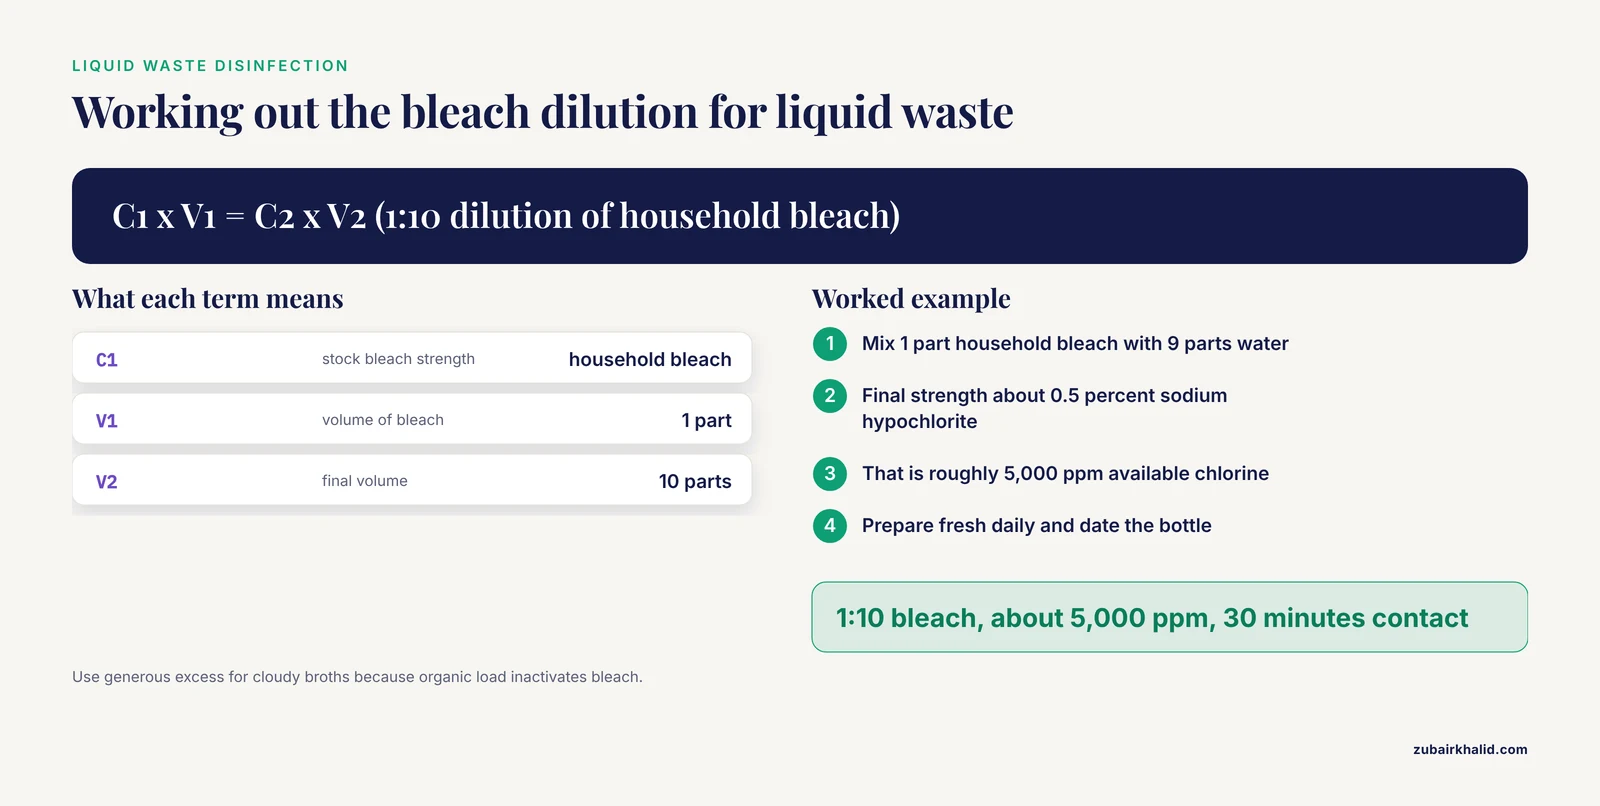
| Sodium hypochlorite (household bleach) | Diluted 1:10 in water, final about 0.5 percent (roughly 5,000 ppm available chlorine), prepared fresh daily | Routine disinfection of liquid waste and surfaces. Inactivated by organic load, so use generous excess for cloudy broths. |
| Ethanol or isopropanol | 70 percent (v/v in water) | Surface wipes and small items. Flammable, keep away from open flames. Not sporicidal. |
| Phenolic or quaternary ammonium disinfectant | Diluted per the manufacturer's label | General bench surfaces between tasks. Verify the label claim covers your organisms. |
| Autoclave bags | Polypropylene, printed with the biohazard symbol, held in rigid autoclavable pans | Solid infectious waste. Never fill past two thirds. |
| Sharps containers | Puncture-resistant, closable, leak-proof on sides and bottom, biohazard labeled | Needles, blades, lancets, contaminated broken glass. Replace at three quarters full. |
| Autoclave tape and Class 5 integrating indicators | One indicator per load, integrator placed inside the densest part of the load | Proof that steam reached the contents. |
| Biological indicator vials | Geobacillus stearothermophilus spores, about 10^6 per vial | Periodic proof that the cycle kills spores. Incubate per the manufacturer's instructions. |
| Chemical waste containers | High-density polyethylene or compatible material, one set per hazard class, with secondary containment trays | Stains, fixatives, solvents, acids, bases, oxidizers, metal-bearing reagents. |
| Biohazard labels and dated tags | Biohazard symbol, agent, date, and initials on every container | Keeps downstream handlers and emergency responders informed. |
| Spill kit | Absorbent granules or pads, pre-diluted disinfectant, gloves, gown, eye protection, spare bags | Immediate response to splashes and broken cultures. |
Safety note. Bleach is a strong oxidizer and corrosive. Never mix it with acids (releases chlorine gas), ammonia (releases chloramine gases), or formaldehyde (can form bis(chloromethyl) ether, a potent carcinogen). Never combine oxidizing waste with organic solvents. Ethanol burns readily. Glutaraldehyde and formaldehyde, where your lab uses them, require fume hood handling and labeled, closed containers.
Waste Categories and Segregation at the Bench
| Category | Typical examples | Container at the bench | Treatment route |
|---|---|---|---|
| Sharps | Needles, blades, lancets, contaminated broken glass, glass Pasteur pipettes | Puncture-resistant sharps container | Autoclave if required, then licensed regulated medical waste (RMW, the licensed stream for treated biomedical material) disposal |
| Cultures and stocks | Plates, slopes, broths, pure cultures, identification panels | Autoclave bag in a rigid pan | Steam sterilization at 121 °C, then the RMW stream or regular trash per written policy |
| Liquid biological | Broth cultures, supernatants, wash fluids, spent media | Leak-proof flask filled to no more than two thirds | Chemical disinfection or autoclaving, then drain disposal only where written policy allows |
| Pathological and anatomical | Tissues, biopsy material, animal carcasses from experiments | Leak-proof rigid container, refrigerated if held | Incineration, which is the standard route for this stream [1] |
| Chemical | Stains, fixatives, solvents, acids, bases, oxidizers | Compatible containers, one per hazard class | Licensed chemical waste contractor, never the drain unless written policy allows after neutralization [6], [7] |
| Heavy metal bearing | Silver nitrate, copper reagents, legacy mercury thermometers, metal-containing stains | Separate labeled container | Licensed recovery or disposal, tracked separately [5] |
| Contaminated glass (non-sharp) | Bottles, flasks, and tubes without breakage | Rigid box or tray | Decontaminate, then reuse or glass recycling |
| General trash | Wrappers, paper, unopened reagent packaging | Regular bin | Municipal waste |
| Radioactive or mixed | Any waste with a radioactive component plus a chemical or biological hazard | Separate, labeled, dedicated area | Radiation safety officer coordinates, characterization before treatment selection [8] |
In US practice, infectious solid waste goes into red or orange biohazard bags. Whatever color system your institution uses, the label and the symbol matter more than the shade.
Microbiology Lab Waste Disposal Checklist, Step by Step
Work through these steps in order at the end of every session that generated waste. The reason for each critical step is stated so new staff learn the logic, not just the motion.
1. Confirm the risk assessment covers today's work. Check the SOP against what you actually cultured today. A day of routine enteric work follows the standard BSL-2 waste path, but a single culture of a risk group 3 agent changes the plan. The reason: treatment stringency follows the agent, and improvising after the fact is how exposures happen.
2. Stage the segregation containers before work starts, not after. Set out the autoclave bag in its pan, the sharps container, the liquid waste flask, and the chemical containers for the reagents you will use. The reason: waste segregates correctly only when the right container is within arm's reach. Sorting mixed waste after the fact is slower, dirtier, and more dangerous than sorting at the bench.
3. Label every container with the biohazard symbol, the agent, the date, and your initials. The reason: everyone who touches the container after you, from coworkers to the autoclave operator to the waste contractor, makes decisions based on that label. An unlabeled flask of cloudy liquid gets treated as a worst case, which costs time and creates risk.
4. Collect liquid waste in flasks filled to no more than two thirds. Leave freeboard (empty space above the liquid) so the flask can be moved without splashing, and set it in secondary containment. The reason: liquid waste is the stream most likely to spill during transport, and a splash from a broth culture is a direct exposure.
5. Decontaminate liquids before they leave the room. For routine bacterial and fungal cultures, add bleach to reach the working concentration in the materials table, or follow your SOP's approved alternative. Give at least 30 minutes of contact time, and leave heavily contaminated or protein-rich material in disinfectant overnight. Bleach is inactivated by organic matter, so use a generous excess for cloudy broths. After contact, drain disposal is acceptable only where your written policy allows it, and always with copious running water. The reason: contact time is what kills, and drain rules protect both the plumbing and the downstream treatment plant. Chemical disinfection is one of the standard treatment methods for biological waste alongside autoclaving and incineration [1].
Safety note. Never add bleach to a flask that held formaldehyde, acid fixatives, or ammonia-based solutions. Empty and rinse those containers separately under the chemical waste procedure.
6. Bag solid waste loosely and keep it under two thirds full. Tie bags only when they are ready to move, and keep the load open enough for steam to penetrate. The reason: steam sterilization works by contact, and a dense, overfilled bag insulates its center from the steam.
7. Add a chemical indicator to every load. Put autoclave tape on the outside and place a Class 5 integrating indicator inside the densest part of the bag or pan. The reason: the indicator is the only item in the load that reports the conditions the contents actually experienced.
8. Load the autoclave correctly. Loosen caps on any liquid containers, vent bags where your SOP directs, keep liquids separate from dry goods, and never seal a container completely. The reason: sealed containers can burst, and superheated liquids boil over violently when disturbed.
Safety note. Autoclaves cause the most common serious injuries in waste handling, scalds from superheated liquids and escaping steam. Wear heat-resistant gloves and a face shield when unloading, and crack the door open slowly before reaching in.
9. Run the validated waste cycle. The reference cycle for waste is 121 °C at roughly 15 psi above atmospheric pressure, with hold times longer than media sterilization, commonly 30 to 60 minutes depending on load size and packaging. Use the cycle your facility validated, not a generic one. The reason: waste loads are denser and more heterogeneous than media flasks, so steam needs more time to reach the center. Autoclaving is the standard terminal treatment for microbiology laboratory waste and has been studied specifically for that application [9].
10. Cool, check indicators, and log the cycle. After cool-down, confirm the chemical indicators reached their endpoint, then record the load contents, cycle parameters, indicator result, and operator in the autoclave log. The reason: the log is the record that proves the treatment happened, and it is the first document an inspector or incident investigator will request.
11. Route treated waste to its final stream. Move autoclaved biohazard bags to the RMW pickup, or to the regular trash only where your written policy explicitly allows it. Send pathological waste to incineration [1]. Hand chemical containers to the licensed contractor against the manifest. Keep the heavy metal stream separate through to final disposal [5]. The reason: treatment and final disposal are different steps with different rules, and a treated bag still needs an authorized destination.
12. Close out the bench. Replace liners, mix fresh bleach solution for the next session, wipe surfaces with disinfectant, confirm sharps containers are below the three quarter line, and note anything unusual for the biosafety officer. The reason: the next session inherits whatever this session leaves behind, and small daily habits are what keep the system working between audits.
Controls and Verification
A checklist without controls is a habit, not a procedure. Four controls prove the system works.
Chemical indicators, every load. Autoclave tape shows that a load was heated, and a Class 5 integrating indicator responds to the combination of time, temperature, and steam exposure that actually inactivates organisms. Place the integrator where conditions are worst, usually the center of the densest bag, not the easiest spot to reach.
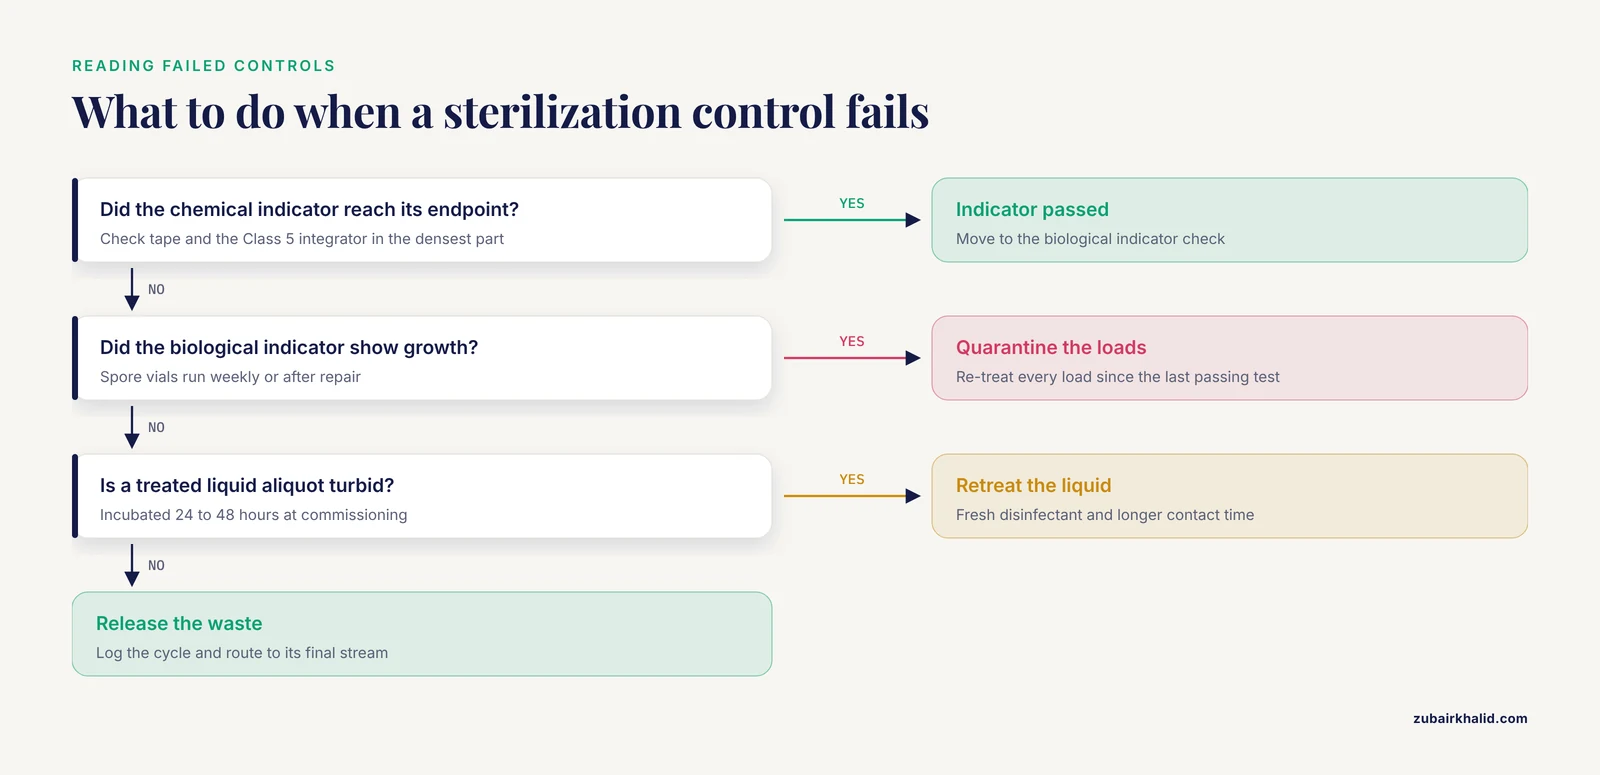
Biological indicators, on a schedule. Spore vials containing about 10^6 Geobacillus stearothermophilus spores are the reference standard for sterilization assurance. Run them at the frequency your SOP sets, commonly weekly for waste cycles, and always after an autoclave repair or a change in load composition. Incubate per the manufacturer's instructions and record the result. A positive growth result means every load since the last passing test must be treated as unsterilized and re-run.
Disinfectant potency. Bleach working solutions decay in storage, so prepare fresh daily, date the bottle, and confirm concentration with chlorine test strips where your SOP requires it.
Treatment verification for liquids. When commissioning a new cycle or after any process change, many laboratories incubate an aliquot of treated liquid waste for 24 to 48 hours and check for turbidity, or plate it on rich medium. No growth confirms the process. This check belongs at commissioning and after changes, not on every flask.
Records are the fourth control. Autoclave logs, waste manifests, training records, and audit findings together form the paper trail that shows a disposal event was real, validated, and authorized. Keep the log format simple enough that a busy technologist actually completes it, because an incomplete log is functionally the same as no log.
Expected Results and How to Read Them
A compliant close-out looks like this. Every chemical indicator in the load shows a complete endpoint, the most recent biological indicator shows no growth after incubation, the autoclave log is complete for every run, the waste room holds only labeled containers below their fill lines, there is no odor beyond a faint disinfectant smell, and the fresh bleach bottle carries today's date.
Read deviations as information, not as failures to hide. Unchanged autoclave tape means the load did not heat, so quarantine it and re-run with the indicator placed deeper in the load. A positive biological indicator means the cycle is not killing spores, so every load since the last passing test is suspect and must be re-treated, and the autoclave needs service before further waste runs. Turbidity in a treated liquid aliquot means the disinfection step failed, usually from organic inactivation of bleach, so retreat with fresh disinfectant and a longer contact time. Odors, leaking bags, or containers above their fill lines mean the schedule is slipping, so increase treatment frequency before an exposure or a complaint forces the issue.
Troubleshooting
| Symptom | Likely cause | Fix |
|---|---|---|
| Autoclave tape unchanged after a full cycle | Overloaded bag, trapped air, or a cold spot in the chamber | Reduce load size, reposition the indicator into the load center, re-run, and have the chamber mapped if it recurs |
| Biological indicator positive after an apparently passing cycle | Cycle too short for the load, dense packaging, or an autoclave fault | Extend the validated hold time, repackage more loosely, take the autoclave out of service for repair, re-treat all loads since the last passing test |
| Biohazard bag melted or split in the autoclave | Bag not rated for steam sterilization, or bag resting on the chamber floor | Use polypropylene bags rated for autoclaving, always place bags in a rigid pan with a small amount of water |
| Burst container or boiled-over liquid | Container sealed or capped tightly during the cycle | Loosen caps and vent liquids before every run |
| Strong chlorine odor or staff throat irritation | Bleach mixed with acid or ammonia in a waste flask | Ventilate and evacuate the area, retrain on incompatibilities, rinse flasks between waste types |
| Rust or corrosion on autoclave racks and pans | Bleach or saline left in contact with stainless steel | Rinse steel after bleach contact, use a non-chlorinating disinfectant on metal surfaces |
| Liquid waste flask overflowing during transport | Filled past two thirds or no freeboard | Enforce the two thirds rule, use larger flasks or more frequent trips |
| Sharps container bulging past the fill line | Replacement step skipped | Replace at three quarters full, never force items in, never reopen a closed container |
| Sink clogs after drain disposal | Agar or fat poured warm into the drain | Solidify agar in the container and bin it as treated solid waste, or follow the written melt-and-treat protocol |
| Growth found in treated liquid waste | Disinfectant inactivated by organic load, or contact time too short | Use fresh disinfectant in generous excess, extend contact time, verify with an incubated aliquot |
| Odor complaints from the waste holding room | Treated waste held too long before pickup | Shorten the hold interval, keep the room cool and ventilated, schedule more frequent pickups |
Variations by Lab Type and Waste Type
Teaching and BSL-1 labs. Work with risk group 1 organisms still generates waste that should be decontaminated before disposal, and most institutions simply run it through the same autoclave path as BSL-2 waste. The checklist applies in full, minus the agent-specific steps.
Clinical BSL-2 labs. This is the default case the checklist was written for. All infectious waste is decontaminated before it leaves the lab, either by on-site autoclave or by a licensed contractor after approved packaging.
BSL-3 suites. Nothing leaves untreated. Waste is decontaminated inside the containment barrier, usually through a pass-through autoclave, and the verification steps run on every single load rather than on a weekly schedule.
High-volume liquid waste. Labs running fermenters or large-scale screening collect hundreds of liters per week. Bulk collection vessels, validated chemical disinfection or dedicated bulk autoclaves, and engineered liquid waste treatment systems are the standard answers. Published reports of laboratory exhaust and liquid waste disposal facilities go back decades [10], and the methods literature on laboratory liquid waste continues to develop [7].
Pathological waste. Incineration, not steam, is the standard route for tissues and carcasses [1].
Mixed waste. Any waste carrying both a radioactive and a chemical or biological hazard cannot follow the standard path. Characterize it first, then select a treatment alternative with the radiation safety officer, the sequence reflected in published evaluations of mixed waste treatment options [8].
Pretreated waste destined for landfill. Where regulations permit solidified or stabilized hazardous waste to enter a landfill, co-landfilling strategies have been evaluated at lab scale to confirm the pretreated material behaves acceptably [4]. This is a contractor-level decision, not a bench decision.
Prion and unusual agent waste. Prions resist normal steam cycles and require harsher, agent-specific protocols planned with the biosafety officer before the first vial is opened.
Mobile and field labs. The same categories apply with smaller containers and more frequent treatment, because storage space is minimal and delays are unavoidable.
Storage and Stability Notes
Disinfectants. Bleach working solutions lose available chlorine within days, especially in light and heat. Prepare fresh daily, store in an opaque closed container, and never top off an old batch. Ethanol solutions are stable but evaporate, so keep containers closed and away from ignition sources.
Accumulated untreated waste. Treat at the end of each session where possible. Where accumulation is unavoidable, institutional policy sets the maximum hold time, and the waste room must be secure, cool, dry, and pest-free. Hold limits exist because untreated waste degrades, leaks, and generates odors and aerosols.
Treated waste. Autoclaved bags should be dry and intact, labeled as treated, and stored separately from untreated waste until pickup. Wet bags support mold growth and odors within days, so schedule pickups before that happens.
Chemical waste. Keep containers closed except when adding waste, maintain secondary containment, store flammables in a rated cabinet, and separate oxidizers from organic material. Check compatibility before combining anything, and keep the heavy metal stream separate through to disposal [5].
Sharps containers. Replace at three quarters full. Closed containers are never reopened.
Records. Autoclave logs, manifests, and training records follow the retention period in your institutional policy. Store them where an inspector can find them without a search.
Microbiology Biosafety Training and Communication
Waste handling fails at the human layer before it fails at the technical layer, so microbiology biosafety training is part of the disposal system, not an add-on.
Structure training around the checklist itself. New staff learn the waste categories, container types, disinfectant preparation, autoclave loading and unloading, indicator use, log completion, and spill response before they handle infectious material alone. Verify competency by direct observation of a full close-out cycle, not by a signed attendance sheet. Refresh annually, and retrain immediately after any spill, exposure, near miss, or SOP change.
Communication deserves explicit attention. Research on risk perception shows that trust between experts and non-experts is fragile, and that communicating about microbiology to lay audiences and to scientists in other disciplines is a skill that benefits from deliberate practice and established guidelines [11]. Inside the lab, that translates into a culture where any staff member can stop a waste step and ask a question without penalty. Outside the lab, it means the biosafety officer and senior staff can explain to facilities teams, contractors, and inspectors exactly what was treated, how, and how it was verified, because cross-disciplinary communication is a precondition for the interdisciplinary work that modern waste management requires [11].
A practical drill worth running twice a year is a timed close-out audit. Give a staff member the checklist and a bench that has just finished a session, and score the segregation, labels, disinfectant freshness, and log entries. The gaps found in ten minutes of drill are the gaps that would surface in a real inspection.
Common Mistakes and Limitations
Common Mistakes
- Setting up containers after work starts. Waste gets mixed, and mixed waste must all be handled at the level of its worst component.
- Overfilling autoclave bags. Steam cannot reach the center of a dense bag, and the middle of the load may come out untreated.
- Autoclaving sealed containers. Sealed flasks and capped tubes can burst and spray superheated contents.
- Trusting one disinfectant for everything. Alcohol does not kill spores, quaternary ammonium compounds miss many non-enveloped viruses, and bleach loses potency against a heavy organic load. Match the disinfectant to the agent and the soil load.
- Mixing incompatible chemicals. Bleach with acid, ammonia, or formaldehyde creates toxic gases. Oxidizers with solvents create fire risk. Rinse containers between waste types.
- Pouring untreated broth or stain down the drain. Drain disposal is allowed only after validated decontamination and only where written policy permits [6], [7].
- Losing the heavy metal stream. Silver, copper, and mercury bearing reagents end up in the biohazard autoclave where they do not belong, and metals need separate capture and licensed disposal [5].
- Recapping needles. Recapping is a leading cause of sharps injuries. Drop the sharp directly into the container.
- Skipping indicators to save time. Without a chemical indicator on every load and a biological indicator on schedule, there is no proof any cycle worked.
- Letting waste accumulate. Hold limits exist for a reason, and an overflowing waste room turns a routine day into an exposure investigation.
- Treating autoclaved as automatically regular trash. Final disposal of treated waste follows written policy and local rules, not habit.
Checklist Tips
- Prepare bleach fresh daily, date the bottle, and place it where the liquid waste flask lives so the two habits bind together.
- Put the Class 5 integrator in the worst spot in the load, not the easiest one.
- Keep a laminated copy of the waste categories table at the bench and another at the autoclave.
- When a waste does not fit a category, over-treat rather than under-treat, then tell the biosafety officer so the SOP can be updated.
- Run the timed close-out drill with new staff within their first two weeks.
Limitations
This checklist reflects standard practice for clinical and research microbiology at biosafety levels 1 through 3. State and local regulations, contractor requirements, and institutional SOPs add rules that take precedence over anything written here. Waste involving risk group 4 agents, prions, radioactive materials, or unknown agents needs case-by-case review with your institutional biosafety officer before handling, rather than improvisation at the bench.
Frequently Asked Questions
What is a microbiology lab waste disposal checklist?
It is a written, ordered list of the segregation, treatment, verification, and documentation steps that move every waste stream from the bench to an authorized final destination without exposing staff or the environment. This article provides a complete version you can adapt into your SOP.
How long should an autoclave cycle run for biohazardous waste?
Longer than a media sterilization cycle, commonly 30 to 60 minutes at 121 °C depending on load size and packaging, using the cycle your facility validated. Indicators, not the clock, prove the cycle worked.
What disinfectant concentration works for liquid culture waste?
A 1:10 dilution of household bleach, giving roughly 0.5 percent sodium hypochlorite (about 5,000 ppm available chlorine), prepared fresh daily, with at least 30 minutes of contact time is the standard choice for routine bacterial and fungal cultures.
Can I pour bacterial broth down the drain?
Only after validated decontamination and only where your written policy allows drain disposal, always with copious running water. Untreated broth goes down no drain.
How do I dispose of needles and glass Pasteur pipettes?
Drop them directly into a puncture-resistant, closable sharps container without recapping, then route the container for autoclaving if required and licensed regulated medical waste disposal.
What do I do with stains, fixatives, and other chemical waste?
Collect them in compatible, labeled containers sorted by hazard class with secondary containment, and hand them to a licensed chemical waste contractor against a manifest. Never mix bleach with fixatives or acids.
How often should microbiology biosafety training be refreshed?
Annually at minimum, with retraining after any spill, exposure, near miss, or SOP change, and competency verified by direct observation rather than attendance alone.
What is the most common mistake in lab waste disposal?
Overfilled or mixed waste at the bench, usually because containers were not staged before work started, which forces post-hoc sorting and defeats the entire segregation system.
Sources
- Effective Disposal of Biological and Pharmaceutical Waste: A Note to the Health Care Professional
- Isolation And Screening For MDR Bacteria, Isolated From Waste Disposal Sites Of Hospital And Pharmaceutical Industries Of Himachal Pradesh
- Microbiology of waste disposal systems
- Co-landfilling of pretreated waste: disposal and management strategies at lab-scale.
- HEAVY METAL LEVELS IN ANALYTICAL LABORATORIES WASTE: A study for the implementation of a programme for the control and disposal of waste from microbiology and chemical analysis laboratories.
- Probe into the disposal of common waste liquids in Chemical Lab
- Methods about the Disposal of Lab's Waste Liqyuid
- SCFA lead lab technical assistance at Oak Ridge Y-12 national security complex: Evaluation of treatment and characterization alternatives of mixed waste soil and debris at disposal area remedial action DARA solids storage facility (SSF)
- Study of the disposal of microbiology laboratory′s waste by autoclave
- A RI LAB. OF NTT AND THE EXAMINED RESULTS OF EXHAUST AND LIQUID WASTE DISPOSAL FACILITIES. IBARAKI ANNEX OF ECL
- Communication and stakeholder engagement of microbiology in radioactive waste disposal