How to Build a Quality Manual for Your Microbiology Lab
By Dr. Zubair Khalid, DVM, MS, PhD ·
By the end of this guide you will be able to draft, from a blank page, a complete quality manual for a clinical microbiology laboratory. That means a controlled, top-level document that states your quality policy, assigns authority, maps the total testing process, defines your microbiology quality control program, and points to every standard operating procedure, form, and record your laboratory quality management system needs. You will also have the math to convert quality indicators into sigma metrics, a plan for external quality assessment, and a checklist for validating new methods and automation.
Have these on hand before you start: your current test menu, an organizational chart with names, an inventory of existing SOPs, an equipment list with models and firmware versions, the last twelve months of quality control logs and proficiency testing results, your incident and corrective action log, and the checklist your accreditation body uses. A spreadsheet program and a controlled network location for the master document are enough software. A free microbiology lab quality manual template can speed up formatting, but the content has to come from your own bench. Each step below doubles as a microbiology lab quality manual template example, with wording you can lift and adapt.
What a Quality Manual Actually Does
A laboratory quality management system, shortened to QMS, is the complete set of policies, processes, and records a laboratory uses to produce dependable results and to prove, to any assessor, that it can keep producing them. The quality manual is the top-level document of that system. It states what the laboratory promises, who is responsible for what, and where every supporting procedure lives. Reviews of the accreditation journey describe the quality manual and the standard operating procedure as the two core documents an assessor asks for first, and warn that laboratories routinely underestimate the preparation both require [1].
Three terms cause the most confusion, so define them once and use them consistently in the manual:
- Quality control (QC) is the checking you do at the bench: control organisms on new media lots, incubator temperature logs, Gram stain control slides, and reference strain panels for susceptibility testing.
- Quality assurance (QA) is the umbrella of planned activities that give confidence results will be correct, including QC, staff training, and document control.
- The quality management system wraps both, adding management responsibility, internal audit, corrective action, and continual improvement.
Microbiology earns its own manual rather than a chapter inside the chemistry lab's document. The analytes are alive. Identification depends on colony morphology, staining reactions, and biochemical or molecular results that trained staff interpret. One specimen can generate a dozen separate reports, from a Gram stain callback to a finalized minimum inhibitory concentration. A contaminated culture can steer therapy wrong for days. A quality manual written for chemistry covers none of that.
Where the Manual Sits in the Document Hierarchy
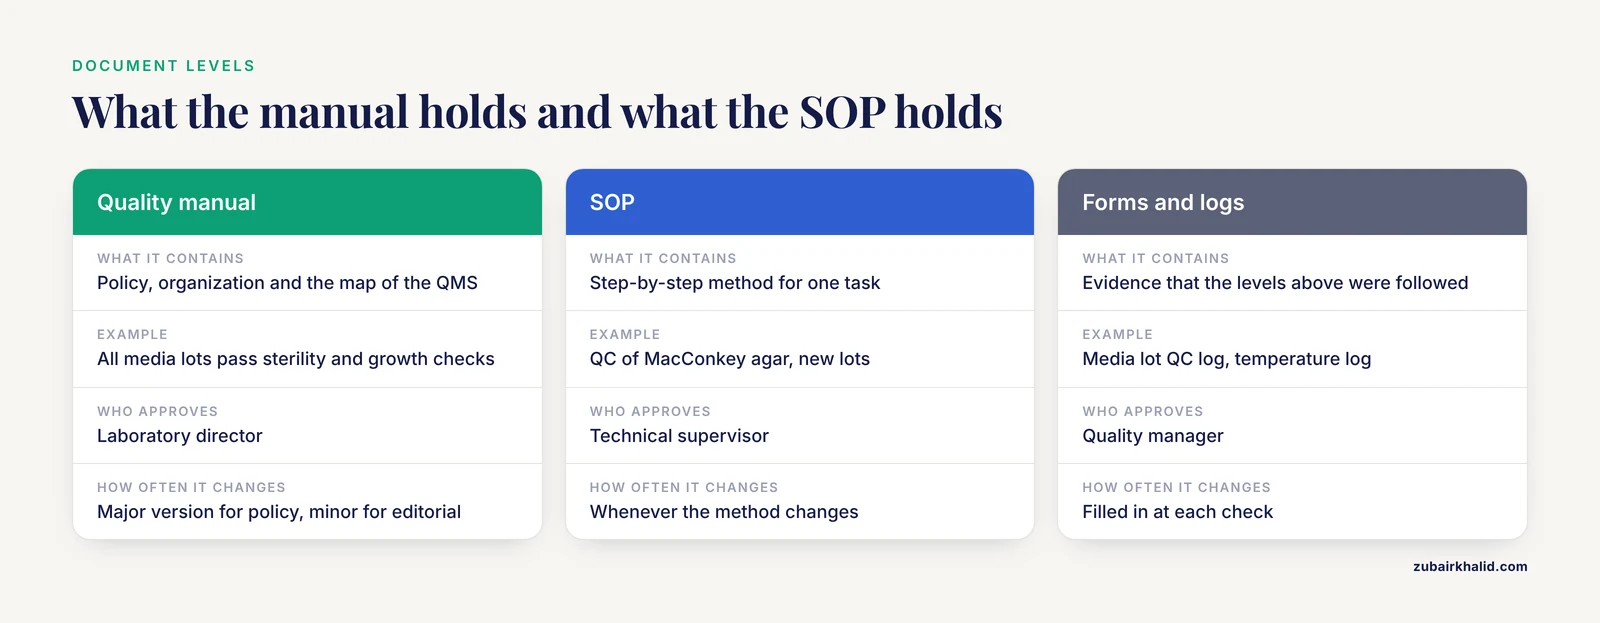
| Level | Document type | What it contains | Example | Who approves |
|---|---|---|---|---|
| 1 | Quality manual | Policy, organization, and the map of the whole QMS | "All media lots pass sterility and growth checks before use" | Laboratory director |
| 2 | Standard operating procedure (SOP) | Step-by-step method for one task | "QC of MacConkey agar, new lots" | Technical supervisor |
| 3 | Work instructions and package inserts | Short job aids at the bench | Incubator setpoint card, kit insert | Technical supervisor |
| 4 | Forms, logs, and records | Evidence that levels 1 through 3 were followed | Media lot QC log, temperature log | Quality manager |
The rule that keeps the manual readable: the manual says what and who, the SOP says how. An assessor should be able to trace any claim in the manual to a numbered SOP, and any SOP to a completed record. Accreditation guidance stresses preparing the SOP set and the quality manual together, because a manual that references SOPs which do not exist is a finding waiting to happen [1].
What to Gather Before You Write
Collect these into a single working folder before drafting a word:
- Current test menu, grouped by discipline (bacteriology, mycobacteriology, mycology, parasitology, molecular).
- Organizational chart with names, credentials, and reporting lines.
- SOP inventory with current version numbers, so the manual can reference real documents.
- Equipment list with models, serial numbers, firmware versions, and service contracts.
- The last twelve months of QC logs, external quality assessment results, incident reports, and corrective actions.
- The checklist or standard your accreditation body assesses against.
- Job descriptions for every role named in the manual.
- Your laboratory information system (LIS or LIMS, the software that tracks specimens and results) name and version.
- Biosafety level, waste handling contracts, and the floor plan showing specimen flow.
Quality Manual Template Format: A Section Map You Can Copy
A workable microbiology lab quality manual template format has numbered sections that mirror both the testing process and the assessor's checklist. Use this skeleton as your table of contents:
MICROBIOLOGY LABORATORY QUALITY MANUAL
Document number: QM-MIC-001
Version: 1.0
Effective date: (fill in)
Approved by: (Laboratory Director)

1.  Introduction, Scope, and Definitions
2.  Quality Policy Statement
3.  Organization, Roles, and Authority
4.  Document and Record Control
5.  Pre-examination (Pre-analytical) Processes
6.  Examination (Analytical) Processes
7.  Post-examination (Post-analytical) Processes
8.  Microbiology Quality Control Program
9.  Method Validation and Verification
10. External Quality Assessment and Interlaboratory Comparison
11. Quality Indicators and Continuous Improvement
12. Nonconformity, Corrective Action, and Complaints
13. Training, Competency, and Privileging
14. Internal Audit and Management Review
15. Biosafety and Waste Management
16. Information Management and Reporting

Appendix A. Master Document List
Appendix B. Quality Indicator Definitions and Formulas
Appendix C. Revision History
Expected result: a table of contents where sections 5 through 7 walk the specimen from receipt to report, sections 8 through 14 cover the quality machinery around it, and the appendices hold the lists an assessor flips to first. If you start from a free template, delete every section that does not map to one of your real processes. Boilerplate that describes tests you never perform is one of the fastest ways to lose an assessor's trust.
Step-by-Step: Building the Manual
Step 1. Write the Scope and Quality Policy
Section 1 states what the manual covers: which specimen types, which disciplines, which locations, and which activities are excluded (for example, research-only testing). Section 2 is the quality policy, three to five sentences in plain language, signed and dated by the laboratory director. Lift this wording and edit it:
The [Laboratory Name] Microbiology Laboratory is committed to reporting
accurate, timely, and clinically useful results for every specimen we
accept. We meet this commitment through a documented quality management
system, qualified and competent staff, validated methods, controlled
media and reagents, and continual improvement driven by quality
indicators and user feedback.

Signed: __________________  Laboratory Director   Date: __________
Expected result: one paragraph that any staff member can explain in their own words. If a technologist cannot paraphrase your quality policy, it is too long.
Step 2. Map the Organization and Assign Authority
Section 3 names the roles and the authority attached to each: laboratory director, quality manager, microbiology technical supervisor, bench technologists, and the specimen collection liaison. State explicitly who may approve an SOP, who may release a corrected report, who may reject a specimen lot, and who may stop testing when QC fails. A simple responsibility line for each role (approves, reviews, performs, consults) prevents the most common authority dispute, which is who signs off when a control strain fails.
Step 3. Set Up Document Control
Section 4 explains how every document in the system is numbered, versioned, approved, distributed, and withdrawn. Put a control block at the top of the manual itself:
document_id: QM-MIC-001
title: Microbiology Laboratory Quality Manual
version: 3.0
effective_date: 2026-01-15
review_due: 2027-01-15
supersedes: Version 2.2 (effective 2025-01-10)
owner: Quality Manager
approved_by: Laboratory Director
distribution: Controlled electronic copy on laboratory intranet
Expected result: a header an assessor can read in ten seconds and match against your revision history in Appendix C. Adopt a major.minor convention: a major version change (2.0 to 3.0) for policy changes approved by the director, a minor change (3.0 to 3.1) for editorial corrections by the quality manager.
Common errors and fixes at this step:
- Two versions circulating. Symptom: an assessor finds a printed page whose footer version does not match the register. Fix: stamp every printable copy "UNCONTROLLED IF PRINTED" and keep the single master on the intranet.
- Meaningless version names such as v3-final or v3-final-FINAL. Fix: the major.minor convention above, with every change recorded in Appendix C.
- Gaps between versions. Symptom: version 2.2 shows an effective date but no retirement date. Fix: one line per version showing supersedes, effective date, and retirement date.
Step 4. Define the Total Testing Process
Sections 5 through 7 map the total testing process, the complete path from the clinician's order to the report being acted on. The pre-examination section states specimen acceptance and rejection rules with concrete criteria: unlabeled or mislabeled containers are rejected, leaking containers are rejected, sputum specimens with more than 10 squamous epithelial cells per low-power field on the screening smear are rejected for routine bacterial culture, and urine held longer than two hours at room temperature before plating is flagged or rejected per your SOP. The examination section lists every method by discipline and points to its SOP number. The post-examination section defines result release, critical value callback (for example, an immediate call for a positive blood culture Gram stain), amended report handling, and retention times for records.
Quality indicators attached to these steps are measurable. In one hospital laboratory that tracked fifteen indicators across the total testing process from 2019 through 2024, critical value notification and timely critical value notification both ran at 100 percent every year, which shows this indicator can be sustained at ceiling performance when the callback process is defined and documented [2].
Step 5. Write the Microbiology Quality Control Program
Section 8 is the heart of microbiology quality control. Cover each consumable and instrument class with its check, its acceptance criterion, its frequency, and the record it generates:
- Media. Every new lot and shipment gets a sterility check on a defined sample of plates (commonly 3 to 5 percent of the lot) incubated at 35 degrees Celsius, plus growth and inhibition checks with reference strains. A MacConkey lot, for example, must support typical Escherichia coli growth with lactose fermentation and suppress swarming by Proteus mirabilis. Record lot number, receipt date, expiry, results, and the person who released the lot.
- Stains and reagents. Gram stain control slides with a known Gram-positive organism (Staphylococcus aureus) and a known Gram-negative organism (Escherichia coli) run each day of use and with each new lot. Oxidase, catalase, and indole reagents get positive and negative controls with each new lot and at the interval your adopted standard sets.
- Antimicrobial susceptibility testing (AST). Reference strains such as Escherichia coli ATCC 25922 test the system end to end: medium, inoculum, incubation, and reading. Define what happens when a zone diameter or MIC falls outside the published control range, including repeat rules and the hold on patient reporting.
- Equipment. Incubators at 35 plus or minus 2 degrees Celsius, carbon dioxide incubators at roughly 5 percent carbon dioxide, refrigerators at 2 to 8 degrees Celsius, and freezers all get logged daily with defined action limits. Autoclaves get physical, chemical, and biological indicators, with Geobacillus stearothermophilus spore strips as the biological check. Biological safety cabinets get annual certification.
Set each frequency by risk, and write the justification next to the frequency. The direction of travel in laboratory process control is toward tighter, faster, and more continuous checking: in point-of-care blood gas testing, a continuously monitored quality management system detected process errors in roughly 2 minutes on average and flagged errors in about 1.4 percent of patient samples, while intermittent liquid QC needed hours to days to catch the same problems [3]. The lesson for your manual is simple: the interval between QC checks should be shorter than the time in which an undetected error could harm patients, and the manual should say why each interval was chosen.
Step 6. Choose Quality Indicators and Do the Math
Section 11 defines each quality indicator (a measurable sign of process performance), its formula, its data source, its review frequency, and its target. Pick a small set that spans the total testing process:
| Quality indicator | Numerator | Denominator | Formula |
|---|---|---|---|
| Blood culture contamination rate | Bottles growing typical skin flora, such as coagulase-negative staphylococci, in a single bottle of a set | All blood culture bottles collected | (numerator ÷ denominator) × 100 |
| Specimen rejection rate | Specimens rejected before testing | All specimens received | (numerator ÷ denominator) × 100 |
| Incorrect sample type rate | Specimens collected in the wrong container or tube | All specimens received | (numerator ÷ denominator) × 100 |
| Critical value notification rate | Critical values documented as communicated within the defined window | All critical values detected | (numerator ÷ denominator) × 100 |
| Turnaround time | Not a rate, track per test type | Time from collection to report | Median and 90th percentile, in minutes |
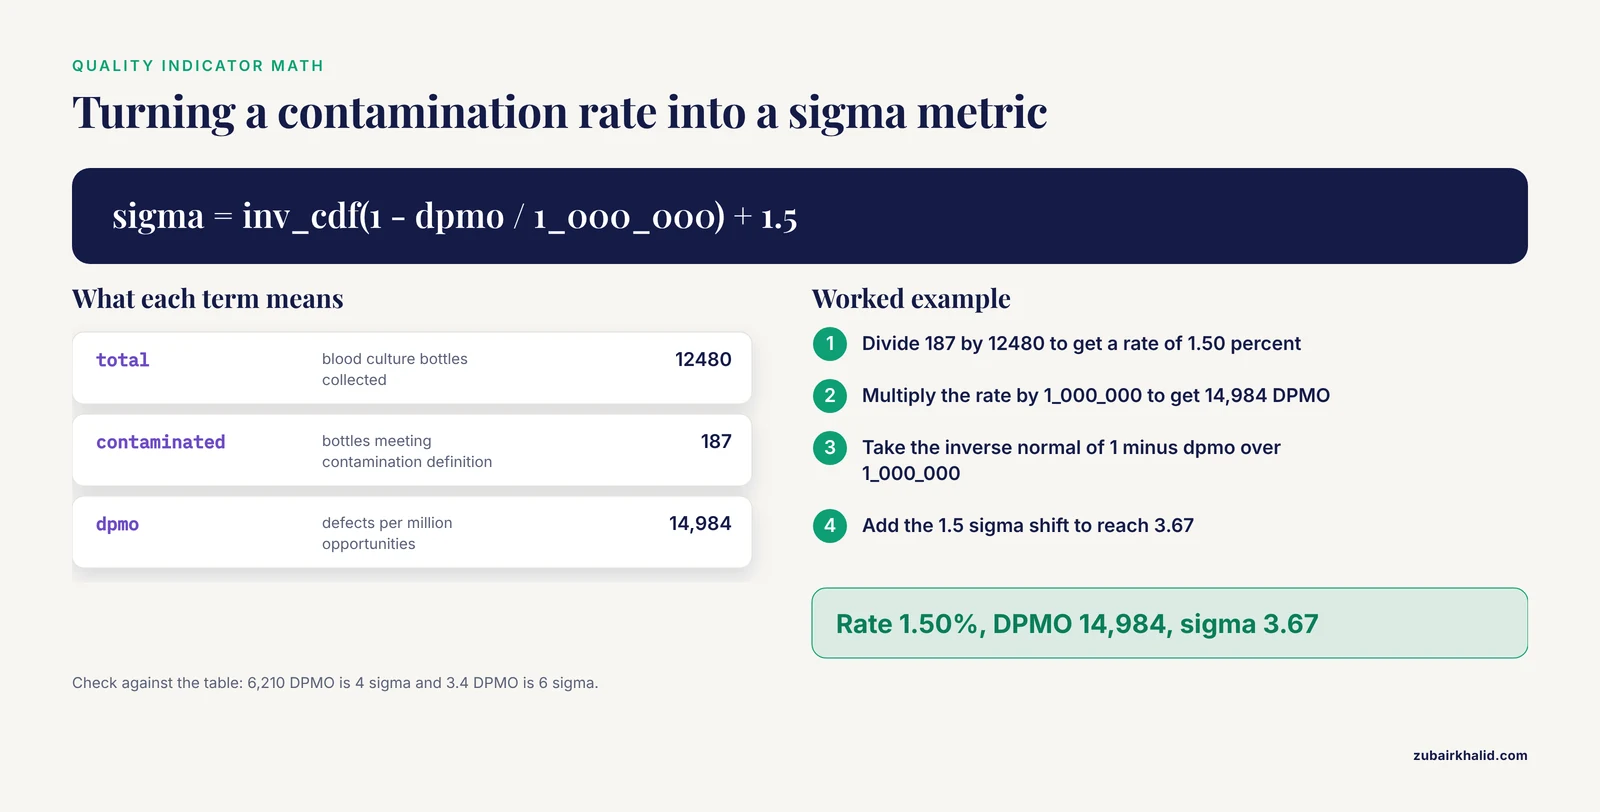
Convert each rate into a sigma metric so indicators can be compared on one scale. A sigma metric expresses how many standard deviations fit between your process average and the nearest defect boundary, and on the conventional shifted scale, six sigma corresponds to 3.4 defects per million opportunities (DPMO). Worked example for the blood culture contamination rate, using a Python script:
from statistics import NormalDist

total = 12480          # blood culture bottles collected in the year
contaminated = 187     # bottles meeting the contamination definition

rate = contaminated / total
dpmo = rate * 1_000_000
sigma = NormalDist().inv_cdf(1 - dpmo / 1_000_000) + 1.5

print(f"Rate: {rate:.2%}")
print(f"DPMO: {dpmo:,.0f}")
print(f"Sigma: {sigma:.2f}")
Expected output:
Rate: 1.50%
DPMO: 14,984
Sigma: 3.67
How to check the result is right: anchor against the standard conversion table. On the shifted scale, 6,210 DPMO equals 4 sigma and 3.4 DPMO equals 6 sigma. If your spreadsheet disagrees with those anchors, the formula is wrong.
Common errors and fixes at this step:
- Wrong denominator. Dividing rejected specimens by specimens tested instead of specimens received silently inflates performance. Fix: state the denominator in Appendix B, word for word.
- Mixing conventions. Some tables use the 1.5 sigma shift and some do not, which moves every value by 1.5. Fix: name your convention in Appendix B and never compare across conventions.
- Averaging monthly sigma values. Convert the pooled annual rate once, rather than averaging twelve conversions.
This is the approach large laboratories now use for management: one hospital laboratory converted fifteen indicators covering the total testing process into sigma values year by year from 2019 through 2024 and ranked periods and specimen types with TOPSIS, a multi-criteria method that scores each period against an ideal and a worst performer. Notably, every indicator averaged below six sigma, and the best performer, incorrect sample type, still averaged 5.73 [2]. Plan for steady improvement, not instant perfection.
Step 7. Plan External Quality Assessment
Section 10 defines your external quality assessment (EQA) program, also called proficiency testing: testing specimens of externally set, unknown composition that a provider grades against reference results. Write down which provider covers each discipline, which staff test the panels, that panels are treated exactly like patient specimens, and that every unsatisfactory result triggers a corrective action record.
Design the panel coverage to match your real workload, including molecular methods. The World Health Organization-coordinated EQA for laboratories supporting invasive bacterial vaccine-preventable disease surveillance in the African Region, distributed by UK NEQAS for Microbiology, built panels from three components: unstained bacterial smears for Gram staining, viable isolates for identification and serotyping or serogrouping, and simulated cerebrospinal fluid samples for species detection by polymerase chain reaction. Passing scores were set at 75 percent or higher for sentinel and national laboratories and 90 percent or higher for regional reference laboratories, and in 2019 only 63 percent (5 of 8) of sentinel and national laboratories correctly identified the targeted pathogens [4]. Two lessons follow: grade different laboratory tiers against different thresholds if your network has tiers, and treat every EQA cycle as a real test of the whole chain from stain to sequence, not a certificate to file.
Step 8. Build Training, Competency, and Privileging
Section 13 states that no one reports results until training is complete and competency is documented. Accreditation-focused reviews of laboratory quality management highlight training and privileging of staff as distinct concepts: training is what a person was taught, while privileging is the formal list of tasks an individual is authorized to perform independently [1]. For each role, list the tasks, the initial competency methods (direct observation, blinded retesting of known specimens, written assessment), the review interval, and the record. Add a line that covers new methods: nobody performs a newly validated method until the validation summary is signed and their competency on that method is documented.
Step 9. Nonconformity, Corrective Action, and Complaints
Section 12 defines a nonconformity (any departure from a documented requirement, such as a failed control strain or a mislabeled specimen that reached the bench) and corrective and preventive action (CAPA, the structured response that removes the cause and prevents recurrence). Specify the log fields: date, what happened, immediate containment, root cause method, corrective action, responsible person, due date, and verification of effectiveness. Add a rule that complaints from clinicians enter the same log, because a clinician calling about an unexpected result is free surveillance data.
Step 10. Internal Audit and Management Review
Section 14 schedules internal audits, in which trained staff who do not perform the audited task check practice against the manual and SOPs. Use two audit types: vertical audits that follow one specimen end to end, and horizontal audits that follow one element, such as document control, across all sections. Then define management review, the periodic meeting where leadership examines a fixed input list: quality indicator trends, EQA results, internal audit findings, nonconformities and CAPA status, staff competency records, resource needs, and user feedback. Require written minutes with decisions and deadlines. An audit without a management review is a filing exercise.
Step 11. Validate New Methods and Equipment
Section 9 distinguishes validation (establishing that a new method performs as intended for its intended use) from verification (confirming that a method drawn from a published standard or a manufacturer's claim performs in your hands). For every new instrument or method, the section must state the performance characteristics tested, the acceptance criteria set before data collection, and who approved the summary.
Automation is the case most microbiology laboratories face now, and the published evaluations show exactly which characteristics matter. In a comparison of the automated Previ Isola inoculator against manual streaking across 377 nonduplicate samples (102 blood cultures, 203 urines, 72 body fluids), quality concordance between the two methods was 100 percent for blood cultures, 97.0 percent for urines, and 98.6 percent for body fluids, quantitative concordance was 98.0, 97.0, and 95.8 percent respectively, and the automated method saved about 6 minutes of hands-on time per 10 samples even though inoculation itself took slightly longer [5]. For stool cultures, a two-year evaluation of 5,884 fecal specimens found that annual Campylobacter recoveries rose from 19 and then 10 positives in the two manual years to 32 in each of the two automated years (P=0.002 and P=0.003), while regional and nationwide surveillance data showed no such increase, meaning the automated method was recovering organisms the manual method missed [6]. At the molecular bench, automated nucleic acid extraction from whole blood cut hands-on time significantly at slightly higher cost, produced downstream results comparable to the manual kit, and showed no cross-contamination, although DNA quantity and purity were marginally higher with the manual method [7].
Build those four characteristics into your validation template: recovery (does the method find what the old one found, and anything the old one missed), concordance (agreement with the reference method), contamination (cross-contamination checks built into the study design), and hands-on time. Speed alone is never an acceptance criterion.
Step 12. Keep the Manual Alive
Close the manual with the review cycle: a scheduled full review at least annually at management review, plus triggered reviews whenever a process, standard, or major instrument changes. Then run a traceability test to check the result is right:
- Pick any SOP at random.
- Trace upward: which manual section and clause requires it?
- Trace downward: which form or log records that it was followed?
- Trace sideways: which quality indicator would detect a failure of this SOP?
If any of the three traces dead-ends, the manual has a hole. Sensible next steps after approval: collect three months of baseline quality indicator data before setting targets, book the first internal audit, and put the manual on the management review agenda.
Where Automation Rewrites Your Manual
Total laboratory automation (TLA), the conveyor-connected chain of preanalytical processors, incubators, and digital plate readers, changes more than the bench. In an Italian hospital laboratory that implemented TLA for urine cultures and positive blood culture follow-up, a health technology assessment built on key performance indicators defined through literature review and expert consensus found a 67 percent decrease in specimen check-in time, inoculation time reductions of up to 100 percent for automated steps, and a 69 percent reduction in plate reading time compared with the manual workflow [8].
For the quality manual, that before-and-after design is the model to copy. Freeze the definitions of your quality indicators and turnaround time measures before automation arrives, so the comparison means something. Then rewrite four sections: the examination section gains the automated workflow and its downtime backup, the QC section gains the automated equipment's own checks and the verification runs after every software update, the validation section gains the TLA validation summary, and the training section gains competency requirements for the new roles automation creates.
Common Mistakes and Limitations
- Adopting a free template word for word. Assessors recognize boilerplate instantly, and every clause you keep that does not match your practice becomes a nonconformity you wrote yourself. Adapt, then delete what does not apply.
- Writing SOP detail into the manual. If a section explains pipetting steps, it belongs in an SOP. The manual that duplicates SOPs goes out of date the first time a method changes.
- Choosing indicators because they are easy to count. Indicators should map to your incident log and your risk points, not to whatever the LIS exports by default.
- Expecting six sigma everywhere. Real clinical laboratories running mature indicator programs report sigma values below six across the board, even for their best indicators [2]. Set targets from your own baseline.
- Treating EQA as a certificate exercise. An unsatisfactory panel result handled outside the CAPA system will resurface as a finding, and EQA programs set demanding thresholds precisely because field performance lags expectations [4].
- Skipping revalidation after change. A firmware update on an automated inoculator is a new method in the eyes of an assessor. Record what was verified, when, and by whom.
- Underestimating documentation infrastructure. In a survey of molecular testing laboratories in Colombia, quality and documentation gaps were reported by 16.7 percent of laboratories as a key limitation, behind infrastructure at 26.2 percent, with biosafety at 14.3 percent and human talent at 10.7 percent [9]. Budget real staff time for document control, or the manual will decay within a year.
- One author, no reviewers. A manual written alone by the quality manager misses bench reality. Have at least one technologist from each discipline mark up the draft before approval.
- Letting the revision history lapse. Appendix C is the first place an assessor checks whether the manual is a living document or a shelf document.
One limitation belongs to the document itself: a quality manual defines how the laboratory works as a system, and it cannot substitute for professional judgment on any individual specimen or result. Qualified staff make the calls at the bench, and the manual makes sure they make them with controlled methods, working instruments, and documented training. Before finalizing, walk through the draft against your accreditation body's exact current checklist, because standards are revised and the manual must match the edition in force.
Frequently Asked Questions
What is a microbiology lab quality manual template?
A microbiology lab quality manual template is a pre-built outline of the sections, policies, and appendices a microbiology laboratory's quality manual should contain. You adapt it to your own test menu, staff, equipment, and accreditation requirements rather than using it word for word.
What is the difference between a quality manual and an SOP?
The quality manual states policy: what the laboratory promises, who is responsible, and where every process lives. An SOP gives the step-by-step instructions for one task, such as running quality control on a new media lot.
How long should a quality manual be?
Short enough that staff actually read it. Most laboratories keep the manual itself to tens of pages and push procedural detail into controlled SOPs that the manual references by number.
How often should the quality manual be reviewed?
At least annually as part of management review, plus immediately whenever a process, regulation, accreditation standard, or major piece of equipment changes.
Which quality indicators should a microbiology laboratory track?
Start with a small set that spans the total testing process, such as specimen rejection rate, blood culture contamination rate, incorrect sample type rate, turnaround time, and critical value notification. Add indicators for any step that has produced errors in your own incident log.
Do we need a quality manual if we are not seeking accreditation?
Yes. The manual standardizes results, shortens training, protects staff during incidents, and makes any future accreditation or client audit far faster to prepare.
How do I write a quality policy statement?
Write three to five sentences committing the laboratory to accurate, timely, clinically useful results, name the quality management system as the mechanism, and have the laboratory director sign and date it. Post it where staff and visitors can see it.
How does automation change the quality manual?
Every automated step needs its own validation record, quality control plan, downtime procedure, and software change control entry. The manual should also state who verifies automated functions after an update and which manual backup method applies during downtime.
Sources
- Laboratory quality management system: road to accreditation and beyond.
- Application of Sigma Metric and TOPSIS Method to Comprehensively Analyze 15 Quality Indicators in Clinical Laboratory from 2019 Through 2024.
- Clinical Validation of a Novel Quality Management System for Blood Gas, Electrolytes, Metabolites, and CO-Oximetry.
- Evaluation of Laboratories Supporting Invasive Bacterial Vaccine-Preventable Disease (IB-VPD) Surveillance in the World Health Organization African Region, through the Performance of Coordinated External Quality Assessment.
- Manual versus automated streaking system in clinical microbiology laboratory: Performance evaluation of Previ Isola for blood culture and body fluid samples.
- Evaluation of the impact of automated specimen inoculation, using Previ Isola, on the quality of and technical time for stool cultures.
- Comparison of manual and automated nucleic acid extraction from whole-blood samples.
- Total Laboratory Automation for Microbiology Activities: An HTA Analysis in an Italian Laboratory Setting.
- Strengthening molecular testing capacity in Colombia: Challenges and opportunities.