First Aid for Biological Exposures: A Quick-Reference Guide
By Dr. Zubair Khalid, DVM, MS, PhD ·
First aid for biological exposures in the lab is the immediate care you give after a needlestick, splash, spill, or aerosol release involving infectious material. The method achieves three things in a fixed order. It removes most of the inoculum, meaning the dose of infectious material that reached skin or a mucous membrane, before an infection can establish. It contains the source so nobody else is exposed. It starts the documented chain of reporting and medical follow-up that ends in post-exposure prophylaxis (PEP), which is preventive treatment given after an exposure to stop an infection from taking hold.
Use this guide for any real or suspected exposure to cultures, clinical specimens, contaminated sharps, contaminated equipment, or infected animals. Hands-on time is 2 to 5 minutes to start correct care. Total elapsed time is about 20 minutes for washing, containment, and documentation, followed by same-day medical evaluation.
Speed matters because the biology is unforgiving. Once a pathogen crosses a mucous membrane or enters a puncture wound, washing can no longer reach it, and the remaining options narrow to prophylaxis and monitoring. A survey-based study of laboratory personnel found that 31.4% of workers reported that experience in emergency situations significantly increases the likelihood of infection, a finding the authors linked to the need for stronger biosecurity measures for experienced staff who may trust their routines too much [1]. The same study warned that a lack of internal and external coordination during emergency response can release pathogens into the environment and create a public health risk [1]. First aid is where coordination begins, and this guide is written to be executed, not admired.
The Principle Behind Exposure First Aid
The logic of biological exposure response rests on three pillars, and the order never changes.
Pillar 1: Mechanical decontamination of the person. Running water dilutes and lifts infectious material off skin and out of eyes. Soap disrupts membranes and strips organisms from the skin surface. Antiseptics add a chemical kill step on intact puncture wounds after washing. Nothing corrosive or irritating ever goes into eyes, mouth, or open tissue, because a chemical injury stacked on a biological exposure makes both worse.
Pillar 2: Containment of the source. A spill that is left wet, or a broken culture tube that is wiped dry, keeps generating risk. Covering a spill with absorbent material before applying disinfectant prevents aerosols, which are tiny airborne droplets and particles that can carry infectious material deep into the lungs. Disinfectant is applied from the perimeter inward so the spill area never spreads.
Pillar 3: Structured reporting, risk assessment, and prophylaxis. First aid buys time. Medical decisions convert that time into protection. Analyses of medical response to nuclear, biological, and chemical incidents concluded that rescue after such events remains challenging and often inefficient, and identified response coordination, practical training, and professional consultant support as the priority fixes [2]. Published case analyses of laboratory biosafety incident response carry the same message, which is that a preplanned escalation pathway outperforms improvisation [3]. A pilot study of standardized major incident reports found that the recurring failures were inadequate resources, lack of a common triage system, confusion over command and control, and communication breakdowns, while effective triage by experienced individuals stood out as a success [4]. Those failures map directly onto a small lab event. The person who washes for 15 minutes and reports within the hour is executing triage, command, and communication correctly.
Materials and Equipment
| Item | Working concentration or specification | Purpose | Notes and hazards |
|---|---|---|---|
| Running water and liquid soap | Plain potable water | First-line washing of wounds and skin | Never add disinfectant to the wash water |
| Plumbed eyewash station | Tepid, continuous, gentle flow | 15-minute eye flush | Test weekly, keep the path to it clear |
| Sterile saline eyewash bottles | 0.9% sodium chloride | Backup eye irrigation where plumbing is absent | Single use, check the expiry date monthly |
| Emergency shower | Potable water | Large body splashes and soaked clothing | Flush for 15 minutes, remove contaminated clothing |
| Alcohol-based hand rub | 60% to 95% ethanol or isopropanol | Hand hygiene after washing | Flammable, never for wounds, eyes, or mucosa |
| Ethanol 70% (v/v in water) | 70% ethanol | Surface wipe-down of small areas, metal surfaces, and equipment | Flammable, keep away from open flames |
| Sodium hypochlorite working solution | 0.5% available chlorine (about 5,000 ppm), diluted 1:10 from 5% household bleach, prepared fresh daily | Disinfection of biological spills on surfaces | Corrosive, irritant fumes, never mix with ammonia or acids, never on skin or eyes |
| Povidone-iodine antiseptic | 10% solution (1% available iodine) | Wound antisepsis after washing | For intact puncture wounds, not for eyes or mucosa |
| Sterile gauze and adhesive dressings | Sterile, single use | Direct pressure and wound cover | Restock after every use |
| Nitrile gloves, fluid-resistant gown, goggles or face shield | Correct size, intact | PPE for spill cleanup | Double-glove for spill work |
| Forceps, tongs, or a dustpan with cardboard | Within reach of every bench | Sharps and broken glass handling | Never use hands |
| Biohazard bags and a puncture-resistant sharps container | Certified for the waste stream | Waste segregation | Do not overfill the sharps container |
| Absorbent pads or paper towels | Plain, unused | Covering spills before disinfection | Keep a full sleeve at the bench |
| Exposure report form and emergency contact card | Posted near the exit | Documentation and escalation | Verify phone numbers quarterly |
Safety note. Sodium hypochlorite releases irritating fumes in enclosed rooms, corrodes metal, and produces toxic chloramine or chlorine gas if mixed with ammonia or acids. Prepare it fresh, use it with ventilation, and store it away from other chemicals. Ethanol is flammable, so keep spray bottles away from Bunsen burners and hot surfaces.
Step-by-Step First Aid for Biological Exposures
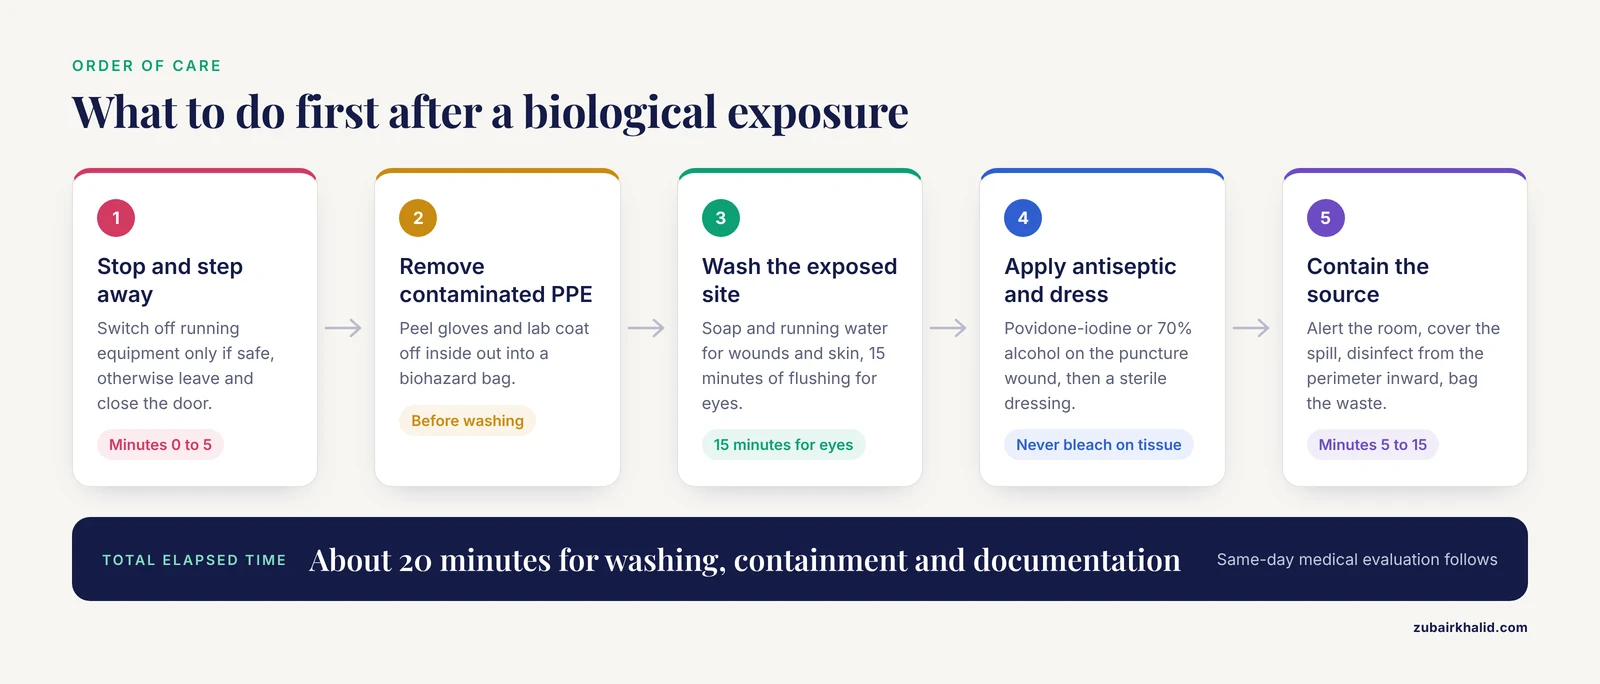
Phase 1: Decontaminate the Person First (Minutes 0 to 5)
- Stop work and step away from the source. Switch off running equipment such as a centrifuge or sonicator only if you can do it safely, otherwise leave the room and close the door. Reason: staying at the bench risks a second exposure and keeps generating aerosols.
- Remove contaminated gloves and lab coat. Peel gloves off inside out, unbutton the coat and pull it off inside out, and drop both into a biohazard bag. Reason: contaminated PPE keeps inoculating your skin every second you wear it.
- For a sharps injury, wash the wound thoroughly with soap and running water. Let the wound bleed briefly on its own, let the water carry blood away, and do not scrub deeply or squeeze the tissue. Reason: flowing water mechanically removes inoculum without driving it deeper, while squeezing damages tissue and pushes material into the wound bed.
- For a skin splash, wash the exposed area thoroughly with soap and running water. Remove any clothing that soaked through before washing. Reason: fabric holds infectious material against the skin and defeats washing.
- For an eye splash, flush at the eyewash station for a full 15 minutes. Hold the eyelids open, rotate the eyes in all directions, and remove contact lenses once flushing has started if they come out easily. Reason: dilution is a function of time and volume, and a gentle stream protects the cornea.
- For a mouth splash, rinse repeatedly with water and spit. Do not swallow the rinse water. Reason: repeated rinsing dilutes material on the oral mucosa without introducing it into the stomach.
- After washing, apply antiseptic to the wound and cover it. Use povidone-iodine or 70% alcohol on a puncture wound, then apply a sterile dressing. Reason: antisepsis reduces residual organisms on intact wound edges and the dressing keeps the site clean for medical evaluation.
Safety note. Never put bleach, undiluted alcohol, or any laboratory disinfectant into eyes, mouth, or open wounds. Disinfectants are for surfaces, antiseptics are for intact skin around a wound, and water is for tissue.
Phase 2: Contain and Disinfect the Source (Minutes 5 to 15)
- Alert everyone in the room, notify your supervisor, and restrict entry. Close the door and post a sign if the event involved an aerosol. Reason: an unmanaged scene produces overlapping rescuers, contaminated shoes, and a wider footprint.
- Cover the spill with absorbent material, then apply disinfectant from the perimeter inward. Pour around the edge first and work toward the center. Reason: covering prevents aerosols, and perimeter-first application keeps the spill area from growing.
- Let the disinfectant sit for the contact time specified in your SOP. Many facilities use 10 minutes or longer for routine spills and longer for high-risk agents. Reason: disinfectants kill by wet contact time, not by instant contact.
- Collect the soaked absorbent with tongs or cardboard into a biohazard bag. Broken glass and sharps go into a sharps container, never into a bag and never with hands. Wipe the area a second time with fresh disinfectant. Reason: mechanical removal of the mass of material lets the second wipe reach the surface itself.
- Remove PPE in the correct order, then wash your hands with soap and water followed by alcohol rub. Reason: glove and gown removal is itself an exposure route if done carelessly.
Phase 3: Report and Assess Risk (Same Shift)
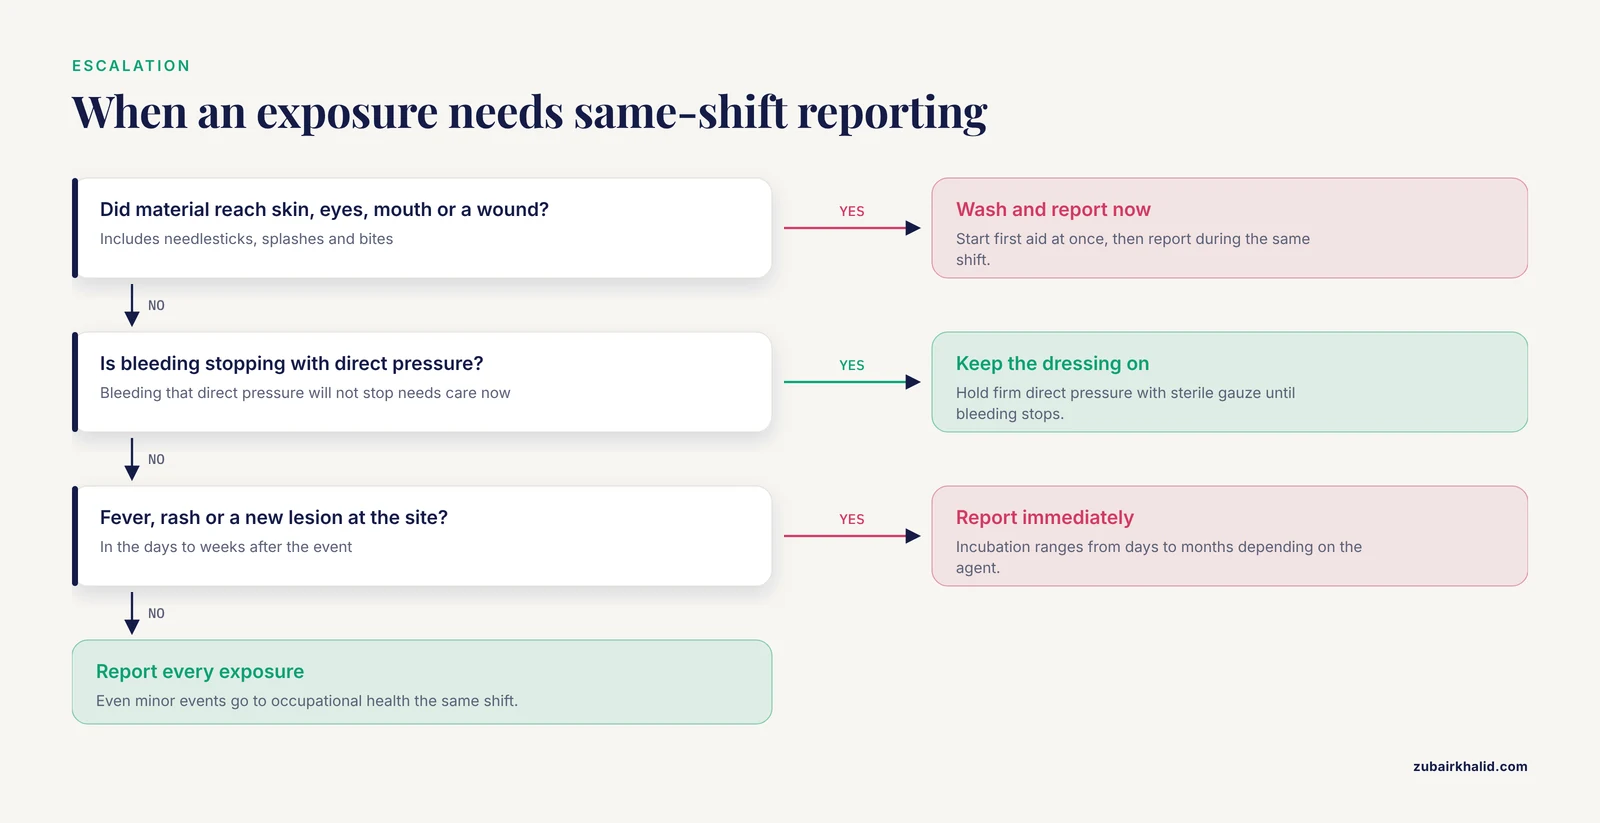
- Report to your supervisor and occupational health during the same shift, no matter how minor the event seems. Reason: prophylaxis decisions are time-sensitive, and communication breakdown is one of the documented recurring failures in emergency response [4]. Reporting is also how the lab learns which bench, task, and PPE combination failed.
- Document the exposure in writing. Record the agent and its hazard group, meaning its classification by disease severity and transmission route, the exposure route (percutaneous, mucosal, non-intact skin, or inhalation), the estimated volume or inoculum, the exact time, the task being performed, the PPE worn, and your vaccination status. Reason: this record drives every downstream medical and administrative decision.
- Complete a biosafety risk assessment with the biosafety officer. A biosafety risk assessment is a structured evaluation of how likely an exposure is to cause infection and how severe that infection would be, based on the agent, the route, the quantity, the PPE failure mode, and the worker's immunity. Reason: the assessment converts a scary event into a defined risk level that medical staff can act on.
Phase 4: Medical Evaluation and Follow-Up
- Attend same-day medical evaluation. Occupational health will arrange baseline testing and decide on PEP. Reason: prophylaxis is a clinical decision that depends on the agent, the route, and your documented immunity, confirmed by antibody titers, which are lab measurements of protective antibodies in your blood.
- Preserve the source material when possible. Keep the culture tube, the specimen, or the animal record available for testing, following occupational health guidance. Reason: identifying the organism turns a generic protocol into a targeted one.
- Attend every follow-up visit and serology draw. Serology is blood testing for antibodies, and the schedule exists because some infections declare themselves weeks or months after exposure. Reason: missed follow-up is how a contained exposure becomes a late diagnosis.
Quick Tips for the Bench
- Know the physical path to the eyewash with your eyes closed, because a splash to the eyes is a blind emergency.
- Keep a pre-split aliquot of bleach diluent at the bench so the working solution is never an excuse to delay.
- Say the exposure out loud to a coworker while it happens. A witness improves the accuracy of the report.
- Treat every unknown specimen as high risk until the risk assessment says otherwise.
- Practice the first three steps as a drill, because the first three steps are the ones you will never have time to look up.
Controls and Readiness Checks
First aid is a system, and controls verify the system before an exposure tests it. A preparedness study that built a validated conceptual model of emergency medical response through a systematic review, in-depth interviews, an expert panel, and two Delphi consensus rounds treated readiness as a designed set of components rather than a personality trait [5]. Apply the same thinking at bench scale.
- Weekly eyewash activation. Run every plumbed station, confirm flow and clarity, and log it. A station that has not run in months is a decoration.
- Monthly kit audit. Check first aid kits, spill kits, sterile eyewash bottles, and antiseptic expiry dates against an inventory list.
- Daily disinfectant preparation. Prepare 0.5% hypochlorite fresh each day and label the bottle with the date and time.
- Scheduled drills. Walk through a mock splash and a mock needlestick, time the eyewash and the report, and debrief. Practical training and exercise are named as priority countermeasures in analyses of response to chemical, biological, and radiological events [2].
- Competency sign-off. No new staff member handles agents before demonstrating the response sequence.
- Post-incident review. After every real exposure, review what worked, what delayed the response, and what to change, in a no-fault format.
Expected Results and How to Read Them
A correct response produces an observable end state. The exposed person is washed, dressed, and out of the immediate work area within 5 minutes. The spill is covered, disinfected, and bagged within 15 minutes. The report is filed and occupational health has been contacted during the same shift. The source material is identified and available for testing. If all four are true, the response worked.
Read the following as escalation signals rather than failures of first aid. Bleeding that does not stop with direct pressure needs medical attention now. Eye pain, grittiness, blurred vision, or light sensitivity after a completed flush needs same-day eye evaluation. Fever, rash, or a new lesion at the exposure site in the days to weeks afterward needs immediate reporting, because incubation periods range from days to months depending on the agent. First aid does not create immunity and it does not replace medical evaluation. It creates the conditions under which medical evaluation can still work.
Agent-Specific Follow-Up and Post-Exposure Prophylaxis
PEP exists for some agents and not others, and the decisions belong to occupational medicine. For bloodborne exposures, hepatitis B prophylaxis relies on vaccination and, for unvaccinated workers or poor responders, hepatitis B immunoglobulin. HIV prophylaxis is an antiretroviral course that works best started the same day, ideally within hours of the event. Hepatitis C has no prophylactic regimen, so the strategy is monitoring with early treatment if infection appears.
Lyssavirus exposures, which include bites, scratches, or material contact involving bats, rabid animals, or lyssavirus cultures, follow their own logic. Sixteen lyssavirus species are classified within 3 or possibly more phylogroups, and all of them can cause encephalitis in mammals, while the vaccines currently used to prevent rabies are effective against phylogroup 1 but ineffective against phylogroups 2 and 3. That is why the medical team needs accurate information about the species and sample involved rather than a generic "animal exposure" label. The cross-border dimension of this work is already institutionalized. The North American Rabies Management Plan, signed by the governments of Mexico, the United States, and Canada in 2008, was designed to strengthen national laboratory networks and coordinated response across shared borders, and Mexico's program earned recognition by the World Health Organization and the Pan American Health Organization as free of human rabies transmitted by dogs [6]. For an individual worker, the practical translation is simple. Wash the wound thoroughly, report immediately, and give the medical team the exact agent or animal context so the phylogroup question gets answered.
For exposures to unknown or uncharacterized material, the default is high risk until the biosafety risk assessment says otherwise. The cost of overreacting is an afternoon. The cost of underreacting can be an infection with no second chance at prophylaxis.
Troubleshooting
| Symptom | Likely cause | Fix |
|---|---|---|
| Eyewash stream is weak, sputters, or runs rusty | Station has not been flushed weekly, sediment in the supply line | Flush weekly per the facility schedule and tag the station for maintenance before anyone relies on it |
| Bleach solution smells flat and seems inactive | Dilution was prepared days earlier and lost activity to light, heat, and storage | Prepare 0.5% hypochlorite fresh daily and label the bottle with the date and time |
| Wound keeps oozing after washing | Vigorous squeezing or scrubbing damaged tissue | Stop squeezing, hold firm direct pressure with sterile gauze until bleeding stops, then dress |
| Eye remains painful or gritty after flushing | Residual material under the eyelids or irritation from the wrong agent | Continue gentle flushing with clean water or saline and arrange same-day eye evaluation |
| Spill spreads outward during cleanup | Disinfectant was poured from the center outward or too much liquid was used | Cover with absorbent material first, then apply disinfectant from the perimeter inward |
| Coworkers re-enter the room immediately after an aerosol release | No agreed settling period and no posted sign | Follow the settling period in the SOP, close the door, post a do-not-enter sign |
| Exposure is reported at the end of the shift or the next day | No-fault reporting culture is weak and staff fear blame | Report during the same shift and review reporting speed in every post-incident debrief |
| Gloves tear during spill cleanup | Wrong glove size or single gloving for heavy work | Stock multiple sizes, double-glove for spill cleanup, change outer gloves when soiled |
| Worker used alcohol hand rub only after a splash | Belief that hand rub replaces washing | Wash with running water first, hand rub is an adjunct for hands only |
| Broken glass or sharps picked up by hand | Tongs not within reach | Keep tongs and a dustpan inside every spill kit and never handle sharps barehanded |
Variations by Exposure Type and Facility
Sharps Injuries
Sharps are the most common serious route in microbiology because they bypass the skin barrier entirely. The response follows Phase 1 step 3, with two additions. Never recap, bend, or break a used needle, and dispose of sharps at the point of use. If the sharp involved is still on the bench, do not handle it again. Note its appearance and location, or have a coworker secure it with tongs, because the device type matters for the risk assessment.
Splashes and Mucocutaneous Exposures
Mucocutaneous exposure means contact with skin, especially non-intact skin, and with the mucous membranes of the eyes, nose, or mouth. Eyes get 15 minutes of flushing, mouths get repeated rinsing and spitting, and skin gets thorough soap-and-water washing. Remove contaminated clothing before washing, because fabric held against skin defeats the water.
Spills and Aerosol-Generating Events
Centrifuge failures, dropped culture tubes, and open blenders or sonicators produce aerosols. The response adds two elements. First, evacuate and hold, following the settling period defined in your facility SOP before re-entry, because airborne particles take time to deposit. Second, upgrade PPE for cleanup, including respiratory protection where your SOP requires it for the agent involved. Cover the spill, wet it from the perimeter, respect the contact time, and bag everything.
Animal Bites, Scratches, and Field or Veterinary Settings
The same first aid applies outside the traditional lab, in veterinary clinics, animal shelters, wildlife work, and farm calls, where zoonotic agents, meaning pathogens transmissible between animals and people, are the hazard. Wash the wound thoroughly with soap and running water, control bleeding with direct pressure, and report immediately. Rabies deserves specific mention because post-exposure prophylaxis decisions depend on the species involved and the vaccine coverage question described in the prophylaxis section.
Higher Containment and Shared Facilities
In BSL-3 and higher containment, which are facility levels designed for agents with serious or lethal aerosol potential, the response adds structural steps. Stay in the room or exit according to the SOP, complete decontamination before leaving the containment boundary, and activate the notification chain, which may include facility management and institutional incident command. Published analyses of laboratory biosafety incident response emphasize that these escalation pathways must be preplanned, because the moment of an incident is the wrong time to design one [3].
Storage, Stability, and Maintenance of Supplies
- Sodium hypochlorite working solution. Prepare 0.5% fresh daily. Activity falls with time, light, heat, and organic load, so an old bottle is a placebo. Label with the date and time of dilution.
- 70% ethanol. Stable in a sealed container, flammable, and subject to evaporation that changes the concentration. Check levels and cap tightness monthly.
- Povidone-iodine. Stable to the printed expiry, but inactivated by organic matter, which is why it comes after washing and never instead of it.
- Sterile eyewash bottles. Single use, with a hard expiry check every month. Once opened, they are no longer sterile.
- Plumbed eyewash stations and showers. Flush weekly to clear sediment and stagnant water, and follow the facility inspection program for annual service.
- First aid kits. Audit monthly, restock immediately after any use, and check dressing sterility dates.
- Spill kits. Inventory after every use, replace absorbents and disinfectant, and reseal. A partially used spill kit is a trap.
- Contact card. Verify every phone number quarterly, because an out-of-date occupational health number costs exactly the time you do not have.
Microbiology Biosafety Training and Biosafety Risk Assessment
Training is what turns this guide from text into reflex. A microbiology biosafety training program for exposure response covers five things. What an exposure looks like, including the minor ones people dismiss. Where the eyewash, shower, spill kit, and report forms are. How to execute the wash, contain, report sequence. Who makes PEP decisions. And what documentation the event requires. Analyses of response to nuclear, biological, and chemical incidents identified practical training and exercise, public education, and professional consultant support as the countermeasures that matter most, precisely because response under stress defaults to habit [2].
Biosafety risk assessment is the analytical backbone. The sequence is to identify the hazard, estimate the probability and consequence of exposure, implement controls matched to that estimate, and review after every incident. The assessment you complete after an exposure feeds directly back into the lab's standing risk assessment, changing SOPs, PPE specifications, or training emphasis. The same survey-based study of laboratory personnel that reported preparedness gaps also included vaccination status among the factors analyzed in relation to infection likelihood, which is a reminder that personal readiness includes keeping vaccinations and titer checks current [1].
System-level reviews reinforce the point that no single component carries the response. A scoping review of 181 articles distilled the essential components of emergency medical response systems into seven major themes and 40 sub-themes, and concluded that these components must be integrated across different settings rather than implemented in isolation [7]. At bench scale, integration means the eyewash, the kit, the form, the contact card, and the drill all exist and all connect.
Common Mistakes and Limitations
These are the errors that show up repeatedly in real exposures, phrased so you can check yourself against them.
- Delaying washing to ask permission. Wash first, tell second. No supervisor would rather you waited.
- Squeezing, sucking, or cutting a wound to express the inoculum. This damages tissue and does not remove material that has already entered cells. Wash instead.
- Using alcohol hand rub instead of soap and water. Hand rub is an adjunct for hands, and it does nothing for eyes, mouth, or wounds.
- Putting bleach or disinfectant on skin, wounds, or in eyes. That trades a biological exposure for a chemical burn.
- Cleaning the spill before washing the person. The person is always first, the source is always second.
- Dry wiping a spill. Wiping a wet spill dry generates aerosols. Cover it, wet it, then collect it.
- Handling broken glass or sharps with hands. Use tongs, forceps, or a dustpan and cardboard, every time.
- Not reporting because the agent seems harmless or you feel fine. Many exposures produce no immediate symptom, prophylaxis windows are measured in hours, and the report is what triggers protection.
- Assuming vaccination removes all risk. Antibody levels wane, breakthroughs happen, and the vaccination decision belongs to occupational health with your titer results in hand.
- Flushing eyes with a hard, high-pressure stream. Gentle flow, held eyelids, full 15 minutes. Pressure injures the cornea.
- Removing contact lenses before flushing starts. Flush first, remove lenses during flushing if they come out easily, and never let lens removal delay the water.
- Skipping documentation because nothing happened. The record drives prophylaxis, compensation, and the lab fix that prevents the next exposure.
Limitations. This guide is a bench reference for trained laboratory personnel, not a medical protocol. Your facility's exposure control plan and SOPs override anything written here, and every real exposure needs evaluation by occupational health or a clinician, because individual cases require professional medical judgment based on the agent, the route, and the person.
Frequently Asked Questions
How long should you flush your eyes after a biological splash?
Flush for a full 15 minutes at an eyewash station, holding the eyelids open so water crosses the whole eye surface. Remove contact lenses during flushing if they come out easily. Seek same-day eye evaluation if pain or vision changes persist after flushing.
Should you squeeze blood out of a needlestick injury?
No. Squeezing damages tissue and does not remove material that has already entered cells. Wash the wound with soap and running water, let it bleed briefly on its own, then apply antiseptic and a sterile dressing.
What disinfectant should you use on a biological spill?
A freshly prepared 0.5% sodium hypochlorite solution is the standard choice for most spills, with 70% ethanol for small areas and metal surfaces where corrosion matters. Cover the spill first, apply from the perimeter inward, and respect the contact time in your SOP.
Do you still need post-exposure prophylaxis if you are vaccinated?
Maybe. It depends on the agent, the exposure route, and your documented immunity, and the decision belongs to occupational health. Report every exposure regardless of vaccination status.
How soon after a lab exposure should you report it?
Immediately, during the same shift, even if the exposure seems trivial. Early reporting is what makes same-day medical evaluation and timely prophylaxis possible.
Can alcohol-based hand rub replace washing after an exposure?
No. Hand rub is an adjunct after washing, not a substitute. Running water mechanically removes inoculum, and hand rub does nothing for eyes, mouth, or wounds.
What should you do after a bite or scratch from a lab animal?
Wash the wound thoroughly with soap and running water, control bleeding with direct pressure, and report immediately. Rabies prophylaxis decisions depend on the species involved, and current rabies vaccines cover lyssaviruses in phylogroup 1 but not phylogroups 2 and 3, so give the medical team accurate information about the animal or sample.
How often should a lab practice biological exposure first aid?
Often enough that the actions are automatic, through scheduled drills where staff walk through a mock splash or needlestick and time the eyewash and reporting steps. Practical training and exercises are a named priority countermeasure for emergency response readiness.
Sources
- BIOSAFETY OF LABORATORY PERSONNEL: RISKS AND READINESS FOR EMERGENCY RESPONSE
- Emergency response to nuclear, biological and chemical incidents: challenges and countermeasures
- Emergency Response for a Laboratory Biosafety Incident.
- Systematic reporting to improve the emergency medical response to major incidents: a pilot study
- Designing a model of emergency medical services preparedness in response to mass casualty incidents: a mixed-method study
- Strengthening Biosafety and Epidemiological Surveillance of Infectious Diseases in North America: Lyssaviruses Surveillance as an Example of Emergency Preparedness and Response
- A Scoping Review of the Essential Components of Emergency Medical Response Systems for Mass Casualty Incidents