How to Build a Biosafety Training Matrix for Your Microbiology Lab
By Dr. Zubair Khalid, DVM, MS, PhD ·
By the end of this guide you will have a working, version-controlled biosafety training matrix for your microbiology lab, a grid that shows every person, every required competency, every completion date, and every expiry, and that produces a clean answer when an inspector, an accreditor, or a new hire asks who is trained on what. You will also have the biosafety risk assessment logic that justifies every row and column, so the matrix holds up under scrutiny instead of looking like a formality.
Gather these before you start: a staff roster with actual roles, the list of agents and specimen types your lab handles, your current SOP list, the incident and near-miss log, whatever training records already exist, and a spreadsheet program such as Excel or Google Sheets (a learning management system works too, and the design below ports directly into one). A small lab can build the first working version in one to two working days. Most of that time goes into the risk assessment, not the spreadsheet.
What a Biosafety Training Matrix Is (and What It Is Not)
Biosafety is the discipline of protecting laboratory personnel, the community, and the environment from biological hazards. That definition is broader than bench safety alone, and the health services waste literature treats it as spanning occupational health, community health, and environmental protection together [1]. A biosafety training matrix is the document that connects that discipline to named people. It is a grid: rows are people or roles, columns are competencies, and each cell holds a completion date, an expiry date, and a pointer to evidence.
The matrix is not a sign-in sheet, which proves attendance but not ability. It is not a calendar, which shows when sessions happen but not who needed them. And it is not a substitute for your biosafety manual or SOPs, which define how work is done. The matrix answers three audit questions in one place: who needs what training, by when, and proven how.
A workable biosafety training matrix format has two layers. The first layer is the module catalog, a controlled list of every training module the lab recognizes, each with an ID, a risk basis, an audience, an assessment method, and a renewal interval. The second layer is the assignment grid, where each person's required modules and dates live. The worked grid later in this guide doubles as a biosafety training matrix example you can copy directly into Excel or Google Sheets.
Start With a Biosafety Risk Assessment
A biosafety risk assessment is a structured judgment of what could cause harm in your lab, how likely it is, how severe it would be, and which controls reduce it. Build the matrix on this foundation, because every required module should trace back to a hazard you actually identified. Standard practice weighs four inputs: the agent, the procedure, the person, and the facility.
Agent and Procedure Factors
Agent factors include pathogenicity, infectious dose, route of transmission, stability outside the host, and whether prophylaxis or treatment exists. Biosafety references group organisms into risk groups 1 through 4, from organisms unlikely to cause disease in healthy adults up to agents that cause serious disease and spread readily. Each risk group maps to a biosafety level (BSL), BSL-1 through BSL-4, a defined combination of practices, protective equipment, and facility features. Most clinical microbiology laboratories operate at BSL-2 and apply enhanced practices for specific high-risk steps.
Procedure factors often matter more than the agent's name. Ask which steps generate aerosols (vortexing, centrifugation, heat fixing, flaming loops, decanting supernatants), which involve sharps, what volumes and concentrations are handled, and what happens if a containment barrier fails. Digesting sputum for acid-fast bacilli (AFB, mycobacterial) work, opening fungal cultures, and processing positive blood culture bottles are classic aerosol and splash points that drive agent-specific training.
Personnel and Facility Factors
Personnel factors include experience, health status, immunization history, and trainee status. Facility factors include the class and certification status of your biosafety cabinets (BSCs, ventilated enclosures that protect both worker and work, with the Class II front-access design standard in clinical microbiology), autoclave access (a pressurized steam sterilizer, classically run at 121 °C for validated cycles), hand-wash sinks, directional airflow, and entry controls.
Material state is a factor labs routinely miss. Preservation is not sterilization. In veterinary anatomy education, formaldehyde fixation suppresses microbial growth but brings its own toxic and potentially carcinogenic hazards, while saturated saline preserves tissue texture and color without sterilizing, so halotolerant (salt-tolerant) microorganisms can persist and create exposure risk for students, instructors, and staff [2]. The same logic applies to any preserved, fixed, or chemically treated material your lab receives: the treatment changes the risk profile, it does not remove the need for precautions, and that distinction belongs in your training content.
Turn Findings Into Requirements
End the risk assessment with a table of hazards, the controls that address them, and the training implication of each. Every line with a training implication becomes a module in the catalog. Aerosol-generating mycobacterial digestion becomes an agent-specific module for that bench. An autoclave as the only decontamination route becomes a waste and decontamination module with verification content. Student presence in the lab becomes a foundations module that installs the precautionary default that an unknown isolate is potentially pathogenic [3]. If a hazard carries no training implication, record that decision in writing, so the gap is a choice rather than an oversight.
Define Roles and Required Competencies
Inventory roles, not job titles. Two people with the same title can face different hazards, and the matrix should reflect what each person actually touches. Walk through the lab and list:
- Bench technologists by bench: bacteriology, mycobacteriology, mycology, molecular, identification.
- Lead technologists and supervisors, who also carry risk assessment and audit duties.
- Laboratory director or manager.
- Media and reprep staff, who handle bulk cultures and large volumes.
- Specimen receipt and processing staff, the first contact with uncontained clinical material.
- Housekeeping and facilities staff, who handle regulated waste and belong on the matrix, since the need for documented waste handling training among health care workers is explicit in the waste management literature [1].
- Students, interns, and visiting researchers.
- After-hours and emergency responders with lab access.
Then define competency tiers:
- Core, for everyone with lab access: orientation and biosafety manual, PPE (personal protective equipment, including gloves, gown, and eye protection matched to the task), waste segregation, spill response, sharps safety, and exposure and incident response.
- Bench-specific: aseptic technique, BSC operation, agent-specific modules, and instrument modules.
- Leadership: risk assessment method, recordkeeping, and audit readiness.
Build the Module Catalog
Give every module a stable ID so records stay linkable across years and staff turnover. Keep one module tied to one assessable outcome. If a module takes more than about an hour to deliver and assess, split it, because long modules produce click-through behavior instead of competence.
| Catalog field | Example entry | Why it matters |
|---|---|---|
| Module ID | BSC-220 | Stable key for records across years |
| Title | Class II biosafety cabinet operation | Removes ambiguity about scope |
| Risk basis | Aerosol-generating procedures | Ties the module to the risk assessment |
| Required for | All bench staff | Drives assignments in the grid |
| Delivery | In person, at the instrument | Sets logistics and who can teach it |
| Assessment | Direct observation checklist | Proves competency, not attendance |
| Renewal interval | 12 months | Feeds the expiry math |
Organize the catalog into families: core modules (LAB-100 series), risk assessment (RA-200), bench skills (PPE, BSC, spill, sharps), waste (WST-250), agent-specific modules (mycobacteria, fungi), instrument modules (MALDI-TOF MS), specialized modules (cell culture, nanomaterials), and leadership modules.
Choose a Format: Template, Spreadsheet, or LMS
A biosafety training matrix template can live on paper, in a spreadsheet, or in a learning management system (LMS, software that delivers courses and stores completion records).
- Paper: workable for a lab of a handful of people, weak on expiry math and evidence links.
- Spreadsheet: the practical center ground for most labs. Formulas handle expiry, filters answer audit questions, and the file moves anywhere.
- LMS: automated reminders and certificates at scale, with more setup and administration.
- Hybrid: LMS for knowledge modules, spreadsheet as the system of record for observed competencies.
Start with a spreadsheet even if you plan to move to an LMS later, because building it forces the decisions that make any system useful.
Build the Matrix in a Spreadsheet, Step by Step
The following walkthrough uses Excel or Google Sheets. The example lab has 12 staff and requires 8 core modules from everyone, with role-specific modules added per bench.
Step 1: Create the Module Catalog Sheet
Open a new workbook, rename the first tab Modules, and paste this catalog into cell A1:
module_id,title,risk_basis,required_for,delivery,assessment,renewal_months
LAB-100,"Lab orientation and biosafety manual","Any lab access","All personnel, students, visitors","In person","Sign-off",24
RA-200,"Biosafety risk assessment workshop","Supervisory duty","Supervisors, biosafety officer","Workshop","Case exercise",12
PPE-210,"PPE selection and donning/doffing","All bench work","All bench staff","In person","Direct observation",12
BSC-220,"Class II biosafety cabinet operation","Aerosol-generating work","All bench staff","In person","Direct observation",12
SPL-230,"Spill response inside and outside the cabinet","Spill hazard","All bench staff","Drill","Observed drill",12
SHP-240,"Sharps safety and exposure response","Sharps hazard","All bench staff","In person","Written test plus demo",12
WST-250,"Waste segregation and decontamination","Waste hazard","All personnel including housekeeping","In person","Written test",12
AGB-310,"Mycobacterial specimen processing","Agent hazard, AFB bench","AFB bench staff","In person","Direct observation",12
FUN-320,"Fungal cultures and dimorphic agents","Agent hazard, mycology bench","Mycology bench staff","In person","Direct observation",12
MAL-330,"MALDI-TOF MS operation and target preparation","Instrument hazard","ID bench staff","Instrument session","Direct observation",12
CLC-340,"Cell culture and immortalized lines","Cell line hazard","Cell culture staff","In person","Written test plus demo",12
Expected result: an 11-row catalog with a header row. Add a 12th module family later if your risk assessment demands it.
Step 2: Create the Matrix Grid
Rename the second tab Matrix. Put names in column A, roles in column B, start dates in column C, then one column per required module ID, then five summary columns. Enter completion dates from existing records. Leave a cell blank if training has not happened, and type NA if the module is not required for that role:
Name        Role             LAB-100     PPE-210     BSC-220     SPL-230   ...
A. Rivera   Bacteriology     2026-08-12  2026-02-03  2026-01-20  2026-03-15
J. Okafor   Mycobacteriology 2026-05-04  2026-02-03  2025-10-09  2026-03-15
M. Chen     New hire         2026-10-06  (blank)     (blank)     (blank)
Step 3: Add Summary Formulas
With module dates in D2:M2, add these in N2 through R2 and fill down. The 365 is the renewal window in days and the 335 gives a 30-day early warning:
N2  Current    =SUMPRODUCT(ISNUMBER(D2:M2)*(D2:M2>TODAY()-365))
O2  Due soon   =SUMPRODUCT(ISNUMBER(D2:M2)*(D2:M2<=TODAY()-335)*(D2:M2>TODAY()-365))
P2  Expired    =SUMPRODUCT(ISNUMBER(D2:M2)*(D2:M2<=TODAY()-365))
Q2  Missing    =COUNTBLANK(D2:M2)
R2  Status     =IF(P2+Q2>0,"Action needed",IF(O2>0,"Book refresher","Compliant"))
The ISNUMBER wrapper keeps NA cells out of the date math, because text compares as greater than any number in spreadsheet logic. Expected output for the three example rows:
Name       Current  Due soon  Expired  Missing  Status
A. Rivera      8        0        0        0     Compliant
J. Okafor      6        1        1        0     Action needed
M. Chen        2        0        0        6     Action needed
Step 4: Add Conditional Formatting
Select the module date range (D2:M13) and add two custom formula rules:
Red fill    =AND(ISNUMBER(D2),D2<=TODAY()-365)
Amber fill  =AND(ISNUMBER(D2),D2<=TODAY()-335,D2>TODAY()-365)
In Google Sheets use Format, Conditional formatting, Custom formula is. In Excel use Conditional Formatting, New Rule, Use a formula to determine which cells to format. Write the formula relative to the top-left cell of the selected range (D2 here) and leave the row reference unlocked.
Step 5: Add Module-Level Compliance
Put a summary row under the grid. For one module column (D2:D13):
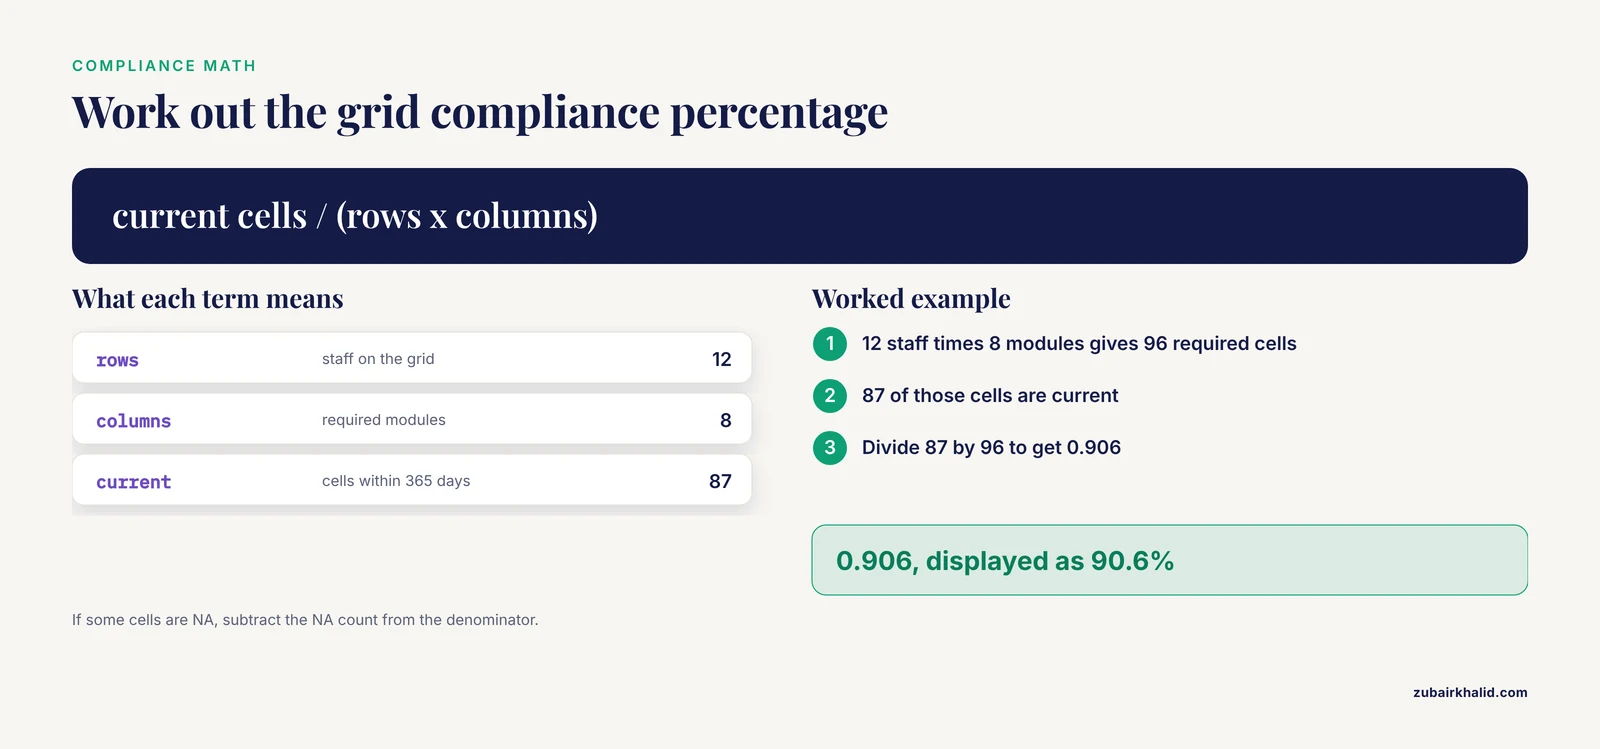
=SUMPRODUCT(ISNUMBER(D2:D13)*(D2:D13>TODAY()-365))/ROWS(D2:D13)Format the cell as a percent. For the whole grid, the worked calculation runs like this: 12 staff times 8 required modules gives 96 cells. Suppose 87 are current, 6 are due soon, and 3 are expired:
=COUNTIF(D2:K13,">"&TODAY()-365)/(ROWS(D2:K13)*COLUMNS(D2:K13))This returns 0.906, which displays as 90.6%. If some cells are NA, adjust the denominator:
=SUMPRODUCT(ISNUMBER(D2:K13)*(D2:K13>TODAY()-365))/(ROWS(D2:K13)*COLUMNS(D2:K13)-COUNTIF(D2:K13,"NA"))Step 6: Add Version Control and Sign-Off
Reserve the top three rows for metadata: matrix version, effective date, prepared by, reviewed by (your biosafety officer or biosafety committee). Freeze the name column and header rows, protect the formula columns against edits, and add a Change log tab that records what changed, when, and why.
Step 7: Check That the Result Is Right
- Sum check: Current plus Due soon plus Expired plus Missing must equal the number of required cells (96 in the example).
- Spot check one person against their paper file, date by date.
- Force a test: temporarily enter a date 366 days old in one cell, confirm the red formatting and the Expired count fire, then undo.
- Recompute one compliance cell by hand and compare.
Common Spreadsheet Errors and Fixes
- #NAME? The function name is misspelled or your Excel version lacks the function. Fix the spelling or use nested IF instead of IFS.
- #VALUE! A date is stored as text. Re-enter it as a real date, or select the column and run Data, Text to Columns, Finish with a date format.
- #REF! A referenced column was deleted. Undo immediately, then re-point the formula.
- Dates imported from CSV as text. Same Text to Columns fix, or paste-special multiply the column by 1 and reformat as date.
- Conditional formatting does not fire. The custom formula is anchored to the wrong cell. Rewrite it relative to the top-left cell of the applied range.
- Formulas error after pasting between machines. Some regional settings swap the argument separator for a character other than the comma. Type formulas directly or align the settings.
Sensible next steps after the grid works: assign an owner for each module, schedule the first refresher cycle, and put a quarterly matrix review on the biosafety committee calendar.
Verify Competency, Not Attendance
Build each module around three evidence tiers:
- Knowledge: a written or oral test against the module objectives, with a typical pass mark of 80 percent and a defined retake path.
- Skill: direct observation against a critical-steps checklist. Critical steps are the ones that cause exposure when done wrong, for example opening a fungal plate outside the cabinet, working with the BSC sash above the marked line, or handling a needle with no sharps container at the point of use. All critical steps must be performed correctly to pass.
- Response: an observed drill for spills and exposures, run at least annually.
Both the trainer and the trainee sign and date the record, and the matrix cell points to it by note or hyperlink.
Instrument and new-technology modules deserve the same shape. The internship teaching literature on MALDI-TOF MS (matrix-assisted laser desorption/ionization time-of-flight mass spectrometry, now a preferred method for rapid identification of clinical microorganisms, with simple operation, low cost, and updatable databases) sequences training from history and principles, through hands-on operation, to troubleshooting of common problems, and closes with quality control and laboratory biosafety [4]. Copy that sequence: no instrument module is complete until its biosafety capstone is observed and signed.
For students and new staff, grade the precautionary habit directly. The frugal microbiology education framework makes "unknown = potentially pathogenic" the operating rule for environmental isolates, paired with checklists and a reliable end-of-session inactivation workflow before anything goes to waste [3]. A trainee who reaches for the cabinet instead of the open bench has passed a critical step, whatever the isolate turns out to be.
New hires follow a defined path: a day-one minimum of orientation, PPE, waste, spill, and exposure response training, then supervised bench work until role-specific modules are signed, with full sign-off within 30 to 90 days depending on the role.
Match Training Depth to Biosafety Level
BSL-1 and Teaching Labs
BSL-1 work still needs real training, and the education literature shows it can be run rigorously with modest resources: safer, food-associated organisms for routine exercises, teacher-led sealed observation for environmental samples, clear biosafety boundaries, and written sterilization, disinfection, and waste protocols including inactivation of cultures before disposal [3]. If your lab hosts interns or student projects, verify this foundation on arrival rather than assuming it.
BSL-2 Clinical Work
BSL-2 is the default for clinical microbiology. Core content covers standard precautions, BSC use for aerosol-generating steps, sharps discipline, waste segregation, and the exposure response plan, with agent-specific modules layered on for the benches your risk assessment names, such as mycobacteria and mycology.
Specialized Modules
- Cell culture and immortalized lines. Where your lab maintains immortalized cell lines, training should cover the residual-risk principle that a process designed to remove a hazard cannot be assumed 100 percent effective. The cell therapy biosafety literature develops this around reversibly immortalized cells, where verification steps and layered controls such as suicide-gene safeguards are used because de-immortalization may not be complete [5]. The trainable behavior is verification: confirm the control worked, document it, and never treat a safety step as self-executing.
- Nanomaterial assays. Labs that evaluate engineered nanomaterials, for example nanoparticle formulations screened for antimicrobial or therapeutic activity, add a materials-specific module, because therapeutic nanomaterial platforms carry their own biosafety considerations in the current literature [6].
- Preserved or fixed specimens. Fold the preservation-is-not-sterilization content into specimen handling modules for any lab receiving fixed tissues or preserved materials.
Frequencies, Triggers, and Expiry Rules
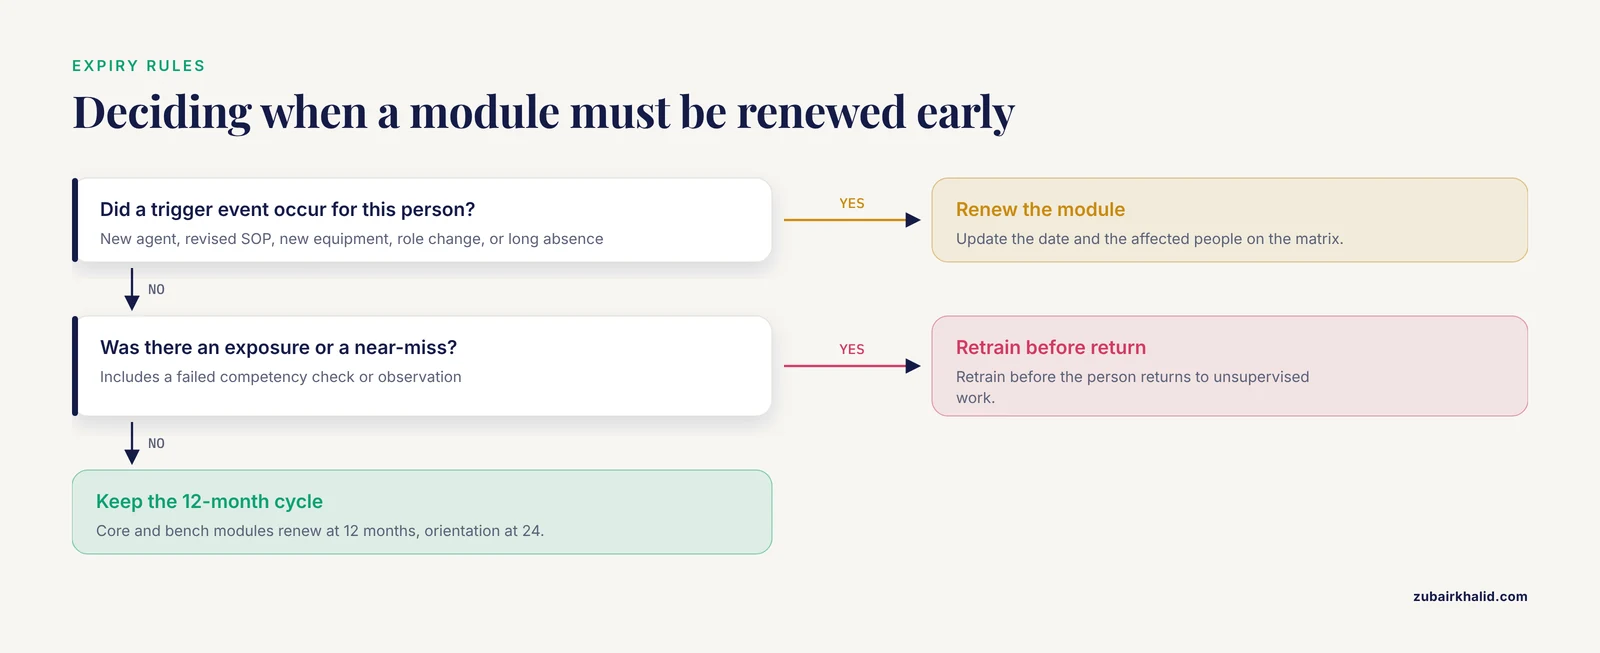
Set a default renewal of 12 months for core and bench-specific modules and 24 months for orientation-style content, and keep the intervals in the catalog so the spreadsheet math and the written policy never disagree. Then define event triggers that force earlier renewal:
- A new agent or specimen type enters the lab.
- An SOP is new or revised.
- New equipment is installed.
- An exposure or a near-miss (an event that could have caused harm but did not) occurs.
- A role changes.
- Someone returns after an extended absence.
- A competency check or observation is failed.
After any exposure, retrain before the person returns to unsupervised work.
Common Mistakes and Limitations
- Building rows from job titles instead of tasks. Two technologists on different benches need different modules, and a title-based matrix hides that.
- No expiry dates. Without them, training from five years ago looks current and the matrix quietly lies.
- Counting attendance as competency. A sign-in sheet proves presence, not skill. Pair every knowledge module with an observed or tested outcome.
- Leaving support staff off the matrix. Housekeeping, facilities, students, and visitors all touch lab risk, and waste handling training for non-bench personnel is a recognized need, not a courtesy [1].
- Letting the matrix drift from the SOPs. When a procedure changes, the related module and the affected people's renewal dates must change with it.
- Treating preserved or fixed material as risk-free. Preservation changes the risk profile, it does not sterilize the material.
- Treating any safety control as self-executing. Train people to verify that a control worked and to document the verification.
- One giant module for everything. Long, undifferentiated modules produce click-through completion and no retention.
- No version control. Without version numbers and a change log, nobody can say which matrix version an old record refers to.
This framework is a starting point, and the final requirements for your lab come from your institutional biosafety officer, your biosafety committee, and the regulations that apply to your institution.
Frequently Asked Questions
What is a biosafety training matrix?
It is a grid that maps every person in the laboratory to the specific biosafety training they must complete, with completion dates, expiry dates, and evidence for each requirement.
Who should appear on the matrix?
Everyone with routine access to the laboratory, including bench staff, supervisors, specimen processors, housekeeping, facilities staff, students, interns, and approved visitors.
How often should modules be renewed?
Most labs set a 12-month renewal for core biosafety modules, with earlier renewal triggered by incidents, new procedures, or new equipment.
What is the difference between a training matrix and a training record?
The matrix is the plan that shows who needs what and when, while training records are the dated evidence, such as signed checklists and test scores, that back each cell.
How do I decide which modules a role needs?
Run a biosafety risk assessment first, then assign every hazard with a training implication to the roles that encounter it.
What counts as proof that training worked?
A combination of a passed knowledge test, a direct observation against a critical-steps checklist, and a dated sign-off by a qualified trainer.
How do I onboard a new hire or intern without cutting corners?
Give a day-one minimum of orientation, PPE, waste, spill, and exposure response training, then keep the person under supervision until every role-specific module is signed off.
Can one template cover BSL-1, BSL-2, and BSL-3 work?
Yes, one matrix can cover all levels if the module catalog is granular enough, with separate modules and sign-offs for the higher-level practices.
Sources
- [[Health services waste management: a biosafety issue].](https://pubmed.ncbi.nlm.nih.gov/15263985/)
- Biosafety implications of cadaver preservation methods in veterinary anatomy education.
- Eco-Microbiology: A Frugal-Circular Framework for Biosafe, Low-Cost Practical Microbiology in Secondary Education.
- Matrix-Assisted Laser Desorption/Ionization Time of Flight Mass Spectrometry as Internship Teaching Content in Laboratory Medicine.
- Immortalization Reversibility in the Context of Cell Therapy Biosafety.
- Matrix metalloproteinase inhibitors (MMPIs) as attractive therapeutic targets: Recent progress and current challenges.