Biosafety Training for New Microbiology Lab Staff
By Dr. Zubair Khalid, DVM, MS, PhD ·
By the end of this guide you will be able to design, deliver, and document biosafety training for a new hire in a clinical or research microbiology laboratory. You will know what must be covered on day one, how to run a biosafety risk assessment that actually drives bench behavior, how to verify competency with direct observation instead of a signature alone, and how to assemble a training record that survives an inspection or accreditation visit.
Have the following on hand before you start: your laboratory's exposure control plan, the biosafety manual, the current package insert or SOP for every assay the new hire will touch, the chemical hygiene plan, a spill kit with a written contents list, the sharps injury log, a personal protective equipment (PPE) size chart, blank competency checklists, and the past year's incident and exposure summaries. The incident summaries matter more than most supervisors realize. They tell you which hazards your own staff actually meet, not just the hazards listed in a textbook.
Why Biosafety Training for New Lab Staff Matters
Microbiology is one of the few laboratory disciplines where the work itself generates hazard. Every primary specimen is unfiltered human or animal material, every plate is a pure culture of something, and every centrifuge spin is a chance to aerosolize an agent. Engineering controls such as biosafety cabinets and sealed rotors reduce exposure, but they only work when the person at the bench uses them correctly. Training is the control that sits upstream of every other control.
Formal biosafety teaching in US laboratories took its modern shape under occupational safety regulation, and early bench-level guidance for laboratory managers emphasized the same three parts that still define a good program today. Teach the hazard. Teach the behavior that controls it. Document both. That structure sounds simple, and it is, which is why programs fail in the execution rather than the design.
The scale of the modern training obligation is easy to underestimate. A national survey of biosafety professionals using a 51-question instrument found that nearly all senior scientists, faculty, staff, and students working in biosafety level 2 (BSL-2), animal biosafety level 2 (ABSL-2), biosafety level 3 (BSL-3), and animal biosafety level 3 (ABSL-3) laboratories are required to complete biosafety training. About three-quarters of respondents reported that a biosafety or environmental health and safety professional gives each new worker explicit instructions on how to report incidents. The same survey documented uneven coverage elsewhere, with affirmative responses dropping to roughly half of respondents from institutions with BSL-2 or ABSL-2 laboratories and 59 percent of those with BSL-3 or ABSL-3 laboratories on the remaining training practices measured. Concern over laboratory-acquired infections and delays in incident reporting drove that scrutiny at the federal level [1].
For a supervisor writing an orientation plan, the survey carries a practical message. Requiring training is nearly universal. Making the training explicit, observed, and reportable is where laboratories diverge, and that is exactly where this guide focuses.
The Core Curriculum for Microbiology Biosafety Training
A complete curriculum for microbiology biosafety training has five blocks. Each block maps to a specific bench behavior you can observe later during competency checks.
Biosafety Levels and What They Mean at the Bench
Biosafety level (BSL) describes the combination of practices, safety equipment, and facility features appropriate for work with a given agent. BSL-1 covers well-characterized agents not known to consistently cause disease in healthy adults. BSL-2 covers agents of moderate potential hazard, which describes nearly all routine clinical bacteriology, mycology, and virology work. BSL-3 covers agents that can cause serious or potentially lethal disease through inhalation. BSL-4 covers dangerous and exotic agents with high risk of life-threatening disease, and no routine clinical microbiology laboratory operates there.
A new hire in a clinical laboratory needs three sentences of orientation on this framework, not an hour of it. The sentence that matters is the local one. Most clinical microbiology benches operate at BSL-2 with BSL-2 practices and a Class II biosafety cabinet (BSC) for any manipulation that can create aerosols. Some specimens, such as respiratory material submitted for mycobacterial or systemic fungal culture, require the more protective practices associated with BSL-3 until the agent is ruled out or identified. Your SOPs already name these. The training job is to make the new hire open the SOP and find the sentence, not to recite the BSL table from memory.
Routes of Exposure
Every hazard control in microbiology maps to one of five exposure routes. New staff must be able to name them and give one bench example of each.
- Percutaneous inoculation. Needlestick during collection, scalpel cut during plating, glass Pasteur pipette breakage.
- Mucous membrane splash. Broth culture dripping during transfer, vortexed tube opening under pressure.
- Ingestion. Eating, drinking, applying cosmetics, or mouth pipetting in the laboratory. Mouth pipetting is prohibited, full stop.
- Inhalation of aerosols. Sniffing plates, which remains a surprisingly durable bad habit, vortexing without protection, flaming a loop in an open bench, centrifuge release of aerosol from an unsealed cup.
- Contact with contaminated surfaces. Gloved hand touching a phone, keyboard, or face, or a lab coat worn into the break room.
The operating rule that binds these together comes from teaching laboratories that must make safety decisions with minimal equipment. Treat anything of unknown status as potentially pathogenic until proven otherwise [2]. In a clinical laboratory that rule extends to every primary specimen, every environmental isolate, and every reagent contaminated by specimen contact.
Standard Precautions and PPE
Laboratory coat, gloves, and eye protection form the floor. Add respirators only under a written respiratory protection program with fit testing and medical clearance, and add them only where the risk assessment calls for them. Teach the new hire two behaviors rather than a list of gear. First, PPE is removed in a defined order at a defined location before hands are washed. Second, PPE never leaves the laboratory on a person. A lab coat folded over an arm walking to the cafeteria is a training failure you can see from across the hall.
Biological Safety Cabinets and Engineering Controls
The BSC is the single most-used engineering control in microbiology, and it is also the single most misused. Hands-on training must cover the difference between a BSC, which protects worker, product, and environment with filtered laminar airflow, and a chemical fume hood, which protects neither product nor worker from biological agents. Cover the sash or view-screen height, the keep-your-hands-in-and-move-them-slowly principle, the five-minute purge after work, the prohibition on open flames inside the cabinet, and the reason the cabinet must be certified after moving. A new hire who can explain why the front grille must never be blocked by an arm or a notebook understands the cabinet. One who can only recite "work in the cabinet" does not.
Decontamination and Waste
Disinfectant selection, contact time, and the workflow from bench to autoclave or regulated medical waste stream belong in the first week. Teaching frameworks built for resource-limited settings make a useful point that clinical trainers should steal. Inactivation must be a defined, verifiable end-of-process step, not an assumption made at the sink [2]. In practice that means the new hire learns which disinfectant is used on which surface, how long it must stay wet, how biohazard bags are closed and staged, and how the autoclave load is documented and verified with a biological indicator.
The Biosafety Risk Assessment: The Document Everything Else Hangs On
A biosafety risk assessment is the systematic evaluation of an agent's hazard, the procedures that create exposure opportunity, and the competence of the people performing the work. The output drives every downstream decision. Which BSL applies, which PPE is mandatory, which manipulations move into the BSC, and what the response plan is if something goes wrong. A training program that is not anchored to a written risk assessment produces staff who memorize rules without knowing why the rules exist.
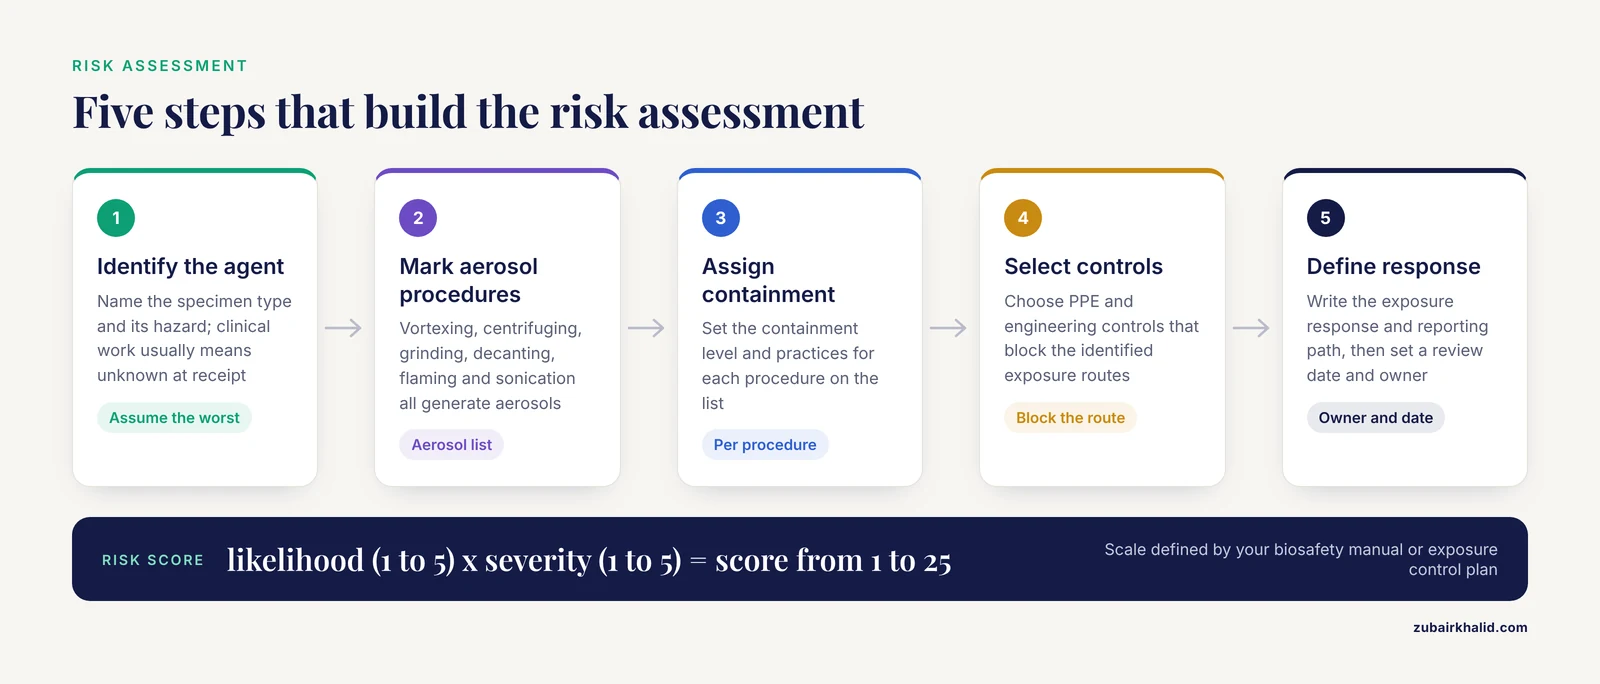
Run the assessment in five steps.
- Identify the agent or specimen type and its inherent hazard. For clinical work, the honest answer is usually "unknown at receipt," which means the assessment assumes the worst plausible agent consistent with the request.
- List the procedures and mark each one for aerosol generation. Vortexing, centrifuging, grinding, snipping prefabricated media tubing, decanting, flaming, and sonication all generate aerosols.
- Assign the containment level and practices for each procedure.
- Select PPE and engineering controls that block the identified routes of exposure.
- Define the exposure response for each route and the reporting path, then set a review date and an owner.
The severity and likelihood ratings in a risk matrix are institutional choices, not universal constants. Your laboratory's biosafety manual or exposure control plan should define the scale. If it does not, a simple likelihood times severity grid with ranks from 1 to 5, producing scores from 1 to 25, is a defensible starting format that you can document and defend. What matters for training is that the new hire watches a senior scientist fill one out, then completes one under supervision for a specimen type they will process that week.
Here is a worked example of the format, filled in for a routine respiratory specimen.
BIOSAFETY RISK ASSESSMENT - WORKED EXAMPLE
Date: ____________  Assessor: ____________  Review due: ____________

Specimen type: Sputum, submitted for routine [bacterial culture](/blog/guides/bacterial-culture)
               AFB (mycobacterial) culture not ruled out at receipt
Requesting unit: Outpatient pulmonary clinic

Agent hazard (assumed, since receipt status is unknown):
  Bacterial respiratory pathogens (moderate hazard)
  Mycobacteria (higher hazard, inhalation route)
  Systemic fungi (higher hazard, inhalation route)

Procedure-by-procedure analysis:
  1. Receipt and accessioning ........... Minimal aerosol. BSL-2 practices,
                                          gloves, lab coat, eye protection.
  2. Direct smear preparation ........... Aerosol possible during swab
                                          manipulation. Perform in Class II BSC.
  3. Digestion-decontamination .......... Reagent chemical hazard PLUS biological
                                          aerosol hazard. BSC required. Chemical
                                          hygiene plan section applies.
  4. Centrifugation ..................... Aerosol hazard on rotor failure or
                                          tube leak. Sealed cups or safety
                                          carriers mandatory. Load and unload
                                          inside BSC if SOP requires.
  5. Culture inoculation and subculture Aerosol and inoculation hazards.
                                          BSC required. No open-bench plating
                                          until AFB status resolved.
  6. Plate reading ...................... Sealed plates only. No sniffing.
                                          Report any unsolicited odor finding
                                          to supervisor immediately.

Route-of-exposure summary:
  Inhalation ............ HIGH (smear, centrifuge, plate handling)
  Percutaneous .......... MODERATE (loops, needles if inoculation requires)
  Mucous splash ......... MODERATE (liquid media, digestion reagents)
  Ingestion ............. LOW (behavioral controls, no food/drink policy)
  Surface contact ....... MODERATE (high-throughput bench, shared equipment)

PPE required: fluid-resistant lab coat, gloves, eye protection.
              Respiratory protection per written respiratory protection
              program where the SOP requires it.

Exposure response: immediate first aid per exposure control plan,
                   report to supervisor, medical evaluation same day.

Assessment outcome: ALL open-bench manipulation prohibited until AFB
                    ruled out. Assign to BSC-trained staff only.

Assessor signature: ____________  Supervisor approval: ____________
The expected output of this exercise, for training purposes, is not the completed form. It is the new hire saying out loud, when handed an unexpected specimen, "AFB is not ruled out, so this stays in the cabinet and goes to the AFB-trained bench." That sentence is the risk assessment doing its job.
Biosafety Training Format: A Day-One Walkthrough
The format that works combines a short classroom block, an equipment walkthrough, supervised bench work, and a documented emergency drill, in that order. Lecture-only orientation is the format most often cited when programs fail, because knowledge delivered without hands-on repetition decays before the first solo shift. The walkthrough below is a practical biosafety training for new lab staff example, sequenced so that each step produces a document for the training file.
- Sign in, receive the biosafety manual, and locate the exposure control plan on the shelf or intranet. Expected output, a signed acknowledgment page.
- Walk the physical safety perimeter. Emergency shower, eyewash stations, fire exits, spill kit locations, first aid station, and the BSC in the new hire's own section. Expected output, the new hire touches and operates the eyewash, not just looks at it.
- Complete respirator fit testing and medical clearance paperwork if the role requires respiratory protection. Expected output, a dated fit-test card.
- Demonstrate BSC startup, airflow check, work-zone setup, and shutdown purge at the actual cabinet the new hire will use. Expected output, a dated cabinet-use observation checklist with the trainer's signature.
- Run the spill response drill with the actual spill kit, using a simulated culture spill on a bench surface. Expected output, a completed spill drill record listing who did what, which disinfectant, and the contact time applied.
- Walk the waste stream. Bench-side biohazard bags, sharps containers, the route to the autoclave or regulated medical waste staging area, and the autoclave log. Expected output, the new hire closes a bag correctly and places a sharps container at the correct fill line.
- Hand over the incident reporting card. One laminated card or intranet link with the supervisor's name, the occupational health number, and the after-hours path. Expected output, the new hire states the three reporting steps back to the trainer without prompting.
- Review the sharps injury log and the past year's incident summaries together. Expected output, a short written note from the new hire naming the two most likely incidents for their assigned bench.
- Assign the first supervised risk assessment, using the format shown in the previous section. Expected output, a completed assessment on a real specimen type, countersigned by the trainer.
- Schedule the 30-day, 60-day, and 90-day competency checks before the new hire leaves the room. Expected output, three calendar entries and three blank checklists in the training file.
The table below summarizes how the modules fit together and what evidence each one leaves behind.
| Module | Format | Where it happens | Competency evidence |
|---|---|---|---|
| Biosafety levels and exposure routes | Short classroom session plus discussion | Training room | Written quiz |
| Exposure control plan and reporting path | Guided document walkthrough | Training room or bench | Signed acknowledgment |
| BSC operation | Demonstration then supervised practice | At the cabinet | Dated observation checklist |
| PPE selection, donning, doffing | Demonstration then practice | Bench or anteroom | Observation checklist |
| Spill response | Hands-on drill with kit | At the bench | Completed spill drill record |
| Waste segregation and decontamination | Guided walk-through with practice | Bench to autoclave | Autoclave log entry countersigned |
| Biosafety risk assessment | Supervised completion on a real specimen | At the bench | Countersigned assessment form |
| Incident and exposure response | Scenario discussion plus drill | Training room | Documented scenario response |
| 30/60/90 day follow-up | Observed bench competency checks | At the bench | Progressive competency checklists |
A Reusable Biosafety Training Template
A biosafety training for new lab staff template needs to do four things. Identify the person and role, force the trainer to check each module rather than assume it, capture the assessment method, and create a dated record an auditor can reconstruct. Below is a template in plain text that you can paste into a document, a spreadsheet, or a learning management system and adapt to local titles and SOP numbers.
MICROBIOLOGY BIOSAFETY TRAINING RECORD
Lab section: ______________________
Employee name: ____________________  Employee ID: __________
Position/start date: ______________  Supervisor: ____________
Trainer(s): _______________________

MODULE COMPLETION   (method: O = observed, D = demonstration, Q = quiz,
                     T = teach-back where employee explains the step)

[ ] 1. Biosafety manual issued and located ................  Date: ____ (D)
[ ] 2. Exposure control plan reviewed ......................  Date: ____ (D)
[ ] 3. BSL levels and local BSL assignments ................  Date: ____ (Q)
[ ] 4. Routes of exposure with bench examples ..............  Date: ____ (T)
[ ] 5. Standard precautions and PPE donning/doffing ........  Date: ____ (O)
[ ] 6. Respirator fit test and medical clearance (if req.)   Date: ____ (D)
[ ] 7. BSC operation, airflow check, purge, work zone ......  Date: ____ (O)
[ ] 8. Centrifuge safety, sealed cups, load/unload SOP .....  Date: ____ (O)
[ ] 9. Disinfectant selection and contact time .............  Date: ____ (T)
[ ] 10. Waste segregation, bag closure, sharps fill line ...  Date: ____ (O)
[ ] 11. Autoclave operation and load verification ..........  Date: ____ (O)
[ ] 12. Spill response drill with kit ......................  Date: ____ (T)
[ ] 13. Incident reporting path, verbal teach-back .........  Date: ____ (T)
[ ] 14. Exposure first aid sequence, verbal teach-back .....  Date: ____ (T)
[ ] 15. Biosafety risk assessment completed on real specimen  Date: ____ (O)
[ ] 16. Incident summary review and personal hazard note ...  Date: ____ (Q)

SUPERVISED BENCH PERIOD
Start date: ________  End date: ________
Specimen types covered: ______________________________________
Assays signed off: ____________________________________________

FOLLOW-UP COMPETENCY CHECKS
30-day check date: ____  Result: pass / remediate  Notes: ____
60-day check date: ____  Result: pass / remediate  Notes: ____
90-day check date: ____  Result: pass / remediate  Notes: ____

EMPLOYEE ACKNOWLEDGMENT
I have received and understood the biosafety training listed above,
and I know how to report an exposure or incident.
Signature: ____________________  Date: ________

TRAINER ATTESTATION
All modules above were completed as indicated.
Signature: ____________________  Date: ________
Two design choices in this template prevent the most common audit findings. Every line has a method code, so the file distinguishes between what the employee was told and what the employee was observed doing. And the teach-back method appears on the modules where recall matters most, because an employee who can explain the contact time for a disinfectant is safer than one who sat through a slide about it.
Assessing Competency and Measuring What Training Changed
A training file full of signatures proves attendance. Competency assessment proves capability, and it needs three instruments used together.
The first instrument is the written or verbal knowledge check. Keep it short, scenario-based, and tied to the local SOPs. Ask what to do when a specimen arrives with a request the bench is not trained for, not what year a standard was published.
The second instrument is direct observation at the bench. Field evaluations of newly introduced diagnostics show why observation carries so much weight. In an operational evaluation of rapid diagnostic testing for Ebola virus disease across 34 sentinel laboratories in Guinea, assessors combined technician questionnaires, evaluator checklists during site visits, and direct observation of technicians performing quality control procedures. Average technician knowledge scores were good at 6.6 out of 8, acceptability of the test was rated good, and yet 69.8 percent of technicians expressed concern for their own safety while performing it, and quality assurance had substantial room for improvement [3]. The lesson for any training program, in any country and any containment level, is that a knowledge score alone would have missed both the safety concern and the quality assurance gap. Ask the new hire directly whether any step makes them feel unsafe. Build the question into the observation checklist, because unsolicited admissions are rare.
The third instrument is the pre-training and post-training comparison, which tells you whether the training moved anything at all. The strongest published example comes from a veterinary diagnostic and vaccine institute that built an organizational biosafety and biosecurity culture from within. Four staff members previously trained in biorisk management developed and delivered training to all 173 institute personnel, divided into three groups by job description based on direct or indirect work with foot-and-mouth disease virus. The three groups received training of varying length covering biosecurity, biosafety, biorisk awareness, and insider threat. Seventy-five percent of staff completed the training, and 80 percent of those completed both a pre-training and post-training Likert-scale knowledge survey. All three groups showed improved awareness above baseline, and all three reached targeted score thresholds [4].
Adapt that pattern at laboratory scale. Give the same ten-question survey before the orientation block and again at the 30-day check. If the scores do not move, the training format is wrong, not the employee.
Building an Organizational Culture of Biosafety
Training delivered once at hire is an event. Training embedded in daily work is a culture, and the published experience of the institute described above shows the mechanism. Safety training succeeded there because it was built by staff who already held biorisk management credentials, delivered to peers segmented by their actual job duties, and measured against a baseline [4]. A clinical microbiology laboratory can copy that structure without the scale. Pick two or three senior technologists, send them through a formal biorisk management or biosafety officer course, and have them own the orientation modules and the annual refreshers rather than outsourcing the whole thing to a generic slide deck.
Culture also lives in the small permissions. A new hire who sees a senior technologist sniffing a plate has learned that the training was theater, whatever the training file says. Correct the behavior in the moment, every time, regardless of seniority. A new hire who reports a near miss and receives a thank-you rather than an interrogation will report the next one too. Incident reporting culture is built in those two interactions more than in any policy document.
Training for Incident Reporting and Exposure Response
The incident block of the curriculum has two halves, and they fail in different ways.
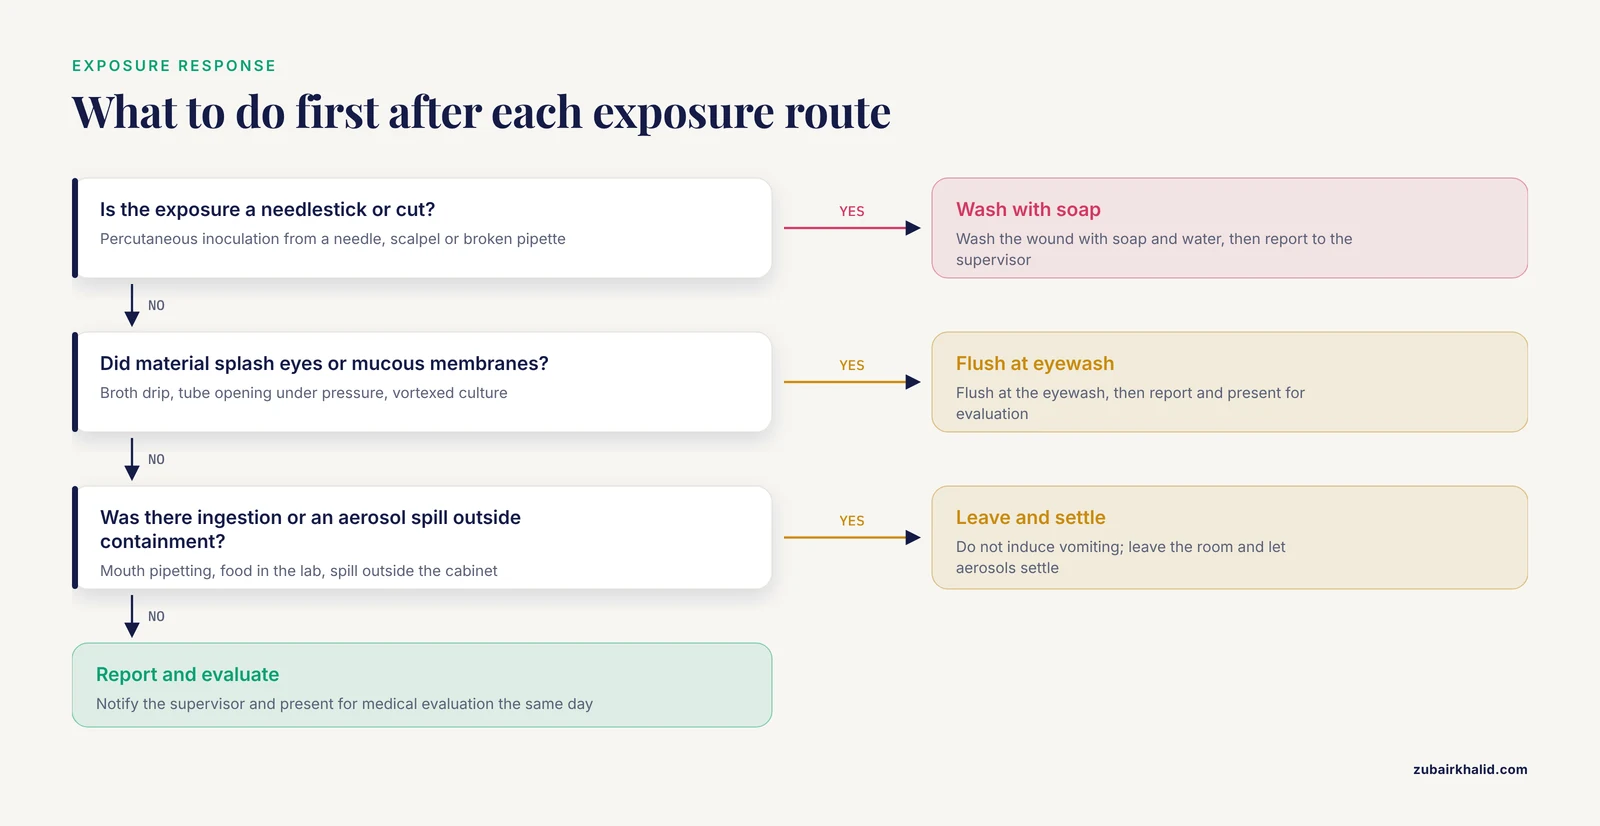
The first half is exposure response. The new hire must be able to recite, unprompted, the sequence for each exposure route. For a percutaneous exposure, the sequence is wash the wound with soap and water, report to the supervisor, and present for medical evaluation the same day. For a mucous membrane splash, flush at the eyewash and then report and evaluate. For an ingestion exposure, do not induce vomiting, report, and evaluate. For an aerosol-generating spill outside containment, leave the room, allow aerosols to settle, don protective equipment, and follow the spill SOP. These sequences come from standard occupational health practice and from your own exposure control plan, which is the controlling document. The training job is rehearsal, because the first real exposure is the worst possible time to read a procedure for the first time.
The second half is reporting. The reporting pathway must be explicit, delivered by a named person, and rehearsed. In the national survey of biosafety professionals, three-quarters of respondents confirmed that a biosafety or environmental health and safety professional gives explicit incident-reporting instructions to each new worker, and that figure represented the strongest practice measured rather than a universal one [1]. In practical terms, explicit means the new hire leaves day one knowing three things. Who to tell first. What form or system the report goes into. And that reporting a near miss with no injury is expected behavior, not an admission of fault. Laboratories that leave reporting instructions to word of mouth are the ones whose incident logs understate reality, and understated logs mean the next risk assessment is built on incomplete hazard data.
Common Mistakes and Limitations
The mistakes below account for most failed orientations in microbiology laboratories. Each one has a concrete fix.
- Lecture-only orientation. Slides are delivered, signatures are collected, and no bench behavior is verified. Fix, require an observation-coded method for every module, as in the template above.
- One-size-fits-all training. The accessioner and the mycobacteriology technologist face different hazards, and a single deck covering both teaches neither. Fix, segment by role and by direct or indirect contact with hazardous material, which is the structure that worked in the institute-level program described earlier [4].
- Copying a risk assessment from another laboratory or a textbook. A borrowed assessment lists agents your lab never sees and omits the shared centrifuge that everyone uses. Fix, write assessments on real local specimens, with the new hire watching and then performing.
- Assuming materials are safe by appearance. Materials that look clean, preserved, or processed can still harbor viable organisms, a finding documented even for chemically preserved and saline-held tissues, where preservation does not equal sterilization [5]. Fix, treat viability as an assumption that requires verification, and teach new hires that "it looks fine" is not data.
- Skipping respirator fit testing because the hire will "mostly" work at low-risk benches. Fix, fit test before the first assignment that could require it, not after.
- No scheduled follow-up. Competency decays and bad habits form in the first solo month. Fix, calendar the 30, 60, and 90-day checks on day one, before the new hire is ever alone.
- Verbal-only incident reporting instructions. Fix, a physical or digital reporting card plus a teach-back, on day one.
- No mechanism for staff to raise safety concerns. Field experience with newly introduced diagnostics shows technicians will carry safety concerns silently unless asked directly [3]. Fix, build the question into every observation checklist and keep an anonymous channel open.
- Treating the training file as complete when the last module is signed. An auditor reconstructs a program from dated records, method codes, and follow-up entries. A file with signatures and no observation evidence reads as attendance, not training.
One honest limitation. This guide describes program structure and teaching method. Individual agents, local regulations, and specific exposure events require judgment from your institution's biosafety officer, occupational health service, and medical staff, and no template replaces that judgment.
Frequently Asked Questions
How long should biosafety training take for a new microbiology hire?
Plan a structured first week rather than a single session, with a classroom block, equipment walkthroughs, supervised bench work, and a spill drill, followed by supervised bench practice before solo shifts. The total time depends on the role, and laboratories that segment training by job duties assign shorter blocks to staff with indirect hazard contact and longer blocks to bench staff [4].
What is the difference between biosafety and biosecurity?
Biosafety protects people and the environment from accidental exposure to biological agents. Biosecurity protects the agents themselves from theft, loss, or misuse. Both belong in the curriculum, and training programs that cover both plus general biorisk awareness produce measurable gains in staff awareness [4].
Do I need BSL-3 training if our laboratory is BSL-2?
You need awareness-level training on what BSL-3 means and on which local specimens or referrals trigger heightened practices, such as respiratory material where mycobacteria or systemic fungi have not been ruled out. Hands-on BSL-3 work requires dedicated, facility-specific training that only applies if your laboratory actually operates that containment level.
What should I do immediately after a needlestick or splash exposure?
Wash the wound with soap and water, or flush the affected eyes or mucous membranes at the eyewash, then notify your supervisor and present for medical evaluation the same day. Your laboratory's exposure control plan is the controlling document, and the day-one teach-back exists so this sequence is automatic under stress.
How often must biosafety training be refreshed?
Annual refresher training is the standard expectation for BSL-2 work, with additional training whenever a new agent, new procedure, new equipment, or a documented incident changes the risk profile. Scheduled competency observations at 30, 60, and 90 days after hire supplement the annual cycle.
What belongs in a biosafety training record?
Each module with its completion date and assessment method, employee and trainer signatures, the supervised bench period with assays signed off, dated follow-up competency checks, and any remediation notes. Method codes that distinguish observation from lecture attendance are the feature auditors look for first.
Who is qualified to deliver biosafety training?
Senior staff with formal biorisk management training, supported by a biosafety or environmental health and safety professional who delivers the incident-reporting instruction explicitly to every new worker. Train-the-trainer programs where credentialed staff develop and deliver the material to peers have produced measurable awareness gains in published institutional experience [4].
How do I write a biosafety risk assessment?
Identify the agent or specimen, list every procedure and mark which ones generate aerosols, assign containment and practices for each procedure, select PPE and engineering controls against the identified exposure routes, and define the exposure response with a review date and a named owner. Then have a new hire complete one on a real specimen under supervision, because completing the form is where the learning happens.
Sources
- Biosafety Training and Incident-reporting Practices in the United States: A 2008 Survey of Biosafety Professionals.
- Eco-Microbiology: A Frugal-Circular Framework for Biosafe, Low-Cost Practical Microbiology in Secondary Education.
- Operational evaluation of rapid diagnostic testing for Ebola Virus Disease in Guinean laboratories.
- Implementing an Organizational Culture of Biosafety and Biosecurity in the ŞAP Institute.
- Biosafety implications of cadaver preservation methods in veterinary anatomy education.