Signage and Labeling: A Biosafety Checklist for Your Microbiology Lab
By Dr. Zubair Khalid, DVM, MS, PhD ·
A working biosafety signage checklist turns your lab's written risk assessment into visible, unmissable instructions at the exact points where decisions happen: the door, the bench, the incubator, the waste station. When signage and labeling are done well, any trained person entering the room knows the containment level, the agents present, the required personal protective equipment (PPE, the gloves, gown, and eye protection worn to block exposure), and what to do if something spills. When they are done poorly, the gap is measurable. In a survey of 235 laboratory staff across clinical and research laboratories in Morocco, knowledge of biosafety signage and biosafety level principles reached only an intermediate level, correct in 42.1% of respondents, and only 17.4% had ever attended a formal biosafety training course [1].
This checklist is for laboratory managers, biosafety officers, bench supervisors, and educators who need to verify or rebuild the signage and labeling system in a microbiology laboratory working at biosafety level 1 (BSL-1, work with well-characterized agents not known to consistently cause disease in healthy adults) or biosafety level 2 (BSL-2, work with agents of moderate hazard such as Staphylococcus aureus, Salmonella species, or human blood and body fluids). Use it when you commission a new laboratory, after any change in the agents handled, before an external inspection or accreditation visit, and at minimum once per year as part of your scheduled biosafety review.
Time commitment. The hands-on walkthrough and checklist scoring for a single mid-sized teaching or diagnostic laboratory takes 3 to 4 hours. The full elapsed cycle, including drafting missing signs, ordering and mounting them, correcting container labels, and briefing staff, typically runs 2 to 3 weeks. Most of that elapsed time is procurement and scheduling, not bench work.
The Principle: Why Signage Is a Biosafety Control, Not Decoration
Signage is the interface between your biosafety risk assessment (the structured process of identifying what agents you work with, what harm they could cause, how exposure could occur, and which controls reduce that risk) and the person standing at your door. Three facts make this interface worth auditing seriously.
First, signage carries information that training decays. A new rotation student, a cleaning contractor, or an emergency responder cannot read your standard operating procedures in the two minutes before they touch a door handle. The door sign can. Surveys of laboratory populations consistently show uneven signage literacy. In the Taif, Saudi Arabia survey of 185 undergraduate medical science students and laboratory workers, students showed moderate to good knowledge of major laboratory signage, yet laboratory workers were generally more aware of key safety aspects than students, which is exactly the pattern you expect when signage must carry the load for people whose training is incomplete [2].
Second, signage failures cluster at predictable points: the unmarked secondary container, the household refrigerator quietly holding clinical isolates, the centrifuge rotor that nobody has labeled as an aerosol risk. Knowledge of which technical operations generate infectious aerosols (droplet nuclei small enough to be inhaled, produced by vortexing, centrifugation, sonication, and similar procedures) was the weakest area in the Morocco survey, correct in only 30.2% of respondents [1]. If staff cannot reliably identify aerosol-generating steps, the physical warnings on that equipment and on the procedure areas around it are not optional extras.
Third, signage is one of the few biosafety controls that auditors can verify in seconds from the doorway, which is why it appears in every institutional, accreditation, and funder inspection. A clean, current, internally consistent sign system also signals to inspectors that the rest of the program is likely maintained.
The principle for your checklist is therefore simple: every hazard that a person can encounter without opening a cabinet should be declared on a sign, and every hazard inside a container should be declared on that container's label.
What Drives the Sign Content: Your Risk Assessment
Never buy generic signs first. The content of every label in the laboratory flows from the risk assessment. A minimal but complete assessment for signage purposes answers five questions:
- What agents are present? List by name, including human blood, body fluids, or primary human cell cultures, which place a laboratory at BSL-2 under standard practice even when no named pathogen is in use.
- What routes of exposure are plausible? Inhalation (aerosols), ingestion (hand to mouth, contaminated gloves), percutaneous inoculation (needles, glass), and mucous membrane splash.
- What containment level applies? BSL-1, BSL-2, or higher. If the laboratory handles agents at more than one level in different rooms, each room carries its own sign.
- What PPE and entry conditions does the assessment require? This becomes the "entry requirements" block of the door sign.
- Who is accountable and who is called in an emergency? Names and telephone numbers for the laboratory supervisor, the biosafety officer, and after-hours contacts.
Run this assessment with the bench staff who actually perform the work, not in an office. Frontline staff identify the unlabeled reagent bottle on the shelf that a manager has never noticed. Write the assessment down, date it, review it annually, and update it whenever a new agent, instrument, or procedure arrives. Every sign you hang afterward should be traceable to a line in that document.
Materials, Sign Stock, and Label Supplies
The table below lists the physical materials needed to execute the full checklist. All concentrations of cleaning agents are given as working concentrations ready for use.
| Item | Specification | Used for | Practical notes |
|---|---|---|---|
| Door hazard signs | Rigid plastic or laminated card, signal word header, biohazard symbol block, blank fields for agent, supervisor, phone | Room entrance | Use wipe-clean stock. Biohazard symbol printed in a high-contrast color on a contrasting field |
| Chemical labels | GHS-style labels with red diamond pictograms, product identifier, signal word, hazard and precautionary statements | Reagent bottles, prepared stains and reagents | Print from your chemical inventory or supplier-provided label files |
| Secondary container labels | Small waterproof labels with fields for contents, concentration, hazard, date, initials | Beakers, squirt bottles, aliquots, staining jars | Solvent-resistant stock for ethanol, xylene substitutes, and fixatives |
| Biohazard waste labels and bags | Pre-printed bags and adhesive labels carrying the biohazard symbol | Infectious waste, contaminated disposables | Color convention: biohazard waste bags in a distinct color from general trash |
| Sharps container labels | Pre-printed on the container, fill-line visible | Needle and glass waste | Replace the container at the fill line, never above it |
| Equipment status tags | Reversible tags (for example "Do Not Use" on one side, "Working" on the other), lanyard or tie | Out-of-service centrifuges, incubators, autoclaves | Tag any instrument with an unresolved fault immediately |
| Storage signage | Appliance labels: "Biohazard," "Flammable Storage Refrigerator, No Food or Drink," "No Food or Drink in This Refrigerator" | Refrigerators, freezers, cold rooms | Laminated or printed on appliance-grade stock, since condensation lifts paper labels |
| Emergency equipment signs | Photoluminescent or high-contrast signs for eyewash, emergency shower, first aid, fire extinguisher, spill kit, emergency exit | Wall-mounted at each station | Keep sight lines clear. A sign behind stored boxes is a failed control |
| Autoclave indicator tape and process records | Steam chemical indicator tape plus a written log | Waste treatment verification | Tape shows whether a load was processed, not sterility. The log supplies the cycle record |
| Adhesive remover and surface cleaner | Isopropyl alcohol wipe or general laboratory surface cleaner at the manufacturer's working dilution | Removing dead labels without damaging surfaces | Follow the surface cleaner's contact time before wiping |
| Laminator or cold-seal pouches | Pouch stock sized to the sign | Durability | Cold-seal pouches avoid heat near printed toner |
| Camera and clipboard or tablet | Any | Audit documentation | Photograph each sign as installed so the "before" state is on record |
Safety note. Isopropyl alcohol and many laboratory surface cleaners are flammable. Apply them to a cloth rather than spraying near electrical outlets or open flames, and allow surfaces to dry before restoring electrical equipment to service. Never remove a label from an unlabeled chemical bottle to "check" it. An unknown chemical is handled as a hazardous unknown until your chemical hygiene officer identifies or disposes of it.
The Step-by-Step Biosafety Signage Checklist
Work through the steps in order. Each step includes the reason it matters, so a deputy can perform the audit with judgment rather than by rote.
Step 1. Assemble the reference documents and the current floor plan
Pull the risk assessment, the agent inventory, the chemical inventory, the emergency contact list, and the last inspection report. Mark each room on the floor plan. Reason: signage that is not traceable to a written assessment will drift from reality at the next agent change. The inspection report also tells you which findings recur, and recurring findings are where your effort belongs.
Step 2. Walk the entrance sequence from the corridor
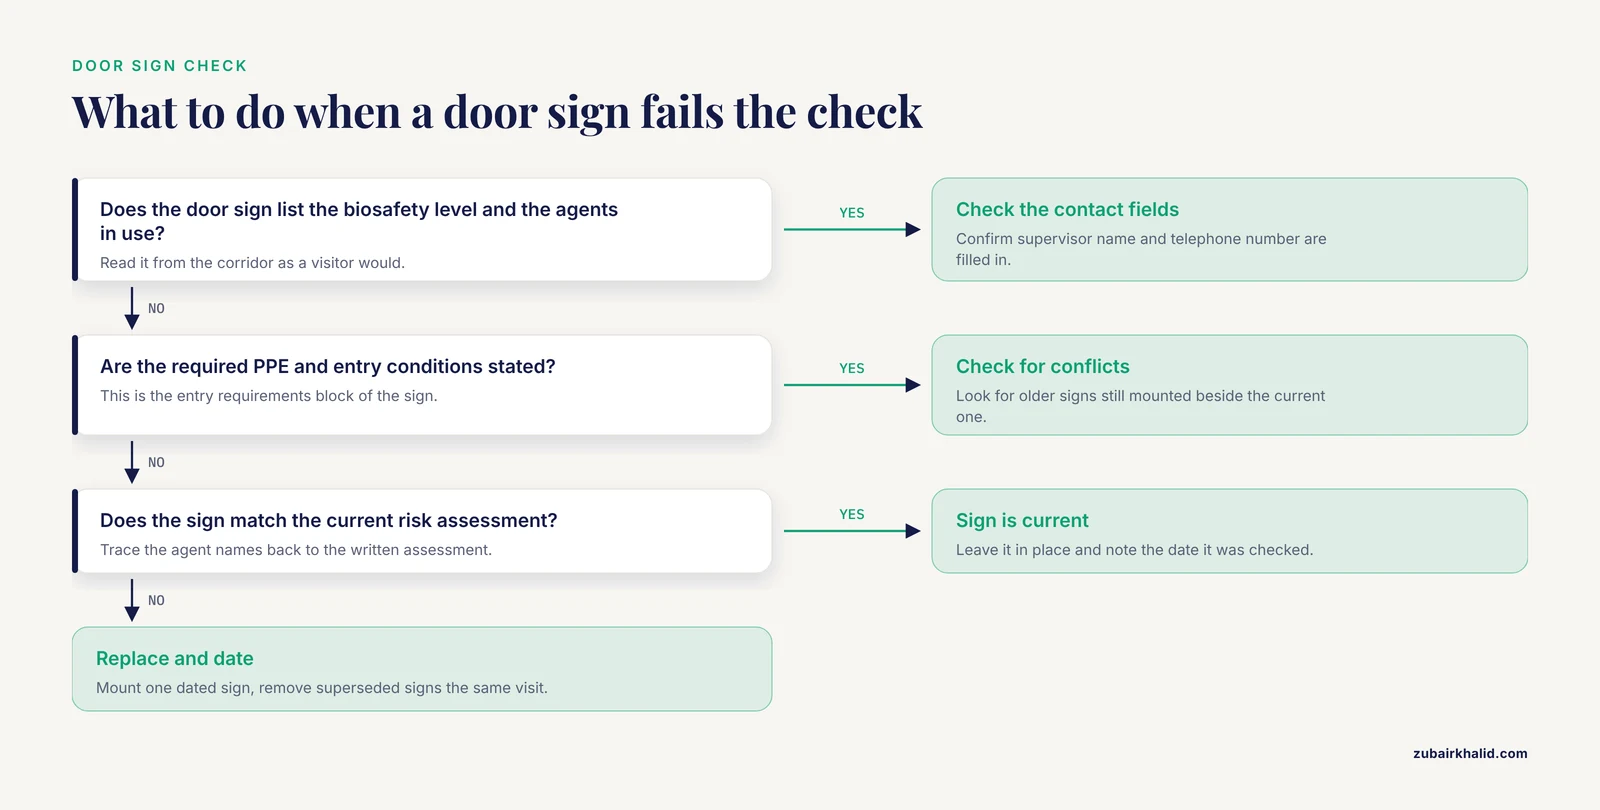
Stand where a visitor stands. Check, in order: the room identification sign, the biosafety level door sign, the emergency contact card, and the path to the exit. The door sign must state the biosafety level, the universal biohazard symbol where infectious agents are present, the agents or agent categories in use, the PPE and entry conditions required, and the supervisor's name and telephone number. Reason: the door sign is the single highest-value label in the laboratory. It is read by everyone who has never been trained in your specific procedures, including contractors and responders.
Step 3. Verify emergency equipment signs and sight lines
Confirm signs for the eyewash station, emergency shower, first aid kit, fire extinguisher, spill kit, and emergency exits. Stand two meters back and confirm each sign is visible and unobstructed. Confirm the exit path itself is clear of stored boxes. Reason: wayfinding failures surface during emergencies, when reading conditions are worst. The Taif survey found that even respondents with good general signage knowledge were deficient regarding fire extinguisher use, which supports marking the extinguisher location and pairing it with a posted quick-use reminder rather than assuming prior knowledge [2].
Step 4. Audit bench-level container labeling
Inspect every container at the bench. Open, prepared, or transferred chemicals must carry a label with the product name, concentration where applicable, hazard warning, date, and the initials of the person who prepared or filled it. Stock bottles keep their supplier GHS label intact. Any unlabeled container goes into quarantine immediately. Reason: secondary container labeling is where laboratories leak compliance fastest. Labels on beakers and wash bottles are removed by solvents and splash, and the habit of relabeling at refill is only built through routine checks.
Step 5. Audit biological materials labeling
Confirm that every container holding viable microorganisms, human-derived material, or infected tissue carries the biohazard symbol or sits inside a primary receptacle and secondary container that do. Confirm the agent name or sample type, the date, and the responsible person appear on the label. Confirm cryogenic vial boxes, incubators, and water baths holding cultures are labeled at the appliance level, not just the vial level. Reason: labels must survive even when the person who made the culture is on leave. Appliance-level labels protect the cleaning contractor and the maintenance engineer, who are the least informed people to touch that appliance.
Step 6. Audit storage appliances for the food and hazardous-storage boundary
Every refrigerator and freezer in the laboratory must carry a "No Food or Drink" label. Any unit used for flammable chemicals must be a certified flammable-storage appliance and say so on the door. Any unit holding infectious material carries the biohazard symbol. Confirm the domestic refrigerator in the break room says food only. Reason: the food-laboratory boundary is a hard rule in every laboratory safety framework because ingestion is a direct exposure route, and mixed-use refrigerators are a classic inspection finding.
Step 7. Audit waste station signage and segregation labels
Confirm that the biohazard waste stream has pre-printed biohazard bags, that sharps containers carry the biohazard symbol and a visible fill line, that a chemical waste tag system with legible full chemical names is in use, and that the autoclave area carries its operating and loading sign. Confirm the general trash stream is clearly separated and equally clearly signed. Reason: waste is the point where laboratory hazards leave the laboratory. Waste sorting knowledge can be excellent, and in the Morocco survey it was the strongest area measured, correct in 100% of respondents, which suggests that a focused, repeated message on one topic does penetrate practice. Apply that same focus to the weaker areas.
Step 8. Label aerosol-generating equipment and its zones
Confirm the biosafety cabinet carries its current certification sticker and operating notice. Confirm centrifuges, vortex mixers, sonicators, homogenizers, and blenders used with infectious material are marked to indicate that infectious aerosols can be generated and that closed-rotor or sealed-bucket practice applies. Confirm the sonicator or homogenizer, where used, sits in a designated, signed area. Reason: aerosol-generating procedures are the least intuitively understood hazard in microbiology. Signage compensates where knowledge is weakest. Aerosol-generating operations were the lowest-scoring knowledge domain in the Morocco survey at 30.2% correct [1].
Step 9. Check special-hazard signage
Confirm signage for any additional hazards present: radiation sources or licensed areas, laser equipment, ultraviolet sources in cabinets and crosslinkers (ultraviolet exposure damages eyes and skin), strong magnets on cryopreservation equipment, and compressed gas cylinders with content and hazard labels plus a restraint chain. Confirm cryogenic liquid Dewars carry asphyxiation and cold-burn warnings. Reason: biological laboratories accumulate non-biological hazards over the years, and the biological focus of the staff means these are the hazards most often left unmarked.
Step 10. Score the checklist and photograph the state
Record each item as conforming, nonconforming, or not applicable. Photograph every nonconforming item. Total the findings and rank them by risk: an unlabeled unknown chemical outranks a faded first aid sign. Reason: a scored, photographed baseline converts the audit from opinion into a tracked corrective-action list, and the photographs settle arguments about what was on the wall before the fix.
Step 11. Correct, mount, and date the new signage
Print or order the missing signs, mount them at consistent eye height, and record the installation date in the corner or on the back. Remove all superseded and conflicting signs during the same visit. Reason: two conflicting signs in one field means the reader chooses, and an untrained reader will not choose safely. A single dated source of truth per location prevents the layered-sign problem.
Step 12. Brief the staff and fold signage into microbiology biosafety training
Hold a 15 to 20 minute briefing: walk the corridor once, point out each sign type, and explain what each label means for daily work. Add the sign system to the onboarding package for every new student, employee, and visiting worker, and to the annual refresher. Reason: signage and training reinforce each other. Formal biosafety training is rare in many settings, with only 17.4% of surveyed laboratory staff in the Morocco study reporting any prior formal biosafety course [1], so the sign system has to do part of the work that a formal curriculum would otherwise do. Conversely, in the Taif survey the more experienced workers outperformed students on safety awareness [2], which is an argument for pairing every new staff member with an experienced signer of the bench rather than relying on posters alone.
Step 13. Schedule the next audit
Set the recurring date, assign an owner, and store the completed checklist with the biosafety documentation. Reason: signage decays by attrition, one refilled bottle and one departed supervisor at a time. The schedule, not the intention, is what keeps the system current.
Controls: How You Know the System Is Working
In analytical terms, your controls are verification activities that prove the signage system performs as intended rather than merely existing.
- Controlled positive. A freshly commissioned BSL-2 room with a complete door sign, labeled waste streams, and labeled appliances. Every new audit is checked against this reference standard for what "complete" looks like in your institution.
- Controlled negative. Deliberately conduct a "stranger test" twice a year. Ask a person from an adjacent laboratory who does not work in the room to read the door sign and state the biosafety level, the required PPE, and the emergency phone number without coaching. If they cannot, the sign has failed its functional test regardless of how compliant it looks on paper.
- Traceability control. Pick three random labels each audit and trace each back to a line in the current risk assessment. If a sign cannot be traced, either the assessment or the sign is stale.
- Consistency control. Confirm the same agent appears with the same name on the door sign, the inventory, and the waste labels. Divergent naming (one document says E. coli O157:H7, the door says "enterics") is an early sign of program drift.
Expected Results and How to Read Them
A conforming laboratory shows the following pattern. Every entrance declares the containment level, the biohazard symbol where relevant, the entry conditions, and a living contact name. Every bench container is labeled with contents, hazard, date, and initials. Waste streams are mutually exclusive and each carries its own symbol and wording. Aerosol-generating equipment is marked. Storage appliances carry their restriction labels. The stranger test passes. The checklist scores above roughly 95% conforming, with the remainder as scheduled corrections rather than open findings.
Intermediate states are informative. A laboratory that scores well on waste labeling but poorly on chemical secondary labeling has a training emphasis problem, not a procurement problem. A laboratory with excellent door signs but obstructed emergency equipment has an aging-and-storage problem rather than a design problem. Read the distribution of findings, not just the total, because the distribution tells you which corrective action will actually move the score.
A failing pattern, in which signs exist but contradict each other or contradict the inventory, is the most dangerous result. Contradiction trains staff to ignore signage, and an ignored sign provides no protection at all.
Troubleshooting
| Symptom | Likely cause | Fix |
|---|---|---|
| Labels peel off within weeks | Wrong stock for the environment, condensation in cold rooms, solvent contact | Switch to appliance-grade or solvent-resistant stock, use cold-seal lamination on cold-room signage |
| Door sign fields left blank (no supervisor, no agent listed) | No assigned owner for the sign, staff turnover | Assign the sign to a named role, not a person, and review the fields at every audit |
| Staff removed or covered a sign | The sign contradicted actual practice, so practice won | Treat this as a reportable finding. Reconcile the sign with the procedure or change the procedure |
| Duplicate and conflicting signs on one door | Successive campaigns never removed old material | One sign per information category per door. Remove superseded signs the same day the new one is mounted |
| Secondary containers relabeled in pencil or not at all | No label stock at the bench, no habit | Dispense secondary container labels at the point of use, beside the tape and markers, and check the bench during walkthroughs |
| Biohazard symbol used decoratively on nonhazardous items | Symbol treated as generic "science" iconography | Reserve the symbol exclusively for biological hazards. Decorative use erodes the alarm value of the real warning |
| Sharps containers overfilled past the fill line | Replacement not assigned to anyone | Assign container exchange to a named role and post the fill-line rule beside the holder |
| Emergency equipment sign obscured by stored materials | Storage creep | Mark a no-storage footprint on the floor and wall and enforce it at the annual audit |
| Sign content lags a new agent or new equipment | Risk assessment updated but signage not derived from it | Make "signage updated" a mandatory closing action of every risk assessment revision |
Variations for Different Laboratory Types
Teaching laboratories. Student turnover is total every semester. Emphasize pictogram-based signage that requires no prior vocabulary, repeat the onboarding sign briefing every term, and reserve the "no food or drink" and waste segregation labels for the most prominent positions. The evidence that students can hold good signage knowledge yet still show practical gaps [2] argues for signage reinforced by supervised practice, not signs alone.
Diagnostic clinical microbiology laboratories. Human specimens arrive continuously, so specimen-reception and transport-container labeling are part of the system, not an afterthought. Emphasize the biohazard labeling of primary specimen containers and their secondary transport receptacles, and the signage of the specimen receipt bench where packaging is opened.
Research laboratories with shared equipment rooms. Shared cold rooms, centrifuge rooms, and instrument rooms need signage that identifies which user group owns which shelf and which hazard applies to which appliance. Appliance-level labels plus a shelf-ownership map prevent the most common shared-space failure, in which one group's hazard signage is read as covering the whole room.
BSL-1 teaching or water microbiology laboratories. The biohazard symbol is often unnecessary at BSL-1 because agents are not known to cause disease consistently in healthy adults. Do not hang biohazard signs by reflex. Hang the sign the risk assessment supports. A BSL-1 room still requires chemical labeling, food-boundary signage, and emergency wayfinding.
Storage, Durability, and Maintenance of the Signage System
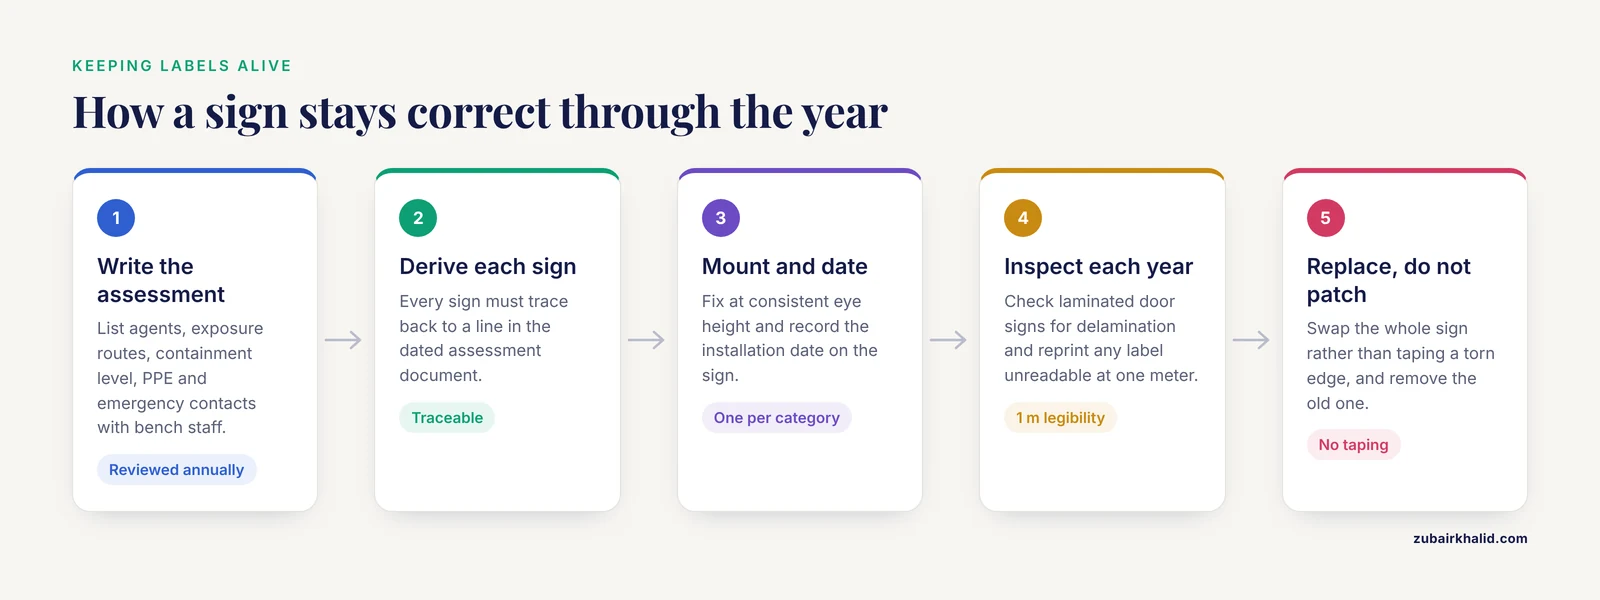
Signage is a physical inventory and needs lifecycle management. Keep a signed master file, physical or electronic, of every approved sign design so replacements are printed identically. Store blank label stock and pouches away from direct sunlight and heat, since ultraviolet exposure and heat fade printed signal words and pictograms before the substrate fails. Inspect laminated door signs annually for delamination and replace them rather than taping over a torn edge, because taped repairs collect residue and look ignored, and a sign that looks ignored is read as optional. Reprint any label where the signal word or hazard statement is no longer legible at one meter. Keep one blank set of the most used labels in the biosafety officer's drawer so a correction never waits on procurement. Review the entire sign inventory whenever the risk assessment changes, and in all cases at least annually, with the review date recorded.
Where Microbiology Biosafety Training Fits
Signage and training are one system viewed from two directions. The sign is the constant reminder. The training is what makes the reminder meaningful. Build your microbiology biosafety training so that each classroom or briefing element points at a physical sign on the following walk-through: containment levels map to door signs, chemical hazard communication maps to GHS labels and secondary containers, waste management maps to the waste station, and aerosol risk maps to the equipment markings. This pairing exploits the strongest finding in the published survey data, which is that a single tightly repeated message, such as waste sorting, can reach complete knowledge penetration in a laboratory workforce [1], while diffuse general awareness leaves individual domains like aerosol risk and signage principles far behind [1].
Train the stranger test into your students as well. A graduate who can read any laboratory door sign correctly on the first day of a new placement has learned a portable skill that will outlast the specific agents of their first job.
Common Mistakes and Limitations
These are the errors seen most often when laboratories implement a signage program, listed so you can check your own program against them.
- Hanging signs before doing the risk assessment. Generic signs from a catalog describe a generic laboratory. Yours has specific agents, specific equipment, and specific contact people. Order the assessment first.
- Treating the biohazard symbol as a universal warning. The symbol means biological hazard and nothing else. Using it on chemical waste or on a door where no biological material is handled teaches staff that the symbol is noise.
- Labeling only the primary container. An opened stock bottle refilled into a beaker, a staining jar, or a squirt bottle needs its own label. The supplier label on the original bottle does not travel with the aliquot.
- Leaving door sign fields blank. A door sign without a supervisor name and telephone number fails its core function, which is connecting an uninformed entrant to an informed person.
- Allowing sign accumulation. Laminating the new sign over the old one, or taping a notice beside three prior notices, produces a wall nobody reads. One dated sign per information category.
- Ignoring non-biological hazards in a biology lab. Ultraviolet sources, cryogenic liquids, compressed gases, and lasers injure laboratory workers regularly, and they are the hazards most often unmarked in biologically focused rooms.
- Obstructing what you have signed. A fire extinguisher sign above a stack of cardboard boxes is a documented finding waiting to happen. Signage and housekeeping are the same audit.
- Decorative or humor signage that mimics hazard formats. A joke "caution" sign in the same color scheme as real warnings degrades the response to real warnings. Keep the visual language exclusive.
- No named owner. Signage owned by "the lab" is owned by nobody. Assign each sign category to a role and put the role in the corrective-action log.
- Limitation to keep in view. A signage audit confirms the visibility of warnings, not the existence of safe behavior. PPE knowledge, for example, can be high while procedure-specific risk knowledge stays low, a combination visible in published workforce surveys [1]. Signage is one layer of a program that also needs engineered controls, validated procedures, and practiced emergency response. Individual risk decisions in a specific laboratory require judgment by a qualified biosafety professional, and this checklist supports that professional rather than replacing them.
Frequently Asked Questions
What is a biosafety signage checklist for a laboratory?
It is a structured inspection list that verifies every hazard in a microbiology laboratory is declared by a correct, current, visible sign or label, from the door sign through bench container labels to waste stream and emergency equipment markings.
What must appear on the door sign of a BSL-2 microbiology laboratory?
The biosafety level, the universal biohazard symbol where infectious agents or human-derived materials are present, the agents or agent categories in use, the required entry conditions and PPE, and the supervisor's name and telephone number with an after-hours emergency contact.
How often should laboratory signage and labels be audited?
At least annually, and additionally whenever the risk assessment changes, whenever a new agent or instrument is introduced, after any staffing change in the supervisor role, and before an external inspection.
What information must a secondary container label carry?
The product name, the concentration where applicable, the hazard warning, the date of preparation or filling, and the initials of the person who prepared or filled it, on solvent-resistant stock where the contents demand it.
Can the biohazard symbol be used on non-biological hazards?
No. The symbol is reserved exclusively for biological hazards. Using it decoratively or on chemical hazards dilutes its warning value and is a common but correctable mistake.
Who is responsible for signage compliance in a laboratory?
A named role, typically the laboratory supervisor with oversight from the institutional biosafety officer. Assigning the responsibility to a person in a specific role, rather than to "the lab," is what keeps the system current through staff turnover.
How does signage connect to microbiology biosafety training?
Each training topic should be paired with the physical sign it explains, so the door sign anchors containment-level teaching, GHS labels anchor chemical hazard teaching, and equipment markings anchor aerosol-risk teaching. The two systems reinforce each other and surveys show neither performs well alone.
What is the single most common labeling mistake in microbiology laboratories?
The unlabeled or partially labeled secondary container, typically a wash bottle, beaker, or staining jar refilled from a labeled stock bottle, is the most frequent finding. Dispensing labels at the bench and checking containers at each walkthrough corrects it.