Biosafety Incident Response Plan Template
By Dr. Zubair Khalid, DVM, MS, PhD ·
By the end of this article you will be able to draft a complete biosafety incident response plan for a microbiology laboratory, fill in every required section with your own facility details, classify a live incident in under a minute, and run a tabletop drill that tests the plan before a real spill, exposure, or security breach does. To build your plan you will need your current laboratory biosafety manual, your agent inventory, an up-to-date staff roster with after-hours phone numbers, a floor plan marked with eyewash stations and spill kits, and the copyable template included in the walkthrough below.
Federal guidance for laboratories handling dangerous biological agents has long rested on a layered model of work practices, containment equipment, facility design, and administrative controls, with security and emergency response added as distinct obligations for laboratories working with select agents [1]. A written incident response plan is the document that turns those layers into actions when something goes wrong at 2 a.m. on a holiday weekend.
What a Biosafety Incident Response Plan Actually Does
A biosafety incident is any event that could expose people, the environment, or the facility to infectious or potentially infectious material, or that compromises the containment or security of such material. In a clinical or research microbiology laboratory this includes the obvious events, such as a broth culture dropped on an open bench, and the less obvious ones, such as a centrifuge that stops with an unbalanced load and a cracked tube inside, a sharps injury during recapping, a broken vial in a shipment box, a specimen that cannot be located in the inventory, or an unauthorized person found inside a restricted suite.
The response plan is a pre-decided answer to six questions:
- Who is in charge when an incident happens?
- Who gets told, in what order, and how fast?
- What does the person closest to the event do in the first five minutes?
- When does the work area close and who has authority to close it?
- How are exposed people and contaminated spaces handled?
- What gets written down, and who reviews it afterward?
The value of writing these answers down in advance is confirmed across response disciplines. Emergency department guidance for chemical, biological, and radiological events emphasizes that response depends on clearly marked clean and contaminated zones, pre-stocked protective equipment, and staff who already understand the plan before the event [2]. Environmental health response planners reached the same conclusion from hazmat work: each incident has unique characteristics, so staff must be prepared to be flexible and adapt the response to what they find, and planning, preparation, training, and coordination are the elements that make that flexibility possible [3]. Those two ideas, a fixed structure with trained flexibility, define a good laboratory plan.
Start With a Biosafety Risk Assessment, Not With the Template
A biosafety risk assessment is the systematic evaluation of the agents you handle, the procedures that could release them, and the people, equipment, and facility that could be affected. It comes first because the incident plan inherits every important setting from it. The assessment answers, at minimum:
- Which agents are present, at what biosafety level, and where they are stored.
- Which procedures create aerosols, splashes, sharps injuries, or high sample volumes.
- Who works with each agent, including students, visitors, contract staff, and after-hours personnel.
- What the consequences of a release would be for staff, the building, the community, and, in veterinary and zoonotic work settings, animal populations.
Modern biorisk management frameworks treat this assessment as the Plan step of the Plan-Do-Check-Act cycle, the same continuous improvement loop that underpins CWA 15793, the European laboratory biorisk management standard used to harmonize laboratory response networks across national boundaries [4]. The practical consequence is that your risk assessment and your incident plan are living documents that get revised together after every incident, drill, and audit, not filed once and forgotten. Veterinary and clinical biosecurity reviews describe the same loop, paired with regular audits and standardized checklist evaluations, as the mechanism that keeps biosecurity measures aligned with real risk rather than with the risk that existed when the plan was first written [5].
Do the assessment at these trigger points, and record the date of each on the plan cover page:
- Before a new agent is introduced to the laboratory.
- When a procedure changes in a way that could increase release risk, for example moving from tube-based to plate-based workflows or adding a sonication step.
- After any incident, drill, or near miss.
- At least annually, even if nothing changed.
The Template Format: Section by Section
The biosafety incident response plan template below follows a format that maps directly onto how guidance documents and institutional oversight frameworks describe incident readiness. The emphasis on a defined incident-and-response component within broader biosafety governance is now standard in emerging-technology biosafety planning as well, where response plans appear alongside surveillance, secure storage, and data governance as required elements [6]. Copy this block into a document and replace every placeholder in square brackets.
# BIOSAFETY INCIDENT RESPONSE PLAN
Laboratory name: [lab name]
Room(s) covered: [room numbers]
[Biosafety levels](/knowledge/diagnostics/emerging-tech/biosafety-levels-1-4-a-decision-framework-for-diagnostic-laboratories) in scope: [BSL-1 / BSL-2 / BSL-3]
Plan version: [x.x]  Effective date: [date]
Review due: [date, max 12 months out]

## SECTION 1. PURPOSE AND SCOPE
This plan governs response to spills, exposures, releases,
equipment failures, specimen losses, and security events
involving infectious material handled in [lab name].
Out of scope: chemical-only spills (see [chemical hygiene plan ref])
and radiological events (see [radiation safety plan ref]).

## SECTION 2. ROLES AND CONTACTS
Incident Lead (default: senior person present):
  [name, title, cell, backup name, backup cell]
Biosafety Officer: [name, cell, email]
Principal Investigator / Laboratory Director: [name, cell]
Facility Manager (spills affecting space, HVAC): [name, cell]
Occupational Health / Employee Health: [phone, after-hours phone]
Security / Police / Fire: [911 internal protocol, non-emergency line]
Institutional Emergency Line: [number]
Select Agent Responsible Official (if applicable): [name, cell]
After-hours escalation order: [list names and numbers in order]

## SECTION 3. INCIDENT CLASSES
Class 1 (Minor): small BSL-1/BSL-2 spill inside cabinet or on
  bench, contained, no exposure, no aerosol beyond the work area.
Class 2 (Moderate): spill outside containment on open bench or
  floor, centrifuge failure with possible aerosol, splash to PPE,
  sharps injury or mucocutaneous exposure, contaminated equipment.
Class 3 (Serious): BSL-3 or select agent incident, release outside
  the laboratory, missing or stolen specimen, suspected malicious
  act, exposure requiring post-exposure evaluation.
Class assignments may be upgraded by the Incident Lead or
  Biosafety Officer at any time. Downgrades require the Biosafety
  Officer.

## SECTION 4. IMMEDIATE ACTIONS BY SITUATION
### 4.1 Splash or spill of broth or suspension on bench
  1. Alert others, stop work, keep everyone out for [X] minutes
     if aerosols are possible, per agent risk assessment.
  2. Don fresh gloves and a lab coat if the current one is soiled.
  3. Cover with absorbent material, apply disinfectant from the
     rim inward, contact time [per product label], remove,
     repeat, then normal cleaning.
  4. Dispose of all materials in biohazard waste.
  5. Wash hands, document on Incident Record (Section 8).
### 4.2 Splash to eyes, nose, mouth, or non-intact skin
  1. Flush at eyewash or sink for  minutes.
  2. Do not apply anything to the site unless directed by
     occupational health.
  3. Notify Incident Lead immediately, before continuing work.
  4. Incident Lead arranges occupational health evaluation and
     completes exposure documentation the same day.
### 4.3 Sharps injury
  1. Wash wound with soap and water, no scrubbing.
  2. Notify Incident Lead, report to occupational health the
     same day for exposure risk evaluation.
  3. Preserve the source material if available for testing
     decisions made by occupational health.
### 4.4 Aerosol-generating event (centrifuge failure, drop and
    break of a sealed tube, blender or vortex failure)
  1. Leave the room, close the door, post a do-not-enter sign.
  2. Notify Incident Lead. Allow room settling time per the
     agent risk assessment, minimum [X] minutes for BSL-2.
  3. Re-entry in full PPE, disinfect from the perimeter inward,
     discard cleanup materials as biohazard waste.
  4. Incident Lead decides whether any occupant is treated as
     exposed based on proximity and activity at the time.
### 4.5 Release outside the laboratory or into a shared corridor
  1. Evacuate the immediate area, close doors, restrict entry.
  2. Incident Lead notifies the Biosafety Officer within
      minutes.
  3. Treat as Class 3 unless the Biosafety Officer downgrades.
### 4.6 Missing, stolen, or suspected tampered specimen
  1. Verify with inventory records within [6] hours.
  2. If unresolved, Biosafety Officer notifies [institutional
     security office] the same day.
  3. No cleanup or paperwork substitutes for this notification.
### 4.7 Alarm, power loss, or flood in containment areas
  1. Secure active cultures where safely possible, leave,
     close doors.
  2. Facility Manager assesses building systems before
     re-entry into BSL-3 or animal containment space.

## SECTION 5. ZONES AND CONTAMINATION CONTROL
  Hot line established at: [describe physical boundary method]
  Clean side supplies kept at: [location of spill cart]
  Spill kit contents checked: [monthly by whom]
  PPE for entry into contaminated zone: [list per BSL level]
  All staff entering a contaminated zone must be monitored,
  and no responder stays inside longer than [X] minutes
  without relief, because heat stress in full PPE is a real
  response hazard, not a theoretical one.

## SECTION 6. EXPOSED PERSON MANAGEMENT
  First aid steps: Section 4.2 and 4.3.
  Evaluation site: [occupational health address and hours,
  after-hours destination]
  Records held by: [institution, confidentiality note]
  Animal-contact exposures in veterinary diagnostic settings
  route through the consulting veterinarian and occupational
  health jointly.

## SECTION 7. NOTIFICATION CASCADE
  Class 1: Incident Lead same day, log entry.
  Class 2: Incident Lead immediately, Biosafety Officer within
    [1] hour, department head same day.
  Class 3: Biosafety Officer immediately, institutional
    emergency line, Responsible Official for select agent
    matters per federal reporting requirements, external
    notifications coordinated by the institution, not by
    individual staff.

## SECTION 8. DOCUMENTATION
  Incident Record fields: date, time, location, agents
  involved, class, persons exposed, actions taken, notifications
  made with times, corrective actions, sign-off by Biosafety
  Officer.
  Retention: [per institutional policy, minimum stated period]

## SECTION 9. AFTER-ACTION REVIEW
  Held within  working days for Class 2 and 3.
  Outputs: corrective actions with owners and due dates,
  risk assessment update if needed, plan revision if needed.

## SECTION 10. TRAINING AND DRILLS
  New staff read this plan and complete spill response
  training before independent work.
  Tabletop drill: [annually, documented].
  Full spill drill: [annually for BSL-2 and above].

Version history:
  [x.x, date, what changed, who approved]
Every bracketed value is a decision your laboratory makes. The template fixes the structure and the sequence. Your risk assessment fixes the numbers.
Incident Classification Table
| Class | Typical trigger events | Immediate notification | Minimum documentation |
|---|---|---|---|
| Class 1 | Contained spill inside a biosafety cabinet, no exposure, BSL-1 bench clutter incident | Incident Lead, same day | Log entry in Incident Record |
| Class 2 | Open-bench spill, sharps injury, splash exposure, centrifuge failure with sealed tubes | Incident Lead immediately, Biosafety Officer within 1 hour | Full Incident Record, same day |
| Class 3 | BSL-3 or select agent event, corridor release, missing specimen, security breach | Biosafety Officer immediately plus institutional emergency line | Full Incident Record plus after-action review and risk assessment update |
Adjust the class boundaries to your agents. A Class 1 event in a laboratory handling only nonpathogenic strains of Bacillus subtilis can be a Class 3 event in a laboratory growing Salmonella enterica serotype Typhi.
Step-by-Step Walkthrough: Building the Plan
Work through these ten steps in order. Each step produces a concrete output you can check.
Step 1. Inventory the agents and assign baseline classifications
List every organism handled in the last 24 months, including quality control strains. Assign each a biosafety level from your biosafety manual. Output: a table of agent, biosafety level, procedure types, storage location.
Step 2. Write the incident classes
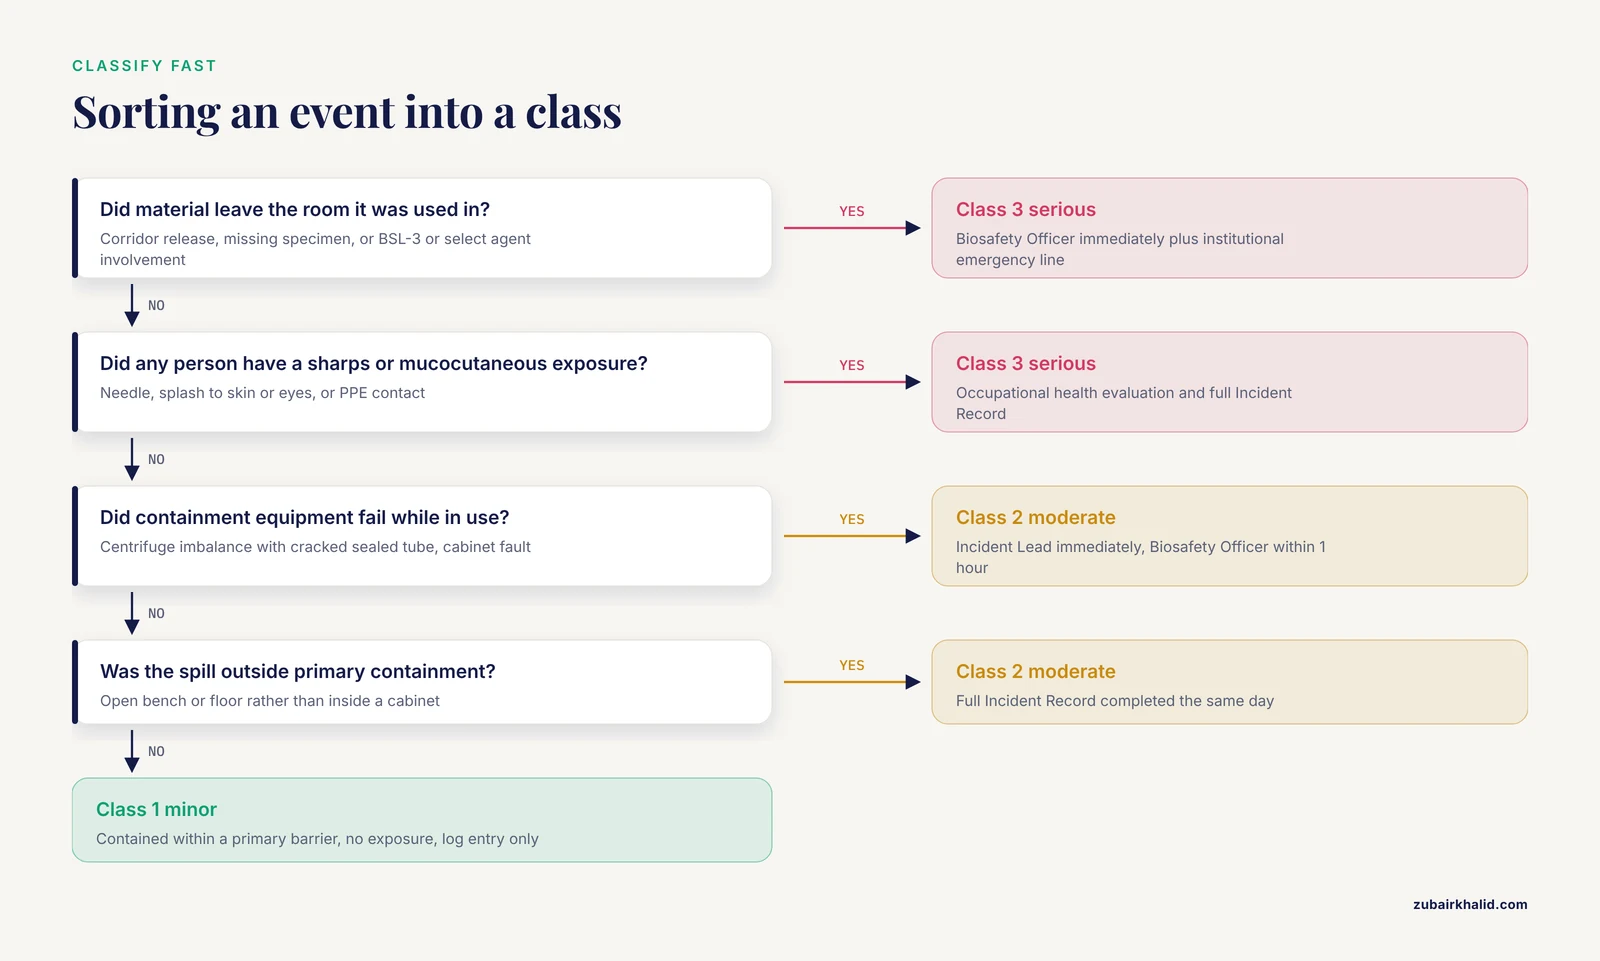
Use the three-class structure from the template. Write your class definitions in a plain text file first, then paste them into Section 3. A Class 3 definition that reads "anything the Biosafety Officer calls serious" will not survive a real event. Tie classes to observable facts.
# classification logic, example values your lab can adjust

CLASS 3 if any of:
  - agent is handled at BSL-3 or is a select agent
  - material left the room it was used in
  - a specimen is unaccounted for
  - any person had a sharps or mucocutaneous exposure
  - containment equipment failed while in use

CLASS 2 if any of:
  - spill outside primary containment on open bench or floor
  - splash contact with intact PPE or skin
  - sharps injury with a clean needle and no agent involved
    (still Class 2 because the person needs evaluation)

CLASS 1 if none of the above and the spill was contained
  within a primary barrier
Expected output after editing: three short paragraphs, one per class, each starting with "Class X means" and containing only observable criteria.
Step 3. Fill the roles section with named people, not job titles alone
"Notify the Biosafety Officer" fails when the officer is on leave. Every role gets a primary and a backup with cell numbers. Output: Section 2 complete, verified by calling each number once.
Step 4. Set the notification times
Write the maximum time between incident recognition and each notification. Keep them short and achievable. A 30-minute internal notification window for a Class 3 event is realistic. A 5-minute window that staff cannot meet trains them to ignore the plan.
Step 5. Write the immediate-action scripts
For each situation in Section 4, write the steps in the second person imperative, as if instructing a stressed colleague. Keep each step to one action. The sequence for aerosol events, leave the room first, close the door, notify, wait, re-enter with PPE, follows standard spill containment practice, and the wait time before re-entry comes from your agent risk assessment.
Step 6. Define the zones and the spill cart
Decide in advance where the hot line goes in each room, what supplies sit on each side, and who checks the spill kit monthly. Emergency response guidance stresses pre-stocked protective equipment and clear clean-versus-contaminated boundaries, and also warns that staff in full protective gear need monitoring and rotation because heat illness is a genuine hazard during prolonged response work [2]. Output: a labeled spill cart contents list taped inside the cart lid.
Step 7. Wire the exposure pathway
Confirm the occupational health phone numbers, the after-hours destination, and who transports an exposed worker if they cannot drive. Confirm the confidentiality boundary for exposure records. Output: Section 6 filled and verified.
Step 8. Build the Incident Record form
One page. Fields listed in Section 8. Test it by filling it in for a fictional event. If the form takes more than ten minutes to complete for a Class 2 spill, it is too long.
Step 9. Schedule the review cycle
Put the annual review date, the drill dates, and the trigger conditions from the risk assessment section into your laboratory quality calendar. The Plan-Do-Check-Act structure used in biorisk management standards makes the check step explicit, through gap analyses and exercises, so that the plan improves rather than decays [4]. Quality-focused biosecurity reviews recommend compliance scoring and standardized checklists as practical tools for that check step [5].
Step 10. Run a tabletop drill within 30 days of plan approval
A tabletop drill is a spoken walkthrough of a scenario, seated, with no material released. Give participants only the facts they would actually have. For example: "It is 4:45 p.m. Friday. A trainee dropped a 50 mL conical tube of liquid culture on the floor near the door. She is wearing a lab coat, gloves, and no face shield. The corridor is busy." Then watch where the plan breaks. Laboratory response network exercises, including insider-role exercises used to test biosecurity management in European reference laboratories, show that drills surface failures that document review never finds [4].
Worked Example: A Filled Template for a BSL-2 Spill
This biosafety incident response plan template example shows Sections 3, 4.1, and 7 filled in for a small clinical microbiology laboratory.
## SECTION 3. INCIDENT CLASSES (filled)
Class 1 (Minor): Spill of a BSL-2 organism contained entirely
  within a biosafety cabinet, no aerosol outside the cabinet,
  no exposure of any person. Example: tipped closed tube of
  E. coli K-12 inside the cabinet.
Class 2 (Moderate): Spill of a BSL-2 organism on the open
  bench or floor, any splash to a person's PPE or skin, any
  sharps injury in the laboratory, centrifuge imbalance with
  cracked sealed tube. Example: dropped S. aureus plate with
  visible splash on the floor.
Class 3 (Serious): Any event involving the BSL-3 room or its
  agents, any spill in a corridor, any missing specimen, any
  exposure requiring occupational health evaluation beyond
  first aid, any unauthorized person in the specimen
  receiving area.

## SECTION 4.1 (filled, BSL-2 open bench spill)
  1. Say "Spill, step back" and move people 2 meters away.
     Stop all work at the bench.
  2. Wait 15 minutes before cleanup because the agent
     assessment for S. aureus and Enterobacterales assumes
     splash-generated aerosols settle within this time.
  3. Put on fresh gloves, disposable gown, and face shield
     from the spill cart by the door.
  4. Cover the spill with paper towels. Flood the towels with
     1:10 diluted household bleach prepared fresh that day,
     from the outer edge inward. Contact time 10 minutes.
  5. Remove towels with tongs into a biohazard bag. Wipe the
     area again with fresh disinfectant, then with water and
     detergent to remove residue.
  6. Remove PPE gloves-last, bag it as biohazard waste, wash
     hands at the lab sink.
  7. Tell the Incident Lead and complete the Incident Record
     before leaving for the day.

## SECTION 7 (filled)
  Class 2: Page Dr. Renner (Incident Lead) at once, cell
  555-0142. Email Biosafety Officer Ms. Okafor within 1 hour,
  cell 555-0177, email okafor@[institution]. Copy the
  department head same day. If neither Renner nor the backup
  (Mr. Silva, 555-0155) answers within 15 minutes, call the
  Biosafety Officer directly.
Note what the filled example does that the blank template could not. It names the wait time, names the disinfectant and its preparation, fixes the contact time, and removes every judgment call from the first five minutes. That is the difference between a plan and a document.
Common Mistakes and Limitations
- Writing the plan around job titles instead of named people. Every contact line needs a name, a cell number, and a backup. Verify numbers by calling them, twice a year.
- Setting notification windows no one can meet. A plan that requires a 5-minute notification will be violated by every real incident, and staff stop reporting violations of plans they already break. Choose achievable windows.
- Omitting the aerosol wait time. The most common improvisation after a dropped culture is immediate cleanup, which is exactly wrong for an aerosol-generating event. State the minimum wait per agent class in Section 4.
- Confusing cleanup training with plan training. Staff who know how to wipe a bench still need to know who to call, when to stop work, and when to leave the room. The plan covers those decisions, the bench protocol does not.
- Skipping the after-action review. A Class 2 spill with no review is a wasted drill. The corrective actions from real events are the highest-value updates your risk assessment will ever receive, and the check step of the Plan-Do-Check-Act cycle depends on them [4], [5].
- Treating security events as someone else's plan. Guidance for laboratories working with select agents places personnel risk assessment, inventory control, and emergency response in the same management structure as biosafety [1]. A missing vial is a biosafety incident, not just a property loss.
- Copying another laboratory's plan without changing the class definitions, wait times, and contacts. Those fields encode your agents, your rooms, and your staff. A transplanted plan encodes someone else's.
- One limitation applies to the whole document. This template is a laboratory management tool, not medical advice. Decisions about post-exposure care belong to occupational health clinicians, and in veterinary diagnostic settings, questions about animal and zoonotic exposure management belong to the attending veterinarian working with occupational health.
Microbiology Biosafety Training and Drills
The plan is only as good as the microbiology biosafety training behind it. Three training tiers cover what a microbiology laboratory needs.
Tier 1, onboarding. Every new person, including students and visiting researchers, reads the plan, tours the spill carts and eyewash stations, and practices donning and doffing PPE before working with agents. For select agent work, federal guidance directs that personnel suitability and risk assessment inform who is allowed access at all [1].
Tier 2, task-specific. Hands-on spill cleanup with a noninfectious simulant, such as colored saline on a dedicated training bench, plus sharps handling and the exposure first aid steps from Sections 4.2 and 4.3. This is the tier where muscle memory forms, and it cannot be delivered by slide presentation.
Tier 3, scenario drills. At least annually, run a tabletop for a Class 3 scenario and a hands-on drill for a Class 2 spill. Document who participated, what the plan failed at, and what changed. Preparedness research across response disciplines, from hospital emergency departments to county hazmat teams, repeatedly identifies coordinated training as the decisive factor in whether plans work under stress [2], [3].
Real events supply the strongest evidence for drilled readiness. During the 2024 Marburg virus disease outbreak, Rwanda achieved an unusually low case-fatality rate through rapid nationwide expansion of molecular testing, early triage, and rapid workforce mobilization inside coordinated multisectoral structures, demonstrating that prepared systems, not improvised ones, produce good outcomes under filovirus pressure [7]. At the national scale, Korea's 2009 H1N1 response showed a deliberate, pre-planned shift from containment to mitigation as community spread outgrew containment, a strategic pivot that only works when the response plan anticipates escalation in advance [8]. Your laboratory plan should contain its own escalation logic in the same way, meaning the class definitions and notification cascade already describe what changes when a contained event becomes an uncontained one.
After-Action Review and Continuous Improvement
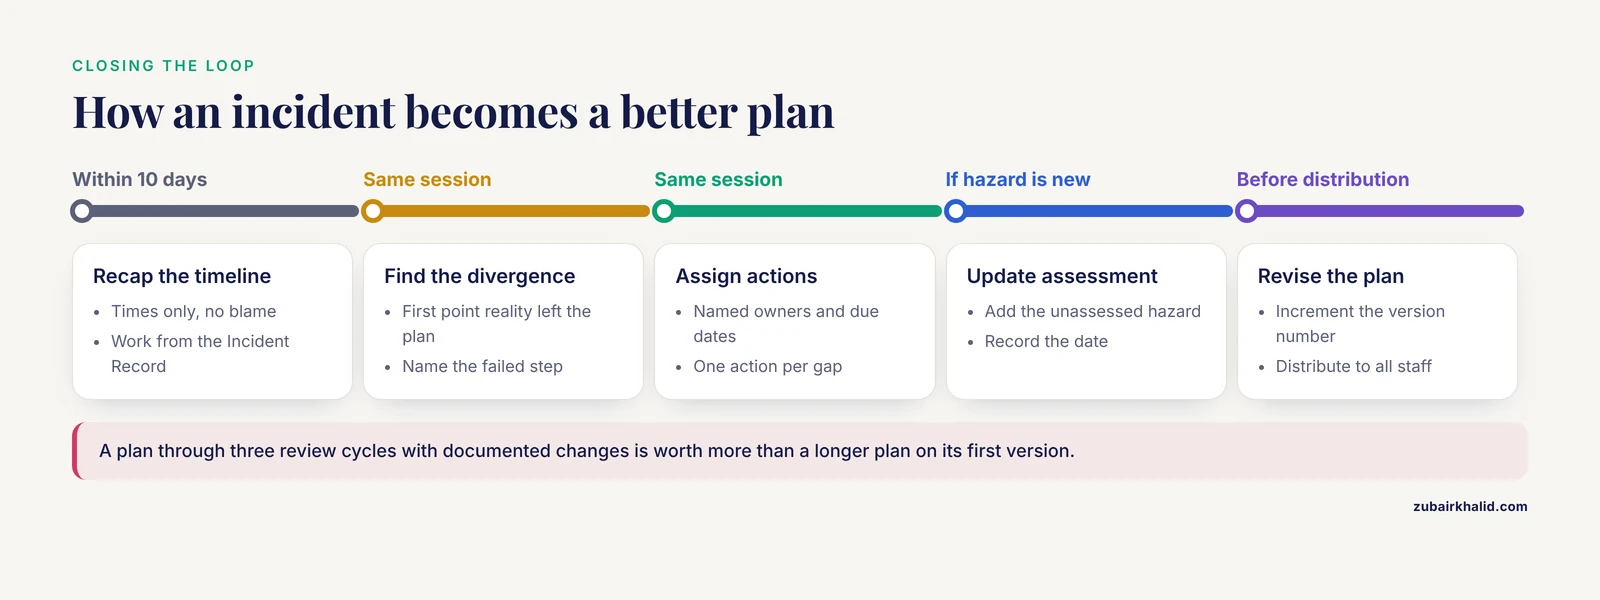
Run the review within ten working days of any Class 2 or Class 3 event or drill. Keep it short and structured.
- Recap the timeline from the Incident Record, no blame, times only.
- Identify the first point where reality diverged from the plan.
- Assign corrective actions with named owners and due dates.
- Update the risk assessment if the event revealed an unassessed hazard.
- Update the plan, increment the version number, and distribute.
This closes the Plan-Do-Check-Act loop that biorisk management standards formalize [4] and that biosecurity quality reviews operationalize through audits, compliance scoring, and standardized checklists [5]. A plan that has been through three review cycles with documented changes is worth more than a longer plan on its first version.
Frequently Asked Questions
What is a biosafety incident response plan template?
It is a pre-structured document that a laboratory fills in with its own agents, contacts, and procedures so that responses to spills, exposures, releases, and security events are decided in advance rather than improvised.
What counts as a biosafety incident in a microbiology laboratory?
Any event that could expose people or the environment to infectious material or compromise containment or security, including spills, sharps injuries, aerosol-generating equipment failures, missing specimens, and unauthorized access.
Who should be on the laboratory incident response team?
At minimum, an Incident Lead drawn from senior bench staff, the Biosafety Officer, the laboratory director or principal investigator, a facility representative for space and building systems, and the occupational health contact, each with a named backup.
How often should the plan be reviewed and drilled?
Review it at least annually and after every incident or drill, and run a tabletop drill and a hands-on spill drill each year for BSL-2 and higher workspaces.
What is the difference between a biosafety and a biosecurity incident?
A biosafety incident is an accidental exposure or release, while a biosecurity incident involves loss, theft, tampering, or unauthorized access to agents, and both belong in the same plan with the same documentation pathway.
What should a person do immediately after a splash or needlestick exposure?
Flush the site with water or eyewash for the duration specified in the plan, notify the Incident Lead before resuming work, and report to occupational health the same day for exposure evaluation.
Does a small BSL-1 spill really need documentation?
Yes, a one-line log entry, because the record establishes patterns, supports the annual risk assessment review, and proves the plan was followed if the event is ever questioned.
How does the incident plan connect to a biosafety risk assessment?
The risk assessment determines which agents, procedures, and people the plan must cover, sets the aerosol wait times and class boundaries, and gets updated from every after-action review so the two documents stay aligned.
Sources
- Laboratory security and emergency response guidance for laboratories working with select agents. Centers for Disease Control and Prevention.
- Chemical-biological-radiological (CBR) response: a template for hospital emergency departments.
- The role of environmental health personnel in hazardous materials emergency response.
- Harmonization of European laboratory response networks by implementing CWA 15793: use of a gap analysis and an "insider" exercise as tools.
- From risk to resilience: A narrative review on strengthening veterinary clinical biosecurity to prevent healthcare-associated infections.
- Reframing Technology and Ethics in Corneal Xenotransplantation: A Scoping Review of Standards and Safety in Ophthalmology.
- Rwanda's lessons for strengthening Africa's response to current Marburg virus disease outbreaks.
- [[National level response to pandemic (H1N1) 2009].](https://pubmed.ncbi.nlm.nih.gov/20383041/)