Segregation of Biological Waste in the Lab
By Dr. Zubair Khalid, DVM, MS, PhD ·
By the end of this article you will be able to set up segregation of biological waste in the lab at the bench, assign every waste stream your microbiology laboratory produces to the correct color-coded container, write a color code template your whole team can follow, validate the decontamination step that follows segregation, and audit compliance with a repeatable checklist. You will need your facility's waste management plan, color-coded bags and rigid containers, puncture-resistant sharps containers, secondary containment bins, autoclave indicator tape or biological indicators, and a printed copy of your institutional biosafety manual.
Segregation means separating waste into defined categories at the exact point where the waste is generated, before it is ever moved, mixed, or handled by anyone else. The World Health Organization advises separating medical waste into seven groups based on type, and color-coded bags and bins are the standard tool for doing this at the source [1]. When segregation fails, mixed waste exposes waste handlers to sharps injuries and infectious material, and incorrect handling of biomedical waste enables transmission of more than 30 high-risk pathogens including HBV, HCV, and HIV [2].
Why Segregation at the Source Decides Everything Downstream
Every downstream decision about your waste, from the autoclave cycle to the final disposal route, depends on what went into the bag at the bench. Studies of healthcare waste management consistently identify segregation at the point of generation as the key step, regardless of which treatment and disposal strategy a facility ultimately uses [3]. In a microbiology laboratory this is especially true because the waste stream is heterogeneous. A single bench can generate contaminated plasticware, liquid cultures, sharps, glass Pasteur pipettes, pathological or clinical specimens, chemical reagent residues, and ordinary packaging in one shift.
The economics support getting this right. Evidence indicates that color-coded segregation systems are an inexpensive and effective method for improving compliance and achieving sustainable waste management [4]. In high-income settings where color coding is backed by regulation, training, and monitoring, compliance with segregation systems approaches 90 percent, while in lower-resource settings compliance drops to roughly 60 to 80 percent, largely because of poorly trained personnel and weak enforcement [4]. The lesson for any laboratory is that the color codes themselves are cheap. The training and enforcement around them are what produce compliance.
Failure at the bench is expensive downstream. When infectious waste ends up in the general trash, waste workers who have no biosafety training handle it. When general waste ends up in the infectious stream, the facility pays to autoclave or incinerate material that never needed treatment, which erodes trust in the system and encourages people to cut corners. A systematic review of 32 studies on healthcare waste management found common deficiencies in poor implementation of color-coding systems, inadequate storage and collection methods, insufficient staff training, and heavy reliance on incineration and open burning, with only a minority of facilities integrating reuse or recycling approaches [5].
Waste Categories in a Microbiology Laboratory
Before assigning colors, your biosafety risk assessment must define the categories your laboratory actually generates. A biosafety risk assessment is the structured process of identifying the infectious agents and hazardous materials you work with, evaluating the exposure routes, and selecting controls, of which waste handling is one. Most clinical and research microbiology laboratories generate some or all of the following streams.
- Infectious laboratory waste. Cultures and stocks of infectious agents, contaminated plasticware such as pipette tips and culture plates, inoculating loops, contaminated PPE, and any item that contacted a BSL-2 or higher material.
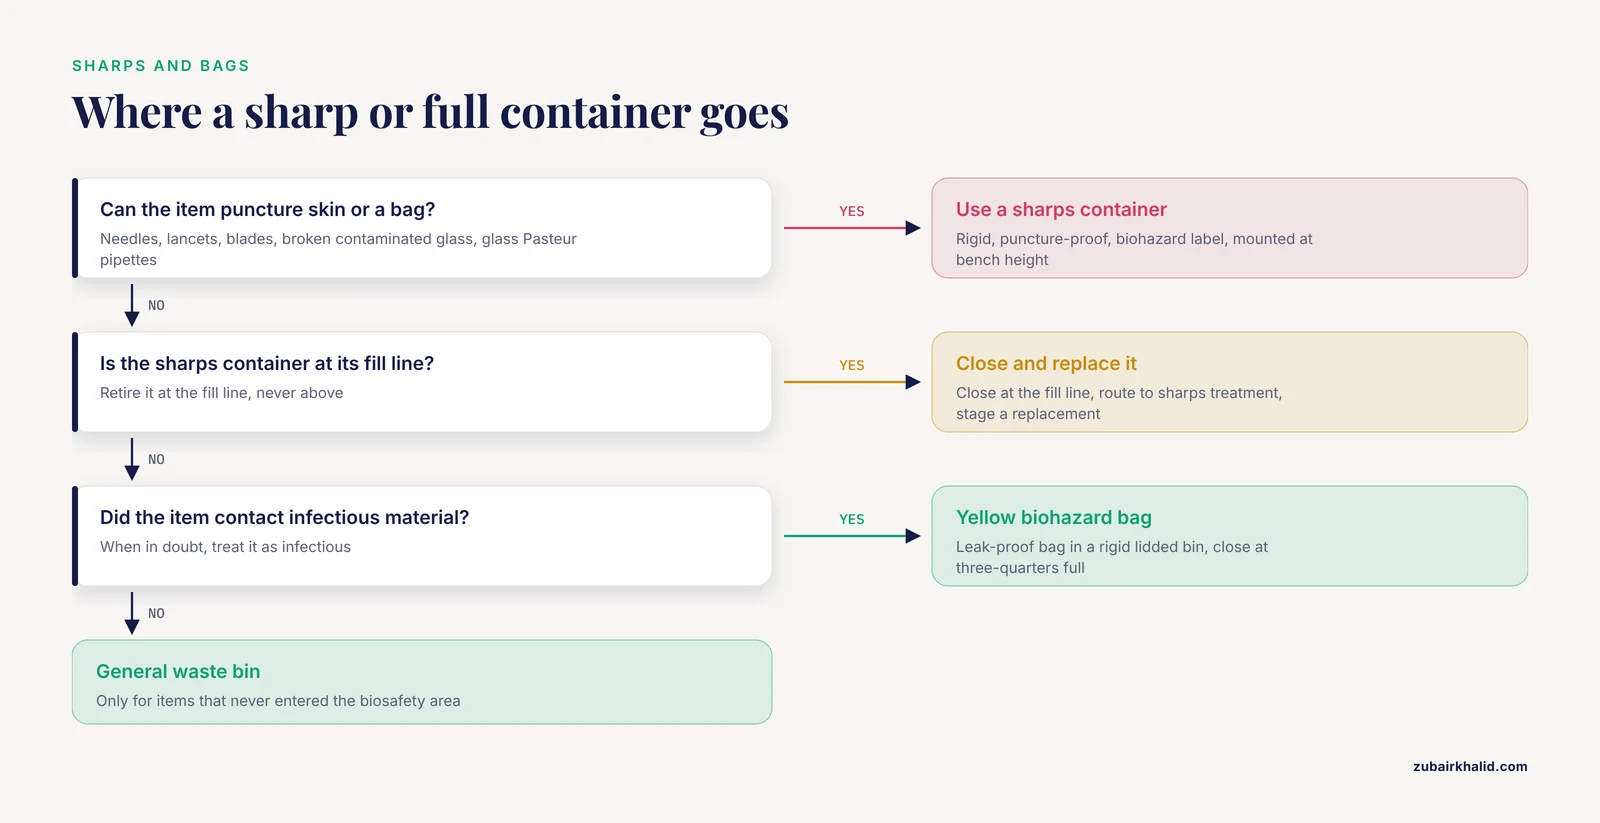
- Sharps. Needles, lancets, scalpel blades, broken contaminated glass, and glass Pasteur pipettes. Sharps are defined by the ability to puncture skin or a bag, not by whether the item is visibly contaminated.
- Pathological waste. Tissues, organs, body parts, carcasses, and fluids removed during procedures. In a diagnostic microbiology lab this includes unfixed human or animal specimens.
- Blood and body fluid waste. Blood bags, blood-contaminated items, specimen containers, and suction tubing. Blood bank operations generate this stream in volume, and effective segregation at the source with color-coded containers and strict labeling is essential there to prevent cross-contamination [6].
- Chemical waste. Spent stains, fixatives, disinfectant solutions, solvent residues, and reagent waste. Chemical and pharmaceutical wastes require specialized treatment distinct from the infectious stream [6].
- Pharmaceutical waste. Expired antibiotics, control reagents, and contaminated medicinals. Pharmaceutical waste management relies on a systematic process of segregation, secure storage, transportation, and disposal tailored to whether the waste is hazardous, and segregation is usually accomplished through color-coded containers [7].
- General non-hazardous waste. Packaging, paper, uncontaminated gloves used only for clean tasks, and office waste.
The distinction between infectious and non-infectious streams matters operationally. In one tertiary hospital study, segregation performance varied by department and the absence of clearly provided infectious waste bins and non-infectious waste bins each independently increased the likelihood of improper segregation, while the mere presence or absence of red or black plastic bags in bins had no significant effect [8]. The container system, not just the bag color, drives behavior.
Biological Waste Segregation Color Codes
Color codes work because they remove a decision from every waste-handling moment. A person holding a contaminated plate should not need to reason about disposal routes. The bag color should decide for them. The specific mapping of color to waste type is set by national and local regulation and by your institutional waste management plan, and it varies between jurisdictions and between facilities. The table below presents the format most widely used in clinical and laboratory settings. Adopt it only after confirming it matches your institutional and local requirements, and document that decision in your biosafety manual.
| Color | Waste category in this format | Typical microbiology examples | Required container | Default treatment route |
|---|---|---|---|---|
| Yellow | Infectious and clinical waste requiring decontamination | Contaminated plasticware, cultures, contaminated PPE, specimen waste | Leak-proof biohazard bag in a rigid secondary bin with a biohazard-labeled lid | Autoclave, then disposal as regulated medical waste or incineration |
| Yellow, puncture-proof | Sharps | Needles, blades, contaminated broken glass, glass Pasteur pipettes | Rigid, puncture-resistant sharps container with biohazard label and fill line | Autoclave or incineration as sharps, never compacted |
| Yellow (separate stream) or dedicated pathological container | Pathological waste and carcasses | Tissues, animal carcasses, unfixed specimens | Rigid, leak-proof, labeled container, often refrigerated storage before removal | Incineration, alkaline hydrolysis, or validated carcass autoclave cycle |
| Red | Potentially infectious plastic waste routed to treatment before disposal | Fluid-filled tubing, IV sets with blood, contaminated recyclable plastics where local rules allow | Red biohazard bag in rigid holder | Decontamination or regulated treatment per local rule |
| Blue | Glassware and non-sharp glass intended for decontamination and reuse | Contaminated reusable glass bottles and jars (where the local scheme assigns blue to glass) | Rigid bin or dedicated bag | Decontamination, washing, and reuse or recycling |
| Black or clear | General non-hazardous waste | Packaging, paper, uncontaminated items | Standard waste bin | Municipal solid waste stream |
| Dedicated chemical-labeled container | Chemical waste | Spent stains, fixatives, disinfectants, solvents | Chemically compatible rigid container with hazard label | Chemical waste vendor or on-site neutralization per the waste management plan |
Three notes on this table. First, some national schemes compress this into fewer colors, and the 2008 Medical Waste Management Rules in Bangladesh, for example, implemented a yellow, red, and blue segregation scheme [4]. Second, some schemes add purple or other colors for cytotoxic and highly hazardous pharmaceutical waste, which is managed through specialized treatment modalities including high-temperature incineration, autoclaving, and chemical disinfection [9]. Third, a single laboratory can run several of these schemes at once if it sits inside a larger hospital, so confirm which scheme governs your specific room before installing bins.
Biological Waste Segregation Color Codes Example
Here is a worked example for a typical BSL-2 diagnostic bacteriology bench performing culture and identification work. Read it as a model you can adapt.
| Item generated at the bench | Correct stream | Why |
|---|---|---|
| Blood agar plate with cultured Staphylococcus after workup | Yellow biohazard bag | Culture material contaminated with a moderate-risk agent |
| Used pipette tip that aspirated the culture | Yellow biohazard bag (into a sharps-safe tip discard pan if it can pierce the bag) | Contaminated plastic, non-sharp |
| 1 mL syringe with needle used to inoculate a blood culture bottle | Puncture-proof sharps container | Needle punctures skin and bags |
| Broken contaminated glass slide | Puncture-proof sharps container | Contaminated broken glass is a sharp |
| Unopened, unused agar plate from an expired lot | Black or clear general waste, or per local rule for media | Not contaminated, not hazardous |
| Giemsa stain working solution discarded from a tray | Chemical-labeled container | Chemical hazard, not infectious |
| Specimen swab transport tube after inoculation | Yellow biohazard bag | Clinical specimen container, infectious category |
| Outer cardboard packaging from media shipments | Black or clear general waste or recycling | Never entered the biosafety area |
The Color Code Format and Template
A usable color code template is a one-page bench document that names each stream, the container, the do-not list, and the treatment route. It must be short enough that a new employee can follow it on day one. The format below is a fill-in template you can copy directly into your biosafety manual or print as a bench card.
BIOLOGICAL WASTE SEGREGATION TEMPLATE  (Facility: ______  Room: ______)
Effective date: ____  Approved by: ____  Review due: ____

STREAM 1  INFECTIOUS SOLID
  Color: ______________
  Put in: leak-proof biohazard bag in rigid lidded bin
  Examples: ______________________
  Never put in this bag: sharps, chemicals, PPE worn only for clean tasks
  Treatment: autoclave or regulated treatment, route: ______________

STREAM 2  SHARPS
  Color: ______________
  Put in: rigid puncture-proof sharps container
  Examples: ______________________
  Close and retire container when waste reaches the fill line, at ______ full
  Treatment: ______________

STREAM 3  PATHOLOGICAL / CARCASSES
  Color: ______________
  Put in: rigid leak-proof labeled container, stored at ____ C
  Examples: ______________________
  Treatment: incineration / alkaline hydrolysis / validated autoclave cycle

STREAM 4  CHEMICAL
  Color/label: ______________
  Put in: compatible container, hazard label required
  Examples: ______________________
  Treatment: ______________

STREAM 5  GENERAL
  Color: ______________
  Put in: standard bin
  Rule: when in doubt whether an item contacted infectious material,
  place it in STREAM 1, not the general bin
And here is the same template filled in for the example BSL-2 bacteriology bench, which you can treat as a second worked example.
BIOLOGICAL WASTE SEGREGATION TEMPLATE  (Facility: University Diagnostic Lab, Room 214)
Effective date: 2026-11-11  Approved by: Biosafety Officer  Review due: 2027-11-11

STREAM 1  INFECTIOUS SOLID
  Color: Yellow
  Put in: biohazard bag in rigid lidded bin, bin label: BSL-2 INFECTIOUS SOLID
  Examples: cultures, plates, tubes, contaminated gloves and gowns, swabs
  Never put in this bag: needles, blades, chemicals, sharps of any kind
  Treatment: autoclave at 121 C, 15 psi, verified cycle, then regulated disposal

STREAM 2  SHARPS
  Color: Yellow puncture-proof container
  Put in: FDA-cleared sharps container mounted at bench height
  Examples: needles, scalpel blades, broken glass, glass Pasteur pipettes
  Retire container when waste reaches the fill line, at three-quarters full
  Treatment: autoclave or incineration as sharps, never compacted

STREAM 3  PATHOLOGICAL
  Color: Yellow, dedicated rigid container, label: PATHOLOGICAL
  Put in: leak-proof container, hold at 4 C until pickup
  Examples: animal tissues, unfixed human specimens
  Treatment: alkaline hydrolysis unit, Room 118

STREAM 4  CHEMICAL
  Color/label: white jerrican, hazard label: FLAMMABLE or CORROSIVE
  Put in: chemically compatible container in flammables cabinet
  Examples: spent fixative, used staining solutions
  Treatment: chemical waste vendor pickup, first Tuesday monthly

STREAM 5  GENERAL
  Color: Black
  Put in: standard bin, label: GENERAL
  Rule: when in doubt, use STREAM 1
Step-by-Step Walkthrough: Installing Segregation at a Bench
This walkthrough takes you from an empty bench to a functioning, auditable segregation system. Work through it once per room. The steps assume a BSL-2 microbiology laboratory and adapt directly to other containment levels.
Step 1. Complete the biosafety risk assessment for the room
List every agent and hazardous material handled in the room, the procedures that generate waste from each, and the volume of each waste stream per week. A bench generating weekly volumes of roughly 2 to 3 cubic feet of infectious solid waste and fewer than 50 sharps items needs a different bin size and pickup frequency than a bench running 200 blood cultures per day. Record the risk group of each agent and the required containment practices, since the risk assessment determines which streams are treated as infectious at all.
Expected output: a completed risk assessment table in your biosafety manual, listing agents, procedures, waste streams, and weekly volumes.
Step 2. Assign each stream a color and a container type
Using the table above and your local scheme, assign every stream from Step 1 to a color and container. The container decision is not cosmetic. The hospital study cited earlier found that simply providing the correct infectious and non-infectious waste bins was what moved segregation performance, because missing bins roughly doubled the likelihood of improper segregation, with an adjusted odds ratio of 2.273 for missing infectious waste bins and 1.476 for missing non-infectious waste bins [8]. Buy rigid, lidded, labeled secondary containers for every bag. A bag hanging open on a stand is an invitation to missegregation.
Expected output: a filled copy of the color code template above, signed by the biosafety officer.
Step 3. Physically place the system at the point of generation
Position bins within arm's reach of where each waste type is actually created, not at the room exit. Sharps containers mount at bench height near the procedures that use sharps, never on the floor and never above shoulder height. Every bin gets a label that states the stream name, the color, and a short example list. Post the one-page color code template on the wall next to the bins.
Expected output: a photograph or floor plan of the room showing each bin's location, kept in the biosafety file for audit purposes.
Step 4. Line and prepare containers correctly
Fit bags into their rigid holders with enough overhang to close without tearing. Never overfill a biohazard bag. The standard practice is to close and remove the bag when it is about three-quarters full, because an overfilled bag cannot be tied securely without hand contact near the contents. When closing, twist the bag, fold the twist over, and secure with a gooseneck tie or bag tape. Wear the same PPE for closing bags that you wore for the work that generated the contents.
Expected output: bags that are closed, labeled if your scheme requires generator labeling, and standing free of the bench surface.
Step 5. Route each closed container to its treatment step
Infectious solid waste goes to the autoclave room or the regulated medical waste pickup point. Sharps containers go to the treatment route designated for sharps, and are never opened, compacted, or decanted. Chemical waste goes to the labeled accumulation point with intact hazard labels. General waste goes to the municipal stream only if you are certain nothing infectious entered it.
Expected output: a waste log entry per movement. A simple log looks like this.
WASTE MOVEMENT LOG  Room 214  Week of 2026-11-09

Date      Stream        Bags/Containers  Autoclave run  Initials
2026-11-09 Infectious   2                AC-1142        MK
2026-11-10 Sharps       1 container      AC-1143        MK
2026-11-11 Chemical     1 jerrican       N/A (vendor)   RS
Step 6. Decontaminate the infectious stream
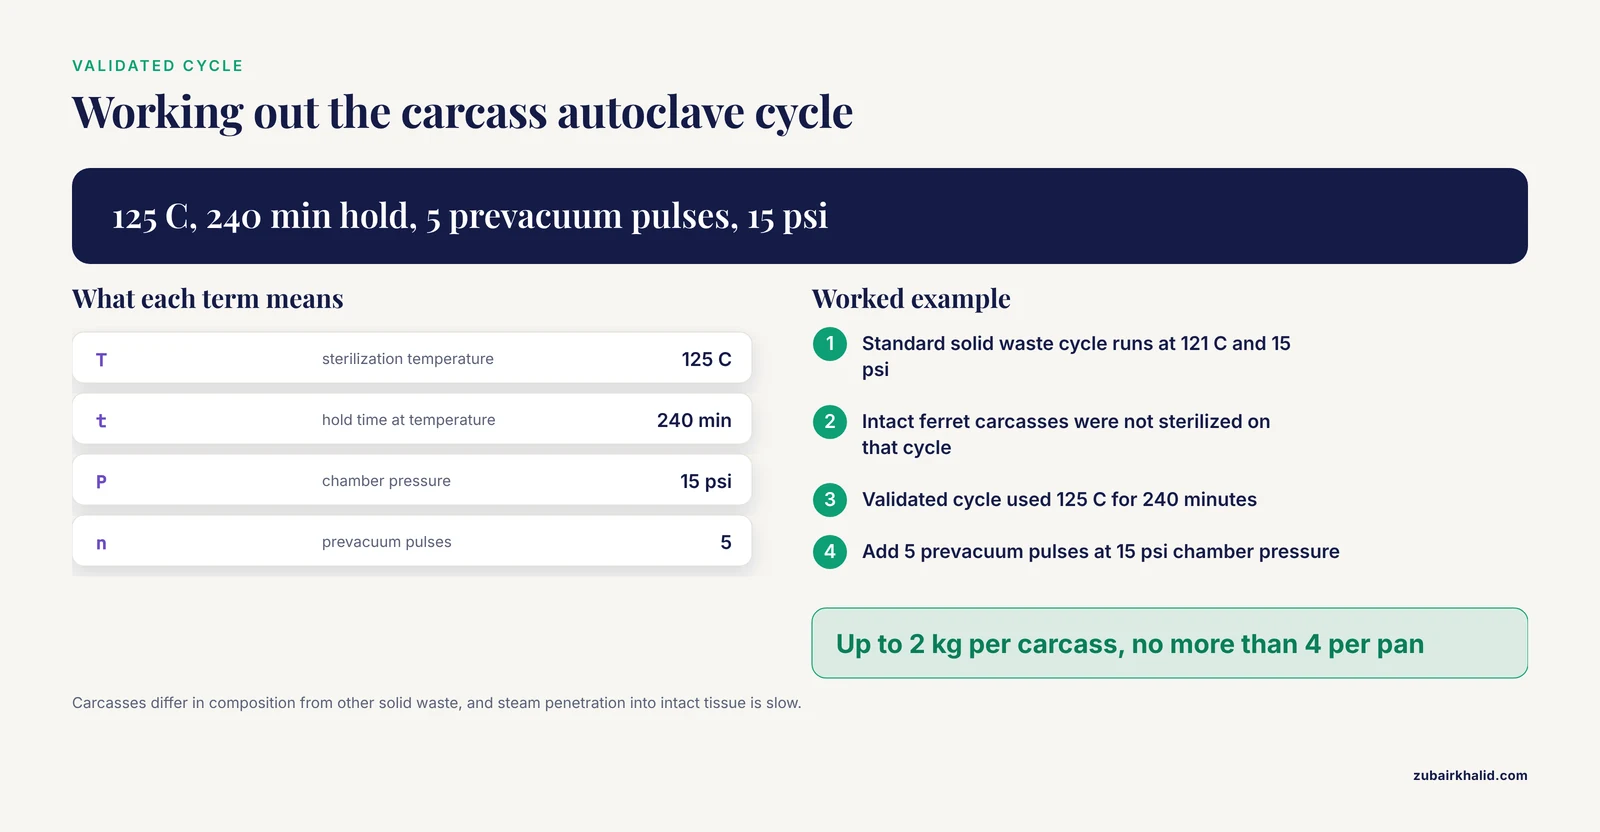
For most BSL-2 solid biohazardous waste, steam sterilization in an autoclave at 121 degrees C and 15 psi is the standard cycle, verified with chemical indicators on every load and biological indicators on a scheduled basis. Verify your own cycle rather than assuming the posted cycle works for your load composition. Animal carcasses are the classic failure case. In a validation study in an animal biosafety level 2/3 suite, cycle parameters applied to general solid biohazardous waste did not ensure sterilization of intact ferret carcasses, and the validated cycle that did work required sterilization at 125 degrees C for 240 minutes with 5 prevacuum pulses at 15 psi chamber pressure, for carcasses up to 2 kg each with no more than 4 carcasses per pan [10]. Carcasses differ in composition from other solid waste, and steam penetration into intact tissue masses is slow.
For laboratories that generate infectious animal waste at higher containment, alkaline hydrolysis tissue dissolvers are an established alternative. In one ABSL-3 facility, a tissue dissolver operated at the manufacturer's recommended cycle parameters inactivated a high concentration of chemically resistant bacterial spores used as the surrogate challenge, and digested animal tissues completely into a non-infectious liquid effluent that could be discharged to the sanitary sewer, although the authors recommend that each facility verify its own unit's efficacy because design and tissue load vary between facilities [11].
Expected output: a printed autoclave cycle record with a passed chemical indicator and, on validation runs, a passed biological indicator. A passed record looks like this.
AUTOCLAVE RUN RECORD  Unit: AC-1  Cycle: SOLID-BIOHAZARD
2026-11-11  Load: 2 bags infectious solid, Room 214
Sterilization temp: 121 C    Hold time: 30 min    Pressure: 15 psi
Prevacuum pulses: 4
Chemical indicator: PASS on bag 1 exterior and bin interior
Biological indicator (weekly): Geobacillus sp. vial, 24 h read: NO GROWTH
Operator: MK    Reviewed by: Biosafety Officer
Step 7. Handle high-containment and pathological streams through dedicated pathways
If your facility works with livestock or loose-housed animals at ABSL-3Ag or ABSL-4Ag containment, the waste stream requires more equipment and attention than lower containment levels, and typical handling equipment includes autoclaves, effluent decontamination systems, incinerators, high-temperature renderers, alkaline tissue digester systems, HEPA filtration of exhaust and supply air, gas decontamination systems, and laundry facilities, with the animal room itself serving as primary containment [12]. At those levels, waste leaves the containment barrier only after validated decontamination, and the transfer process itself is a designed, documented procedure.
Step 8. Train, audit, and correct
Schedule microbiology biosafety training for every person who generates waste in the room, including students and short-term visitors, and repeat it on a fixed cycle. Training works. In a study of 280 healthcare workers in public and private hospitals in Dire Dawa, Ethiopia, good waste segregation practice was associated with ever having received waste management training, with an adjusted odds ratio of 2.74, and with the presence of guidelines and instructive posters on segregation, with an adjusted odds ratio of 8.21, while adequate knowledge itself carried an adjusted odds ratio of 2.42 [3]. Knowledge gaps are common and consequential. Among junior doctors in one hospital study, only a portion had correct knowledge of segregation into appropriate color-coded bags, and only 26 percent knew the final disposal route for biomedical waste [13]. People cannot segregate correctly to a destination they cannot name.
Expected output: a training roster with dates, a posted color code template, and a quarterly audit record. The audit method is described in a later section.
Decontamination and Treatment Routes After Segregation
Segregation is the first half of the system. The second half is what happens to each segregated stream.
Steam sterilization (autoclaving). The default for infectious solid waste from BSL-1 and BSL-2 laboratories. Key parameters are temperature, hold time at temperature, pressure, and prevacuum pulses, and the load's mass, packaging, and water content all affect steam penetration. Validate each cycle type with a biological indicator containing bacterial spores placed at the center of the densest load. Carcasses and other dense loads need extended cycles, as the ferret carcass validation work demonstrated, where the effective cycle ran 240 minutes at 125 degrees C rather than the shorter standard solid waste cycle [10].
Alkaline hydrolysis. Tissue dissolvers digest carcasses and pathological waste into a sterile aqueous solution of peptides, amino acids, and soaps, and validated units produce effluent suitable for sanitary sewer discharge. The spore inactivation data from the ABSL-3 study support the technology for high-consequence agents, with the standing caveat that each facility must verify performance on its own loads [11].
Incineration. The standard route for pathological waste, anatomical waste, sharps destined for destruction, and certain chemical and pharmaceutical streams. Hospital blood bank waste management frameworks typically direct infectious and sharp wastes to incineration while chemical and pharmaceutical wastes require specialized treatment [6]. Incineration is also the predominant treatment method observed in resource-limited settings, sometimes using substandard equipment or open burning, which is a recognized deficiency in healthcare waste management practice [5].
Chemical disinfection. Appropriate for liquid waste such as culture media and spent disinfectant solutions, using validated contact times and concentrations for the agents in use, followed by disposal to the sanitary sewer where permitted.
Common Mistakes and Limitations
These are the specific failures seen most often in laboratories, with the practical fix for each.
- Overfilled bags. A bag filled past three-quarters cannot be closed without bringing hands near the contents. Fix by shortening the bag change interval and training staff to tie bags at the three-quarter mark.
- Sharps in bags. Any needle in a biohazard bag endangers every person downstream, from autoclave operators to waste haulers. Fix by placing sharps containers closer to the point of use and never decanting sharps.
- Missing bins as the root cause. When people cannot find the correct bin, they use the nearest one. The Rwandan hospital study showed that the absence of infectious waste bins increased improper segregation odds by more than twofold, so fix infrastructure before retraining people [8].
- Assuming the standard autoclave cycle works for everything. Dense loads such as carcasses require validated extended cycles, and a failed cycle releases unsterilized infectious material from containment [10].
- Assuming the tissue dissolver works as advertised on your load. Verify performance with spore challenges and load compositions representative of your facility before routine use [11].
- Training without the destination. Teaching only bag colors while omitting the final disposal route leaves staff unable to reason through novel items. Only a minority of junior doctors in one study knew the final disposal route for biomedical waste [13], so pair color training with the destination and treatment for each stream.
- Treating bag color as sufficient enforcement. Color codes improve compliance, but compliance in high-performing systems rests on regulation, training, and monitoring together, not the colors alone [4].
- Audit blind spots on chemical and pharmaceutical streams. Laboratories concentrate their auditing on the infectious stream and let the chemical stream drift. Chemical waste requires its own labeled containers and specialized treatment [6], and expired or contaminated medicinals follow the pharmaceutical segregation and storage pathway [7].
- Mixing streams to save bag volume. Emptying a general bag into an infectious bag to avoid an autoclave charge reverses the economics permanently, because treatment capacity is consumed by waste that never needed it.
One limitation applies to any written guide. Individual waste determinations, especially for novel agents, mixed chemical-biological hazards, and high-containment material, require judgment by your facility's biosafety officer and institutional biosafety committee rather than a general article.
Biosafety Risk Assessment and Training as Standing Systems
Segregation is a control selected by your biosafety risk assessment, and its performance decays without maintenance. Two practices keep it healthy.
First, make the risk assessment a living document. Every time the laboratory adds an agent, a procedure, or a new waste type, update the risk assessment and the color code template in the same change-control step. This prevents the most common slow failure, where the bench starts generating a stream the template does not name and staff improvise.
Second, run microbiology biosafety training on a fixed schedule with an audit between sessions. The evidence base is consistent that training and posted guidance move practice. Trained workers had more than twice the odds of good segregation practice, and the presence of guidelines and instructive posters at the point of segregation carried the strongest association reported in that dataset [3]. Conversely, in a systematic review of 32 studies, insufficient staff training and poor implementation of color-coding systems were among the most common deficiencies identified across healthcare facilities [5]. A training session that covers the color codes, the treatment route for each stream, the do-not lists, and the closing and labeling procedure, followed by a quarterly direct-observation audit, is the practical minimum for a working system.
Monitoring, Auditing, and Emerging Automation
A segregation system that is not audited drifts. The audit method is simple and observational. Once per quarter, an observer walks the bench during normal work and records, for each waste event, whether the item entered the correct container. Score the room as a percentage of correct events, review misses with the team within a week, and post the result near the bins. Facility-level data reinforce this approach. In the Dire Dawa hospital study, only 56.4 percent of healthcare workers demonstrated good segregation practice overall, and factors such as workload hours, training, knowledge, and the presence of guidelines and posters distinguished good from poor practice [3]. Your own audit percentage, measured against your own trend line, is the number that matters.
Digitalization is beginning to address the residual missegregation that color codes alone do not eliminate. Misplacement and mixed waste still occur frequently despite color-coded bin bags, and one proposed framework uses barcode tagging and scanning connected through a monitoring system that notifies waste generators and collectors when waste is incorrectly categorized [1]. Computer vision approaches are maturing rapidly. A system using the SSD MobileNet object detection model classified medical waste into distinct categories including infectious waste, non-infectious waste, sharps, and glassware, with average precision and recall of approximately 90 percent [14]. A separate platform built on the YOLOv8 model classifies common biomedical waste items such as gloves, syringes, vials, and cotton materials in real time and actuates bin release accordingly [2]. Sensor-driven smart bins add another layer, using color-coding detection to differentiate waste types while integrated sensors monitor fill level and weight and trigger alerts at set thresholds [15], and broader IoT-based segregator designs extend the same principle to metal, wet, and dry streams with robotic collection [16].
For a working laboratory today, the practical takeaway is narrower. Manual color-coded segregation remains the operative system, and the highest-value additions are a posted template, a bin placement that matches the work, a validated treatment cycle per stream, and a quarterly audit. Automation belongs on your radar for procurement discussions in coming years, not as a substitute for the bench practices described here.
Quick Reference Table
| Parameter or decision | Recommended practice | Rationale |
|---|---|---|
| Bag closure point | Close and remove at about three-quarters full | Allows secure tying without hand contact near contents |
| Sharps container retirement | Close at the fill line, never above | Fill lines are the manufacturer's puncture and handling limit |
| Standard BSL-2 solid waste autoclave | 121 degrees C, 15 psi, validated hold time, chemical indicator each load, biological indicator on schedule | Steam penetration depends on load composition and packaging |
| Carcass autoclave validation | Extended cycle required, demonstrated at 125 degrees C for 240 minutes with 5 prevacuum pulses for ferret carcasses up to 2 kg | Intact tissue masses slow steam penetration [10] |
| Tissue dissolver use | Verify spore inactivation and digestion on your own load before routine use | Unit design and tissue load vary between facilities [11] |
| High-containment waste exit | Decontaminate by validated method before transfer out of the containment barrier | ABSL-3Ag and ABSL-4Ag facilities require dedicated equipment systems [12] |
| Audit frequency | Quarterly direct observation, scored, with same-week feedback | Trained staff and posted guidance are the strongest practice factors [3] |
| When in doubt | Place the item in the infectious stream | Overtreatment is recoverable, exposure is not |
Frequently Asked Questions
What do the biological waste segregation color codes mean in a microbiology lab?
In the most common format, yellow holds infectious and clinical waste such as cultures and contaminated plasticware, a puncture-proof yellow container holds sharps, dedicated containers hold pathological waste and carcasses, red often holds potentially infectious plastic routed for treatment, blue often holds glass for decontamination and reuse, and black or clear holds general non-hazardous waste. The exact mapping is set by your local regulations and institutional plan, so confirm it before installing bins.
Where does a color-coded segregation template belong?
Post the one-page color code template on the wall beside the bins in each room, keep a signed copy in the biosafety manual, and attach a copy to the training curriculum. A template that exists only in a binder does not change behavior at the bench.
Can I put a used needle in the yellow bag if the container is full?
No. A used needle always goes into a rigid puncture-proof sharps container, never into any bag, regardless of how full the container is. Retire the full sharps container by closing it at the fill line and routing it to the designated treatment step, then stage a replacement before resuming work.
How full can a biohazard bag be before I close it?
Close and remove a biohazard bag when it is about three-quarters full. Past that point you cannot tie it securely without bringing your hands close to the contents, and the bag risks tearing during removal.
Who is responsible for correct segregation, the bench scientist or the waste handler?
The person who generates the waste is responsible for placing it in the correct container at the point of generation. Waste handlers move and treat sealed, labeled, correctly segregated containers, and they should never need to re-sort mixed waste.
Does bag color alone prevent missegregation?
No. Compliance depends on training, posted guidance, and the physical presence of the correct bins. A hospital study found that missing infectious waste bins more than doubled the odds of improper segregation, while the presence or absence of bag colors in bins had no significant effect [8].
How often should waste segregation training be refreshed?
Schedule microbiology biosafety training with a waste segregation module for every new entrant to the laboratory and refresh it at least annually, with a direct-observation audit between sessions. Training and the presence of instructive posters at the point of segregation were the strongest practice factors in the published evidence [3].
What should I do if infectious waste ends up in the general bin?
Stop, do not compact or empty the bin, and treat the entire bin's contents as infectious by routing it through decontamination before disposal. Then log the event, review it with the bench team within the week, and correct the root cause, which is most often a missing, full, or poorly placed bin.
Sources
- Waste 4.0: transforming medical waste management through digitalization and automated segregation
- Vision-Guided Segregation of Biomedical Waste Using AI-Driven Control Architecture
- Healthcare Waste Segregation Practice and Associated Factors among Healthcare Professionals Working in Public and Private Hospitals, Dire Dawa, Eastern Ethiopia
- Color-Coded Segregation in Dental Waste Management: Global Evidence, Regional Practices, and the Bangladesh Perspective
- Enhancing HealthCare Waste Management through Circular Economy Principles: A Systematic Review
- Medical waste management in Hospital Blood Banks (HBB): a literature review
- Review on Strategy of Pharmaceuticals Waste Management
- Determinants of improper healthcare waste segregation in a Tertiary Referral Hospital in Southern Rwanda: a cross-sectional study
- A Review on Sustainable Practices in Pharmaceutical Waste Management
- Validating Autoclave Cycles for Carcass Disposal in Animal Biosafety Level 2/3 Containment Laboratories.
- Decontamination and digestion of infectious animal waste using a tissue dissolver in an animal biosafety level 3 facility.
- Challenges and Solutions With Agricultural Animal High Containment Waste Disposal.
- : Biomedical waste, junior doctors, segregation had correct knowledge regarding segregation of wastes in to appropriate color-coded bags. Only 26% had knowledge regarding final disposal of BMW.
- Automated Medical Waste Segregation Using SSD MobileNet: Enhancing Public Health and Environmental Safety
- Smart Waste Segregation System Applying IoT with Notification and Monitoring
- An advanced IoT-based Automated Waste Segregation System for Smart Cities