How to Decontaminate Spills of Biological Agents: A Decision Tree
By Dr. Zubair Khalid, DVM, MS, PhD ·
The difference between a quick wipe-up and a full room evacuation comes down to three questions: how much material spilled, whether the spill generated aerosols, and how dangerous the agent is. A simple rule of thumb covers most laboratory situations. If the spill is small (roughly under 10 milliliters), involves a low-risk agent, and did not splash or aerosolize, clean it in place with disinfectant-soaked absorbent towels. Anything larger, anything involving a Risk Group 2 agent or above, or anything released from equipment that can aerosolize liquid (centrifuges, blenders, sonicators, homogenizers) gets the full protocol: clear the room, let aerosols settle, don full protective equipment, and flood the spill with a fresh disinfectant from the perimeter inward.
This article walks through the biological spill decontamination decision tree options one by one, compares them on the criteria that actually decide real choices, gives worked scenarios, and lists the mistakes that cause most spill-response failures. The framework assumes a laboratory or clinical setting in the United States, and it draws on standard biosafety texts and published experience from containment laboratories that have validated their own spill and waste procedures.
Start Here: The Rule of Thumb
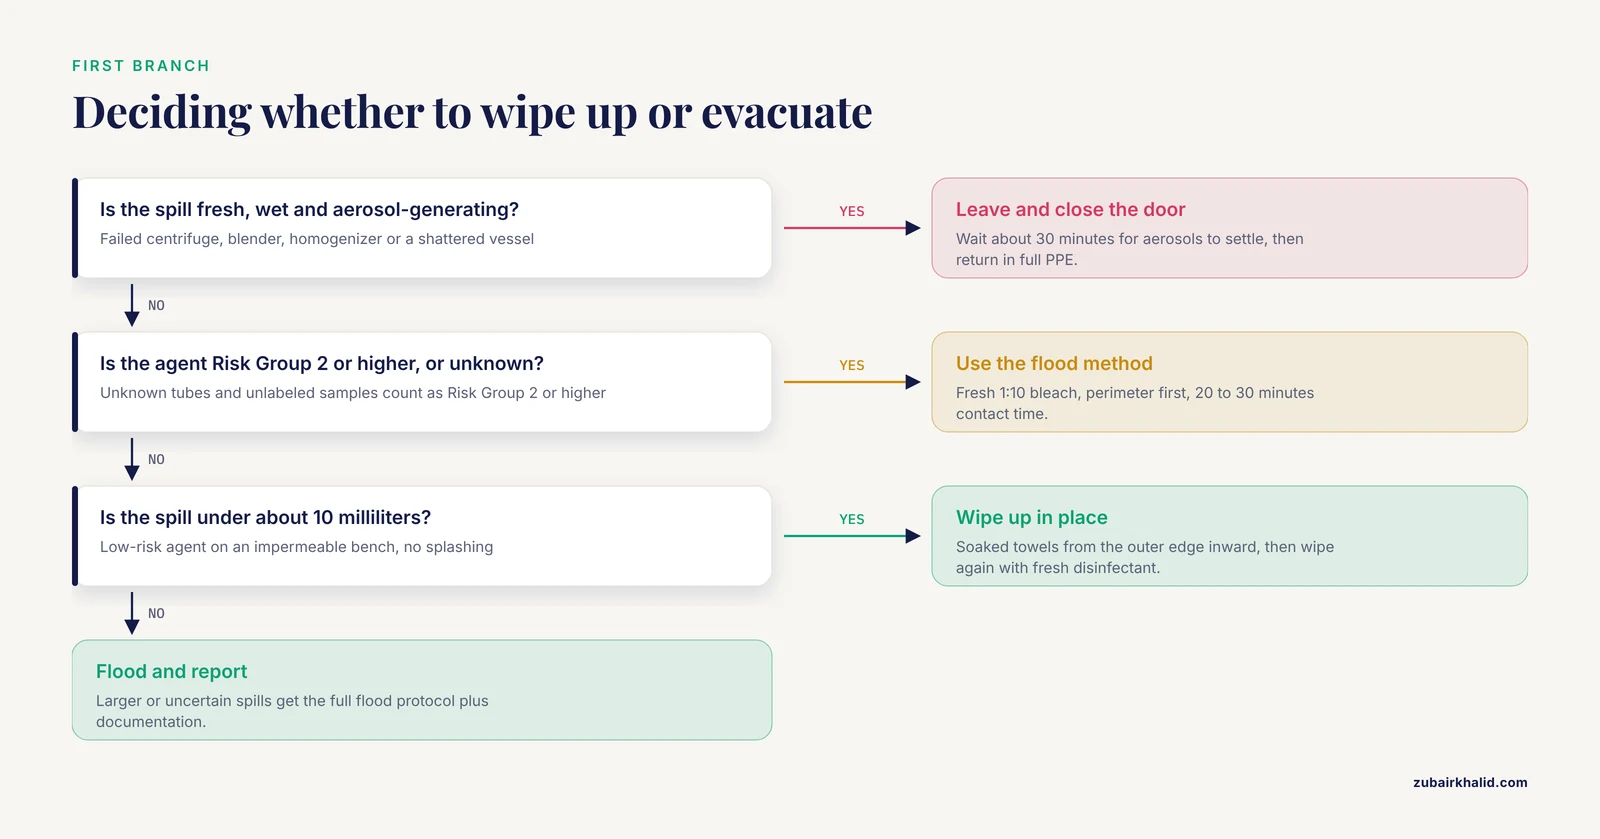
Before any detailed branching, memorize this short version of the decision tree.
- Announce and protect. Alert everyone nearby. Hold your breath or step back if the spill is fresh and wet, which limits inhalation of aerosols.
- Classify the spill. Small or large, aerosol-generating or not, Risk Group 1 or higher.
- Small, low-risk, no aerosol. Cover with absorbent towels soaked in a suitable disinfectant, wait the required contact time, then wipe up and discard the towels as biohazardous waste.
- Large, higher-risk, or aerosol-generating. Leave the room, close the door, wait about 30 minutes for aerosols to settle, then return in full personal protective equipment and use the flood method: disinfectant around the spill, absorbent material over the spill, more disinfectant on top, and a contact time of 20 to 30 minutes before cleanup.
- Inside a biosafety cabinet. Keep the cabinet running, flood the work surface and grilles, wait the contact time, then disinfect the interior surfaces before resuming work.
- Generate waste, then decontaminate it. Everything that touched the spill goes into a biohazard bag or sharps container and is autoclaved or otherwise validated as decontaminated before it leaves the facility. This last step matters more than most people assume. A study from a biosafety level 3 virology institute found that a factory-default autoclave cycle failed to reliably decontaminate typical biological waste loads, and the team had to redesign load distribution and validate a custom cycle using lethality calculations before the waste could safely leave the facility [1].
What Drives the Decision: A Biosafety Risk Assessment
Every good biological spill decontamination decision tree is downstream of a biosafety risk assessment done before anything spills. Risk assessment in biosafety means evaluating the agent (its virulence, infectious dose, route of exposure, and availability of treatment), the activity (how much material, how concentrated, what equipment), and the consequences of an accidental release. The output should be a written spill plan that names the agents in use, the disinfectants known to work against them, the personal protective equipment required, and the trained personnel responsible.
Two features of the agent drive most decisions:
Risk Group classification. Risk Group 1 agents are unlikely to cause disease in healthy adults (most environmental isolates, most nonpathogenic E. coli strains used in teaching labs). Risk Group 2 agents cause disease in humans but are usually treatable and pose low community risk (Staphylococcus aureus, Salmonella species, hepatitis B virus, most clinical specimens handled in routine microbiology). Risk Group 3 agents cause serious or potentially lethal disease and may be treatable (Mycobacterium tuberculosis, Brucella species, SARS-CoV-2 work classified at that level). Risk Group 4 agents are dangerous and often untreatable, and spill response for them is never improvised. If your facility works with Risk Group 4 agents, your spill plan is written by the institutional biosafety program and practiced, not read off a website.
Aerosol potential. A dropped culture plate mostly splashes. A centrifuge rotor that fails while loaded with liquid creates a respirable aerosol throughout the sealed chamber and often the surrounding room. The response differs because aerosols stay airborne for minutes to hours depending on droplet size, room air changes, and air currents, which is why waiting before reentry is a core step rather than an optional courtesy.
Volume matters too, but less than people expect. The conventional teaching threshold is about 10 milliliters. Below that, a few absorbent towels handle the liquid. Above it, or whenever liquid has traveled under equipment, into seams, or onto the floor, the flood method is more reliable because it guarantees wet contact between disinfectant and every contaminated surface.
The Biological Spill Decontamination Decision Tree, Step by Step
Use the following sequence as your working tree. Each branch point sends you to one of the options described in the next section.
- Is anyone contaminated? If a person was splashed or injured, that takes priority. Remove contaminated clothing, flush exposed skin for 15 minutes at an eyewash or safety shower, wash exposed skin with soap and water, report to occupational health, and document the incident. Wound first aid and medical evaluation come before environmental cleanup.
- Is the spill still generating aerosols? A fresh centrifuge spill, a dropped vessel that shattered, or any vigorous splash means everyone should hold their breath, leave, and close the door. In containment laboratories, standard practice is to wait about 30 minutes before reentry. For spills inside a functioning biosafety cabinet, the cabinet itself contains the aerosol, so you stay at the cabinet and keep it running.
- What is the agent and risk group? Risk Group 1, small, no aerosol: proceed with wipe-up. Risk Group 2 or higher, or any aerosol-generating event: proceed with the full flood protocol after the settling period. Unknown agent (an unlabeled tube, a clinical sample of uncertain content): treat it as Risk Group 2 or higher until proven otherwise.
- Where did it happen? Open bench, floor, biosafety cabinet, incubator, water bath, or inside equipment each change the details. Spills inside sealed equipment get the equipment treated as a contaminated closed container: leave it closed, decontaminate the exterior, then open it only after the settling period and under the flood protocol.
- How much disinfectant and how much contact time? For the standard flood method, use fresh 1:10 household bleach diluted the day of use, which gives roughly 0.5 percent sodium hypochlorite (about 5,000 to 6,500 ppm available chlorine). Pour disinfectant around the perimeter first so the spill does not spread outward, cover the spill with absorbent material, then saturate the covering with more disinfectant and allow 20 to 30 minutes of contact time. Some agents and some institutional protocols call for longer contact times, so follow your local biosafety manual.
- Is there broken glass or sharps? Never reach into a spill with hands. Use forceps, tongs, or a dustpan and brush designated for biohazard cleanup, place sharps in a sharps container, and only then proceed with the liquid cleanup.
- What waste was created? All towels, gloves, gowns, and reusable tools that contacted the spill are biohazardous waste. Collect them in a biohazard bag, close it, and route it to validated decontamination, typically autoclaving.
- Is the surface itself contaminated beyond the liquid? After the spill is removed, disinfect the entire zone again, working from clean to dirty areas, and repeat if the surface is visibly soiled or porous.
- Does the event need to be reported and documented? In most US institutions, any spill of a Risk Group 2 or higher agent, any spill outside containment, any spill with personnel exposure, and any aerosol-generating failure must be reported to the biosafety officer and logged. Facilities that maintain structured biosafety documentation, including forms for sharps waste and spill events, find that the paper trail supports both regulatory inspection and later training [2].
The Options Explained
Different spills call for different tools. Here are the main biological spill decontamination decision tree options, each described on its own terms.
Option 1: Direct Wipe-Up with Disinfectant-Soaked Towels
For small spills of low-risk agents on impermeable bench surfaces, soak absorbent towels in disinfectant and lay them over the spill, working from the outer edge inward. After the contact time, lift the towels with gloved hands or forceps, wipe the surface again with fresh disinfectant, and dry it.
Strengths. Fast, simple, minimal waste, minimal disruption to the work area. This is the right answer for a few milliliters of a Risk Group 1 culture on a clean bench.
Drawbacks. It depends entirely on honest classification. If the spill was actually larger, more infectious, or more aerosolized than the responder judged, wipe-up leaves viable agent behind and generates unnecessary exposure. The towels also absorb liquid quickly, so the disinfectant must be applied generously, not dripped on afterward.
Option 2: Flood-and-Soak with Hypochlorite (the Standard Method)
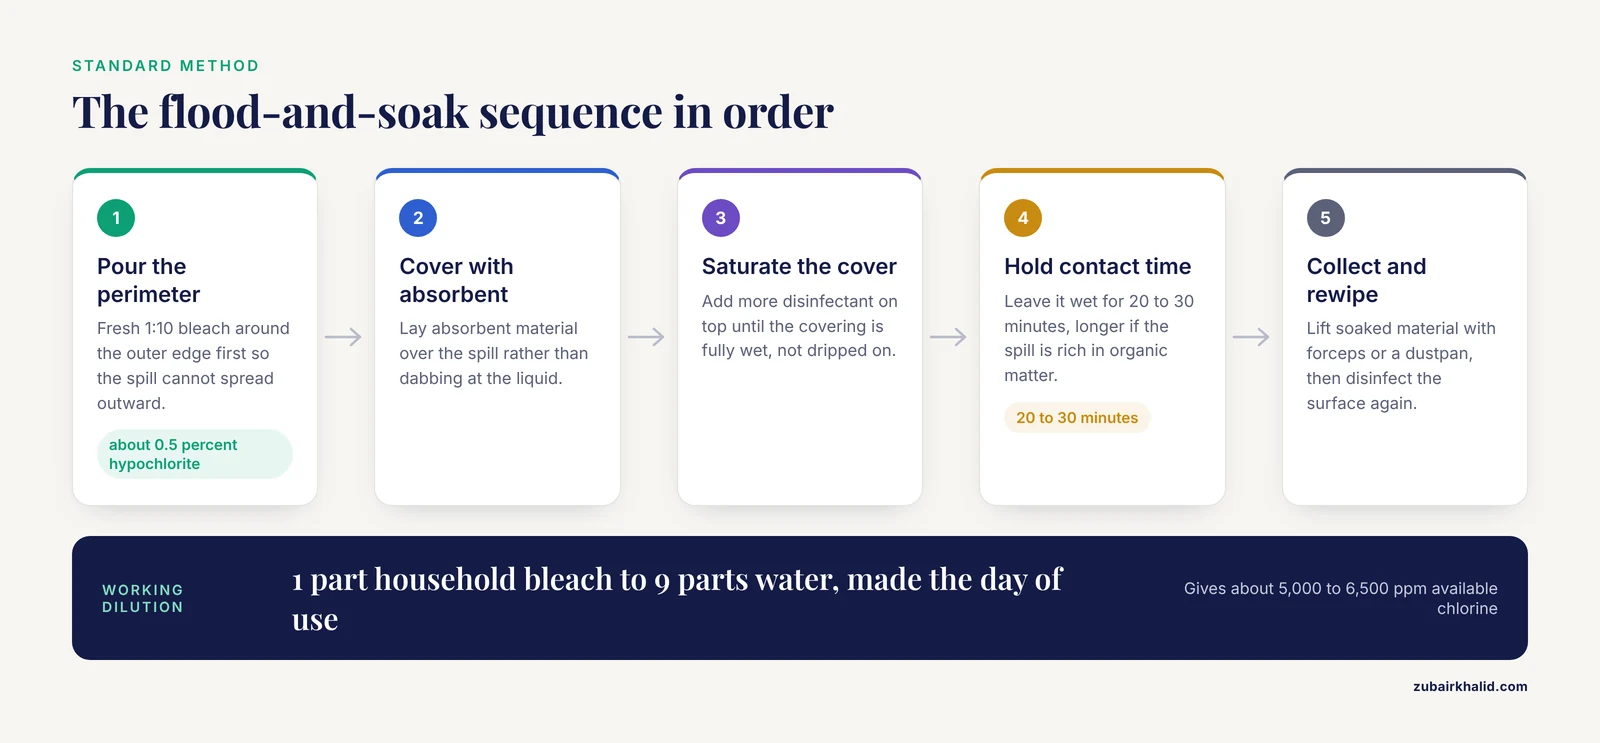
This is the anchor option of every biological spill decontamination decision tree and the default for spills of Risk Group 2 and higher agents. The sequence is: perimeter first, absorbent cover, saturate the cover, wait 20 to 30 minutes, then collect the soaked material with forceps or a dustpan, rinse or disinfect the surface, and repeat if needed.
Strengths. Hypochlorite at working strength has a broad spectrum: vegetative bacteria, fungi, enveloped viruses, and many non-enveloped viruses are reliably inactivated, and higher concentrations or longer times extend activity toward bacterial spores. It is cheap, widely stocked, and easy to verify (fresh solution has a measurable chlorine content, and commercial test strips confirm working strength).
Drawbacks. Hypochlorite corrodes stainless steel over time, is rapidly inactivated by organic matter (which is why the flood method saturates the spill rather than dabbing it), loses potency within days once diluted, and releases irritating chlorine gas if mixed with acids or ammonia. Spills in metal centrifuge rotors or on polished equipment often get a second cleanup with water or alcohol after the hypochlorite contact time to limit corrosion.
Option 3: Absorbent-First (Granular and Gelling Agents)
Commercial spill absorbents, often sold as powders or sachets, gellify liquid spills so they can be scooped up without spreading. The usual sequence is to sprinkle the powder over the spill, allow it to gel, scoop the gelled mass with a dedicated scoop, place it in a biohazard bag, then disinfect the residual surface separately.
Strengths. Minimal splashing, quick containment of large liquid volumes, and less aerosol risk during cleanup than handling soaked towels. Useful on floors and for spills of larger volumes that would overwhelm towels.
Drawbacks. The absorbent itself does not kill anything. The disinfection step still has to happen afterward, and responders sometimes skip it because the visible liquid is gone. Contact between disinfectant and agent is also less uniform than in a flood, so this option pairs best with a thorough second disinfection pass. It is also more expensive than bleach and towels.
Option 4: Alternative Chemical Disinfectants
Not every surface tolerates bleach, and not every agent needs it.
- 70 percent ethanol or isopropanol. Fast-acting against vegetative bacteria and enveloped viruses. Weak against non-enveloped viruses and useless against spores. It evaporates before long contact times can elapse, so it works best as a wipe-down for small spills and surface finishing, not as the primary flood agent. Flammability limits how much can be used at once.
- Quaternary ammonium compounds. Common in clinical settings, adequate against many vegetative bacteria and enveloped viruses, but historically weak against non-enveloped viruses and some gram-negative bacteria. Fine for routine surface hygiene, a poor choice as the sole agent for a spill of an unknown or hardy agent.
- Phenolic disinfectants. Broad activity with residual effect on surfaces, but leave films, are toxic, and require careful rinsing on food-contact or animal-contact surfaces.
- Accelerated hydrogen peroxide formulations. Increasingly common as one-step surface disinfectants with shorter contact times, better materials compatibility than bleach, and lower odor. Follow the manufacturer's labeled contact time exactly, because shortened real-world contact is the usual failure mode.
- Glutaraldehyde and similar high-level disinfectants. Reserved for equipment that cannot tolerate bleach, not for routine floor spills, and they carry significant occupational exposure concerns that demand ventilation and training.
The core principle: match the disinfectant to the agent's known susceptibilities. A disinfectant chosen because it happens to be at hand is a common and avoidable error, and biosafety surveys have repeatedly tied poor waste and spill practices to gaps in staff knowledge rather than to missing equipment [3].
Option 5: Mechanical Cleanup of Broken Glass and Sharps
Any spill involving a shattered vessel containing cultures requires this step first. After aerosol settling (if applicable) and while wearing gloves sturdy enough for glass handling, use forceps or tongs to lift large fragments, sweep small shards with a dedicated dustpan and brush, and place everything directly into a rigid sharps container. Only then do you flood the residual liquid and contaminated surface. Picking glass out of a bleach-soaked towel by hand is one of the most common routes to a sharps injury during spill response.
Option 6: Validated Autoclaving of Spill Waste
Everything the spill touched, including towels, gowns, gloves, and absorbent material, becomes infectious waste. The assumed answer is "autoclave it," but validation is the part that separates real biosafety programs from paper ones. The BSL-3 decontamination study cited above is instructive: the institute evaluated the autoclave's factory-programmed cycles, calculated lethality for realistic waste loads and their distribution in the chamber, found the standard cycle insufficient, and then defined and validated a new load configuration and cycle that guaranteed steam sterilization of the waste before it left the containment area [1]. The lesson generalizes. An autoclave cycle that has never been challenged with biological indicators or lethality calculations on realistic loads is a hope, not a control.
Option 7: Specialized Handling of Animal Carcass Waste
When the spilled or contaminated material includes animal carcasses or large tissue masses, liquid disinfectants and standard autoclave loads may not penetrate adequately. One published approach from an animal biosafety level 3 facility used a tissue dissolver (an alkaline enzymatic digestion system) to decontaminate and digest infectious animal waste, reducing carcass mass and producing a liquid effluent that could be discharged after validation [4]. Facilities that regularly handle infected animals should treat carcass waste as its own branch of the decision tree rather than folding it into general solid biohazard waste.
Option 8: Whole-Room and System Decontamination
Aerosol-generating failures in containment laboratories can contaminate surfaces throughout a room. Where a spot decontamination is insufficient, the response escalates to a whole-room disinfection, typically with a fumigant such as formaldehyde gas or, in modern practice, vapor-phase hydrogen peroxide, executed by trained personnel with the room sealed. This is rare for routine teaching and clinical laboratories and should be triggered by the facility's biosafety plan, not improvised. Containment laboratory experience also shows that waste generated by such events multiplies quickly, which is one of the operational issues discussed in reviews of infectious waste handling in biosafety level 3 laboratories [5].
Side-by-Side Comparison of the Main Options
| Option | Best for | Contact time | Key strengths | Key drawbacks | Waste stream |
|---|---|---|---|---|---|
| Wipe-up with soaked towels | Small (under ~10 mL), Risk Group 1, no aerosol | Minutes to the disinfectant's label time | Fast, low waste, minimal disruption | Depends on honest spill classification | Small biohazard bag |
| Flood-and-soak with 1:10 bleach | Default for Risk Group 2+ spills | 20 to 30 minutes minimum | Broad spectrum, cheap, verifiable | Corrodes steel, inactivated by organic matter, loses potency after dilution | Bulky soaked towels and PPE, autoclave |
| Granular/gelling absorbent | Large liquid volumes, floors, spill containment | Absorption minutes, then a full disinfection pass | Containment without splashing, less aerosol risk | Kills nothing by itself, residual disinfection still required | Gelled mass in biohazard bag, autoclave |
| Alcohol (70 percent) | Small surface spills, finishing wipe-down | Until dry, repeated applications | Fast, no corrosion | No spore activity, flammable, evaporates early | Minimal |
| Quats, phenolics, accelerated hydrogen peroxide | Agent-compatible routine spills | Per product label | Materials compatibility, residual action | Variable spectra, label contact times often ignored | Biohazard bag |
| Glutaraldehyde-type agents | Equipment that cannot tolerate bleach | Per label | High-level disinfection of instruments | Toxic, ventilation and training required | Chemical waste rules apply |
| Forceps/dustpan sharps removal | Broken glass in any spill | Immediate | Prevents the most common secondary injury | Needs dedicated, cleanable tools | Sharps container |
| Validated autoclave cycle | All solid spill waste before leaving the facility | Validated cycle parameters | Only method with documented lethality when validated | Factory cycles may fail on realistic loads, requires validation work | Regulated medical waste |
| Tissue dissolver digestion | Infected carcasses and bulk tissue in animal facilities | Per validated protocol | Digests mass, reduces handling | Facility-specific, requires validation | Liquid effluent per permit |
| Whole-room fumigation | Room-wide contamination after aerosol events | Hours, per protocol | Only practical answer for widespread contamination | Costly, requires trained personnel and room sealing | Large mixed waste volume |
Comparing the Options on the Criteria That Decide Real Choices
When people search for the best biological spill decontamination decision tree, they are usually asking which option to commit to. The honest answer is that the tree picks for you, and the branches below are the ones that matter.
Agent susceptibility versus disinfectant spectrum. The single most common real-world mismatch is choosing a disinfectant that cannot inactivate the agent at hand. Non-enveloped viruses (norovirus, rotavirus, many enteroviruses) and bacterial spores survive alcohols and quats. If your biosafety risk assessment lists such agents, your spill kit should contain a sporicidal or hospital-grade disinfectant, and the hypochlorite flood becomes the safer default.
Materials compatibility. Bleach eats stainless steel, and repeated exposures shorten the life of expensive rotors and cabinet interiors. Alcohol is safer on steel but weak on hardy agents. Accelerated hydrogen peroxide chemistry is often the compromise. A lab that does the assessment up front stocks the right option rather than reaching for bleach on every surface and paying for it in corroded equipment.
Organic load. Blood, protein-rich media, and tissue inactivate hypochlorite quickly. Flood-and-saturate exists precisely because a thin film of disinfectant on top of a protein-rich spill does nothing to the middle of it. For spills dominated by organic material, doubling the disinfectant volume and extending the contact time is more protective than switching to a stronger chemical.
Aerosol risk. This criterion decides whether the responder stays or leaves. It also decides equipment choice for cleanup: gelling powders and perimeter-first pouring minimize the disturbance of settled droplets, while aggressive wiping of a fresh wet spill can re-aerosolize material.
Waste stream burden. Every option generates waste, and the waste has to be decontaminated before it leaves the facility. A flood of a large spill can produce a heavily soaked, very dense waste load, which is exactly the kind of load that defeated the factory autoclave cycle in the validated BSL-3 study [1]. Plan the waste route at the same time you plan the cleanup, and remember that containment labs face structural constraints on how waste exits the facility at all [5].
Training burden. The flood method requires more trained personnel than wipe-up. Where formal microbiology biosafety training is thin, complicated responses fail in predictable ways. Published surveys of healthcare workers have documented meaningful gaps in knowledge of routine biosafety measures and proper waste disposal even in facilities handling infectious material daily [3], and studies of biomedical waste streams have identified both biosafety knowledge deficits and, on occasion, actual parasites and pathogens present in untreated waste awaiting disposal. Those findings support a simple conclusion: drill the decision tree, do not just laminate it.
Worked Scenarios
Scenario 1: A dropped culture plate on an open bench
A teaching microbiology student drops a plate of a nonpathogenic E. coli strain (Risk Group 1). The agar cracked and about 5 milliliters of broth spread over the bench. No splashing beyond arm's reach, no aerosol-generating equipment involved. The branch: wipe-up. Cover the spill with towels soaked in fresh 1:10 bleach, wait at least the standard contact time, collect with gloves, wipe the zone again, bag all material as biohazard waste, and wash hands. Total interruption: under 15 minutes.
Scenario 2: A centrifuge rotor failure with a Risk Group 2 pathogen
A sealed-rotor centrifuge containing Salmonella cultures fails, and the chamber is visibly wet. The branch: aerosol-generating equipment. Do not open the centrifuge. Close the lab, post signage, and wait about 30 minutes for aerosols to settle. Return in gown, gloves, and face protection, disinfect the centrifuge exterior, carry the rotor to the biosafety cabinet or open it in place, flood the chamber with disinfectant, allow full contact time, remove material with forceps, disinfect again, and log the event. The wet chamber, not the visible splash, defines the contaminated zone.
Scenario 3: A spill inside a biosafety cabinet
A flask of Risk Group 2 material tips inside a class II cabinet. The cabinet is doing its job, so keep it running. Contain the spill within the work surface, flood the surface and drain trough with disinfectant, allow contact time, wipe all interior surfaces including the back wall and the interior of the sash, and then discard all materials through the cabinet's waste route. Decontaminate gloves before withdrawing hands, and disinfect the drain pan and grilles before resuming work. If the cabinet has a spill beyond the work surface into the plenum, the biosafety officer decides whether gaseous decontamination of the cabinet itself is needed.
Scenario 4: A large floor spill in an animal room
Two liters of contaminated bedding slurry spread across a floor. The branch: absorbent-first, then flood. Apply granular absorbent to contain and gel the liquid, scoop the gelled mass into biohazard bags, then disinfect the floor with an agent compatible with the room's surfaces and the animals' schedule, with full contact time. If infected carcasses are part of the waste, they follow a carcass-specific route such as validated tissue dissolution rather than ordinary solid-waste handling [4]. Report the event, because a spill of this size in an animal holding area usually triggers the institutional reporting threshold.
Scenario 5: An unknown liquid spill near a shared work area
A labeled but uninformative tube breaks near a shared bench. The agent is unknown. The branch: treat as Risk Group 2 or higher. Full flood protocol, reporting, and documentation. Most institutions would rather over-respond to an unknown than under-respond to something they later identify as significant, and the cost of over-response is measured in minutes, while the cost of under-response is measured in exposures.
Managing the Waste Afterward
Spill cleanup is only half the event. The other half is proving that the resulting waste is safe to leave the facility. Three practical points follow from the published experience.
Validation is not optional. The BSL-3 waste decontamination study showed that a seemingly standard steam sterilization cycle did not guarantee decontamination of realistic waste loads, and that lethality calculations and a redesigned load distribution were needed to close the gap [1]. Any laboratory that generates spill waste should know whether its autoclave cycle has been validated for the loads it actually runs.
Waste routing shapes response. Reviews of infectious waste disposal in biosafety level 3 laboratories emphasize that the path waste takes out of the facility, and the containment features it crosses, constrain both how much waste a spill can generate and how it must be packaged [5]. Spill plans that ignore the waste route fail at the last step.
Recordkeeping closes the loop. Facilities that use structured biosafety documentation, including sharps disposal forms and spill logs, generate the records that inspections and incident reviews rely on [2]. A spill that is cleaned but not logged is, from the biosafety program's perspective, a spill that never happened and a lesson that was never learned.
Training, Drills, and the Spill Kit
A decision tree on paper is worth what the nearest responder can execute under stress. Formal microbiology biosafety training should include hands-on spill response, because the survey evidence on biosafety knowledge among laboratory and healthcare staff shows that familiarity with routine measures cannot be assumed even where infectious materials are handled regularly [3]. Two training practices pay for themselves quickly.
Run drills with a simulated spill. Use colored liquid, drop it deliberately, and have staff walk the tree aloud: classify, protect, choose the option, contact time, waste route, documentation. Repeating the sequence converts it from reading material into motor memory.
Audit the spill kit against the agents in use. A standard kit contains fresh disinfectant (or concentrated stock with dated dilution instructions), absorbent towels, granular absorbent, forceps, tongs, a dustpan and brush, biohazard bags, a sharps container, gown, gloves, eye and face protection, and shoe covers. If the facility's risk assessment includes spore-forming or non-enveloped-virus agents, the kit needs a disinfectant with that spectrum, not just bleach. Where waste disposal practices have been studied in operating facilities, the gaps found were most often in consistent application of known procedures, which is exactly what drills and audits fix.
Common Mistakes and Limitations
Misjudging aerosol generation. The most consequential classification error is treating an aerosol-generating event (a rotor failure, a dropped flask that shattered, a blender mishap) as a simple splash and wiping it immediately. The settling period exists because it is the only practical way to lower the airborne concentration before a person's face enters the zone.
Trusting old diluted bleach. A 1:10 dilution loses most of its available chlorine within days, especially in light and heat. A spill response that uses last month's dilution bottle is a response with no active disinfectant. Make dilutions fresh, date them, and check with test strips.
Skipping the perimeter-first pour. Pouring disinfectant into the center of a liquid spill pushes viable material outward and enlarges the contaminated zone. Perimeter first, then inward, is not decorative detail.
Reaching into a spill for glass. Most secondary injuries during spill response are sharps injuries sustained during cleanup. Forceps and a dedicated dustpan are in the kit for this reason.
Treating gelling absorbents as disinfectants. The powder contains the spill, it does not kill the agent. Residual disinfection of the surface is a separate, mandatory step.
Assuming the autoclave works because it usually works. The validated-cycle study in a working BSL-3 institute demonstrated that default cycles can fail on realistic loads and that only explicit validation (lethality calculations, load mapping, biological indicators) establishes that waste is actually decontaminated [1].
Cleaning without documenting. Unlogged spills cannot inform risk assessment, training, or inspection. Structured forms and logs exist for this purpose, and facilities that use them consistently build a better evidence base for their own biosafety programs [2].
Letting the decision tree substitute for the risk assessment. The tree is a response tool. The upstream work, identifying agents, matching disinfectants, and pre-assigning responsibilities, is the biosafety risk assessment, and it must be done before the spill.
One final limitation. This framework covers standard laboratory situations and standard agents. Individual facilities with unusual agents, unusual equipment, or regulatory obligations need a biosafety professional to write and validate their specific plan, and individual exposure incidents always require occupational health evaluation.
Frequently Asked Questions
What is the best biological spill decontamination decision tree for a small teaching lab?
The best decision tree for a small lab is the shortest one that still handles its agents. If the lab works only with Risk Group 1 and 2 agents in small volumes, a three-branch tree (wipe-up for small clean spills, flood-and-soak with fresh 1:10 bleach for everything else, and a hard stop to call the supervisor for any unknown or aerosol-generating event) covers nearly every case.
Can I use 70 percent alcohol instead of bleach for a biological spill?
Yes for small surface spills of vegetative bacteria and enveloped viruses, no as a general substitute. Alcohol evaporates before long contact times can elapse, does not reliably inactivate non-enveloped viruses or spores, and is flammable in quantity. Bleach at working strength, or a labeled sporicidal product, is the safer default for spills of higher-risk or unknown agents.
How long should disinfectant stay on a spill?
The standard flood protocol calls for 20 to 30 minutes of wet contact time with fresh 1:10 bleach. Alcohol-based wipes need only the time until the surface dries, and proprietary products carry labeled contact times that must be followed exactly. Longer is safer than shorter whenever the spill contains heavy organic load.
What do I do if a spill happens inside a biosafety cabinet?
Keep the cabinet running, because it is containing the aerosol for you. Flood the work surface and drain trough, allow the contact time, wipe all interior surfaces, and route all materials into the cabinet's biohazard waste path. Decontaminate gloves before withdrawing your hands, and notify the biosafety officer if the spill entered the plenum.
When should a room be evacuated after a biological spill?
Evacuate whenever the spill is fresh, wet, and aerosol-generating, most notably from failed centrifuges, blenders, or homogenizers, or when liquid splashed widely. The standard settling period is about 30 minutes with the door closed. Spills contained inside a functioning biosafety cabinet do not require evacuation because the cabinet captures the aerosol.
How do I know my autoclave actually sterilizes spill waste?
You know only if the cycle has been validated against realistic loads. Published work from a BSL-3 facility showed that a factory-programmed autoclave cycle failed to reliably decontaminate typical waste loads until lethality calculations and a redesigned load distribution were applied and verified [1]. Validation means biological indicators placed at defined load positions, repeated until the cycle consistently achieves sterility, and repeated again whenever load composition or volume changes.
Sources
- Development and Validation of Waste Decontamination Cycle in a Biosafety Level 3 Laboratory
- Biosafety-Forms , Manuals & Plans Forms : Sharps Waste Disposal Form
- Knowledge and Awareness of Routine Biosafety Measures and Proper Waste Disposal Practices among Healthcare Workers in Karachi, Pakistan
- Decontamination and digestion of infectious animal waste using a tissue dissolver in an animal biosafety level 3 facility
- Discussion on issues related to the disposal of infectious waste in biosafety level 3 laboratories