Biological Spill Cleanup Procedures for BSL-1 and BSL-2 Labs
By Dr. Zubair Khalid, DVM, MS, PhD ·
A biological spill cleanup procedure for BSL-2 labs is a scripted sequence that contains infectious material, inactivates it with a validated disinfectant, protects the people doing the work, and documents the event so the laboratory can learn from it. Use it whenever a culture flask, tube, plate, or contaminated liquid escapes its container on an open bench, on the floor, inside a centrifuge, or in any other space of a laboratory operating at biosafety level 1 or biosafety level 2.
At a glance:
- What it achieves: containment of the release, chemical inactivation of the agent, protection of staff, safe waste disposal, and a documented record.
- When to use it: any release of BSL-1 or BSL-2 material, including routine cultures, clinical specimens, and human blood or body fluids handled under universal precautions.
- Hands-on time: 20 to 40 minutes for a typical bench or floor spill.
- Elapsed time: 60 to 90 minutes from incident to signed incident report, because the sequence deliberately includes a 30-minute aerosol settling wait and a 20 to 30 minute disinfectant contact time.
Scope note: this article covers spills of BSL-1 and BSL-2 agents. Spills involving agents that require higher containment, select agents (pathogens regulated because of their potential threat), or prions follow institution-specific emergency plans and are outside a standard bench procedure.
The payoff for running this sequence well is measurable at the level of whole institutions, not just individual workers. During its first Marburg virus disease outbreak in 2024, Rwanda recorded a case-fatality rate (the share of recognized cases who die) of 23 percent, far below the 60 to 100 percent reported in earlier filovirus outbreaks in the Democratic Republic of the Congo, Angola, Uganda, and Tanzania, and the pillars behind that result included innovative infection prevention and control measures and rapid expansion of laboratory testing [1]. Spill response is the bench-level expression of those same pillars. It converts an uncontrolled release into a contained, disinfected, documented event instead of a secondary transmission.
Principle: What a Spill Procedure Actually Does
A biosafety level (BSL) describes the combination of work practices, safety equipment, and facility features matched to the risk of the organisms handled in a space. BSL-1 labs work with well-characterized agents that are not known to consistently cause disease in healthy adults, such as Bacillus subtilis and nonpathogenic Escherichia coli K-12. BSL-2 labs add agents of moderate hazard to people and the environment, handle human-derived materials, and work with organisms such as Salmonella enterica, Staphylococcus aureus, hepatitis B virus, and HIV. Because BSL-2 materials can cause disease, the response to their release is formalized rather than improvised.
An aerosol is a suspension of tiny droplets or particles that stays airborne and travels on air currents. A dropped culture flask generates one at the moment of impact, and those particles can linger in the breathing zone for minutes. The first moves in any spill procedure are therefore about people leaving the room, not about the liquid on the floor.
Disinfection is the chemical inactivation of infectious agents on a surface. The workhorse for biological spills is sodium hypochlorite (NaOCl), the active ingredient in household bleach. Hypochlorite irreversibly oxidizes proteins, lipids, and nucleic acids, which is why it works against both enveloped viruses (such as influenza and HIV, whose outer lipid envelope is chemically fragile) and non-enveloped viruses (such as adenovirus, which resists many other disinfectants). Two properties govern its use. Contact time, the period the surface stays visibly wet with disinfectant, determines whether inactivation is complete. Organic load, the amount of protein and soil in the spill, consumes free chlorine before it can reach the organisms, which is why spills are flooded generously and then cleaned rather than wiped first and sprayed afterward.
Alcohol at 70 percent is a good wipe-down agent but a poor spill disinfectant, because it evaporates before completing a contact time and it is flammable. Quaternary ammonium compounds share the weakness against non-enveloped viruses. Fresh hypochlorite remains the default for spills, with alcohol reserved for final wipe-downs and small surface disinfection.
Biosafety Risk Assessment Before You Touch the Spill
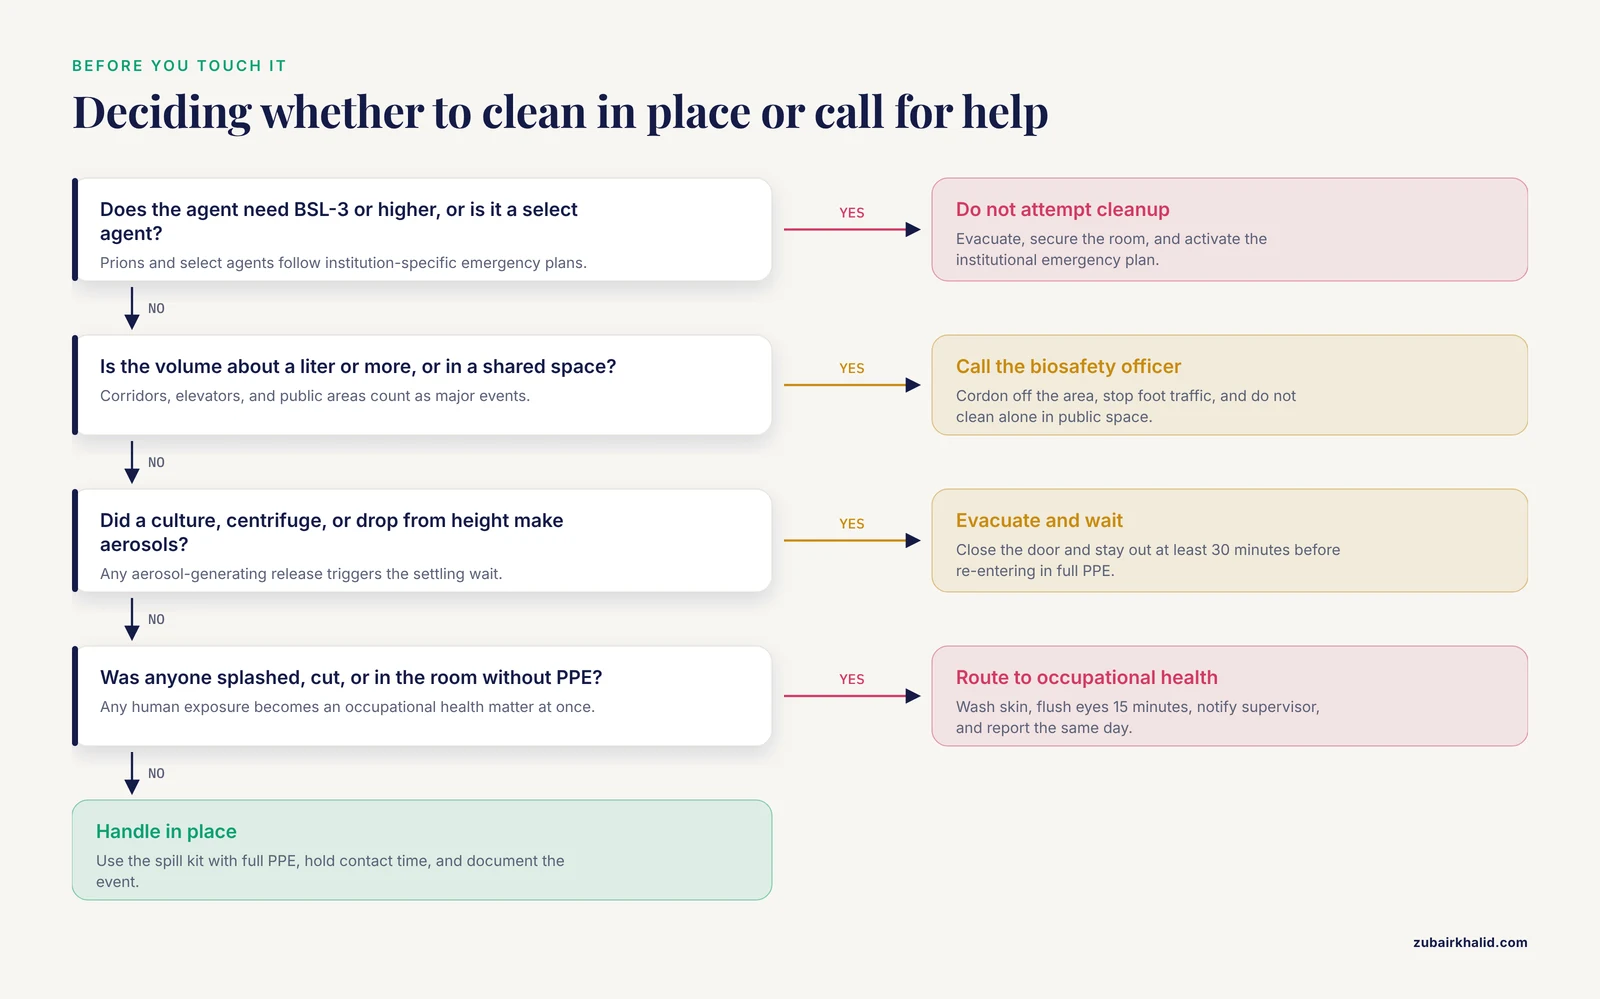
Biosafety risk assessment is the structured judgment that decides how strong a spill response must be. Run it mentally in seconds before re-entry, then again in writing afterward. Five questions drive it:
- Agent. What organism or material was spilled, and at what biosafety level is it normally handled?
- Volume. A few milliliters on a bench is a minor event. A large volume, roughly a liter or more, or any spill that reaches a shared or public space, is treated as a major event under most institutional programs.
- Aerosol potential. Did the release involve a culture, a centrifuge, a drop from height, or pressurized material? Those generate aerosols and trigger the 30-minute settling wait.
- Location. Spills inside a biosafety cabinet (BSC), a ventilated enclosure that protects the worker, the product, and the environment, are contained by design. Spills in corridors or elevators are not.
- People. Was anyone splashed, cut, or in the room without personal protective equipment (PPE)? Any human exposure converts the event into an occupational health matter immediately.
Body fluids deserve conservative handling even when the source person appears recovered. Research launched after the 2024 Marburg outbreak in Rwanda is sampling blood, urine, and semen from survivors over 24 months post-recovery to define how long viral persistence in body fluids lasts, a reminder that a recovered patient does not automatically mean a virus-free specimen [2]. Laboratories that receive such specimens treat every body-fluid spill as potentially infectious, the same logic behind universal precautions, the practice of treating all human blood and body fluids as if infectious regardless of source.
The output of the risk assessment is a decision: handle in place with the spill kit, or evacuate, isolate, and call the biosafety officer. When in doubt, choose the second option.
Materials and Reagents
| Item | Working concentration or specification | Purpose |
|---|---|---|
| Household bleach (sodium hypochlorite) | Stock typically 5 to 6 percent NaOCl, concentrated formulations up to about 8 percent, read the label | Base disinfectant |
| Fresh 1:10 bleach working solution | 1 part stock bleach plus 9 parts water, about 5,000 to 6,000 ppm available chlorine (ppm, parts per million, the measure of free chlorine concentration) | Primary spill disinfectant |
| Ethanol or isopropanol | 70 percent in water | Final wipe-down, bleach residue removal, small surfaces |
| Absorbent material | Paper towels, spill pillows or pads, absorbent granules for large volumes | Contains liquid, limits splashing |
| Forceps, tongs, autoclavable dustpan and brush | Heat-stable set | Pickup of sharps and waste without hands |
| Sharps container | Puncture-resistant, closable | Broken glass and sharps |
| Biohazard and autoclave bags | Certified for autoclave use | Waste containment |
| Nitrile gloves | Worn as a double layer | Barrier compatible with hypochlorite (latex degrades in bleach) |
| Fluid-resistant gown or dedicated lab coat | Knee length | Clothing protection |
| Shoe covers | Disposable | Prevents tracking contamination out of the room |
| Eye protection and face shield | Goggles plus surgical mask, or full face shield | Splash protection for eyes and mucous membranes |
| N95 respirator | Fit-tested, filters at least 95 percent of airborne particles, used for aerosol-generating spills per your risk assessment | Respiratory protection |
| Spray bottle | Bleach-compatible | Applies disinfectant without splashing |
| Free chlorine test strips | Range matching the working concentration | Verifies solution strength |
| Sodium thiosulfate | Optional, per institutional SOP | Neutralizes chlorine before drain disposal of large volumes |
| Incident report card and door sign | Laminated, stored in the kit | Documentation and access control |
Safety note: Never mix bleach with ammonia-containing cleaners or acids. The reaction releases chloramine or chlorine gas, which injures the airway at low concentrations. Store bleach away from both.
Biological Spill Cleanup Procedure BSL-2 Step by Step
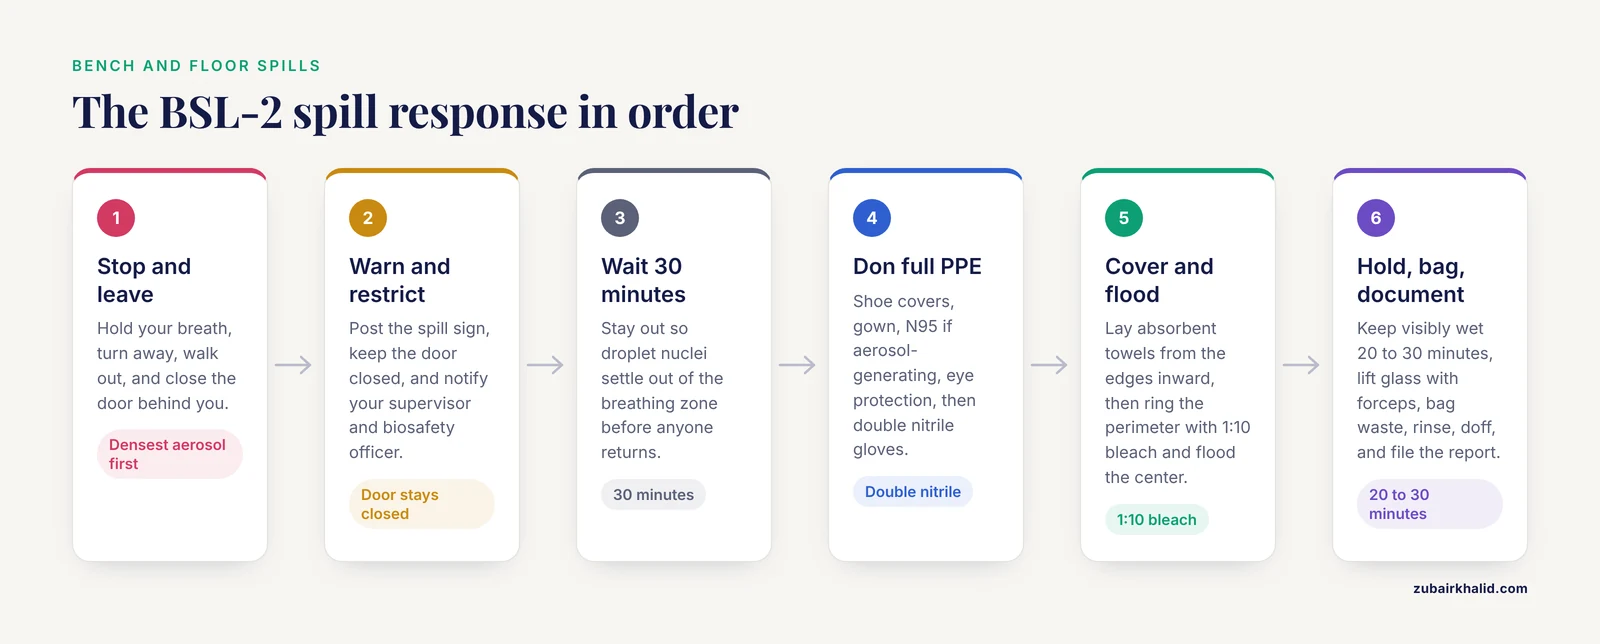
The sequence below is the standard response to an aerosol-generating BSL-2 spill on an open floor or bench, for example a dropped flask of Salmonella culture. Adapt volumes and contact times to your institutional SOP.
- Stop and leave. Hold your breath, turn away from the spill, and walk out of the room. Close the door behind you. Reason: the aerosol cloud is densest in the first seconds, and breathing through it or lingering in it is the highest-risk exposure of the entire event.
- Warn and restrict. Post a spill warning sign, keep the door closed, and notify your supervisor and the biosafety officer. Reason: secondary exposures happen when colleagues walk in unaware.
- Wait 30 minutes. For any spill that generated aerosols, stay out for at least 30 minutes so droplet nuclei settle out of the breathing zone. Reason: this settling period is the standard interval in biosafety practice, and re-entering sooner defeats the purpose of leaving.
- Remove contaminated clothing and wash skin. If your coat, sleeves, or shoes were splashed, remove the garment at the doorway, fold the contaminated side inward, and bag it for autoclaving. Wash exposed skin with soap and water. Reason: you are part of the spill now, and carrying contamination out of the room spreads it.
- Don full PPE. In order, put on shoe covers, a fluid-resistant gown or dedicated lab coat, a fit-tested N95 respirator if the spill was aerosol-generating, goggles plus a surgical mask or a full face shield, then double nitrile gloves with the outer cuff over the gown sleeve. Reason: donning from cleanest (body) to most exposed (hands) prevents self-contamination, and nitrile, unlike latex, holds up in hypochlorite.
- Cover the spill from the edges inward. Lay absorbent towels or spill pillows over the liquid, starting at the perimeter and working toward the center. Reason: this keeps liquid from being pushed outward into a larger contaminated footprint.
- Apply disinfectant in a ring, then flood. Pour or spray fresh 1:10 bleach around the perimeter first, then over the center, saturating all absorbent material. Reason: the perimeter ring locks in the spill boundary, and hypochlorite needs free contact with the full organic load to work.
Safety note: Work in a ventilated space and avoid leaning directly over the spill while pouring. If you smell strong chlorine or feel throat irritation, step back and ventilate before continuing.
- Hold the contact time. Keep everything visibly wet for 20 to 30 minutes (10 minutes minimum under most protocols), reapplying disinfectant if towels begin to dry. Reason: disinfection is time-dependent, and a dry surface means the chemistry stopped early.
- Remove sharps and broken glass. Use forceps, tongs, or the dustpan and brush, never hands, and place glass into the sharps container. Reason: puncture wounds are the leading route to genuine exposure during cleanup.
- Bag the waste. Collect all towels and pillows with tongs into a biohazard or autoclave bag. Reason: autoclaving at 121 degrees C in a validated cycle renders the waste safe for regulated disposal.
- Reapply disinfectant, then rinse. Apply a second application of fresh bleach to the cleaned area, wipe it up, then wipe with water and finish with 70 percent alcohol. Reason: the second pass catches organisms shielded by residual organic matter, and removing bleach residue protects stainless steel from corrosion.
- Doff, wash, document, restock. Remove PPE from clean to dirty (gown and shoe covers first, then eye protection, then gloves last), discard as biohazard, wash hands with soap and water for at least 20 seconds, complete the incident report, arrange occupational health evaluation for anyone exposed, and restock the spill kit. Reason: documentation and restocking are what turn one good response into a permanent capability.
Safety note: If the spill involved broken glass hidden under liquid, do not search for it by hand. Flood the area first, then lift glass with forceps.
BSL-1 Spill Cleanup: The Simplified Path
Spills of defined BSL-1 agents, such as a dropped plate of E. coli K-12, follow the same chemistry with a lighter footprint. Cover the spill with towels, saturate with 1:10 bleach or 70 percent alcohol, hold a contact time of about 10 minutes, wipe up, and dispose of the waste in biohazard streams. A single pair of gloves, a lab coat, and safety glasses are adequate PPE, and evacuation is not required unless the spill was strongly aerosol-generating. Broken glass still goes into a sharps container with forceps, never hands, and hand hygiene still follows. The formal differences from a BSL-2 response are notification intensity and PPE level, not the disinfection itself. Report BSL-1 spills according to your local SOP so repeated events can be traced to a root cause.
Variations: Equipment, Corridors, and Body Fluids
Spill inside a biosafety cabinet
Leave the cabinet running, since its airflow is containing the release. Cover the spill with absorbent material, flood the work surface, the walls, and the drain pan with 1:10 bleach, and hold a 20 to 30 minute contact time. Drain the basin through the drain valve into a container holding additional disinfectant, then wipe all interior surfaces and finish with 70 percent alcohol. If the volume was large or the cabinet requires fumigation, call the biosafety officer for formal gas decontamination.
Spill inside a centrifuge
Stop the rotor, keep the lid closed, and wait 30 minutes before opening, because centrifugation is one of the most efficient aerosol generators in a laboratory. Open carefully, and if the rotor and cups can be moved, carry them into a BSC for disassembly and disinfection. Otherwise decontaminate in place with fresh 1:10 bleach, then rinse metal parts with water and dry them to prevent corrosion. Document the event, since a centrifuge spill often indicates an unclosed cup or a cracked tube that needs a process fix.
Incubators, shakers, and water baths
Wait for splashing aerosols to settle, don PPE, absorb or drain the liquid, and disinfect with 1:10 bleach, followed by a thorough water rinse to protect the interior surfaces. For water baths where corrosion is a recurring problem, follow your institutional SOP for an alternative disinfectant and shorten the bleach exposure.
Corridors, elevators, and shared spaces
Treat any spill outside your own laboratory as a major event. Cordon off the area, prevent foot traffic, and call the biosafety officer. Do not attempt a solo cleanup in a public space, because you cannot control access or ventilation there.
Spills of human blood or body fluids
Apply universal precautions and use fresh 1:10 bleach as the default. Institutional protocols commonly allow stronger hypochlorite solutions, up to roughly 10,000 ppm available chlorine, for heavy organic loads such as gross blood, so follow your written SOP. The conservative default exists for a reason, and the Marburg survivor follow-up program in Rwanda, which formalizes safe sample collection through dedicated written protocols, illustrates how seriously high-consequence body-fluid handling is treated even outside acute outbreak care [2].
When the spill exceeds BSL-2 scope
If the agent requires BSL-3 or higher containment, or it is a select agent, do not attempt cleanup. Evacuate, secure the room, and activate the institutional emergency plan. Agent-specific written protocols, not a general bench SOP, govern that work.
Controls and Verification
- Disinfectant strength control. Verify the 1:10 working solution with free chlorine test strips before use. A reading far below the expected range means the dilution has degraded and must be remade.
- Surface verification. In high-stakes spaces, contact plates (RODAC plates, agar-filled plates pressed directly onto a surface) or swab-rinse sampling before and after cleanup can confirm removal of viable organisms. Read as colony counts, comparing pre- and post-cleanup.
- Waste treatment control. Monitor every autoclave load with a chemical indicator, and run biological indicators (spore strips of Geobacillus stearothermophilus, a heat-resistant spore-forming bacterium) at the validated frequency.
- Program controls. Audit spill kit contents quarterly, run spill drills, and require a documented competency sign-off before staff work unsupervised with BSL-2 agents.
Expected Results and How to Read Them
A successful response looks like this: no visible liquid or residue, a faint chlorine odor that dissipates within hours, no corrosion on equipment, no staff exposures, verification cultures (when used) with no growth or a marked drop from pre-cleanup counts, a filed incident report, and a restocked kit.
Red flags and their meaning: growth on post-cleanup contact plates means the decontamination failed and must be repeated with fresh disinfectant and a longer contact time. A reported exposure that surfaces hours later means the occupational health pathway was skipped, so route the person to occupational health immediately. Rust appearing on stainless steel days later means bleach residue was not rinsed, so add the water rinse and alcohol wipe back into the routine.
Troubleshooting
| Symptom | Likely cause | Fix |
|---|---|---|
| Bleach solution smells faint or test strip reads low | Stock degraded or dilution is old | Remake 1:10 fresh from dated stock and verify with a strip |
| Towels dry before contact time ends | Too little disinfectant applied or a warm surface | Reapply, add saturated towels, restart the timer |
| Spill spreads outward during cleanup | Disinfectant poured into the center first | Blot the outer edge first, then apply the perimeter ring before flooding |
| Outer gloves degrade or swell | Latex gloves or prolonged bleach contact | Use nitrile, double glove, change the outer pair when torn |
| Rust spots on stainless steel days later | Bleach residue left to dry | Rinse with water and wipe with 70 percent alcohol after every bleach use |
| Chlorine fumes, burning eyes | Bleach mixed with an acid or ammonia cleaner | Leave, ventilate, never combine products, report the event |
| Growth on post-cleanup contact plates | Organic load consumed chlorine or contact time was short | Preclean, then redisinfect with fresh solution and extend contact time |
| Broken glass found after waste was bagged | Inadequate visual check | Stop, reopen the bag over absorbent material, transfer glass with forceps to the sharps container |
| Colleague walked through the spill area | Access was not controlled | Log the person for exposure evaluation and tighten the signage step in the next drill |
Storage and Stability
- Stock bleach. Store cool, dark, and tightly capped. Date the bottle when opened and replace it by the manufacturer's expiration or sooner if the characteristic chlorine odor fades.
- Diluted 1:10 bleach. Prepare fresh and label with the date and time. Replace at least weekly, and daily is better, because diluted hypochlorite loses available chlorine within days. Store in an opaque, chemically compatible container, never next to ammonia products.
- 70 percent alcohol. A flammable liquid, so keep volumes within your fire code allowance and away from ignition sources.
- Spill kit. Keep it sealed, inventoried quarterly, and restocked immediately after every use, with the laminated procedure card inside the lid.
- Biohazard waste. Hold bagged waste closed in the designated area until autoclaved, and do not store wet biohazard waste beyond your institutional limit.
Common Mistakes and Limitations
The most frequent failures in biological spill cleanup procedures for BSL-1 and BSL-2 labs are predictable, which makes them preventable:
- Skipping the 30-minute aerosol wait. Re-entering early exposes staff to the densest part of the cloud.
- Wiping first, disinfecting after. Dry wiping aerosolizes organisms and spreads the footprint.
- Using old or pre-diluted bleach. Degraded hypochlorite reads clean on the bench and fails on the plate.
- Cutting the contact time. Ten seconds of wet contact inactivates nothing.
- Picking up broken glass by hand. A puncture through a glove converts a nuisance into an exposure.
- Relying on 70 percent alcohol alone for a spill. It evaporates before the contact time completes and burns.
- Wearing latex gloves or a single pair for BSL-2 work. Latex degrades in hypochlorite, and a single layer leaves no backup when the outer glove tears.
- Skipping eye and face protection. A splash into the eye is a mucosal exposure requiring immediate response.
- Not reporting the incident or the exposure. Undocumented events cannot be trended, and delayed exposure care limits post-exposure options.
- Not restocking the kit. The next person inherits an empty box during a real event.
- Mixing bleach with other cleaners. Chloramine and chlorine gas are the result.
- Treating a BSL-2 spill like a BSL-1 one. Skipping notification and evacuation removes the two safeguards that protect everyone else in the building.
- Tracking contamination out on shoes. Without shoe covers, the spill follows you to the break room.
Limitations: this procedure covers routine BSL-1 and BSL-2 events. Unusual agents, large volumes, injuries, and anything involving higher containment require the judgment of your institutional biosafety officer and, where relevant, occupational health. The procedure supplements, and never replaces, your institution's written exposure control plan and SOPs.
Tips for a Reliable BSL-2 Spill Response
- Pre-stage, do not improvise. Keep a complete kit within seconds of every BSL-2 room.
- Laminate the 12-step card and tape it inside the kit lid, because memory degrades under stress.
- Drill twice a year with a dummy spill of dyed water, including the evacuation and doffing steps.
- Date every bleach bottle, both stock and working dilution.
- Use a buddy system. One person cleans, one observes for PPE breaks and keeps the timer.
- Practice doffing as much as cleanup. Most self-contamination happens during removal.
- Keep chlorine test strips in the kit, not in a distant supply room.
- Debrief for 10 minutes after every real spill and update the SOP with what you learned.
Microbiology Biosafety Training and Documentation
Competency-based microbiology biosafety training turns the written sequence into muscle memory. Every new laboratory member should demonstrate a mock spill response, including PPE doffing and documentation, before working unsupervised with BSL-2 agents, followed by annual refreshers and drill participation. Rwanda's Marburg response identified rapid workforce mobilization and the rapid nationwide expansion of molecular testing as pillars of outbreak control, and both depended on staff who could execute written procedures under pressure [1]. The bench-level analog is the same: trained people, rehearsed steps, written records. Incident reports should feed a periodic review by your biosafety committee, and repeated spills in the same location should trigger engineering fixes such as better secondary containment, improved bottle closures, or relocation of the work into a BSC.
Frequently Asked Questions
What is the correct bleach dilution for a biological spill in a BSL-2 lab?
Use a fresh 1:10 dilution of household bleach, meaning 1 part bleach plus 9 parts water, which delivers roughly 5,000 to 6,000 ppm available chlorine when the stock is 5 to 6 percent sodium hypochlorite. Prepare it the day of use, because diluted bleach loses activity within days, and confirm strength with a free chlorine test strip.
How long should disinfectant stay in contact with a biological spill?
Keep the disinfectant visibly wet on the spill for at least 10 minutes, and use 20 to 30 minutes for visible culture or specimen spills under most institutional protocols. Reapply disinfectant if the surface starts to dry before the contact time ends.
How long should you wait before re-entering the room after an aerosol-generating spill?
Wait 30 minutes after closing the door. This standard settling period lets infectious droplet nuclei fall out of the breathing zone before staff return in full PPE.
What belongs in a biological spill kit?
A complete kit holds fresh 1:10 bleach or an equivalent commercial disinfectant with a label claim against your agents, absorbent towels or pillows, forceps and an autoclavable dustpan, a sharps container, biohazard and autoclave bags, double nitrile gloves, a fluid-resistant gown, goggles or a face shield, a spray bottle, chlorine test strips, shoe covers, and a laminated incident report card.
What is the difference between a BSL-1 and a BSL-2 spill response?
A BSL-1 spill of a low-risk organism can be blotted and disinfected in place with single gloves and a short contact time, while a BSL-2 spill adds supervisor notification, evacuation for aerosol-generating events, full PPE with double gloves and eye protection, and formal incident documentation.
Can 70 percent alcohol replace bleach for spill cleanup?
No. 70 percent ethanol or isopropanol is a useful wipe-down agent for small surfaces, but it evaporates too fast to hold a contact time on a spill, it is flammable, and it is unreliable against non-enveloped viruses. Use fresh hypochlorite for spills and reserve alcohol for the final wipe.
What should I do if I am exposed during a spill cleanup?
Wash the skin with soap and water, flush eyes or other mucous membranes at an eyewash for 15 minutes, then notify your supervisor and report to occupational health the same day for exposure evaluation and post-exposure decisions.
How do I handle a spill inside a centrifuge or biosafety cabinet?
For a centrifuge, keep the lid closed, wait 30 minutes, then decontaminate the chamber and rotor with fresh 1:10 bleach, ideally inside a biosafety cabinet, and rinse metal parts with water afterward. For a cabinet, leave it running, flood the work surface and drain pan with disinfectant, hold the contact time, drain the basin, and wipe all interior surfaces down.