How to Identify Biological Hazards in Your Microbiology Lab
By Dr. Zubair Khalid, DVM, MS, PhD ·
Biological hazard identification in a microbiology lab is the systematic process of finding every agent, specimen, and activity that can expose staff to infectious or toxic material, then ranking those exposures so that controls land where they matter most. Run a full assessment when a lab opens, at least annually, and whenever you add an agent, a new protocol, or a new piece of equipment. A first pass in a small clinical or teaching lab takes roughly 12 to 16 hours of hands-on work spread over two to four weeks. After that, monthly audits of one to two hours per bench area keep the record current. What you finish with is a documented risk register containing a defensible containment decision for every agent-activity pair, a prioritized control plan, and an audit trail that answers accreditation and inspector questions before they are asked.
What Counts as a Biological Hazard in a Microbiology Lab
A biological hazard is any material that can cause infection, intoxication, or a harmful immune reaction in the people who handle it. In a working microbiology lab that definition covers more than the organism list on the wall. The categories below all belong in your register.
- Live cultures and reference strains, including stocks in storage freezers.
- Primary clinical specimens such as blood, cerebrospinal fluid, tissue, sputum, urine, and stool, which arrive with an unknown microbial load.
- Aerosols and droplets generated by vortexing, centrifugation, decanting, pipetting, and spills.
- Sharps, including needles, glass Pasteur pipettes, broken culture containers, and lancets.
- Toxins, such as preformed bacterial toxins, which can remain dangerous even when no live organism is present.
- Genetically modified organisms and viral vectors, where the construct can change the hazard of the parent strain.
- Contaminated waste and equipment awaiting decontamination, including incubators, centrifuge rotors, and biohazard bags.
- Specimens in transit between the ward and the lab, a phase of the workflow that is easy to forget because it happens outside your room.
Environmental persistence matters too. Spores and other resistant forms behave differently from vegetative cells and survive processes that kill ordinary bacteria. The team preparing for Mars sample return had to define exactly what constitutes a biological hazard before designing any test for it, and their answer centered on two questions, whether microorganisms are present and whether they could be, or recently were, alive [1]. That two-part logic transfers directly to earthbound labs. An unknown organism in an unknown matrix is a hazard even when you cannot name it yet.
Risk Group (RG) classification describes the intrinsic hazard of an agent. RG1 agents are unlikely to cause disease in healthy adults. RG2 agents cause disease but effective treatment exists and spread beyond an exposed person is rare. RG3 agents cause serious disease with limited treatment options. RG4 agents cause severe, often fatal disease with few countermeasures. These definitions are standard across biosafety programs. The error to avoid is treating the risk group as the final answer. A comparative analysis of ten national and international biosafety references, including the WHO Laboratory Biosafety Manual fourth edition, the CDC and NIH manual Biosafety in Microbiological and Biomedical Laboratories sixth edition, and the CDC Biological Risk Assessment from 2024, concluded that the exposure generated by the procedure, rather than agent taxonomy alone, should drive the containment decision [2]. The same organism handled as a validated inactivated extract and handled as a live culture in an open centrifuge are two different hazards wearing one label.
The Principle Behind Biosafety Risk Assessment
A hazard is something that can cause harm. Risk combines how likely that harm is with how severe it would be. Modern biosafety risk assessment stitches together several established frameworks, and understanding how they fit makes your own assessment stronger.
Hazard Identification and Risk Assessment (HIRA) is the hospital-wide method for finding and scoring hazards across departments. In an analytical study at VY Hospital, departments including the Pathology Lab were appraised with a risk matrix built on severity and likelihood, and the control measures covered staff training, equipment maintenance, waste management, and monthly safety audits [3]. HIRA answers the operational question, where are our worst exposures and what do we fix first.
Quantitative microbial risk assessment (QMRA) adds a formal structure borrowed from public health. Its four steps are hazard identification, exposure assessment, dose-response modelling, and risk characterization [4]. Most labs will never build a dose-response curve, but the four-step skeleton keeps the thinking honest. You must state what the hazard is, how much of it reaches a person, what dose causes harm, and what the combined risk level is.
The WHO Laboratory Biosafety Manual fourth edition (LBM4) made risk-based rather than prescriptive containment the international standard. A structured review of Hendra and Nipah viruses, two highly pathogenic zoonotic henipaviruses, found that LBM4 requires risk assessments tailored to the specific pathogen, the specific activity, and the operational setting, and that inactivation and decontamination claims need validation evidence behind them [5]. The lesson generalizes, the assessment is always about your agent, your procedure, and your room, never about a generic organism.
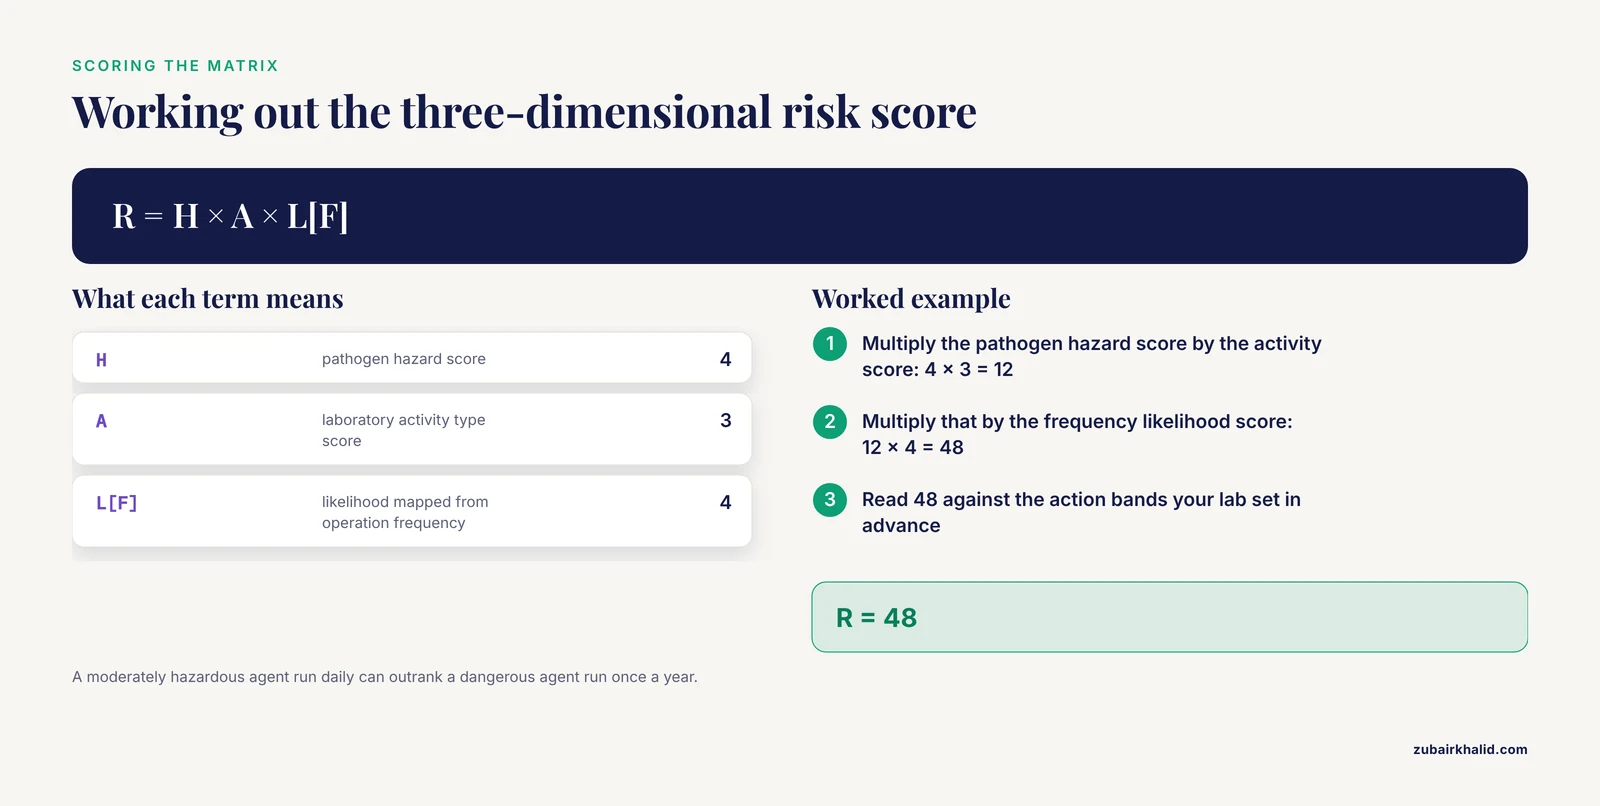
Finally, semi-quantitative scoring keeps the process reproducible instead of dependent on whoever filled out the form. A three-dimensional risk matrix developed for primary-level pathogen laboratories scores three dimensions, pathogen hazard (H), laboratory activity type (A), and annual operation frequency (F), and combines them in the formula R = H × A × L[F], where L[F] maps operation frequency to the likelihood of an event [6]. The multiplication matters. A moderately hazardous agent worked with daily can outrank a dangerous agent worked with once a year.
Materials and Equipment for the Assessment
| Item | Working concentration or specification | Purpose |
|---|---|---|
| Agent inventory and procedure map forms (paper or spreadsheet) | One row per agent-activity pair | The raw material of the risk register |
| Risk matrix template | 5 × 5 severity by likelihood grid, bands defined in advance | Converting judgments into comparable scores |
| PPE for the walkthrough | Fluid-resistant lab coat, nitrile gloves, safety glasses, fit-tested N95 respirator where respiratory hazards exist | Protecting the assessors while they inspect |
| Sodium hypochlorite (household bleach, 5.25 to 6.15 percent) | 1:100 dilution for routine surfaces, about 500 to 1,000 ppm available chlorine. 1:10 dilution, about 5,000 ppm, for spill response. Prepare fresh daily | Disinfecting during and after the walkthrough |
| Ethanol or isopropanol | 70 percent (v/v) in water | Spot disinfection and wiping down the biosafety cabinet work surface |
| Biological indicators | Geobacillus stearothermophilus spore carriers, typically 10⁶ spores per carrier | Verifying that autoclave cycles actually sterilize |
| Chemical indicator strips or tape | Per load | Detecting cycle failures between biological checks |
| Viable bioaerosol sampler | Single-stage impactor (for example a BioStage style impactor) on a calibrated pump, standard flow 28.3 L/min, tryptic soy agar plates | Measuring airborne bacterial and fungal load where uncertainty exists |
| Surface sampling swabs | Swabs in neutralizing broth (for example Dey-Engley or letheen medium) | Checking cleaning efficacy on benches and equipment |
| Spill kit | Absorbent pads, chlorine disinfectant, sharps container, biohazard bags, shoe covers | Responding to a release during the assessment |
| Calibrated thermometer or data logger | Traceable reference, set for 4 °C checks | Verifying specimen transport and holding conditions |
| Inspection flashlight and checklist | Engineering control survey list | Finding worn gaskets, blocked grilles, and overloaded sharps containers |
Safety note. Never mix hypochlorite with ammonia, acids, or other cleaners, the reaction releases toxic chloramine or chlorine gas. Ethanol at 70 percent is flammable, keep it away from Bunsen burners and incinerators. Respirators require fit testing and medical clearance before use. Treat every primary specimen and culture touched during the walkthrough as infectious.
Step-by-Step Biological Hazard Identification in the Microbiology Lab
1. Assemble the team and define the scope. Include bench technologists, the supervisor, the biosafety officer, and where relevant facilities and cleaning staff. Draw the boundary of the assessment, which rooms, which specimen types, which shared equipment. Reason. Front-line staff know the shortcuts that never appear in the standard operating procedure, and the failure mode analysis of specimen transfer showed that a multidisciplinary team is what surfaces them [7].
2. Build the agent and specimen inventory. List every organism the lab cultures, every reference strain in storage, and every specimen type received. Assign each a risk group. Reason. Pathogen hazard (H) is the first term in the risk formula, and you cannot score what you have not listed [6].
3. Map every activity from receipt to disposal. Walk the bench and write down each unit operation, specimen receipt and accessioning, plating and streaking, rapid antigen testing, staining, centrifugation, vortexing, aliquoting, molecular setup, incubation, identification, susceptibility testing, and discard. Reason. Activity type (A) is the second term in the risk formula [6], and exposure is generated by what you physically do, not by the name on the vial [2].
4. Record how often each activity runs. Count tests per day, week, and month for each activity. Reason. Frequency maps directly to the likelihood of an event in the three-dimensional model, R = H × A × L[F] [6]. A daily high-load procedure deserves a harder look than an annual one at the same hazard score.
5. Identify the exposure route for each agent-activity pair. For each row, ask how the agent could reach a person, inhalation of aerosols, percutaneous injury from sharps, mucocutaneous splash, or ingestion from hand-to-mouth contact. Reason. The route determines which control matters. A sealed rotor answers an inhalation risk, a needle-free transfer device answers a percutaneous one.
6. Score severity and likelihood on the risk matrix. Use the 5 × 5 grid. Define severity bands in writing before scoring, from negligible (no treatment needed) through catastrophic (life-threatening disease), and calibrate likelihood against your own incident history. Reason. The severity-likelihood matrix is the core of the HIRA method, and predefined bands stop the assessment from drifting [3].
7. Compute the semi-quantitative risk score. For each pair, multiply the three terms, R = H × A × L[F]. As pure arithmetic, a hazard score of 4, an activity score of 3, and a likelihood score of 4 give R = 48. Where the cutoffs between acceptable, tolerable, and unacceptable fall is a local decision, set the bands before you score and document them. Reason. The three-dimensional model was validated against real workload data from 16 district public health labs and produced actionable risk levels, which is the point of scoring [6].
8. Survey engineering controls against the exposure map. Check biosafety cabinet class and certification date, centrifuge rotor seals and cups, sharps container fill levels, eyewash function, and handwash access, and match each control to the exposure routes you identified in step 5. Reason. A control that does not address the actual route is decoration, not protection.
9. Assign containment procedure by procedure, not agent by agent. For each agent-activity pair, decide the biosafety level required. Where the procedure reduces exposure, for example validated chemical inactivation before open handling, containment can be adjusted down with justification. Where the procedure increases it, for example sonication or high-speed blending, adjust up. Reason. The eight-step Procedure-Specific Risk (PSR) framework was built precisely because fixed risk-group-to-BSL mapping fails for modern work with genetically modified organisms, viral vectors, and multi-step protocols [2].
10. Sample air and surfaces where uncertainty remains. When the walkthrough leaves doubt, for example an unexplained cluster of symptoms or a heavily used centrifuge corridor, quantify. Collect culturable bioaerosols with a single-stage impactor on a calibrated pump at 1.5 m breathing-zone height, and take surface swabs after the normal cleaning round. In one occupational survey, 320 air samples collected across ten operational units and both morning and evening shifts showed that exposure varied by location and time of day, which is why a single grab sample misleads [8]. Reason. Measurement replaces argument.
11. Audit the pre-analytical chain. Follow a specimen backward, from your bench to the ward. Check transport packaging, labeling, request forms, and chain of custody. In a failure mode, effects, and criticality analysis (FMECA) of frozen-section sample transfer, a multidisciplinary team working through six workflow steps found 12 failure modes across 11 sub-processes, with missing patient identification, incorrect sample retrieval, missing labels, misdirected samples, and samples sent to the wrong lab among the top-ranked risks, scored by risk priority number from severity, occurrence, and detectability [7]. Reason. A leaking or mislabeled specimen is a biological hazard to couriers, accessioning staff, and the patient in that order.
12. Verify decontamination and waste streams. Watch an autoclave cycle end to end, check load configuration, confirm biological indicator results are on file, and trace the route of sharps and biohazard bags from bench to final disposal. Reason. Waste management was one of the control pillars in the hospital HIRA program, and an unverified autoclave is an uncontrolled hazard with a clean-looking label [3].
13. Select controls using the hierarchy and document residual risk. Work down the hierarchy, elimination, substitution, engineering controls, administrative controls, then PPE. Record what you chose, why, and what risk remains after the control. Sign and date the register. Reason. Residual risk is the number your next assessment compares against, and a signed record is what an inspector asks for.
14. Re-score after controls and set the audit calendar. Rescore every pair with the new controls in place and schedule monthly audits plus a full annual reassessment. In the hospital HIRA study, risk scores before and after implementation were compared with a paired t-test, and both severity and likelihood fell significantly, alongside fewer staff injuries [3]. Reason. Without a before-and-after comparison you cannot demonstrate that the assessment changed anything.
Controls and Verification of Your Findings
An identification exercise without verification produces confident guesses. Build these checks into the assessment.
Autoclave verification. Run a Geobacillus stearothermophilus biological indicator with every validation cycle and at a regular interval for routine loads, with chemical indicators in every load. A cycle that passes chemical indicators but fails the biological indicator has a steam quality or loading problem.
Cabinet verification. Confirm annual certification of every biosafety cabinet, and check airflow with a simple smoke pencil or taper during the walkthrough. A cabinet that passes certification but sits under a supply diffuser that disturbs its air curtain is not protecting anyone.
Validated environmental sampling. Before you trust a negative surface or air result, prove the method recovers a positive. The benchmark is the Bacillus anthracis spore work, where an optimized protocol of washing, centrifugation, sonication, and shaking improved recovery from spiked soils to a matrix limit of detection near 14 spores per gram, and two independent laboratories achieved comparable recoveries on both loamy and sandy soils [9]. Spike your own matrix, run the recovery, and record the limit of detection for your sampling method.
Molecular result error management. When PCR or sequencing is used to confirm or exclude a hazard, manage the known error classes from the metabarcoding literature, false negatives, false positives, artifactual variants, disproportions, and incomplete or incorrect taxonomic identifications [10]. The recommended checkpoints transfer directly, rigorous protocol optimization, error minimization with physical separation of pre- and post-amplification areas and negative controls, and downstream analysis that acknowledges residual bias.
Calibration. Verify that thermometers, pumps, and pipettes used in the assessment carry current calibration. An uncalibrated pump makes your air volumes, and therefore your concentrations, fiction.
Expected Results and How to Read Them
The deliverable is a risk register. Each row carries the agent, the specimen or culture type, the activity, the exposure route, the H, A, and L[F] scores, the computed R, the controls in place, the residual risk, the responsible person, and the review date. Read it in bands. Most routine diagnostic work under standard BSL-2 controls should land in the tolerable band, and the register should isolate the rare outlier rather than drowning every row in amber.
Calibrate your expectations against published validation. When the three-dimensional model was applied to real 2024 workload data from 16 district public health laboratories running 130 tests, 88 percent of the tests involved Category III pathogens, laboratory intensity varied widely with only two sites reporting five or more tests per day in a BSL-2 room, one activity was judged unacceptable, and inactivated and non-infectious materials were 100 percent acceptable [6]. The pattern is typical, most of the register sits at moderate risk driven by volume, and the assessment earns its keep by finding the one row that does not belong.
For air sampling data, convert counts into hazard quotient (HQ) and hazard index (HI) estimates, the standard non-carcinogenic risk metrics used in occupational bioaerosol studies, where an HQ below 1 is conventionally read as acceptable [8]. Compare units and shifts rather than chasing a single number, spatial and temporal variation is the finding that points to a specific source.
The proof of the whole exercise is directional. After the hospital HIRA program introduced its controls, the paired comparison showed a considerable reduction in both severity and likelihood scores, with fewer employee injuries and improved operational efficiency [3]. Your register should show the same slope at the next review.
Troubleshooting Your Hazard Identification
| Symptom | Likely cause | Fix |
|---|---|---|
| Every row scores low risk | Normalization bias, staff scoring against their own lab rather than defined bands | Score against written severity definitions and calibrate with past incidents and near misses |
| The register has not been touched in a year | No owner and no review date on the document | Name a responsible person per section and tie updates to the monthly audit cycle [3] |
| Air counts spike near one instrument | An aerosol-generating step, typically centrifugation, vortexing, or decanting | Use sealed rotors or cups, move the step into the cabinet, resample to confirm |
| Biological indicator fails but chemical indicators pass | Steam penetration problem, overloaded chamber, or wrong cycle parameters | Repack with standard load, verify 121 °C cycle parameters, service the unit, retest |
| Specimens arrive leaking or mislabeled | Transport packaging and identification failure upstream | Enforce sterile hermetic containers and two-identifier labeling, and audit the courier route [11], [7] |
| Molecular results conflict with culture | Contamination-driven false positives or artifactual variants | Separate pre- and post-amplification areas, add negative controls, apply the error checkpoint framework [10] |
| A new rapid method went live and the register never changed | No change-control link between method adoption and risk assessment | Require steps 3 through 7 to be rerun before any new protocol handles its first live specimen |
Variations for Special Situations
Genetically modified organisms and viral vectors. Use the eight-step Procedure-Specific Risk framework, which assigns containment from procedural exposure using a BSL assignment matrix, a structured template, and a freely accessible digital implementation tool, with validity grounded in the ten reference documents it synthesizes [2].
High-consequence zoonotic agents. For agents in the henipavirus class, apply the LBM4 risk-based approach with pathogen-specific, activity-specific evidence, require validated inactivation and decontamination data before any downgrading, and coordinate across human, animal, and laboratory systems under a One Health framework [5].
Unknown or exotic samples. For material of uncertain origin, borrow the three-step sample safety assessment logic developed for Mars sample return, first determine whether microorganisms are present, then determine whether they could be or recently were alive, supported by a statistical framework before release from containment [1].
Fully quantitative assessment. When prevalence, concentration, and dose-response data exist for your scenario, run the four QMRA steps to a numerical risk estimate instead of a band [4].
Omics-assisted exposure assessment. Metagenomics can characterize the environmental microbiota of a facility and how it shifts over time under your operating conditions, an emerging route to finer-grained exposure assessment [12].
New rapid workflows. Any workflow change reopens steps 3 through 7. A direct-from-blood bacterial isolation protocol illustrates the point, it removes the traditional culture step, achieves over 70 percent isolation efficiency within 30 minutes, works at low concentrations of 1 to 10 bacteria in 0.3 mL of blood, preserves viability, and runs on common lab equipment [13]. Faster handling of positive blood cultures changes the exposure profile, so the register changes with it.
Biofilm-heavy specimen types. Labs processing implant-related specimens follow structured guidance, including sequential collection of synovial fluid, tissue, and hardware per the World Association against Infection in Orthopaedics and Trauma, cold chain at 4 °C, sterile hermetic containers, sonication of hardware or dithiothreitol (DTT) elution to free biofilm bacteria, blood culture bottle systems with extended 14-day incubation, and quantitative thresholds of at least 50 CFU/mL to separate infection from contamination [11]. Note that sonication and DTT pretreatment are themselves aerosol and chemical hazards that must be added to the register.
Storage, Records, and Stability
The register. Keep it version controlled, dated, and signed. Record the review date on every row. Retain superseded versions so the before-and-after comparison at the next assessment has a baseline.
Disinfectants. Hypochlorite dilutions lose activity within hours to days, prepare fresh daily and label with the date and concentration. Seventy percent ethanol is stable in storage but flammable, store it away from ignition sources in rated cabinets.
Biological and chemical indicators. Store per the manufacturer, check expiry dates during the audit, and record lot numbers with results so a failed lot can be traced.
Specimens. Maintain the cold chain at 4 °C during transport and short-term holding for specimen types where it is required, in sterile hermetic containers that prevent leaks and preserve viability [11]. Verify transport temperature with a calibrated logger rather than trusting the shipping box.
Sampling media. Use agar plates within their shelf life and incubate promptly after sampling, holding times at room temperature distort counts in both directions.
Common Mistakes and Limitations
- Copying the risk group onto the door sign. Risk group describes the agent, biosafety level describes the containment your procedure needs, and the procedure decides [2].
- Scoring activity without frequency. The R = H × A × L[F] model exists because intensity of use changes the likelihood term, and ignoring it flattens the register into wallpaper [6].
- Writing the register once and shelving it. The hospital HIRA evidence shows the benefit comes from ongoing assessment, monthly audits, and repeated training, not from the first document [3].
- Ignoring the pre-analytical chain. The FMECA of specimen transfer found its worst failure modes in labeling and routing before the sample ever reached the bench [7].
- Trusting inactivated without validation. Downgrading containment on the word inactivated, without validated inactivation and decontamination data, is how high-consequence agents escape containment [5].
- Believing negative environmental samples from an unvalidated method. Validate recovery on your own matrix with spiked positives before a negative result means anything [9].
- Treating a molecular negative as proof of absence. False negatives and artifactual variants are managed, not eliminated, through protocol optimization, controls, and bias-aware interpretation [10].
- Leaving new methods off the register. A faster workflow changes activity type and exposure, and it belongs in the assessment from day one [13].
- Scoring everything medium to avoid hard decisions. If no row is ever unacceptable, the bands are wrong, not the lab.
This framework manages organizational risk. An individual exposure, needlestick, or suspected lab-acquired infection needs immediate first aid, incident reporting, and clinical evaluation through occupational health, which sits outside a bench-level assessment.
Microbiology Biosafety Training That Keeps the Assessment Alive
A register nobody can execute is a filing exercise. Microbiology biosafety training should cover the agent hazards on your inventory, the procedure hazards on your activity map, correct PPE and cabinet use, spill response, waste handling, and exposure reporting, with competency demonstrated by observed performance rather than attendance sheets. Schedule onboarding training before a new employee touches a live specimen, annual refreshers, and a targeted session after every incident or near miss. The hospital HIRA program paired its assessment with improved training and monthly safety audits, and that combination built the safety culture associated with fewer employee injuries [3]. Apply the same rule to new methods, when a lab adopts a faster workflow such as direct blood isolation, train the aerosol points of the new protocol before the first live run, not after [13].
Frequently Asked Questions
What counts as a biological hazard in a microbiology lab?
Anything that can expose staff to infectious or toxic material, including live cultures, primary clinical specimens, aerosols, sharps, toxins, genetically modified organisms, contaminated waste, and specimens in transit.
How often should a biosafety risk assessment be updated?
At least annually, plus whenever you introduce a new agent, protocol, or piece of equipment, and after any incident or near miss.
What is the difference between a risk group and a biosafety level?
A risk group describes the intrinsic hazard of the agent, while a biosafety level describes the containment your specific procedure requires, and the procedure rather than the agent name drives the assignment [2].
How do I calculate risk with the three-dimensional matrix?
Multiply pathogen hazard, laboratory activity type, and the likelihood mapped from operation frequency, R = H × A × L[F], then read the score against action bands your lab has defined in advance [6].
Do I need to sample the air in my lab?
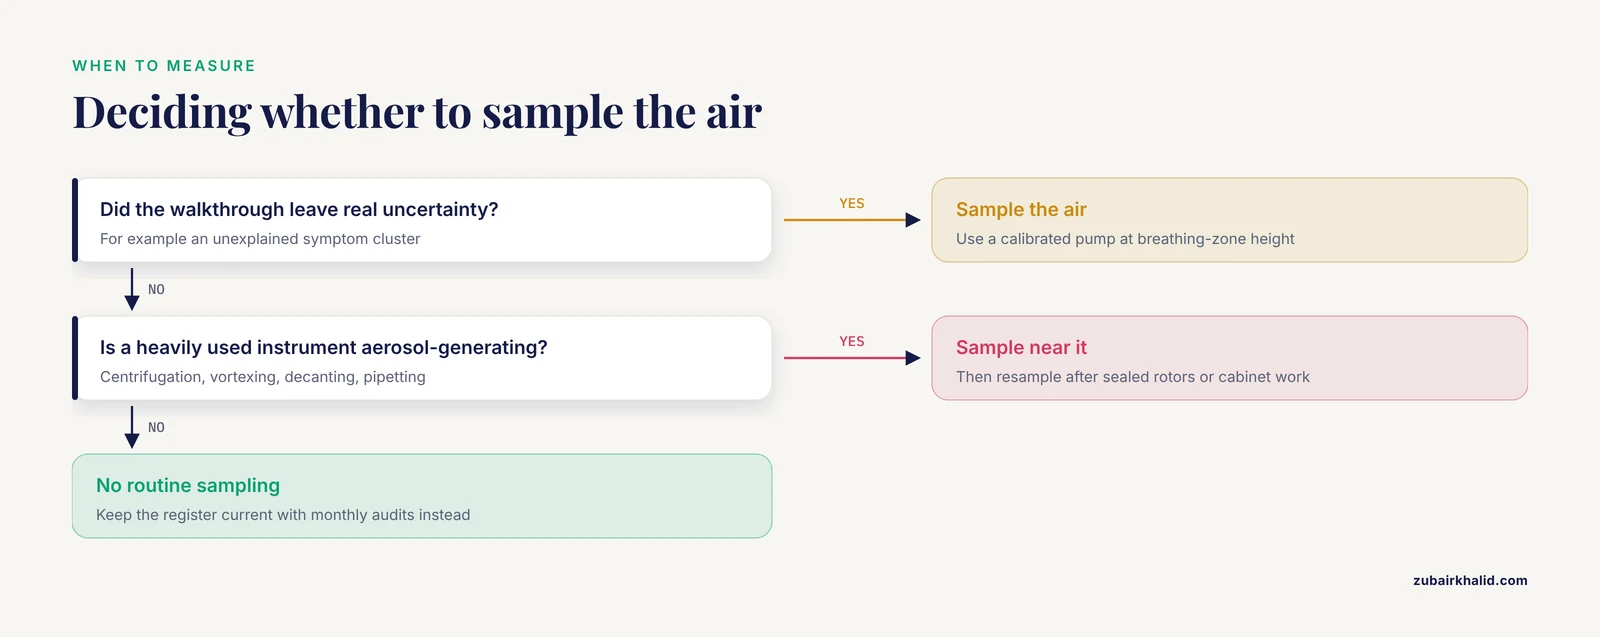
Not routinely, use air sampling when the walkthrough leaves real uncertainty, such as an unexplained symptom cluster or a heavily used aerosol-generating instrument, and sample at breathing-zone height with a calibrated pump [8].
Which lab activities generate the most aerosols?
Centrifugation, vortexing, decanting, vigorous pipetting, and spill cleanup generate the most, which is why sealed rotors and cabinet work target the highest-risk steps.
How does specimen transport create biological hazards?
Leaks, breakage, temperature abuse, and labeling errors expose couriers and accessioning staff, and pre-analytical failure modes such as missing labels and misdirected samples rank among the top specimen-handling risks [7].
What should microbiology biosafety training include?
Agent and procedure hazards, correct PPE and cabinet use, spill response, waste handling, and exposure reporting, with observed competency checks, annual refreshers, and retraining after incidents [3].
Sources
- Mars sample return campaign: biological risk and a proposed sample safety assessment protocol
- An 8-step procedure-specific risk framework enables reproducible biosafety level assignment beyond agent-based classification.
- Enhancing Hospital Safety through Hazard Identification and Risk Assessment (HIRA): An Analytical Study
- Quantitative microbial risk assessment of acute gastrointestinal illness attributable to freshwater recreation in Ontario.
- Hendra and Nipah viruses: Biosafety evidence for risk-based containment, inactivation practices, and one health preparedness.
- A semi-quantitative risk assessment of pathogenic microorganism laboratories in Beijing's CDCs based on a three-dimensional risk matrix model.
- From the Operating Theater to the Pathology Laboratory: Failure Mode, Effects, and Criticality Analysis of the Biological Samples Transfer
- Inhalation exposure and non-carcinogenic risk assessment of bacterial and fungal bioaerosols among wastewater treatment plants workers.
- Optimization of a sample processing protocol for recovery of Bacillus anthracis spores from soil.
- Current practice in plankton metabarcoding: optimization and error management
- The sample’s journey in orthopedic implant infections : from the operating room to the microbiology lab
- Next generation of microbiological risk assessment: Potential of omics data for exposure assessment.
- A simple, low-cost, and highly efficient protocol for rapid isolation of pathogenic bacteria from human blood