How to Integrate QC Samples into an Automated Workcell
By Dr. Zubair Khalid, DVM, MS, PhD ·

Integrating quality control samples into an automated workcell means routing reference organisms, control materials, and sterility checks through the same robotic streaking, incubation, digital imaging, and identification pipeline that handles patient specimens. The goal is a continuous, timestamped, middleware-managed record of system performance that requires no manual plate handling and no separate paper log. A laboratory processing 50 to 500 specimens per day typically needs 2 to 4 weeks for initial configuration and validation, followed by 15 to 30 minutes of daily oversight once the automated workcell QC scheduling calendar is running. This guide walks through the principle, the materials, the step-by-step procedure, the controls, the expected results, troubleshooting, and the mistakes that cause most QC integration projects to stall.
Principle
An automated workcell in clinical microbiology is a connected set of instruments, typically a plate streaker, one or more continuous-feed incubators, a digital imaging reader, and an identification and antimicrobial susceptibility testing module, all linked by a conveyor track and governed by middleware that decides which specimen goes where and when. Quality control in this environment cannot rely on the manual habits that work well on an open bench. A frozen glycerol stock of Staphylococcus aureus ATCC 25923 does not help you if it sits in a freezer while the middleware routes every position on the streaker to patient samples.
The principle behind automated workcell QC scheduling is simple: treat every QC sample as a specimen with its own barcode, its own routing rules, its own acceptance criteria, and its own corrective action pathway inside the middleware. When the middleware sees a QC barcode, it applies QC-specific logic. When the middleware sees a patient barcode, it applies patient logic. Both travel the same physical track, but the software treats them differently at every decision point.
This approach mirrors what has been demonstrated in other high-throughput laboratory disciplines. In clinical mass spectrometry, integrating QC tracking into total laboratory automation middleware enables standardized data validation and real-time operational monitoring across a continuous specimen stream rather than discrete batches [1]. In digital pathology, an AI-driven automated QC platform evaluated 94,995 whole-slide images in a single month across 10 subspecialty services, demonstrating that automated QC can operate at enterprise scale when it is embedded in the production workflow rather than run alongside it [2]. The same logic applies to microbiology workcells.
The regulatory foundation is laboratory quality management. Under CLIA and the standards of accrediting bodies such as CAP, every analytical system must have documented QC procedures that verify performance at defined intervals. An automated workcell does not change that requirement. It changes how you satisfy it: instead of a technologist pulling a control plate from the incubator and reading it manually, the middleware schedules the control, the robot streaks it, the incubator holds it, the imager captures it, and the software compares the result to acceptance criteria, all without human hands touching a plate.
Materials and Equipment
| Item | Specification or Working Concentration | Purpose |
|---|---|---|
| ATCC reference strains | Frozen glycerol stocks at -80 °C, working cultures on appropriate agar at 2-8 °C | Verify media, staining, identification, and AST performance |
| QC control organisms (per CLSI M40/M100 or equivalent) | Strain selection depends on the test menu and media type | Meet regulatory requirements for media and reagent QC |
| Sterile uninoculated media plates | Same lot as patient media | Detect contamination introduced by the streaker or track |
| Barcode label printer and labels | Workcell-compatible barcode symbology (Code 128 or equivalent), cryolabel stock for frozen vials | Identify QC samples in middleware |
| Middleware or laboratory automation software | Vendor-provided or third-party, with configurable QC routing rules | Schedule, route, and evaluate QC samples |
| LIMS interface | Bidirectional middleware-to-LIMS connection with audit trail | Document QC results for regulatory compliance |
| QC acceptance criteria table | Written criteria per organism, per test, per media lot | Define pass/fail thresholds |
| Validation protocol | IQ/OQ/PQ documents or equivalent | Prove the QC workflow works end to end before going live |
| Personal protective equipment | Lab coat, gloves, eye protection per institutional biosafety manual | Protect staff during handling of reference strains |
Step-by-Step Procedure
The following procedure covers automated workcell QC scheduling step by step, from initial inventory through go-live and daily operation. Each step includes the reason it matters.
Step 1: Inventory all QC requirements
List every test the workcell performs, every medium lot in use, every reagent lot in use, and every instrument that requires periodic verification. For each, record the required QC organism or material, the required frequency (per lot, per day, per week, per shipment), and the acceptance criteria from the manufacturer package insert or from CLSI standards.
Reason: You cannot schedule what you have not enumerated. Missing a single media lot QC requirement is a citation during inspection. A written inventory also reveals redundancies, such as two tests that use the same control organism on the same frequency, which lets you consolidate and reduce QC workload.
Step 2: Assign QC frequencies and build the calendar
Map each QC requirement to a scheduling rule in the middleware. Common patterns include:
- Per-shift QC: Run at the start of each shift to confirm the system is ready. Appropriate for staining QC and instrument function checks.
- Per-lot QC: Run when a new lot of medium, reagent, or cartridge is loaded. Appropriate for media growth promotion and reagent reactivity checks.
- Daily QC: Run once per 24-hour period. Appropriate for identification and AST panel QC.
- Weekly or monthly QC: Run at defined calendar intervals. Appropriate for incubator temperature and CO2 verification, though many workcells log these continuously from onboard sensors.
A centralized QC management platform evaluated over 60 months in a diagnostic radiology department recorded a mean of 56.3 QC tests per month across three imaging units, with an overall weighted mean pass rate of 97.49 percent [3]. While that study is from radiology, the scheduling architecture it describes, a centralized platform with defined test frequencies, tolerance limits, and automated compliance tracking, is directly transferable to microbiology workcell QC.
Reason: The middleware calendar is the single source of truth for when QC is due. If the calendar is wrong, the middleware will either skip QC (a compliance gap) or over-schedule it (wasted capacity and consumables). Build the calendar from the inventory in Step 1, not from habit or from what the previous supervisor did on the manual bench.
Step 3: Design the QC barcode and labeling scheme
Every QC sample entering the workcell must carry a barcode that the middleware recognizes as QC. Design a barcode convention that encodes at minimum:
- The QC sample type (reference organism, sterility check, calibration material)
- The specific organism or material identifier
- The date prepared or thawed
- The lot number of the medium or reagent being verified
- The target instrument or module
A common convention uses a prefix that is never assigned to patient accessions. For example, all QC barcodes might begin with "QC" followed by a five-digit sequence. The middleware routing table is then configured to send any specimen with a barcode starting with "QC" to the QC workflow rather than the patient workflow.
Reason: If QC and patient samples share the same barcode namespace, a transcription error can route a control organism into the patient result stream or, worse, route a patient specimen through QC evaluation and fail to generate a report. A distinct prefix eliminates this at the barcode level.
Step 4: Configure middleware routing rules
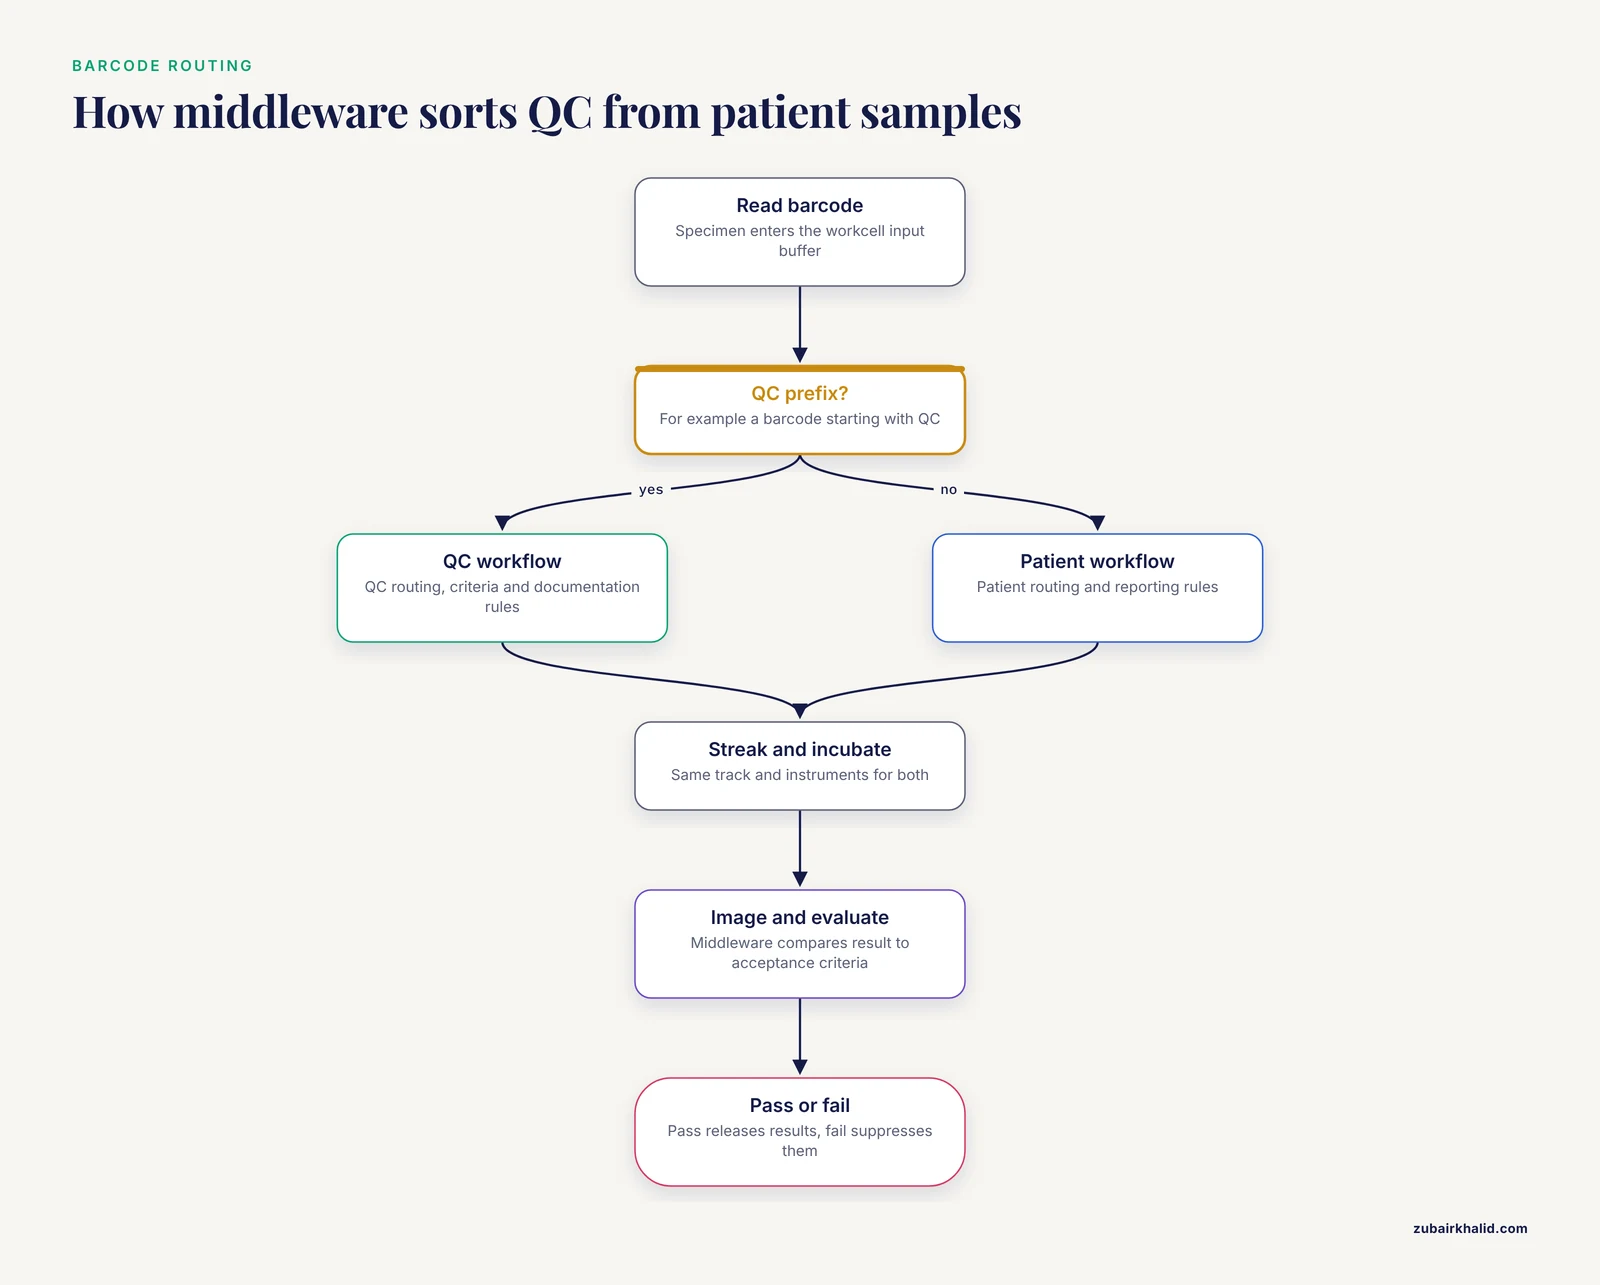
In the middleware configuration module, create a QC workflow that specifies:
- Which physical track positions QC samples occupy
- Which instruments QC samples are directed to
- What incubation parameters apply (temperature, atmosphere, duration)
- What imaging protocol applies
- What happens after imaging (auto-evaluation, flag for review, or both)
- What the timeout is if a QC sample does not complete its workflow within the expected window
Modern middleware platforms increasingly support intelligent routing and AI-assisted algorithms for standardized data validation and QC tracking, as described in the integration of LC-MS/MS into total laboratory automation [1]. In microbiology workcells, the same principle applies: the middleware should evaluate QC results against stored acceptance criteria and flag failures automatically, without waiting for a technologist to open the image and eyeball the growth.
Reason: Routing rules are the operational core of automated workcell QC scheduling. If the rules are incomplete, a QC sample can be streaked but never imaged, or imaged but never evaluated. If the rules are too rigid, the system halts when a QC sample is delayed by a busy track, and patient samples back up behind it.
Step 5: Establish acceptance criteria and auto-verification rules
For each QC sample type, define:
- What constitutes a passing result (for example, expected colony morphology, expected identification confidence, expected zone diameter within CLSI limits)
- What constitutes a failing result
- What the middleware does automatically when a result passes (mark QC as complete, update the QC log, release any patient results that were held pending QC)
- What the middleware does automatically when a result fails (suppress patient results from the affected lot or instrument, generate a deviation record, notify the supervisor)
A hybrid rule-based and retrieval-augmented LLM system implemented for newborn screening post-analytical workflow demonstrated that deterministic QC flagging was fully concordant with manual review, and that automated QC evaluation reduced per-batch processing time from 50.5 ± 14.8 minutes to 24.3 ± 8.8 minutes [4]. The key design feature was that all AI-generated outputs required mandatory specialist review before release, preserving human oversight while automating the flagging step.
Reason: Auto-verification rules turn QC from a passive record into an active gate. When QC passes, patient results flow. When QC fails, patient results are held. This is the mechanism that makes automated workcell QC scheduling clinically meaningful rather than merely documentary.
Step 6: Validate the QC workflow end to end
Before going live, run a validation that proves:
- QC barcodes are recognized correctly by the middleware
- QC samples are routed to the correct instruments
- QC results are compared to the correct acceptance criteria
- Passing QC results are documented in the LIMS with a timestamp and operator identity
- Failing QC results trigger the correct suppression and notification actions
- Patient results are not affected by QC sample processing (no cross-contamination, no misrouting)
- The QC calendar fires on schedule without manual prompting
Document each of these as a discrete test with a pass or fail outcome. A cloud-enabled LIMS-QMS platform designed for GLP/GMP-aligned laboratory operations embedded 1,456 QC checkpoints across 187 laboratory requests during a pilot deployment, with 43 deviation-handling episodes documented [5]. The scale of that checkpoint architecture illustrates the level of granularity expected in a validated automated QC system.
Reason: Validation is the evidence that your QC scheduling works. Without it, an inspector or accreditor has no basis to trust that the middleware is actually evaluating QC results and not just recording them. The validation protocol is also your recovery tool: if the middleware is upgraded or a rule is changed, you re-run the relevant validation tests.
Step 7: Train staff and write the SOP
Write an SOP that covers:
- How to prepare QC samples (which organism, which medium, which dilution, which label)
- How to load QC samples into the workcell input buffer
- How to verify that the middleware has recognized the QC sample
- What to do when a QC sample fails (who to notify, what results to suppress, how to document)
- How to troubleshoot common QC workflow errors (barcode read failure, track jam, imaging timeout)
- How to review the QC dashboard and confirm that all scheduled QC has completed
Reason: Automation reduces hands-on time but does not eliminate the need for staff who understand the system. A technologist who does not know that a QC sample failed will not know that patient results are being held. Training is the bridge between the middleware logic and the human decision-making that remains essential.
Step 8: Go live and monitor
Start with a limited QC schedule (for example, daily QC only) and expand to per-lot and per-shift QC as confidence builds. Monitor the first 2 to 4 weeks closely:
- Are QC samples completing their workflows on time?
- Are acceptance criteria being applied correctly?
- Are any QC samples being missed by the scheduler?
- Is the QC dashboard readable and useful?
Reason: Early monitoring catches configuration errors before they cause a compliance gap or a patient safety issue. Once the schedule is stable, oversight shifts from daily troubleshooting to periodic review.
Step 9: Review and adjust
At defined intervals (monthly is typical), review:
- QC pass rates by test and by instrument
- Frequency of QC failures and their root causes
- Whether any QC frequencies can be reduced (for example, if a medium lot has never failed, the laboratory may be able to justify reduced frequency per its QC plan)
- Whether any QC frequencies need to be increased (for example, if an instrument is drifting)
Reason: Laboratory quality management is a cycle, not a one-time setup. The QC schedule that is correct at go-live may be excessive or insufficient six months later as reagent lots change, instrument performance stabilizes, or the test menu expands.
Controls
Every QC workflow in an automated workcell should include the following control types:
Positive control. A reference organism or material that should produce a known positive result. For culture media QC, this is typically a defined ATCC strain inoculated to verify growth supportiveness. For identification panels, it is an organism with a known biochemical or MALDI-TOF spectrum. For AST, it is a strain with defined MIC values or zone diameters.
Negative control. A sterile medium plate or a known-negative material that should produce no growth or no signal. In an automated workcell, the negative control also serves as a sterility check on the streaking mechanism and the conveyor track, since any contamination introduced by the hardware will appear on the negative control.
Process control. A QC sample that travels the entire workcell pathway, from input buffer through streaking, incubation, imaging, and evaluation. This confirms that the system as a whole, not just individual instruments, is performing correctly. Process controls are typically run at the start of each shift or each production day.
Instrument control. A QC sample specific to one instrument module. For example, a calibration card for the digital imager or a known organism for the ID/AST module. Instrument controls isolate problems to a single module when the process control fails.
Expected Results and How to Read Them
When the QC schedule is running correctly, the middleware dashboard should show:
- All scheduled QC samples completed within their expected time windows
- All QC results within acceptance criteria
- No patient results held or suppressed due to QC failures
- A complete, timestamped audit trail in the LIMS
A passing QC result for a culture medium means the reference organism grew with the expected colony morphology within the expected incubation period. A passing QC result for an identification panel means the organism was identified correctly at the expected confidence level. A passing QC result for AST means the zone diameter or MIC fell within the published range for that strain and antibiotic combination.
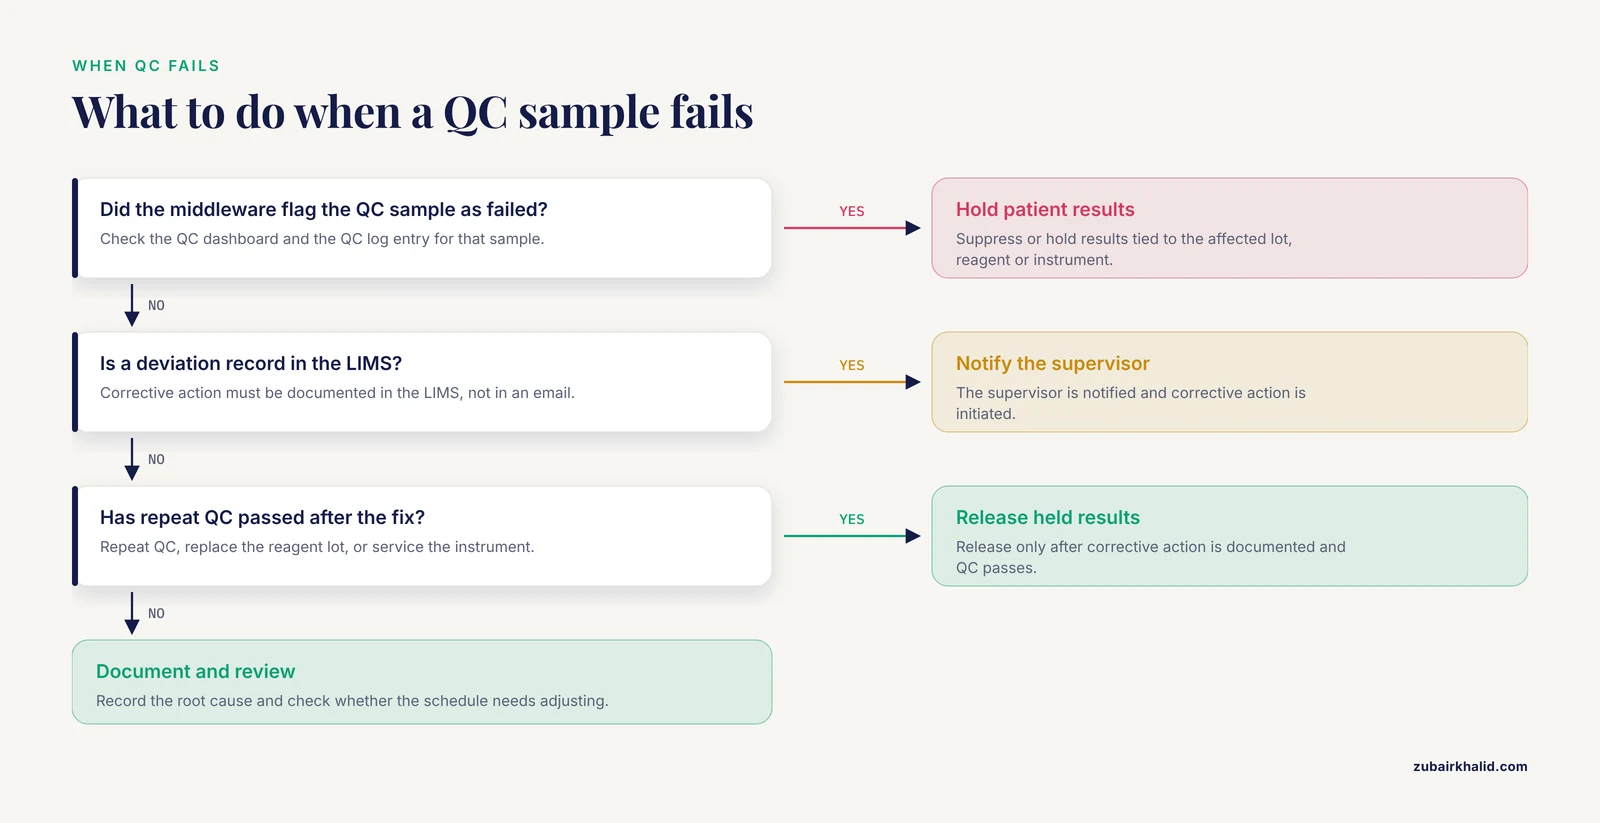
A failing QC result triggers a cascade:
- The middleware flags the QC sample as failed
- Patient results associated with the affected lot, reagent, or instrument are suppressed or held
- A deviation record is generated in the LIMS
- The supervisor is notified
- Corrective action is initiated (repeat QC, replace reagent lot, service instrument)
- Patient results are released only after corrective action is documented and QC passes
The overall QC pass rate in a well-functioning automated system should be high. In the 60-month QATrack+ evaluation, the weighted mean pass rate across 3,376 QC test entries was 97.49 percent, with a range of 95.70 to 98.86 percent [3]. A microbiology workcell operating below this range should prompt investigation into whether the issue is with the QC materials themselves, the instruments, or the acceptance criteria.
Troubleshooting
| Symptom | Likely Cause | Fix |
|---|---|---|
| QC sample not recognized by middleware | Barcode unreadable, wrong symbology, or prefix not in routing table | Reprint label, verify symbology matches scanner specification, confirm QC prefix is registered in middleware |
| QC sample streaked but never imaged | Imaging module not scheduled for QC samples, or timing conflict with patient sample queue | Add QC samples to the imaging schedule, adjust priority rules |
| QC result recorded but not evaluated against acceptance criteria | Acceptance criteria not loaded for that QC type, or middleware rule disabled | Load or re-enable the criteria, re-run the QC evaluation |
| QC passes but patient results remain suppressed | Suppression release rule not configured, or manual release required | Configure auto-release on QC pass, or document manual release step in SOP |
| QC fails intermittently on the same instrument | Instrument drift, reagent lot issue, or environmental condition (temperature, humidity) in the workcell | Run instrument-specific control, check environmental logs, contact service if drift confirmed |
| QC sample delayed past validity window | Track congestion from high patient volume, or QC priority set too low | Increase QC priority in middleware, or schedule QC during low-volume periods |
| Duplicate QC samples generated for the same lot | Calendar rule fires more than once, or manual QC entry duplicates automated QC | Audit calendar rules, remove duplicate triggers |
| Middleware does not notify supervisor on QC failure | Notification rule missing or email/SMS integration not configured | Configure notification rules, test with a deliberate QC failure during validation |
Variations
24/7 operations
Laboratories that run the workcell continuously need QC scheduled at every shift change. The middleware calendar should fire QC at fixed clock times (for example, 0700, 1500, 2300) rather than relative to shift start, so that QC is never skipped when a shift starts late or ends early.
New lot verification
When a new lot of culture media, identification panels, or AST cards is received, QC must be performed before the lot is released for patient use. In an automated workcell, this means the middleware must have a lot-blocking mechanism: patient samples are not routed to the new lot until QC for that lot passes. Some middleware platforms support this natively. Others require the laboratory to maintain a lot status table in the LIMS that the middleware queries before routing.
Molecular and mass spectrometry workflows
Workcells that include MALDI-TOF target verification or molecular panels require QC materials specific to those modalities. The multi-attribute method (MAM) approach in biopharmaceutical QC demonstrates the value of tracking multiple quality attributes in a single integrated analysis rather than running separate single-attribute tests [6]. In microbiology, the analogous concept is a single QC organism that verifies multiple attributes simultaneously (growth, morphology, identification, and susceptibility) rather than four separate QC runs.
Reduced frequency QC
Some laboratories qualify for reduced QC frequency after demonstrating consistent performance over time. CLSI M40 for culture media allows reduced frequency after initial conformance testing, provided the laboratory documents ongoing monitoring. The middleware should be configured to support both full-frequency and reduced-frequency schedules, with an audit trail showing when the frequency was changed and what data supported the change.
Storage and Stability
Reference strain stocks. Prepare frozen glycerol stocks (typically 15 to 20 percent glycerol in appropriate broth) and store at -80 °C or below in aliquots. Avoid repeated freeze-thaw cycles. Maintain a working culture on appropriate agar at 2-8 °C, subcultured at intervals defined in your SOP (typically weekly for most organisms, but shorter for fastidious strains). Discard working cultures when they show atypical colony morphology or when the subculture limit is reached.
Control materials. Store per manufacturer instructions. Note the expiration date and the open-vial stability period. The middleware should track lot numbers and expiration dates for all QC materials and flag expired lots before they are used.
QC records. The LIMS must retain QC records for the period required by CLIA and your accrediting body. Electronic records require audit trails, access controls, and backup procedures. A cloud-native LIMS platform designed for clinical trials incorporates multifactor authentication, encryption, audit trails, and electronic signatures to meet regulatory requirements for laboratory data integrity [7]. Microbiology laboratories should apply the same standards to their QC records.
Middleware data. Back up middleware configuration files, routing rules, and acceptance criteria tables. If the middleware server fails, the laboratory must be able to restore the QC schedule without rebuilding it from scratch. Store backups off-site or in a redundant cloud environment.
Common Mistakes and Limitations
Treating QC as an afterthought in middleware configuration. The most common failure in automated workcell QC scheduling is building the patient workflow first and then trying to squeeze QC in. Design the QC workflow in parallel with the patient workflow from the start. Both are first-class citizens in the middleware.
Using the same barcode namespace for QC and patient samples. A single-character transposition error can route a control organism into the patient result stream or a patient specimen through QC evaluation. Use a distinct barcode prefix that is never assigned to patient accessions.
Failing to configure auto-suppression of patient results on QC failure. If the middleware records a QC failure but does not hold the affected patient results, the QC system is documentary rather than protective. This is a patient safety gap and a compliance finding.
Scheduling QC during peak patient volume. QC samples compete for track positions, incubator slots, and imager time. Scheduling QC at the busiest time of day causes delays that can push QC samples past their validity window. Schedule QC during predictable low-volume periods or give QC samples priority in the middleware routing logic.
Not validating the QC workflow before go-live. The middleware will happily run a QC workflow that is configured incorrectly. It will streak the wrong organism, apply the wrong acceptance criteria, or fail to suppress patient results. Validation is not optional. It is the evidence that the system works.
Overcomplicating the QC schedule. Running more QC than required wastes consumables, track capacity, and staff time. Conversely, running less QC than required creates compliance gaps. Build the schedule from a written inventory of requirements (Step 1), not from habit.
Ignoring the pre-analytical phase. Failure mode and effects analysis in anatomical pathology found that diagnostic errors were most prevalent in the pre-examination phase, not the analytical phase [8]. In an automated workcell, the pre-analytical phase includes specimen labeling, input buffer loading, and barcode scanning. QC samples do not address errors in these steps. Complement QC scheduling with pre-analytical error monitoring, such as barcode read-failure rates and specimen rejection logs.
Assuming automation eliminates the need for human review. Automated QC flagging is powerful, but it does not replace judgment. A hybrid system that combines deterministic rule-based flagging with mandatory specialist review, as implemented in a newborn screening post-analytical workflow, demonstrated the value of keeping a human in the loop [4]. The middleware flags. The microbiologist interprets.
Not documenting deviations. When QC fails, the corrective action must be documented in the LIMS, not in an email or a verbal conversation. A pilot deployment of a unified LIMS-QMS platform recorded 43 deviation-handling episodes across 187 laboratory requests, demonstrating that deviations are a normal part of laboratory operations and must be captured systematically [5].
Failing to update the QC schedule when the test menu changes. Adding a new culture medium, a new identification panel, or a new AST drug requires updating the QC inventory, the middleware calendar, and the acceptance criteria table. If the schedule is not updated, the new test runs without QC coverage.
Safety Note
Reference strains used for QC in clinical microbiology may include organisms classified at Biosafety Level 2 (for example, S. aureus, Pseudomonas aeruginosa, Enterococcus faecalis). Handle frozen stocks and working cultures in a certified biosafety cabinet when vortexing, opening vials, or preparing inocula. Automated workcell hardware includes moving robotic arms, conveyor tracks, and automated plate handlers. Keep hands clear of moving components. Follow the manufacturer's lockout/tagout procedure before reaching into any module. Wear appropriate personal protective equipment (lab coat, gloves, eye protection) at all times when loading or unloading samples from the workcell.
Frequently Asked Questions
How often should QC samples run through an automated workcell?
The frequency depends on the test, the reagent lot, and regulatory requirements. Per-shift QC confirms daily readiness, per-lot QC verifies each new reagent or media lot, and daily QC covers identification and AST panels. Build the schedule from a written inventory of requirements rather than from habit.
Can QC samples be mixed with patient samples on the same track?
Yes. QC samples share the same physical conveyor track and instruments as patient samples, but the middleware routes them differently based on their barcode prefix. This is the core design feature of automated workcell QC scheduling. The middleware recognizes the QC barcode and applies QC-specific routing, evaluation, and documentation rules.
What happens when a QC sample fails in an automated system?
The middleware flags the failure, suppresses or holds patient results associated with the affected lot or instrument, generates a deviation record, and notifies the supervisor. Patient results are released only after corrective action is documented and repeat QC passes. This cascade must be configured in the middleware before go-live.
Do QC samples need special barcodes in an automated workcell?
Yes. QC samples must carry barcodes that the middleware recognizes as distinct from patient accessions. A common convention uses a prefix such as "QC" that is never assigned to patient specimens. The middleware routing table is configured to direct all barcodes with that prefix to the QC workflow.
How do you validate a new QC schedule in an automated workcell?
Run a validation protocol that tests each function: barcode recognition, routing to the correct instrument, application of the correct acceptance criteria, documentation in the LIMS, suppression of patient results on QC failure, and calendar firing on schedule. Document each test with a pass or fail outcome before releasing the system for production use.
Can middleware automatically release patient results when QC passes?
Yes, if the auto-release rule is configured. When QC passes, the middleware updates the QC log and releases any patient results that were held pending QC. If auto-release is not configured, a technologist must manually release results after reviewing the QC outcome, which adds delay and introduces the risk of forgetting to release.
What is the difference between process QC and instrument QC in a workcell?
Process QC travels the entire workcell pathway from input buffer through streaking, incubation, imaging, and evaluation, confirming that the system as a whole performs correctly. Instrument QC targets a single module, such as a calibration card for the imager or a known organism for the ID/AST panel, and isolates problems to that module when process QC fails.
How do you document QC in an automated workcell for inspection?
The LIMS must contain a timestamped, operator-attributed record of every QC sample: when it was scheduled, when it was processed, what result was obtained, whether it passed or failed, and what corrective action was taken if it failed. Electronic records require audit trails, access controls, and backup procedures per CLIA and accrediting body standards.
Sources
- Integration of liquid chromatography-tandem mass spectrometry into total laboratory automation: technical challenges and clinical advantages.
- Deployment of AI-driven automated quality control of whole-slide images in a large tertiary cancer center.
- Long-term evaluation of a web-based quality control management system (QATrack+) in diagnostic radiology.
- Automated Post-Analytical Workflow for Newborn Screening Using a Hybrid Rule-Based and Retrieval-Augmented Large Language Model System.
- A cloud-enabled LIMS-QMS platform with large language model-assisted standard operating procedure generation for GLP/GMP-aligned theranostics laboratory operations.
- Development and Integrated Application of the Multi-Attribute Method (MAM) in Quality Control of Biotechnological Drugs.
- ATRI LIMS: a cloud-native open-source laboratory information management system for biomarker-driven Alzheimer's disease clinical trials.
- A conceptual framework integrating artificial intelligence with failure mode and effects analysis for diagnostic error reduction in anatomical pathology.