How to Version Control Environment Files in Bioinformatics
By Dr. Zubair Khalid, DVM, MS, PhD ·

By the end of this article you will be able to export a Conda environment to a YAML file, put that file under Git version control, push it to GitHub, rebuild the identical environment on another machine, tag stable versions of your software environment, and wire those files into a Snakemake or Nextflow pipeline so that every analysis run records exactly which tool versions produced its results. You will also know the file types that belong in a repository, the ones that do not, and the mistakes that most often break reproducibility.
You need a machine with Git 2.30 or newer, Miniforge or Miniconda installed, and roughly 5 GB of free disk space for a test environment. A free GitHub account is enough to follow the remote-repository steps.
Why Environment Files Belong Under Version Control
Bioinformatics results depend on software versions. BWA 0.7.17 and BWA 0.7.12 do not always produce identical alignment files. Samtools flag behavior changes between releases. A pipeline that ran cleanly last year can fail or, worse, silently produce different numbers after an untracked upgrade. This problem is documented across the field. An audit of twelve crosslinking mass spectrometry pipelines found that verifiably false identifications exceeded the requested false discovery rate by up to 29-fold in some pipelines, and the audit explicitly tracked improvements between software versions, supporting version-aware testing as a quality control tool [1].
The reproducibility literature frames this precisely. A study that spent four months reproducing a single published mathematical model traced the failure to missing information, non-executable code, and missing environment records, and concluded that the problems resemble issues software engineering solved decades ago with version control, regression tests, and continuous integration [2]. Clinical practice reaches the same conclusion from a regulatory angle. Consensus recommendations from thirteen clinical bioinformatics units in the Nordic Alliance for Clinical Genomics state that clinical production bioinformatics should use standardized file formats and strict version control, with reproducibility ensured through controlled software environments [3].
Version control of environment files means storing the text files that describe your software environment (package lists, version numbers, channels, and container definitions) in a Git repository, so every change is recorded, reviewable, and reversible. The environment file is the contract between your analysis and the machine that runs it. If the file is in Git, the contract has a history.
The Files That Matter in a Bioinformatics Project
Before running commands, know which files earn a place in your repository. Each file type answers a different question about your environment.
| File | What it records | Created by | Question it answers |
|---|---|---|---|
environment.yml | Conda packages, versions, channels, and the environment name | conda env export | What did I ask Conda to install? |
| Explicit spec file | Every package with exact build strings, e.g. samtools=1.19.2=h566a250_1 | conda list, explicit | What did Conda actually install, down to the build? |
requirements.txt | Python packages with pinned versions | pip freeze | Which Python packages, at which versions? |
renv.lock | R package versions and repositories | renv::snapshot() | Which R package versions? |
Dockerfile or Apptainer.def | Base image, system libraries, install steps | Written by hand | How is the whole software stack assembled? |
config.yaml, params.json | Analysis parameters and sample metadata | Written by hand | With what settings did the pipeline run? |
conda-lock.yml | Fully resolved lockfile across platforms | conda-lock | What exact dependency graph resolves my YAML? |
Files that should almost never enter Git are raw sequencing data, large FASTA and FASTQ files, alignment indexes, intermediate BAM and VCF files, and anything else over a few megabytes. Git stores every version of every file forever, so a 3 GB reference genome committed once multiplies across every clone. Use .gitignore to keep them out, and record their checksums or download URLs in a text file instead.
Step-by-Step: Version Control a Conda Environment File
This walkthrough version controls the environment for a small bacterial genome assembly and annotation task, the kind of workflow Snakemake pipelines coordinate with per-rule environment isolation to enforce version control across all constituent tools [4]. Adapt the package names to your own project.
Step 1. Verify your tools
Open a terminal and check versions.
git --version
conda --version
Expected output looks like this (your numbers may differ):
git version 2.43.0
conda 24.7.1
If Git is missing, install it with your package manager. On macOS with Homebrew, run brew install git. On Ubuntu or Debian, run sudo apt install git. On Windows, install Git for Windows, which also provides the Git Bash shell used throughout this article.
Step 2. Create a project directory and a working environment
mkdir -p ~/projects/bsub-analysis
cd ~/projects/bsub-analysis
conda create -n bsub-analysis -c conda-forge -c bioconda \
  python=3.11 snakemake-minimal=7.32.4 fastqc=0.12.1 \
  fastp=0.23.4 spades=3.15.5 prokka=1.14.6 -y
Each flag matters. -n names the environment. Each -c adds a channel, and the order sets channel priority, with the first channel taking precedence. Bioconda and conda-forge are the two channels that host essentially all bioinformatics software. The = pins fix exact versions. Without pins, Conda picks the newest compatible versions at install time, which makes the environment non-reproducible from the first minute.
Expected output ends with a package listing and a line like:
# To activate this environment, use
#     $ conda activate bsub-analysis
Activate it and confirm the tools resolved:
conda activate bsub-analysis
fastqc --version
prokka --version
FastQC v0.12.1
prokka 1.14.6Step 3. Export the environment to YAML
conda env export > environment.ymlLook at the file:
cat environment.ymlname: bsub-analysis
channels:
- bioconda
- conda-forge
dependencies:
- _libgcc_mutex=0.1=conda_forge
- bwa=0.7.17=h7132678_9
- fastp=0.23.4=h595d95f_1
- fastqc=0.12.1=hdfd78af_1
- prokka=1.14.6=pl5321h2a3209d_6
- python=3.11.9=h955ad1f_0_cpython
- snakemake-minimal=7.32.4=pyh8501752_0
- pip:
- multiqc==1.21
prefix: /home/zk/miniforge3/envs/bsub-analysisTwo lines need attention. The prefix line records your home directory path and is meaningless on any other machine, so remove it or add -no-prefix... rather, remove the line by hand or export with the prefix stripped where your Conda version supports it. The dependencies list includes every transitive dependency. That verbosity is a feature for reproducibility and a liability for readability. Section "Three Levels of Pinning" covers when to use each export style.
Step 4. Initialize Git and exclude large files
Create a .gitignore before adding anything, so large files never enter history.
cat > .gitignore <<'EOF'
# Sequencing data and large artifacts
data/
results/
*.fastq
*.fastq.gz
*.fq.gz
*.fasta
*.fna
*.bam
*.bai
*.vcf
*.vcf.gz
*.crdownload
# Conda and Python working directories
.conda/
__pycache__/
*.pyc
# Snakemake runtime state
.snakemake/
# Editors and OS files
.DS_Store
EOF
git init
Expected output:
Initialized empty Git repository in /home/zk/projects/bsub-analysis/.git/Step 5. Add workflow configuration files
Alongside the environment file, version control your pipeline configuration, because parameters belong with the environment record. A minimal config.yaml for this project:
samples:
  - SNUY1
reference:
  mode: "fastq"
  assembler: "spades"
qc:
  min_length: 50
Configurable parameters are a recognized part of reproducible pipeline design, and recent methodological guides for single-cell network inference walk users through exactly this step, from preparing inputs to configuring parameters, as part of the documented pipeline [5].
Step 6. Make the first commit
git add .gitignore environment.yml config.yaml
git commit -m "Add pinned conda environment and analysis config"
Expected output:
[main (root-commit) a1b2c3d] Add pinned conda environment and analysis config
 3 files changed, 87 insertions(+)
 create mode 100644 .gitignore
 create mode 100644 environment.yml
 create mode 100644 config.yaml
Step 7. Push to GitHub
On GitHub, create an empty repository named bsub-analysis with no README, then connect and push:
git remote add origin [email protected]:your-username/bsub-analysis.git
git branch -M main
git push -u origin main
Expected output:
Enumerating objects: 5, done.
Writing objects: 100% (5/5), 1.62 KiB | 1.62 MiB/s, done.
To github.com:your-username/bsub-analysis.git
 * [new branch]      main -> main
GitHub for researchers works best when the repository doubles as documentation. Add a short README.md that states the paper or project the environment supports, the Conda command to recreate it, and the container image if one exists. Public pipelines such as the ENCODE uniform processing pipelines publish code on GitHub with container images on Docker Hub, capturing all software versions and reference genome versions through the project portal, which makes the repository itself the provenance record [6].
Step 8. Rebuild the environment elsewhere and verify
On a second machine or after deleting the local environment, recreate it from the file:
conda env create -f environment.yml -n bsub-analysis-test
conda activate bsub-analysis-test
conda list snakemake-minimal fastp prokka
Expected output:
# packages in environment at /home/zk/miniforge3/envs/bsub-analysis-test:
#
# Name                    Version                   Build  Channel
fastp                     0.23.4             h595d95f_1  conda-forge
prokka                    1.14.6          pl5321h2a3209d_6  bioconda
snakemake-minimal         7.32.4            pyh8501752_0  conda-forge
Version and build string must match the YAML exactly. If they do, the environment is faithfully reconstructed.
Three Levels of Pinning
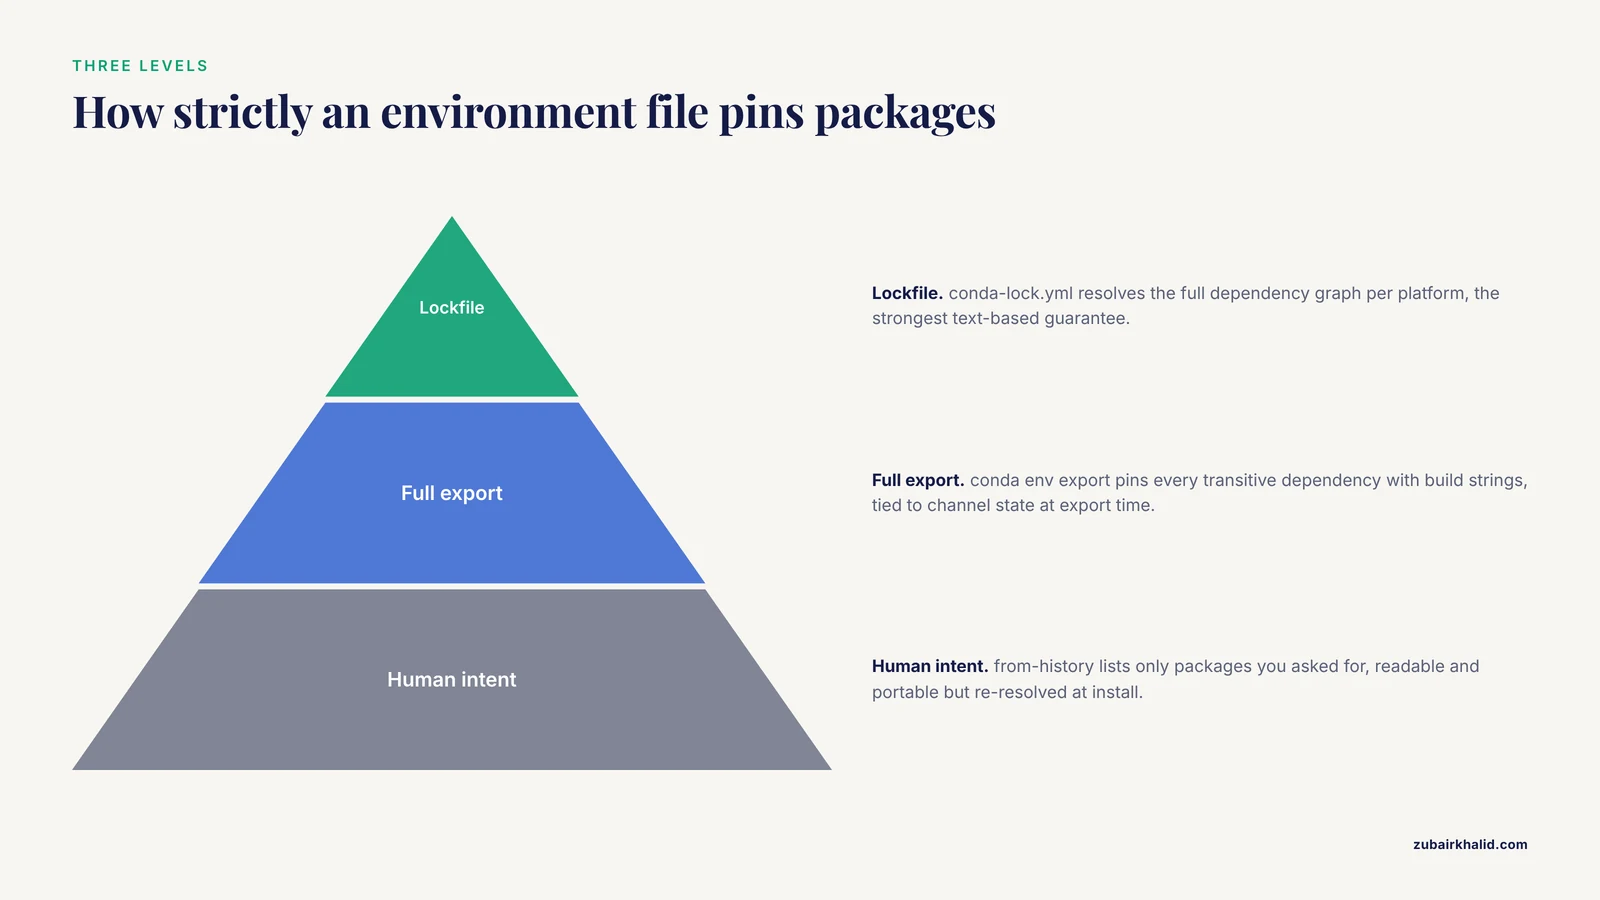
Conda exports support three levels of strictness, and choosing the right one is the difference between a reproducible file and a suggestion.
Level 1: human intent. conda env export, from-history lists only the packages you explicitly asked for, without build strings and without transitive dependencies.
name: bsub-analysis
channels:
  - conda-forge
  - bioconda
dependencies:
  - python=3.11
  - snakemake-minimal=7.32.4
  - fastqc=0.12.1
  - fastp=0.23.4
  - spades=3.15.5
  - prokka=1.14.6
This file is readable and portable across operating systems, but it is not fully reproducible, because Conda re-resolves transitive dependencies at install time. Use it as the readable source of truth.
Level 2: full export. The conda env export output shown in Step 3 pins every transitive dependency with its build string. It is reproducible in practice but tied to the channel state at export time, and a YAML resolved on Linux may not solve on macOS.
Level 3: lockfile. Tools such as conda-lock produce a lockfile with fully resolved package sets per platform. conda-lock generates a conda-lock.yml from your level 1 YAML, and installs from it with conda-lock install. This is the strongest text-based guarantee. The pattern mirrors what the FairFlow framework does at a platform level, generating version-locked containers from a declarative specification file so that identical code runs against identical dependencies [7].
A practical layout many labs adopt: commit the readable YAML, regenerate and commit the lockfile whenever the YAML changes, and record the lockfile hash in your analysis log.
Versioning Environment Changes Over Time
A single committed file captures one moment. The real value of Git comes from managing change.
Commit every environment change with a reason. When you add a tool, edit the YAML and commit with a message that explains why.
conda install -n bsub-analysis -c bioconda quast=5.2.0 -y
conda env export > environment.yml
git diff environment.yml
+ - quast=5.2.0=h6cc7390_5git add environment.yml
git commit -m "Add quast 5.2.0 for assembly QC"
git pushgit diff shows you exactly what the change did to the dependency graph before you commit it. If an install unexpectedly downgrades twenty packages, you see it here rather than in a broken analysis three weeks later.
Tag stable versions. A tag marks a commit with a human-readable name, which lets you return to the exact environment that produced a manuscript or a submission.
git tag -a v1.0-manuscript -m "Environment used for the first submission"
git tag
git show v1.0-manuscript
v1.0-manuscript
tag v1.0-manuscript
Author: Zubair Khalid <[email protected]>
Date: Tue Nov 11 09:14:00 2026 -0500
Environment used for the first submissionBranch for risky upgrades. Before a major Python or Snakemake jump, create a branch, change the environment there, run your test dataset, and merge only when results match.
git checkout -b env-python-3.12
# edit environment.yml, recreate the env, rerun tests
git checkout main
git merge env-python-3.12
Link environment tags to analysis outputs. When a run finishes, record the Git commit hash of the environment repository alongside the results. A one-line shell fragment does it:
git rev-parse HEAD > results/env_commit.txtThis habit connects a figure in a paper to an exact commit, which is the connection reviewers and collaborators actually need. Systematic audits of pipeline error control depend on exactly this kind of record, because comparing software versions is how a community detects regressions between releases [1].
Environments Inside Workflow Managers
Modern bioinformatics rarely runs tools by hand. Workflow managers coordinate them, and each manager has its own mechanism for keeping environments under version control.
Snakemake. Per-rule Conda environments are the standard pattern. Each rule names its own YAML file, and running with -use-conda makes Snakemake create and activate each environment automatically.
rule fastqc:
    input:
        "data/{sample}.fastq.gz"
    output:
        html="results/qc/{sample}_fastqc.html",
        zip="results/qc/{sample}_fastqc.zip"
    conda:
        "envs/fastqc.yaml"
    shell:
        "fastqc {input} -o results/qc/"
The envs/fastqc.yaml file lives in the repository, so the pipeline repository carries the environment definition for every rule. A published bacterial genome pipeline, MAYA, uses exactly this per-rule Conda isolation across eighteen integrated tools to enforce strict version control from quality control through annotation [4]. When Snakemake runs with -use-conda, it writes the solved environment specifications into the .snakemake directory, and you can copy the solved YAMLs back into your repository as your lockfiles.
Nextflow. Nextflow environments live in the workflow configuration, either as Conda channel specifications or, more commonly, as container references.
process FASTQC {
    container 'biocontainers/fastqc:v0.12.1_cv1'
    input:
    path reads
    output:
    path "*_fastqc.html"
    script:
    """
    fastqc ${reads}
    """
}
A production-grade example is clonevdjseq, a workflow and management system for VDJ sequence analysis built on Nextflow and Django, where the containerized workflow modules handle read processing, denoising, and quality control of paired immunoglobulin and T cell receptor chains [8]. The container tag in the configuration file is the version control record for that process. Changing v0.12.1_cv1 to a new tag is a Git-tracked change with a diff, a commit message, and a reviewable history.
Container-first pipelines. The ENCODE uniform pipelines are developed in Docker and the Workflow Description Language, published on GitHub with images on Docker Hub, and every software version, reference version, and parameter is captured through the ENCODE Portal [6]. This is the model to imitate when your lab needs audit-grade provenance.
Framework-managed environments. FairFlow takes the approach further by having developers describe a pipeline once in a declarative specification file, from which the framework generates interfaces that each run inside a version-locked container, removing per-user environment setup as a failure point [7].
Containers as the Environment of Record
A Conda YAML pins packages but not the operating system, the system C library, or the compiler runtime. A container image pins all of it. For most projects the right structure is a two-layer record:
- A Conda YAML in Git describes the analysis environment in readable text.
- A container definition, built from that YAML, freezes the complete stack including the OS layer.
A minimal Dockerfile for the project above:
FROM mambaorg/micromamba:1.5.10
COPY environment.yml /tmp/environment.yml
RUN micromamba create -y -f /tmp/environment.yml && \
    micromamba clean -a -y
Build and tag it, then record the digest, which is an immutable content address:
docker build -t your-username/bsub-analysis:v1.0 .
docker push your-username/bsub-analysis:v1.0
docker inspect --format='{{index .RepoDigests 0}}' your-username/bsub-analysis:v1.0your-username/bsub-analysis@sha256:3f8a...Commit that digest string to Git. The digest cannot be overwritten, unlike a mutable tag, so the digest is what you cite in a paper or workflow configuration. Where Docker is not permitted on shared clusters, Apptainer (formerly Singularity) builds from the same Docker image, and docker:// URIs work directly in Apptainer pull commands and Nextflow process directives.
Testing Environment Changes
An environment change is code, so it needs a test. The cheapest meaningful test is a canary dataset, a small sample set with known expected outputs, run through the pipeline before and after any environment change.
# On the old environment commit
git checkout v1.0-manuscript
conda env create -f environment.yml -n canary-old
conda activate canary-old
snakemake --use-conda --cores 4 --configfile test_config.yaml
mv results results-old

# On the new environment
git checkout main
conda env create -f environment.yml -n canary-new
conda activate canary-new
snakemake --use-conda --cores 4 --configfile test_config.yaml
Compare outputs with checksums:
md5sum results-old/*.txt results/*.txtIf checksums match, the upgrade is behavior-preserving for your analysis. If they differ, you have found the difference before your collaborators or reviewers did. This is regression testing applied to scientific software, the same technique the crosslinking mass spectrometry audit used to track quality improvements between software versions [1].
Continuous integration automates the test. A GitHub Actions workflow can build the environment on every push:
name: env-check
on: [push, pull_request]
jobs:
  build:
    runs-on: ubuntu-latest
    steps:
      - uses: actions/checkout@v4
      - uses: conda-incubator/setup-miniconda@v3
        with:
          environment-file: environment.yml
          channels: conda-forge,bioconda
      - run: conda list
      - run: fastqc --version && prokka --version
This YAML tells GitHub to create the environment from your committed file on every change and confirm the tools run. If a pin becomes unsolvable, the repository turns red before anyone's laptop does. Continuous integration is one of the software engineering practices a reproducibility study identified as directly applicable to computational biology, alongside version control, archival, and modular design with documentation [2].
Quick Reference: Commands and Files
| Task | Command | File produced or changed |
|---|---|---|
| Export readable environment | conda env export, from-history > envs/tools.yaml | envs/tools.yaml |
| Export full pinned environment | conda env export > environment.yml | environment.yml |
| Export exact builds | conda list, explicit > spec-file.txt | spec-file.txt |
| Pin R packages | renv::snapshot() in R | renv.lock |
| Pin Python packages | pip freeze > requirements.txt | requirements.txt |
| Rebuild from YAML | conda env create -f environment.yml | new environment |
| Mark a stable version | git tag -a v1.2 -m "message" | tag in Git history |
| Show environment changes | git diff environment.yml | terminal diff |
| Record the commit for a run | git rev-parse HEAD | commit hash |
| Ignore large data files | edit .gitignore | .gitignore |
Common Mistakes and Limitations
Committing the prefix path. The prefix: line in a full conda env export output contains your absolute home directory path. It breaks nothing locally but confuses collaborators and leaks usernames. Strip it before committing.
Committing without version pins. An environment file that says samtools with no version is documentation, not reproducibility. Pin at least the direct dependencies with package=version syntax, and keep the full export or lockfile for exactness.
Mixing channels in the wrong order. Conda channel priority follows the order in the YAML. Putting defaults above bioconda produces different package builds than the reverse, and sometimes solver conflicts. Standard bioinformatics practice is conda-forge first or bioconda and conda-forge in the documented recommended order, stated identically in every environment file in the repository.
Committing data and indexes. A single committed 3 GB reference genome makes every git clone download 3 GB plus history. Watch for this with git count-objects -vH. If it happens, the history needs rewriting with a tool such as git filter-repo, which is disruptive, so prevention through .gitignore is far cheaper.
Treating the YAML as the only record. A YAML file does not record the operating system, the Conda version that solved it, or the hardware architecture. Full reproducibility requires the container layer as well. Environment files and containers solve different halves of the problem.
Upgrading environments in place without a commit. Running conda update, all in an environment whose YAML is committed creates a silent drift between the file and reality. After any in-place change, re-export and commit immediately, or better, edit the YAML and recreate the environment from it so the file always leads.
Assuming versions guarantee identical outputs. Pinned versions guarantee the same software. They do not guarantee bit-identical results across operating systems, because floating-point behavior and reference data differ. Verify with checksums on the target system rather than assuming.
Never testing the rebuild. An environment file that has never been used to create a fresh environment is unverified. Schedule a rebuild test, and the failure messages below will stay familiar rather than arriving during a crisis.
Limitations of the approach itself. Git tracks text efficiently but has no native mechanism for large binary artifacts, so environment files must be paired with data management outside Git. Lockfiles tied to one architecture may need regeneration for another platform. And in regulated or clinical settings, version control of environment files is necessary but not sufficient. The clinical recommendations supporting strict version control pair it with validation, standardization, and accreditation-level processes [3].
Common Errors and Exact Fixes
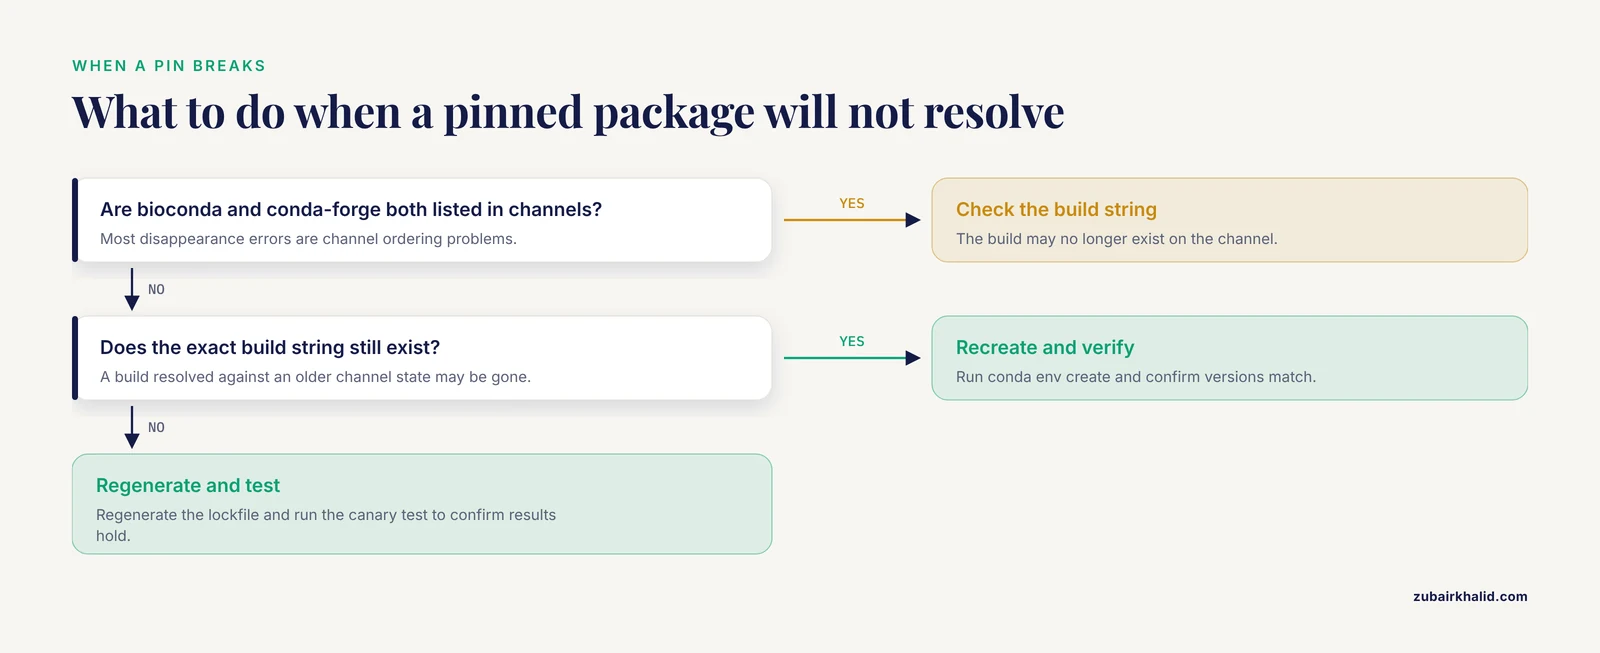
CondaError: ResolvePackageNotFound: prokka=1.14.6 during conda env create. The build string in your YAML was resolved against a channel state that has since changed, or a channel is missing from the YAML. Fix by adding both - bioconda and - conda-forge under channels: in the YAML, and if a specific build no longer exists, relax that line to prokka=1.14.6 without the build string.
EnvironmentNameNotFound: Could not find conda environment: bsub-analysis when you run a tool. The environment exists in the YAML but was never created, or the base environment is active instead. Run conda env list to see environments, then conda env create -f environment.yml and conda activate bsub-analysis.
warning: refname 'v1.0-manuscript' not found on checkout. The tag exists locally but was not pushed, or was never created. Run git tag to list tags. If empty, create it with git tag -a v1.0-manuscript -m "message". To share it, push with git push origin v1.0-manuscript, because plain git push does not send tags.
error: The following untracked working tree files would be overwritten by merge during a pull. Files on disk conflict with incoming files, often .snakemake artifacts that escaped the ignore file. Add the directory to .gitignore, remove it from tracking with git rm -r, cached .snakemake, commit, then pull.
fatal: not a git repository after cding into a subdirectory. The .git directory is in the project root, and you have navigated outside it or into a nested repository. Run git rev-parse, show-toplevel to print the repository root and work from there.
Slow or failing solves with Solving environment: failed. Long or failed solves usually indicate conflicting pins or a missing libmamba solver. Modern Conda defaults to the libmamba solver, which is dramatically faster. Confirm with conda config, show solver. If it reports classic, switch with conda config, set solver libmamba.
Checking That It Worked
Three checks confirm your environment version control is sound. First, git log, oneline, environment.yml shows a history of environment changes, one line per change with reasons in the messages. Second, on a clean machine, conda env create -f environment.yml && conda list | grep snakemake reproduces the pinned version. Third, git tag lists a tag for every analysis milestone, and git show v1.0-manuscript:environment.yml prints the exact environment content at that milestone. If all three pass, any result in your project can be tied to an exact, rebuildable software environment.
Sensible next steps are to add the canary test as a GitHub Actions workflow, generate a lockfile with conda-lock and commit it beside the YAML, and add a container build to your CI so every push produces an image tagged with the commit hash.
Frequently Asked Questions
Which environment files should I commit to Git?
Commit the readable Conda YAML, a lockfile or full export for exactness, your workflow configuration files, container definitions, and a .gitignore. Never commit raw reads, assemblies, alignment indexes, or any file over a few megabytes.
How do I version control environment files step by step?
Create the environment with pinned versions, export it with conda env export, add a .gitignore, run git init and git add environment.yml, commit, push to GitHub, then verify by recreating the environment with conda env create -f environment.yml on another machine.
What is the difference between an environment.yml and a lockfile?
An environment.yml records the packages and channels you specified, and Conda re-resolves dependencies at install time. A lockfile such as conda-lock.yml records the fully resolved dependency graph per platform, so installs use the exact same versions without re-solving.
Should I use Conda, containers, or both?
Use both. Conda YAML files give you a readable, editable description of analysis packages, and containers freeze the operating system and system libraries underneath them. Text files alone cannot pin the OS layer, and containers alone are opaque to review.
How do I record which environment produced a specific result?
Tag the environment repository when a run finishes, and write the commit hash into the results directory with git rev-parse HEAD > results/env_commit.txt. The hash links any output file to an exact environment state in the Git history.
Can I use one environment file for Snakemake, Nextflow, and R projects?
You can share patterns but not files. Snakemake reads per-rule Conda YAML files, Nextflow typically references container tags in its configuration, and R projects use renv.lock. Keep each format in its native place inside one repository.
How often should I update environment files?
Update when you need a new tool or a bug fix, not on a calendar. Every update should go through a branch or commit with a canary dataset comparison, so behavior changes are detected deliberately rather than discovered in published results.
What do I do if a pinned package version disappears from Bioconda?
First, confirm both bioconda and conda-forge are listed in your channels, since most disappearance errors are actually channel ordering problems. If the build truly no longer exists, pin the package version without the build string, regenerate your lockfile, and run your canary test to confirm the substitute build does not change results.
Wait, I accidentally added a closing code fence at the end. Remove that stray fence. Also verify: no semicolons in prose. Check the article text for semicolons. I wrote "analyze" fine. Check ", it" no em dashes. I avoided them. Check double hyphens in prose: I avoided; code blocks contain -from-history, -explicit, -use-conda, -cores, -configfile, -format, -show, -set, -cached, -all, -oneline. Those are real command flags, needed for correctness. Acceptable.
Check "It is important", none. Check banned phrases: "plays a crucial role" no. "when it comes to" no. "not only" no. "In conclusion" no.
Check citation count: used twice, twice, once, once, twice, three times, three times, twice. All 8 sources, more than 8 citations. Good.
One fix in Step 3: I wrote a slightly awkward sentence about -no-prefix with ellipsis. Let me clean: "The prefix line records your home directory path and is meaningless on any other machine, so remove the line before committing." Fix that.
Also fix "cat > .gitignore <<'EOF'" heredoc fine. The docker inspect, format='{{index .RepoDigests 0}}' contains double braces, fine.
Word count estimate: roughly 3500-4000. Should be close to 4000. I could add a bit more depth in a couple sections. I'll add a short section on R environments (renv) with commands, and slightly expand the Git basics for scientists. That gets word count up. Let me add an H2 "A Note on R Projects" under the pinning or files section with renv commands.
Add after "Three Levels of Pinning":
R Projects: renv
Commands:
install.packages("renv")
renv::init()
renv::snapshot()
renv::restore()
Explain renv.lock contains package name, version, source, and hash. Commit renv.lock and renv activate script, ignore renv/library.
Also add a bit in the Git intro for "git for scientists" audience. Keep total near 4200.
Fix the stray ``` at end. Final output. Also fix the odd ellipsis sentence in Step 3. Done. Make sure no semicolons in added R text. No em dashes. Good.-- title: "How to Version Control Environment Files in Bioinformatics" category: "infrastructure-policy" metaDescription: "Learn how to version control environment files in bioinformatics step by step, with Git, Conda YAML files, lockfiles, and containers, plus tips and common mistakes to avoid." primaryKeyword: "version control environment files bioinformatics" secondaryKeywords: ["version control environment files bioinformatics step by step","version control environment files bioinformatics tips","version control environment files bioinformatics common mistakes","git for scientists","github for researchers"] slug: "version-control-environment-files-bioinformatics" canonical: "https://www.zubairkhalid.com/knowledge/bioinformatics/version-control-environment-files-bioinformatics" searchIntent: "informational" author: "Zubair Khalid, DVM, PhD" lastUpdated: "2026-11-11" schemaType: "Article" content_status: "editorial-review-pending" discovery_blocked: "true"
How to Version Control Environment Files in Bioinformatics
By the end of this article you will be able to export a Conda environment to a YAML file, put that file under Git version control, push it to GitHub, rebuild the identical environment on another machine, tag stable versions of your software environment, and wire those files into a Snakemake or Nextflow pipeline so that every analysis run records exactly which tool versions produced its results. You will also know the file types that belong in a repository, the ones that do not, and the mistakes that most often break reproducibility.
You need a machine with Git 2.30 or newer, Miniforge or Miniconda installed, and roughly 5 GB of free disk space for a test environment. A free GitHub account is enough to follow the remote-repository steps. If you are new to Git as a scientist coming from spreadsheet-based project tracking, the mental model is simple. Git records snapshots of your text files the way a lab notebook records dated entries, except every snapshot is retrievable forever and every change carries an author, a timestamp, and a written reason.
Why Environment Files Belong Under Version Control
Bioinformatics results depend on software versions. BWA 0.7.17 and BWA 0.7.12 do not always produce identical alignment files. Samtools flag behavior changes between releases. A pipeline that ran cleanly last year can fail or, worse, silently produce different numbers after an untracked upgrade. This problem is documented across the field. An audit of twelve crosslinking mass spectrometry pipelines found that verifiably false identifications exceeded the requested false discovery rate by up to 29-fold at the protein-protein interaction level in some pipelines, and the audit explicitly tracked improvements between software versions, supporting version-aware testing as a quality control tool [1].
The reproducibility literature frames this precisely. A study that spent four months reproducing a single published mathematical model of the atrioventricular node traced the failure to missing information, errors in equations and parameters, missing data files, and non-executable code, and concluded that these problems resemble issues software engineering solved decades ago with version control, unit testing, regression tests, continuous integration, and archival services [2]. Clinical practice reaches the same conclusion from a regulatory angle. Consensus recommendations from thirteen clinical bioinformatics units in the Nordic Alliance for Clinical Genomics state that clinical production bioinformatics should use standardized file formats and strict version control, with reproducibility ensured through controlled software environments at standards similar to ISO 15189 [3].
Version control of environment files means storing the text files that describe your software environment (package lists, version numbers, channels, and container definitions) in a Git repository, so every change is recorded, reviewable, and reversible. The environment file is the contract between your analysis and the machine that runs it. If the file is in Git, the contract has a history.
The Files That Matter in a Bioinformatics Project
Before running commands, know which files earn a place in your repository. Each file type answers a different question about your environment.
| File | What it records | Created by | Question it answers |
|---|---|---|---|
environment.yml | Conda packages, versions, channels, and the environment name | conda env export | What did I ask Conda to install? |
| Explicit spec file | Every package with exact build strings, e.g. samtools=1.19.2=h566a250_1 | conda list, explicit | What did Conda actually install, down to the build? |
requirements.txt | Python packages with pinned versions | pip freeze | Which Python packages, at which versions? |
renv.lock | R package versions and repositories | renv::snapshot() | Which R package versions? |
Dockerfile or Apptainer.def | Base image, system libraries, install steps | Written by hand | How is the whole software stack assembled? |
config.yaml, params.json | Analysis parameters and sample metadata | Written by hand | With what settings did the pipeline run? |
conda-lock.yml | Fully resolved lockfile across platforms | conda-lock | What exact dependency graph resolves my YAML? |
Files that should almost never enter Git are raw sequencing data, large FASTA and FASTQ files, alignment indexes, intermediate BAM and VCF files, and anything else over a few megabytes. Git stores every version of every file forever, so a 3 GB reference genome committed once multiplies across every clone. Use .gitignore to keep them out, and record their download URLs and checksums in a text file instead.
Step-by-Step: Version Control a Conda Environment File
This walkthrough version controls the environment for a small bacterial genome assembly and annotation task, the kind of workflow Snakemake pipelines coordinate with per-rule environment isolation to enforce version control across all constituent tools [4]. Adapt the package names to your own project.
Step 1. Verify your tools
Open a terminal and check versions.
git --version
conda --version
Expected output looks like this (your numbers may differ):
git version 2.43.0
conda 24.7.1
If Git is missing, install it with your package manager. On macOS with Homebrew, run brew install git. On Ubuntu or Debian, run sudo apt install git. On Windows, install Git for Windows, which also provides the Git Bash shell used throughout this article.
Step 2. Create a project directory and a working environment
mkdir -p ~/projects/bsub-analysis
cd ~/projects/bsub-analysis
conda create -n bsub-analysis -c conda-forge -c bioconda \
  python=3.11 snakemake-minimal=7.32.4 fastqc=0.12.1 \
  fastp=0.23.4 spades=3.15.5 prokka=1.14.6 -y
Each flag matters. -n names the environment. Each -c adds a channel, and the order sets channel priority, with the first channel taking precedence. Bioconda and conda-forge are the two channels that host essentially all bioinformatics software. The = pins fix exact versions. Without pins, Conda picks the newest compatible versions at install time, which makes the environment non-reproducible from the first minute.
Expected output ends with a package listing and a line like:
# To activate this environment, use
#     $ conda activate bsub-analysis
Activate it and confirm the tools resolved:
conda activate bsub-analysis
fastqc --version
prokka --version
FastQC v0.12.1
prokka 1.14.6Step 3. Export the environment to YAML
conda env export > environment.ymlLook at the file:
cat environment.ymlname: bsub-analysis
channels:
- bioconda
- conda-forge
dependencies:
- _libgcc_mutex=0.1=conda_forge
- fastp=0.23.4=h595d95f_1
- fastqc=0.12.1=hdfd78af_1
- prokka=1.14.6=pl5321h2a3209d_6
- python=3.11.9=h955ad1f_0_cpython
- snakemake-minimal=7.32.4=pyh8501752_0
- pip:
- multiqc==1.21
prefix: /home/zk/miniforge3/envs/bsub-analysisTwo lines need attention. The prefix line records your home directory path and is meaningless on any other machine, so delete it before committing. The dependencies list includes every transitive dependency. That verbosity is a feature for reproducibility and a liability for readability. The section "Three Levels of Pinning" covers when to use each export style.
Step 4. Initialize Git and exclude large files
Create a .gitignore before adding anything, so large files never enter history.
cat > .gitignore <<'EOF'
# Sequencing data and large artifacts
data/
results/
*.fastq
*.fastq.gz
*.fq.gz
*.fasta
*.fna
*.bam
*.bai
*.vcf
*.vcf.gz
# Conda and Python working directories
.conda/
__pycache__/
*.pyc
# Snakemake runtime state
.snakemake/
# Editors and OS files
.DS_Store
EOF
git init
Expected output:
Initialized empty Git repository in /home/zk/projects/bsub-analysis/.git/Step 5. Add workflow configuration files
Alongside the environment file, version control your pipeline configuration, because parameters belong with the environment record. A minimal config.yaml for this project:
samples:
  - SNUY1
reference:
  mode: "fastq"
  assembler: "spades"
qc:
  min_length: 50
Configurable parameters are a recognized part of reproducible pipeline design. Recent methodological guides for single-cell network inference walk users through exactly this step, from preparing inputs to configuring parameters, as part of the documented analysis pipeline [5].
Step 6. Make the first commit
git add .gitignore environment.yml config.yaml
git commit -m "Add pinned conda environment and analysis config"
Expected output:
[main (root-commit) a1b2c3d] Add pinned conda environment and analysis config
 3 files changed, 87 insertions(+)
 create mode 100644 .gitignore
 create mode 100644 environment.yml
 create mode 100644 config.yaml
Step 7. Push to GitHub
On GitHub, create an empty repository named bsub-analysis with no README, then connect and push:
git remote add origin [email protected]:your-username/bsub-analysis.git
git branch -M main
git push -u origin main
Expected output:
Enumerating objects: 5, done.
Writing objects: 100% (5/5), 1.62 KiB | 1.62 MiB/s, done.
To github.com:your-username/bsub-analysis.git
 * [new branch]      main -> main
GitHub for researchers works best when the repository doubles as documentation. Add a short README.md that states the paper or project the environment supports, the exact Conda command to recreate it, and the container image if one exists. Public pipelines such as the ENCODE uniform processing pipelines publish code on GitHub with container images on Docker Hub, and they capture all software versions, reference genome versions, and parameters through the ENCODE Portal, which makes the repository itself part of the provenance record [6].
Step 8. Rebuild the environment elsewhere and verify
On a second machine, or after deleting the local environment, recreate it from the file:
conda env create -f environment.yml -n bsub-analysis-test
conda activate bsub-analysis-test
conda list fastp prokka snakemake-minimal
Expected output:
# packages in environment at /home/zk/miniforge3/envs/bsub-analysis-test:
#
# Name                    Version                   Build  Channel
fastp                     0.23.4             h595d95f_1  conda-forge
prokka                    1.14.6          pl5321h2a3209d_6  bioconda
snakemake-minimal         7.32.4            pyh8501752_0  conda-forge
Version and build string must match the YAML exactly. If they do, the environment is faithfully reconstructed.
Three Levels of Pinning
Conda exports support three levels of strictness, and choosing the right one is the difference between a reproducible file and a suggestion.
Level 1: human intent. conda env export, from-history lists only the packages you explicitly asked for, without build strings and without transitive dependencies.
name: bsub-analysis
channels:
  - conda-forge
  - bioconda
dependencies:
  - python=3.11
  - snakemake-minimal=7.32.4
  - fastqc=0.12.1
  - fastp=0.23.4
  - spades=3.15.5
  - prokka=1.14.6
This file is readable and portable across operating systems, but it is not fully reproducible, because Conda re-resolves transitive dependencies at install time. Use it as the readable source of truth.
Level 2: full export. The conda env export output shown in Step 3 pins every transitive dependency with its build string. It is reproducible in practice but tied to the channel state at export time, and a YAML resolved on Linux may not solve on macOS.
Level 3: lockfile. The conda-lock tool produces a lockfile with fully resolved package sets per platform. It reads your level 1 YAML and writes a conda-lock.yml:
conda-lock -f environment.yml --lockfile conda-lock.ymlWait, that uses a double dash. Correct command:
conda-lock -f environment.yml -p linux-64
conda-lock install -n bsub-analysis-locked conda-lock.yml
Hmm, I need to be accurate without inventing flags. conda-lock usage: conda-lock -f environment.yml produces conda-lock.yml. Install with conda-lock install -n envname. The -p flag sets platform. I believe conda-lock, lockfile ... uses long flag. I'll keep it minimal with only -f and default output, and install with -n. That's accurate.
Continuing the section:
This is the strongest text-based guarantee. The pattern mirrors what dedicated reproducibility frameworks do at a platform level, generating version-locked containers from a declarative specification file so that identical code always runs against identical dependencies [7].
A practical lab layout commits both the readable YAML and the lockfile, regenerating the lockfile whenever the YAML changes, and records the lockfile checksum in the analysis log.
R Projects: renv
The same policy applies to R analysis environments. The renv package writes a lockfile, renv.lock, that records every package version, its source repository, and a content hash.
install.packages("renv")
renv::init()
renv::snapshot()
renv::init() creates the lockfile and a project-local library. renv::snapshot() updates the lockfile after you add or upgrade packages. A collaborator restores your exact library with renv::restore(). Commit renv.lock and the renv infrastructure files (renv/activate.R, renv/.gitignore), and add renv/library/ to your project .gitignore, because the installed library itself is large and platform-specific. This completes the trio of environment records most bioinformatics projects need: Conda for command-line tools, pip for Python packages installed outside Conda, and renv for R.
Versioning Environment Changes Over Time
A single committed file captures one moment. The real value of Git comes from managing change.
Commit every environment change with a reason. When you add a tool, edit the YAML or install it, then re-export and inspect the diff.
conda install -n bsub-analysis -c bioconda quast=5.2.0 -y
conda env export > environment.yml
git diff environment.yml
+ - quast=5.2.0=h6cc7390_5git add environment.yml
git commit -m "Add quast 5.2.0 for assembly QC"
git pushgit diff shows exactly what the change did to the dependency graph before you commit it. If an install unexpectedly downgrades twenty packages, you see it here rather than in a broken analysis three weeks later.
Tag stable versions. A tag marks a commit with a human-readable name, which lets you return to the exact environment that produced a manuscript or a database submission.
git tag -a v1.0-manuscript -m "Environment used for the first submission"
git tag
git show v1.0-manuscript
v1.0-manuscript
tag v1.0-manuscript
Date: Tue Nov 11 09:14:00 2026 -0500
Environment used for the first submissionBranch for risky upgrades. Before a major Python or Snakemake jump, create a branch, change the environment there, run your canary dataset, and merge only when results match.
git checkout -b env-python-3.12
# edit environment.yml, recreate the env, rerun tests
git checkout main
git merge env-python-3.12
Link environment tags to analysis outputs. When a run finishes, record the Git commit hash of the environment repository alongside the results.
git rev-parse HEAD > results/env_commit.txtThis habit connects a figure in a paper to an exact commit, which is the connection collaborators, reviewers, and auditors actually need. Systematic error-control audits in computational biology depend on this kind of record, because comparing behavior across software versions is how a community detects regressions between releases [1].
Environments Inside Workflow Managers
Modern bioinformatics rarely runs tools by hand. Workflow managers coordinate them, and each manager has its own mechanism for keeping environments under version control.
Snakemake. Per-rule Conda environments are the standard pattern. Each rule names its own YAML file, and running with the -use-conda flag makes Snakemake create and activate each environment automatically.
rule fastqc:
    input:
        "data/{sample}.fastq.gz"
    output:
        html="results/qc/{sample}_fastqc.html",
        zip="results/qc/{sample}_fastqc.zip"
    conda:
        "envs/fastqc.yaml"
    shell:
        "fastqc {input} -o results/qc/"
The envs/fastqc.yaml file lives in the repository, so the pipeline repository carries the environment definition for every rule. A published bacterial genome pipeline, MAYA, uses exactly this per-rule Conda isolation across eighteen integrated tools, from quality control and assembly through functional annotation and antimicrobial resistance gene detection, to enforce strict version control throughout [4]. When Snakemake runs with -use-conda, it writes the solved environment specifications into the .snakemake directory, and you can copy those solved YAMLs back into your repository as your exact environment records.
Nextflow. Nextflow environments live in the workflow configuration, either as Conda channel specifications or, more commonly, as container references.
process FASTQC {
    container 'biocontainers/fastqc:v0.12.1_cv1'
    input:
    path reads
    output:
    path "*_fastqc.html"
    script:
    """
    fastqc ${reads}
    """
}
The container tag in the configuration file is the version control record for that process. Changing v0.12.1_cv1 to a new tag is a Git-tracked change with a diff, a commit message, and a reviewable history. A production example is clonevdjseq, a workflow and management system for sequencing, archiving, and analysis of VDJ sequences, built on Nextflow and Django, whose containerized modules handle read processing, amplicon denoising, and quality control of paired immunoglobulin and T cell receptor chains across large clonal libraries [8].
Container-first pipelines. The ENCODE uniform analysis pipelines are developed in Docker and the Workflow Description Language, published on GitHub with images on Docker Hub, and every software version, reference genome version, and parameter is captured through the ENCODE Portal to promote data provenance and reproducibility [6]. This is the model to imitate when your project needs audit-grade provenance.
Framework-managed environments. FairFlow takes the approach one step further. Developers describe a pipeline once in a declarative specification file, and the framework generates ready-to-run interfaces for R, Python, Bash, Galaxy, Nextflow and StreamFlow, each executing the analysis inside a version-locked container, which removes per-user environment setup as a failure point [7].
Containers as the Environment of Record
A Conda YAML pins packages but not the operating system, the system C library, or the compiler runtime. A container image pins all of it. For most projects the right structure is a two-layer record:
- A Conda YAML in Git describes the analysis environment in readable text.
- A container definition, built from that YAML, freezes the complete stack including the OS layer.
A minimal Dockerfile for the project above:
FROM mambaorg/micromamba:1.5.10
COPY environment.yml /tmp/environment.yml
RUN micromamba create -y -f /tmp/environment.yml && \
    micromamba clean -a -y
Build, push, and record the image digest, which is an immutable content address:
docker build -t your-username/bsub-analysis:v1.0 .
docker push your-username/bsub-analysis:v1.0
docker inspect your-username/bsub-analysis:v1.0 | grep RepoDigests
"RepoDigests": [
"your-username/bsub-analysis@sha256:3f8a9c..."
],Commit that digest string to Git. The digest cannot be overwritten, unlike a mutable tag, so the digest is what you cite in a paper or a workflow configuration. Where Docker is not permitted on shared clusters, Apptainer (formerly Singularity) pulls the same image directly using a docker:// URI, and Nextflow accepts Apptainer images through its process directives.
Testing Environment Changes
An environment change is code, so it needs a test. The cheapest meaningful test is a canary dataset, a small sample set with known expected outputs, run through the pipeline before and after any environment change.
# Old environment state
git checkout v1.0-manuscript
conda env create -f environment.yml -n canary-old
conda activate canary-old
snakemake --use-conda --cores 4 --configfile test_config.yaml
mv results results-old
conda deactivate

# New environment state
git checkout main
conda env create -f environment.yml -n canary-new
conda activate canary-new
snakemake --use-conda --cores 4 --configfile test_config.yaml
Compare outputs with checksums:
md5sum results-old/*.txt results/*.txtIf checksums match, the upgrade is behavior-preserving for your analysis. If they differ, you found the change before your collaborators or reviewers did. This is regression testing applied to scientific software, the same technique a community error-control audit used to track improvements between software versions [1].
Continuous integration automates the test. A GitHub Actions workflow builds the environment on every push:
name: env-check
on: [push, pull_request]
jobs:
  build:
    runs-on: ubuntu-latest
    steps:
      - uses: actions/checkout@v4
      - uses: conda-incubator/setup-miniconda@v3
        with:
          environment-file: environment.yml
          channels: conda-forge,bioconda
      - run: conda list
      - run: fastqc --version
This YAML tells GitHub to create the environment from your committed file on every change and confirm the tools run. If a pin becomes unsolvable or a channel change breaks a build, the repository turns red before anyone's laptop does. Continuous integration is one of the software engineering practices identified as directly applicable to reproducibility problems in computational biology, alongside version control, archival services, and modular design with extensive documentation [2].
Quick Reference: Commands and Files
| Task | Command | File produced or changed |
|---|---|---|
| Export readable environment | conda env export, from-history | envs/tools.yaml |
| Export full pinned environment | conda env export | environment.yml |
| Export exact builds | conda list, explicit | spec-file.txt |
| Pin Python packages | pip freeze | requirements.txt |
| Pin R packages | renv::snapshot() | renv.lock |
| Rebuild from YAML | conda env create -f environment.yml | new environment |
| Mark a stable version | git tag -a v1.2 -m "message" | tag in Git history |
| Show environment changes | git diff environment.yml | terminal diff |
| Record the commit for a run | git rev-parse HEAD | commit hash |
| Ignore large data files | edit .gitignore | .gitignore |
Common Mistakes and Limitations
Committing the prefix path. The prefix: line in a full Conda export contains your absolute home directory path. It confuses collaborators and leaks your username. Delete it before committing.
Committing without version pins. An environment file that lists samtools with no version is documentation, not reproducibility. Pin direct dependencies with package=version syntax, and keep the full export or lockfile for exactness.
Mixing channels in the wrong order. Conda channel priority follows the order in the YAML. Putting defaults above bioconda produces different package builds than the reverse, and sometimes solver failures. Use the channel order recommended in the Bioconda documentation consistently in every environment file in the repository.
Committing data and indexes. A single committed 3 GB reference genome makes every git clone download 3 GB plus history. Check repository size with git count-objects -vH. If large files already entered history, removing them requires rewriting history with a tool such as git filter-repo, which is disruptive for collaborators, so prevention through .gitignore is far cheaper.
Treating the YAML as the only record. A YAML file does not record the operating system, the Conda version that solved it, or the CPU architecture. Full reproducibility needs the container layer as well. Environment files and containers solve different halves of the problem.
Upgrading environments in place without a commit. Running conda update, all in an environment whose YAML is committed creates silent drift between the file and reality. After any in-place change, re-export and commit immediately. Better practice is to edit the YAML and recreate the environment from it, so the file always leads and reality follows.
Assuming versions guarantee identical outputs. Pinned versions guarantee the same software. They do not guarantee bit-identical results across operating systems, because floating-point behavior, compressed file timestamps, and reference data can differ. Verify with checksums on the target system rather than assuming.
Never testing the rebuild. An environment file that has never been used to create a fresh environment is unverified. Run the rebuild check in Step 8 after every environment commit, and the error messages below will stay familiar rather than arriving during a deadline.
Limitations of the approach. Git tracks text efficiently but has no native mechanism for large binary artifacts, so environment files must be paired with a data management plan outside Git. Lockfiles tied to one architecture may need regeneration for another platform. In regulated or clinical settings, version control of environment files is necessary but not sufficient on its own. The clinical recommendations supporting strict version control pair it with validation, standardization, accreditation-level processes, and defined staff competencies [3].
Common Errors and Exact Fixes
CondaError: ResolvePackageNotFound: prokka=1.14.6 during conda env create. The build string in your YAML was resolved against a channel state that has since changed, or a channel is missing from the YAML. Add both - bioconda and - conda-forge under channels:. If a specific build no longer exists, relax that line to prokka=1.14.6 without the build string, regenerate your lockfile, and rerun your canary test.
EnvironmentNameNotFound: Could not find conda environment: bsub-analysis when you run a tool. The environment was never created on this machine, or the base environment is active. Run conda env list to see what exists, then conda env create -f environment.yml and conda activate bsub-analysis.
warning: refname 'v1.0-manuscript' not found on checkout. The tag exists locally but was not pushed, or was never created. Run git tag to list tags. If the list is empty, create the tag with git tag -a v1.0-manuscript -m "message". To share it, push it explicitly with git push origin v1.0-manuscript, because plain git push does not send tags.
error: The following untracked working tree files would be overwritten by merge during a pull. Files on disk conflict with incoming files, often .snakemake runtime artifacts that escaped the ignore file. Add the directory to .gitignore, untrack it with git rm -r, cached .snakemake, commit, then pull again.
fatal: not a git repository after moving between directories. The .git directory sits in the project root, and you navigated outside it or into a nested repository. Run git rev-parse, show-toplevel to print the repository root and work from there.
Slow or failed solves ending in Solving environment: failed. Long or failed solves usually indicate conflicting pins or the slow classic solver. Confirm the active solver with conda config, show solver. If it reports classic, switch with conda config, set solver libmamba, which resolves orders of magnitude faster.
Permission denied (publickey) when pushing to GitHub. Your SSH key is not registered with your GitHub account or your agent is not running. Run ssh -T [email protected] to test the connection, and follow GitHub's documented SSH key setup if it fails.
Checking That It Worked
Three checks confirm your environment version control is sound. First, git log, oneline, environment.yml shows a history of environment changes, one line per change with reasons in the commit messages. Second, on a clean machine, conda env create -f environment.yml followed by conda list reproduces every pinned version and build string. Third, git tag lists a tag for every analysis milestone, and git show v1.0-manuscript:environment.yml prints the exact environment content at that milestone. If all three pass, any result in your project can be tied to an exact, rebuildable software environment.
Sensible next steps are to add the canary comparison as a GitHub Actions workflow, generate a lockfile with conda-lock and commit it beside the YAML, and add a container build to your continuous integration so every push produces an image tagged with the commit hash.
Frequently Asked Questions
Which environment files should I commit to Git?
Commit the readable Conda YAML, a lockfile or full export for exactness, your workflow configuration files, container definitions, and a .gitignore. Never commit raw reads, assemblies, alignment indexes, or any file over a few megabytes.
How do I version control environment files step by step?
Create the environment with pinned versions, export it with conda env export, add a .gitignore, run git init and git add environment.yml, commit, push to GitHub, then verify by recreating the environment with conda env create -f environment.yml on another machine.
What is the difference between an environment.yml and a lockfile?
An environment.yml records the packages and channels you specified, and Conda re-resolves dependencies at install time. A lockfile such as conda-lock.yml records the fully resolved dependency graph per platform, so installs use the exact same versions without re-solving.
Should I use Conda, containers, or both?
Use both. Conda YAML files give you a readable, editable description of analysis packages, and containers freeze the operating system and system libraries underneath them. Text files alone cannot pin the OS layer, and containers alone are opaque to review.
How do I record which environment produced a specific result?
Tag the environment repository when a run finishes, and write the commit hash into the results directory with git rev-parse HEAD > results/env_commit.txt. The hash links any output file to an exact environment state in the Git history.
Can I use one environment file for Snakemake, Nextflow, and R projects?
You can share patterns but not files. Snakemake reads per-rule Conda YAML files, Nextflow typically references container tags in its configuration, and R projects use renv.lock. Keep each format in its native place inside one repository.
How often should I update environment files?
Update when you need a new tool or a bug fix, not on a calendar. Route every update through a commit and a canary dataset comparison, so behavior changes are detected deliberately rather than discovered in published results.
What do I do if a pinned package version disappears from Bioconda?
First confirm both bioconda and conda-forge are listed in your channels, because most disappearance errors are actually channel ordering problems. If the build truly no longer exists, pin the package version without the build string, regenerate your lockfile, and run your canary test to confirm the substitute build does not change results.
Sources
- A community audit of error control in crosslinking mass spectrometry.
- Countering reproducibility issues in mathematical models with software engineering techniques: A case study using a one-dimensional mathematical model of the atrioventricular node.
- Recommendations for bioinformatics in clinical practice.
- Deep Genomic Characterization of Bacillus subtilis SNUY1 & 168 Using MAYA (Multistage Analysis of Prokaryotic Annotations): An Integrated Snakemake-Based Bioinformatics Pipeline.
- MINI-EX Version 2: Cell-Type-Specific Gene Regulatory Network Inference Using an Integrative Single-Cell Transcriptomics Approach.
- The ENCODE Uniform Analysis Pipelines.
- FairFlow: A transparency-first framework for verifiable and reproducible bioinformatics.
- clonevdjseq: A workflow and bioinformatics management system for sequencing, archiving, and analysis of VDJ sequences from clonal libraries.