How to Update and Upgrade Bioinformatics Tools with Conda and Mamba
By Dr. Zubair Khalid, DVM, MS, PhD ·

By the end of this guide you will be able to update a single bioinformatics tool inside a conda environment, check exactly which version is installed and where it lives, upgrade conda and mamba themselves, export a reproducible record of what changed, and rebuild an environment from scratch when an in-place update goes sideways. You will also learn the update habits that keep pipelines reproducible, and the mistakes that most often break them.
You need a Linux workstation or server (Ubuntu, Debian, CentOS, Rocky, or similar), a user account with no administrator privileges required, Miniconda or Anaconda already installed, and an internet connection. If you have never touched the terminal before, that is fine. Every command in this article is copy-and-paste ready, and a short Linux primer is included.
The problem this solves is old. A 2004 protocol on running a local copy of BLAST walked readers through obtaining the software, installing it by hand for several operating systems, and then maintaining the installation and its sequence databases over time [1]. Package managers such as conda automated that maintenance, and systems like the Dugong Docker image went further by automating the installation of more than 3500 bioinformatics tools together with their libraries and dependencies [2]. But automation does not mean zero effort. Tools still age, and you still have to decide when and how to move them forward.
Why Updating Bioinformatics Tools Matters
Bioinformatics software is not static. Aligners gain speed improvements, variant callers fix bugs that affect results, and format parsers adapt to new file quirks. When the COMBAT-TB Workbench team built their Mycobacterium tuberculosis workflows on the IRIDA and Galaxy platforms, part of the engineering work was updating existing tools such as Trimmomatic, snippy, and snp-sites so the workflows behaved correctly and consistently [3]. Updates are part of the life of a pipeline, not an optional chore.
The stakes scale with pipeline size. EVscope, a pipeline for extracellular vesicle RNA sequencing, coordinates 27 major steps spanning quality control, contamination assessment, alignment, UMI-based deduplication, and RNA quantification [4]. Every one of those steps is a separate piece of software with its own dependencies. If one tool silently changes behavior after an update, the whole pipeline can drift, and the drift can be invisible until a reviewer asks why last month's numbers differ from this month's.
Conda solves the versioning half of this problem by installing each tool and its dependencies into isolated environments. Mamba solves the speed half by replacing conda's dependency resolver with a much faster implementation. Updating tools well means using both deliberately: small, targeted, recorded changes rather than wholesale upgrades.
Conda, Mamba, and Your Linux System
A few definitions before the commands.
Conda is a cross-platform package and environment manager. It installs software from channels, which are online repositories. The two channels that matter most for bioinformatics are conda-forge, a large community channel for general software, and bioconda, a channel dedicated to bioinformatics packages. A conda environment is a self-contained directory holding a specific set of packages and versions.
Mamba is a drop-in replacement for the conda command that uses the libmamba solver, a faster dependency resolver. Commands are nearly identical: anywhere you type conda you can usually type mamba. Micromamba is a standalone executable that needs no separate Python installation and has no base environment of its own, which makes it popular on high-performance computing clusters.
The base environment is the default environment conda creates at installation. It holds conda itself and little else, and keeping it that way is one of the habits covered later.
Because conda lives entirely in your home directory, you never need sudo for any command in this guide. That is one of the reasons conda became standard for Linux for bioinformatics: shared cluster machines rarely give users administrator rights, and conda does not ask for them.
Ten Linux commands that carry most of the work
Most Linux commands bioinformatics work relies on are simple inspection tools. Keep these in your fingers.
| Command | What it shows | Example |
|---|---|---|
which samtools | Full path of the samtools binary that runs first | ~/miniconda3/envs/rnaseq/bin/samtools |
type -a python | Every python on your PATH, in search order | All conda and system Pythons |
conda info | Active environment, solver, channel priority | Shows solver: libmamba when configured |
conda env list | All environments with the active one marked | rnaseq ~/miniconda3/envs/rnaseq |
cat ~/.condarc | Your channel and solver configuration | Confirms strict priority is set |
echo $PATH | Directory search order for commands | Conda env paths should lead |
grep samtools file.yml | Lines in a file matching a pattern | Finding a pin in an environment file |
df -h | Disk space in human-readable units | Environments can eat tens of gigabytes |
du -sh ~/miniconda3 | Total size of your conda installation | Useful before a big update |
history | Your recent shell commands | Recovering the exact update you ran |
The which and type -a commands deserve emphasis. A surprising number of "my update did not take effect" reports trace back to an old copy of a tool sitting in ~/.local/bin, /usr/local/bin, or a leftover directory earlier on the PATH than the conda environment. Checking where a binary actually comes from is a two-second habit that prevents hours of confusion.
Update Conda Bioinformatics Tools Step by Step
This walkthrough assumes Miniconda on Linux with the bash shell. If you use zsh, the commands are identical. Run each block in order and compare your output with the examples.
Step 1: Confirm what you have
conda -V
mamba -V
which conda
Expected output will look something like:
conda 24.7.1
mamba 1.5.8
/home/yourname/miniconda3/bin/conda
If conda -V prints a version, you are set. If mamba -V prints nothing, you will install it in Step 3. The -V flag (capital V) prints the version for both tools and avoids any longer option strings.
Also run conda info and note two lines in the output: active environment and solver. If the solver line says classic, you are using the older resolver and mamba will feel like a different program entirely.
Step 2: Write a clean configuration file
Instead of issuing a series of one-off configuration commands, write the configuration file directly. This makes the state of your setup visible in one place and easy to copy between machines.
cat > ~/.condarc << 'EOF'
channels:
  - conda-forge
  - bioconda
  - nodefaults
channel_priority: strict
solver: libmamba
EOF
Verify it:
cat ~/.condarc
conda info
Each line matters:
channelssets the search order. conda-forge first, bioconda second. Both build their packages against each other, and this ordering is the arrangement the bioconda project documents.nodefaultsexcludes the vendor defaults channel. This avoids dependency conflicts with the two community channels and sidesteps licensing questions that have come up around the commercial terms of the defaults repository.channel_priority: strictprevents conda from pulling a package from a lower-priority channel when the higher one has it. Mixed-channel solves are the leading cause of broken bioinformatics environments.solver: libmambatells conda itself to use the fast resolver, so even plaincondacommands benefit.
Step 3: Update conda and install or update mamba
Conda manages itself like any other package, and it lives in the base environment. Update it first.
conda update -n base condaExpected output:
## Package Plan ##
  environment location: /home/yourname/miniconda3
The following packages will be updated:
  conda        24.5.0 -> 24.7.1
Proceed ([y]/n)?
Press Enter to accept the default. Then bring mamba into base:
conda install -n base -c conda-forge mamba
mamba -V
Explanation of the flags:
-n basenames the target environment. Without it, conda acts on the active environment, which may not be what you intend when scripting.-c conda-forgepulls mamba from the conda-forge channel, where current builds live.- When a command would modify many packages, conda asks for confirmation. Answering
yproceeds. Adding-yto the command skips the prompt, which is convenient in scripts and risky when you are still learning to read the transaction summary.
Step 4: Look before you leap with conda search
Before updating a tool, see what is available. This replaces the guesswork of firing an update blind.
conda search -c conda-forge "samtools"Expected output (truncated):
Loading channels: done
# Name  Version  Build  Channel
samtools  1.19.2  h50ea8bc_1  conda-forge
samtools  1.21    h50ea8bc_0  conda-forge
You can narrow with a version spec:
conda search -c conda-forge "samtools>=1.20"The quoted comparison string is a conda match specification. Quoting matters because the shell would otherwise interpret the > character as a redirect.
Step 5: Update one tool in one environment
This is the core move. Say you maintain an RNA-seq environment called rnaseq and samtools released a new version.
conda update -n rnaseq samtoolsExpected output:
The following packages will be UPDATED:
  samtools   1.19.2 -> 1.21   h50ea8bc_0
  htslib     1.19.1 -> 1.21   h5efdd21_0
Proceed ([y]/n)?
Read this summary carefully. Notice that htslib, the underlying library for handling aligned read files, moves with samtools. Dependency packages updating alongside your tool is normal. What deserves suspicion is a long list of unrelated packages changing. If the transaction touches dozens of packages you did not ask about, press n, and rebuild the environment from a file instead (Step 8). That long list means the solver wants to restructure the environment, and you want to control that restructure rather than let it happen implicitly.
With mamba the same command is mamba update -n rnaseq samtools and the resolver finishes in a fraction of the time on large environments.
Step 6: Update several tools deliberately
mamba update -n rnaseq -y samtools htslib seqkitHere -y auto-confirms because you chose the full list yourself. The rule of thumb: when the package list is short and written by you, auto-confirm is safe. When the solver generates the list, review it.
Step 7: Record exactly what you have now
conda list -n rnaseq samtools
conda env export -n rnaseq > rnaseq_2026-11-11.yml
The first command prints every package matching the name with its version and build string. The second writes a complete snapshot of the environment, every package and version, to a dated file. This file is your receipt. Store it alongside your project data or in a Git repository. If anything goes wrong in the future, this file rebuilds the environment bit for bit.
The > symbol redirects output into a file. The dated filename is a tip worth stealing: updates without dates are updates nobody can audit later.
Step 8: When in doubt, recreate instead of update
In-place updating is convenient but accumulates state: packages installed by hand, pins added months ago, leftover dependencies nothing uses anymore. The robust pattern for a major tool jump is to build a fresh environment from a file, test it, and only then retire the old one.
First, edit your environment file to the target versions, or write one from scratch:
cat > rnaseq_new.yml << 'EOF'
name: rnaseq2
channels:
  - conda-forge
  - bioconda
  - nodefaults
dependencies:
  - samtools=1.21
  - seqkit=2.8.2
  - fastqc=0.12.1
  - multiqc=1.25
EOF
Then build and test:
mamba env create -f rnaseq_new.yml
conda activate rnaseq2
seqkit version
conda list | grep samtools
The file format breaks down as follows: name sets the environment name, channels repeats your channel order (environment files are self-contained by design, so the tool builds the same way on a collaborator's machine), and dependencies lists packages with = pins. A single = fixes the exact version, which is what you want for analysis environments.
Once the new environment passes your tests, remove the old one to reclaim disk space:
conda deactivate
conda env remove -n rnaseq
Step 9: Verify the result honestly
A version number changing is not proof a tool works. Run it on a tiny known input and check the output is sane. For a read-manipulation tool, convert a small test file and count the records. For a renderer, regenerate a plot. Keep a one-line test command per pipeline in your project notes, and run it after every update. This five-minute check is what separates an update from a gamble.
Pinning Versions and Keeping Environments Reproducible
The word "update" hides a tension in bioinformatics. You want current software for security and correctness, but you also want the numbers in your manuscript to be reproducible. Both goals are served by the same discipline: analysis environments are frozen, and new work happens in new or deliberately updated environments.
Three tips carry most of the weight:
- Pin exact versions in environment files for anything tied to a publication or a longitudinal project.
samtools=1.21in a file means the same alignment behavior in 2026 and in 2030. - One tool family per environment. A
qcenvironment with FastQC, MultiQC, and seqkit, analignmentenvironment with samtools and bwa, and so on. Narrow environments update cleanly because their dependency trees are small. - Export before every update, as in Step 7. The dated environment file costs nothing and converts every update into a reversible experiment.
There is a blanket option that updates every package in an environment at once, and experienced users mostly avoid it for analysis environments. A wholesale upgrade rewrites dozens of dependencies at once, produces a diff no human can review, and gives you no isolation between "the tool changed" and "twenty libraries changed." Targeted updates or a rebuild from a file give you a change you can actually read.
Conda and Containers: Know When to Use Each
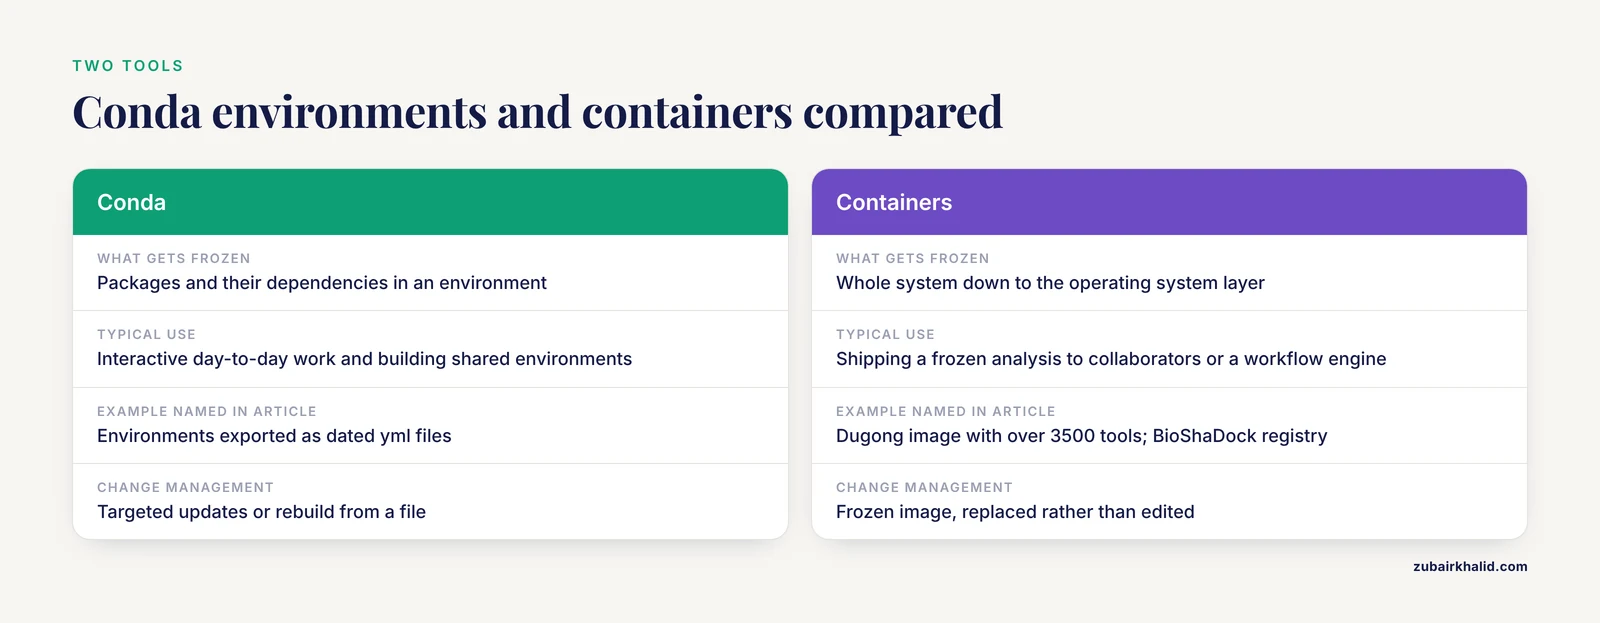
Conda does not replace container technology, and the two solve overlapping but different problems. The Dugong project packages thousands of bioinformatics tools inside a Docker image so that the entire software stack, down to the operating system layer and a graphical interface for users uncomfortable with the command line, travels as one unit [2]. BioShaDock applies the same idea at the registry level, giving bioinformatics a curated home for container images with domain-specific metadata drawn from the EDAM ontology, so researchers can find the right image rather than an unvetted public one [5]. Containers achieve reproducibility by freezing the whole system, not just the Python and C libraries conda manages.
A practical division of labor has emerged in many labs: conda environments for interactive day-to-day work and for building the environments that get exported and shared, containers for shipping a complete, frozen analysis to collaborators or to a workflow engine. Teams building web platforms for pathogen genomics, such as the COMBAT-TB Workbench, wrapped their conda-style tool stacks inside Docker so a laboratory could install the entire system with minimal friction [3].
The opposite need also exists. In regulated manufacturing settings, software must be validated, documented, and traceable, with audit trails and controlled change management, as described for analytical ultracentrifugation software moving into a Good Manufacturing Practices environment [6]. If you ever operate under such constraints, ad hoc updates are not merely a bad habit, they are a compliance problem. The environment files and dated exports described above are the same discipline formalized, which is why the habit is worth building early.
Common Mistakes and Limitations
These are the failure modes that account for most broken bioinformatics environments.
Installing tools into base. The base environment holds conda itself. Cramming analysis packages into it couples every tool to conda's own dependencies, and eventually an update request forces a conflict between your tools and conda's plumbing. Keep base nearly empty. Every analysis package goes in a named environment.
Updating in place right before results are due. An update the night before a thesis committee meeting or a grant deadline is a self-inflicted wound. Update early in a project, test, then freeze. If you must update a working environment, export it first (Step 7) so you can rebuild the exact prior state.
Mixing pip and conda carelessly. Both package managers install Python packages, and they do not coordinate. A pip install can quietly replace a library conda installed, breaking a tool that depends on it. If a package exists only on PyPI, install it inside a dedicated environment, after the conda packages, and pin it in the environment file under the pip section so the record is honest.
Ignoring channel order. Installing one package with -c defaults and another from bioconda into the same environment mixes builds compiled against different libraries. The nodefaults entry in the configuration file prevents this class of error structurally rather than through vigilance.
Trusting PATH over the environment. Running samtools and getting an old version usually means something earlier on PATH is shadowing your environment. Diagnose with type -a samtools and which samtools. The fix is almost always conda activate of the environment you meant to use, or deleting the stray binary.
Updating everything at once. Covered above, and worth repeating as a mistake because it is the most common instinct. Whole-environment upgrades feel efficient and audit terribly.
Skipping the post-update test. A successful solve is not a successful analysis. Run your known-input check before trusting the environment with real data.
Forgetting disk usage. Old environments, package caches, and tarballs accumulate. du -sh ~/miniconda3 shows the total, conda env list shows forgotten environments, and conda clean -a removes cached package archives without touching your environments. Run a cleanup when df -h starts looking tight.
On limitations: this guide covers the mechanics of updating, not whether a given release is scientifically appropriate for your analysis. Version changes can alter numerical results, and the literature around any specific tool is where that judgment belongs. And as noted, if your work falls under formal validation requirements, version changes follow your institution's change-control process, not this article's convenience [6].
Frequently Asked Questions
Do I need administrator rights to update conda bioinformatics tools?
No. Conda installs entirely inside your home directory, so every update, install, and removal command runs as your ordinary user. This is precisely why conda dominates on shared Linux servers where users lack sudo.
What is the difference between conda update and conda install?
conda update moves a package to the newest version compatible with your environment, while conda install obtains a package at any version you specify, including downgrades with a pin like samtools=1.19.2. Use update for routine maintenance and install when you need an exact version.
How do I check which version of a tool is actually installed?
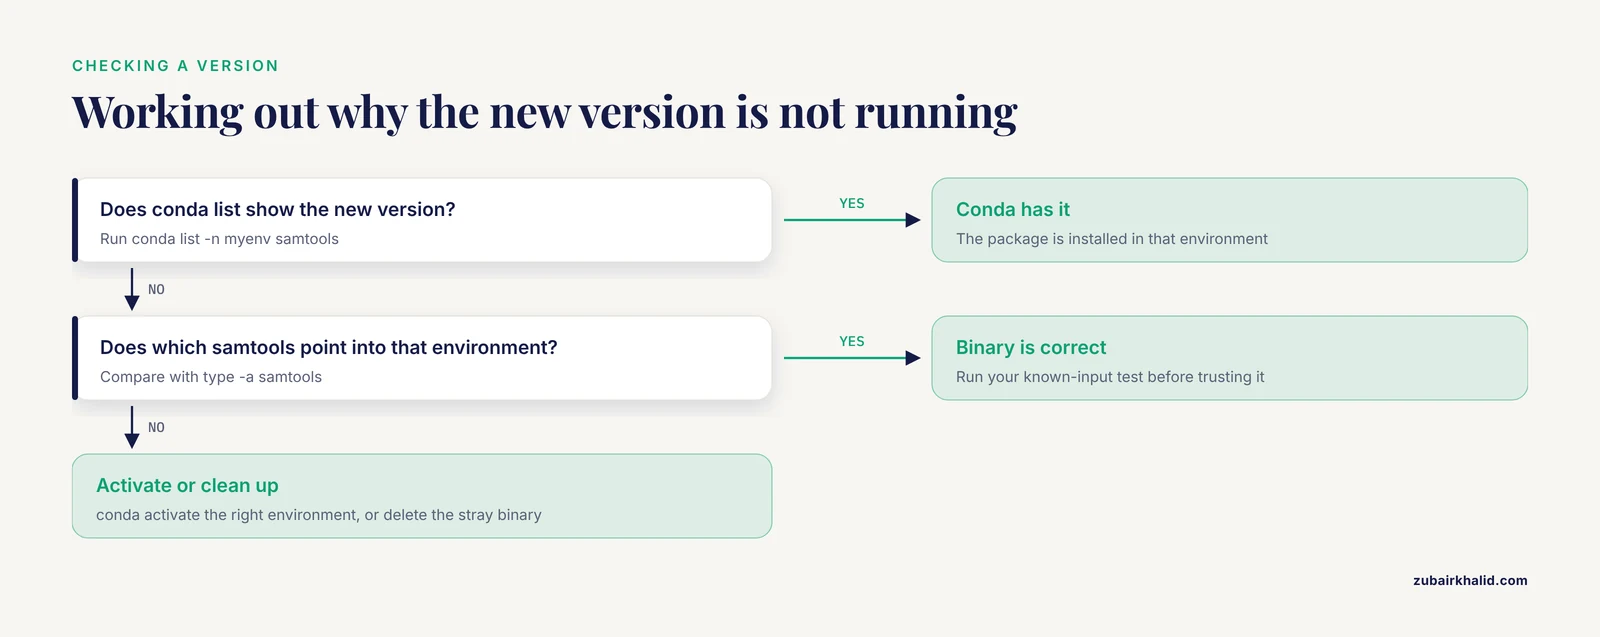
Run conda list -n myenv samtools to see the version and build conda installed, and which samtools to confirm the binary your shell executes comes from that environment. Both checks together rule out shadowing by stray copies on your PATH.
Should I update packages in the base environment?
Keep base minimal and update only conda and mamba there with conda update -n base conda. Analysis tools in base couple your software to conda's own dependencies and make every future update riskier.
Why is conda slow, and does mamba fix it?
Conda's classic solver explores dependency combinations in Python and can take minutes to hours on large bioinformatics environments. Mamba uses the libmamba solver written in C plus parallel downloads, typically turning those waits into seconds, and it accepts the same commands and environment files.
Can I mix the defaults, conda-forge, and bioconda channels?
Avoid it. Conda-forge and bioconda build their packages to be compatible with each other in the strict order conda-forge first, bioconda second, defaults excluded. Mixing defaults into that stack is the most common source of unsolvable dependency conflicts in bioinformatics environments.
How do I roll back an update that broke my pipeline?
Rebuild from your pre-update export: run conda env create -f rnaseq_2026-11-11.yml -n rnaseq_rollback, test the rebuilt environment, then point your work at it. If you did not export beforehand, install the previous version explicitly, for example conda install -n rnaseq samtools=1.19.2.
How often should I update my bioinformatics environments?
Update deliberately at project boundaries rather than on a timer: when a pipeline is starting, when a tool fixes a bug affecting your results, or when a collaborator needs compatibility. Between updates, keep analysis environments frozen and record every state with a dated environment export.
Sources
- Installing, maintaining, and using a local copy of BLAST for intranet and workstation use.
- Dugong: a Docker image, based on Ubuntu Linux, focused on reproducibility and replicability for bioinformatics analyses.
- The COMBAT-TB Workbench: Making Powerful Mycobacterium tuberculosis Bioinformatics Accessible.
- EVscope: A Comprehensive Bioinformatics Pipeline for Accurate and Robust Analysis of Total RNA Sequencing from Extracellular Vesicles.
- BioShaDock: a community driven bioinformatics shared Docker-based tools registry.
- Moving analytical ultracentrifugation software to a good manufacturing practices (GMP) environment.