How to Use tar to Archive and Compress Bioinformatics Datasets
By Dr. Zubair Khalid, DVM, MS, PhD ·

By the end of this article you will be able to pack a sequencing project directory into a single archive, compress it with gzip or a modern alternative, verify the archive is intact, extract it on another machine, and stream it between servers without ever writing it to an intermediate disk. You will also know which bioinformatics file types should never be recompressed, and which mistakes most often corrupt or bloat archives.
To follow along you need a Linux or macOS terminal (or the Windows Subsystem for Linux), GNU tar version 1.31 or newer to use every command shown here, a directory of real or test data, and roughly one gigabyte of free disk space. No root access is required for anything in the main walkthrough.
Why tar Matters in Bioinformatics
A single Illumina sequencing run can produce thousands of FASTQ files, each one a plain-text record of millions of reads with base qualities. A project folder holding raw reads, alignment indexes, variant calls, and log files can easily contain tens of thousands of files. Moving or backing up that many small files one at a time is slow because every file incurs filesystem overhead, and transferring them individually over a network multiplies that overhead into hours of waiting.
tar, short for tape archive, solves this by bundling many files and directories into one sequential file called an archive. tar itself concatenates. It does not shrink anything. Compression tools such as gzip, xz, and zstd shrink the archive after tar builds it. The two steps are so commonly chained that the combined operation, often written as tar -czf, has become the default way to archive and compress data on Linux systems. Fluency with this operation is one of the foundational linux commands bioinformatics work depends on.
The need is not only practical but scientific. Datasets in structural biology and related fields have grown dramatically in size and complexity as experimental and computational methods advance, and efficient archiving is central to keeping data reusable in line with the FAIR Principles, which call for data that is findable, accessible, interoperable, and reusable [1]. A reproducible, well-named, verified archive is the smallest unit of that promise.
There is also a correctness angle. When a collaborator downloads your data, they should get exactly the files you intended, with permissions and directory structure intact. A tar archive captures all of that in one object that can be checksummed once and verified anywhere.
What You Need Before Starting
Run this to confirm tar is present and to see which flavor you have:
tar --versionOn most Linux distributions you will see GNU tar, for example:
tar (GNU tar) 1.34On macOS the default tar is bsdtar (the libarchive implementation), which behaves slightly differently but supports the commands in this walkthrough. GNU tar 1.31 or newer adds native zstd support through the -zstd flag. If you need zstd and your tar is older, install a current version through your package manager, for example sudo apt install tar on Debian or Ubuntu systems.
Check your available disk space, because you should never create an archive on a nearly full volume:
df -h .Expected output looks like this:
Filesystem      Size  Used Avail Use% Mounted on
/dev/sda1       500G  212G  288G  43% /home
Finally, create a small practice directory so you can test commands safely before touching real sequencing data:
mkdir -p demo_project/rawdata demo_project/analysis
head -c 1000000 /dev/urandom > demo_project/rawdata/sample_L001_R1_001.fastq.gz
head -c 1000000 /dev/urandom > demo_project/rawdata/sample_L001_R2_001.fastq.gz
echo "run: 001, lane: L001" > demo_project/analysis/run_config.txt
Here /dev/urandom supplies random bytes to stand in for binary data, and head -c 1000000 limits the output to one million bytes, about one megabyte.
tar Archive Compress Bioinformatics: Step-by-Step Walkthrough
This section is the core walkthrough for anyone who wants to tar archive compress bioinformatics data correctly the first time. Each step shows the command, what it does, and what you should see.
Step 1: Look Before You Pack
List what you are about to archive, including hidden files, and measure its size:
du -sh demo_project
find demo_project -type f | wc -l
ls -la demo_project
Expected output:
2.0M    demo_project
3
demo_project:
total 16
drwxr-xr-x 4 user user 4096 Nov 11 09:15 .
drwxr-xr-x 8 user user 4096 Nov 11 09:10 ..
drwxr-xr-x 2 user user 4096 Nov 11 09:15 analysis
drwxr-xr-x 2 user user 4096 Nov 11 09:15 rawdata
du -sh reports the directory size in a human-readable summary. find -type f | wc -l counts regular files, which gives you a number to verify against after archiving. If the count includes files you do not want in the archive, deal with that now rather than after a two-hour compression run.
Step 2: Create Your First Uncompressed Archive
tar -cvf demo_project.tar demo_projectExpected output:
demo_project/
demo_project/analysis/
demo_project/analysis/run_config.txt
demo_project/rawdata/
demo_project/rawdata/sample_L001_R1_001.fastq.gz
demo_project/rawdata/sample_L001_R2_001.fastq.gz
Each flag matters:
-ccreates a new archive, overwriting any file of the same name without asking.-vis verbose mode, printing each file as it is added. Drop it in scripts, keep it when learning.-f demo_project.tarnames the archive file. The-fflag expects a filename immediately after it, which is why experienced users write-flast in a flag cluster.
By convention, tar archives in bioinformatics projects use the .tar extension, and compressed variants append the compression suffix, giving .tar.gz, .tgz, .tar.bz2, .tar.xz, or .tar.zst.
One convention to adopt immediately: when you create an archive of a directory, name the directory (as done above) rather than using a trailing slash. The paths stored inside the archive then begin with demo_project/, and extraction creates a clean containing folder instead of scattering files into the current directory.
Step 3: Compress With gzip in One Command
In practice you almost always compress in the same step:
tar -czvf demo_project.tar.gz demo_projectThe -z flag pipes the archive stream through gzip, the GNU zip compressor, before writing it to disk. Verify the result:
ls -lh demo_project.tar demo_project.tar.gzExpected output on this random-bytes demo (random data resists compression, so the savings are small):
-rw-r--r-- 2.1M user user Nov 11 09:20 demo_project.tar
-rw-r--r-- 2.0M user user Nov 11 09:22 demo_project.tar.gz
On real FASTQ text before gzip, the savings are far larger, because biological text is highly repetitive. Note that the two .fastq.gz files inside this demo directory are already gzip-compressed, so tar plus gzip adds almost nothing for them. That observation previews a rule developed later in this article.
The -z flag is a convenience wrapper. These two commands produce equivalent archives:
tar -czvf demo_project.tar.gz demo_project
tar -cvf - demo_project | gzip > demo_project.tar.gz
The second form, where - means standard output, is worth knowing because it generalizes to streaming over networks, covered in Step 7.
Step 4: Choose a Compression Algorithm
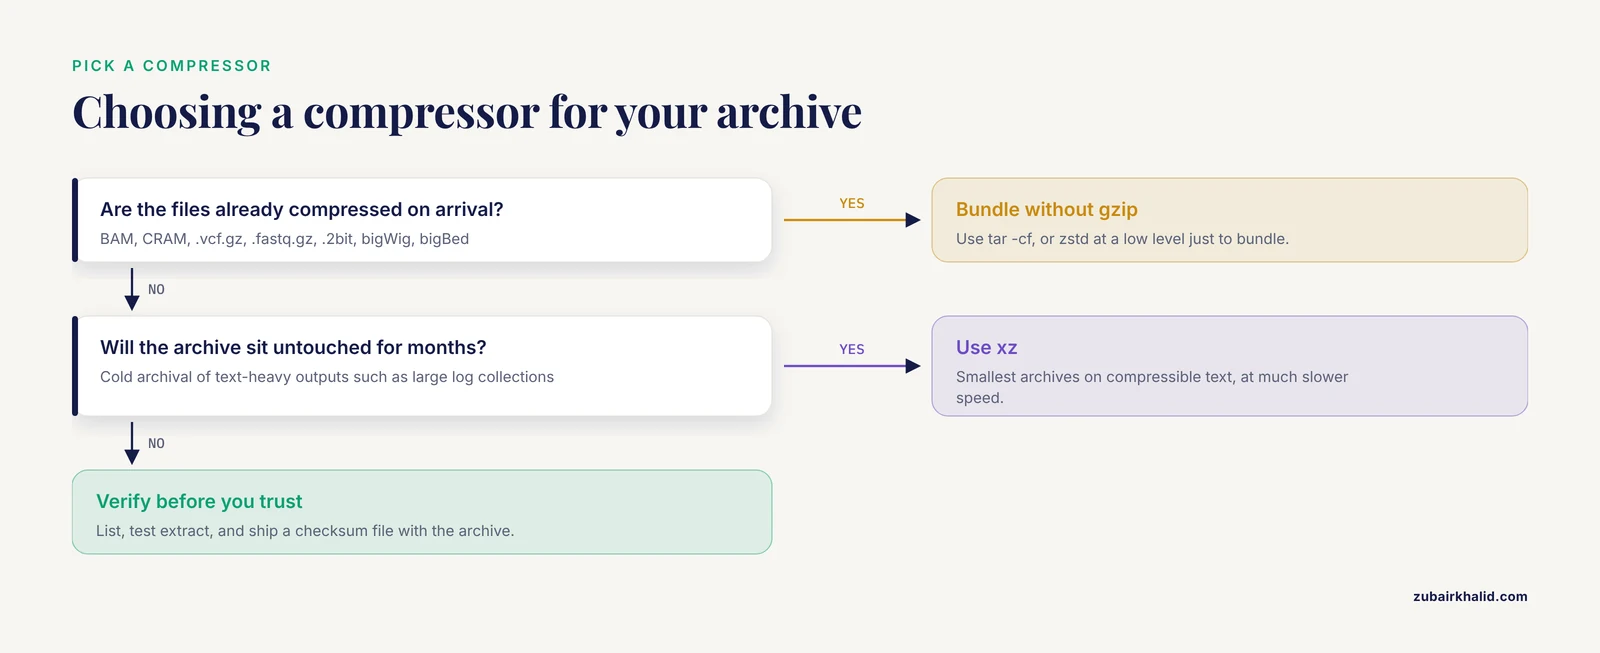
tar can drive several compressors. The choice trades archive size against compression speed and decompression speed.
tar -cvf demo_project.tar demo_project
gzip -k demo_project.tar          # gzip, level 6 by default, -k keeps the original
xz -k -T0 demo_project.tar        # xz, strongest common compression, -T0 uses all cores
zstd -k -19 demo_project.tar      # zstd, fast modern compressor at level 19
bzip2 -k demo_project.tar         # bzip2, older, slow, occasionally useful
Then compare:
ls -lh demo_project.tar.*As a working rule for bioinformatics data:
- gzip at the default level is the universal choice. Every tool, cluster, and collaborator can open it.
- xz produces substantially smaller archives than gzip on compressible text, at a much slower compression speed. It suits cold archival of text-heavy outputs such as large log collections or unaligned text files.
- zstd compresses nearly as well as gzip while running far faster, and decompresses faster still. It is the best daily driver on clusters where CPU time is billed.
- bzip2 is largely superseded by xz and zstd but still appears in older pipelines.
The command xz -k -T0 deserves a note. -k means keep the input file instead of deleting it, and -T0 tells xz to use all available CPU threads. Parallel equivalents exist for gzip (the pigz tool) and zstd (the zstd -T0 or pzstd variants).
Step 5: Verify the Archive Before You Trust It
Verification is the step most people skip and most pipelines regret. Do three checks.
First, list the contents without extracting:
tar -tzvf demo_project.tar.gzExpected output:
drwxr-xr-x user/user         0 2026-11-11 09:15 demo_project/
drwxr-xr-x user/user         0 2026-11-11 09:15 demo_project/analysis/
-rw-r--r-- user/user        27 2026-11-11 09:15 demo_project/analysis/run_config.txt
drwxr-xr-x user/user         0 2026-11-11 09:15 demo_project/rawdata/
-rw-r--r-- user/user   1000000 2026-11-11 09:15 demo_project/rawdata/sample_L001_R1_001.fastq.gz
-rw-r--r-- user/user   1000000 2026-11-11 09:15 demo_project/rawdata/sample_L001_R2_001.fastq.gz
The listing shows permissions, owner, size, timestamp, and path. Compare the file count against the number from Step 1. A full listing also exercises the entire compressed stream, so a truncated or corrupted archive often fails here with an error such as tar: Unexpected EOF in archive.
Second, test extraction into a throwaway directory:
mkdir verify_tmp
tar -xzvf demo_project.tar.gz -C verify_tmp
diff -r demo_project verify_tmp/demo_project
diff -r compares two directory trees recursively and prints nothing when they are identical. Silence here is success.
Third, record a checksum so future readers of the archive can confirm it arrived unchanged. MD5 is the long-standing convention in bioinformatics file manifests, though SHA-256 is the stronger cryptographic choice:
md5sum demo_project.tar.gz > demo_project.tar.gz.md5
sha256sum demo_project.tar.gz > demo_project.tar.gz.sha256
cat demo_project.tar.gz.md5
Expected output:
9f2c8d31a47b6e0f5a1d8c3b7e2f9a60 demo_project.tar.gzThe manifest convention is simple and portable. Anyone, on any system, runs md5sum -c demo_project.tar.gz.md5 in the directory holding the archive and sees either OK or FAILED. Shipping an archive without a checksum file is the single most common gap in data-sharing packages.
Step 6: Extract the Archive Correctly on Another Machine
cd /some/other/location
tar -xzvf demo_project.tar.gz
The -x flag extracts, and -z decompresses gzip. Modern GNU tar and bsdtar auto-detect the compression format during extraction, so tar -xvf usually works on any archive, but including the flag costs nothing and protects you on older systems.
To extract into a specific directory, use -C:
mkdir -p /scratch/received
tar -xzf demo_project.tar.gz -C /scratch/received
tar recreates the stored directory structure under the target. Because this archive stored paths beginning with demo_project/, extraction produces /scratch/received/demo_project/ with everything inside it. This is the payoff for the naming convention in Step 2.
If you only need one file out of a large archive, name it. tar extracts just that member and skips the rest of the stream after finding it:
tar -xzvf demo_project.tar.gz demo_project/analysis/run_config.txtStep 7: Stream an Archive Between Machines
The pattern that makes tar indispensable on clusters and servers is streaming. The archive never touches the local disk. tar writes to standard output, ssh carries the stream, and a second tar reads it on the far side:
tar -czf - demo_project | ssh [email protected] "tar -xzf - -C /scratch/user/"Reading left to right: tar creates (-c) a gzip-compressed (-z) archive written to stdout (-f -), the pipe hands that stream to ssh, and the remote command extracts (-xzf -) into the target directory with -C. For a one-way copy where you want the archive file itself on the remote host, redirect on the remote side instead:
tar -czf - demo_project | ssh [email protected] "cat > /scratch/user/demo_project.tar.gz"The same streaming pattern chains nicely with other bioinformatics tools. For example, you can compress on the fly while copying, or pipe an uncompressed tar straight into a checksummer so verification happens during the transfer:
tar -czf - demo_project | tee demo_project.tar.gz | md5sum > transferred.md5Here tee writes the stream to both a file and the pipe, so the checksum and the archive are produced in one pass.
Step 8: Control What Goes In With Excludes, File Lists, and Appends
Real project directories contain things you often should not archive. The -exclude option filters by pattern, and patterns must be quoted so the shell does not expand them:
tar -czvf analysis_only.tar.gz demo_project \
  --exclude='*.bam' \
  --exclude='*.bai' \
  --exclude='demo_project/tmp' \
  --exclude='.git'
Note the placement. When excluding, put the excludes after the archive name and before or after the directory, and test first with a dry run by replacing -c with -t against a listing, or simply by inspecting the verbose output above.
For precise control, generate a file list first and hand it to tar:
find demo_project -type f -name '*.fastq.gz' > files_to_archive.txt
tar -czvf fastq_only.tar.gz -T files_to_archive.txt
-T reads member names from the given file, one path per line. This two-step approach is safer than wildcards when your selection logic is complex, and the list file itself becomes documentation of what the archive contains.
To add files to an existing uncompressed archive:
tar -rvf demo_project.tar new_result.tsvThe -r append flag only works on uncompressed archives. Compressed archives cannot be appended in place, because the compressor needs the whole stream. To add files to a compressed archive, extract, rebuild, and re-verify. The -update (-u) flag adds files only when they are newer than the copies already in the archive, which is useful for uncompressed working archives.
Key tar Options at a Glance
| Option | Meaning | Typical use |
|---|---|---|
-c | Create a new archive | Start every archive |
-x | Extract from an archive | Unpack on any machine |
-t | List archive contents | Verify without extracting |
-v | Verbose, list files as processed | Learning and logging |
-f FILE | Use FILE as the archive | Always, usually last in the flag cluster |
-z | Filter through gzip | The default bioinformatics compression |
-j | Filter through bzip2 | Legacy compatibility |
-J | Filter through xz | Maximum compression of text |
-zstd | Filter through zstd | Fast compression on modern GNU tar |
-C DIR | Change to DIR before acting | Extract into a chosen directory |
-T FILE | Read member names from FILE | Archive from an explicit list |
-r | Append to an uncompressed archive | Growing working archives |
-u | Append only newer files | Incremental working archives |
Compression Choices for Common Bioinformatics File Types
Not every bioinformatics file benefits from tar plus gzip. Matching the tool to the file type saves hours of CPU and gigabytes of disk.
Plain text formats compress extremely well with gzip. FASTQ, FASTA, SAM, GFF, BED, VCF (before bgzip), tabular phenotype files, and log files are all highly repetitive text. For these, tar -czf is the right default, and tar -c, zstd -f or an xz variant is better when the archive will sit untouched for months.
Already-compressed binary formats are the trap. BAM files store alignments in the BGZF format, which is gzip under the hood. CRAM files use their own compression schemes. .vcf.gz, .fastq.gz, .2bit, bigWig, and bigBed files are all compressed on arrival. Running gzip over them again yields little or no size reduction and can even enlarge the file slightly, while burning CPU on every megabyte. When archiving these, either store them uncompressed inside the tar (tar -cf) or use a fast compressor like zstd at a low level purely to bundle efficiently. The compression comes from the file format, not from tar.
A second trap is double compression by accident, producing files such as archive.tar.gz.gz. This happens when a script gzips a file that is already named .tar.gz, or when an automation layer compresses output that a workflow engine already compressed. The tell is that the archive extracts to another compressed archive. Check with file:
file demo_project.tar.gzExpected output:
demo_project.tar.gz: gzip compressed data, original size modulo 2^32 2202009If the same command on your mystery file reports gzip for what should be a text file, you are looking at a compression layer nobody intended.
When Generic Compression Is Not Enough
Generic compressors treat every byte stream the same. Domain-aware formats do better because they know the structure of the data. The clearest worked example comes from structural biology, where the Protein Data Bank's legacy CIF text format describes three-dimensional macromolecular structures. The BinaryCIF serialization encodes CIF data in a binary form with bespoke compression techniques while staying fully compatible with schemas such as PDBx/mmCIF, and it reduces file sizes by more than a factor of two compared with gzip-compressed CIF files. For the largest structures the gains are larger still, with compression improvements of a factor of ten versus raw CIF files and a factor of four versus gzip-compressed CIF files. The accompanying CIFTools libraries in Java and TypeScript support general and typed handling of both CIF and BinaryCIF files [1].
The lesson for archive planning is direct. Before you reach for a bigger tar flag, check whether a domain format already exists that stores the same information more compactly. mmCIF replaces legacy PDB text, CRAM replaces BAM where a reference is available, and columnar formats replace flat tables. Then use tar to bundle the domain-format files. Tar is the envelope, not the letter.
This layered thinking also serves reproducibility. An archive that stores standardized, schema-compliant files preserves interoperability, which is what makes the data reusable by others and by future software [1]. An archive of ad hoc binary blobs does not, no matter how well it compresses.
tar Tips for Everyday Bioinformatics Work
These field-tested habits cover the tips that separate smooth archives from late-night recoveries.
Use timestamps in archive names. projectA_rawdata_2026-11-11.tar.gz sorts correctly, prevents silent overwrites, and makes provenance obvious months later. final.tar.gz and final2.tar.gz do neither.
Archive from the parent directory. Run tar from the directory that contains demo_project, not from inside demo_project. This keeps leading paths clean and makes extraction predictable.
Prefer relative paths. Archiving with an absolute path such as tar -cf backup.tar /home/user/demo_project stores /home/user/demo_project inside the archive, and extraction on another machine writes to that literal location or fails. GNU tar strips a leading slash and warns with a message like tar: Removing leading /' from member names`, which is a signal to fix the command, not to accept the warning.
Let the shell complete long pipelines. For very large directories, start with a quick uncompressed archive of a small subset to confirm your exclude patterns and path conventions, then run the full compressed job in tmux or screen so it survives a dropped ssh connection.
Pair pigz with tar on servers with many cores. The pigz tool is a parallel gzip implementation. The invocation looks like this:
tar -cf - demo_project | pigz -p 8 > demo_project.tar.gzDecompression uses pigz -d -p 8. On multi-core nodes this turns a single-threaded bottleneck into a near-linear speedup.
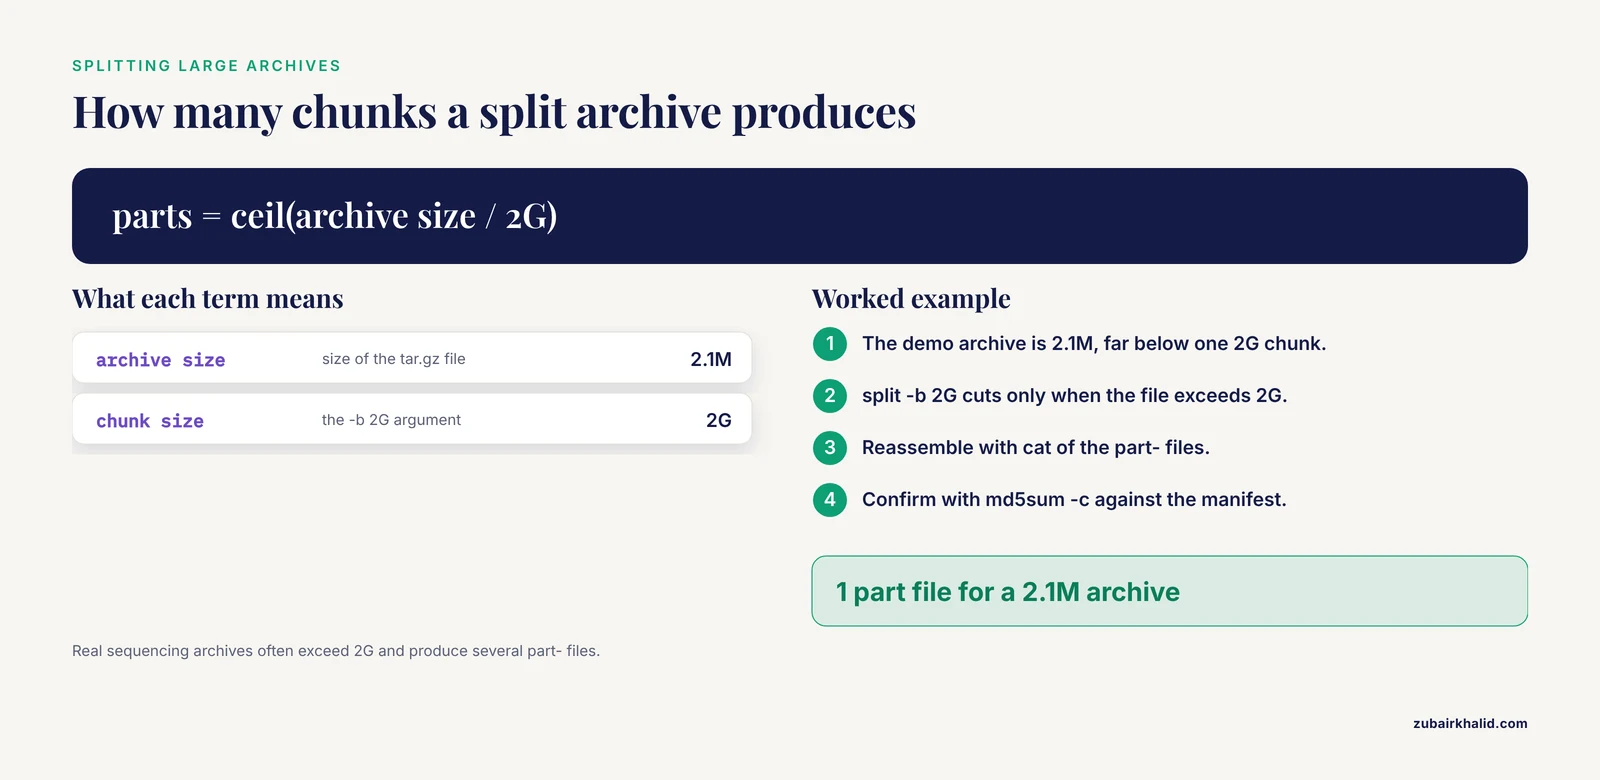
Split huge archives for transport. Filesystems, transfer portals, and external drives often cap file sizes. Produce chunks with split and verify with checksums:
split -b 2G demo_project.tar.gz demo_project.tar.gz.part-
cat demo_project.tar.gz.part-* > demo_project.tar.gz
md5sum -c demo_project.tar.gz.md5
The cat reassembles the original byte-for-byte, and the checksum proves the round trip. Note that -b 2G means two gibibytes, and the part- prefix labels the chunks in sortable order.
Log what you did. A one-line entry in a README inside the project, stating the tar command and checksum, converts your archive from a mystery blob into a documented artifact. Future you is the most frequent consumer of your own archives.
Common Mistakes and Limitations
This section collects the common mistakes that cause lost data, wasted hours, and corrupted transfers, along with the exact errors you will see and the fixes.
Mistake 1: Misplacing -f in the flag cluster. The command tar -cvzf archive.tar.gz dir fails on GNU tar with an error resembling tar: archive.tar.gz: Cannot stat: No such file or directory, because -f grabs the next character in the cluster, z, as its filename argument. Fix by putting -f last: tar -czvf archive.tar.gz dir. GNU tar also accepts the modern style tar -c -v -z -f archive.tar.gz dir, which removes the ambiguity entirely.
Mistake 2: Creating an archive of nothing. A wrong directory name or a typo in a variable produces this exact message: tar: Cowardly refusing to create an empty archive. tar will not write an archive with no members, which is protective behavior. Fix the path, and in scripts add a check such as test -d "$DIR" before invoking tar.
Mistake 3: Archiving while the data is still being written. If a sequencer, downloader, or running workflow is writing into the directory, tar captures files at whatever state they are in as the stream passes them. The archive may contain truncated files, and the errors, if any, may only surface on extraction far away. Stop writes or wait for completion before archiving, and use lsof +D demo_project to confirm no process holds files open.
Mistake 4: Trusting a transfer without a checksum. An interrupted network transfer often leaves an archive that lists fine at first and dies partway through extraction with tar: Unexpected EOF in archive. The cure is preventive. Always ship a .md5 or .sha256 file alongside the archive, as described in Step 5, and verify on arrival before deleting the local copy.
Mistake 5: Recompressing compressed formats. As covered above, gzip on BAM, CRAM, or .fastq.gz content inside an archive buys almost nothing and costs real time. Audit your inputs before choosing -z, -J, or -zstd.
Mistake 6: Extracting carelessly as root or into the wrong directory. An archive built with absolute paths, extracted with root privileges, can overwrite system files at their stored locations. Modern tar refuses absolute paths by default during extraction and strips the leading slash, but archives built by old or nonstandard tools may not behave. Extract untrusted archives first with tar -tzf to inspect member paths, then extract as an unprivileged user into a dedicated directory with -C.
Mistake 7: Assuming extraction order equals verification. tar -xzf returning to the prompt means tar read the stream without complaint, not that every file matches what you archived. Only the diff -r test from Step 5 and the checksum manifest prove integrity.
Limitation 1: tar is not a versioned backup system. It captures one moment. For incrementally changing project directories, use dated archive names plus a manifest, or move to a real backup tool. Keep in mind that individual research cases, institutional policies, and data-sharing agreements may impose their own requirements beyond any general workflow, so check the expectations of your repository, journal, or funder before finalizing an archival strategy.
Limitation 2: tar does not encrypt. A tar archive containing human genomic data is readable by anyone who holds the file. Protect such archives with filesystem-level or transfer-level encryption and access controls appropriate to your institution's data governance rules.
Frequently Asked Questions
Does tar compress data by itself?
No. tar bundles files into one archive without shrinking them, and compression comes from a separate filter such as gzip, xz, or zstd that you enable with a flag like -z, -J, or -zstd.
Should I compress BAM, CRAM, or gzipped VCF files inside a tar.gz?
Generally no. These formats are already compressed internally, so a second layer of gzip adds CPU cost with little or no size benefit. Bundle them with plain tar -cf, or use a fast bundling compressor like zstd if you need a single transferable file.
What is the difference between .tar, .tar.gz, .tgz, and .tar.xz?
The suffix records the pipeline that produced the file. .tar is an uncompressed archive, .tar.gz (also written .tgz) is the same archive passed through gzip, and .tar.xz is passed through xz. The contents and extraction procedure are identical apart from the decompression flag.
How do I extract a tar archive into a specific directory?
Use the -C flag, for example tar -xzf archive.tar.gz -C /scratch/received, and make sure the target directory exists first with mkdir -p /scratch/received.
How can I inspect a tar archive without extracting it?
Run tar -tzvf archive.tar.gz. The -t flag lists every member with permissions, sizes, and timestamps, and a complete listing also confirms the compressed stream is intact end to end.
Why does my archive contain absolute paths, and is that a problem?
The archive contains whatever paths you passed to tar, so archiving /home/user/project stores those absolute paths. GNU tar strips the leading slash and warns tar: Removing leading /' from member names`, but absolute paths still make extraction location-dependent. Archive from the parent directory using relative paths instead.
How do I split a very large archive across multiple files or drives?
Build the archive, then run split -b 2G archive.tar.gz archive.tar.gz.part- to cut it into fixed-size chunks. Reassemble with cat archive.tar.gz.part-* > archive.tar.gz and confirm integrity with the checksum manifest.
Can I add files to an existing compressed archive?
No. Appending with tar -rvf works only on uncompressed archives, because a compressed archive cannot be modified without rewriting the whole compressed stream. To update a compressed archive, extract, add files, rebuild, and verify again.